

Elasticsearch:运用 Go 语言实现 Elasticsearch 搜索 - 8.x
| 阿里云国内75折 回扣 微信号:monov8 |
| 阿里云国际,腾讯云国际,低至75折。AWS 93折 免费开户实名账号 代冲值 优惠多多 微信号:monov8 飞机:@monov6 |
在我之前的文章 “ElasticsearchGo 客户端简介 - 8.x”我对 Elasticsearch golang 客户端做了一个简单的介绍。在今天的这篇文章中我将详细介绍如何使用这个客户端来一步一步地连接到 Elasticsearch进而创建索引搜索等。关于 golang 客户端的使用完整的文档托管在 GitHub 和 PkgGoDev 上。
在我们的展示中我们将使用 Elastic Stack 8.5.3 来进行展示。
安装
Elasticsearch 及 Kibana
如果你还没有安装好自己的 Elasticsearch 及 Kibana 的话那么请参考我之前的文章
在今天的展示中我将使用 Elastic Stack 8.x 来进行展示。在安装的时候请参考相应的 Elastic Stack 8.x 的文章来进行安装。
Golang 安装
要安装客户端的 8.x 版本请将包添加到你的 go.mod 文件中
require github.com/elastic/go-elasticsearch/v8 8.5或者clone 存储库
git clone --branch 8.5 https://github.com/elastic/go-elasticsearch.git $GOPATH/src/github要安装另一个版本请相应地修改路径或分支名称。 客户端主要版本对应于 Elasticsearch 主要版本。
你可以在下面找到完整的安装示例
mkdir my-elasticsearch-app8 && cd my-elasticsearch-app8

cat > go.mod <<-END
  module my-elasticsearch-app8

  require github.com/elastic/go-elasticsearch/v8 main
END

cat > main.go <<-END
  package main

  import (
    "log"

    "github.com/elastic/go-elasticsearch/v8"
  )

  func main() {
    es, _ := elasticsearch.NewDefaultClient()
    log.Println(elasticsearch.Version)
    log.Println(es.Info())
  }
END
在我的电脑上面我运行如上的命令
$ pwd
/Users/liuxg/go
$ mkdir my-elasticsearch-app8 && cd my-elasticsearch-app8
$
$ cat > go.mod <<-END
>   module my-elasticsearch-app8
>
>   require github.com/elastic/go-elasticsearch/v8 main
> END
$
$ cat > main.go <<-END
>   package main
>
>   import (
>     "log"
>
>     "github.com/elastic/go-elasticsearch/v8"
>   )
>
>   func main() {
>     es, _ := elasticsearch.NewDefaultClient()
>     log.Println(elasticsearch.Version)
>     log.Println(es.Info())
>   }
> END
$ ls
go.mod  main.go
$ pwd
/Users/liuxg/go/my-elasticsearch-app8
很显然它生成了两个文件go.mod 及 main.go。我们还不能直接运行上面的命令除非我们按照我之前的文章 “Elastic Stack 8.0 安装 - 保护你的 Elastic Stack 现在比以往任何时候都简单” 进行安装。请参考其中的 “如何配置 Elasticsearch 不带安全性” 章节。这样的配置不需要安全性索引在连接的时候我们也不需要任何的验证。一旦我们按照完毕后我们在 terminal 中打入如下的命令
$ pwd
/Users/liuxg/go/my-elasticsearch-app8
$ go run main.go
go: updates to go.mod needed; to update it:
	go mod tidy
$ go mod tidy
go: downloading github.com/elastic/go-elasticsearch/v8 v8.4.0-alpha.1.0.20221227164349-c40d762a40ad
go: downloading github.com/elastic/elastic-transport-go/v8 v8.0.0-20211216131617-bbee439d559c
$ go run main.go
2023/01/10 17:27:35 8.7.0-SNAPSHOT
2023/01/10 17:27:35 [200 OK] {
  "name" : "liuxgm.local",
  "cluster_name" : "elasticsearch",
  "cluster_uuid" : "c7GQIJYaQ-yeesPYys24fw",
  "version" : {
    "number" : "8.5.3",
    "build_flavor" : "default",
    "build_type" : "tar",
    "build_hash" : "4ed5ee9afac63de92ec98f404ccbed7d3ba9584e",
    "build_date" : "2022-12-05T18:22:22.226119656Z",
    "build_snapshot" : false,
    "lucene_version" : "9.4.2",
    "minimum_wire_compatibility_version" : "7.17.0",
    "minimum_index_compatibility_version" : "7.0.0"
  },
  "tagline" : "You Know, for Search"
}
 <nil>
上面显示我们已经成功地连接到 Elasticsearch 了。Hooray! 小试牛刀我们对如何连接到 Elasticsearch 有一个基本的印象。
在默认的情况下我们可以通过设置环境变量 ELASTICSEARCH_URL 来配置 Elasticsearch 的端点地址
export ELASTICSEARCH_URL="https://localhost:9200"如果你有多个 Elasticsearch 端点地址请用逗号分隔它们。
警告不建议在未启用安全性的情况下运行 Elasticsearch。
Elasticsearch 版本兼容性
语言客户端向前兼容 这意味着客户端支持与更大或相等的次要版本的 Elasticsearch 进行通信。 Elasticsearch 语言客户端仅向后兼容默认发行版并且不作任何保证。
Elasticsearch server 8.0 版本引入了新的兼容模式让你从 7.x 到 8x 的升级体验更流畅。简而言之你可以将最新的 7.x go-elasticsearch Elasticsearch 客户端与 8.x Elasticsearch 服务器一起使用提供更多协调将代码库升级到下一个主要版本的空间。
如果你想利用此功能请确保你使用的是最新的 7.x go-elasticsearch 客户端并将环境变量 ELASTIC_CLIENT_APIVERSIONING 设置为 true 或在客户端配置中设置配置选项 config.EnableCompatibilityMode。 客户端在内部处理其余部分。 对于每个 8.0 及更高版本的 go-elasticsearch 客户端你都准备好了 默认情况下启用兼容模式。
使用 Go 模块时在导入路径中包含版本并指定显式版本或分支
require github.com/elastic/go-elasticsearch/v8 v8.0.0
require github.com/elastic/go-elasticsearch/v7 7.17
可以在一个项目中使用多个版本的客户端
// go.mod
github.com/elastic/go-elasticsearch/v7 v7.17.0
github.com/elastic/go-elasticsearch/v8 v8.0.0

// main.go
import (
  elasticsearch7 "github.com/elastic/go-elasticsearch/v7"
  elasticsearch8 "github.com/elastic/go-elasticsearch/v8"
)
// ...
es7, _ := elasticsearch7.NewDefaultClient()
es8, _ := elasticsearch8.NewDefaultClient()
客户端的 main 分支兼容当前 Elasticsearch 的 master 分支。
连接到 Elasticsearch
在今天的文章中我主要来讲述如何连接到自托管的 Elasticsearch 集群。
连接到没有设置安全的集群
在上面我们已经显示了如何连接到没有设置安全的集群。在上面它默认连接的是 http://localhost:9200。在实际的部署中你可能并不是使用的默认的地址。这个时候我们需要对连接进行配置
main.go
package main

import (
	"log"

	"github.com/elastic/go-elasticsearch/v8"
)

func main() {
	cfg := elasticsearch.Config{
		Addresses: []string{
			"http://localhost:9200",
		},
	}
	es, err := elasticsearch.NewClient(cfg)
	log.Println(err)
	if err == nil {
		log.Println(elasticsearch.Version)
		log.Println(es.Info())
	} else {
		log.Println("Something wrong with connection to Elasticsearch")
	}
}
$ pwd
/Users/liuxg/go/my-elasticsearch-app8
$ ls
go.mod go.sum main.go
$ go run main.go
2023/01/10 19:21:49 <nil>
2023/01/10 19:21:49 8.7.0-SNAPSHOT
2023/01/10 19:21:49 [200 OK] {
"name" : "liuxgm.local",
"cluster_name" : "elasticsearch",
"cluster_uuid" : "c7GQIJYaQ-yeesPYys24fw",
"version" : {
"number" : "8.5.3",
"build_flavor" : "default",
"build_type" : "tar",
"build_hash" : "4ed5ee9afac63de92ec98f404ccbed7d3ba9584e",
"build_date" : "2022-12-05T18:22:22.226119656Z",
"build_snapshot" : false,
"lucene_version" : "9.4.2",
"minimum_wire_compatibility_version" : "7.17.0",
"minimum_index_compatibility_version" : "7.0.0"
},
"tagline" : "You Know, for Search"
}
<nil>从上面我们可以看出来我们成功地连接到 Elasticsearch。此外由于 Addresses 是一个 slice它可以由多个 Elasticsearch 的端点组成。比如我们可以有一下的格式
cfg := elasticsearch.Config{
        Addresses: []string{
            "http://localhost:9200",
            "http://localhost:9201",
        },
}
es, err := elasticsearch.NewClient(cfg)注意如果你的 Elasticsearch 集群位于负载均衡器后面就像在使用 Elastic Cloud 时一样你将不需要配置多个节点。 而是使用负载平衡器主机和端口。
连接到带有基本安全的集群
我们可以连接到带有基本安全的集群。针对 Elastic Stack 8.x在默认的安装下集群是带有 HTTPS 的访问。我们可以通过参考文章 “Elastic Stack 8.0 安装 - 保护你的 Elastic Stack 现在比以往任何时候都简单” 中的 “如何配置 Elasticsearch 只带有基本安全” 章节来进行安装。
基本认证
要以编程方式设置集群端点、用户名和密码请将配置对象传递给 elasticsearch.NewClient() 函数。
main.go
package main

import (
	"log"

	"github.com/elastic/go-elasticsearch/v8"
)

func main() {
	cfg := elasticsearch.Config{
		Addresses: []string{
			"https://localhost:9200",
		},
		Username: "elastic",
		Password: "password",
	}

	es, err := elasticsearch.NewClient(cfg)
	log.Println(err)
	if err == nil {
		log.Println(elasticsearch.Version)
		log.Println(es.Info())
	} else {
		log.Println("Something wrong with connection to Elasticsearch")
	}
}
在上面我使用了超级用户 elastic 来进行验证尽管在实际的使用中我们并不建议这么做。你可以使用一个带有一定权限的用户来进行连接。运行上面的代码
go run main.go $ go run main.go
2023/01/10 19:44:29 <nil>
2023/01/10 19:44:29 8.7.0-SNAPSHOT
2023/01/10 19:44:29 [200 OK] {
"name" : "liuxgm.local",
"cluster_name" : "elasticsearch",
"cluster_uuid" : "jBt9oXsxT4y_2YOWOw8QRQ",
"version" : {
"number" : "8.5.3",
"build_flavor" : "default",
"build_type" : "tar",
"build_hash" : "4ed5ee9afac63de92ec98f404ccbed7d3ba9584e",
"build_date" : "2022-12-05T18:22:22.226119656Z",
"build_snapshot" : false,
"lucene_version" : "9.4.2",
"minimum_wire_compatibility_version" : "7.17.0",
"minimum_index_compatibility_version" : "7.0.0"
},
"tagline" : "You Know, for Search"
}
<nil>很显然我们的连接是成功的。
你还可以在端点 URL 中包含用户名和密码
main.go
package main

import (
	"log"

	"github.com/elastic/go-elasticsearch/v8"
)

func main() {
	cfg := elasticsearch.Config{
		Addresses: []string{
			"http://elastic:password@localhost:9200",
		},
	}

	es, err := elasticsearch.NewClient(cfg)
	log.Println(err)
	if err == nil {
		log.Println(elasticsearch.Version)
		log.Println(es.Info())
	} else {
		log.Println("Something wrong with connection to Elasticsearch")
	}
}
连接到带有 HTTPS 的集群
在 Elastic Stack 8.x 的默认安装中Elasticsearch 是带有 HTTPS 的访问权限的。特别是针对自签名证书的安装我们需要使用证书来进行连接。请按照如下的文档进行安装
在 Elasticsearch 第一次启动的时候
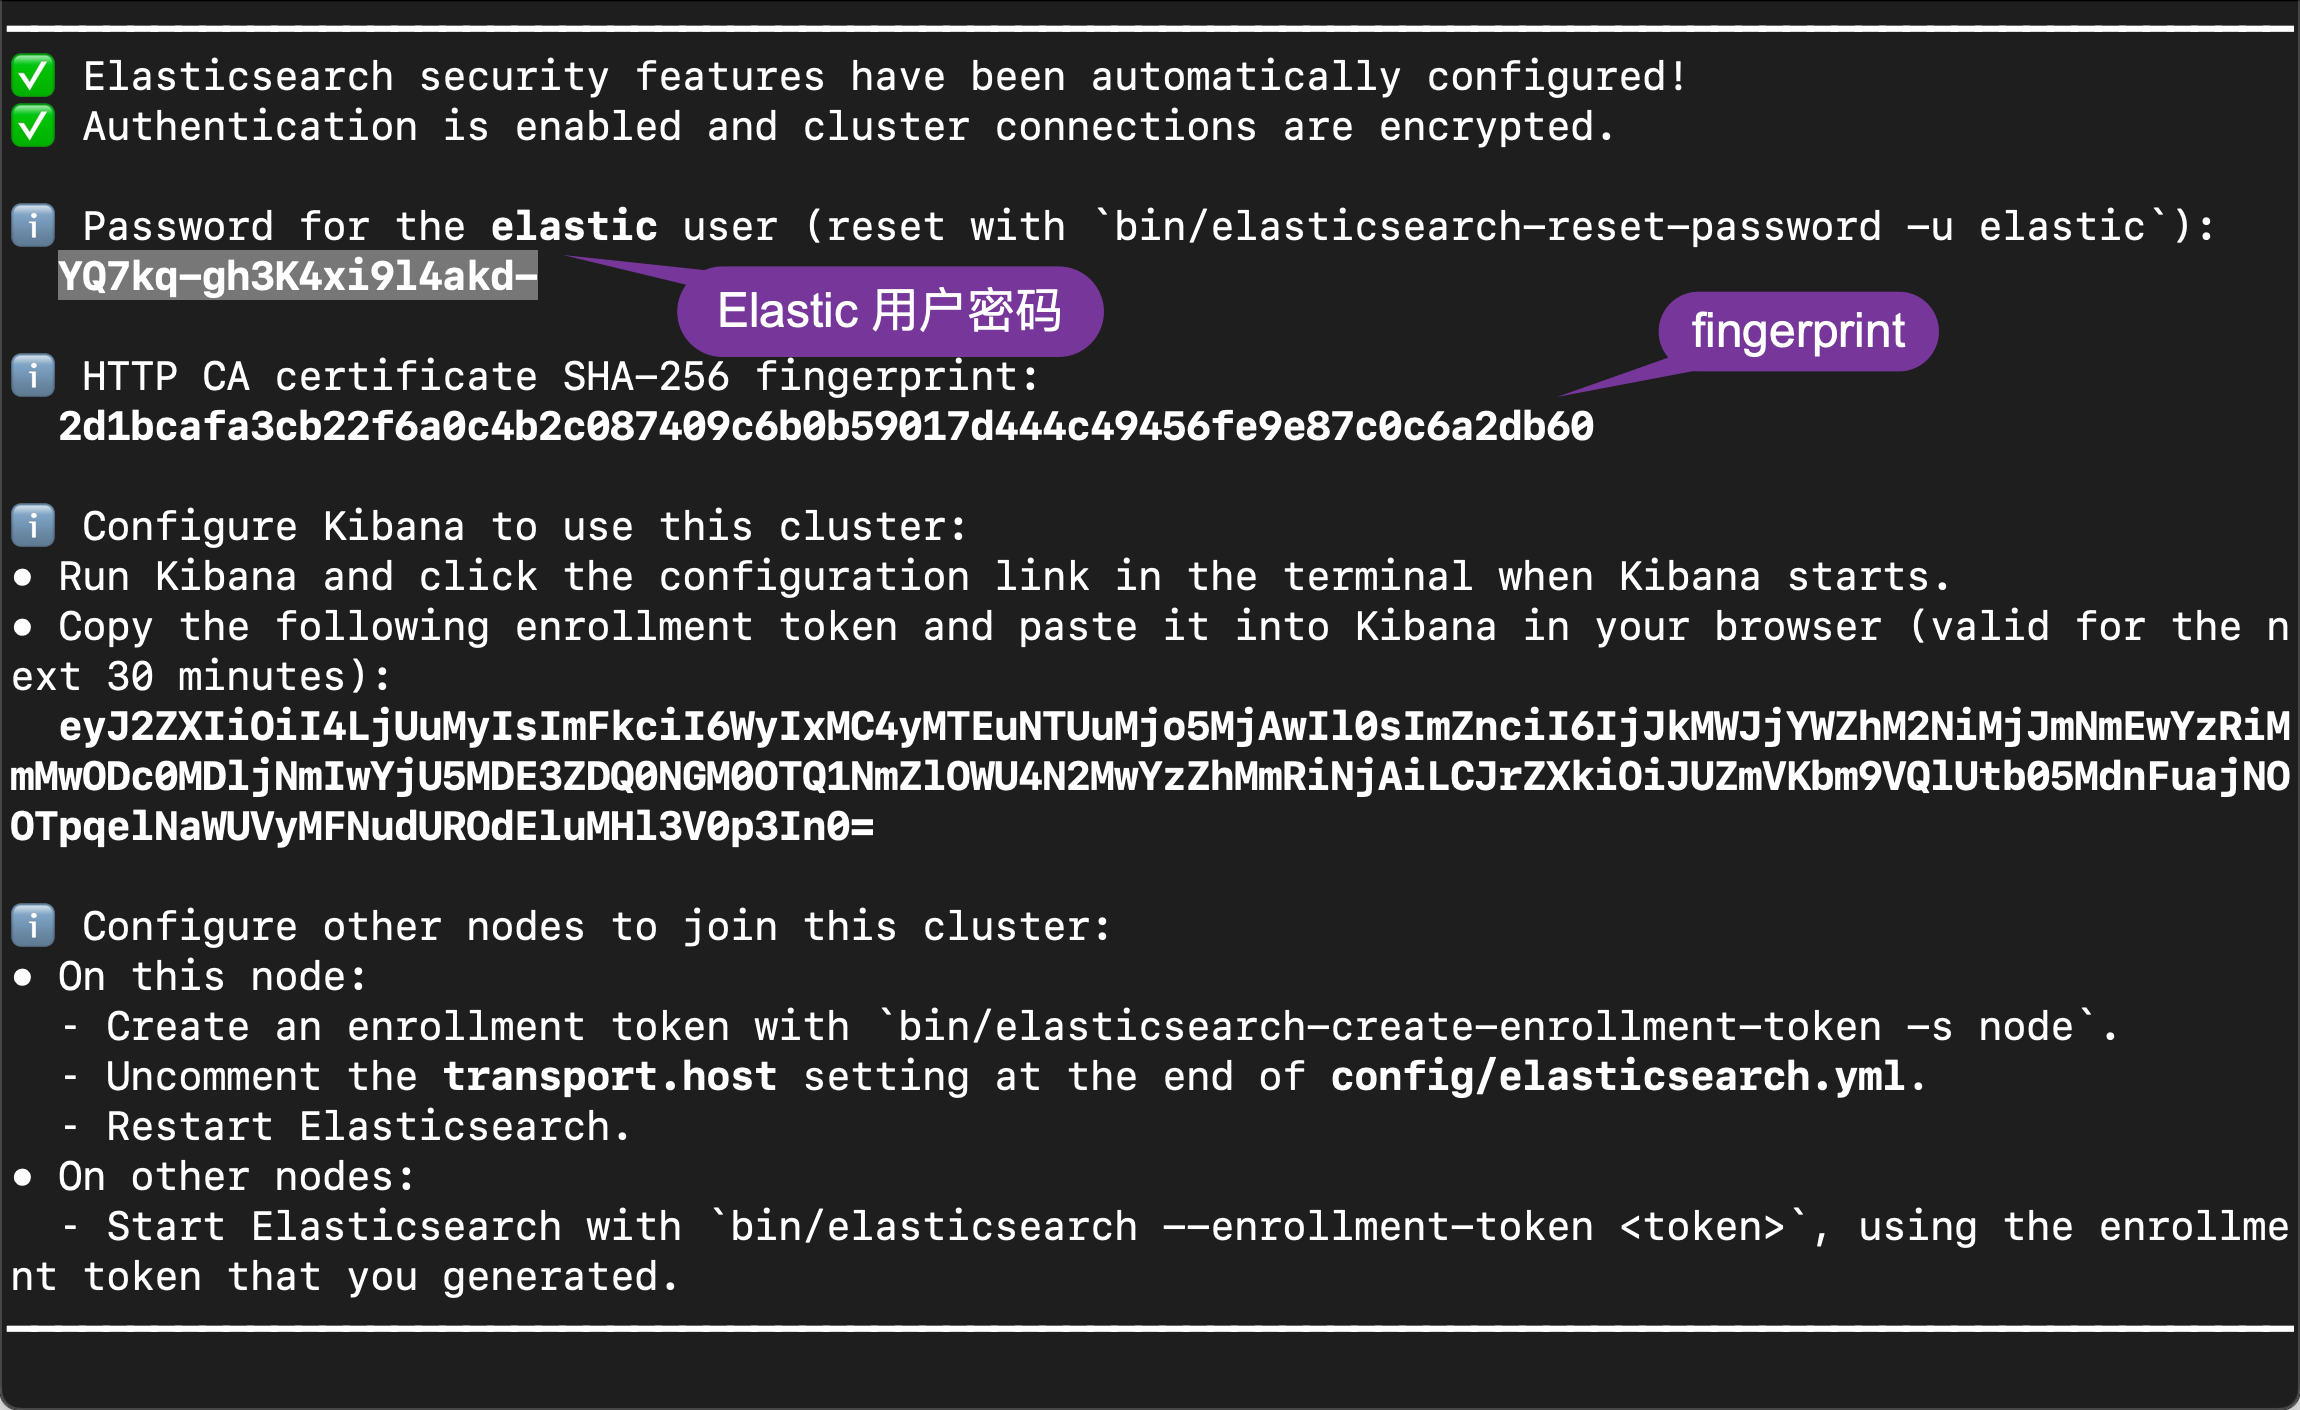
我们从上面可以看到超级用户 elastic 的信息。记下 elastic 用户密码和 HTTP CA 指纹。我们在下面的示例中将使用到。
根据具体情况有两种验证 HTTPS 连接的选项要么使用 CA 证书本身进行验证要么通过 HTTP CA 证书指纹进行验证。
使用 CA 证书来验证 HTTPS
生成的根 CA 证书可以在 Elasticsearch 配置位置 ($ES_CONF_PATH/certs/http_ca.crt) 的 certs 目录中找到。 如果你在 Docker 中运行 Elasticsearch则还有用于检索 CA 证书的其他文档。一旦你在某个地方获得了 http_ca.crt 文件就可以通过 CACert 将文件的内容传递给客户端
我们可以在 Elasticsearch 的安装目录中查看到证书的信息
$ pwd
/Users/liuxg/elastic/elasticsearch-8.5.3/config/certs
$ ls
http.p12      http_ca.crt   transport.p12
我们可以通过如下的方式来连接到 Elasticsearch
main.go
package main

import (
	"io/ioutil"
	"log"

	"github.com/elastic/go-elasticsearch/v8"
)

func main() {
	cert, _ := ioutil.ReadFile("/Users/liuxg/elastic/elasticsearch-8.5.3/config/certs/http_ca.crt")

	cfg := elasticsearch.Config{
		Addresses: []string{
			"https://localhost:9200",
		},
		Username: "elastic",
		Password: "YQ7kq-gh3K4xi9l4akd-",
		CACert:   cert,
	}

	es, err := elasticsearch.NewClient(cfg)
	log.Println(err)

	if err == nil {
		log.Println(elasticsearch.Version)
		log.Println(es.Info())
	} else {
		log.Println("Something wrong with connection to Elasticsearch")
	}
}
运行上面的代码我们可以看到和上面一样的运行结果。
使用证书 fingerprint 来验证 HTTPS
这种验证 HTTPS 连接的方法利用了前面记下的证书指纹值。 获取此 SHA256 指纹值并通过 ca_fingerprint 将其传递给 Go Elasticsearch 客户端
main.go
package main

import (
	"log"

	"github.com/elastic/go-elasticsearch/v8"
)

func main() {
	cfg := elasticsearch.Config{
		Addresses: []string{
			"https://localhost:9200",
		},
		Username:               "elastic",
		Password:               "YQ7kq-gh3K4xi9l4akd-",
		CertificateFingerprint: "2d1bcafa3cb22f6a0c4b2c087409c6b0b59017d444c49456fe9e87c0c6a2db60",
	}

	es, err := elasticsearch.NewClient(cfg)
	log.Println(err)

	if err == nil {
		log.Println(elasticsearch.Version)
		log.Println(es.Info())
	} else {
		log.Println("Something wrong with connection to Elasticsearch")
	}
}
我们运行上面的代码我们可以看到和之前输出一样的结果。
可以使用带有证书文件的 openssl x509 计算证书指纹
openssl x509 -fingerprint -sha256 -noout -in /path/to/http_ca.crt$ pwd
/Users/liuxg/elastic/elasticsearch-8.5.3/config/certs
$ ls
http.p12 http_ca.crt transport.p12
$ openssl x509 -fingerprint -sha256 -noout -in http_ca.crt
sha256 Fingerprint=2D:1B:CA:FA:3C:B2:2F:6A:0C:4B:2C:08:74:09:C6:B0:B5:90:17:D4:44:C4:94:56:FE:9E:87:C0:C6:A2:DB:60如果你无权访问 Elasticsearch 生成的 CA 文件你可以使用以下脚本通过 openssl s_client 输出 Elasticsearch 实例的根 CA 指纹
# Replace the values of 'localhost' and '9200' to the
# corresponding host and port values for the cluster.
openssl s_client -connect localhost:9200 -servername localhost -showcerts </dev/null 2>/dev/null \
  | openssl x509 -fingerprint -sha256 -noout -in /dev/stdin
$ openssl s_client -connect localhost:9200 -servername localhost -showcerts </dev/null 2>/dev/null \
> | openssl x509 -fingerprint -sha256 -noout -in /dev/stdin
sha256 Fingerprint=92:54:07:A7:BF:FE:AA:6C:A9:4C:17:7E:A8:E7:7D:F9:B7:27:2E:99:BF:DC:9C:D0:51:D1:9F:F2:2E:D7:9A:4A在上面的代码中千万要注意的是我们代码中的 fingerprint 是没有冒号的。我们可以使用如下的命令来直接进行获得
$ pwd
/Users/liuxg/elastic/elasticsearch-8.5.3/config/certs
$ ls
http.p12      http_ca.crt   transport.p12
$ openssl x509 -in http_ca.crt -sha256 -fingerprint | grep sha256 | sed 's/://g'
sha256 Fingerprint=2D1BCAFA3CB22F6A0C4B2C087409C6B0B59017D444C49456FE9E87C0C6A2DB60
HTTP Bearer 认证
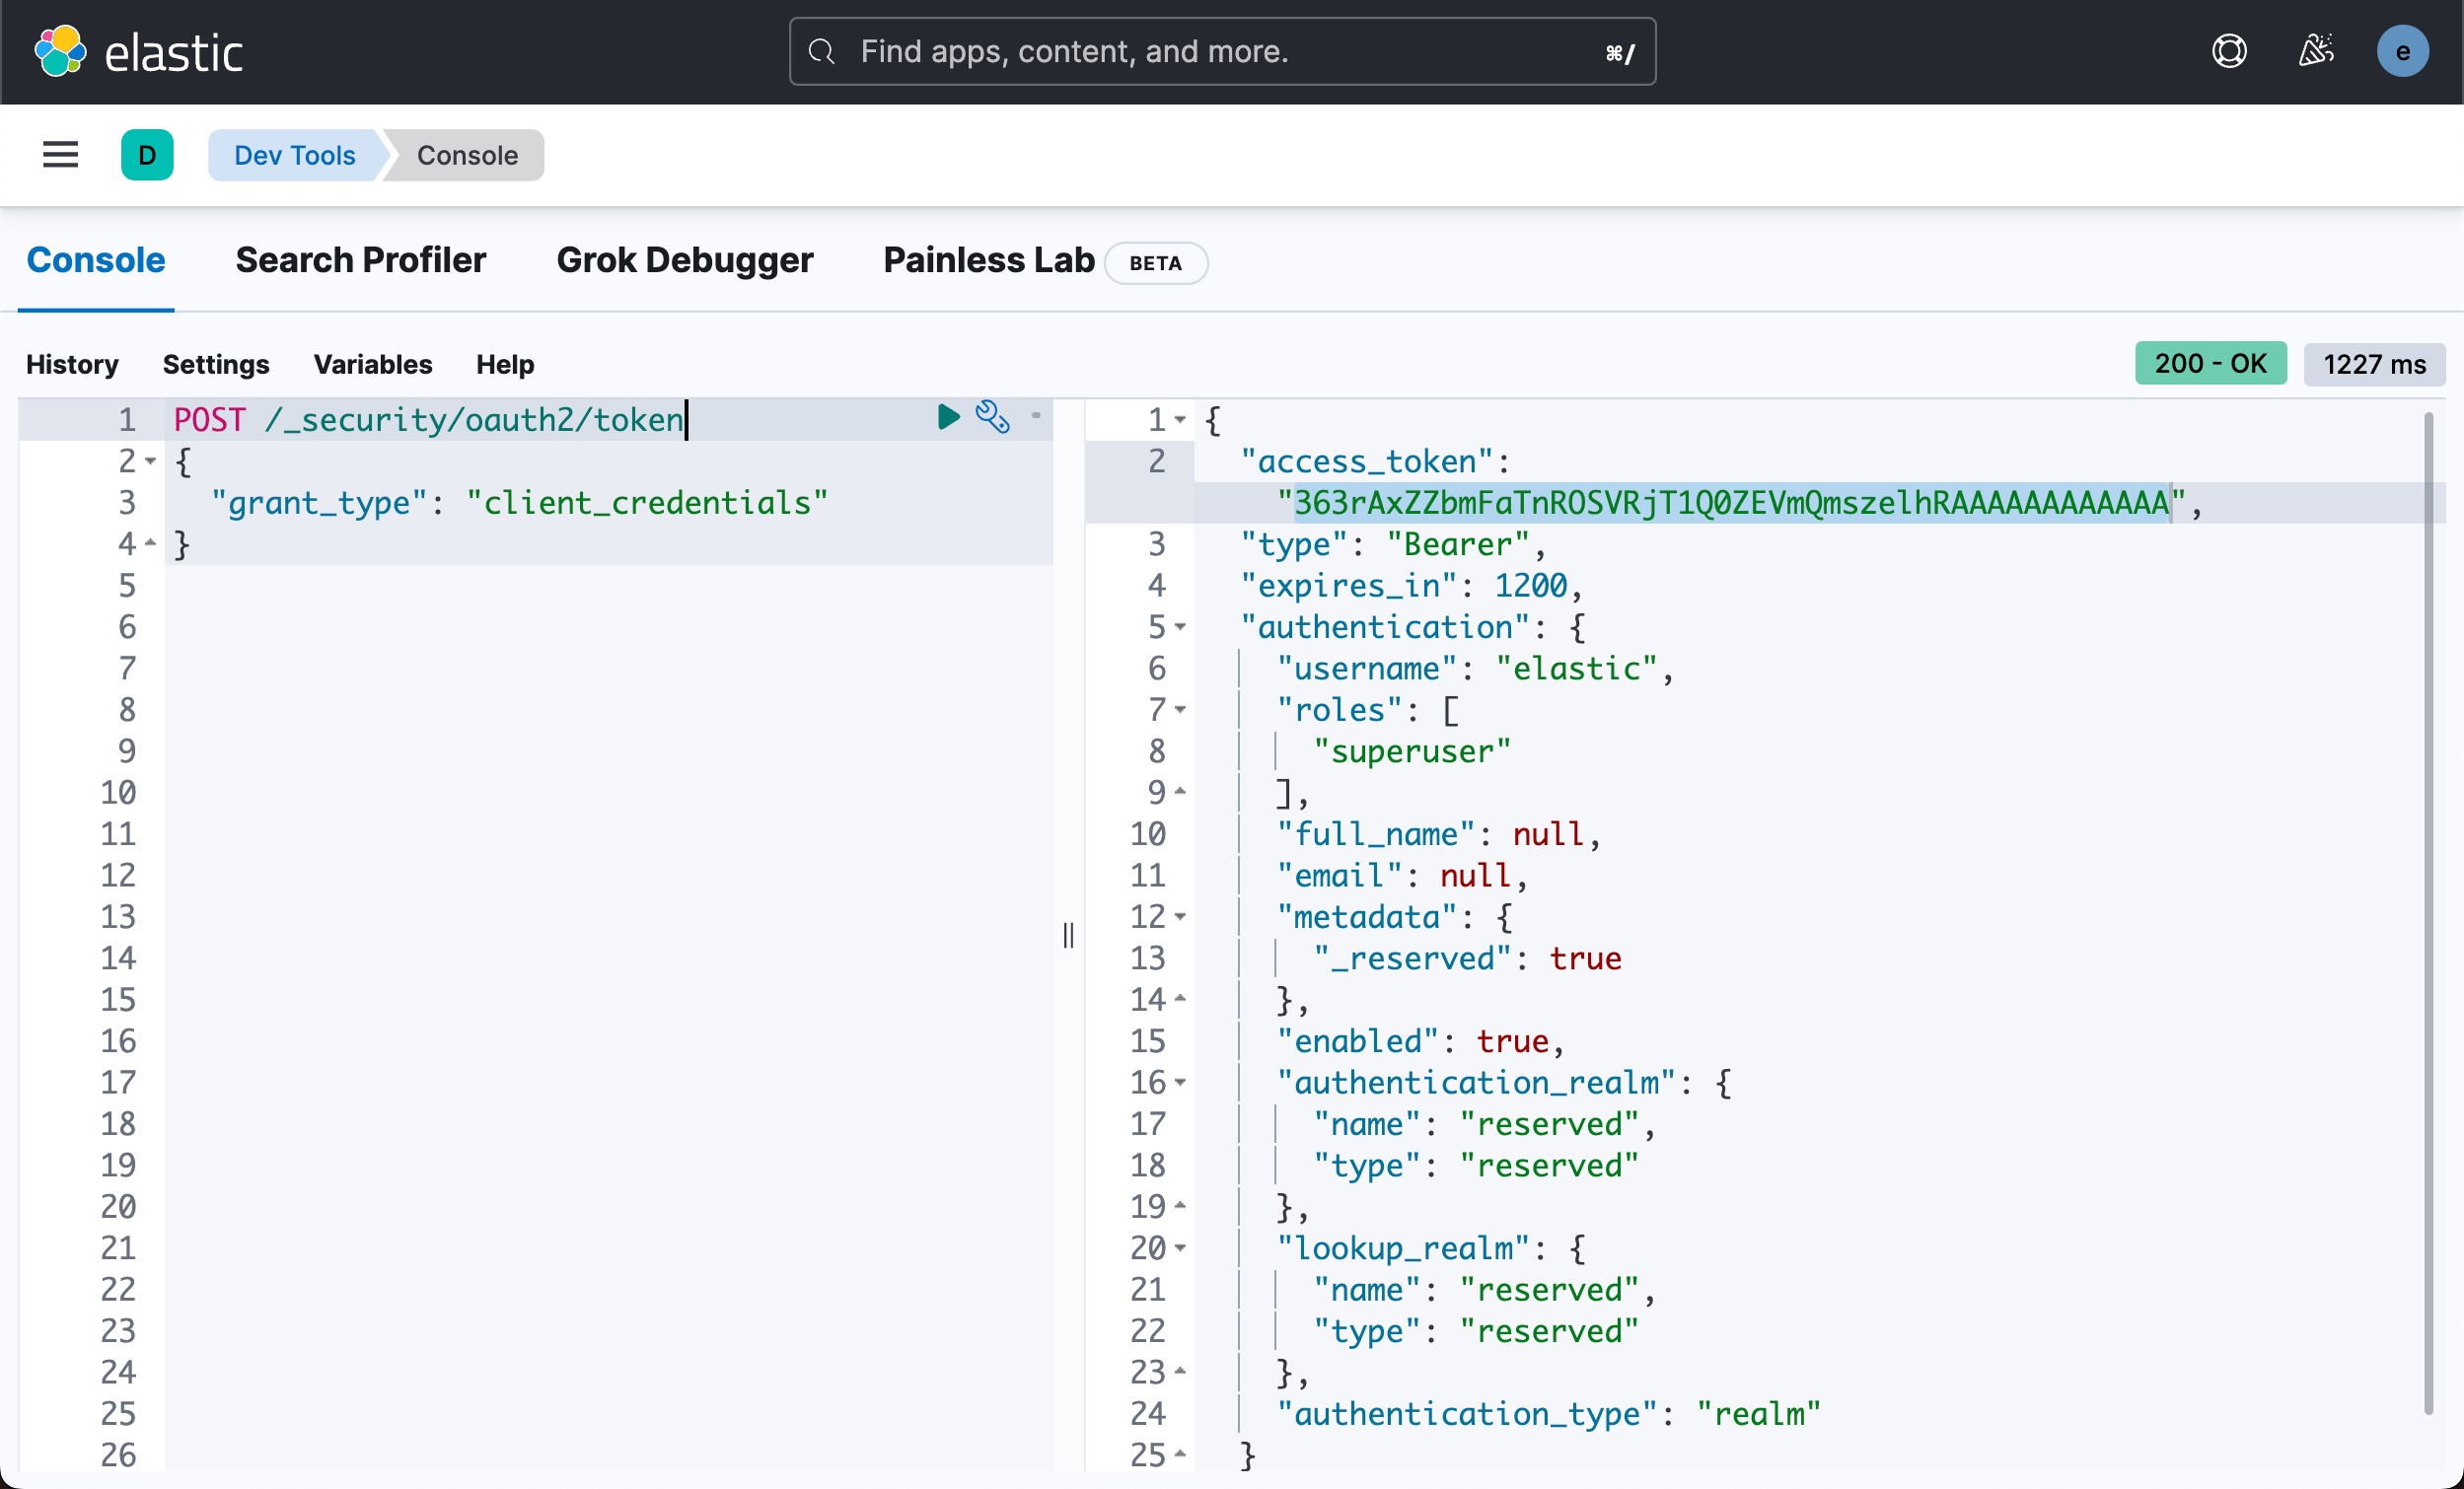
HTTP Bearer 身份验证通过将令牌作为字符串传递来使用 ServiceToken 参数。 此身份验证方法由服务帐户令牌和不记名令牌使用。关于如何生成 service token请参考我之前的文章 “Elasticsearch无需基本身份验证即可创建用于访问的不记名令牌”。
POST /_security/oauth2/token
{
  "grant_type": "client_credentials"
}
main.go
package main

import (
	"log"

	"github.com/elastic/go-elasticsearch/v8"
)

func main() {
	cfg := elasticsearch.Config{
		Addresses: []string{
			"https://localhost:9200",
		},
		CertificateFingerprint: "d293735f339412c738c5a258fe950fb2fcdaa33f772365a948abbb332a7c58b4",
		ServiceToken:           "363rAxZZbmFaTnROSVRjT1Q0ZEVmQmszelhRAAAAAAAAAAAA",
	}

	es, err := elasticsearch.NewClient(cfg)
	log.Println(err)

	if err == nil {
		log.Println(elasticsearch.Version)
		log.Println(es.Info())
	} else {
		log.Println("Something wrong with connection to Elasticsearch")
	}
}
我们运行上面的代码它会输出和上面一样的结果。我们或者使用如下的格式
package main

import (
	"log"
	"net/http"

	"github.com/elastic/go-elasticsearch/v8"
)

func main() {
	cfg := elasticsearch.Config{
		Addresses: []string{
			"https://localhost:9200",
		},
		CertificateFingerprint: "d293735f339412c738c5a258fe950fb2fcdaa33f772365a948abbb332a7c58b4",
		Header: http.Header(map[string][]string{
			"Authorization": {"Bearer 363rAxZsR0Q0RDMzb1MtaXU1alJPMnFHMjZ3AAAAAAAAAAAA"},
		}),
	}

	es, err := elasticsearch.NewClient(cfg)
	log.Println(err)

	if err == nil {
		log.Println(elasticsearch.Version)
		log.Println(es.Info())
	} else {
		log.Println("Something wrong with connection to Elasticsearch")
	}
}
在上面我们使用 Bearer 在 header 中的定义来实现请求。
API key 验证
我们也可以使用 API key 的方法来进行验证。我们可以参考文章 “Elasticsearch创建 API key 接口访问 Elasticsearch” 来获取 API key。我们也可以使用如下的方法来获取 API key
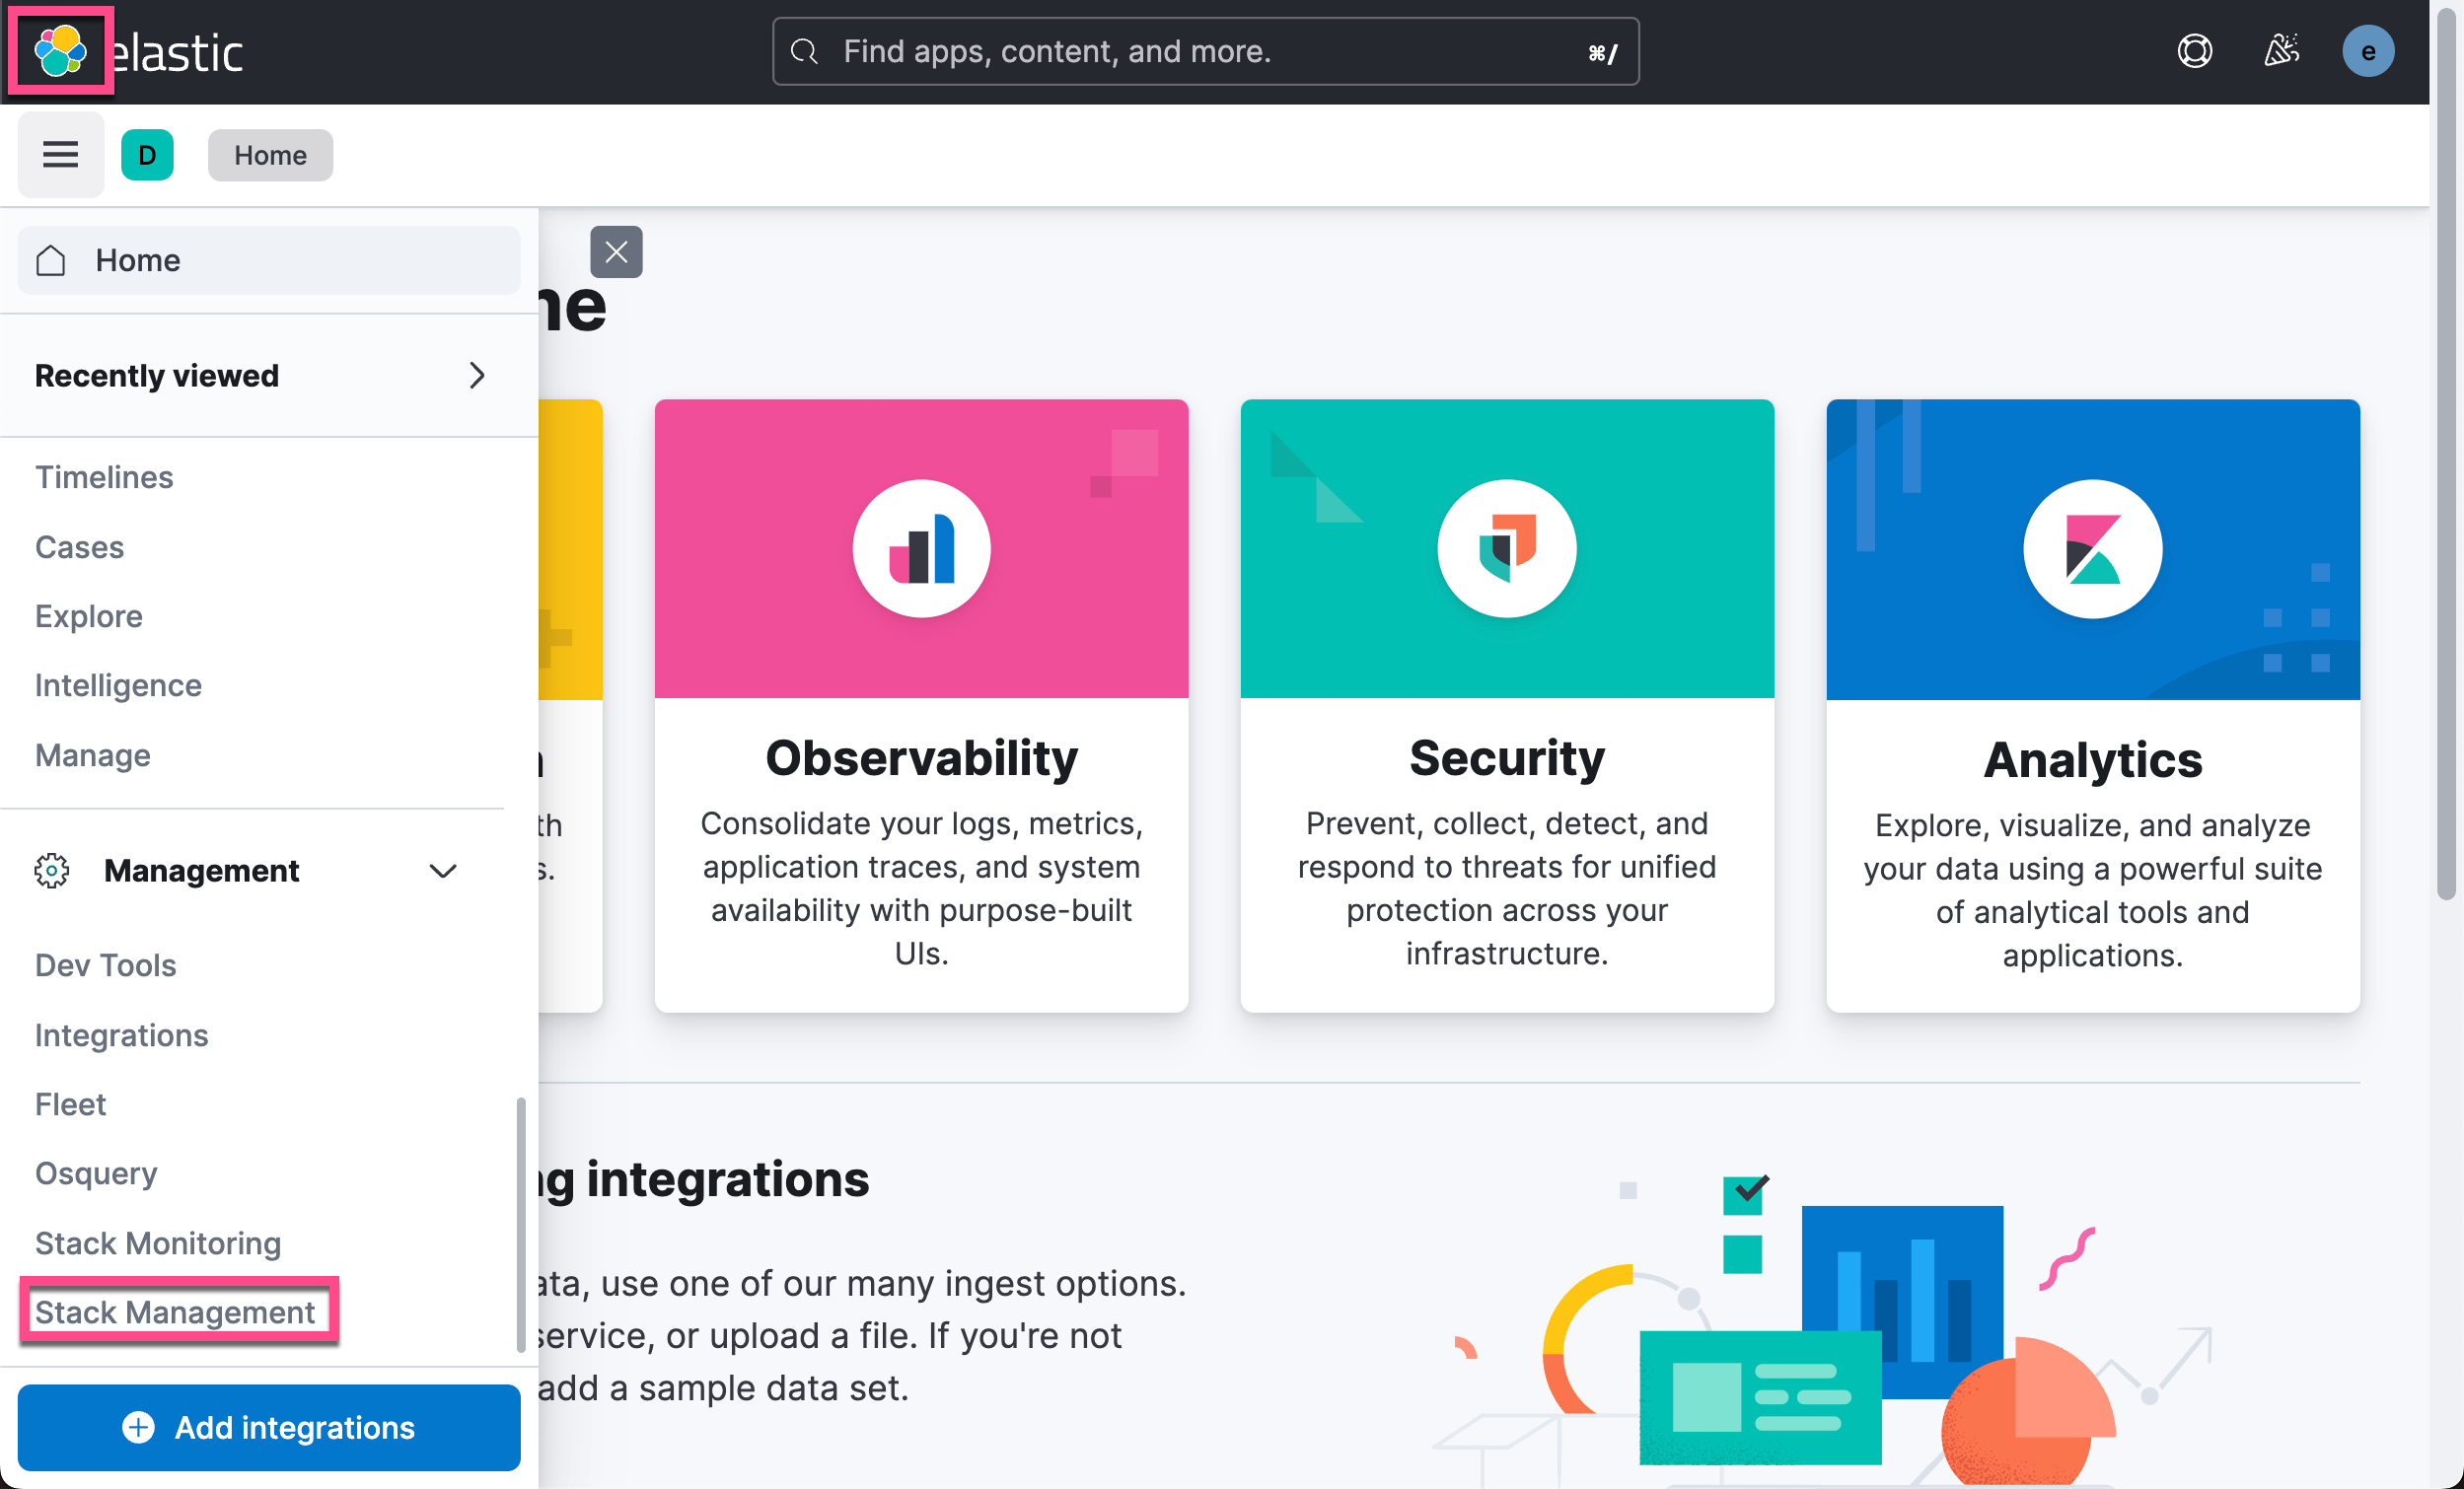
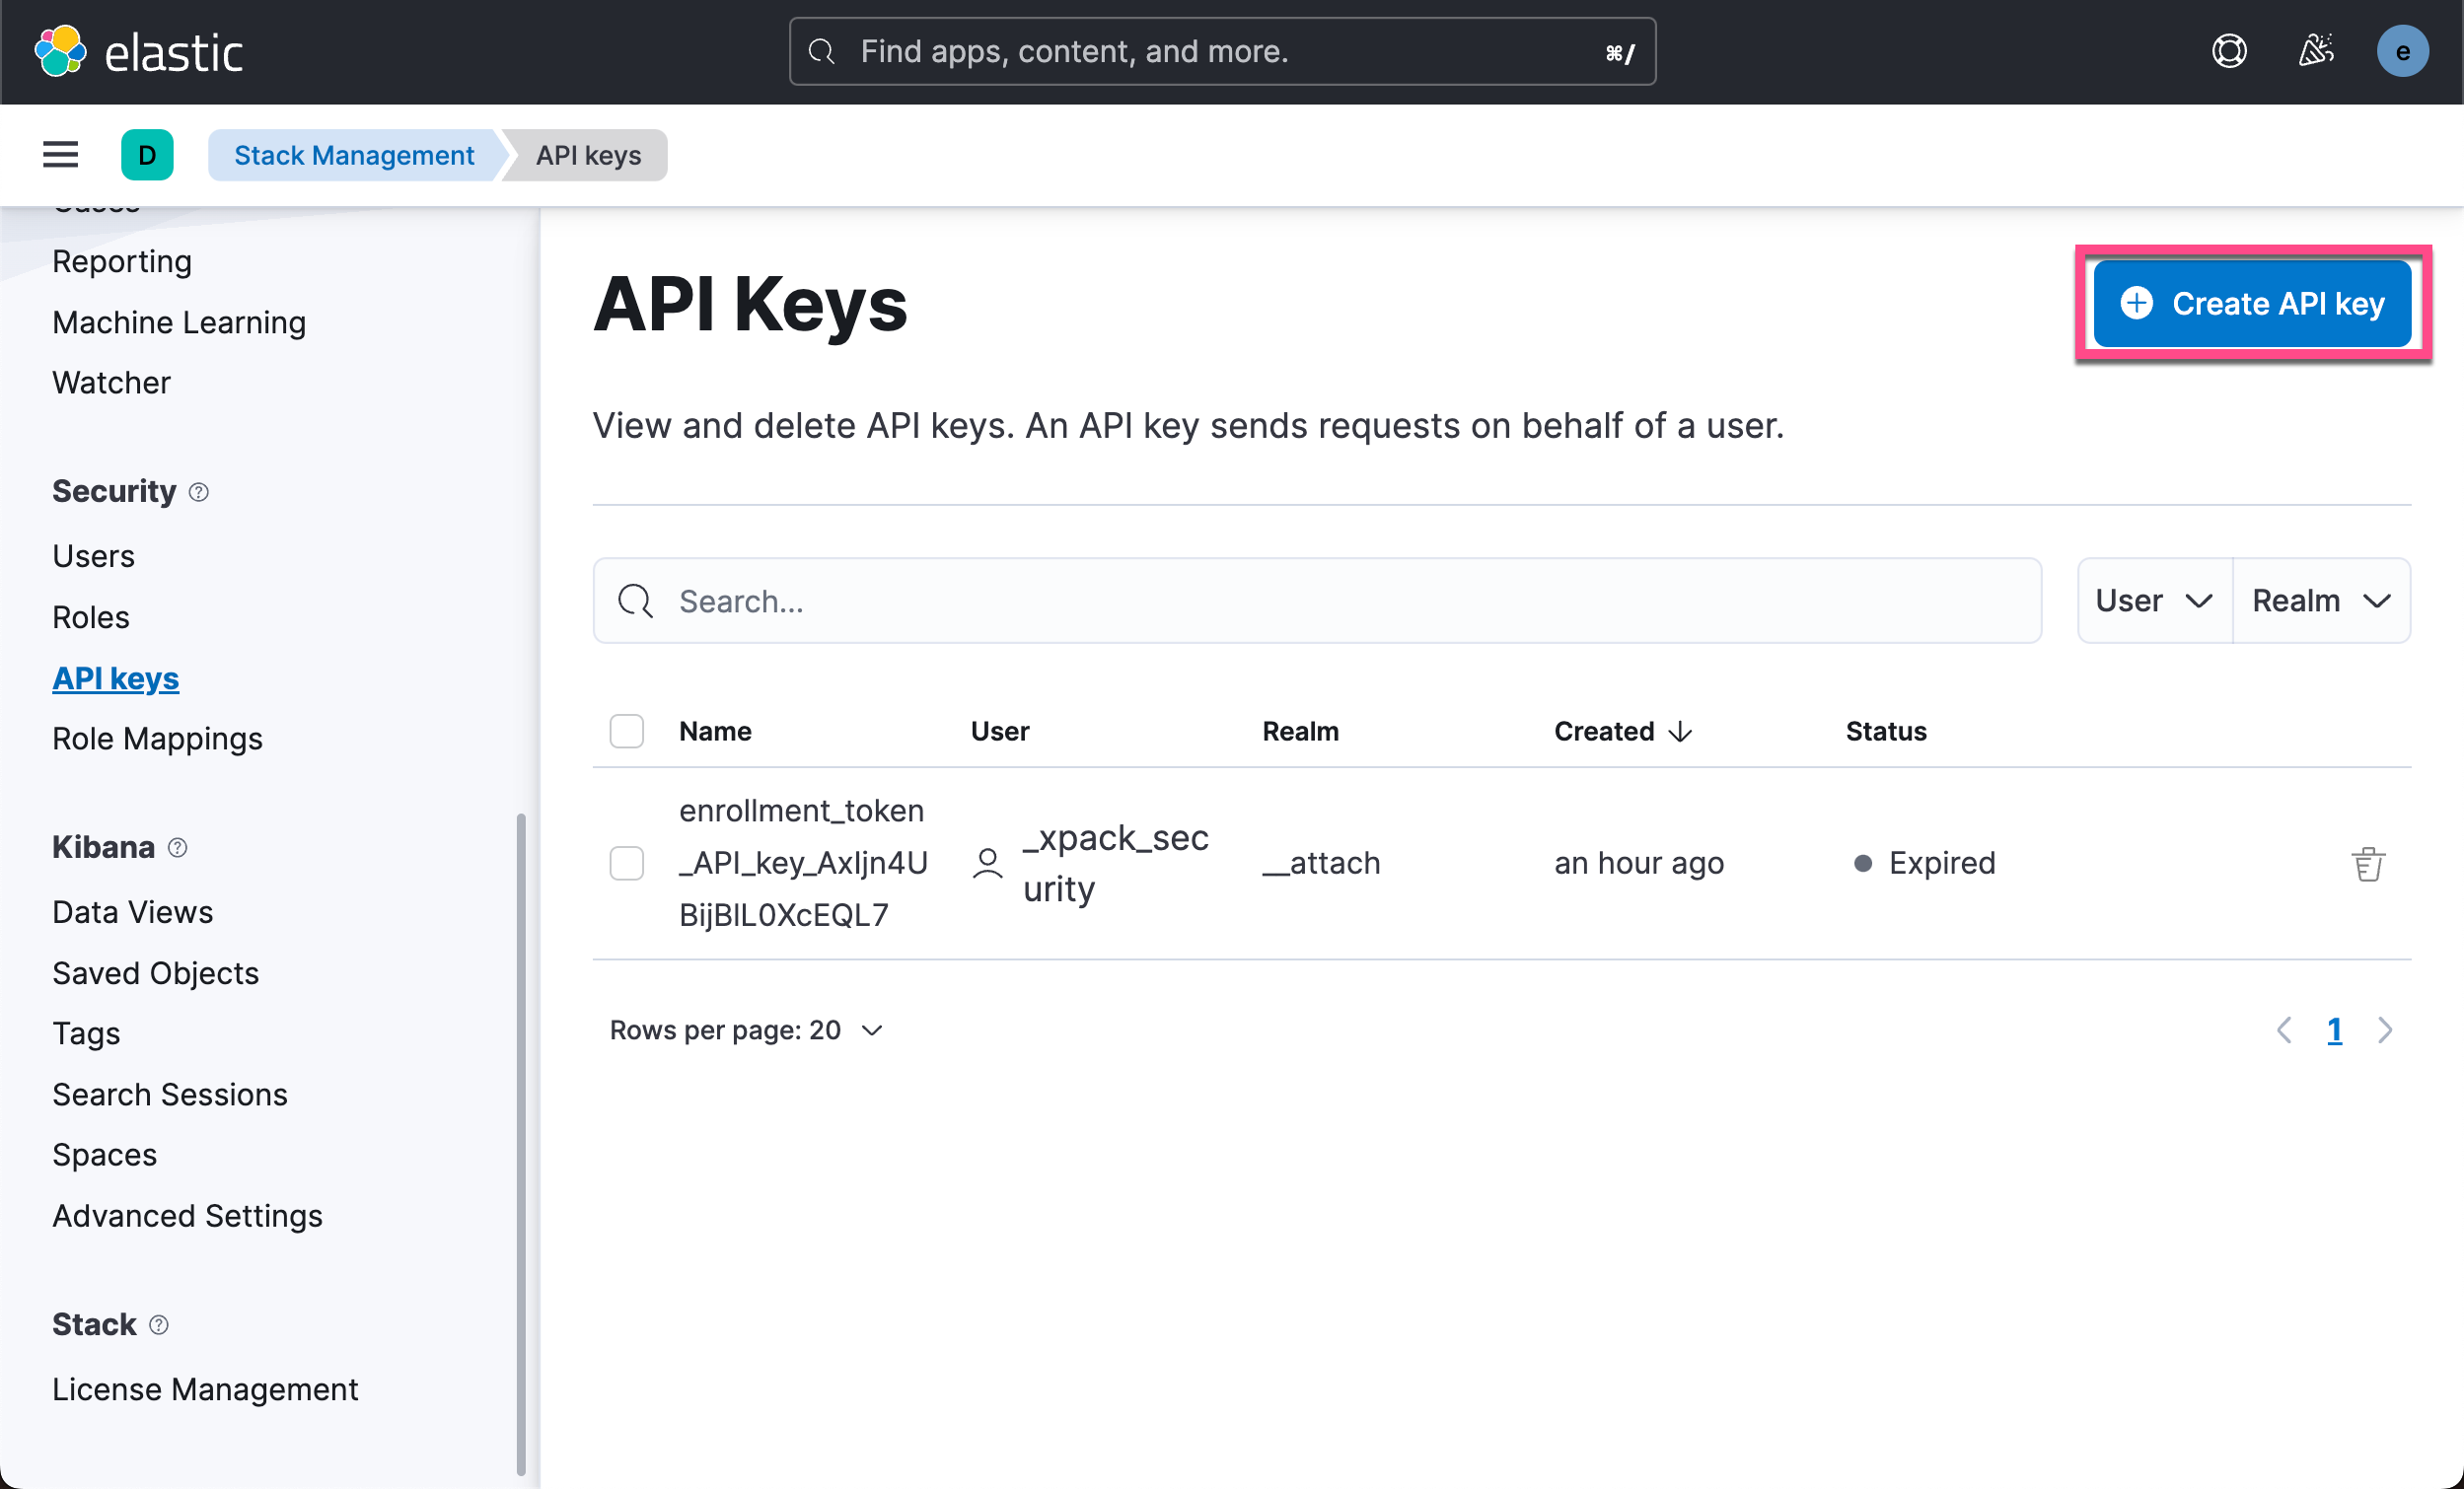
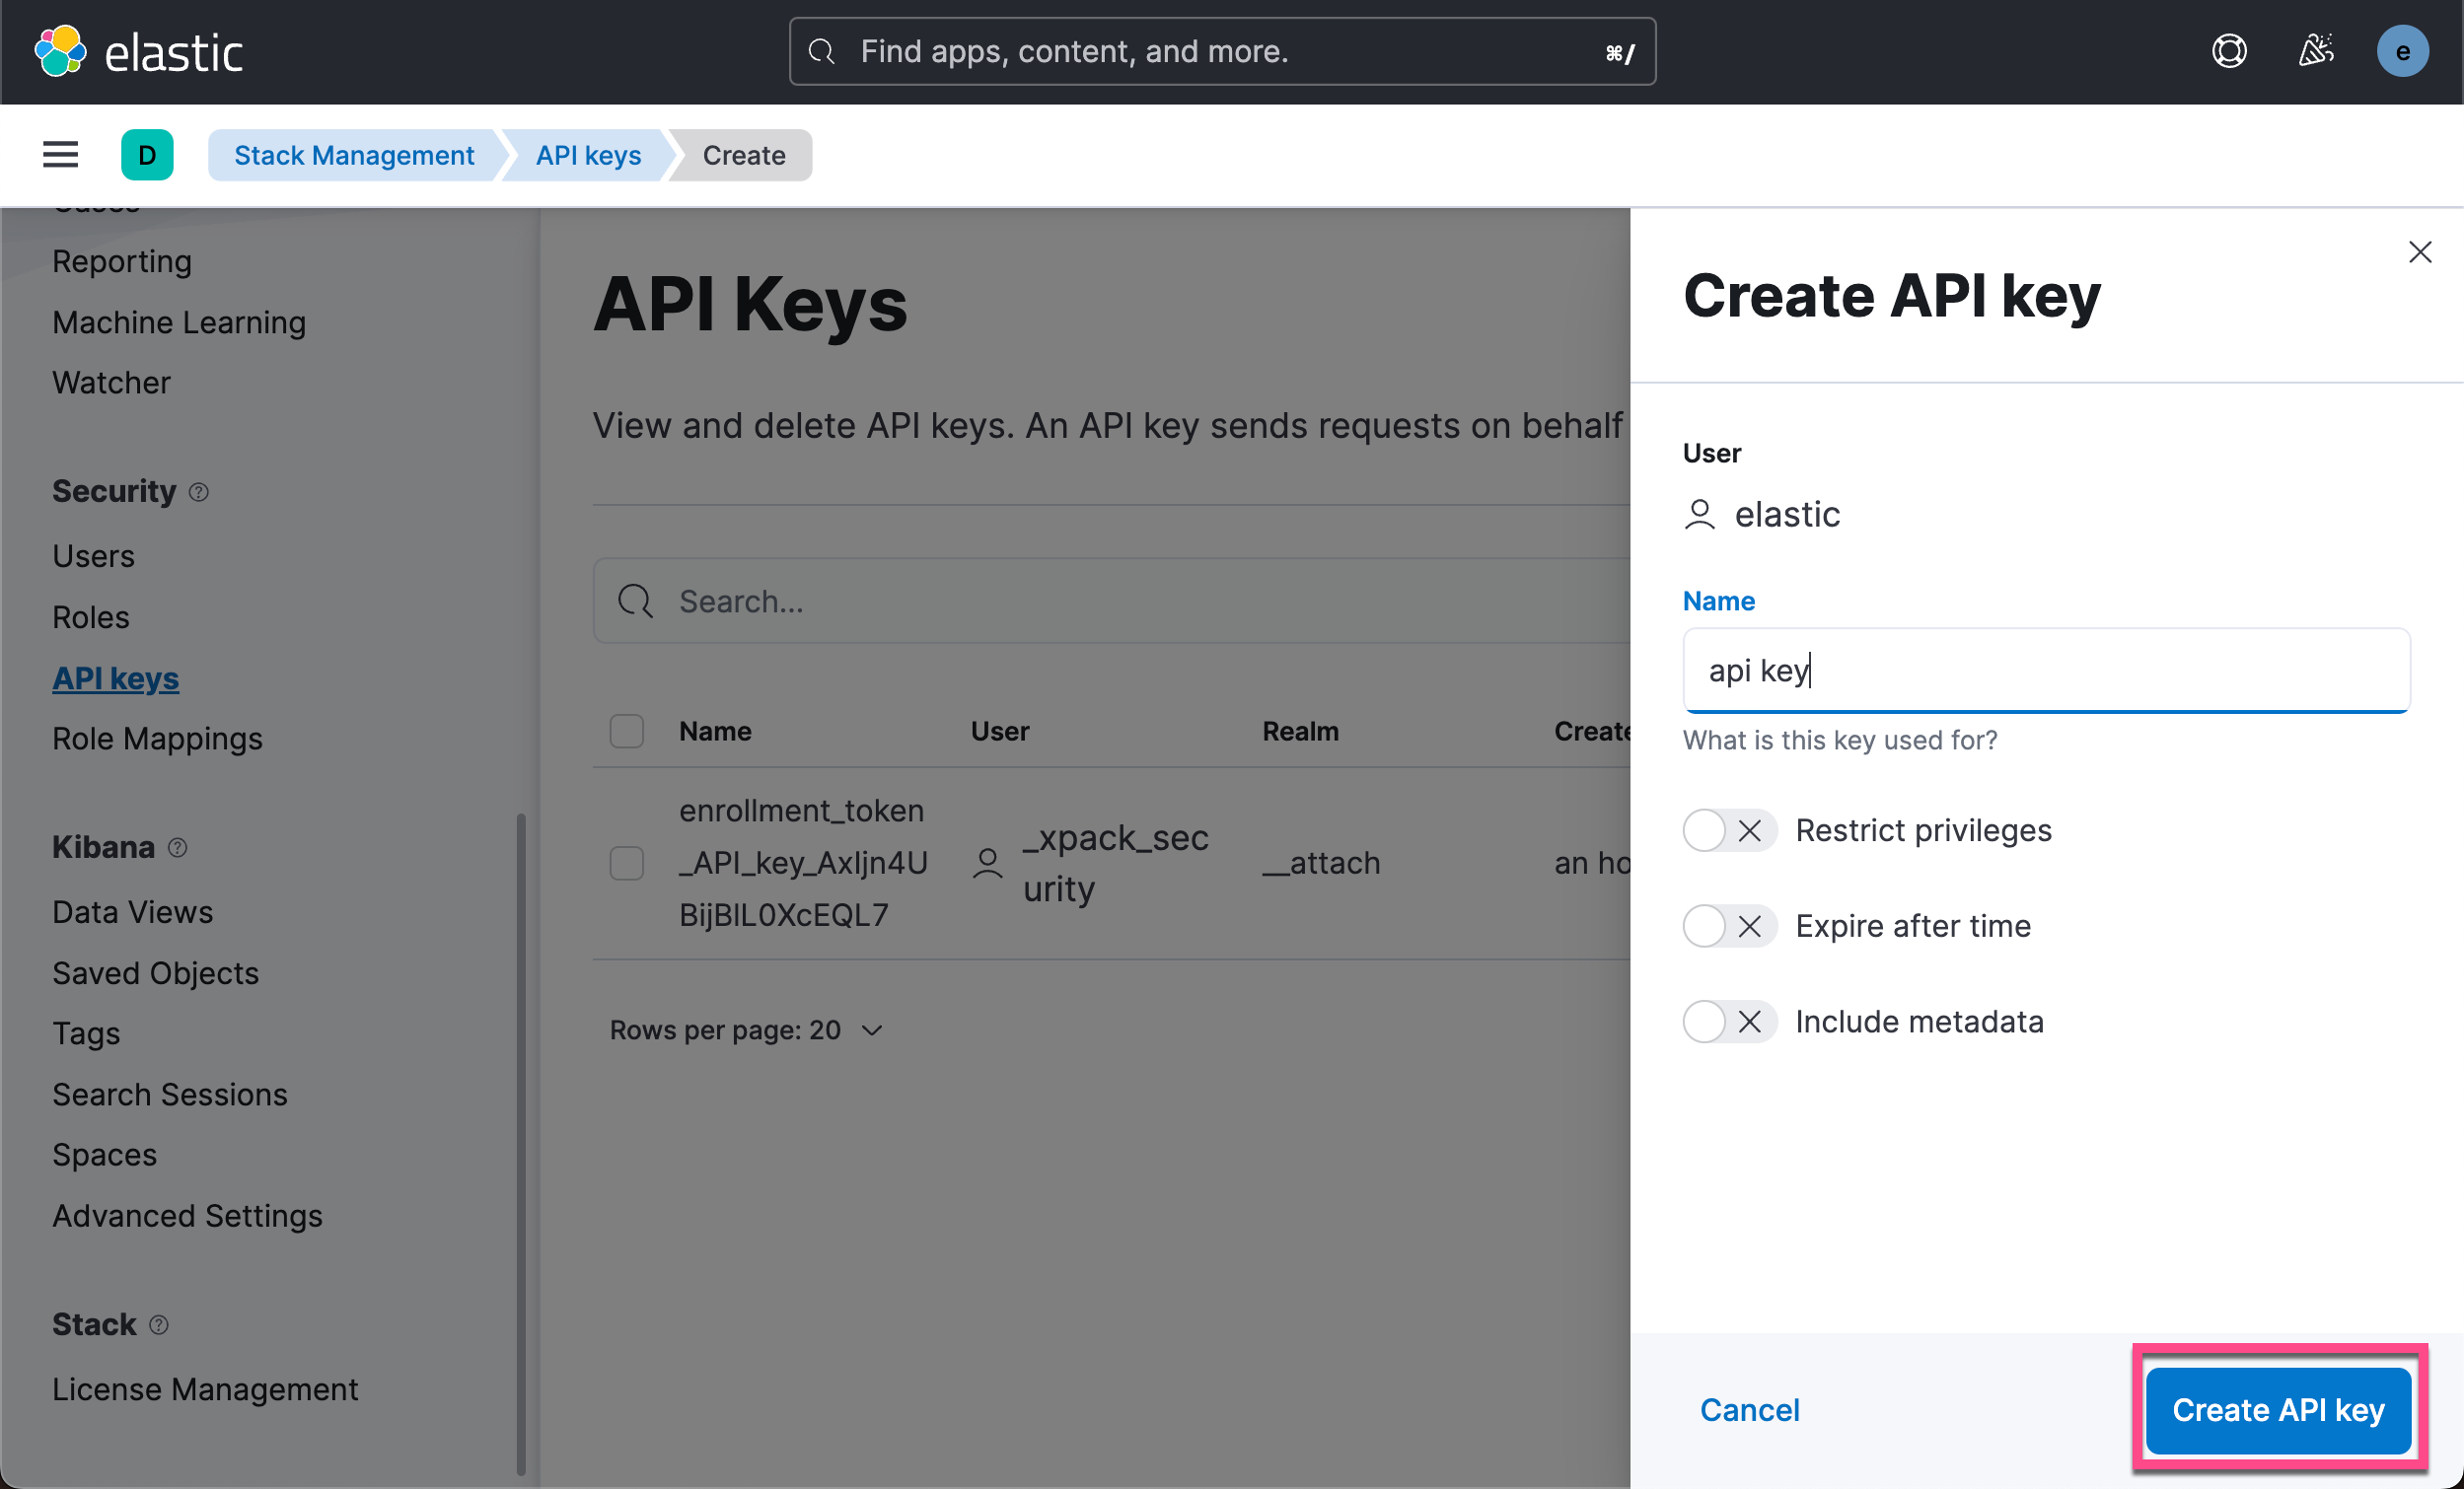
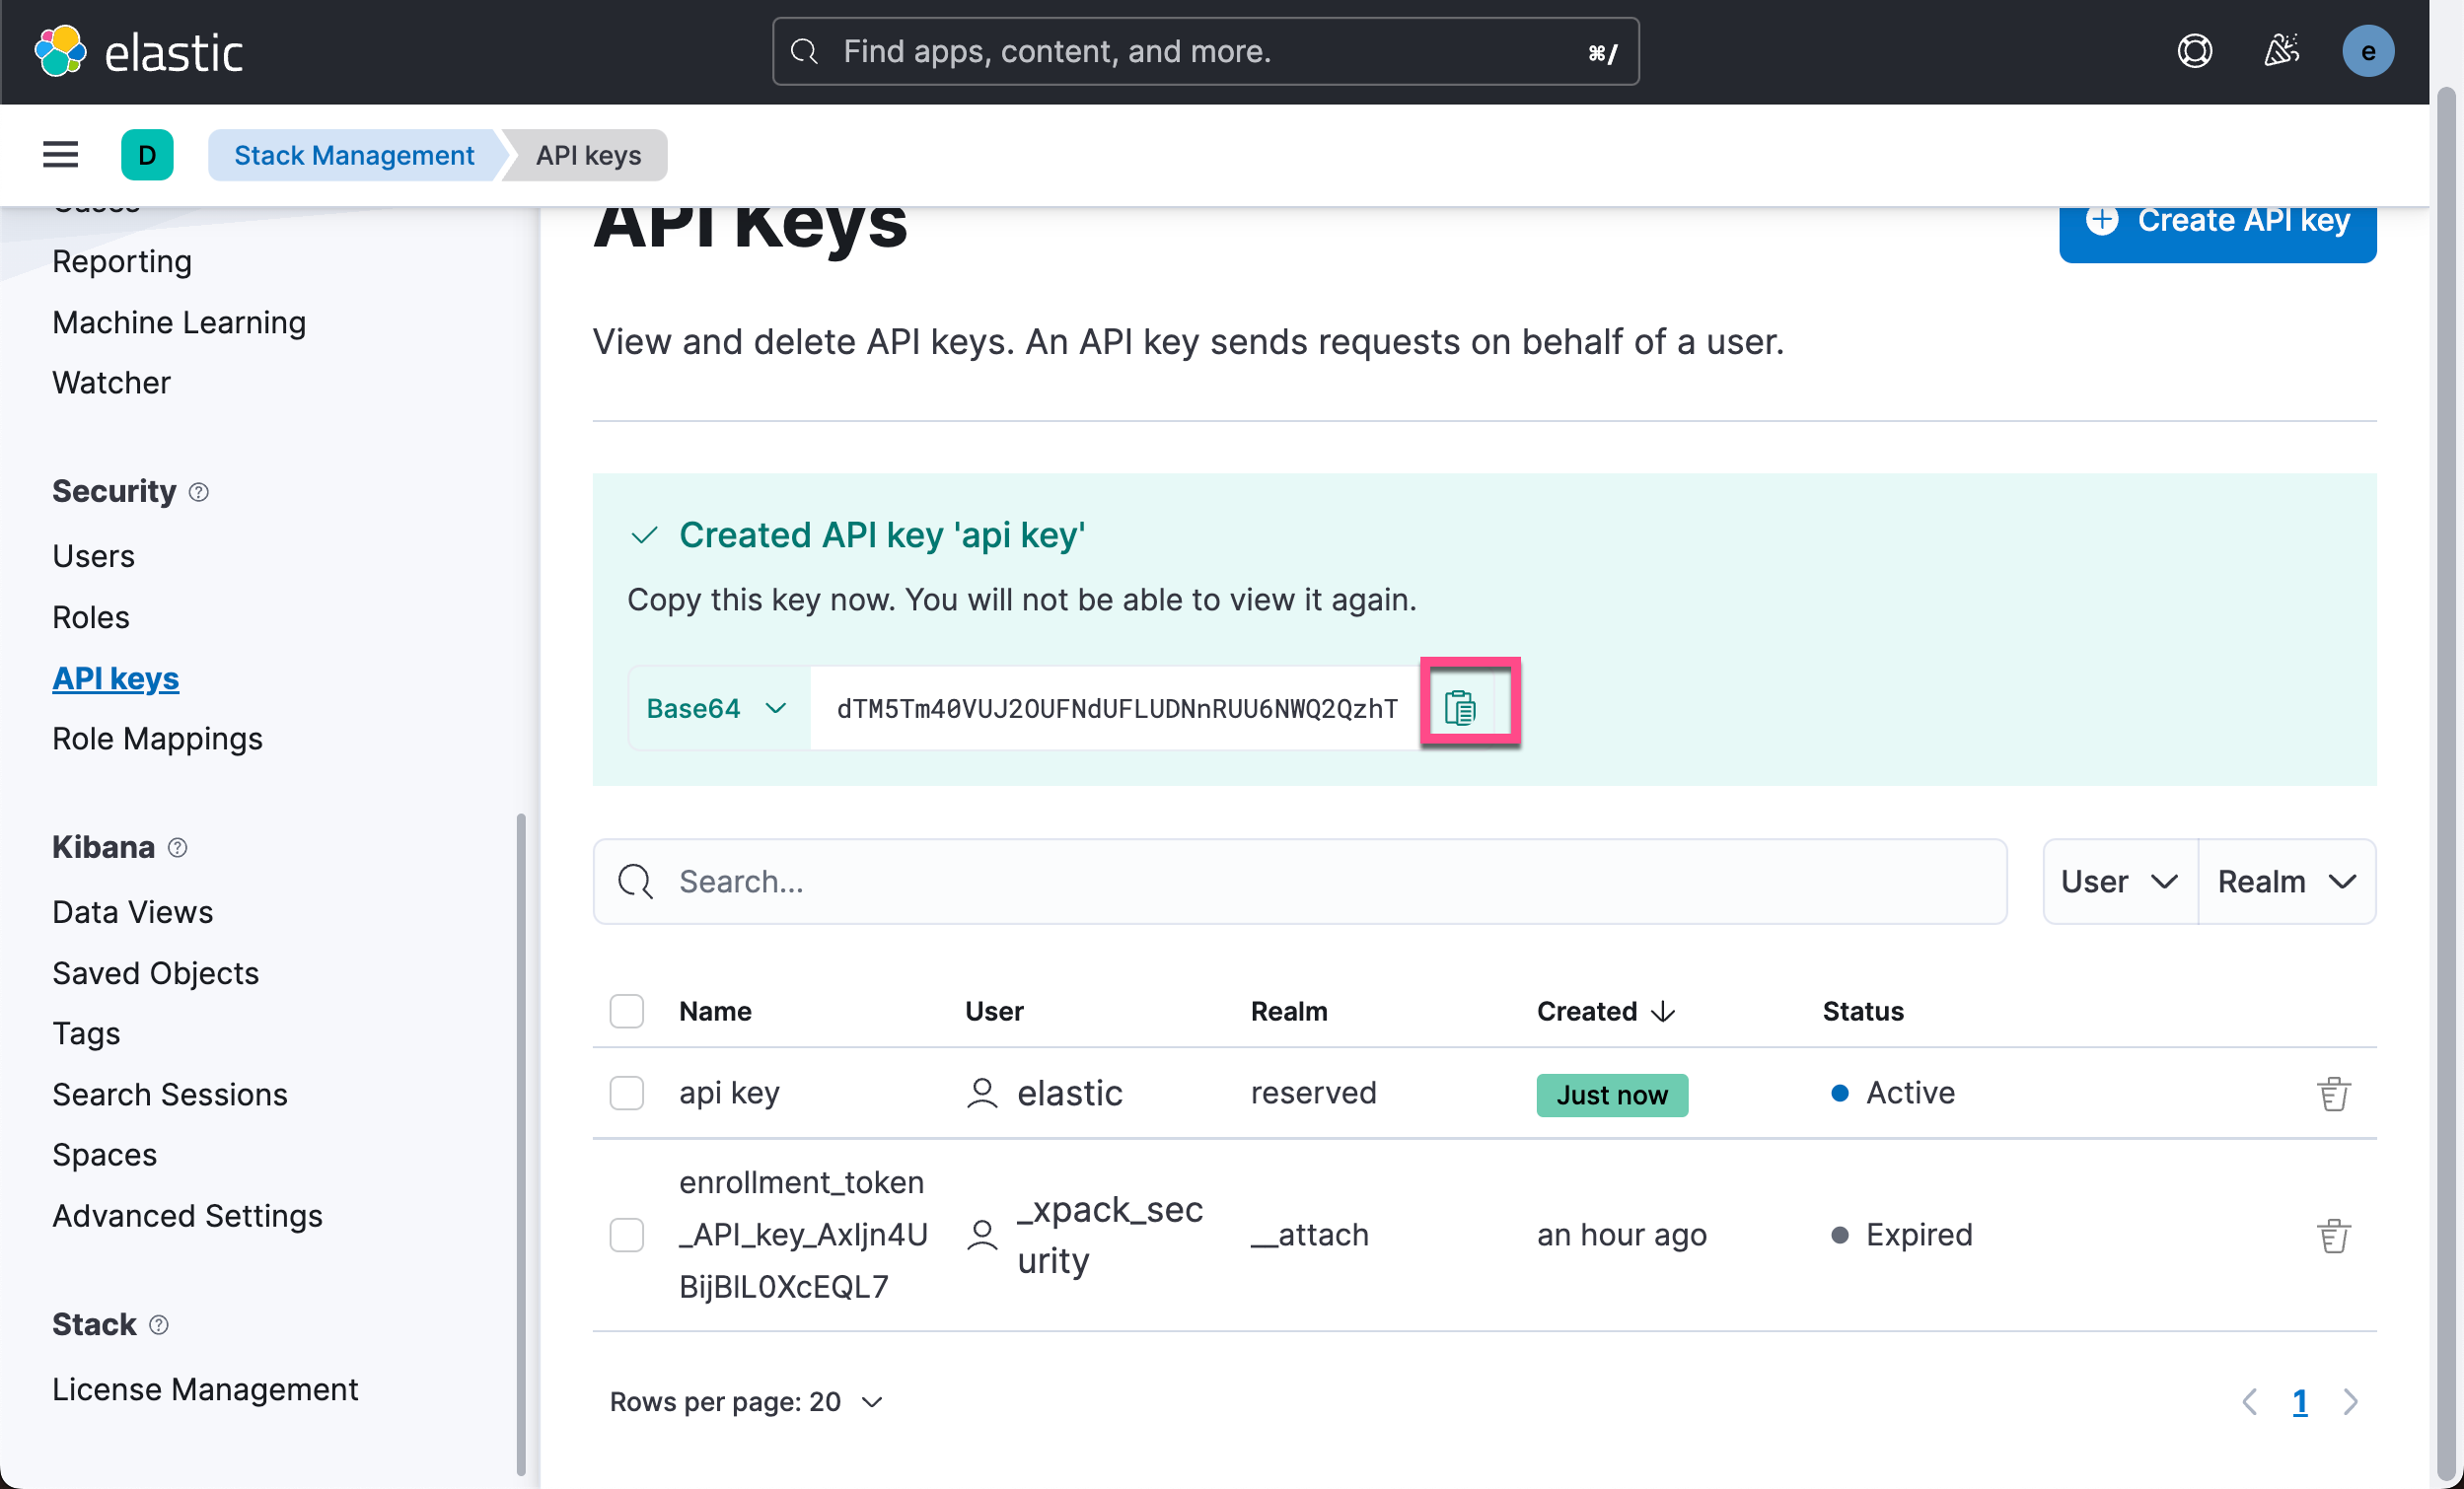
点击上面的 copy 按钮。拷贝生成的 API key。我们把这个 API key 应用到如下的代码中
main.go
package main

import (
	"log"

	"github.com/elastic/go-elasticsearch/v8"
)

func main() {
	cfg := elasticsearch.Config{
		Addresses: []string{
			"https://localhost:9200",
		},
		CertificateFingerprint: "d293735f339412c738c5a258fe950fb2fcdaa33f772365a948abbb332a7c58b4",
		APIKey:                 "dTM5Tm40VUJ2OUFNdUFLUDNnRUU6NWQ2QzhTZmhURk82MUFsUFE0a2ltUQ==",
	}

	es, err := elasticsearch.NewClient(cfg)
	log.Println(err)

	if err == nil {
		log.Println(elasticsearch.Version)
		log.Println(es.Info())
	} else {
		log.Println("Something wrong with connection to Elasticsearch")
	}
}
运行上面的代码。它将成功地连接到 Elasticsearch 集群。
Retries
我们已经了解了客户端如何管理连接并针对特定条件重试请求。 现在让我们看看相关的配置选项。
默认情况下客户端最多重试请求 3 次 要设置不同的限制请使用 MaxRetries 字段。 要更改应重试的响应状态代码列表请使用 RetryOnStatus 字段。 与 RetryBackoff 选项一起您可以使用它在服务器发送 429 Too Many Requests 响应时重试请求
main.go
package main

import (
	"log"
	"math"
	"time"

	"github.com/elastic/go-elasticsearch/v8"
)

func main() {
	cfg := elasticsearch.Config{
		Addresses: []string{
			"https://localhost:9200",
		},
		CertificateFingerprint: "d293735f339412c738c5a258fe950fb2fcdaa33f772365a948abbb332a7c58b4",
		APIKey:                 "dTM5Tm40VUJ2OUFNdUFLUDNnRUU6NWQ2QzhTZmhURk82MUFsUFE0a2ltUQ==",
		RetryOnStatus:          []int{429, 502, 503, 504},
		RetryBackoff: func(i int) time.Duration {
			// A simple exponential delay
			d := time.Duration(math.Exp2(float64(i))) * time.Second
			log.Printf("Attempt: %d | Sleeping for %s...\n", i, d)
			return d
		},
	}

	es, err := elasticsearch.NewClient(cfg)
	log.Println(err)

	if err == nil {
		log.Println(elasticsearch.Version)
		log.Println(es.Info())
	} else {
		log.Println("Something wrong with connection to Elasticsearch")
	}
}
配置其它 HTTP 设置
要配置其他 HTTP 设置请在配置对象中传递一个 http.Transport 对象。
cfg := elasticsearch.Config{
  Transport: &http.Transport{
    MaxIdleConnsPerHost:   10,
    ResponseHeaderTimeout: time.Second,
    TLSClientConfig: &tls.Config{
      MinVersion: tls.VersionTLS12,
      // ...
    },
    // ...
  },
}
有关客户端配置和自定义的更多示例请参阅 _examples/configuration.go 和 _examples/customization.go 文件。 有关安全配置的示例请参阅 _examples/security。
完整例子
以下示例演示了更复杂的用法。 它从集群中获取 Elasticsearch 版本同时索引几个文档并使用响应主体周围的轻量级包装器打印搜索结果。我们从上面的代码作为基础进行编码
main.go
package main

import (
	"encoding/json"
	"log"
	"math"
	"time"

	"github.com/elastic/go-elasticsearch/v8"
)

func main() {
	cfg := elasticsearch.Config{
		Addresses: []string{
			"https://localhost:9200",
		},
		CertificateFingerprint: "d293735f339412c738c5a258fe950fb2fcdaa33f772365a948abbb332a7c58b4",
		APIKey:                 "dTM5Tm40VUJ2OUFNdUFLUDNnRUU6NWQ2QzhTZmhURk82MUFsUFE0a2ltUQ==",
		RetryOnStatus:          []int{429, 502, 503, 504},
		RetryBackoff: func(i int) time.Duration {
			// A simple exponential delay
			d := time.Duration(math.Exp2(float64(i))) * time.Second
			log.Printf("Attempt: %d | Sleeping for %s...\n", i, d)
			return d
		},
	}

	log.SetFlags(0)

	var (
		r map[string]interface{}
		// wg sync.WaitGroup
	)

	es, err := elasticsearch.NewClient(cfg)
	log.Println(err)
	if err == nil {
		log.Println("Successfully connected to Elasticsearch!")
	}
	// 1. Get cluster info
	//
	res, err := es.Info()
	if err != nil {
		log.Fatalf("Error getting response: %s", err)
	}
	defer res.Body.Close()

	// Check response status
	if res.IsError() {
		log.Fatalf("Error: %s", res.String())
	}

	// Deserialize the response into a map.
	if err := json.NewDecoder(res.Body).Decode(&r); err != nil {
		log.Fatalf("Error parsing the response body: %s", err)
	}
}
运行上面的代码
go run main.go上面的代码运行的结果为
$ go run main.go
<nil>
Successfully connected to Elasticsearch!
它显示我们的连接到 Elasticsearch 是成功的。
我们接下来打印运行的结果
  // Print client and server version numbers.
  log.Printf("Client: %s", elasticsearch.Version)
  log.Printf("Server: %s", r["version"].(map[string]interface{})["number"])
  log.Println(strings.Repeat("~", 37))
$ go run main.go
<nil>
Successfully connected to Elasticsearch!
Client: 8.7.0-SNAPSHOT
Server: 8.5.3
~~~~~~~~~~~~~~~~~~~~~~~~~~~~~~~~~~~~~我们接下来运行如下的命令来下载 esapi 包
go get github.com/elastic/go-elasticsearch/v8/esapimain.go
package main
import (
"bytes"
"context"
"encoding/json"
"log"
"math"
"strconv"
"strings"
"sync"
"time"
"github.com/elastic/go-elasticsearch/v8"
"github.com/elastic/go-elasticsearch/v8/esapi"
)
func main() {
cfg := elasticsearch.Config{
Addresses: []string{
"https://localhost:9200",
},
CertificateFingerprint: "d293735f339412c738c5a258fe950fb2fcdaa33f772365a948abbb332a7c58b4",
APIKey: "dTM5Tm40VUJ2OUFNdUFLUDNnRUU6NWQ2QzhTZmhURk82MUFsUFE0a2ltUQ==",
RetryOnStatus: []int{429, 502, 503, 504},
RetryBackoff: func(i int) time.Duration {
// A simple exponential delay
d := time.Duration(math.Exp2(float64(i))) * time.Second
log.Printf("Attempt: %d | Sleeping for %s...\n", i, d)
return d
},
}
log.SetFlags(0)
var (
r map[string]interface{}
// wg sync.WaitGroup
)
es, err := elasticsearch.NewClient(cfg)
log.Println(err)
if err == nil {
log.Println("Successfully connected to Elasticsearch!")
}
// 1. Get cluster info
//
res, err := es.Info()
if err != nil {
log.Fatalf("Error getting response: %s", err)
}
defer res.Body.Close()
// Check response status
if res.IsError() {
log.Fatalf("Error: %s", res.String())
}
// Deserialize the response into a map.
if err := json.NewDecoder(res.Body).Decode(&r); err != nil {
log.Fatalf("Error parsing the response body: %s", err)
}
// Print client and server version numbers.
log.Printf("Client: %s", elasticsearch.Version)
log.Printf("Server: %s", r["version"].(map[string]interface{})["number"])
log.Println(strings.Repeat("~", 37))
var wg sync.WaitGroup
for i, title := range []string{"Test One", "Test Two"} {
wg.Add(1)
go func(i int, title string) {
defer wg.Done()
// Build the request body.
data, err := json.Marshal(struct{ Title string }{Title: title})
if err != nil {
log.Fatalf("Error marshaling document: %s", err)
}
// Set up the request object.
req := esapi.IndexRequest{
Index: "test",
DocumentID: strconv.Itoa(i + 1),
Body: bytes.NewReader(data),
Refresh: "true",
}
// Perform the request with the client.
res, err := req.Do(context.Background(), es)
if err != nil {
log.Fatalf("Error getting response: %s", err)
}
defer res.Body.Close()
if res.IsError() {
log.Printf("[%s] Error indexing document ID=%d", res.Status(), i+1)
} else {
// Deserialize the response into a map.
var r map[string]interface{}
if err := json.NewDecoder(res.Body).Decode(&r); err != nil {
log.Printf("Error parsing the response body: %s", err)
} else {
// Print the response status and indexed document version.
log.Printf("[%s] %s; version=%d", res.Status(), r["result"], int(r["_version"].(float64)))
}
}
}(i, title)
}
wg.Wait()
log.Println(strings.Repeat("-", 37))
}
运行上面的代码
<nil>
Successfully connected to Elasticsearch!
Client: 8.7.0-SNAPSHOT
Server: 8.5.3
~~~~~~~~~~~~~~~~~~~~~~~~~~~~~~~~~~~~~
[201 Created] created; version=1
[201 Created] created; version=1
-------------------------------------上面的代码在 Elasticsearch 中创建一个叫做 test 的索引并向里面写入两个文档。我们可以在 Kibana 中进行查看
GET test/_search?filter_path=**.hits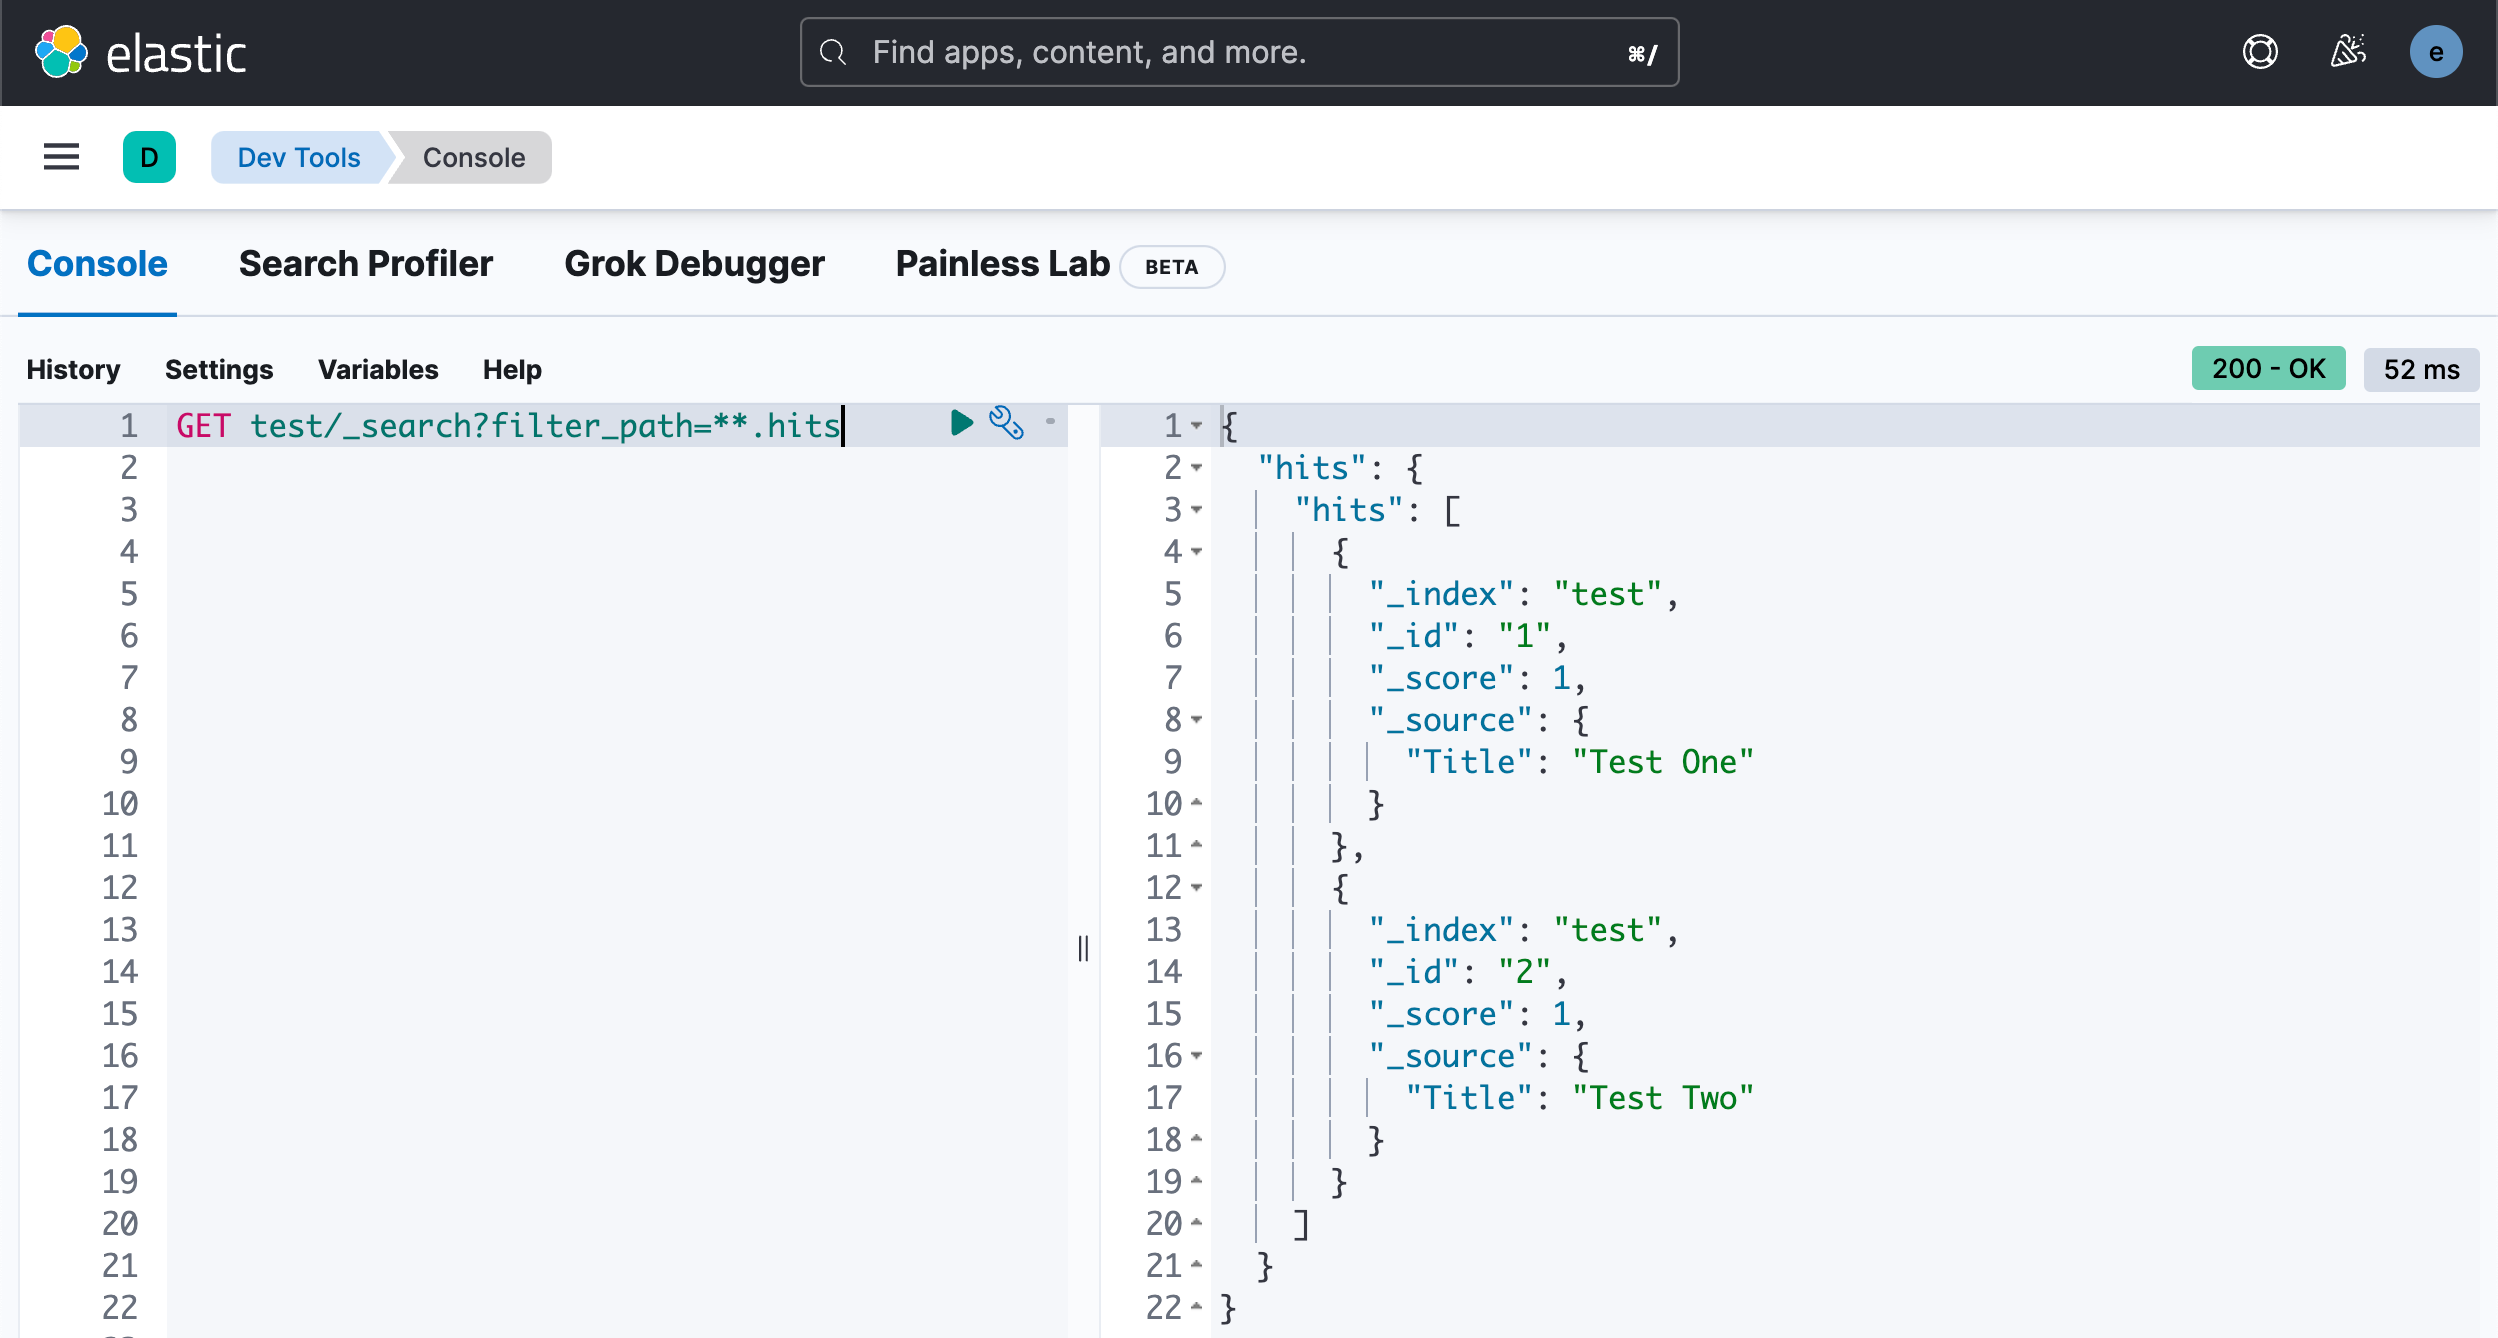
接下来我们添加如下的代码来进行搜索
// 3. Search for the indexed documents
//
// Build the request body.
var buf bytes.Buffer
query := map[string]interface{}{
"query": map[string]interface{}{
"match": map[string]interface{}{
"Title": "test",
},
},
}
if err := json.NewEncoder(&buf).Encode(query); err != nil {
log.Fatalf("Error encoding query: %s", err)
}
// Perform the search request.
res, err = es.Search(
es.Search.WithContext(context.Background()),
es.Search.WithIndex("test"),
es.Search.WithBody(&buf),
es.Search.WithTrackTotalHits(true),
es.Search.WithPretty(),
)
if err != nil {
log.Fatalf("Error getting response: %s", err)
}
defer res.Body.Close()
if res.IsError() {
var e map[string]interface{}
if err := json.NewDecoder(res.Body).Decode(&e); err != nil {
log.Fatalf("Error parsing the response body: %s", err)
} else {
// Print the response status and error information.
log.Fatalf("[%s] %s: %s",
res.Status(),
e["error"].(map[string]interface{})["type"],
e["error"].(map[string]interface{})["reason"],
)
}
}
if err := json.NewDecoder(res.Body).Decode(&r); err != nil {
log.Fatalf("Error parsing the response body: %s", err)
}
// Print the response status, number of results, and request duration.
log.Printf(
"[%s] %d hits; took: %dms",
res.Status(),
int(r["hits"].(map[string]interface{})["total"].(map[string]interface{})["value"].(float64)),
int(r["took"].(float64)),
)
// Print the ID and document source for each hit.
for _, hit := range r["hits"].(map[string]interface{})["hits"].([]interface{}) {
log.Printf(" * ID=%s, %s", hit.(map[string]interface{})["_id"], hit.(map[string]interface{})["_source"])
}
log.Println(strings.Repeat("=", 37))运行上面的结果
$ go run main.go
<nil>
Successfully connected to Elasticsearch!
Client: 8.7.0-SNAPSHOT
Server: 8.5.3
~~~~~~~~~~~~~~~~~~~~~~~~~~~~~~~~~~~~~
[200 OK] updated; version=4
[200 OK] updated; version=4
-------------------------------------
[200 OK] 2 hits; took: 0ms
* ID=1, map[Title:Test One]
* ID=2, map[Title:Test Two]
=====================================上面的搜索相当于如下的搜索
GET test/_search
{
"query": {
"match": {
"Title": "test"
}
}
}它显示的搜索结果为
{
"took": 0,
"timed_out": false,
"_shards": {
"total": 1,
"successful": 1,
"skipped": 0,
"failed": 0
},
"hits": {
"total": {
"value": 2,
"relation": "eq"
},
"max_score": 0.074107975,
"hits": [
{
"_index": "test",
"_id": "1",
"_score": 0.074107975,
"_source": {
"Title": "Test One"
}
},
{
"_index": "test",
"_id": "2",
"_score": 0.074107975,
"_source": {
"Title": "Test Two"
}
}
]
}
}最终的代码为
main.go
package main
import (
"bytes"
"context"
"encoding/json"
"log"
"math"
"strconv"
"strings"
"sync"
"time"
"github.com/elastic/go-elasticsearch/v8"
"github.com/elastic/go-elasticsearch/v8/esapi"
)
func main() {
cfg := elasticsearch.Config{
Addresses: []string{
"https://localhost:9200",
},
CertificateFingerprint: "d293735f339412c738c5a258fe950fb2fcdaa33f772365a948abbb332a7c58b4",
APIKey: "dTM5Tm40VUJ2OUFNdUFLUDNnRUU6NWQ2QzhTZmhURk82MUFsUFE0a2ltUQ==",
RetryOnStatus: []int{429, 502, 503, 504},
RetryBackoff: func(i int) time.Duration {
// A simple exponential delay
d := time.Duration(math.Exp2(float64(i))) * time.Second
log.Printf("Attempt: %d | Sleeping for %s...\n", i, d)
return d
},
}
log.SetFlags(0)
var (
r map[string]interface{}
// wg sync.WaitGroup
)
es, err := elasticsearch.NewClient(cfg)
log.Println(err)
if err == nil {
log.Println("Successfully connected to Elasticsearch!")
}
// 1. Get cluster info
//
res, err := es.Info()
if err != nil {
log.Fatalf("Error getting response: %s", err)
}
defer res.Body.Close()
// Check response status
if res.IsError() {
log.Fatalf("Error: %s", res.String())
}
// Deserialize the response into a map.
if err := json.NewDecoder(res.Body).Decode(&r); err != nil {
log.Fatalf("Error parsing the response body: %s", err)
}
// Print client and server version numbers.
log.Printf("Client: %s", elasticsearch.Version)
log.Printf("Server: %s", r["version"].(map[string]interface{})["number"])
log.Println(strings.Repeat("~", 37))
var wg sync.WaitGroup
for i, title := range []string{"Test One", "Test Two"} {
wg.Add(1)
go func(i int, title string) {
defer wg.Done()
// Build the request body.
data, err := json.Marshal(struct{ Title string }{Title: title})
if err != nil {
log.Fatalf("Error marshaling document: %s", err)
}
// Set up the request object.
req := esapi.IndexRequest{
Index: "test",
DocumentID: strconv.Itoa(i + 1),
Body: bytes.NewReader(data),
Refresh: "true",
}
// Perform the request with the client.
res, err := req.Do(context.Background(), es)
if err != nil {
log.Fatalf("Error getting response: %s", err)
}
defer res.Body.Close()
if res.IsError() {
log.Printf("[%s] Error indexing document ID=%d", res.Status(), i+1)
} else {
// Deserialize the response into a map.
var r map[string]interface{}
if err := json.NewDecoder(res.Body).Decode(&r); err != nil {
log.Printf("Error parsing the response body: %s", err)
} else {
// Print the response status and indexed document version.
log.Printf("[%s] %s; version=%d", res.Status(), r["result"], int(r["_version"].(float64)))
}
}
}(i, title)
}
wg.Wait()
log.Println(strings.Repeat("-", 37))
  // 3. Search for the indexed documents
  //
  // Build the request body.
  var buf bytes.Buffer
  query := map[string]interface{}{
    "query": map[string]interface{}{
      "match": map[string]interface{}{
        "Title": "test",
      },
    },
  }
  if err := json.NewEncoder(&buf).Encode(query); err != nil {
    log.Fatalf("Error encoding query: %s", err)
  }

  // Perform the search request.
  res, err = es.Search(
    es.Search.WithContext(context.Background()),
    es.Search.WithIndex("test"),
    es.Search.WithBody(&buf),
    es.Search.WithTrackTotalHits(true),
    es.Search.WithPretty(),
  )
  if err != nil {
    log.Fatalf("Error getting response: %s", err)
  }
  defer res.Body.Close()

  if res.IsError() {
    var e map[string]interface{}
    if err := json.NewDecoder(res.Body).Decode(&e); err != nil {
      log.Fatalf("Error parsing the response body: %s", err)
    } else {
      // Print the response status and error information.
      log.Fatalf("[%s] %s: %s",
        res.Status(),
        e["error"].(map[string]interface{})["type"],
        e["error"].(map[string]interface{})["reason"],
      )
    }
  }

  if err := json.NewDecoder(res.Body).Decode(&r); err != nil {
    log.Fatalf("Error parsing the response body: %s", err)
  }
  // Print the response status, number of results, and request duration.
  log.Printf(
    "[%s] %d hits; took: %dms",
    res.Status(),
    int(r["hits"].(map[string]interface{})["total"].(map[string]interface{})["value"].(float64)),
    int(r["took"].(float64)),
  )
  // Print the ID and document source for each hit.
  for _, hit := range r["hits"].(map[string]interface{})["hits"].([]interface{}) {
    log.Printf(" * ID=%s, %s", hit.(map[string]interface{})["_id"], hit.(map[string]interface{})["_source"])
  }

  log.Println(strings.Repeat("=", 37))
}关于 7.x 的文章ElasticsearchElasticsearch 开发入门 - Golang
更多例子go-elasticsearch/_examples at main · elastic/go-elasticsearch · GitHub