

RabbitMQ学习笔记
| 阿里云国内75折 回扣 微信号:monov8 |
| 阿里云国际,腾讯云国际,低至75折。AWS 93折 免费开户实名账号 代冲值 优惠多多 微信号:monov8 飞机:@monov6 |
目录
2.通过return机制保证消息在rabbitmq中能够成功的投递到队列⾥
一、引⾔
Message Queue消息 队列从字⾯上理解⾸先它是⼀个队列。
FIFO
先进先出的数据结构——
队列。消息队列就是所谓的存放消息的队列。消息队列解决的不是存放消息的队列的⽬的解决的是通信问题。 ⽐如以电商订单系统为例如果各服务之间使⽤同步通信不仅耗时较久且过程中受到⽹络波动的影响不能保证⾼成功率。因此使⽤异步的通信⽅式对架构进⾏改造。使⽤异步的通信⽅式对模块间的调⽤进⾏解耦可以快速的提升系统的吞吐量。上游执⾏完消息的发送业务后⽴即获得结果下游多个服务订阅到消息后各⾃消费。通过消息队列屏蔽底层的通信协议使得解藕和并⾏消费得以实现。
二、RabbitMQ介绍
市⾯上⽐较⽕爆的⼏款
MQ
ActiveMQ
RocketMQ
Kafka
RabbitMQ
。
- 语⾔的⽀持ActiveMQRocketMQ只⽀持Java语⾔Kafka可以⽀持多们语⾔RabbitMQ⽀持多种语⾔。
- 效率⽅⾯ActiveMQRocketMQKafka效率都是毫秒级别RabbitMQ是微秒级别的。
- 消息丢失消息重复问题 RabbitMQ针对消息的持久化和重复问题都有⽐较成熟的解决⽅案。
- 学习成本RabbitMQ⾮常简单。
- 官网Messaging that just works — RabbitMQ
RabbitMQ
是由
Rabbit
公司去研发和维护的最终是在
Pivotal。
RabbitMQ
严格的遵循
AMQP
协议⾼级消息队列协议帮助我们在进程之间传
递异步消息。
三、RabbitMQ安装
环境ubuntu、docker、docker-compose

编写docker-compose.yml
version: "3.1"
services:
  rabbitmq:
    image: daocloud.io/library/rabbitmq:management
    restart: always
    container_name: rabbitmq
    ports:
      - 5672:5672
      - 15672:15672
    volumes:
      - ./data:/var/lib/rabbitmq
执行
docker-compose up -d
四、RabbitMQ架构
1.官⽅的简单架构图
Publisher - ⽣产者发布消息到 RabbitMQ 中的 ExchangeConsumer - 消费者监听 RabbitMQ 中的 Queue 中的消息Exchange - 交换机和⽣产者建⽴连接并接收⽣产者的消息Queue - 队列 Exchange 会将消息分发到指定的 Queue Queue 和消费者进⾏交互Routes - 路由交换机以什么样的策略将消息发布到 Queue

2.RabbitMQ的完整架构图

3.查看图形化界⾯并创建⼀个Virtual Host
虚拟主机就是⽤来将⼀个 rabbitmq 内部划分成多个主机给不同的⽤户来使⽤⽽不会冲突。

创建⼀个全新的⽤户和全新的 Virtual Host 并且将 test ⽤户设置上可以操作/test 的权限


五、RabbitMQ的队列模式
1.RabbitMQ的通讯⽅式
地址RabbitMQ Tutorials — RabbitMQ
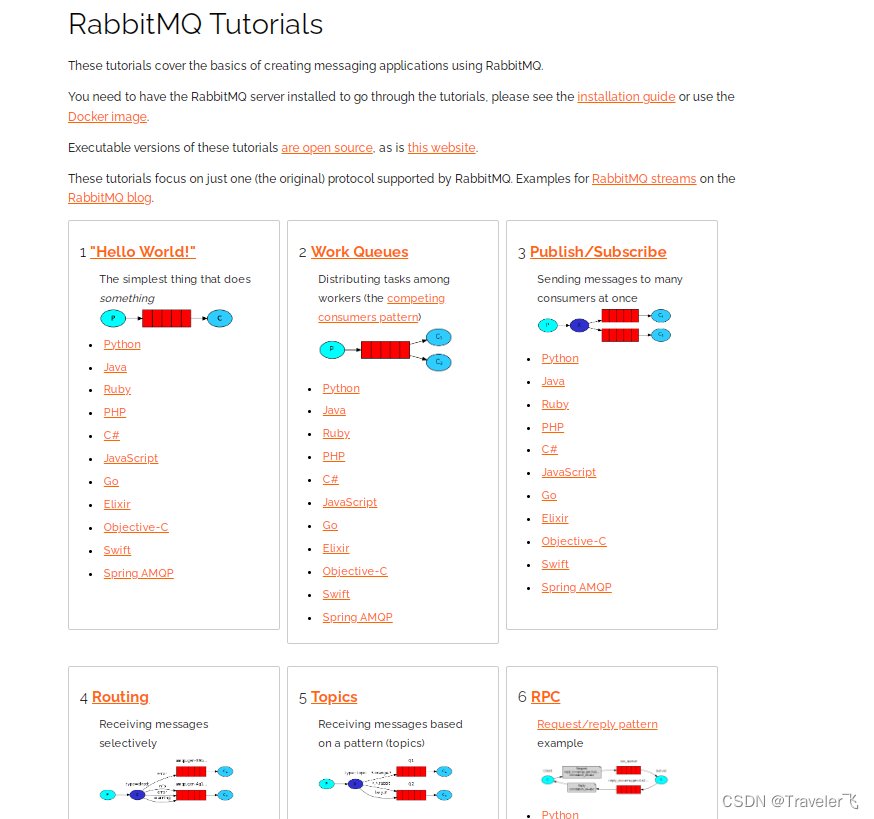
2.HelloWorld模式-简单队列模式
1
创建消息的⽣产者
<dependency>
 <groupId>com.rabbitmq</groupId>
 <artifactId>amqp-client</artifactId>
 <version>5.10.0</version>
</dependency>
package com.wang.helloword;
import com.rabbitmq.client.*;
import java.io.IOException;
import java.util.concurrent.TimeoutException;
/**
* @BelongsProject: RabbitMqLearn
* @BelongsPackage: com.wang
* @Author: wang fei
* @CreateTime: 2023-02-03 15:58
* @Description: TODO rabbitmq-helloword队列模式简单队列模式生产者
* @Version: 1.0
*/
public class MyProducer {
public static final String QUEUE_NAME = "my_queue";
public static void main(String[] args) throws IOException, TimeoutException {
//获得连接工厂
ConnectionFactory connectionFactory = new ConnectionFactory();
connectionFactory.setHost("192.168.206.130");
connectionFactory.setPort(5672);
connectionFactory.setUsername("wang");
connectionFactory.setPassword("123456");
connectionFactory.setVirtualHost("/test1");
//获得链接对像
Connection connection = connectionFactory.newConnection();
//获得信道
Channel channel = connection.createChannel();
//声明队列
/*
queue – the name of the queue 队列名称
durable – true if we are declaring a durable queue (the queue will
survive a server restart) 队列是否持久化
exclusive – true if we are declaring an exclusive queue
(restricted to this connection) 独占是否只给当前客户端来使⽤
autoDelete – true if we are declaring an autodelete queue (server
will delete it when no longer in use) ⾃动删除
arguments – other properties (construction arguments) for the queue
*/
channel.queueDeclare(QUEUE_NAME, false, false, false, null);
//定义消息
String message = "我是生产者";
//发送消息
channel.basicPublish("", QUEUE_NAME, null, message.getBytes());
System.out.println("消息发送成功");
//断开链接
channel.close();
connection.close();
}
}
2
创建消息的消费者
package com.wang.helloword;

import com.rabbitmq.client.*;

import java.io.IOException;
import java.util.concurrent.TimeoutException;

/**
 * @BelongsProject: RabbitMqLearn
 * @BelongsPackage: com.wang
 * @Author: wang fei
 * @CreateTime: 2023-02-03  16:49
 * @Description: TODORabbitMq helloword消费者
 * @Version: 1.0
 */
public class MyConsumer {
    public static final String QUEUE_NAME ="my_queue";

    public static void main(String[] args) throws IOException, TimeoutException {
        //获取链接工厂
        ConnectionFactory connectionFactory = new ConnectionFactory();
        connectionFactory.setHost("192.168.206.130");
        connectionFactory.setPort(5672);
        connectionFactory.setUsername("wang");
        connectionFactory.setPassword("123456");
        connectionFactory.setVirtualHost("/test1");
        //获得链接对像
        Connection connection = connectionFactory.newConnection();
        //获得信道
        Channel channel = connection.createChannel();
        //使⽤⾮Lambda的⽅式来消费
//        //创建Consumer对象,指明具体的消息处理程序
//        Consumer consumer = new DefaultConsumer(channel){
//            @Override
//            public void handleDelivery(String consumerTag, Envelope envelope, AMQP.BasicProperties properties, byte[] body) throws IOException {
//                String message = new String(body, "UTF-8");
//                //处理信息,并且进行业务逻辑处理,打印信息
//                System.out.println(message);
//            }
//        };
//        //设置消费者监听queue("my_queue")
//        channel.basicConsume(QUEUE_NAME, true, consumer);

        //Lambda的⽅式来消费
        DeliverCallback deliverCallback = (consumerTag, delivery) -> {
            //处理信息,并且进行业务逻辑处理,打印信息
            String message = new String(delivery.getBody(), "UTF-8");
            System.out.println(message);
        };
        //设置消费者监听queue("my_queue")
        channel.basicConsume(QUEUE_NAME,true,deliverCallback,consumerTag->{});
    }
}
简单队列的问题
当多个消费者消费同⼀个队列时。这个时候
rabbitmq
的公平调度机制就开启了
于是⽆论消费者的消费能⼒如何每个消费者都能公平均分到相同数量的消息
⽽不能出现能者多劳的情况。
3. work 队列模式 能者多劳模式
将⾃动ack
改成⼿动
ack
消费者先声明⼀次只接收⼀条消息
channel.basicQos(1)
消费者关闭⾃动
ack
消费者消费完消息后⼿动
ack
1创建消费者
package com.wang.work;

import com.rabbitmq.client.*;

import java.io.IOException;
import java.util.concurrent.TimeoutException;

/**
 * @BelongsProject: RabbitMqLearn
 * @BelongsPackage: com.wang
 * @Author: wang fei
 * @CreateTime: 2023-02-03  16:49
 * @Description: TODO RabbitMq work队列模式能者多劳消费者,消费者先声明⼀次只接收⼀条消息 channel.basicQos(1),消费者关闭⾃动ack
 * @Version: 1.0
 */
public class MyConsumer {
    public static final String QUEUE_NAME ="my_work_queue";

    public static void main(String[] args) throws IOException, TimeoutException {
        //获取链接工厂
        ConnectionFactory connectionFactory = new ConnectionFactory();
        connectionFactory.setHost("192.168.206.130");
        connectionFactory.setPort(5672);
        connectionFactory.setUsername("wang");
        connectionFactory.setPassword("123456");
        connectionFactory.setVirtualHost("/test1");
        //获得链接对像
        Connection connection = connectionFactory.newConnection();
        //获得信道
        Channel channel = connection.createChannel();
        //表示⼀次只接收⼀条消息
        channel.basicQos(1);

       //创建Consumer对象,指明具体的消息处理程序
        Consumer consumer = new DefaultConsumer(channel){
            @Override
            public void handleDelivery(String consumerTag, Envelope envelope, AMQP.BasicProperties properties, byte[] body) throws IOException {
                String message = new String(body, "UTF-8");
                //处理信息,并且进行业务逻辑处理,打印信息
                System.out.println(message);
                //⼿动ack 传的是消息的Tag标记⽤来表示当前处理的这条消息
                channel.basicAck(envelope.getDeliveryTag(),true);
            }
        };
        //设置消费者监听queue("my_queue"),把⾃动ack改为⼿动ack
        channel.basicConsume(QUEUE_NAME, false, consumer);
    }
}
2创建信息⽣产者
package com.wang.work;
import com.rabbitmq.client.*;

import java.io.IOException;
import java.util.concurrent.TimeoutException;


/**
 * @BelongsProject: RabbitMqLearn
 * @BelongsPackage: com.wang
 * @Author: wang fei
 * @CreateTime: 2023-02-03  15:58
 * @Description: TODO TODORabbitMq work队列模式能者多劳生产者
 * @Version: 1.0
 */
public class MyProducer {
    public static final String QUEUE_NAME ="my_work_queue";

    public static void main(String[] args) throws IOException, TimeoutException {
        //获得连接工厂
        ConnectionFactory connectionFactory = new ConnectionFactory();
        connectionFactory.setHost("192.168.206.130");
        connectionFactory.setPort(5672);
        connectionFactory.setUsername("wang");
        connectionFactory.setPassword("123456");
        connectionFactory.setVirtualHost("/test1");
        //获得链接对像
        Connection connection = connectionFactory.newConnection();
        //获得信道
        Channel channel = connection.createChannel();
        //声明队列
        channel.queueDeclare(QUEUE_NAME, false, false, false, null);

        //发送消息
        for (int i = 0; i < 100; i++) {
            //定义消息
            String message = "我是生产者"+i;
            channel.basicPublish("", QUEUE_NAME, null, message.getBytes());
            System.out.println("消息发送成功");
        }
        //断开链接
        channel.close();
        connection.close();
    }

}
4. 发布订阅模式-fanout
对于之前的队列模式是没有办法解决⼀条消息同时被多个消费者消费。于是使⽤发布订阅模式来实现。
1
编写⽣产者
关键步骤声明交换机、把消息发送到交换机上
package com.wang.pubsub;

import com.rabbitmq.client.Channel;

import com.rabbitmq.client.Connection;
import com.rabbitmq.client.ConnectionFactory;
import com.wang.utils.RabbitMqUtil;


/**
 * @BelongsProject: RabbitMqLearn
 * @BelongsPackage: com.wang
 * @Author: wang fei
 * @CreateTime: 2023-02-03  15:58
 * @Description: TODO rabbitmq-fanout队列模式生产者
 * @Version: 1.0
 */
public class MyProducer {
    //定义交换机名称
    public  static String EXCHANGE_NAME = "my_fanout_exchange";

    public static void main(String[] args) throws Exception {
        Connection connection=RabbitMqUtil.getConnection();
        Channel channel = connection.createChannel();
        //声名交换机
        channel.exchangeDeclare(EXCHANGE_NAME, "fanout");
        //发送信息
        for (int i = 0; i < 20; i++) {
            String message = "Hello RabbitMq!";
            channel.basicPublish(EXCHANGE_NAME, "", null, message.getBytes());
        }
        System.out.println("消息发送成功");
        //断开链接
        channel.close();
        connection.close();
    }

}
2
编写消费者
关键动作
- 创建队列
- 创建交换机
- 把队列绑定在交换机上
- 让消费者监听队列
package com.wang.pubsub;

import com.rabbitmq.client.*;
import com.wang.utils.RabbitMqUtil;

import java.io.IOException;


/**
 * @BelongsProject: RabbitMqLearn
 * @BelongsPackage: com.wang
 * @Author: wang fei
 * @CreateTime: 2023-02-03  15:58
 * @Description: TODO 发布订阅模式-fanout 对于之前的队列模式是没有办法解决⼀条消息同时被多个消费者消费。于是使⽤发布订阅模式来实现。
 * @Version: 1.0
 */
public class MyConsumer{
    //发布订阅模式
    //定义交换机名称
    public  static String EXCHANGE_NAME = "my_fanout_exchange";

    //定义队列名称
    public  static String QUEUE_NAME = "my_fanout_queue";

    public static void main(String[] args) throws Exception {
        Connection connection = RabbitMqUtil.getConnection();
        Channel channel = connection.createChannel();
        //声名队列
        channel.queueDeclare(QUEUE_NAME, false, false, false, null);
        //声名交换机
        channel.exchangeDeclare(EXCHANGE_NAME, "fanout");
        //将队列绑定到交换机上
        channel.queueBind(QUEUE_NAME, EXCHANGE_NAME, "");

        Consumer consumer = new DefaultConsumer(channel) {
            @Override
            public void handleDelivery(String s, Envelope envelope, AMQP.BasicProperties basicProperties, byte[] bytes) throws IOException {
                System.out.println("接收到消息为:" + new String(bytes));
            }
        };

        //监听队列
        channel.basicConsume(QUEUE_NAME, true,consumer);

    }
}
5.routing模式-direct
关键动作
- 在⽣产者发送消息时指明routing-key
- 在消费者声明队列和交换机的绑定关系时指明routing-key
1
编写⽣产者
package com.wang.routing;

import com.rabbitmq.client.Channel;

import com.rabbitmq.client.Connection;
import com.rabbitmq.client.ConnectionFactory;
import com.wang.utils.RabbitMqUtil;


/**
 * @BelongsProject: RabbitMqLearn
 * @BelongsPackage: com.wang
 * @Author: wang fei
 * @CreateTime: 2023-02-03  15:58
 * @Description: TODO rabbitmq-routing模式-direct 生产者
 * 关键动作
 * 在⽣产者发送消息时指明routing-key
 * 在消费者声明队列和交换机的绑定关系时指明routing-key
 * @Version: 1.0
 */
public class MyProducer {
    //定义交换机名称
    public  static String EXCHANGE_NAME = "my_routing_exchange";

    public static void main(String[] args) throws Exception {
        Connection connection=RabbitMqUtil.getConnection();
        Channel channel = connection.createChannel();
        //声名交换机
        channel.exchangeDeclare(EXCHANGE_NAME, "direct");
        //发送信息
        for (int i = 0; i < 20; i++) {
            String message = "Hello routing模式-direct!";
            channel.basicPublish(EXCHANGE_NAME, "my_routing_key", null, message.getBytes());
        }
        System.out.println("消息发送成功");
        //断开链接
        channel.close();
        connection.close();
    }

}
2
编写消费者
package com.wang.routing;

import com.rabbitmq.client.*;
import com.wang.utils.RabbitMqUtil;

import java.io.IOException;


/**
 * @BelongsProject: RabbitMqLearn
 * @BelongsPackage: com.wang
 * @Author: wang fei
 * @CreateTime: 2023-02-03  15:58
 * @Description: TODO routing模式-direct。 消费者
 * @Version: 1.0
 */
public class MyConsumer {
    //发布订阅模式
    //定义交换机名称
    public  static String EXCHANGE_NAME = "my_routing_exchange";

    //定义队列名称
    public  static String QUEUE_NAME = "my_routing_queue";
    //定义路由键名称
    public  static String ROUTING_KEY = "my_routing_key";


    public static void main(String[] args) throws Exception {
        Connection connection = RabbitMqUtil.getConnection();
        Channel channel = connection.createChannel();
        //声名队列
        channel.queueDeclare(QUEUE_NAME, false, false, false, null);
        //声名交换机
        channel.exchangeDeclare(EXCHANGE_NAME, "direct");
        //将队列绑定到交换机上
        channel.queueBind(QUEUE_NAME, EXCHANGE_NAME, ROUTING_KEY);

        Consumer consumer = new DefaultConsumer(channel) {
            @Override
            public void handleDelivery(String s, Envelope envelope, AMQP.BasicProperties basicProperties, byte[] bytes) throws IOException {
                System.out.println("接收到消息为:" + new String(bytes));
            }
        };

        //监听队列
        channel.basicConsume(QUEUE_NAME, false,consumer);

    }
}
6.topics模式
在
routing
模式的基础上对
routing-key
使⽤了通配符提⾼了匹配的范围增加了可玩性。
绑定关系中如果使⽤了 product.* , 那么在发送消息时product.add okproduct.del okproduct.add.one 不 ok绑定关系中如果使⽤了 product.#, 那么在发送消息时product.add okproduct.add.one ok
1
编写⽣产者
package com.wang.topic;

import com.rabbitmq.client.Channel;

import com.rabbitmq.client.Connection;
import com.rabbitmq.client.ConnectionFactory;
import com.wang.utils.RabbitMqUtil;


/**
 * @BelongsProject: RabbitMqLearn
 * @BelongsPackage: com.wang
 * @Author: wang fei
 * @CreateTime: 2023-02-03  15:58
 * @Description: TODO rabbitmq-topics模式 生产者
 * 绑定关系中如果使⽤了product.* ,那么在发送消息时
 * product.add ok
 * product.del ok
 * product.add.one 不ok
 *
 *绑定关系中如果使⽤了product.#,那么在发送消息时
 * product.add ok
 * product.add.one ok
 * @Version: 1.0
 */
public class MyProducer {
    //定义交换机名称
    public  static String EXCHANGE_NAME = "my_topic_exchange";

    public static void main(String[] args) throws Exception {
        Connection connection=RabbitMqUtil.getConnection();
        Channel channel = connection.createChannel();
        //声名交换机
        channel.exchangeDeclare(EXCHANGE_NAME, "topic");
        //发送信息
        String message = "topics模式!";
        channel.basicPublish(EXCHANGE_NAME, "product.add.one", null, message.getBytes());
        System.out.println("消息发送成功");
        //断开链接
        channel.close();
        connection.close();
    }

}
2
编写消费者
package com.wang.topic;


import com.rabbitmq.client.*;
import com.wang.utils.RabbitMqUtil;

import java.io.IOException;


/**
 * @author 飞
 */
public class MyConsumer1 {
    //交换机的名称
    private static String EXCHANGE_NAME = "my_topic_exchange";
    //队列的名称
    private static String QUEUE_NAME = "my_topic_queue_1";

    public static void main(String[] args) throws Exception {
        Connection connection = RabbitMqUtil.getConnection();
        Channel channel = connection.createChannel();
        //声明交换机
        channel.exchangeDeclare(EXCHANGE_NAME,"topic");
        //声明队列
        channel.queueDeclare(QUEUE_NAME,false,false,false,null);
        //绑定
        channel.queueBind(QUEUE_NAME,EXCHANGE_NAME,"product.*");
        //创建消费者
        Consumer consumer = new DefaultConsumer(channel){
            @Override
            public void handleDelivery(String consumerTag, Envelope envelope, AMQP.BasicProperties properties, byte[] body) throws IOException {
                System.out.println("product.* 消费者"+new String(body));
            }
        };
        //让消费者监听队列
        channel.basicConsume(QUEUE_NAME,consumer);

    }

}
工具类
package com.wang.utils;

import com.rabbitmq.client.Connection;
import com.rabbitmq.client.ConnectionFactory;

/**
 * @BelongsProject: RabbitMqLearn
 * @BelongsPackage: com.wang.utils
 * @Author: wang fei
 * @CreateTime: 2023-02-03  18:07
 * @Description: TODO 工具类
 * @Version: 1.0
 */
public class RabbitMqUtil {
    private static ConnectionFactory connectionFactory;
    private static String USER_NAME;
    private static String PASSWORD;
    private static String VIRTUAL_HOST;
    private static String HOST;
    private static int PORT;

    static {
        USER_NAME = "wang";
        PASSWORD = "123456";
        HOST = "192.168.206.130";
        PORT = 5672;
        VIRTUAL_HOST = "/test1";
        connectionFactory = new ConnectionFactory();
        connectionFactory.setHost(HOST);
        connectionFactory.setPort(PORT);
        connectionFactory.setUsername(USER_NAME);
        connectionFactory.setPassword(PASSWORD);
        connectionFactory.setVirtualHost(VIRTUAL_HOST);
    }

    /**
     * @description: 获得连接对象
     * @method: getConnection
     * @author: wang fei
     * @date: 2023/2/3 18:17:02
     * @param: []
     * @return: com.rabbitmq.client.Connection
     **/
    public static Connection getConnection() throws Exception {
        return connectionFactory.newConnection();
    }
}
六、在Springboot中使⽤RabbitMQ
准备
1.
引⼊依赖
        <dependency>
            <groupId>org.springframework.boot</groupId>
            <artifactId>spring-boot-starter-amqp</artifactId>
        </dependency>
2.
编写配置⽂件
server:
  port: 8090
spring:
  application:
    name: my-spring-boot-producer
  rabbitmq:
    port: 5672
    host: 192.168.206.130
    username: wang
    password: 123456
virtual-host: /test11.使⽤发布订阅模式
- 编写配置类
package com.wang.config;

import org.springframework.amqp.core.*;
import org.springframework.context.annotation.Bean;
import org.springframework.context.annotation.Configuration;

/**
 * @BelongsProject: RabbitMqLearn
 * @BelongsPackage: com.wang.com.wang.config
 * @Author: wang fei
 * @CreateTime: 2023-02-04  17:08
 * @Description: TODO 声明队列、交换机、绑定关系
 * @Version: 1.0
 */
@Configuration
public class RabbitConfig {


    private static String QUEUE_NAME ="my_boot_fanout_queue";
    private static String EXCHANGE_NAME = "my_boot_fanout_exchange";

    /**
     * @description: 声明队列
     * @method: queue
     * @author: wang fei
     * @date: 2023/2/4 17:14:03
     * @param: []
     * @return: org.springframework.amqp.core.Queue
    **/
    @Bean
    public Queue queue(){
        return  new Queue(QUEUE_NAME,true,false,false);
    }

    /**
     * @description: 声明交换机
     * @method: exchange
     * @author: wang fei
     * @date: 2023/2/4 17:14:54
     * @param: []
     * @return: org.springframework.amqp.core.FanoutExchange
    **/
    @Bean
    public FanoutExchange exchange(){
        return   new FanoutExchange(EXCHANGE_NAME,true,false);
    }

    /**
     * @description: 声明绑定关系 注意后⾯多了with携带routing-key
     * @method: binding
     * @author: wang fei
     * @date: 2023/2/4 17:17:04
     * @param: [queue, exchange]
     * @return: org.springframework.amqp.core.Binding
    **/
    @Bean
    public Binding binding(Queue queue, FanoutExchange exchange) {
        return BindingBuilder.bind(queue).to(exchange);
    }
}
- 编写消费消息的⽅法
关键使⽤该注解来指定监听的队列
@RabbitListener(queues = "my_boot_fanout_queue")
package com.wang.consumer;

import org.springframework.amqp.rabbit.annotation.RabbitListener;
import org.springframework.stereotype.Component;

/**
 * @BelongsProject: RabbitMqLearn
 * @BelongsPackage: com.wang.config.consumer
 * @Author: wang fei
 * @CreateTime: 2023-02-04  17:20
 * @Description: TODO MQ 订阅者
 * @Version: 1.0
 */
@Component
public class MyConsumer {

    /**
     * @description: 监听队列当队列中有消息的时候该⽅法会被回调⽤来消费消息
     * @method: receive
     * @author: wang fei
     * @date: 2023/2/4 17:22:35
     * @param: [message]
     * @return: void
    **/
    @RabbitListener(queues = "my_boot_fanout_queue")
    public void receive(String message){
        byte[] msg = message.getBytes();
        System.out.println("收到消息" + new String(msg));
    }
}
2
编写⽣产者
- 编写配置类
package com.wang.config;

import org.springframework.amqp.core.FanoutExchange;
import org.springframework.context.annotation.Bean;
import org.springframework.context.annotation.Configuration;

/**
 * @BelongsProject: RabbitMqLearn
 * @BelongsPackage: com.wang.config
 * @Author: wang fei
 * @CreateTime: 2023-02-04  17:30
 * @Description: TODO
 * @Version: 1.0
 */
@Configuration
public class RabbitConfig {
    private static String EXCHANGE_NAME = "my_boot_fanout_exchange";

    /**
     * 声明交换机
     */
    @Bean
    public FanoutExchange exchange(){
        return new FanoutExchange(EXCHANGE_NAME,true,false);
    }

}
- 使⽤RabbitTemplate发送消息
  @Autowired
    RabbitTemplate rabbitTemplate;

    @Test
    void contextLoads() {
    String msg="Hello spring boot rabbit mq";
    rabbitTemplate.convertAndSend("my_boot_fanout_exchange","", msg);
}2.使⽤topic模式
topic
模式相⽐发布订阅模式多了
routing-key
的使⽤
- 调整消费者配置类
package com.example.config;


import org.springframework.amqp.core.*;
import org.springframework.context.annotation.Bean;
import org.springframework.context.annotation.Configuration;

/**
 * @BelongsProject: RabbitMqLearn
 * @BelongsPackage: com.wang.com.wang.config
 * @Author: wang fei
 * @CreateTime: 2023-02-04  17:08
 * @Description: TODO 声明队列、交换机、绑定关系
 * @Version: 1.0
 */
@Configuration
public class RabbitConfig {


    private static String QUEUE_NAME ="my_boot_potic_queue";
    private static String EXCHANGE_NAME = "my_boot_topic_exchange";

    /**
     * @description: 声明队列
     * @method: queue
     * @author: wang fei
     * @date: 2023/2/4 17:14:03
     * @param: []
     * @return: org.springframework.amqp.core.Queue
    **/
    @Bean
    public Queue queue(){
        return  new Queue(QUEUE_NAME,true,false,false);
    }

    /**
     * @description: 声明交换机
     * @method: exchange
     * @author: wang fei
     * @date: 2023/2/4 17:14:54
     * @param: []
     * @return: org.springframework.amqp.core.FanoutExchange
    **/
    @Bean
    public FanoutExchange exchange(){
        return   new FanoutExchange(EXCHANGE_NAME,true,false);
    }

    /**
     * @description: 声明绑定关系 注意后⾯多了with携带routing-key
     * @method: binding
     * @author: wang fei
     * @date: 2023/2/4 17:17:04
     * @param: [queue, exchange]
     * @return: org.springframework.amqp.core.Binding
    **/
    @Bean
    public Binding binding(Queue queue, Exchange exchange) {
        return BindingBuilder.bind(queue).to(exchange).with("product.*").noargs();
    }
}
- 编写消费者
package com.example.consumer;

import com.rabbitmq.client.Channel;
import org.springframework.amqp.core.Message;
import org.springframework.amqp.rabbit.annotation.RabbitListener;
import org.springframework.amqp.rabbit.core.RabbitTemplate;
import org.springframework.beans.factory.annotation.Autowired;
import org.springframework.stereotype.Component;

import java.io.IOException;
import java.util.concurrent.TimeUnit;

/**
 * @BelongsProject: RabbitMqLearn
 * @BelongsPackage: com.wang.config.consumer
 * @Author: wang fei
 * @CreateTime: 2023-02-04  17:20
 * @Description: TODO MQ 订阅者
 * @Version: 1.0
 */
@Component
public class MyConsumer {

    /**
     * @description: 监听队列当队列中有消息的时候该⽅法会被回调⽤来消费消息 消费端的幂等性的实现
     * @method: receive
     * @author: wang fei
     * @date: 2023/2/4 17:22:35
     * @param: [message]
     * @return: void
     **/
    @RabbitListener(queues = "my_boot_potic_queue")
    public void receive(Message message, Channel channel) throws IOException {
        byte[] msg = message.getBody();
        //获得消息的业务id
        String messageId = message.getMessageProperties().getHeader("spring_returned_message_correlation");
        //设置分布式锁
        Boolean lock=false;
//         lock = redisTemplate.opsForValue().setIfAbsent(messageId, 1, 100000,TimeUnit.MILLISECONDS);
        //⼿动ack
        if (lock) {
            //做消费
            //⼿动ack
            channel.basicAck(message.getMessageProperties().getDeliveryTag(), false);
        } else {
            //不做消费
            System.out.println("已重复消费");
            channel.basicReject(message.getMessageProperties().getDeliveryTag(), false);
        }
        System.out.println("收到消息" + new String(msg));
    }
}
2
编写⽣产者
- 调整⽣产者的配置
package com.example.config;

import org.springframework.amqp.core.FanoutExchange;

import org.springframework.context.annotation.Bean;
import org.springframework.context.annotation.Configuration;


/**
 * @BelongsProject: RabbitMqLearn
 * @BelongsPackage: com.wang.config
 * @Author: wang fei
 * @CreateTime: 2023-02-04  17:30
 * @Description: TODO
 * @Version: 1.0
 */
@Configuration
public class RabbitConfig  {
    private static String EXCHANGE_NAME = "my_boot_topic_exchange";

    /**
     * 声明交换机
     */
    @Bean
    public FanoutExchange exchange(){
        return new FanoutExchange(EXCHANGE_NAME,true,false);
    }

}
- 发消息时携带routing-key
package com.example;

import org.junit.jupiter.api.Test;
import org.springframework.amqp.rabbit.core.RabbitTemplate;
import org.springframework.beans.factory.annotation.Autowired;
import org.springframework.boot.test.context.SpringBootTest;

@SpringBootTest
class MySpringBootTopicProducerApplicationTests {
    @Autowired
    RabbitTemplate rabbitTemplate;

    @Test
    void contextLoads() {
        String msg="Hello spring boot rabbit mq-topic";
        rabbitTemplate.convertAndSend("my_boot_topic_exchange","product.add", msg);
        System.out.println("发送信息成功");
    }
}
5.⼿动ack的实现
- 在配置⽂件中添加⼿动ack的配置
server:
  port: 8090
spring:
  application:
    name: my-spring-boot-topic-consumer
  rabbitmq:
    port: 5672
    host: 192.168.206.130
    username: wang
    password: 123456
    virtual-host:  /test1
      # 关闭⾃动ack设置成⼿动ack
    listener:
      simple:
acknowledge-mode: manual- 在消费者中进⾏⼿动ack

七、消息的可靠性投递
1.通过confirm机制保证⽣产者消息能够投递到MQ
- 在spring项⽬中做confirm
package com.wang.confirm;

import com.rabbitmq.client.Channel;

import com.rabbitmq.client.ConfirmListener;
import com.rabbitmq.client.Connection;
import com.rabbitmq.client.ConnectionFactory;
import com.wang.utils.RabbitMqUtil;

import java.io.IOException;


/**
 * @BelongsProject: RabbitMqLearn
 * @BelongsPackage: com.wang
 * @Author: wang fei
 * @CreateTime: 2023-02-03  15:58
 * @Description: TODO rabbitmq-topics模式 生产者  通过confirm机制保证⽣产者消息能够投递到MQ
 * @Version: 1.0
 */
public class MyProducer {
    //定义交换机名称
    public  static String EXCHANGE_NAME = "my_topic_exchange";

    public static void main(String[] args) throws Exception {
        Connection connection=RabbitMqUtil.getConnection();
        Channel channel = connection.createChannel();
        //声名交换机
        channel.exchangeDeclare(EXCHANGE_NAME, "topic");
        //开启confirm机制
        channel.confirmSelect();
        //设置confrim的监听器
        channel.addConfirmListener(new ConfirmListener() {
            //当消息发送成功将会执⾏这⾥的⽅法
            @Override
            public void handleAck(long l, boolean b) throws IOException {
                System.out.println("消息已经成功投递");
            }
            //当消息发送失败会执⾏这⾥的⽅法通过重试机制进⾏重新投递如果重新投递的次数达到阈值那么就需要⼈⼯介⼊
            @Override
            public void handleNack(long l, boolean b) throws IOException {
                System.out.println("消息投递失败");
            }
        });

        //发送信息
        String message = "topics模式!";
        channel.basicPublish(EXCHANGE_NAME, "product.add.one", null, message.getBytes());
        System.out.println("消息发送成功");
        //断开链接
        channel.close();
        connection.close();
    }

}
- 在springboot中实现
步骤⼀修改⽣产者的配置
server:
  port: 8090
spring:
  application:
    name: my-spring-boot-topic-producer
  rabbitmq:
    port: 5672
    host: 192.168.206.130
    username: wang
    password: 123456
    virtual-host:  /test1
    # 开启confirm simple:简单的执⾏ack的判断correlated: 执⾏ack的时候还会携带数据;none: 不ack 默认的
    publisher-confirm-type: correlated
      # 开启return机制
    publisher-returns: true
publisher-confirm-type:
有三种配置
- simple:简单的执⾏ack的判断在发布消息成功后使⽤rabbitTemplate调⽤
- waitForConfirms或waitForConfirmsOrDie⽅法等待broker节点返回发送结果根 据返回结果来判断下⼀步的逻辑。但是要注意的是当waitForConfirmsOrDie⽅法如果返回false则会关闭channel。
- correlated: 执⾏ack的时候还会携带数据消息的元数据;
- none: 禁⽤发布确认模式 默认的
步骤⼆编写⼀个
ConfirmCallback
的实现类监听器并注⼊到
R
package com.example.confirm_retrun;

import org.springframework.amqp.core.Message;
import org.springframework.amqp.rabbit.connection.CorrelationData;
import org.springframework.amqp.rabbit.core.RabbitTemplate;
import org.springframework.beans.factory.annotation.Autowired;
import org.springframework.stereotype.Component;

import javax.annotation.PostConstruct;
import java.util.Objects;

/**
 * @BelongsProject: RabbitMqLearn
 * @BelongsPackage: com.wang.config
 * @Author: wang fei
 * @CreateTime: 2023-02-04  17:30
 * @Description: TODO
 * @Version: 1.0
 */
@Component
public class RabbitConfirmConfig implements RabbitTemplate.ConfirmCallback{
    @Autowired
    private RabbitTemplate rabbitTemplate;


    /**
     * @description: 注⼊当前监听器到RabbitTemplate
     * @method: init
     * @author: wang fei
     * @date: 2023/2/6 17:45:56
     **/
    @PostConstruct
    public void init() {
        rabbitTemplate.setConfirmCallback(this);
    }

    @Override
    public void confirm(CorrelationData correlationData, boolean b, String s) {
        String dataId = "";
        if (Objects.nonNull(correlationData)) {
            dataId = correlationData.getId();
        }
        if (b) {
            //信息发送成功
            System.out.printf("消息发送成功:" + dataId);
        } else {
            //信息发送失败
            System.out.printf("消息发送失败:" + s);
        }
    }
}
2.通过return机制保证消息在rabbitmq中能够成功的投递到队列⾥
⽣产者将消息投递到
mq
的交换机上
——Confirm
机制来保证的。如果交换机没办法将消息投递到队列上就可以通过Return
机制来进⾏重试。
1)
在
spring
项⽬中
package com.wang.returns;

import com.rabbitmq.client.*;

import com.wang.utils.RabbitMqUtil;

import java.io.IOException;


/**
 * @BelongsProject: RabbitMqLearn
 * @BelongsPackage: com.wang
 * @Author: wang fei
 * @CreateTime: 2023-02-03  15:58
 * @Description: TODO rabbitmq-topics模式 生产者  通过confirm机制保证⽣产者消息能够投递到MQ  通过return机制保证消息在rabbitmq中能够 成功的投递到队列⾥
 * @Version: 1.0
 */
public class MyProducer {
    //定义交换机名称
    public  static String EXCHANGE_NAME = "my_topic_exchange";

    public static void main(String[] args) throws Exception {
        Connection connection=RabbitMqUtil.getConnection();
        Channel channel = connection.createChannel();
        //声名交换机
        channel.exchangeDeclare(EXCHANGE_NAME, "topic");
        //开启confirm机制
        channel.confirmSelect();
        //设置confrim的监听器
        channel.addConfirmListener(new ConfirmListener() {
            //当消息发送成功将会执⾏这⾥的⽅法
            @Override
            public void handleAck(long l, boolean b) throws IOException {
                System.out.println("消息已经成功投递");
            }
            //当消息发送失败会执⾏这⾥的⽅法通过重试机制进⾏重新投递如果重新投递的次数达到阈值那么就需要⼈⼯介⼊
            @Override
            public void handleNack(long l, boolean b) throws IOException {
                System.out.println("消息投递失败");
            }
        });

        // 开启return机制
        channel.addReturnListener(new ReturnListener() {
            @Override
            public void handleReturn(int replyCode, String
                    replyText, String exchange, String routingKey,
                                     AMQP.BasicProperties properties, byte[] body) throws IOException {
                //如果消息没有成功抵达队列此⽅法将会被调⽤
                System.out.println("消息没有抵达队列");
            }
        });

        //发送信息
        String message = "topics模式!";
        channel.basicPublish(EXCHANGE_NAME, "product.add.one", true,null, message.getBytes());
        System.out.println("消息发送成功");
        //断开链接
        channel.close();
        connection.close();
    }

}
2
在
springboot
中使⽤
步骤⼀修改配置⽂件
server:
  port: 8090
spring:
  application:
    name: my-spring-boot-topic-producer
  rabbitmq:
    port: 5672
    host: 192.168.206.130
    username: wang
    password: 123456
    virtual-host:  /test1
    # 开启confirm simple:简单的执⾏ack的判断correlated: 执⾏ack的时候还会携带数据;none: 不ack 默认的
    publisher-confirm-type: correlated
      # 开启return机制
    publisher-returns: true
步骤⼆在监听类中实现
RabbitTemplate.ReturnCallback
接⼝
package com.example.confirm_retrun;

import org.springframework.amqp.core.Message;
import org.springframework.amqp.rabbit.connection.CorrelationData;
import org.springframework.amqp.rabbit.core.RabbitTemplate;
import org.springframework.beans.factory.annotation.Autowired;
import org.springframework.stereotype.Component;

import javax.annotation.PostConstruct;
import java.util.Objects;

/**
 * @BelongsProject: RabbitMqLearn
 * @BelongsPackage: com.wang.config
 * @Author: wang fei
 * @CreateTime: 2023-02-04  17:30
 * @Description: TODO
 * @Version: 1.0
 */
@Component
public class RabbitConfirmConfig implements RabbitTemplate.ConfirmCallback, RabbitTemplate.ReturnCallback {
    @Autowired
    private RabbitTemplate rabbitTemplate;


    /**
     * @description: 注⼊当前监听器到RabbitTemplate
     * @method: init
     * @author: wang fei
     * @date: 2023/2/6 17:45:56
     **/
    @PostConstruct
    public void init() {
        rabbitTemplate.setConfirmCallback(this);
        rabbitTemplate.setReturnCallback(this);
    }

    @Override
    public void confirm(CorrelationData correlationData, boolean b, String s) {
        String dataId = "";
        if (Objects.nonNull(correlationData)) {
            dataId = correlationData.getId();
        }
        if (b) {
            //信息发送成功
            System.out.printf("消息发送成功:" + dataId);
        } else {
            //信息发送失败
            System.out.printf("消息发送失败:" + s);
        }
    }

    /**
     * @description: 当消息没办法抵达队列时会被调⽤
     * @method: returnedMessage
     * @author: wang fei
     * @date: 2023/2/6 18:20:03
     * @param: [message, i, s, s1, s2]
     * @return: void
     **/
    @Override
    public void returnedMessage(Message message, int i, String s, String s1, String s2) {
        System.out.println("消息" + new String(message.getBody()) + "没有投递到队列");
    }
}
3.⼿动ack、nack、reject的区别
1)
不做任何的
ack
RabbitMQ
会把消息标记成
unacked,
此时
mq
是在等待消费者进⾏
ack
如果消费者失去了会话此时消息会重新回到ready
状态被其他消费者消费。
2
ack
确认签收之后消息会从队列中剔除。
3
reject
reject
就是拒绝此条消息。
reject
⼀次只⽀持处理⼀条消息。消息被拒绝掉之后并且
requeue
设置成了
false
将会进⼊到死信队列中。如果requeue
设置成
true
将会重回队列但是这种情况很少使⽤。
4
nack
nack
和
reject
相同只是
nack
⽀持批量处理多条消息。
package com.wang.acknack;


import com.rabbitmq.client.*;
import com.wang.utils.RabbitMqUtil;

import java.io.IOException;


public class MyConsumer1 {
    //交换机的名称
    private static String EXCHANGE_NAME = "my_topic_exchange";
    //队列的名称
    private static String QUEUE_NAME = "my_topic_queue_1";

    public static void main(String[] args) throws Exception {
        Connection connection = RabbitMqUtil.getConnection();
        Channel channel = connection.createChannel();
        //声明交换机
        channel.exchangeDeclare(EXCHANGE_NAME,"topic",true);
        //声明队列
        channel.queueDeclare(QUEUE_NAME,false,false,false,null);
        //绑定
        channel.queueBind(QUEUE_NAME,EXCHANGE_NAME,"product.#");
        //创建消费者
        Consumer consumer = new DefaultConsumer(channel){
            @Override
            public void handleDelivery(String consumerTag, Envelope envelope, AMQP.BasicProperties properties, byte[] body) throws IOException {
                System.out.println("product.# 消费者"+new String(body));
                //手动ack
                //channel.basicAck(envelope.getDeliveryTag(),false);
                //nack
//                channel.basicNack(envelope.getDeliveryTag(),false,false);
                channel.basicReject(envelope.getDeliveryTag(), false);
            }

        };
        //让消费者监听队列
        channel.basicConsume(QUEUE_NAME,false,consumer);

    }

}
5
消息元数据的封装
- ⽣产者端
package com.wang.properties;

import com.rabbitmq.client.AMQP;
import com.rabbitmq.client.Channel;
import com.rabbitmq.client.Connection;
import com.wang.utils.RabbitMqUtil;

import java.nio.charset.StandardCharsets;
import java.util.HashMap;
import java.util.Map;
import java.util.UUID;


public class MyProducer {

    //定义交换机的名称
    private static String EXCHANGE_NAME = "my_topic_exchange";

    public static void main(String[] args) throws Exception {
        Connection connection = RabbitMqUtil.getConnection();
        Channel channel = connection.createChannel();
        //1.声明交换机
        channel.exchangeDeclare(EXCHANGE_NAME,"topic",true);

        //创建消息的元数据
        Map<String,Object> map = new HashMap<>();
        map.put("name","zhangsan");
        map.put("age",20);
        AMQP.BasicProperties properties = new AMQP.BasicProperties().builder()
                .deliveryMode(2) //消息是否支持持久化1不支持2支持
                .messageId(UUID.randomUUID().toString()) //定义消息的业务id
                .expiration("10000") //定义消息的过期时间
                .headers(map)
                .build();


        //2.发送消息
        channel.basicPublish(EXCHANGE_NAME,"product.add.one",properties,"hello topic".getBytes(StandardCharsets.UTF_8));
        System.out.println("消息已发送");
        //3.关闭连接
        channel.close();
        connection.close();

    }
}
- 消费者端
package com.wang.properties;


import com.rabbitmq.client.*;
import com.wang.utils.RabbitMqUtil;

import java.io.IOException;
import java.util.Map;


/**
 * @author 飞
 */
public class MyConsumer1 {
    //交换机的名称
    private static String EXCHANGE_NAME = "my_topic_exchange";
    //队列的名称
    private static String QUEUE_NAME = "my_topic_queue_1";

    public static void main(String[] args) throws Exception {
        Connection connection = RabbitMqUtil.getConnection();
        Channel channel = connection.createChannel();
        //声明交换机
        channel.exchangeDeclare(EXCHANGE_NAME,"topic",true);
        //声明队列
        channel.queueDeclare(QUEUE_NAME,false,false,false,null);
        //绑定
        channel.queueBind(QUEUE_NAME,EXCHANGE_NAME,"product.#");
        //创建消费者
        Consumer consumer = new DefaultConsumer(channel){
            @Override
            public void handleDelivery(String consumerTag, Envelope envelope, AMQP.BasicProperties properties, byte[] body) throws IOException {
                System.out.println("product.# 消费者"+new String(body));
                Map<String, Object> map = properties.getHeaders();
                System.out.println(map.get("name"));
                System.out.println(properties.getMessageId());
                //手动ack
                channel.basicAck(envelope.getDeliveryTag(),false);
                //nack
//                channel.basicNack(envelope.getDeliveryTag(),false,false);
            }

        };
        //让消费者监听队列
        channel.basicConsume(QUEUE_NAME,false,consumer);

    }

}
⼋、消息的重复消费问题
1.什么幂等性
幂等性多次操作造成的结果是⼀致的。对于⾮幂等的操作幂等性如何保证 ——使⽤分布式锁。
1
在请求⽅式中的幂等性的体现
get
多次
get
结果是⼀致的
post
添加⾮幂等
put
修改幂等根据
id
修改
delete
根据
id
删除幂等
对于⾮幂等的请求我们在业务⾥要做幂等性保证。
2
在消息队列中的幂等性体现
消息队列中很可能⼀条消息被冗余部署的多个消费者收到对于⾮幂等的操作
⽐如⽤户的注册就需要做幂等性保证否则消息将会被重复消费。使⽤分布式锁
解决幂等性问题
2.业务代码中实现幂等性
1
⽣产者端修改配置⽂件
publisher-confirm-type: correlated
开启
confirm
请求头中将会使⽤“spring_returned_message_correlation”键来传递业务
id
。
 port: 9090
spring:
 rabbitmq:
 host: 172.16.253.8
 port: 5672
 username: xiaoming
 password: 123456
 virtual-host: java2007
# # 开启confirm simple:简单的执⾏ack的判断correlated: 执⾏ack的时
候还会携带数据;none: 不ack 默认的
 publisher-confirm-type: correlated
# # 开启return机制
# publisher-returns: true
2
⽣产者端传递业务
id
@Test
 public void testSendMessage(){
 //业务id
 String id = UUID.randomUUID().toString();
 //封装了业务id的消息元数据
 CorrelationData correlationData = new CorrelationData(id);
 //发送消息并且携带消息的业务id
 rabbitTemplate.convertAndSend("my_boot_topic_exchange",
 "product.add",
 "hello message",
 correlationData
 );
 }
3
消费者端进⾏业务逻辑判断
    @RabbitListener(queues = "my_boot_potic_queue")
    public void receive(Message message, Channel channel) throws IOException {
        byte[] msg = message.getBody();
        //获得消息的业务id
        String messageId = message.getMessageProperties().getHeader("spring_returned_message_correlation");
        //设置分布式锁
        Boolean lock=false;
//         lock = redisTemplate.opsForValue().setIfAbsent(messageId, 1, 100000,TimeUnit.MILLISECONDS);
        //⼿动ack
        if (lock) {
            //做消费
            //⼿动ack
            channel.basicAck(message.getMessageProperties().getDeliveryTag(), false);
        } else {
            //不做消费
            System.out.println("已重复消费");
            channel.basicReject(message.getMessageProperties().getDeliveryTag(), false);
        }
        System.out.println("收到消息" + new String(msg));
    }
其中
message
的请求头中的这两个键值对分别为
- spring_listener_return_correlation:该属性是⽤来确定消息被退回时调⽤哪个监听器
- spring_returned_message_correlation该属性是指退回待确认消息的唯⼀标识
九、死信队列——“延迟”队列
1.死信队列的介绍
死信队列 让⼀条消息在满⾜⼀定的条件下成为死信会被发送到另⼀个交换
机上再被消费。 这个过程就是死信队列的作⽤。死信队列就可以做出“
延迟
”
队列的效果。⽐如在订单超时未⽀付 将订单状态改成“
已取消
”
这个操作就可以使⽤死信队列来完成。设置消息的超时时间当消息超时则消息成为死信于是通过监听死信队列的消费者来做取消订单的动作。
要掌握两个知识
- 消息如何成为死信 成为死信的条件
- 怎样创建死信队列完成死信队列的效果
2.消息成为死信的条件
- 消息被拒签并且没有重回队列消息将成为死信。
- 消息过期了消息将成为死信。
- 队列⻓度有限存不下消息了存不下的消息将会成为死信
3.创建死信队列
DLX是一个正常的交换器和一般的交换器没有区别它能在任何的队列上被指定实际上就是设置某个队列的属性。当这个队列中存在死信时RabbitMQ就会自动地将这个消息重新发布到设置的DLX上去进而被路由到另一个队列即死信队列。可以监听这个队列中的消息进行相应的处理这个特性与将消息的TTL设置为0配合使用可以弥补immediate参数的功能。
- 声明队列、交换器、绑定路由并在容器启动时自动创建通过在队列的参数上设置x-dead-letter-exchange参数添加死信交换器设置x-dead-letter-routing-key参数添加死信路由
package com.yaomy.control.rabbitmq.amqp.ttl.config;

import com.google.common.collect.Maps;
import org.springframework.amqp.core.*;
import org.springframework.context.annotation.Bean;
import org.springframework.context.annotation.Configuration;

import java.util.Map;

/**
 * @Description: RabbitMQ生产者交换器、绑定、队列声明
 * @Version: 1.0
 */
@SuppressWarnings("all")
@Configuration
public class RabbitConfig {
    public static final String TTL_TOPIC_EXCHANGE = "ttl.topic.exchange";
    public static final String TTL_TOPIC_QUEUE = "ttl_topic_queue";
    public static final String TTL__TOPIC_ROUTING_KEY = "*.topic.*";
    public static final String TTL_DELAY_EXCHANGE = "ttl.dlx.exchange";
    public static final String TTL_DELAY_ROUTING_KEY = "ttl.dlrk.routingkey";
    public static final String TTL_DELAY_QUEUE = "ttl_dlk_queue";
    /**
     * 声明队列
     */
    @Bean
    public Queue topicQueue(){
        Map<String, Object> args = Maps.newHashMap();
        /**
         * 设置消息发送到队列之后多久被丢弃单位毫秒
         */
        args.put("x-message-ttl", 10000);
        /**
         * 消息变成死信一般由以下几种情况引起
         * 1.消息被拒绝并且设置requeue参数为false
         * 2.消息过期
         * 3.队列达到最大长度
         * x-dead-letter-exchange参数是指消息编程死信之后重新发送的DLX
         */
        args.put("x-dead-letter-exchange", TTL_DELAY_EXCHANGE);
        /**
         * 为DLX指定路由键DLK
         */
        args.put("x-dead-letter-routing-key", TTL_DELAY_ROUTING_KEY);
        /**
         * 定义优先级队列消息最大优先级为15优先级范围为0-15数字越大优先级越高
         */
        args.put("x-max-priority", 15);
        /**
         * 设置持久化队列
         */
        return QueueBuilder.durable(TTL_TOPIC_QUEUE).withArguments(args).build();
    }


    /**
     * 声明Topic类型交换器
     */
    @Bean
    public TopicExchange topicExchange(){
        TopicExchange exchange = new TopicExchange(TTL_TOPIC_EXCHANGE);
        return exchange;
    }

    /**
     * Topic交换器和队列通过bindingKey绑定
     * @return
     */
    @Bean
    public Binding bindingTopicExchangeQueue(){
        return BindingBuilder.bind(topicQueue()).to(topicExchange()).with(TTL__TOPIC_ROUTING_KEY);
    }

    //============================延迟队列及交换器定义=================================
    /**
     * 定义延迟队列
     */
    @Bean
    public Queue ttlQueue(){
        return QueueBuilder.durable(TTL_DELAY_QUEUE).build();
    }

    /**
     * 定义延迟交换器
     */
    @Bean
    public TopicExchange ttlExchange(){
        TopicExchange exchange = new TopicExchange(TTL_DELAY_EXCHANGE);
        return exchange;
    }

    /**
     * 延迟队列交换器绑定
     */
    @Bean
    public Binding bindingTtlDirectExchangeQueue(){
        return BindingBuilder.bind(ttlQueue()).to(ttlExchange()).with(TTL_DELAY_ROUTING_KEY);
    }
}
- 创建消息生产者
package com.yaomy.control.rabbitmq.amqp.ttl;

import org.springframework.amqp.AmqpException;
import org.springframework.amqp.core.*;
import org.springframework.amqp.rabbit.connection.CorrelationData;
import org.springframework.amqp.rabbit.connection.PublisherCallbackChannel;
import org.springframework.amqp.rabbit.core.RabbitTemplate;
import org.springframework.beans.factory.annotation.Autowired;
import org.springframework.stereotype.Component;

import java.util.UUID;

/**
 * @Description: RabbitMQ生产者
 * @ProjectName: spring-parent
 * @Version: 1.0
 */
@SuppressWarnings("all")
@Component
public class RabbitSender {
    @Autowired
    private RabbitTemplate rabbitTemplate;
    /**
     * 创建一个消息是否投递成功的回调方法
     */
    private final RabbitTemplate.ConfirmCallback confirmCallback = new RabbitTemplate.ConfirmCallback() {
        /**
         *
         * @param correlationData 消息的附加信息
         * @param ack true for ack, false for nack
         * @param cause 是一个可选的原因对于nack如果可用否则为空。
         */
        @Override
        public void confirm(CorrelationData correlationData, boolean ack, String cause) {
            if(!ack){
                //可以进行日志记录、异常处理、补偿处理等
                System.err.println("异常ack-"+ack+",id-"+correlationData.getId()+",cause:"+cause);
            }else {
                //更新数据库可靠性投递机制
                System.out.println("正常ack-"+ack+",id-"+correlationData.getId());
                try{
                System.out.println(new String(correlationData.getReturnedMessage().getBody()));

                } catch (Exception e){

                }
            }
        }
    };
    /**
     * 创建一个消息是否被队列接收的监听对象如果没有队列接收发送出的消息则调用此方法进行后续处理
     */
    private final RabbitTemplate.ReturnCallback returnCallback = new RabbitTemplate.ReturnCallback() {
        /**
         *
         * @param message 被退回的消息
         * @param replyCode 错误编码
         * @param replyText 错误描述
         * @param exchange 交换器
         * @param routingKey 路由
         */
        @Override
        public void returnedMessage(Message message, int replyCode, String replyText, String exchange, String routingKey) {
            System.err.println("spring_returned_message_correlation:"+message.getMessageProperties().getHeaders().get(PublisherCallbackChannel.RETURNED_MESSAGE_CORRELATION_KEY)
                                +"return exchange: " + exchange
                                + ", routingKey: "+ routingKey
                                + ", replyCode: " + replyCode
                                + ", replyText: " + replyText
                                + ",message:" + message);
            try {
                System.out.println(new String(message.getBody()));
            } catch (Exception e){

            }
        }
    };
    /**
     * 扩展点在消息转换完成之后发送之前调用可以修改消息属性、消息头信息
     */
    private final MessagePostProcessor messagePostProcessor = new MessagePostProcessor() {
        @Override
        public Message postProcessMessage(Message message) throws AmqpException {
            MessageProperties properties = message.getMessageProperties();
            /**
             * 设置消息发送到队列之后多久被丢弃单位毫秒
             * 此种方案需要每条消息都设置此属性比较灵活
             * 还有一种方案是在声明队列的时候指定发送到队列中的过期时间
             * * Queue queue = new Queue("test_queue2");
             * * queue.getArguments().put("x-message-ttl", 10000);
             * 这两种方案可以同时存在以值小的为准
             */
            //properties.setExpiration("10000");
            /**
             * 设置消息的优先级
             */
            properties.setPriority(9);
            /**
             * 设置消息发送到队列中的模式持久化|非持久化只存在于内存中
             */
            properties.setDeliveryMode(MessageDeliveryMode.PERSISTENT);

            return message;
        }
    };
    /**
     * 发送消息
     * @param exchange 交换器
     * @param route 路由键
     * @param message 消息
     * @param properties
     */
    public void sendMsg(String exchange, String routingKey, String message, MessageProperties properties){
        /**
         * 设置生产者消息publish-confirm回调函数
         */
        this.rabbitTemplate.setConfirmCallback(confirmCallback);
        /**
         * 设置消息退回回调函数
         */
        this.rabbitTemplate.setReturnCallback(returnCallback);
        /**
         * 新增消息转换完成后、发送之前的扩展点
         */
        this.rabbitTemplate.setBeforePublishPostProcessors(messagePostProcessor);

        try {
            if(null == properties){
                properties = new MessageProperties();
            }
            /**
             * 设置消息唯一标识
             */
            properties.setMessageId(UUID.randomUUID().toString());
            /**
             * 创建消息包装对象
             */
            Message msg = MessageBuilder.withBody(message.getBytes()).andProperties(properties).build();
            /**
             * 将消息主题和属性封装在Message类中
             */
            Message returnedMessage = MessageBuilder.withBody(message.getBytes()).build();
            /**
             * 相关数据
             */
            CorrelationData correlationData = new CorrelationData();
            /**
             * 消息ID全局唯一
             */
            correlationData.setId(msg.getMessageProperties().getMessageId());

            /**
             * 设置此相关数据的返回消息
             */
            correlationData.setReturnedMessage(returnedMessage);
            /**
             * 如果msg是org.springframework.amqp.core.Message对象的实例则直接返回否则转化为Message对象
             */
            this.rabbitTemplate.convertAndSend(exchange, routingKey, msg, correlationData);
        } catch (Exception e){
            e.printStackTrace();
        }
    }
}
更多可以查看