

Java基础知识点汇总
| 阿里云国内75折 回扣 微信号:monov8 |
| 阿里云国际,腾讯云国际,低至75折。AWS 93折 免费开户实名账号 代冲值 优惠多多 微信号:monov8 飞机:@monov6 |
Java基础知识点汇总
一. Java基础语法
1. 类型转换
        // 强制类型转换
        float a = 20.34f;
        int b = (int)a;
        //自动类型转换
        int c = 10;
        float d = c;
        //操作较大的数时注意溢出问题
        //JDK7新特性数字之间可以用下划线分割
        int money = 10_0000_0000;
        int years = 20;
        long total = money * years;//默认两个参数都是int计算的时候产生溢出
        System.out.println(total);//-1474836480

        long total_2 = money*((long)years);//先把一个数转化为long
        System.out.println(total_2);//20000000000
2. 方法
    public static void main(String[] args) {
        // 可变参数的传递
        Demo01 demo = new Demo01();
        demo.printMax(2,485,1,2,344,5);
    }

    public void printMax(int ...numbers){ //仅能为最后一个参数才能使用...}
3. 位运算
       //位运算
        /*
        * A = 0011 1100
        * B = 0000 1101
        * --------------
        * A & B = 0000 1100       对应位置都为1才为1
        * A | B = 0011 1101       对应位置有一个为1结果为1
        * A ^ B = 0011 0001       对应位置相同为0不同为1
        * ~ B = 1111 0010         对应位置取反
        *
        *
        * 2 * 8 =16,  2*2*2*2
        * << 左移  *2
        * >> 右移  /2
        *
        * 0000 0000   0
        * 0000 0001   1
        * 0000 0010   2
        * 0000 0011   3
        * 0000 0100   4
        * 0000 1000   8
        * 0001 0000   16
        *
        * */
4. 循环
        //增强for循环
        int[] numbers = {10,20,30,40};

        for (int x:numbers){
            System.out.println(x);
        }
5. 装箱与拆箱
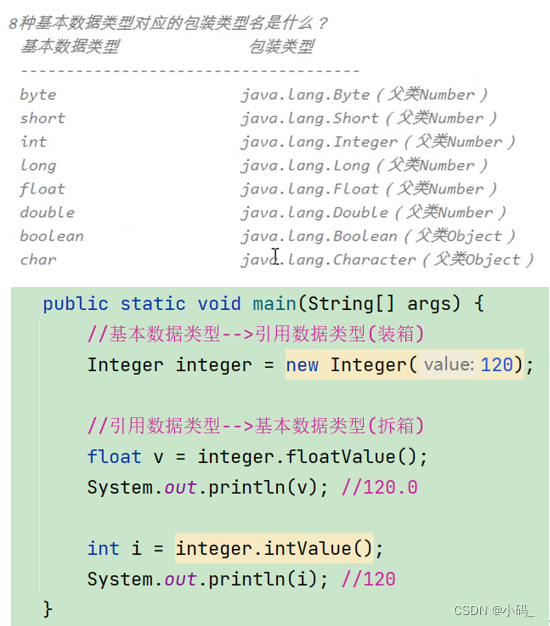
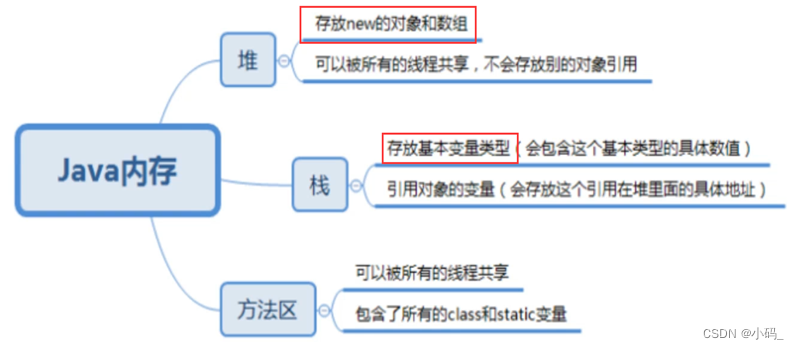
6. 内存分析
二. 面向对象
1. 概念
面向对象的本质:以类的方式组织代码以对象的方式封装数据。
三大特性:封装继承多态。
2. 对象的初始化与创建
使用new关键字创建的时候除了分配内存空间之外还会给创建好的对象进行默认的初始化以及对类中的构造器的调用。一旦定义了有参构造无参构造就必须要显示定义。
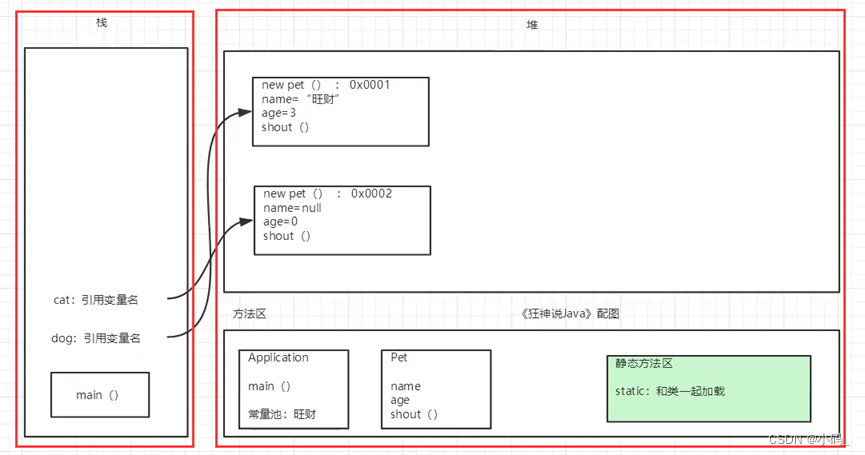
3. 创建对象的内存分析
4. 封装
程序设计的要求:“高内聚低耦合”。高内聚就是类的内部数据操作细节自己完成不允许外部干涉;低耦合:仅暴露少量的方法给外部使用。
封装数据的隐藏:应禁止直接访问一个对象中数据的实际表示而应通过操作接口来访问。
5. 继承
所有的类都默认直接或者间接继承Object类。JAVA中类只有单继承无多继承。私有的东西无法被类继承。
6. 多态
多态存在的条件:① 有继承关系。② 子类重写父类的方法。③ 父类引用指向子类对象。④ 多态是方法的多态属性没有多态。⑤ 对象能够执行的方法主要看左边的类型。当子类重写了父类的方法所调用的皆是子类的方法。
7. Instanceof
Java 中的instanceof 运算符是用来在运行时指出对象是否是特定类的一个实例。instanceof通过返回一个布尔值来指出这个对象是否是这个特定类或者是它的子类的一个实例。
8. Static关键字、代码块
Static关键字:和类一起加载可以直接通过 类名.静态方法 调用方法。
代码块:执行顺序:静态代码块 > 构造方法 > 匿名代码块。静态代码块只执行一次即使有多个同一个类的实例仍只运行一次。
9. 抽象类
① 抽象方法只有方法的名字没有方法的实现。② 不能new抽象类只能靠子类来实现。③ 抽象方法必须在抽象类中抽象类中可以有普通方法。 ③ 抽象类的所有方法都需要由它的子类来实现。 除非子类为抽象类则由子子类实现。
10. 接口
① Interface 定义的关键字接口都需要有实现类。② 接口中所有方法都是抽象的:public abstract接口只可做方法的声明。 ③ 类实现接口需要重写接口中的所有方法。④ 利用接口可以实现多继承。
11. 方法的重写和重载
-
方法的重写
① 需要有继承关系子类重写父类的方法与属性无关。
② 方法名相同参数列表必须相同方法体不同。
③ 修饰符范围可以扩大但不能缩小:public>protected>default>private。
④ 抛出的异常范围可以缩小但不能扩大。
⑤ 重写的原因:父类的功能子类可能不需要或不满足。 -
方法的重载
① 重载就是在同一个类中有相同的函数名称但形参不同的函数。
② 方法名必须相同参数列表必须不同参数个数不同或类型不同或参数排列顺序不同等
③ 方法的返回类型可以相同也可以不同。
④ 仅仅返回类型不同不足以构成方法的重载。
三. 异常处理
- 异常两大类:Exception、Error。
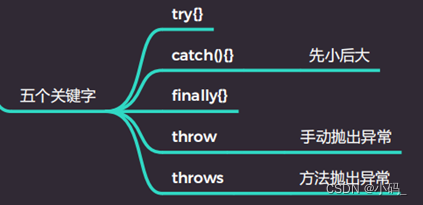
- 若多个catch捕获异常异常等级由小到大。 Finally可以不要一定会执行用于处理善后工作。
- 自定义异常类:类继承Exception。Throw new MyException():抛出自定义异常。
四. 集合
1. 集合的概念
① 集合是对象的容器。
② 集合不能直接存储基本数据类型集合也不能直接存储java对象集合当中存储的都是java对象的内存地址。或者说集合中存储的是引用
③ 集合类和集合接口都在java.util.* 包下。
④ 数组可存储基本类型和引用类型集合只能存储引用类型。

2. Collection体系

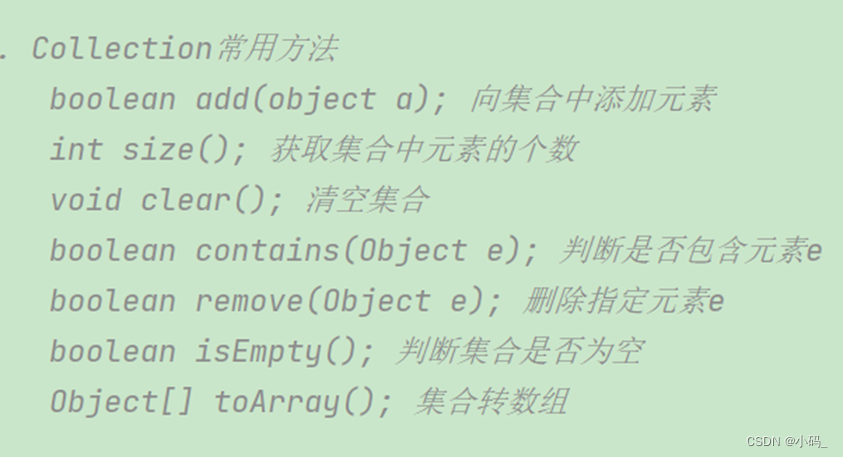
3. Collection中常用方法
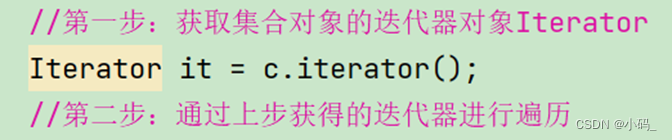
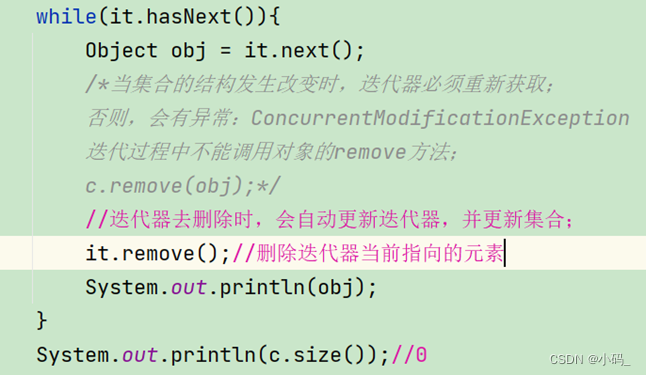
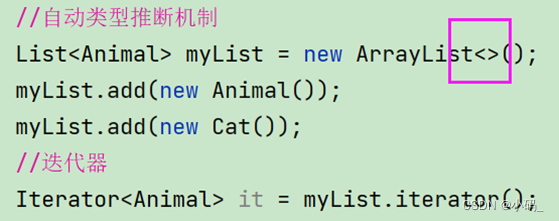
4. Iterator迭代器

public static void main(String[] args) {
//以下遍历方式/迭代方式是所有collection通用的一种方式。 在Map集合中不能使用。
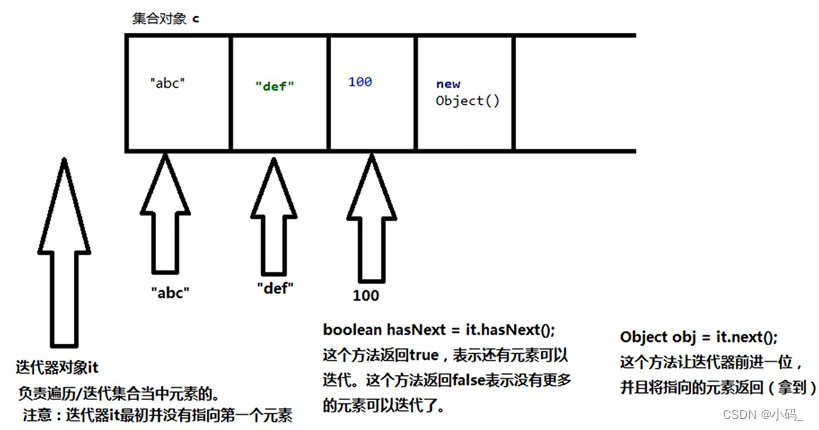
//创建集合对象
Collection c = new ArrayList();//后面的集合无所谓主要是看前面的collection接口,怎么遍历/迭代。
//添加元素
c.add(120);
c.add("hello");
c.add(new Object());
//对集合Collection进行遍历/迭代
//第一步:获取集合对象的迭代器对象Iterator
Iterator it = c.iterator();
//第二步:通过上步获得的迭代器进行遍历
/*
* 迭代器对象iterator中的方法:
* boolean hasNext(); 如果仍有元素可以迭代返回true。
* Object next(); 返回迭代的下一个元素。Object obj = it.next();
* */
System.out.println("集合中元素有:");
while(it.hasNext()){
Object o = it.next();
System.out.println(o);
}
}
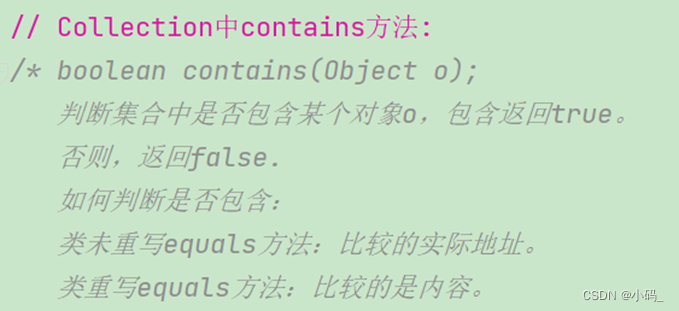
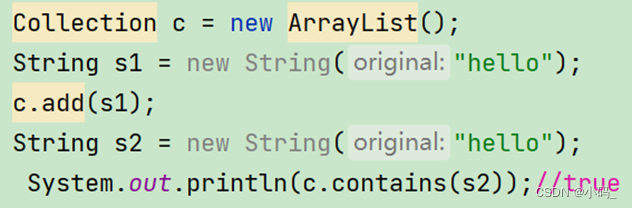
5. Contains方法
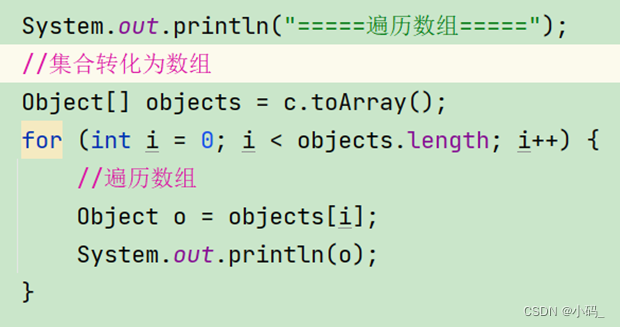
6. 集合转数组
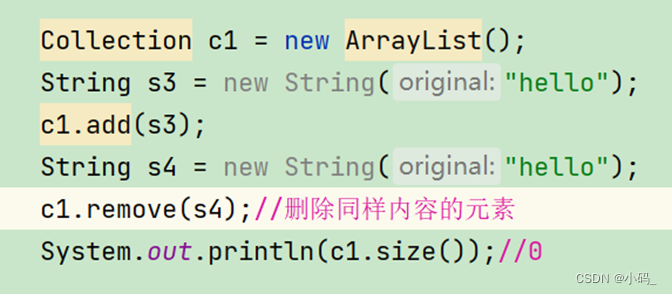
7. Remove方法
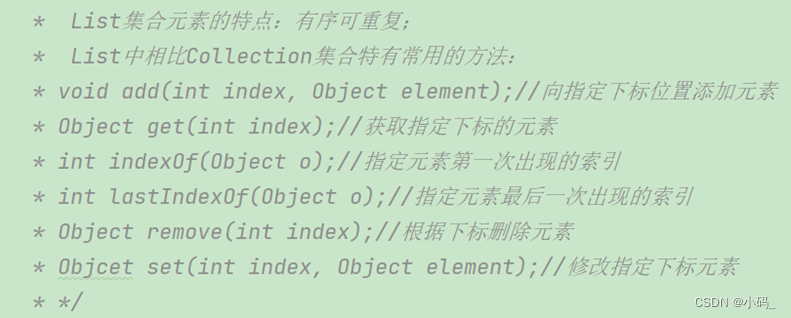
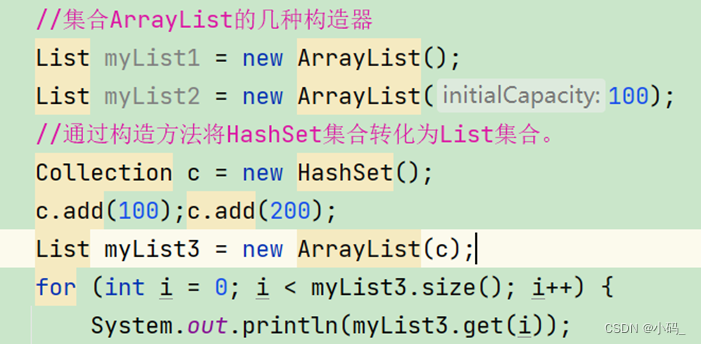
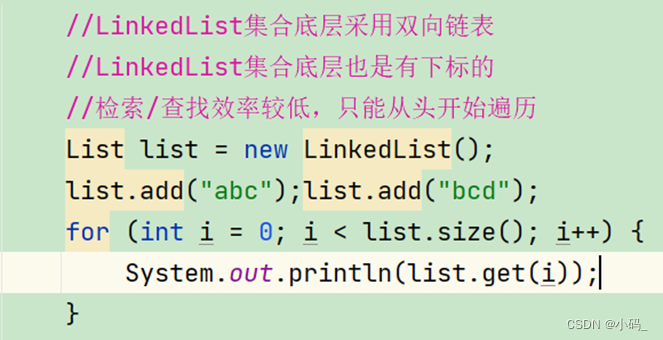
8. List集合
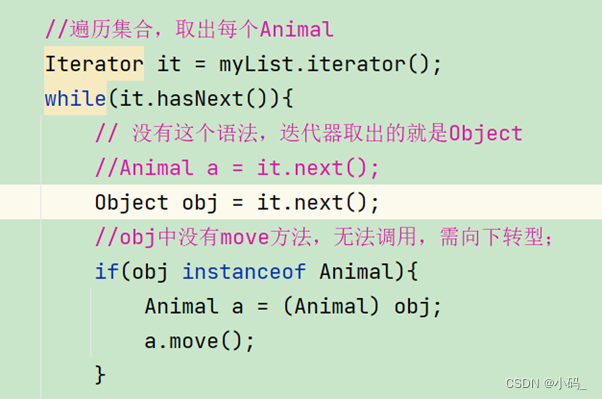
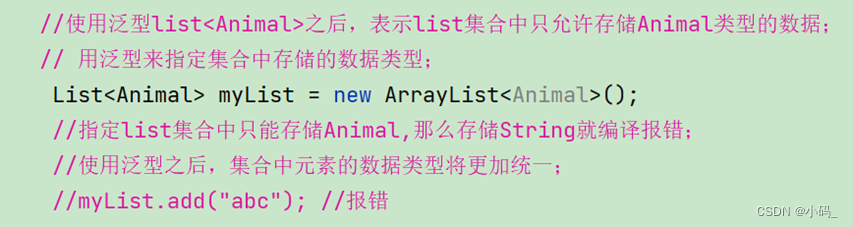
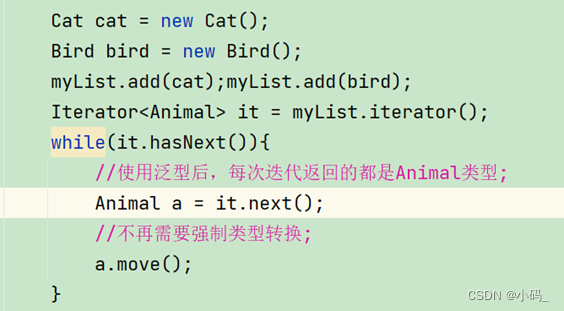
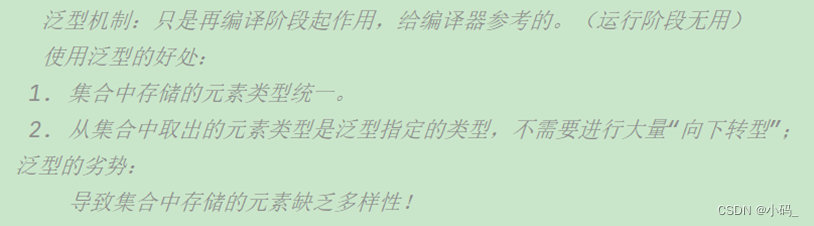
9. 泛型

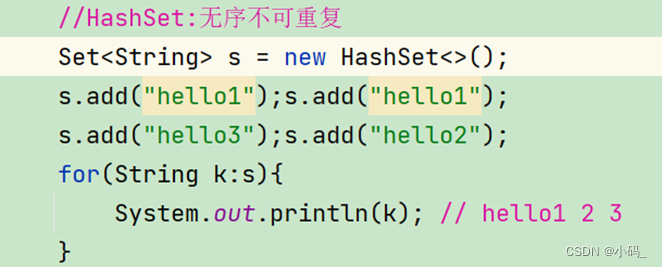
10. HashSet集合
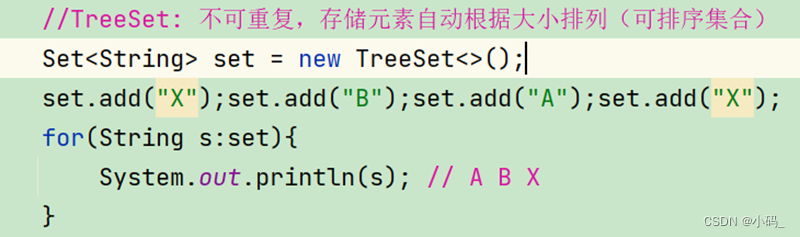
11. TreeSet集合
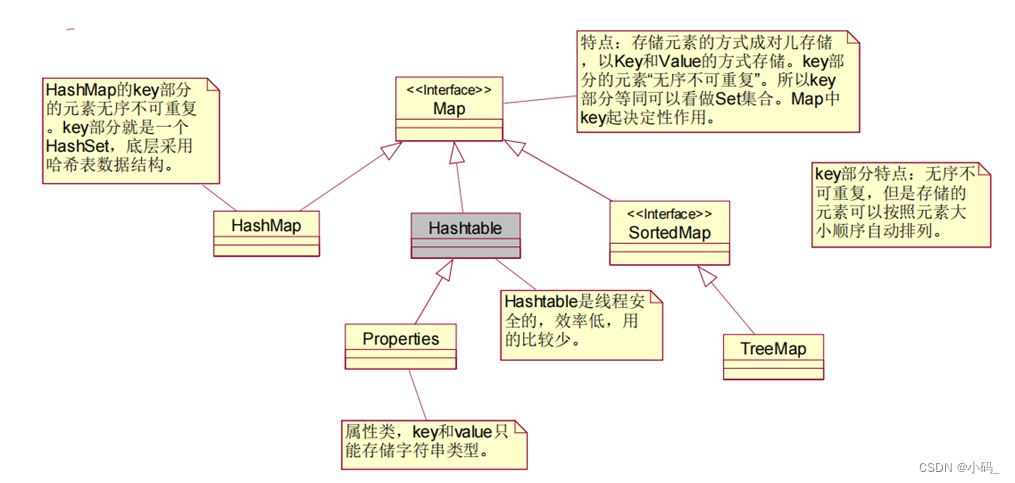
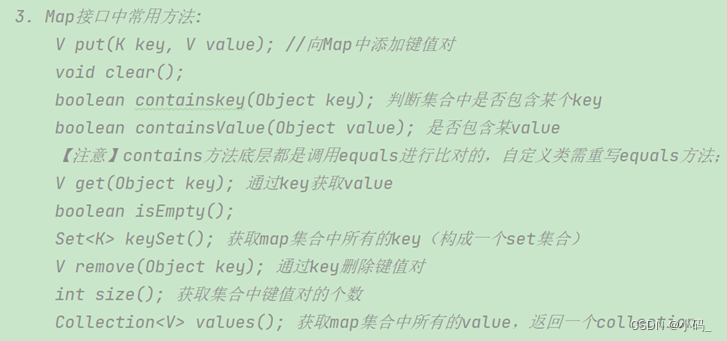
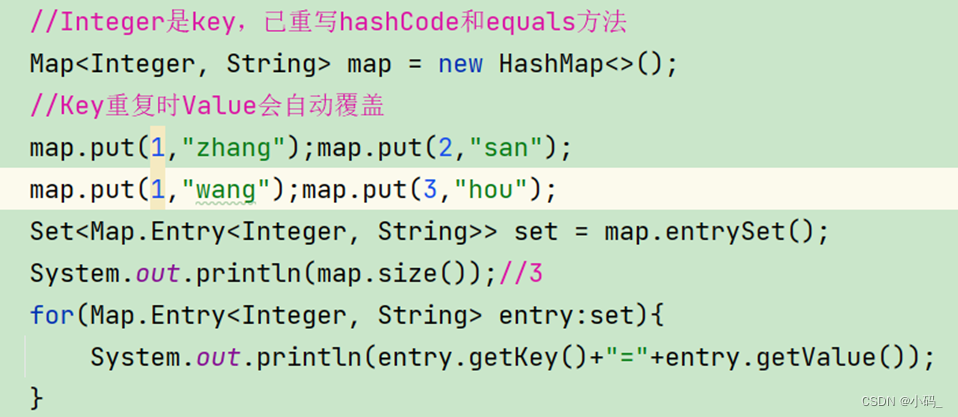
12. Map接口常用方法


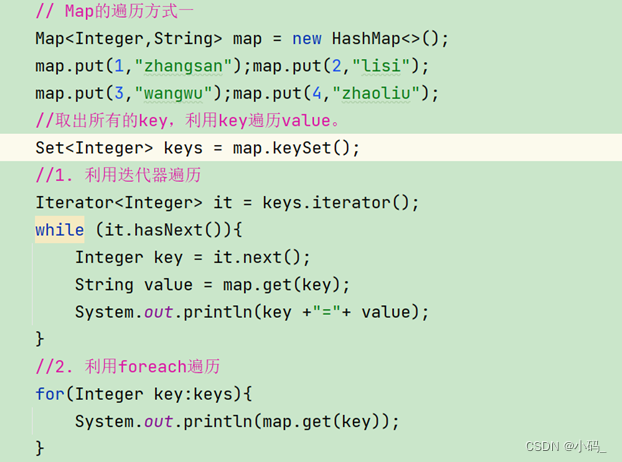
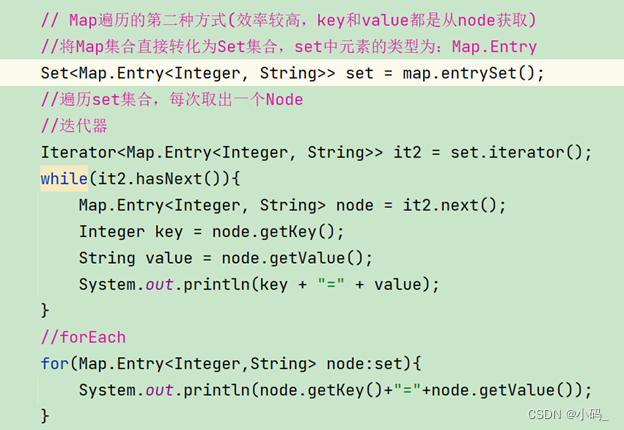
13. Map的遍历

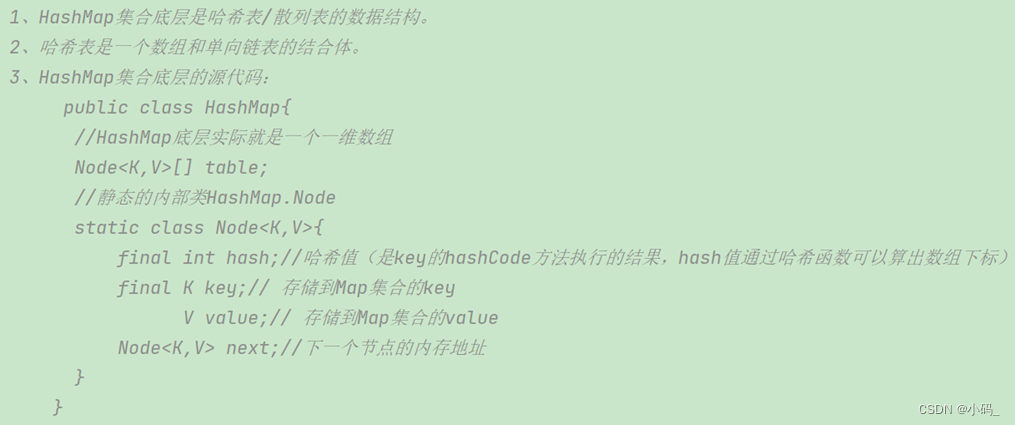
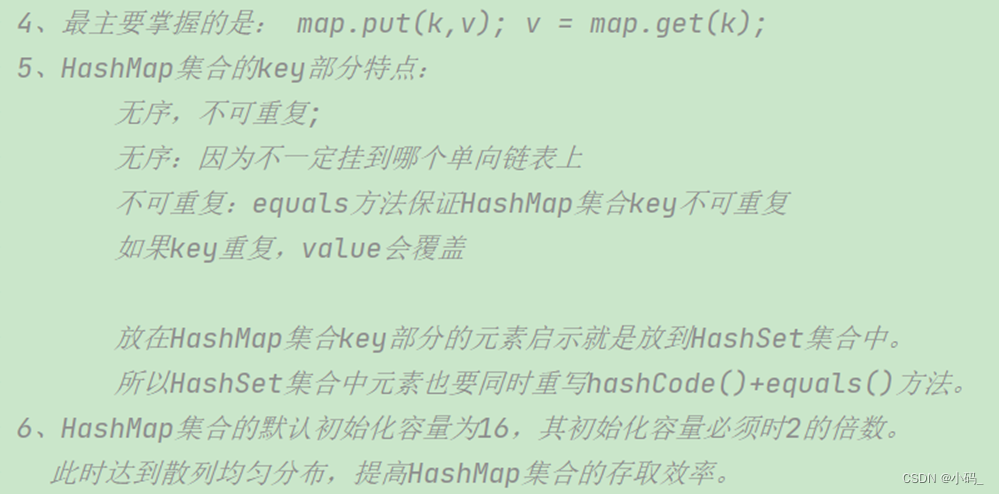
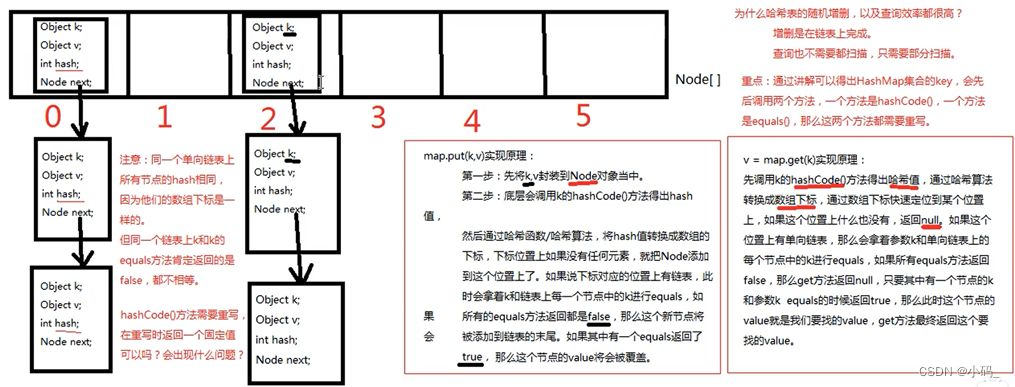
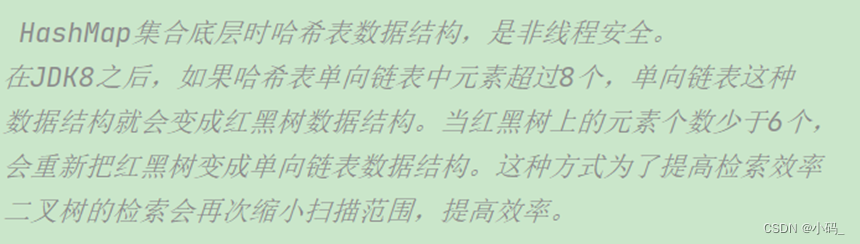
14. HashMap

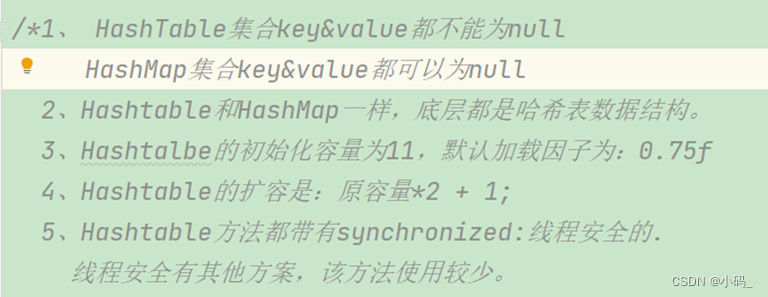
15. HashTable集合
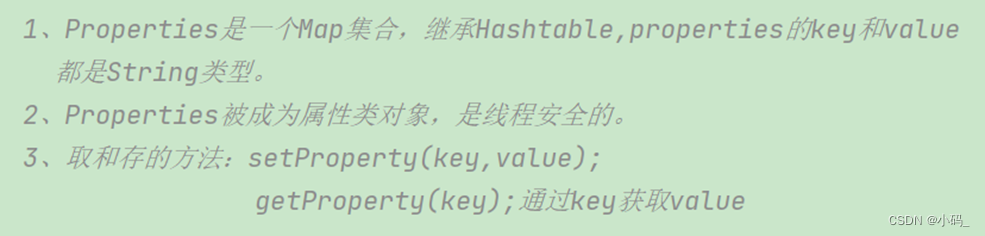
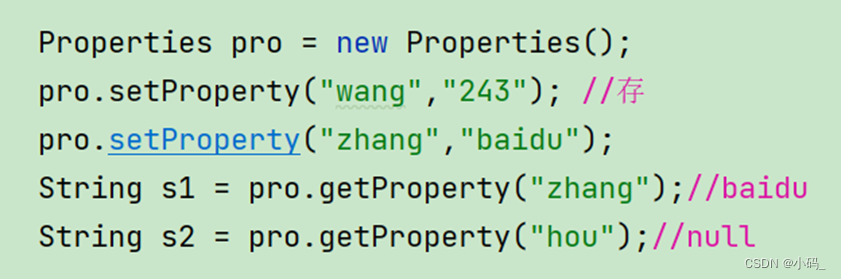
16. Properties集合
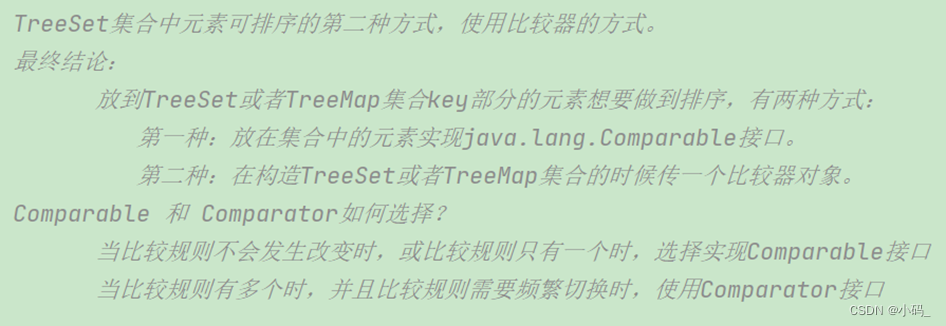
17. TreeSet集合元素排序
方法一:类实现Comparable接口重写compareTo方法。

//自定义类型实现comparable接口放在TreeSet集合后实现排序。
//放在TreeSet集合中的元素需要实现java.lang.Comparable接口。
//并且实现compareTo方法equals方法可以不写。
class Customer implements Comparable<Customer>{
    int age;

    public Customer(int age) {
        this.age = age;
    }

    //需要在这个方法中实现比较的逻辑或规则有程序员指定。
    @Override
    public int compareTo(Customer o) {
        return this.age - o.age;//比较年龄大小
    }

    @Override
    public String toString() {
        return "Customer{" +
                "age=" + age +
                '}';
    }
}
方法二:编写一个类实现Comparator接口重写compare方法。

//给构造方法传递一个比较器
TreeSet<WuGui> wuGuis = new TreeSet<>(new WuGuiComparator());
//单独写一个比较器实现java.util.Comparator接口。
//而Comparable是Java.lang包下的。
class WuGuiComparator implements Comparator<WuGui> {
    @Override
    public int compare(WuGui o1, WuGui o2) {
        return o1.age - o2.age;
    }
}

class WuGui{
    int age;

    public WuGui(int age) {
        this.age = age;
    }

    @Override
    public String toString() {
        return "WuGui{" +
                "age=" + age +
                '}';
    }
}
方式三:匿名内部类不单独写构造器。

//第三种方式使用匿名内部类不用单独写构造器直接new接口
TreeSet<WuGui> wuGuis = new TreeSet<>(new Comparator<WuGui>() {
	  @Override
	  public int compare(WuGui o1, WuGui o2) {
	     return o1.age - o2.age;
	  }
});
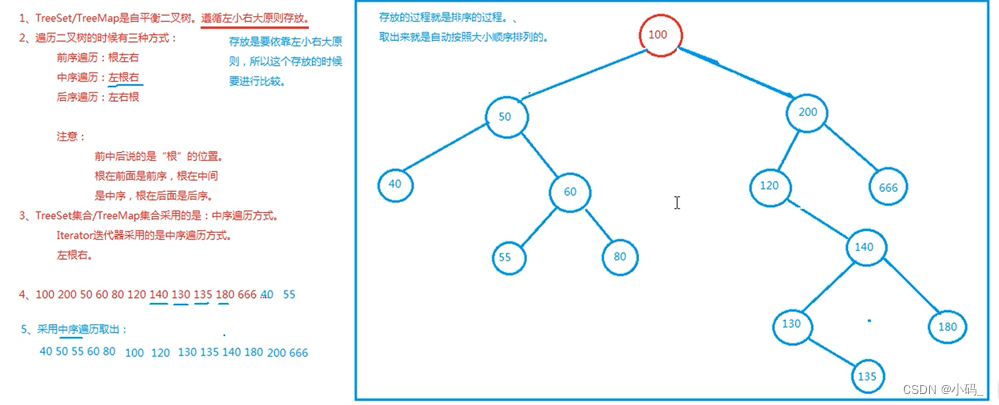
18. 自平衡二叉树
19. Collections工具类
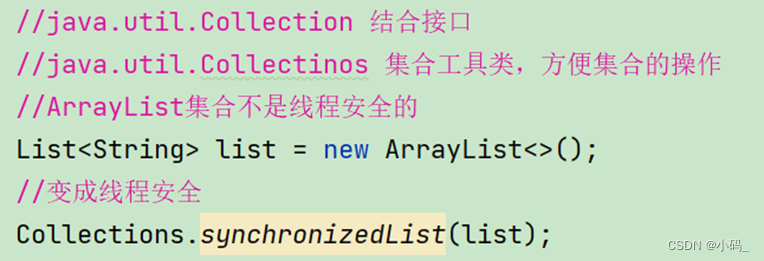
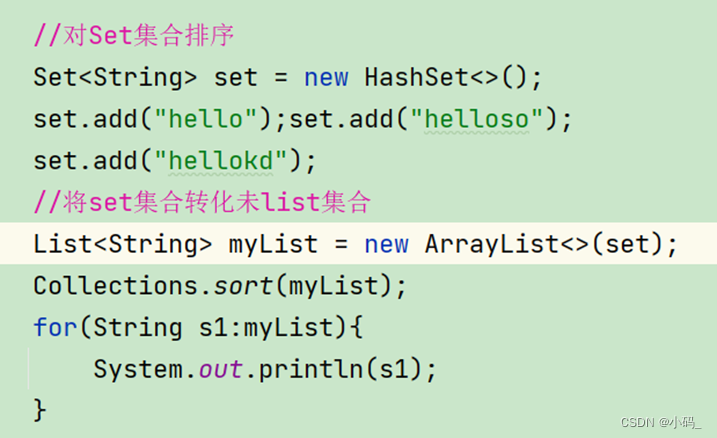
① HashSet输出的元素是无序的存储自定义类型元素需重写equals和hashcode方法避免重复的问题TreeSet输出的元素自动排序实现接口编写比较器。
② HashMap中元素是没有顺序的;TreeMap中所有元素都是有某一固定顺序的。
五. IO流
1. 什么是IO
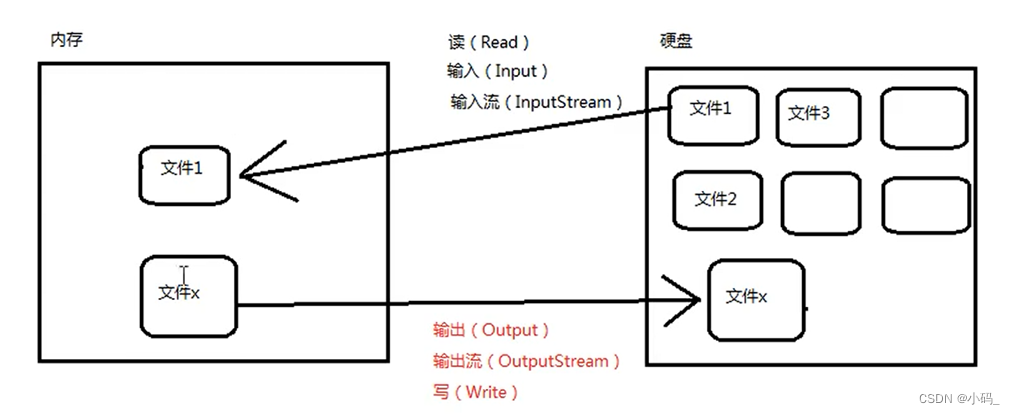
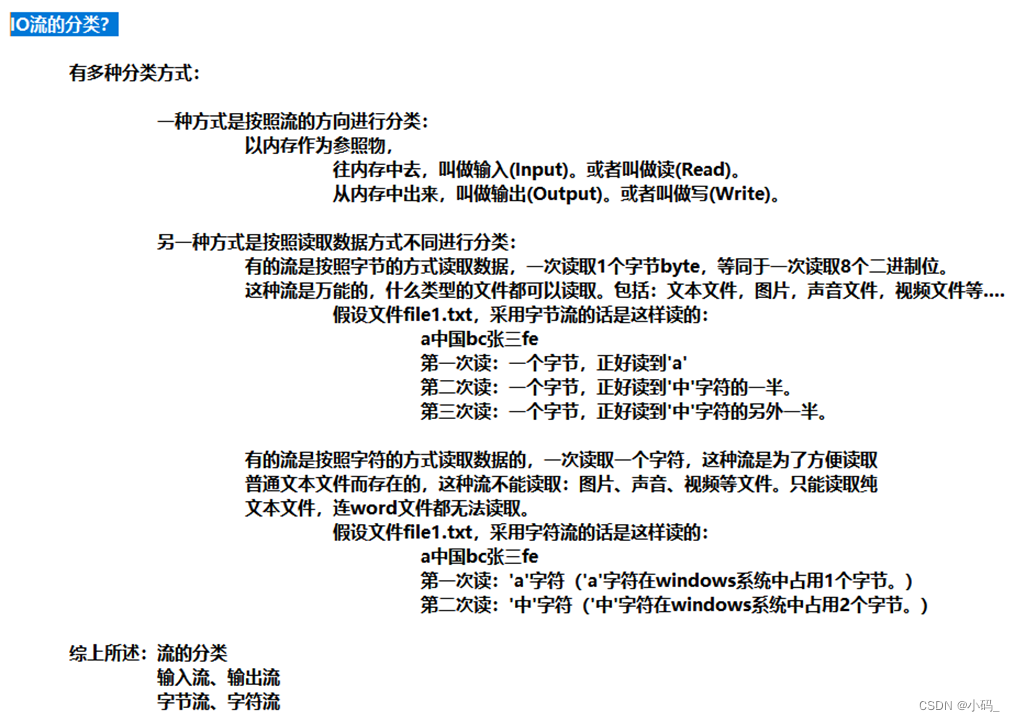
2. IO流的分类
3. IO流四大家族

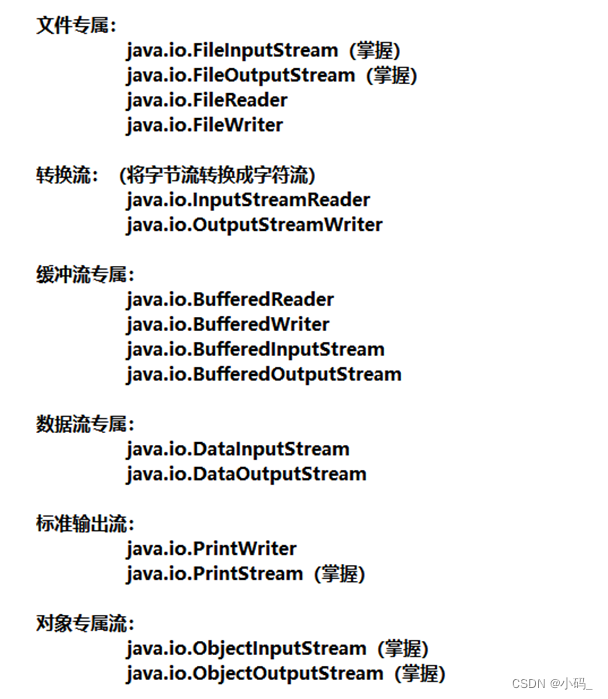
4. FileInputStream和FileOutputStream
public class FileInputStreamTest03 {
    public static void main(String[] args) {
        FileInputStream fis = null;
        try {
            fis = new FileInputStream("tempfile");
            byte[] bytes = new byte[4];
            int readCount = 0;
            while ((readCount = fis.read(bytes)) != -1){
                System.out.print(new String(bytes,0,readCount));
            }
        } catch (FileNotFoundException e) {
            e.printStackTrace();
        } catch (IOException e) {
            e.printStackTrace();
        } finally {
            if (fis != null) {
                try {
                    fis.close();
                } catch (IOException e) {
                    e.printStackTrace();
                }
            }
        }
    }
}
  public static void main(String[] args) {
        FileOutputStream fos = null;
        try {
            //文件不存在会自动新建
            //该语句执行时会先清空文件内容然后再写
//            fos = new FileOutputStream("testfile.txt");
            //以追加的方式在文件末尾写,不清空源文件
            fos = new FileOutputStream("testfile.txt",true);
            //开始写
            byte[] bytes = {97,98,99,100};
            //将byte数组全部写出
            fos.write(bytes); //abcd
            //将byte数组部分写出
            fos.write(bytes,0,2);//abcdab

            String s = "我是中国人";
            //将字符串转化为字符数组
            byte[] bs = s.getBytes();
            fos.write(bs);//abcdab我是中国人

            //输出流最后要刷新
            fos.flush();

        } catch (FileNotFoundException e) {
            e.printStackTrace();
        } catch (IOException e) {
            e.printStackTrace();
        } finally {
            if (fos != null) {
                try {
                    fos.close();
                } catch (IOException e) {
                    e.printStackTrace();
                }
            }
        }
    }
5. FileReader和FileWriter
   public static void main(String[] args) {
        FileReader reader = null;
        try {
            //创建文件字符流
            reader = new FileReader("tempfile");
            //开始读
            char[] chars = new char[4];
            //往char数组读
            reader.read(chars);
            for(char c : chars){
                System.out.print(c);
            }
/*            int readCount = 0;
            while((readCount = reader.read(chars)) != -1){
                System.out.print(new String(chars,0,readCount));
            }*/
        } catch (FileNotFoundException e) {
            e.printStackTrace();
        } catch (IOException e) {
            e.printStackTrace();
        } finally {
            if (reader != null) {
                try {
                    reader.close();
                } catch (IOException e) {
                    e.printStackTrace();
                }
            }
        }
    }
 public static void main(String[] args) {
        FileWriter out = null;
        try {
//            out = new FileWriter("myfile.txt");
            out = new FileWriter("myfile.txt",true);
            char[] chars = {'我','是','中','国','人'};
            out.write(chars);
            out.write(chars,0,2);

            out.write("java工程师");
            out.write("\n");
            out.write("你好");

            out.flush();

        } catch (IOException e) {
            e.printStackTrace();
        }finally {
            if (out != null) {
                try {
                    out.close();
                } catch (IOException e) {
                    e.printStackTrace();
                }
            }
        }
    }
6. 文件拷贝
    public static void main(String[] args) {
        FileInputStream fis = null;
        FileOutputStream fos = null;
        try {
            fis = new FileInputStream("E:\\PPT模板\\An Improved DV-Hop Localization Algorithm Based on Selected Anchors.pdf");
            fos = new FileOutputStream("E:\\An Improved DV-Hop Localization Algorithm Based on Selected Anchors.pdf");

            byte[] bytes = new byte[1024*1024]; //每次最多读取1M
            int readCount = 0;
            while((readCount = fis.read(bytes)) != -1){
                fos.write(bytes,0,readCount);
            }
            //刷新
            fos.flush();
            //fos和fis关闭时分开try。否则会影响另一个。


        } catch (FileNotFoundException e) {
            e.printStackTrace();
        } catch (IOException e) {
            e.printStackTrace();
        } finally {
            //fos和fis关闭时分开try。否则会影响另一个。
            if (fos != null) {
                try {
                    fos.close();
                } catch (IOException e) {
                    e.printStackTrace();
                }
            }

            if (fis != null) {
                try {
                    fis.close();
                } catch (IOException e) {
                    e.printStackTrace();
                }
            }
        }
 public static void main(String[] args) {
        FileReader fr = null;
        FileWriter fw = null;
        try {

            fr = new FileReader("javase/src/com/IOStream/FileReaderTest01.java");
            fw = new FileWriter("fileReaderText.txt");

            char[] chars = new char[1024*512];
            int readCount = 0;
            while ((readCount = fr.read(chars)) != -1){
                fw.write(chars,0,readCount);
            }

            fw.flush();

        } catch (FileNotFoundException e) {
            e.printStackTrace();
        } catch (IOException e) {
            e.printStackTrace();
        }finally {
            if (fw != null) {
                try {
                    fw.close();
                } catch (IOException e) {
                    e.printStackTrace();
                }
            }

            if (fr != null) {
                try {
                    fr.close();
                } catch (IOException e) {
                    e.printStackTrace();
                }
            }
        }
    }
7. BufferedReader和BufferedWriter
 public static void main(String[] args) throws Exception{
        //当一个流的构造方法中需要一个流时被传进来的流称为节点流
        //外部负责包装的这个流叫包装流或处理流
        FileReader reader = new FileReader("fileReaderText.txt");//节点流
        BufferedReader br = new BufferedReader(reader);//包装流

        //读行
        String s = null;
        while ((s = br.readLine()) != null){//读一行文本不读换行符
            System.out.println(s);
        }

        br.close();//关闭包装流自动关闭节点流
    }
    public static void main(String[] args) throws Exception{

        //字节流
        FileInputStream in = new FileInputStream("fileReaderText.txt");
        //字节流转化为字符流
        InputStreamReader reader = new InputStreamReader(in);
        //BufferedReader构造器只能传字符流
        BufferedReader br = new BufferedReader(reader);

//        //以上合并写法:
//        BufferedReader br = new BufferedReader(new InputStreamReader
//                (new FileInputStream("fileReaderText.txt")));

        String s = null;
        while ((s = br.readLine()) != null){
            System.out.println(s);
        }

        br.close();
    }
    public static void main(String[] args) throws Exception{
//        BufferedWriter bw = new BufferedWriter(new FileWriter("copy.txt"));
        BufferedWriter bw = new BufferedWriter(new OutputStreamWriter
                (new FileOutputStream("copy.txt",true)));//追加
        bw.write("hello");bw.write("\n");
        bw.write("houshuaixin");
        bw.flush();bw.close();
    }
8. PrintStream
    public static void main(String[] args) throws FileNotFoundException {
        //java.io.PrintStream:标准的字节输入流默认输出至控制台
        //分开写,标准输出流不需要close()关闭
        PrintStream ps = System.out;
        ps.println("hello");ps.println("better");
        //联合写
        System.out.println("helloword");

        //改变标准输出流的输出方向
        //标准输出流不在指向控制台指向“log”文件
        PrintStream printStream = new PrintStream(new FileOutputStream("log.txt"));
        //修改输出方向至“log.txt”文件
        System.setOut(printStream);
        System.out.println("helloword");
        System.out.println("hellokitty");
    }
六. 注解
//测试元注解
@MyAnnotation
public class TestAnnotation01 {
    public void test(){

    }
}

//定义一个注解
//Target 表示我们的注解可以用在那些地方
@Target(value = {ElementType.METHOD,ElementType.TYPE})

//Retention 表示我们的注解在什么地方还有效
// runtime>class>source
@Retention(value = RetentionPolicy.RUNTIME)

//Documented 表示是否将我们的注解生成在JAVAdoc中
@Documented

//Inherited 子类可以继承父类的注解
@Inherited

@interface MyAnnotation{

}
使用@interface自定义注解时自动继承了java.lang.annotation.Annotation接口。
//自定义注解
public class TestAnnotation02 {
    //注解可以显式赋值如果没有默认值必须给注解赋值。
    @MyAnnotation2(name = "hou")
    public void test(){}
}

@Target({ElementType.TYPE,ElementType.METHOD})
@Retention(RetentionPolicy.RUNTIME)
@interface MyAnnotation2{
    //注解的参数:参数类型 + 参数名 + ();
    String name();
    //String name() default "";
    int age() default 15;
    String[] schools() default {"北大","清华"};
}
七. 反射
1. Class类
① Class本身也是一个类Class对象只能由系统建立。
②一个加载的类在JVM中只会有一个Class实例Class对象只有一个。
③ 一个Class对象对应的是一个加载到JVM中的一个 .class 文件。
④ 通过Class实例可以获得一个类中所有被加载的结构。
2. Class类的实例
    public static void main(String[] args) throws ClassNotFoundException {
        //通过反射获取类的Class对象
        Class c1 = Class.forName("Reflections.User");
        System.out.println(c1); //class Reflections.User

        Class c2 = Class.forName("Reflections.User");
        Class c3 = Class.forName("Reflections.User");

        //一个类在内存中只有一个Class对象
        //一个类被加载后类的整个结构都会被封装在Class对象中
        System.out.println(c1.hashCode());//21685669
        System.out.println(c2.hashCode());//21685669
        System.out.println(c3.hashCode());//21685669
    }
3. Class类的创建方式
    public static void main(String[] args) throws ClassNotFoundException {
        Person person = new Student();
        System.out.println("这个人是:"+person.name);

        //方式一:通过对象获得
        Class c1 = person.getClass();
        System.out.println(c1);//class Reflections.Student

        //方式二:forname获得
        Class c2 = Class.forName("Reflections.Student");
        System.out.println(c2);//class Reflections.Student

        //方式三:通过类名.class获得
        Class c3 = Student.class;
        System.out.println(c3);//class Reflections.Student

        //方式四:基本内置类型的包装类有一个TYPE属性
        Class c4 = Integer.TYPE;
        System.out.println(c4);//int

        //获得父类类型
        Class c5 = c1.getSuperclass();
        System.out.println(c5);//class Reflections.Person
    }
4. 类加载器
    public static void main(String[] args) throws ClassNotFoundException {

        //获取系统类加载器
        ClassLoader systemClassLoader = ClassLoader.getSystemClassLoader();
        System.out.println(systemClassLoader);

        //获取系统类加载器的父类加载器---》扩展类加载器
        ClassLoader parent = systemClassLoader.getParent();
        System.out.println(parent);

        //获取扩展类加载器的父类加载器---》根加载器C、C++
        ClassLoader parent1 = parent.getParent();
        System.out.println(parent1); //null

        //测试当前类是那个加载器加载的
        ClassLoader classLoader = Class.forName("Reflections.Test04").getClassLoader();
        System.out.println(classLoader);

        //测试JDK内置的类是谁加载的
        ClassLoader classLoader1 = Class.forName("java.lang.Object").getClassLoader();
        System.out.println(classLoader1);
    }
5. 获取类运行时完整结构
    public static void main(String[] args) throws ClassNotFoundException, NoSuchFieldException, NoSuchMethodException {
        Class c1 = Class.forName("Reflections.User");

        //获得类的名字
        System.out.println(c1.getName());//获得包名+类名
        System.out.println(c1.getSimpleName()); //获得类名

        //获得类的属性
        System.out.println("==========获得类的属性===========");
        Field[] fields = c1.getFields(); //只能找到public属性
        fields = c1.getDeclaredFields(); //找到所有属性
        for (Field field:fields){
            System.out.println(field);
        }

        //获得指定类型的属性
        Field name = c1.getDeclaredField("name");
        System.out.println(name);

        //获得类的方法
        System.out.println("==========获得类的方法===========");
        Method[] methods = c1.getMethods(); // 获得本类及其父类的所有public方法
        methods = c1.getDeclaredMethods(); // 获得本类的所有方法
        for(Method method:methods){
            System.out.println(method);
        }

        //获得指定方法(因重载问题需出入指定方法的参数)
        Method getName = c1.getMethod("getName", null);
        Method setName = c1.getMethod("setName", String.class);
        System.out.println(getName);
        System.out.println(setName);

        //获得类的构造器
        System.out.println("==========获得指定的构造器===========");
        Constructor[] constructors = c1.getConstructors();//本类的public
        constructors = c1.getDeclaredConstructors();//本类所有的

        //获得类的指定构造器
        Constructor deConstructor = c1.getDeclaredConstructor(String.class, int.class, int.class);
        System.out.println(deConstructor);

    }
6. 动态创建对象调用方法和属性
    public static void main(String[] args) throws ClassNotFoundException, InstantiationException, IllegalAccessException, NoSuchMethodException, InvocationTargetException, NoSuchFieldException {

        //获得class对象
        Class c1 = Class.forName("Reflections.User");

        //创建一个对象   针对有无参构造器
        User user1 = (User) c1.newInstance(); //本质是调用了类的无参构造
        System.out.println(user1);

        //通过构造器创建对象   针对没有无参构造器
        Constructor constructor = c1.getDeclaredConstructor(String.class, int.class, int.class);
        User user2 = (User)constructor.newInstance("hou", 45, 12);
        System.out.println(user2);

        //通过反射调用普通方法
        User user3 = (User) c1.newInstance();
        //通过反射获得一个方法
        Method setName = c1.getDeclaredMethod("setName", String.class);
        setName.invoke(user3,"hou");//invoke(对象“传入的值”)
        System.out.println(user3.getName());

        //通过反射操作属性
        User user4 = (User)c1.newInstance();
        Field name = c1.getDeclaredField("name");
        //不能直接操作私有属性需关闭程序的安全检测属性(方法).setAccessible(true);
        name.setAccessible(true);
        name.set(user4,"侯帅鑫");
        System.out.println(user4.getName());

    }
八. 多线程
1. 概念
① 进程:是一次执行程序的过程是系统资源分配的单位。
② 线程:一个进程通常包括若干个线程一个进程中至少有一个线程线程是CPU调度和执行的单位。
③ Main为主线程为系统的入口。
2. 创建线程的三种方式
① 自定义类继承Thread类重写run方法创建线程对象调用start方法启动。
② 自定义类实现Runnable接口重现run方法。
③ 自定义类实现Callable接口重写call方法需抛出异常。
public class TestThreads {
    public static void main(String[] args) {
        //方式一启动线程
        new MyThread1().start();

        //方式二启动线程
        new Thread(new MyThread2()).start();

        //方式三启动线程了解
        FutureTask<Integer> futureTask = new FutureTask<>(new MyThread3());
        new Thread(futureTask).start();

        Integer integer = null;
        try {
            integer = futureTask.get();
        } catch (InterruptedException e) {
            e.printStackTrace();
        } catch (ExecutionException e) {
            e.printStackTrace();
        }
        System.out.println(integer);
    }
}

//1.继承Thread类
class MyThread1 extends Thread{
    @Override
    public void run() {
        System.out.println("MyThread1");
    }
}

//2.实现Runnable接口
class MyThread2 implements Runnable{

    @Override
    public void run() {
        System.out.println("MyThread2");
    }
}

//3.实现Callable接口
class MyThread3 implements Callable<Integer>{
    @Override
    public Integer call() throws Exception {
        System.out.println("MyThread3");
        return 100;
    }
}
3. 静态代理
① 真实角色和代理角色都要实现同一个接口。
② 代理对象要代理真实角色。
③ 优点:代理对象可以做真实对象做不了的事真实对象专注于做自己的事。
//静态代理
public class StaticProxy {
    public static void main(String[] args) {
        You you = new You();
        new Thread( ()-> System.out.println("我爱你")).start();
        new WeddingComp(new You()).HappyMarry();
    }
}

interface Marry{

    void HappyMarry();

}

//真是角色
class You implements Marry{

    @Override
    public void HappyMarry() {
        System.out.println("我要结婚了");
    }
}

//代理角色
class WeddingComp implements Marry{

    private Marry target;

    public WeddingComp(Marry target) {
        this.target = target;
    }

    @Override
    public void HappyMarry() {
        before();
        this.target.HappyMarry();
        after();
    }

    private void after() {
        System.out.println("收尾款");
    }

    private void before() {
        System.out.println("布置婚礼现场");
    }
}
4. Lambda表达式
public class TestLambda02 {

    public static void main(String[] args) {

        // Lambda表示简化
        ILove iLove = (int a)->{
            System.out.println("I Love You -->" + a);
        };

        //简化1.参数类型
        iLove = (a)->{
            System.out.println("I Love You -->" + a);
        };

        //简化2简化括号
        iLove = a->{
            System.out.println("I Love You -->" + a);
        };

        //简化3去掉花括号 ,仅适用于只有一行代码的情况
        iLove = a -> System.out.println("I Love You -->" + a);

        //前提接口为函数式接口
        //多个参数的类型名可同时省略但括号必须保留

        iLove.love(2);
    }

}
interface ILove{  //函数式接口
    void love(int a);
}
5. 停止线程
//停止线程
//测试Stop
//1.建议线程正常停止--->利用次数不建议死循环
//2.建议使用标志位---->设置一个标志位
//3.不要使用stop或者destroy等过时或者JDK不建议使用的方法
public class TestStop implements Runnable{

    //1.设置一个标识位
    private boolean flag = true;

    @Override
    public void run() {
        int i = 0;
        while(flag){
            System.out.println("run....." + i++);
        }
    }

    //2.设置一个公开的方法停止线程
    public void stop(){
        this.flag = false;
    }

    public static void main(String[] args) {

        TestStop testStop = new TestStop();
        new Thread(testStop).start();

        for (int i = 0; i < 1000; i++) {
            System.out.println("main--->"+i);
            if(i == 900){
                //转换标识位停止线程
                testStop.stop();
                System.out.println("线程停止==========");
            }
        }

    }
}
6. 线程休眠
sleep时间达到后线程进入就绪状态sleep可以模拟网络延时倒计时等。每个对象都有一个锁sleep不会释放锁。
//模拟倒计时
public class TestSleep {
    public static void main(String[] args) {

        //倒计时
        try {
            tenDown();
        } catch (InterruptedException e) {
            e.printStackTrace();
        }

        //打印当前系统时间
        Date startTime = new Date(System.currentTimeMillis());//获取系统当前时间

        while (true){
            try {
                Thread.sleep(1000);
                System.out.println(new SimpleDateFormat("HH:mm:ss").format(startTime));
                startTime = new Date(System.currentTimeMillis());
            } catch (InterruptedException e) {
                e.printStackTrace();
            }
        }
    }

        //模拟倒计时
    public static void tenDown() throws InterruptedException {
        int num = 10;
        while(true){
            Thread.sleep(1000);
            System.out.println(num--);
            if(num<=0){
                break;
            }
        }
    }
}
7. 线程礼让
让当前正在执行的线程暂停但不阻塞将线程由运行状态转为就绪状态让cpu重新调度礼让不一定成功看cpu心情。
//测试线程礼让
public class TestYield implements Runnable{

    @Override
    public void run() {
        System.out.println(Thread.currentThread().getName() + "线程开始");
        Thread.yield();//线程礼让礼让不一定成功看CPU心情
        System.out.println(Thread.currentThread().getName() + "线程停止");
    }

    public static void main(String[] args) {

        TestYield testYield = new TestYield();

        new Thread(testYield,"a").start();
        new Thread(testYield,"b").start();

    }
}
8. 线程强制执行
待该线程执行完后再执行其他线程使其他线程阻塞可以想象为插队。
public class TestJoin implements Runnable{
    @Override
    public void run() {
        for (int i = 0; i < 500; i++) {
            System.out.println("线程Vip。。。。。" + i);
        }
    }
    public static void main(String[] args) {
        //启动线程
        TestJoin testJoin = new TestJoin();
        Thread thread = new Thread(testJoin);
        thread.start();
        //主线程
        for (int i = 0; i < 300; i++) {
            if(i==200){
                try {
                    thread.join();//线程插队
                } catch (InterruptedException e) {
                    e.printStackTrace();
                }
            }
            System.out.println("主线程。。。" + i);
        }
    }
}
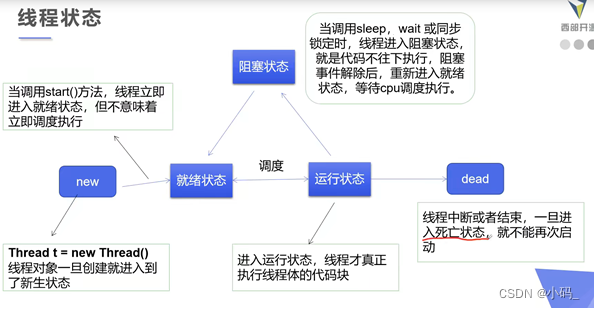
9. 线程状态

10. 线程优先级
线程的优先级用数字表示范围1-10。优先级低只是表示获得调度的概率低并不是优先级低不会被调用具体要看CPU的调度。改变优先级和获取优先级:setPriority(int xxx)、getPriority()。
//测试线程优先级
public class TestPriority {
    public static void main(String[] args) {
        //主线程的优先级
        System.out.println(Thread.currentThread().getName()+"--->"+Thread.currentThread().getPriority());

        MyPriority myPriority = new MyPriority();

        Thread t1 = new Thread(myPriority);
        Thread t2 = new Thread(myPriority);
        Thread t3 = new Thread(myPriority);
        Thread t4 = new Thread(myPriority);

        t1.setPriority(8);t1.start();

        t2.setPriority(1);t2.start();

        t3.setPriority(Thread.MAX_PRIORITY);t3.start();

        t4.setPriority(6);t4.start();
    }
}

class MyPriority implements Runnable{
    @Override
    public void run() {
        System.out.println(Thread.currentThread().getName()+"--->"+Thread.currentThread().getPriority());
    }
}
11. 守护线程
线程分为用户线程和守护线程。虚拟机必须确保用户线程执行完毕不用等待守护线程执行完毕。
public class TestDaemon {
    public static void main(String[] args) {
        God god = new God();
        Your your = new Your();

        Thread thread = new Thread(god);
        thread.setDaemon(true); //默认是false表示用户线程正常的线程都是用户线程。
        thread.start();//上帝守护线程启动虽然god为死循环但是用户线程结束后它也结束

        new Thread(your).start();//你用户线程启动
    }

}

//上帝
class God implements Runnable{

    @Override
    public void run() {
        while(true){
            System.out.println("上帝守护着你");
        }
    }
}
//你
class Your implements Runnable{

    @Override
    public void run() {
        for (int i = 0; i < 36500; i++) {
            System.out.println("开心每一天");
        }
        System.out.println("=================goodbye==================");
    }
}
12. 线程同步机制
多个线程操作同一个资源。线程同步形成的条件:队列+锁。锁机制:synchronized。
Synchronized默认锁的是this。锁的对象就是变化的量需要增删改查的对象。
同步块:synchronizedobj{ }
//不安全的买票方案
public class UnSafeBuyTicket {
    public static void main(String[] args) {
        BuyTicket station = new BuyTicket();

        new Thread(station,"aa").start();
        new Thread(station,"bb").start();
        new Thread(station,"cc").start();
    }

}

class BuyTicket implements Runnable{

    private int ticketNums = 10;
    boolean flag = true;
    @Override
    public void run() {
        while(flag){
            try {
                buy();
            } catch (InterruptedException e) {
                e.printStackTrace();
            }
        }
    }
    //同步方法安全的
    //public synchronized void buy() throws InterruptedException
    public  void buy() throws InterruptedException {
        if(ticketNums<=0){
            flag = false;
            return;
        }
        //模拟延时
        Thread.sleep(100);
        System.out.println(Thread.currentThread().getName() + "拿到----->" + ticketNums--);
    }
}
13. 死锁
死锁产生的条件:
① 互斥条件:一个资源每次只能被一个进程使用。
② 请求与保持条件:一个进程因请求资源而阻塞时对已获得的资源保持不放。
③ 不剥夺条件:进程已获得的资源在未使用完前不能强行剥夺。
④ 循环等待条件:若干进程之间形成一种头尾相接的循环等待资源关系。
//测试死锁:多个线程互相抱着对方需要的资源形成僵持
public class TestDeadLock {
    public static void main(String[] args) {

        Makeup g1 = new Makeup(0, "灰姑娘");
        Makeup g2 = new Makeup(1, "白雪公主");

        g1.start();
        g2.start();

    }
}

//口红
class LipStick{

}

//镜子
class Mirror{

}

class Makeup extends Thread {
    //需要的资源只有一份用static来保证只有一份
    static LipStick lipStick = new LipStick();
    static Mirror mirror = new Mirror();

    int choice;//选择
    String name;//使用化妆品的人

    public Makeup(int choice, String name) {
        this.choice = choice;
        this.name = name;
    }

    @Override
    public void run() {
        try {
            makeup();
        } catch (InterruptedException e) {
            e.printStackTrace();
        }
    }

    //化妆互相持有对方的锁就是需要拿到对方的资源
    //避免死锁
    private void makeup() throws InterruptedException {
        if (choice == 0) {
            synchronized (lipStick) {
                System.out.println(this.getName() + "获得口红的锁");
                Thread.sleep(2000);
            }
            synchronized (mirror) {
                System.out.println(this.getName() + "获得镜子的锁");
            }
        } else {
            synchronized (mirror) {
                System.out.println(this.getName() + "获得镜子的锁");
                Thread.sleep(2000);
            }
            synchronized (lipStick) {
                System.out.println(this.getName() + "获得口红的锁");
            }
        }
    }
}
14. Lock锁
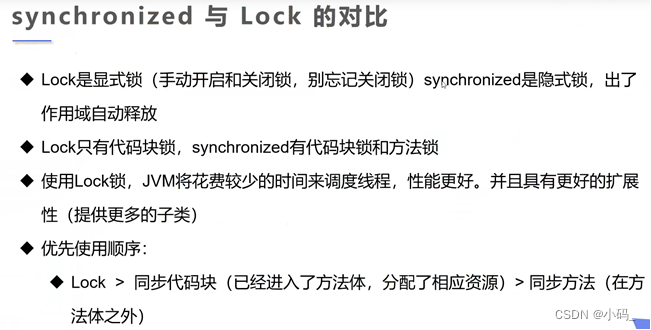
public class TestLock {
    public static void main(String[] args) {
        Buyticket buyticket = new Buyticket();

        new Thread(buyticket).start();
        new Thread(buyticket).start();
        new Thread(buyticket).start();

    }
}

class Buyticket implements Runnable{

    int tickeNums = 10;
    //定义lock锁
    private final ReentrantLock lock = new ReentrantLock();
    @Override
    public void run() {
        while(true){

            try {
                lock.lock(); //加锁
                if(tickeNums>0){
                    try {
                        Thread.sleep(1000);
                    } catch (InterruptedException e) {
                        e.printStackTrace();
                    }
                    System.out.println(tickeNums--);
                }else{
                    break;
                }
            }finally {
                lock.unlock();//解锁
            }

        }

    }
}
15. 线程池
//测试线程池
public class TestPool {
    public static void main(String[] args) {
        //1.创建服务创建线程池
        //newFixedThreadPool  参数为:线程池大小
        ExecutorService service = Executors.newFixedThreadPool(10);
        //执行
        service.execute(new MyThread());
        service.execute(new MyThread());
        service.execute(new MyThread());

        //2.关闭链接
        service.shutdown();
    }
}

class MyThread implements Runnable{

    @Override
    public void run() {
        System.out.println(Thread.currentThread().getName());
    }
}
16. wait和notify
- tt.wait(): 让正在tt对象上活动的线程进入等待状态。
- wait(): 无限期等待直至被唤醒。
- tt.notify():唤醒正在tt对象上等待的线程。
- tt.notifyAll(): 唤醒tt对象上处于等待的所有线程。
17. 生产者消费者
package multiThreads.PCModel;

public class TestBestPC {
    public static void main(String[] args) {
        Resources resources = new Resources();
        Thread threadProduct = new Thread(new Producers(resources));
        Thread threadConsume = new Thread(new Consumers(resources));
        threadProduct.setName("Producers");
        threadConsume.setName("Consumers");
        threadProduct.start();
        threadConsume.start();
    }
}

//资源
class Resources{

    //当前资源的数量
    int num = 0;
    //当前资源的上限
    int size = 100;

}

//消费者
class Consumers implements Runnable{

    private Resources resources;

    public Consumers(Resources resources) {
        this.resources = resources;
    }

    @Override
    public void run() {
        while (true){
            synchronized (resources){
                if(resources.num == 0){
                    System.out.println("========消费者等待=======");
                    try {
                        resources.wait();
                    } catch (InterruptedException e) {
                        e.printStackTrace();
                    }
                }
                resources.num--;
                System.out.println("消费者:"+Thread.currentThread().getName()+"剩余资源"+resources.num);
                resources.notify();
            }
        }
    }
}

//生产者
class Producers implements Runnable{

    private Resources resources;

    public Producers(Resources resources) {
        this.resources = resources;
    }

    @Override
    public void run() {
        while (true){
            synchronized (resources){
                if(resources.num == resources.size){
                    System.out.println("========生产者等待=======");
                    try {
                        resources.wait();
                    } catch (InterruptedException e) {
                        e.printStackTrace();
                    }
                }
                resources.num++;
                System.out.println("生产者:"+Thread.currentThread().getName()+"剩余资源"+resources.num);
                resources.notify();
            }
        }
    }
}