

Defects4j数据集安装及使用-CSDN博客
| 阿里云国内75折 回扣 微信号:monov8 |
| 阿里云国际,腾讯云国际,低至75折。AWS 93折 免费开户实名账号 代冲值 优惠多多 微信号:monov8 飞机:@monov6 |
一、Defects4j数据集安装
在Ubuntu系统上进行操作具体的在Defects4j数据集安装
二、Defects4j数据集的使用
1. 常用命令
Getting started
----------------
#### Setting up Defects4J
1. Clone Defects4J:
    - `git clone https://github.com/rjust/defects4j`

2. Initialize Defects4J (download the project repositories and external libraries, which are not included in the git repository for size purposes and to avoid redundancies):
    - `cd defects4j`
    - `./init.sh`

3. Add Defects4J's executables to your PATH:
    - `export PATH=$PATH:"path2defects4j"/framework/bin`

#### Using Defects4J
4. Check installation and get information for a specific project (commons lang):
    - `defects4j info -p Lang`
    - `defects4j info -p Math`

5. Get information for a specific bug (commons lang, bug 1):
    - `defects4j info -p Lang -b 1`

6. Checkout a buggy source code version (commons lang, bug 1, buggy version):
    - `defects4j checkout -p Lang -v 1b -w /tmp/lang_1_buggy`

7. Change to the working directory, compile sources and tests, and run tests:
    - `cd /tmp/lang_1_buggy`
    - `defects4j compile`
    - `defects4j test`

8. More examples of how to use the framework are available in `framework/test`
2. 框架
defects4j
   |
   |--- project_repos:     The version control repositories of the provided projects.
   |
   |--- major:             The Major mutation framework.
   |
   |--- framework:         Libraries and executables of the database abstraction and
       |                   test execution framework.
       |
       |--- bin:           Command line interface to Defects4J.
       |
       |--- core:          The modules of the core framework.
       |
       |--- lib:           Libraries used in the core framework.
       |
       |--- util:          Util scripts used by Defects4J.
       |
       |--- projects:      Project-specific resource files.
       |
       |--- test:          Scripts to test the framework.
首先看一下文件结构首先是project_repos,指提供的含有故障的项目的版本控制库之后是major,是主要的变异框架再framework中存在我们比较需要的各种信息重点关注projects里面是各种真实故障的项目。
以Lang为例讲解一下里面的目录结构
Lang
逻辑是这样的对每个defects4j项目来有很多测试类每个测试类里面有很多测试用例如果全通过了就说明程序没有问题但有些情况下测试可能不通过可能只是某一两个测试方法不通过难道要把所有的程序再重新加载进行实验吗西门子故障程序是那么做的不同版本的故障程序之间只有一两行不一样所有的测试用例也都是一样的测试用例对在运行不同版本的故障程序时结果是不同的。这种情况在defects4j上行不通因为西门子程序太小了这里动辄上万行的代码。
- trigger tests
每个故障版本都对应个一个trigger test这个trigger test里面包含了一些引发了程序bug的测试方法。

-
modified classes
既然有了trigger test 那么就必然有bug那么文件夹modified_classes里面装的就是将bug修复时需要改动源程序中的哪些类。
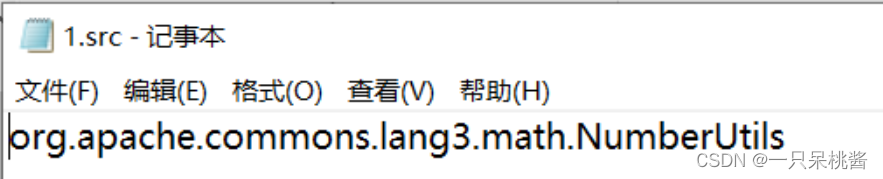
如图Lang项目的第一个故障版本需要改动NumberUtils类即可修复。 -
loaded classes/relevant classes
虽然bug只和这一个类有关但程序是一个整体只有这一个类跑不起来呀想要跑起来需要很多relevant classes,在项目里是loaded_classes文件夹下只有将这些类都加载进JVM中trigger test方法才能跑起来。 -
relevant tests
既然trigger test的运行说明了程序中存在bug只是在trigger_test中引发了bug,其他的测试程序中可能也跑了故障代码modified classes但是没有引发故障所以relevent tests里面记录的就是所有的相关测试类。所谓相关测试类就是指当执行测试方法时JVM中加载了modified classes,这样就保证了所有相关的测试都包含在内。 -
patches
最后就是patches,其中src.patch记录了故障应该怎么修复比如说按照github的教程上执行了
defects4j checkout -p Lang -v 1b -w /tmp/lang_1_buggy
这行代码后实际上就是在/tmp/lang_1_buggy文件夹下将这个Lang 1 版本编译测试所需要所有类和测试类都写进去了在src文件夹下我们再执行
cd /tmp/lang_1_buggy
defects4j compile
defects4j test
注意这里可以直接在linux中使用命令进行编译和测试如果想在IDEA中进行运行测试我这里用的环境是jdk1.7和maven3.8.1注意亲测maven3.6不行
这时候我们编译的是含有故障的代码运行后
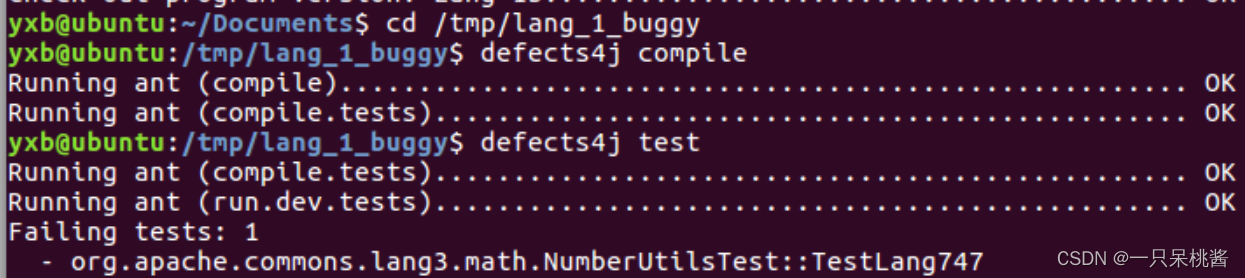
它就会显示trigger test中记录的故障代号。
如果我们想要一个没有故障的版本怎么办呢就对defects4j checkout后/tmp/lang_1_buggy中的源码进行更改即可按照src.patch更改源码其中@@后是代码在NumberUtils.java中的行数每行代码前面没有符号时代表代码无需改动- 代表是新加的正确代码+ 代表是错误代码注释掉即可。
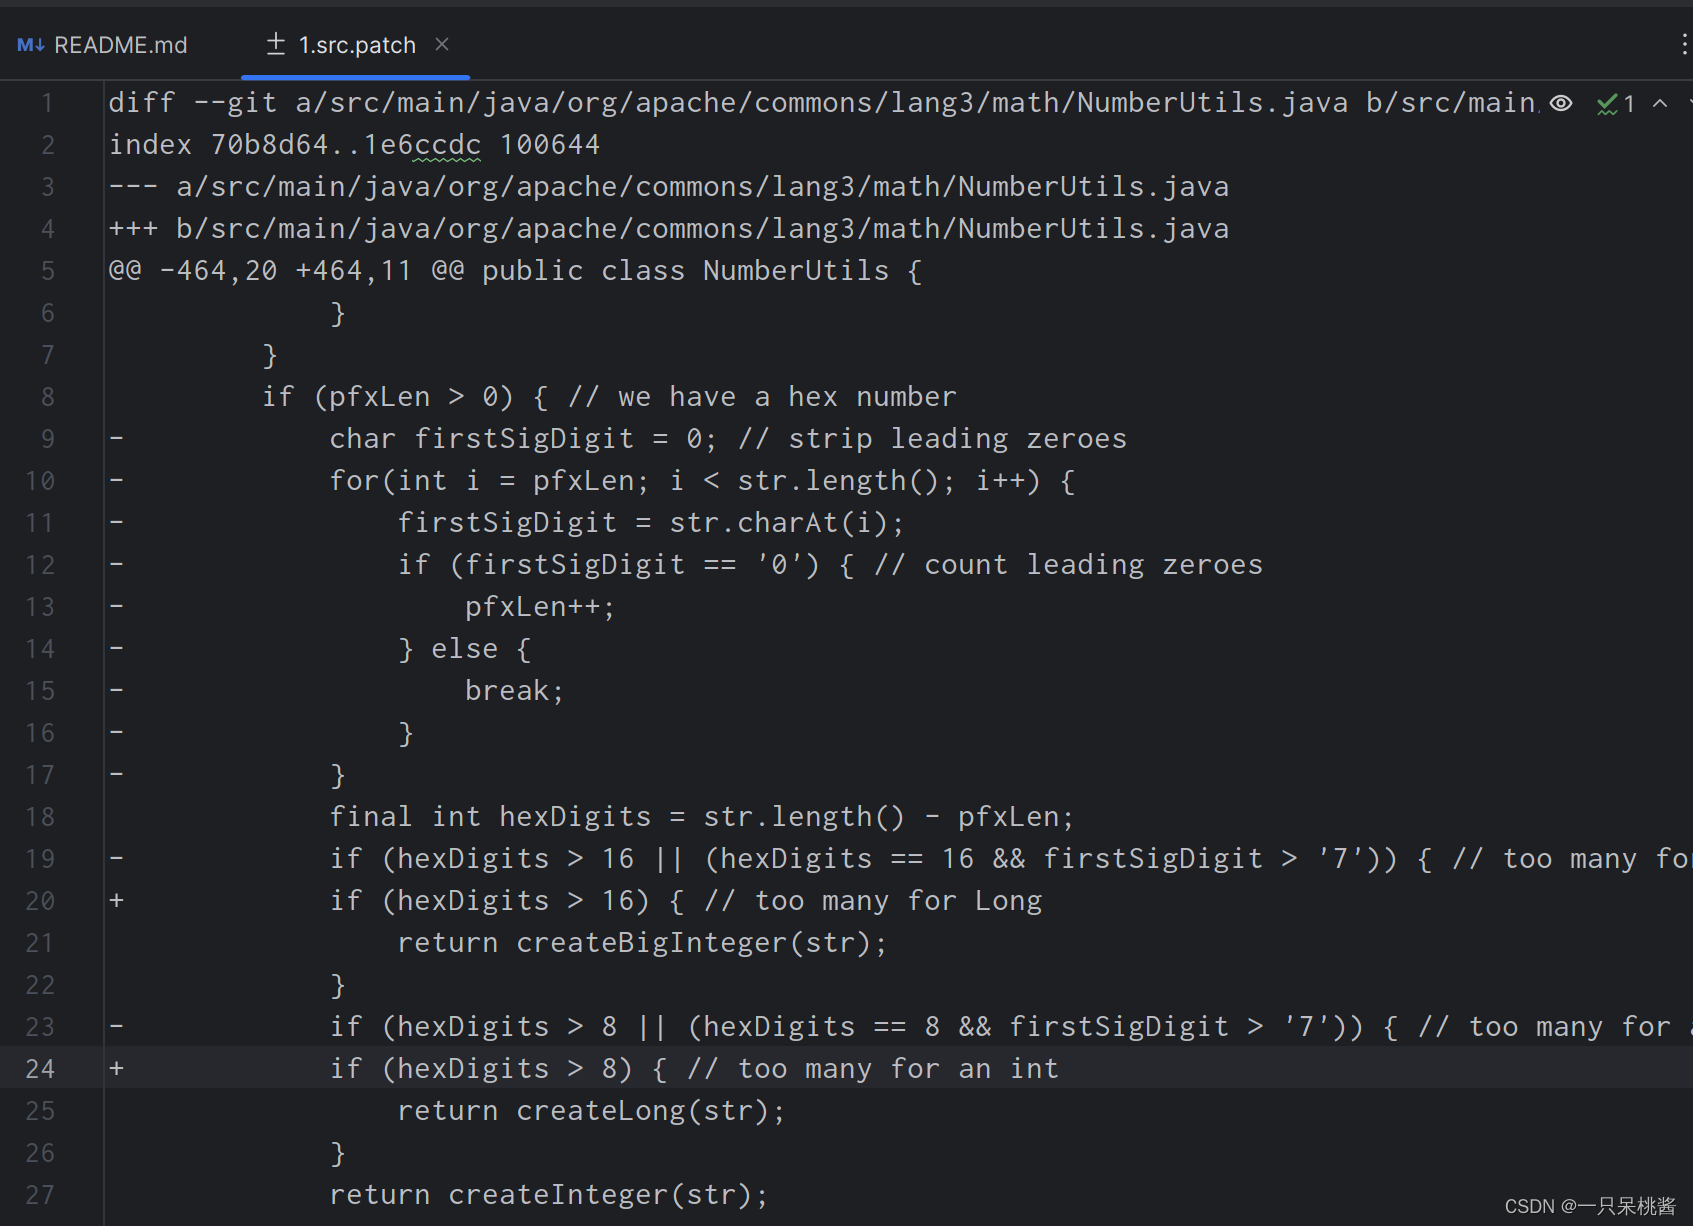
更改完代码后我们再执行defexts4j test 就没有错误了。
这种方法可以帮助我们获取无故障的源码以及为程序中插入故障提供思路。
三、 Defects4j-FL
| 阿里云国内75折 回扣 微信号:monov8 |
| 阿里云国际,腾讯云国际,低至75折。AWS 93折 免费开户实名账号 代冲值 优惠多多 微信号:monov8 飞机:@monov6 |