

SpringBoot第一讲
| 阿里云国内75折 回扣 微信号:monov8 |
| 阿里云国际,腾讯云国际,低至75折。AWS 93折 免费开户实名账号 代冲值 优惠多多 微信号:monov8 飞机:@monov6 |
目录
1.2.1 SpringBoot中resources项目结构
一、SpringBoot
1.1 SpringBoot介绍
1.1.1 SpringBoot产生的背景
Servlet->Struts2->Spring->SpringMVC技术发展过程中对使用者来说越来越简单成本越来越低。
SSM框架搭建WEB项目的时候需要做什么
1.引入Spring,SpringMVC,Mybatis依赖关系
2.编写配置文件Spring +SpringMVC+MyBatis Web.xml
3.编写代码
问题Spring框架存在了大量的xml配置文件和依赖关系为了解决这些问题出现了Springboot框架。
1.1.2 什么是SpringBoot
Springboot是Spring平台的一个全新的框架目的是简化Spring框架应用中的初始化搭建和开发过程。
SpringBoot基于Spring4进行的设计。使用“约定优于配置”的方式来简化开发过程从而使开发人员不再需要定义过多的配置boot使用Maven来管理依赖关系。
1.1.3 使用SpringBoot的好处
1.无需xml配置文件
2.无需手动管理jar包的依赖关系使用Maven来进行统一管理
3.无需外部服务器有内置的tomcat服务器可以直接启动项目
4.配置热部署和自动启动
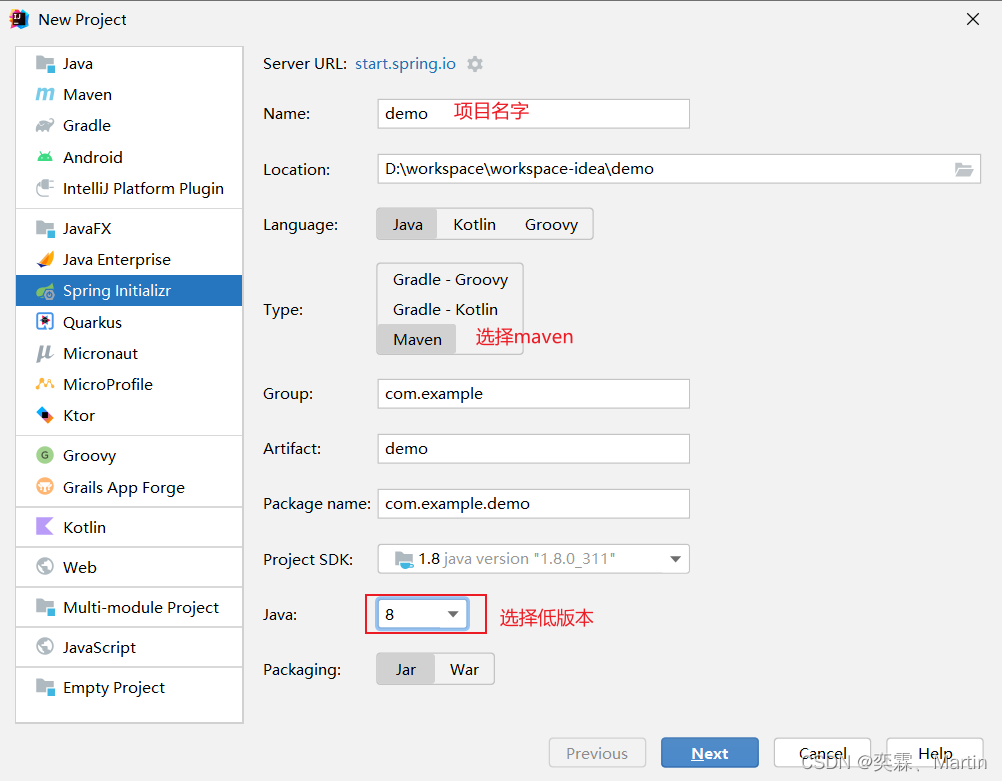
1.2 搭建项目
idea版本为2021.3.2
http://start.spring.io https://start.aliyun.com/
第一步
第二步
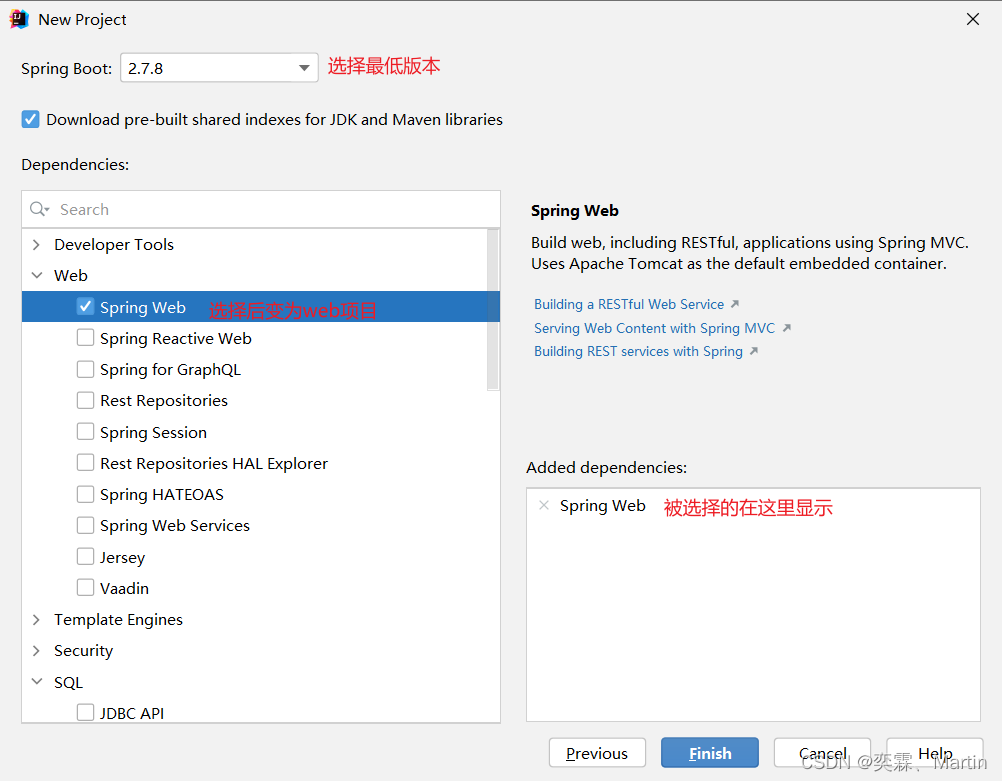
【Developer Tools】-【Springboot Web DevTools】实现热部署
【Web】-【Spring Web】
【Template Engines】-【Thymeleaf】添加Thymeleaf模板
【SQL】-【MyBatis-Framework】+【MySQL Driver】
后续依赖可以在pom文件中进行添加
1.2.1 SpringBoot中resources项目结构

static:存放静态资源比如css,js,图片
templates:模板文件
application.propertiesspringboot配置文件
applicatio.yml也是springboot配置文件
bootstrap.properties 是配置文件中心 分布式项目时会使用
bootstrap.yml
banner的在线地址http://www.network-science.de/ascii/配置文件格式
properties文件key-value的格式
yml文件阶梯状得配置格式相同级别只能出现一次
properties文件和yml文件中有相同属性时properties文件得优先级高于yml文件推荐使用yml文件格式清晰
如果两个文件里面包含有相同的属性 只加载properties文件里面的内容 yml里面的改属性的值被忽略
1.2.2 SpringBoot的基本配置
以yml形式的文件配置
#设置端口号
# 设置上下文的路径 必须以/为开头
server:
port: 8888
# servlet:
# context-path: /test2
#配置视图
spring:
mvc:
view:
prefix: /
suffix: .jsp
# 配置时间转换格式
jackson:
date-format: yyyy-MM-dd HH:mm:ss
time-zone: GMT+8
# 配置数据源
datasource:
driver-class-name: com.mysql.cj.jdbc.Driver
url: jdbc:mysql://localhost:3306/test_zzz_test?useSSL=false&serverTimezone=Asia/Shanghai
username: root
password: 密码
# 设置mapper文件所在的位置
mybatis:
mapper-locations: classpath:mapper/ *.xml
#
configuration:
log-impl: org.apache.ibatis.logging.stdout.StdOutImpl
#输出日志的另一种方法Mybatis自带的日志写法要配上mybatis的jar包1.2.3 跳转jsp页面
1、在pom文件中添加依赖
<!-- 支持跳转jsp页面 -->
<dependency>
    <groupId>javax.servlet</groupId>
    <artifactId>jstl</artifactId>
</dependency>
<dependency>
    <groupId>org.apache.tomcat.embed</groupId>
    <artifactId>tomcat-embed-jasper</artifactId>
</dependency>2、在main文件夹下创建webapp文件夹
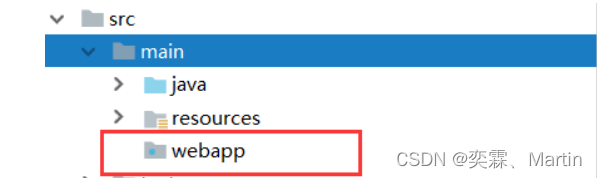
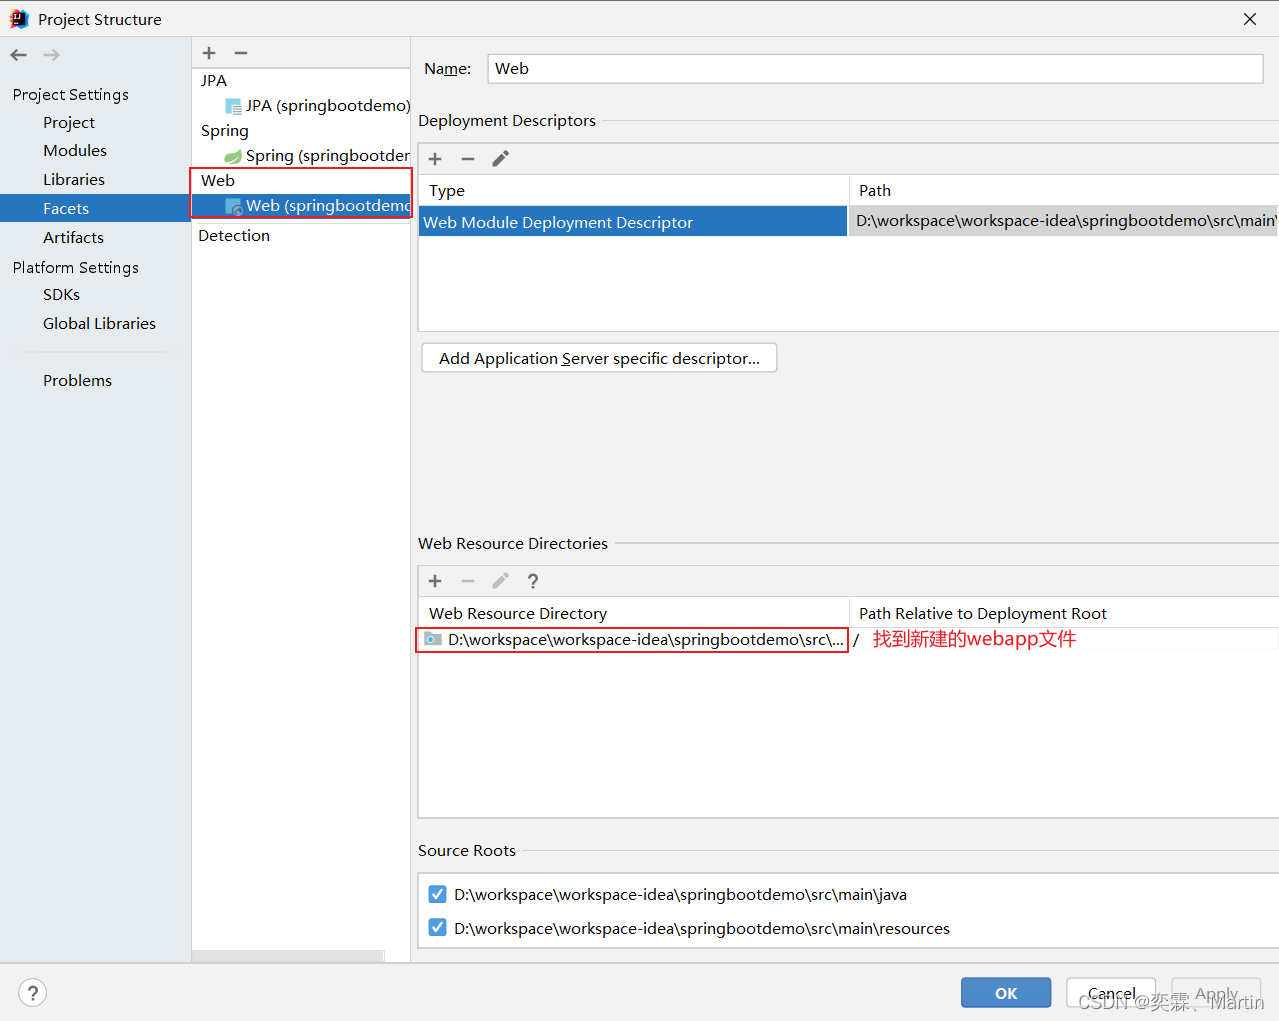
3、在webapp文件夹下创建jsp页面
controller页 面代码
面代码
@Controller
public class IndexController {
/**
* 测试跳转jsp页面
* @return
*/
@GetMapping("index")
public String index(){
return "index";
}
/**
* 测试向前台发送json数据
*/
@GetMapping("sec")
@ResponseBody
public User testSend(){
System.out.println("000");
return new User("test",new Date());
}
}1.2.4 配置热部署
1、在pom中添加依赖
        <dependency>
            <!-- optional设置为true 否则热部署无效-->
            <groupId>org.springframework.boot</groupId>
            <artifactId>spring-boot-devtools</artifactId>
            <scope>true</scope>
            <optional>true</optional>
</dependency> 修改插件配置
<build>
    <plugins>
        <plugin>
            <groupId>org.springframework.boot</groupId>
            <artifactId>spring-boot-maven-plugin</artifactId>
            <configuration>
                <!--fork:如果没有该项配置,整个devtools不会起作用-->
                <fork>true</fork>
            </configuration>
        </plugin>
    </plugins>
</build>
2、然后修改系统设置
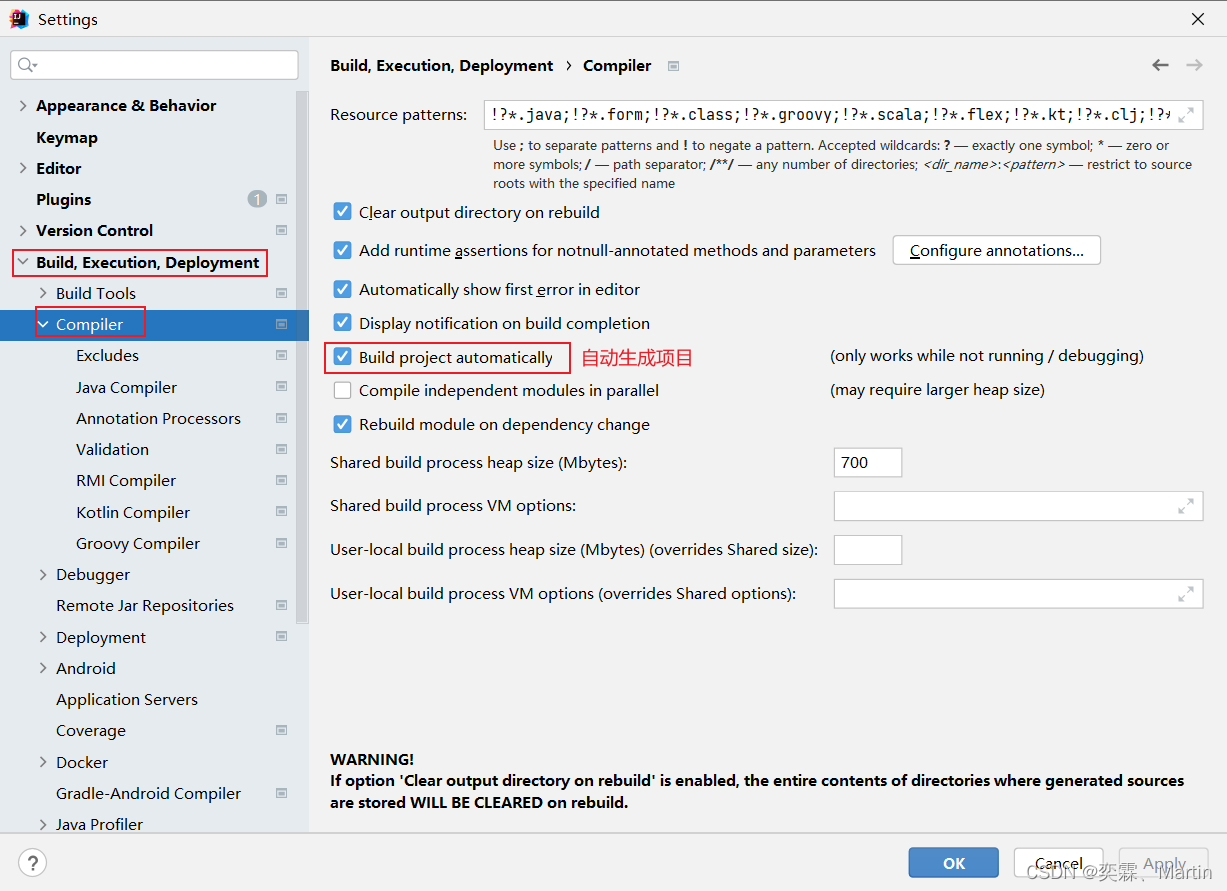
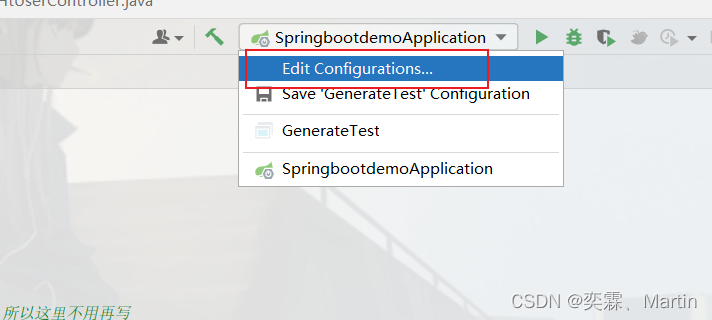
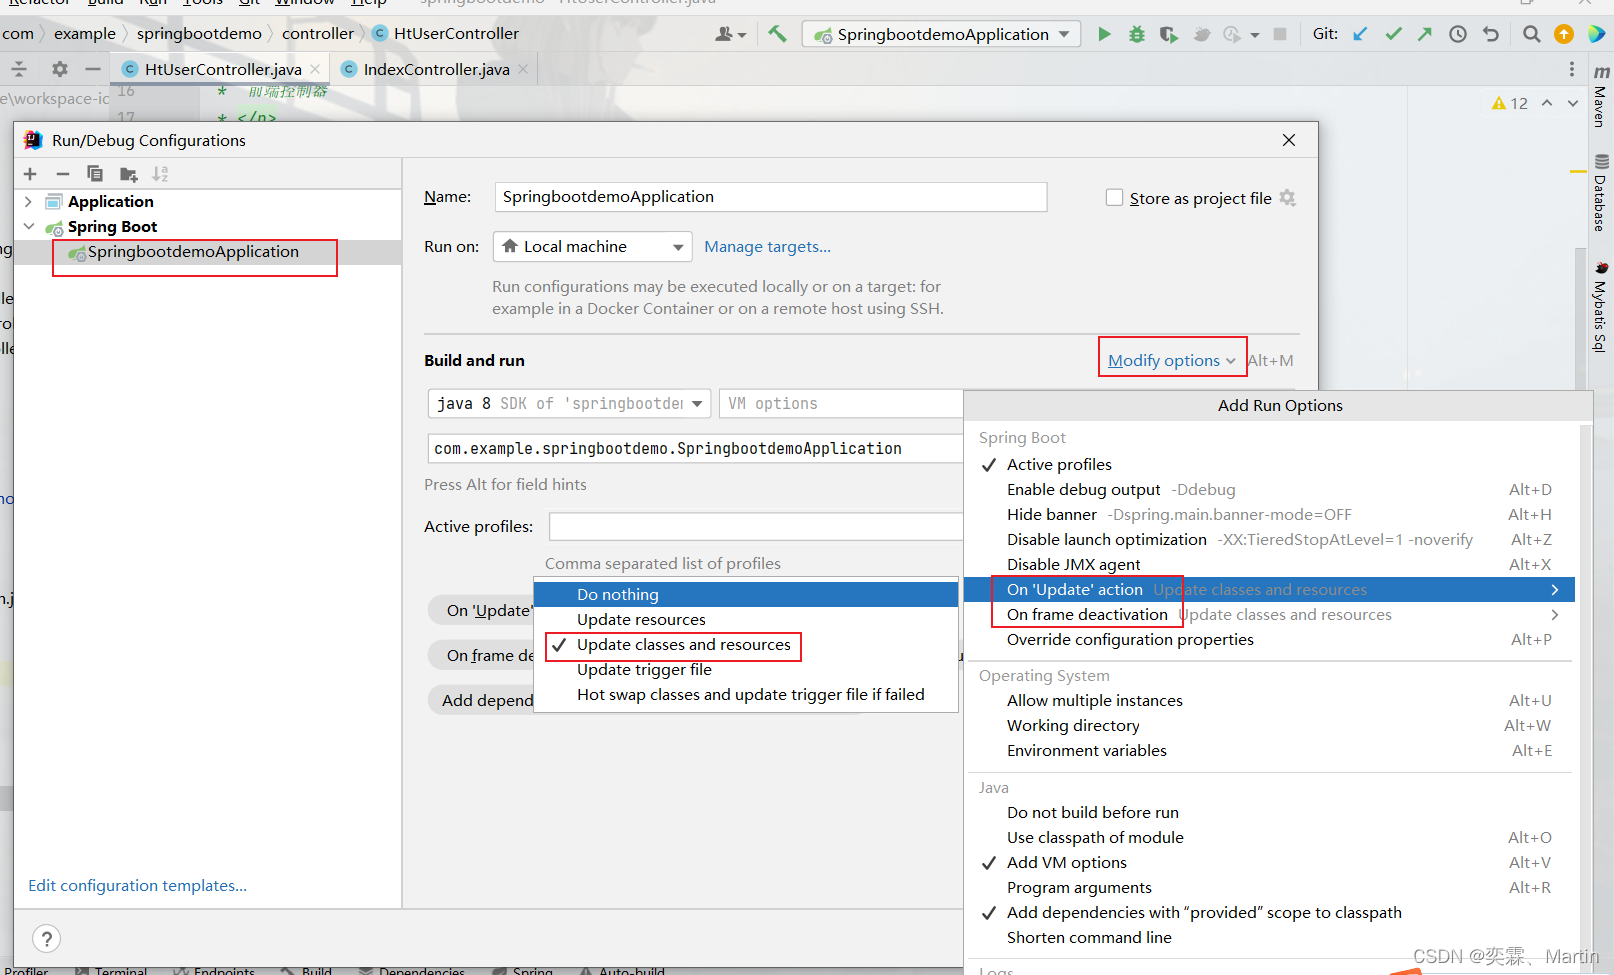
3、进行项目配置
按快捷键ctrl+alt+s hift+/会跳出来一个菜单,选registry
然后在弹出的菜单列表中往下滑找一个c开头的 compiler.automake.allow.when.app.running 即允许在工程运行时进行自动编译.
如果idea版本比较高没有这种选项
这里还有另外一种做法
1.2.5 整合mybatis开发web项目
1、在pom文件中添加mybatis 和 通用Mapper 依赖
      <!--mybatis持久层操作-->
        <dependency>
            <groupId>org.mybatis.spring.boot</groupId>
            <artifactId>mybatis-spring-boot-starter</artifactId>
            <version>1.3.2</version>
        </dependency>
        <!--通用的Mapper-->
        <dependency>
            <groupId>tk.mybatis</groupId>
            <artifactId>mapper-spring-boot-starter</artifactId>
            <version>RELEASE</version>
        </dependency>
通用Mapper中的方法
 方法List<T> select(T record);
    说明根据实体中的属性值进行查询查询条件使用等号
    方法T selectByPrimaryKey(Object key);
    说明根据主键字段进行查询方法参数必须包含完整的主键属性查询条件使用等号
    方法List<T> selectAll();
    说明查询全部结果select(null)方法能达到同样的效果
    方法T selectOne(T record);
    说明根据实体中的属性进行查询只能有一个返回值有多个结果是抛出异常查询条件使用等号
    方法int selectCount(T record);
    说明根据实体中的属性查询总数查询条件使用等号
Insert
    方法int insert(T record);
    说明保存一个实体null的属性也会保存不会使用数据库默认值
    方法int insertSelective(T record);
    说明保存一个实体null的属性不会保存会使用数据库默认值
Update
    方法int updateByPrimaryKey(T record);
    说明根据主键更新实体全部字段null值会被更新
    方法int updateByPrimaryKeySelective(T record);
    说明根据主键更新属性不为null的值
Delete
    方法int delete(T record);
    说明根据实体属性作为条件进行删除查询条件使用等号
    方法int deleteByPrimaryKey(Object key);
    说明根据主键字段进行删除方法参数必须包含完整的主键属性
 Example方法
    方法List<T> selectByExample(Object example);
    说明根据Example条件进行查询
    重点这个查询支持通过Example类指定查询列通过selectProperties方法指定查询列
    方法int selectCountByExample(Object example);
    说明根据Example条件进行查询总数
    方法int updateByExample(@Param("record") T record, @Param("example") Object example);
    说明根据Example条件更新实体record包含的全部属性null值会被更新
    方法int updateByExampleSelective(@Param("record") T record, @Param("example") Object example);
    说明根据Example条件更新实体record包含的不是null的属性值
    方法int deleteByExample(Object example);
    说明根据Example条件删除数据
2、mybatis输出日志
mybatis
configuration:
log-impl: org.apache.ibatis.logging.stdout.StdOutImpl
#输出日志的另一种方法Mybatis自带的日志写法
# 输出的日志的值是写dao接口的路径
#logging:
# level:
# com.example.springbootdemo.mapper: debug3、集成分页的插件
<!--分页-->
<dependency>
    <groupId>com.github.pagehelper</groupId>
    <artifactId>pagehelper-spring-boot-starter</artifactId>
    <version>1.2.13</version>
</dependency>
编写controller service dao 的文件
启动类
//将接口生成代理注入到spring中
//1、在这个启动类中加上MapperScan注解
//2、或者是在对应的dao接口中加上@Mapper注解
@SpringBootApplication
@MapperScan("com.example.springbootdemo.dao")
public class SpringbootdemoApplication {
public static void main(String[] args) {
SpringApplication.run(SpringbootdemoApplication.class, args);
}
}
controller
@RestController
@RequestMapping("/ht-user")
//@CrossOrigin 已经在另外一个类中配置过所以这里不用再写
public class HtUserController {
@Resource
private IHtUserService htUserService;
@GetMapping
public Result getAll(HtUser user, Page page){
return new Result(htUserService.listByNameAndSex(user,page));
}
}
service
public interface IHtUserService extends IService<HtUser> {
Page listByNameAndSex(HtUser user, Page page);
}
@Service
public class HtUserServiceImpl extends ServiceImpl<HtUserMapper, HtUser> implements IHtUserService {
@Override
public Page listByNameAndSex(HtUser user, Page page) {
QueryWrapper queryWrapper = new QueryWrapper();
if (StringUtils.isNotBlank(user.getUsername())){
queryWrapper.like("username",user.getUsername());
}
if (StringUtils.isNotBlank(user.getSex())){
queryWrapper.like("sex",user.getSex());
}
Page page1 = this.page(page, queryWrapper);
// 返回当前字节里面的一个查询条件的结果
return page1;
}
}
dao
public interface HtUserMapper extends BaseMapper<HtUser> {
}1.2.6 前后端时间格式转换
@Data
@AllArgsConstructor
@NoArgsConstructor
public class User {
private String name;
// 如果使用的是 LocalDateTime 格式话的时间应该是 yyyy-MM-dd'T'HH:mm:ss.SSS'Z'
// @JsonFormat规定的是后端向前端传递数据的格式 这里的格式也可以在application.properties文件中进行规定
// @JsonFormat(pattern = "yyyy-MM-dd HH:mm:ss")
// @DateTimeFormat:规定的是前端向后端传递数据格式
@DateTimeFormat(pattern = "yyyy-MM-dd")
private Date birthday;
}1.2.7 配置德鲁伊监测
datasource:
type: com.alibaba.druid.pool.DruidDataSource
username: root
password: 密码
driver-class-name: com.mysql.jdbc.Driver
url: jdbc:mysql:///test?useSSL=false&serverTimezone=UTC
filters: stat,wall
配置文件的设置
package com.aaa.springboot01.config;
import com.alibaba.druid.pool.DruidDataSource;
import com.alibaba.druid.support.http.StatViewServlet;
import com.alibaba.druid.support.http.WebStatFilter;
import org.springframework.boot.context.properties.ConfigurationProperties;
import org.springframework.boot.web.servlet.FilterRegistrationBean;
import org.springframework.boot.web.servlet.ServletRegistrationBean;
import org.springframework.context.annotation.Bean;
import org.springframework.context.annotation.Configuration;
import javax.sql.DataSource;
@Configuration
public class DruidConfig {
@Bean
public ServletRegistrationBean druidServlet(){
ServletRegistrationBean ser=new ServletRegistrationBean(new StatViewServlet(),"/druid/*");
//设置密码
// ser.addInitParameter("loginUsername","druid");
// ser.addInitParameter("loginPassword","druid");
return ser;
}
/**
* 监控
*/
@Bean
public FilterRegistrationBean filterRegistrationBean(){
FilterRegistrationBean filterRegistrationBean=new FilterRegistrationBean();
filterRegistrationBean.setFilter(new WebStatFilter());
filterRegistrationBean.addUrlPatterns("/**");
filterRegistrationBean.addInitParameter("exclusions","/static/*,*.js,*.gif,*.jpg,*.png,*.css,*.ico,/druid/*");
return filterRegistrationBean;
}
@Bean
@ConfigurationProperties(prefix = "spring.datasource")
public DataSource druidDataSource(){
return new DruidDataSource();
}
}1.2.8 jsp中获取项目的路径遇到的问题
在JSP中我们有${pageContext.request.ContextPath}来定位。
但是在使用SpringBoot时一般我们都不推荐再使用JSP这个技术了。这也是官方文档为什么又没JSP与SpringBoot的使用的教程的原因。
此时我们可以通过拦截器在返回的使用在requst中注入我们的路径。
import org.slf4j.Logger;
      import org.slf4j.LoggerFactory;
      import org.springframework.context.annotation.Bean;
      import org.springframework.context.annotation.Configuration;
      import org.springframework.web.servlet.config.annotation.InterceptorRegistration;
      import org.springframework.web.servlet.config.annotation.InterceptorRegistry;
      import org.springframework.web.servlet.config.annotation.WebMvcConfigurerAdapter;
      import org.springframework.web.servlet.handler.HandlerInterceptorAdapter;
      import javax.servlet.http.HttpServletRequest;
      import javax.servlet.http.HttpServletResponse;
      /**
       *
       */
      @Configuration
      public class WebRequestPathConfig extends WebMvcConfigurerAdapter {
              private final static Logger logger = LoggerFactory.getLogger(WebRequestPathConfig.class);
                @Bean
                public RequestExtendPathInterceptor getRequestExtendPathInterceptor() {
                        return new RequestExtendPathInterceptor();
                }
                public void addInterceptors(InterceptorRegistry registry) {
                        InterceptorRegistration addInterceptor = registry.addInterceptor(getRequestExtendPathInterceptor());
                        // 拦截配置
                        addInterceptor.addPathPatterns("/**");
                }
                private class RequestExtendPathInterceptor extends HandlerInterceptorAdapter {
                        @Override
                        public boolean preHandle(HttpServletRequest request, HttpServletResponse response, Object handler)
                                        throws Exception {
                                String scheme = request.getScheme();
                                String serverName = request.getServerName();
                                int port = request.getServerPort();
                                String path = request.getContextPath();
                                String basePath = scheme + "://" + serverName + ":" + port + path;
                                logger.info(basePath);
                                request.setAttribute("basePath", basePath);
                                return true;
                        }
                }
        }
1.3 SpringBoot自动配置原理
SpringBoot项目无需各种配置文件启动类中一个main方法就能把项目启动起来。那么我们看看SpringBoot是如何进行自动配置和启动的。
run方法从一个使用了默认配置的指定资源启动一个SpringApplication并返回ApplicationContext对象这个默认配置如何指定呢

这个默认配置来源于@SpringBootApplication注解这个注解是个复合注解里面还包含了其他注解。
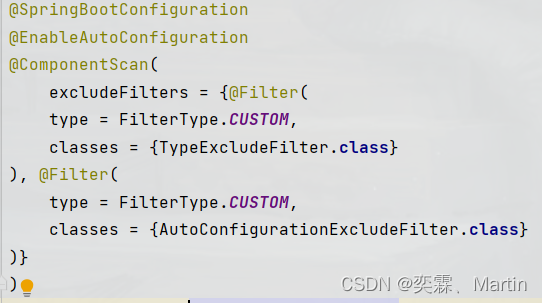
其中有三个注解是比较重要的
1.@SpringBootConfiguration
这个注解的底层是一个@Configuration注解意思被@Configuration注解修饰的类是一个IOC容器支持JavaConfig的方式来进行配置
2.@ComponentScan
这个就是扫描注解的意思默认扫描当前类所在的包及其子包下包含的注解将@Controller/@Service/@Component/@Repository等注解加载到IOC容器中
3.@EnableAutoConfiguration
这个注解表明启动自动装配里面包含连个比较重要的注解@AutoConfigurationPackage和@Import。
3.1.@AutoConfigurationPackage和@ComponentScan一样也是将主配置类所在的包及其子包里面的组件扫描到IOC容器中但是区别是@AutoConfigurationPackage扫描@Enitity、@MapperScan等第三方依赖的注解@ComponentScan只扫描@Controller/@Service/@Component/@Repository这些常见注解。所以这两个注解扫描的对象是不一样的。
3.2.@Import(AutoConfigurationImportSelector.class)是自动装配的核心注解AutoConfigurationImportSelector.class中有个selectImports方法selectImports方法还调用了getCandidateConfigurations方法

getCandidateConfigurations方法中我们可以看下断言说找不到META-INF/spring.factories由此可见这个方法是用来找META-INF/spring.factories文件的

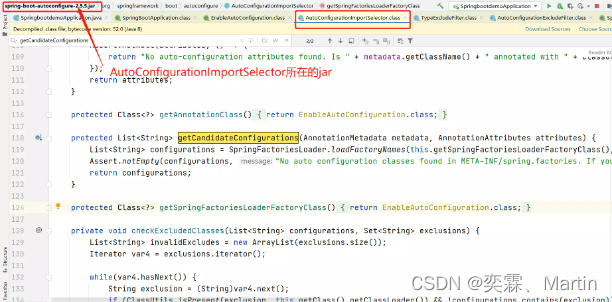
我们可以定位到这个方法所在的类处于spring-boot-autoconfigure-2.5.5*.jar包中找到这个jar中对应的spring.factories文件

spring.factories文件是一组组的key=value的形式包含了key为EnableAutoConfiguration的全类名value是一个AutoConfiguration类名的列表以逗号分隔。

最终@EnableAutoConfiguration注解通过@SpringBootApplication注解被间接的标记在了SpringBoot的启动类上SpringApplicaton.run方法的内部就会执行selectImports方法进而找到所有JavaConfig配置类全限定名对应的class然后将所有自动配置类加载到IOC容器中。
1.3.1 配置原理举例
那么这些类是如何获取默认属性值的呢以ServletWebServerFactoryAutoConfiguration为例它是Servlet容器的自动配置类
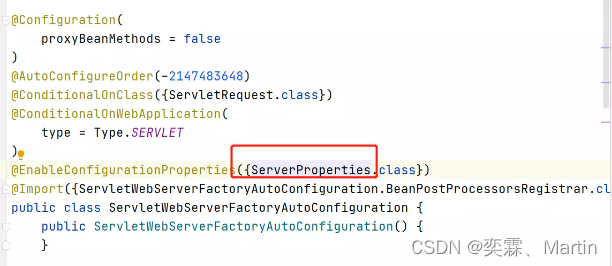
该类上开启了@EnableConfigurationProperties(ServerProperties.class)注解最终找到了ServerProperties类。
至此我们大致可以了解。在全局配置的属性如server.port等通过@ConfigurationProperties注解绑定到对应的XxxxProperties配置实体类上封装为一个bean然后再通过@EnableConfigurationProperties注解导入到Spring容器中。
1.4 Thymeleaf
1.4.1 Thymeleaf介绍
Thymeleaf是一个全新得模板引擎可以用来替代jsp页面。是spring4推荐使用得一个模板引擎。
特点
1.Thymeleaf支持HTML原型在服务不运行得情况下可以直接运行可以让美工在浏览器上直接查看页面的静态效果也可以支持开发人员在服务器运行时查询动态页面效果。
2.在html标签中增加了额外得属性来达到模版+数据得展示方式在浏览器解析html页面时会自动忽略html标签中未定义得属性达到可以显示静态页面效果当有数据返回时thymeleaf标签会动态得替换掉静态内容显示动态页面。
3.提供了标准和spring标准两种语言实现jstl,ognl表达式得效果。
4.使用方便学习简单快速得实现表单得数据绑定。
1.4.2 Thymeleaf使用
1、配置Thymeleaf
server.servlet.context-path=/springboot03
•
# 数据库配置
spring.datasource.driver-class-name=com.mysql.cj.jdbc.Driver
spring.datasource.url=jdbc:mysql://127.0.0.1:3306/yiibaidb?useSSL=false&serverTimezone=UTC
spring.datasource.username=root
spring.datasource.password=admin
•
# thymeleaf模板配置
spring.thymeleaf.suffix=.html
spring.thymeleaf.cache=false
spring.thymeleaf.mode=HTML5
spring.thymeleaf.encoding=UTF-8
2、编写controller层代码
@Controller
public class TestController {
    @RequestMapping("test")
    public String test(Model model){
        model.addAttribute("msg","测试方法调用成功");
        return "success";
    }
}
3、创
建Thymeleaf模板
在templates创建html页面在html页面上引入thymeleaf命名空间
<html lang="en" xmlns:th="http://wwww.thymeleaf.org" > 4、 在html标签中使用thymeleaf标签获取服务器返回得数据信息
<span th:text="${msg}">success</span>5、直接访问templates下模板文件
# 静态资源路径
spring.resources.static-locations=classpath:/META-INF/resources/,classpath:/resources/, classpath:/static/,classpath:/public/,classpath:/templates/
配置好静态资源路径后就可以将templates下的静态文件当成根目录下的静态网页来访问了。
1.4.3 Thymeleaf常用标签
1.1 th:text
用于文本的显示,并且可以进行简单的计算。
<td  th:text="${username}">mlm</td> ---> <td>maliming</td>
<td  th:text="9+7">2018</td> ---> <td>16</td>
1.2 th:utext
用于html的文本替换,常用于富文本编辑器编辑后的内容显示到前台页面上。
<p th:utext="${article.content}"></p> ---> <p>my name is <b>maliming</b></p>1.3 th:if
用于判断条件,还可以多条件 and,or(二元操作符)!,not非(一元操作符)。
<div th:if="${user} != null">show</div>如果user对象为空则不显示不为空则显示
---> <div>show</div>
<div th:if="${user} != null and ${otherUser} != null">show</div> 运算符还可以写在${}里show -> show运算符放在了 {} 内部, 此时整个 {} 内的表达式用 ognl/spel 引擎计算; 如果运算符放在外部, 那么 thymeleaf 引擎负责计算。
1.4 th:unless
用于判断条件与th:if作用相反。
<div th:if="${user} != null">show</div>如果user对象不为空则不显示为空则显示
---> <div>show</div>
1.5 th:switch th:case
用于多个同等级相同目的判断,多选一时使用。
<div th:switch="${user.name}">
    <p th:case="maliming">first</p>若${user.name}中的值为maliming则显示否则不显示
    <p th:case="${otherUser.name}">second</p>
</div>
1.6 th:action
用于定义后台控制器的路径表单的提交地址相当于<form>标签的action属性。
<form th:action="@{user/login}" method="post"></form>1.7 th:each
用于遍历集合中的对象相当于jstl中的c:forEach标签。
① List集合循环遍历
<tr th:each="user,userStat:${list}">
    <td th:text="${user.name}"></td>
    <td th:text="userStat.index"></td>
</tr>
其中的user是临时变量相当于for(User user : users)中的useruserStat称为状态变量属性有index:当前迭代对象的index(从0开始计算);count: 当前迭代对象的index(从1开始计算), size:被迭代对象的大小,current:当前迭代变量,even/odd:布尔值当前循环是否是偶数/奇数(从0开始计算), first:布尔值当前循环是否是第一个,last:布尔值当前循环是否是最后一个。
② Map集合循环遍历
<div th:each="map:${maps}" th:text="${map}"></div>③ 数组循环遍历
<tr>
    <td th:each="array:${arrays}" th:text="${array}"></td>
</tr>
1.8 th:value
用于属性赋值。
<option th:value="${user.name}"></option> -> <option value="maliming"></option>1.9 th:src
用于外部资源的引入例如图片js文件。
<img th:src="@{../images/myself.jpg}"/>或
<script th:src="@{../static/login.js}"></script>
1.10 th:href
用于定义超链接,相当于<a></a>>标签的href属性。
<a th:href="@{/user/selectUser?(currentPage=1,reTypeid=${reTypeid},inquiry=${inquiry})}"></a> 传参。1.11 th:remove
用于删除。可以表达式传参。
<table border="1">
    <thead>
          <tr>
             <th>编号</th>
             <th>用户名</th>
             <th>姓名</th>
             <th>性别</th>
          </tr>
    </thead>
    <tbody th:remove="all-but-first" 或者表达式th:remove="${choice}? all : all-but-first">
          <tr>
             <td>1</td>
             <td>xxxxxxxx@qq.com</td>
             <td>Tom</td>
             <td>男</td>
          </tr>
          <tr>
             <td>3</td>
             <td>xxxxxxxx@qq.com</td>
             <td>Lucy13</td>
             <td>女</td>
           </tr>
    </tbody>
</table>
这里的<tbody></tbody>标签中有th:remove="all-but-first"意思是只保留<tbody></tbody>标签中的第一个字标签也就是name为Tom的所在<tr></tr>,其他的子标签则会删除th:remove有五个属性值。all删除所在标签和内容及其所属的所有子标签。body删除所在标签的内容及其所属的所有子标签。tag删除所在标签不删除任何所属的子标签。all-but-first删除除第一个子标签外的其他子标签。none不起作用什么也不做。
1.12 th:selected
用于选择框设置选中值。通常和th:each一起使用。
<select>
<option th:selected="${user.name} == ${otherUser.name}"></option> 若相等就默认选中此<option></option>
</select>
1.13 th:object
用于表单数据对象绑定后台controller中参数保持一致和选择(星号)表达式。
<form th:object="${user}">
    <input th:value="*{name}"/> *号代替了${user}
</form>
1.14 th:attr
用于设置任意属性
<input th:attr="value=${user.name}"/> 设置单个属性。
<input th:attr="value=${user.username},name=username"/> 设置多个属性之间用逗号隔开。
1.4.4 Thymeleaf中的内置对象
dates日期格式化内置对象具体方法可以参照java.util.Date
<span th:text="${#dates.format(user.date, ‘yyyy-MM-dd‘)}">日期</span>
   或者
<span th:text="${#dates.format(billingForm.startTime,‘yyyy-MM-dd HH:mm:ss‘)}">时间</span>
calendars类似于#dates但是 是java.util.Calendar类的方法
numbers 数字格式化
strings字符串格式化具体方法可以参照java.lang.String如startsWith、contains等
objects参照java.lang.Object
bools判断boolean类型的工具
arrays数组操作的工具
lists列表操作的工具参照java.util.List
setsSet操作工具参照java.util.Set
mapsMap操作工具参照java.util.Map
aggregates操作数组或集合的工具
messages操作消息的工具。