

后端人眼中的Vue(三)
| 阿里云国内75折 回扣 微信号:monov8 |
| 阿里云国际,腾讯云国际,低至75折。AWS 93折 免费开户实名账号 代冲值 优惠多多 微信号:monov8 飞机:@monov6 |
五、高级
5.1、计算
5.1.1、computed
在之前的购物车的案例当中我们已经实现了购物车价格的计算但是有些时候我们需要在其他很多地方也展示价格所以每展示一次我们就需要调用一次计算价格的方法所以Vue给了一个计算属性用于在Vue实例中完成相关业务计算的工作。
日后在某个数据渲染到页面时如果该数据需要经过业务处理之后或者是需要多次渲染的时候就可以使用computed这个属性。他最大的好处是可以提升Vue的运行性能使用computed进行相关计算处理会将第一次计算结果进行缓存便于日后页面多次使用。
<!DOCTYPE html>
<html>

<head>
    <meta charset="UTF-8">
    <meta name="viewport" content="width=device-width, initial-scale=1.0">
    <meta http-equiv="X-UA-Compatible" content="ie=edge">
    <title></title>
    <script src="https://cdn.jsdelivr.net/npm/vue/dist/vue.js"></script>
</head>

<body>
    <!--
            computed:  计算属性  推荐
                作用:  用来在vue实例中完成相关业务计算工作    日后在将某个数据渲染页面时如果该数据需要经过业务处理之后再渲染就可以使用computed
                好处:  提升vue运行性能  主要使用computed进行计算相关处理 会将第一次计算结果进行缓存,便于日后页面多次使用
                使用:  {{属性名}}
        -->
    <div id='app'>
        <h1>{{msg}} {{counts}} {{counts}} {{counts}}{{counts}}{{counts}}{{counts}}{{counts}}</h1>
    </div>
</body>

</html>
<script>
    new Vue({
        el: '#app',
        data: {
            msg: "购物车案例之computed",
            count:0,
        },
        methods: {
        },
        computed: { //计算属性
            counts() {
                console.log("computed.counts----------------------");
                return this.count + 10;
            },

        }
    });
</script>
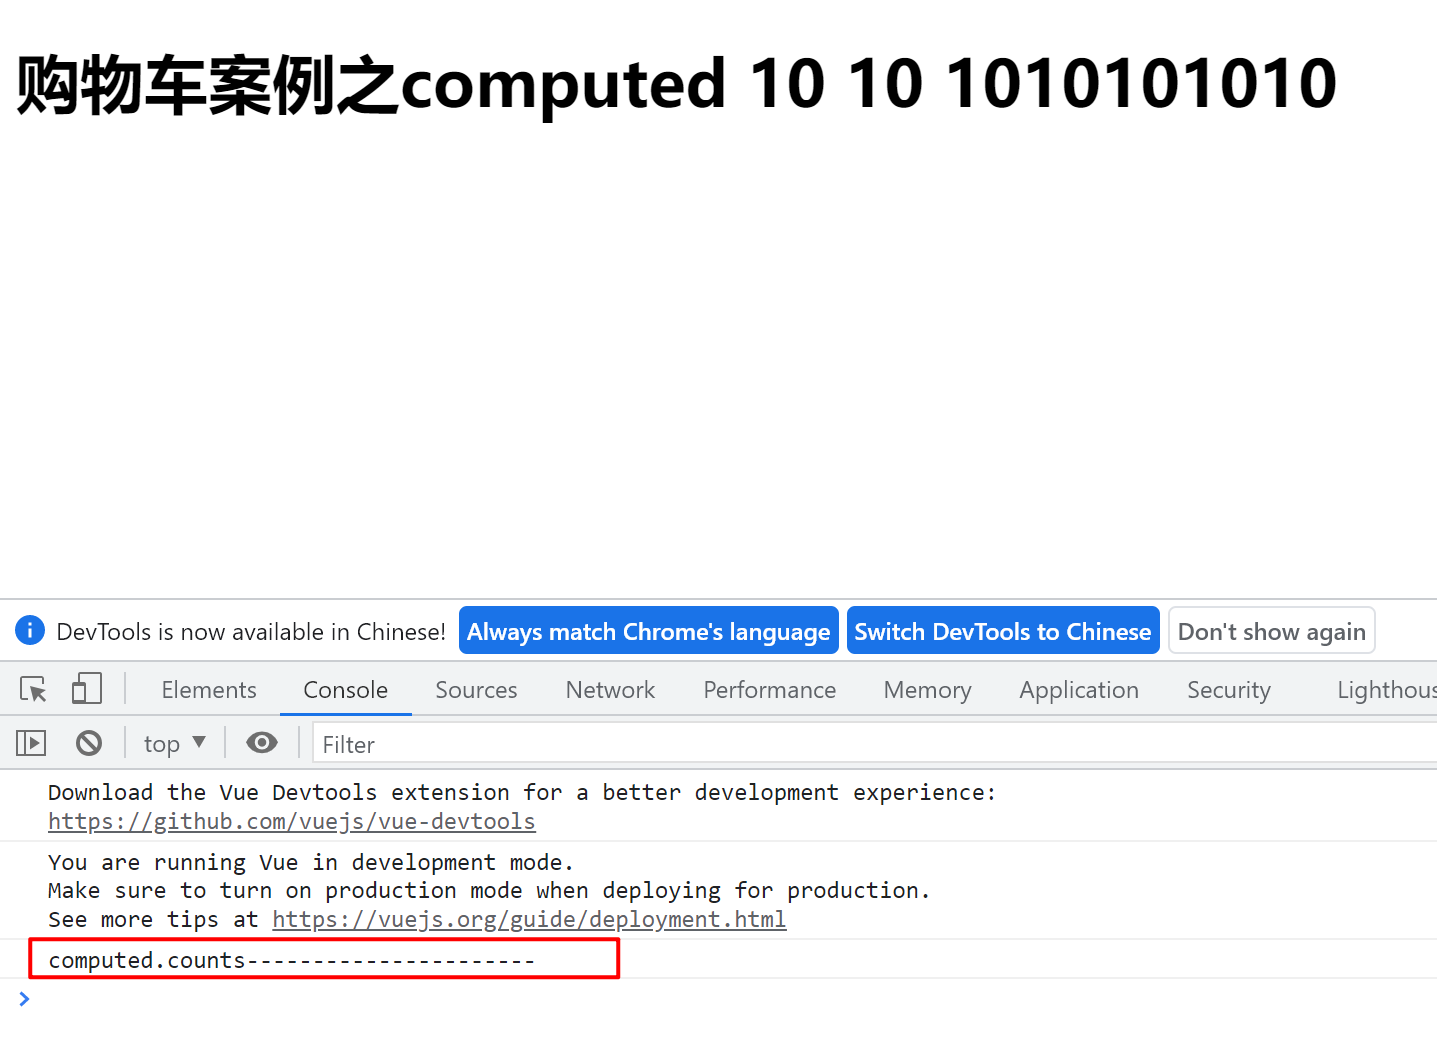
可以看到他只调用了一次提高了性能。
5.2、事件修饰符
修饰符是用来喝事件连用可以用来决定事件触发条件或者是阻止事件触发的机制Vue官方给了四种常见的事件修饰符
- .stop用来阻止事件冒泡。
- .prevent用来阻止事件或者标签的默认行为。
- .self只监听自身标签触发的事件。
- .once该事件只触发一次。
5.2.1、.stop
事件冒泡孩子的事件会扩散到父亲的事件中导致父亲的事件也触发了。他的语法是@事件名事件修饰符="事件处理函数"类似@click.stop="test"。
<!DOCTYPE html>
<html>

<head>
    <meta charset="UTF-8">
    <meta name="viewport" content="width=device-width, initial-scale=1.0">
    <meta http-equiv="X-UA-Compatible" content="ie=edge">
    <title></title>
    <script src="https://cdn.jsdelivr.net/npm/vue/dist/vue.js"></script>
</head>

<body>
    <div id='app'>
        <h3>stop修饰符</h3>
        <div style="width: 200px;height: 200px;background: red" @click="parent">

            <div style="width: 100px;height: 100px;background: aquamarine" @click.stop="child">

                <div style="width: 50px;height: 50px;background:royalblue" @click="child1">

                </div>

            </div>

        </div>
    </div>
</body>

</html>
<script>
    new Vue({
        el:"#app",
        data:{
            msg:"事件修饰符"
        },
        methods:{
            test(){
                console.log("test");
            },
            parent(){
                console.log("parent");
            },
            child(){
                console.log("child");
            },
            child1(){
                console.log("child1");
            },
            testa(){
                console.log("testa");
            }
        },
        computed:{},//用来在vue实例中定义一些列计算属性    {{属性名}}
    });
</script>
5.2.2、.prevent
<!DOCTYPE html>
<html>

<head>
    <meta charset="UTF-8">
    <meta name="viewport" content="width=device-width, initial-scale=1.0">
    <meta http-equiv="X-UA-Compatible" content="ie=edge">
    <title></title>
    <script src="https://cdn.jsdelivr.net/npm/vue/dist/vue.js"></script>
</head>

<body>
    <div id='app'>
        <h3>prevent修饰符</h3>
        <a href="http://www.baidu.com" @click.prevent="testa">点我</a>
        <a href="javascript:;" @click.prevent="testa">点我</a>
    </div>
</body>

</html>
<script>
    new Vue({
        el: '#app',
        data: {
        },
        methods: {
        },
    });
</script>
5.2.3、self
事件修饰符还可以连用大概长这样@click.self.stop。
<!DOCTYPE html>
<html>

<head>
    <meta charset="UTF-8">
    <meta name="viewport" content="width=device-width, initial-scale=1.0">
    <meta http-equiv="X-UA-Compatible" content="ie=edge">
    <title></title>
    <script src="https://cdn.jsdelivr.net/npm/vue/dist/vue.js"></script>
</head>

<body>
    <div id='app'>
        <h3>self修饰符(事件修饰符可以连用)</h3>
        <div style="width: 200px;height: 200px;background: red" @click.self="parent">

            <div style="width: 100px;height: 100px;background: aquamarine" @click.self.stop="child">

                <div style="width: 50px;height: 50px;background:royalblue" @click="child1">

                </div>

            </div>

        </div>
    </div>
</body>

</html>
<script>
    new Vue({
        el: '#app',
        data: {
        },
        methods: {
        },
    });
</script>
5.3、按键修饰符
事件修饰符是可以对所有事件进行修饰而按键修饰符只可以对键盘事件来进行修饰按键修饰符同样可以连着修饰Vue提供了一堆的按键修饰符
- .enter对回车键修饰。
- .tab对键盘切换tab键修饰。
- .delete对删除或者是退格键进行修饰。
- .esc对键盘esc事件进行修饰。
- .space对键盘空格键进行修饰。
- .up对键盘方向键中的上键进行修饰。
- .down对键盘方向键中的下键进行修饰。
- .left对键盘方向键中的左键进行修饰。
- .right对键盘方向键中的右键进行修饰。
5.4、数组常用操作
在操作数组的时候有这几种常见的操作
- push会返回数组长度
- pop会返回删除的值
- unshift会返回数组长度
- shift 会返回删除的值
- splice会返回新数组
- concat会返回新数组
var arr = [1, 2, 3]
// 往数组最后一位添加一个数字
arr.push(4) // [1, 2, 3, 4]
// 删除数组最后一个数字
arr.pop()   // [1, 2, 3]
console.log(arr)
// 往数组第一位添加一个数字
arr.unshift(0)
console.log(arr)
// 删除数组第一个元素
arr.shift()
console.log(arr)
// splice
// 删除第一个元素
arr.splice(1, 2)
console.log(arr)
arr.splice(1, 2, 2, 4, 5)
console.log(arr)
// 合并数组
console.log([1, 6].concat([5, 7]))
数组去重
	var arr2 = [1, 2, 3, 1, 6, 2, 3]

    //ES6
    consoloe.log([...new Set(arr2)])
    console.log(Array.from(new Set(arr2)))

    var newArray = [];
    for(var i=0; i<arr2.length; i++){
        if(newArray.indexOf(arr2[i])==-1){
            newArray.push(arr2[i])
        }
    }
    console.log(newArray)

    var newArray2 = [];
    var obj = {};
    for(var i=0; i<arr2.length; i++){
        if(!obj[arr2[i]]){ //如果不在obj中就表示不重复的数据就在对象中添加键值对

            obj[arr2[i]] = arr2[i]
            newArray2.push(arr2[i])
        }
    }
    console.log(newArray2)
5.5、本地存储
有些时候需要缓存一些数据
5.5.1、localStorage永久存储
// 添加数据setItem的value值是字符串类型的数据
localStorage.setItem('name','张三')
// 获取数据
localStorage.getItem('name'); // 张三
// 清空
localStorage.clear();
注意
- 除非是主动删除不然是不会自动删除的。
- 一般浏览器存储的大小是5M5M = 1024 * 5kb。
5.5.2、sessionStorage临时会话存储
// 添加数据setItem的value值是字符串类型的数据
sessionStorage.setItem('name','张三')
// 获取数据
sessionStorage.getItem('name'); // 张三
// 清空
sessionStorage.clear();
注意
- 关闭浏览器会自动清空数据。
- 一般浏览器存储的大小是5M。
5.6、深入双向数据绑定原理
5.6.1、原理
双向数据绑定是Vue最独特的特性之一是其非侵入性的响应式系统。数据模型仅仅是普通的 JavaScript 对象。而当你修改它们时视图会进行更新。Vue里面是怎么做到的的呢其实就是使用了Object.defineProperty 把Vue内的属性全部转成 getter/setter。Object.defineProperty 是 ES5 中一个无法 shim 的特性这也就是 Vue 不支持 IE8 以及更低版本浏览器的原因。
**vue双向数据绑定原理借助Object.defineProperty()对数据进行劫持并结合发布-订阅者模式来实现双向数据绑定。**他的语法
Object.defineProperty(obj, prop, desc)
1. `obj` 需要定义属性的当前对象
2. `prop` 当前需要定义的属性名
3. `desc` 属性描述符
通过Object.defineProperty()为对象定义属性有两种形式分别为数据描述符存取描述符下面分别描述两者的区别
value表示它的默认值writable如果为true标识可以被修改如果为false标识不能被修改默认值为falseconfigurable描述属性是否配置以及可否删除可以认为是总开关 默认值 false不可删除enumerable描述属性是否出现在for in 或者 Object.keys()的遍历中 默认值false(不能遍历)
let obj = {};
Object.defineProperty(obj, 'name', {
    value: '张三'
})
obj.name = '李四'
console.log(obj.name) // 张三
let obj = {};
Object.defineProperty(obj, 'name', {
    value: '张三',
    writable: true
})
obj.name = '李四'
console.log(obj.name)
let obj = {};
  Object.defineProperty(obj, 'name', {
    value: '张三',
    writable: true,
    configurable: true,
    enumerable: true
  })
  obj.name = '李四'
  // delete obj.name
  console.log(obj.name) // 李四
  console.log(Object.keys(obj)) // ['name']
5.6.2、面试题
vue的双向数据绑定原理是什么
- vue数据双向绑定是通过数据劫持结合“发布者-订阅者模式”的方式来实现的。
- vue是通过Object.defineProperty()来实现数据劫持其中会有getter()和setter方法当读取属性值时就会触发getter()方法在view中如果数据发生了变化就会通过Object.defineProperty()对属性设置一个setter函数当数据改变了就会来触发这个函数
5.7、父子组件
5.7.1、父级向子级传递
在组件中使用选项props来声明需要从父级接收到的数据。pros机制接受数据相当于自己组件data中声明了一个数据。只能父亲影响孩子不可以孩子影响父亲。
props的值有两种方式
- 字符串数组数组中的字符串就是传递时的名称。
- 对象对象可以设置传递时的类型StringNumberBooleanArray ObjectDateFunctionSymbol也可以设置默认值等。
<body>
  <div id="app1">
    <my-con1></my-con1>
  </div>
</body>

<template id="template2">
  <section>
    <h3>{{title}}B</h3>
    <p>组件内容B</p>
    <!-- my-con1组件内的aa组件 -->
    <aa v-bind:parent-txt="childtxt"></aa>
  </section>
</template>
<script>
  var componentB = {
    template: '#template2',
    data() {
      return {
        title: 'zj',
        childtxt: 'child text'
      }
    },
    components: {
      'aa': {
        template: '<div>{{parentTxt}}</div>',
        props: ['parentTxt']
      }
    }
  }

  const vm1 = new Vue({
    el: '#app1',
    components: {
      'my-con1': componentB
    }
  })
</script>
5.7.2、子级向父级传递
<body>
  <div id="app1">
    <my-con1></my-con1>
  </div>
</body>

<template id="template2">
  <section>
    <h3>{{title}}B</h3>
    <p>组件内容B</p>
    <aa v-bind:parent-txt="childtxt" v-on:changetitle="changeTitle"></aa>
  </section>
</template>
<script>
  var componentB = {
    template: '#template2',
    data() {
      return {
        title: 'zj',
        childtxt: 'child text'
      }
    },
    components: {
      'aa': {
        template: '<div v-on:click="change">{{parentTxt}}</div>',
        props: ['parentTxt'],
        methods: {
          change() {
            this.$emit('changetitle', {
              a: 1
            })
          }
        }
      }
    },
    methods: {
      changeTitle(obj) {
        console.log(obj)
        this.title = obj.a
      }
    }
  }

  const vm1 = new Vue({
    el: '#app1',
    components: {
      'my-con1': componentB
    }
  })
</script>
5.7.3、非父子组件通讯
实际工作中如果遇到跨组件或者非父组件间的传递数据那该怎么办
- 可以使用中央事件总线也就是一个中介来完成。
- 使用
Vuex提供的功能。
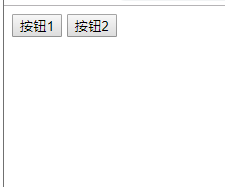
比如我点击按钮1改变按钮2的背景颜色。
<!DOCTYPE html>
<html lang="en">

<head>
  <meta charset="UTF-8">
  <meta name="viewport" content="width=device-width, initial-scale=1.0">
  <meta http-equiv="X-UA-Compatible" content="ie=edge">
  <title>Document</title>
  <script src="https://cdn.jsdelivr.net/npm/vue/dist/vue.js"></script>
</head>

<body>
  <div id="app1">
    <my-con></my-con>
    <my-con1></my-con1>
  </div>
</body>

<template id="template1">
  <button @click="click1">按钮1</button>
</template>
<template id="template2">
  <button @click="click2" :style="{backgroundColor: fontColor}">按钮2</button>
</template>
<script>
  const bus = new Vue();
  const componentA = {
    template: '#template1',
    methods: {
      click1() {
        // 点击按钮1
        bus.$emit('xxx', this.getRandomColor());
      },
      getRandomColor() {
        return `rgb(${this.getRandomNum()},${this.getRandomNum()},${this.getRandomNum()})`
      },
      getRandomNum() {
        return Math.floor(Math.random() * 256)
      }
    }
  }
  const componentB = {
    template: '#template2',
    data() {
      return {
        fontColor: ''
      }
    },
    methods: {
      click2() {
        // 点击按钮2
      }
    },
    mounted() {
      bus.$on('xxx', (color) => {
        console.log(color)
        this.fontColor = color
      })
    }
  }
  const vm1 = new Vue({
    el: '#app1',
    components: {
      myCon: componentA,
      myCon1: componentB
    }
  })
</script>

</html>
5.8、插槽slot
5.8.1、概述
slot翻译为插槽组件的插槽
-
组件的插槽也是为了让我们封装的组件更加具有扩展性。
-
让使用者可以决定组件内容的一些内容到底展示什么。


5.8.2、使用slot
如何去封装这类的组件呢
- 它们也很多区别但是也有很多共性。
- 如果我们每一个单独去封装一个组件显然不合适比如每个页面都返回这部分内容我们就要重复去封装。
- 但是如果我们封装成一个好像也不合理有些左侧是菜单有些是返回有些中间是搜索有些是文字等等。
如何封装合适呢抽取共性保留不同
- 最好的封装方式就是将共性抽取到组件中将不同暴露为插槽。
- 一旦我们预留了插槽就可以让使用者根据自己的需求决定插槽中插入什么内容。
- 是搜索框还是文字还是菜单。由调用者自己来决定。
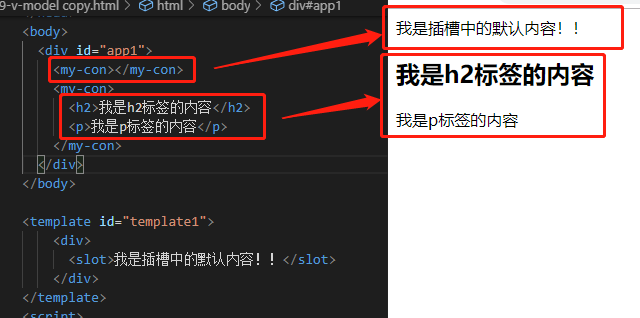
5.8.3、匿名插槽
在子组件中使用特殊的元素<slot>就可以为子组件开启一个插槽。
<!DOCTYPE html>
<html lang="en">

<head>
  <meta charset="UTF-8">
  <meta name="viewport" content="width=device-width, initial-scale=1.0">
  <meta http-equiv="X-UA-Compatible" content="ie=edge">
  <title>Document</title>
  <style>

  </style>
  <script src="https://cdn.jsdelivr.net/npm/vue/dist/vue.js"></script>
</head>
<body>
  <div id="app1">
    <my-con></my-con>
    <my-con>
      <h2>我是h2标签的内容</h2>
      <p>我是p标签的内容</p>
    </my-con>
  </div>
</body>

<template id="template1">
    <div>
      <slot>我是插槽中的默认内容</slot>
    </div>
</template>
<script>
  var componentA = {
    template: '#template1',
  }
  const vm1 = new Vue({
    el: '#app1',
    data: {

    },
    components: {
      myCon: componentA
    }
  })
</script>

</html>
5.8.4、具名插槽
当子组件的功能复杂时子组件的插槽可能并非是一个他有以下几种情况
- 比如我们封装一个导航栏的子组件可能就需要三个插槽分别代表左边、中间、右边。
- 那么外面在给插槽插入内容时如何区分插入的是哪一个呢
- 这个时候我们就需要给插槽起一个名字
这个时候我们就需要具名插槽我们只需要给slot元素一个name属性即可<slot name='myslot'></slot>
<!DOCTYPE html>
<html lang="en">

<head>
  <meta charset="UTF-8">
  <meta name="viewport" content="width=device-width, initial-scale=1.0">
  <meta http-equiv="X-UA-Compatible" content="ie=edge">
  <title>Document</title>
  <style>

  </style>
  <script src="https://cdn.jsdelivr.net/npm/vue/dist/vue.js"></script>
</head>
<body>
  <div id="app1">
    <my-con>
      <div slot="left">左侧</div>
      <div slot="right">右侧</div>
      <div slot="center">中间</div>
    </my-con>
  </div>
</body>

<template id="template1">
    <div>
      <slot name="left">我是左侧插槽中的默认内容</slot>
      <slot name="center">我是中间侧插槽中的默认内容</slot>
      <slot name="right">我是右侧插槽中的默认内容</slot>
    </div>
</template>
<script>
  var componentA = {
    template: '#template1',
  }
  const vm1 = new Vue({
    el: '#app1',
    data: {

    },
    components: {
      myCon: componentA
    }
  })
</script>

</html>
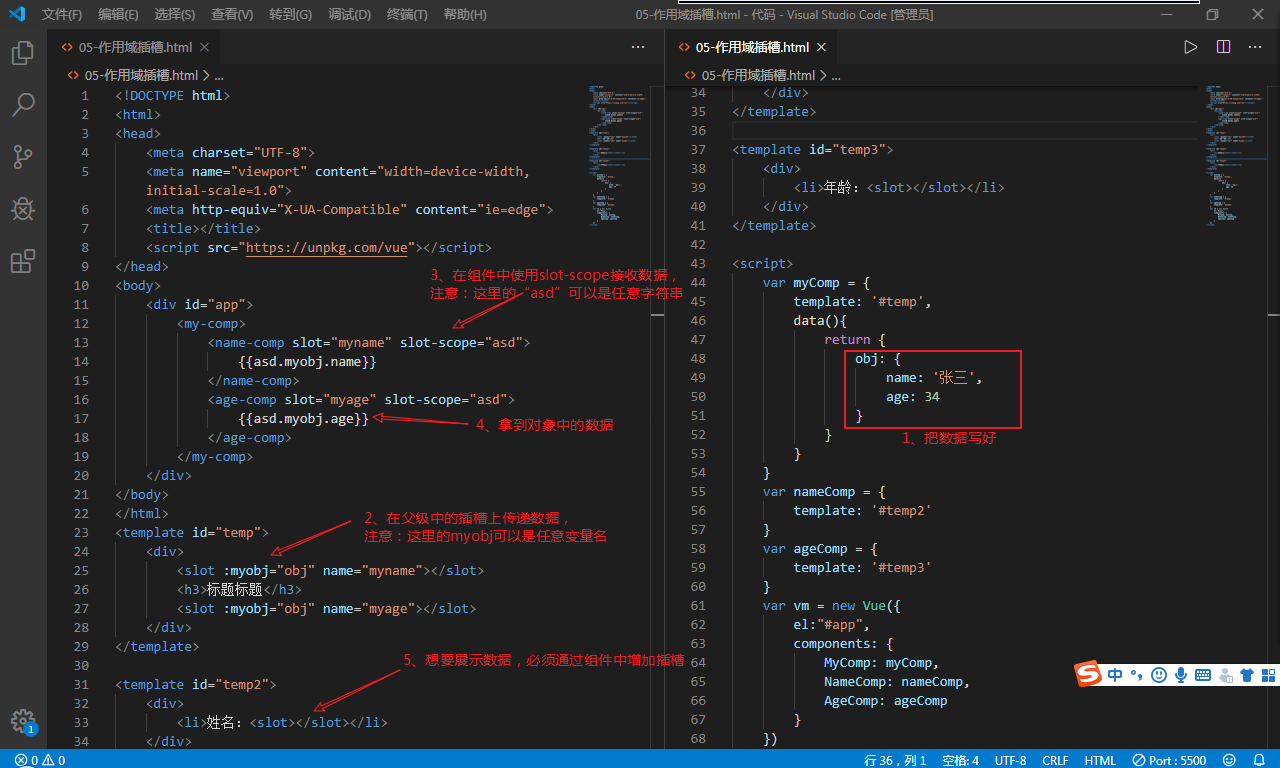
5.8.5、作用域插槽
默认情况下父组件使用子组件插槽数据默认是拿父组件的数据而不是子组件拿数据。
作用域插槽在父组件使用我们的子组件时 插槽的数据从子组件中拿到数据而不是从父组件拿到。
// 1、基本写法
<one-comp>
  <button slot="btn" slot-scope="scope">按钮{{scope.msg}}</button>
</one-comp>

// 2、基本写法之模板写法
<one-comp>
  <template slot="btn" slot-scope="scope">
    <button>按钮{{scope.msg}}</button>
  </template>
</one-comp>

// 3、指令写法
<one-comp v-slot:btn="scope">
  <button>按钮{{scope.msg}}</button>
</one-comp>

// 4、指令写法之模板写法
<one-comp>
  <template v-slot:btn="scope">
    <button>按钮{{scope.msg}}</button>
  </template>
</one-comp>
六、axious异步请求
6.1、ajax和axious区别
- ajax用来在页面上发起异步请求到后端服务并将后端服务相应的数据渲染到页面上。jQuery里面推荐ajax技术。
- axious前段异步3请求库和ajax类似。在vue中并不推荐使用jQuery框架axious是Vue官方推荐的一种异步请求技术用于在前端发起一个异步请求请求后页面不动相应回来刷新页面。
6.2、axious
官网地址http://www.axios-js.com/使用axious的过程
- 下载axious核心js文件。
- 页面引用axious核心js文件。
- 可以开始使用发异步请求。
6.2.1、get请求
// 为给定 ID 的 user 创建请求
axios.get('/user?ID=12345')
  .then(function (response) { //请求成功后的处理
    console.log(response);
  })
  .catch(function (error) { //请求失败后的处理
    console.log(error);
  });
6.2.2、post请求
axios.post('/user', { //参数使用json
    firstName: 'Fred',
    lastName: 'Flintstone'
  })
  .then(function (response) {
    console.log(response);
  })
  .catch(function (error) {
    console.log(error);
  });
6.2.3、axious默认实例
axious还支持通过默认实例来发异步请求这也就完全解耦了。
const instance = axios.create({
  baseURL: 'http://localhost:8080/', // 公共部分url
  timeout: 1000,
  headers: {'X-Custom-Header': 'foobar'}
});
6.3、axious拦截器
6.3.1、请求拦截器
拦截器用来将axious的公共参数相应公共处理交给拦截器处理减少axious发送请求时代码冗余。
    //请求拦截器
    instance.interceptors.request.use(function (config) {
        if(config.url.indexOf("?")==-1){ // 若原来没有参数就拼"?"
            config.url+="?token=1234"
        }else{
            config.url +="&token=1234"; // 否则拼"&"
        }
        return config;
    });
6.3.2、相应拦截器
当后端服务出现异常的时候可以用相应拦截器来处理错误的情况。
    //响应拦截器
    instance.interceptors.response.use(function (response) {
        if(response.status==500){
            alert('服务器出现错误!');
        }
        return response;
    });