

JavaWeb开发(三)3.3——Spring Bean详解
| 阿里云国内75折 回扣 微信号:monov8 |
| 阿里云国际,腾讯云国际,低至75折。AWS 93折 免费开户实名账号 代冲值 优惠多多 微信号:monov8 飞机:@monov6 |
一、Bean的概念
由 Spring IoC 容器负责创建、管理所有的Java对象这些管理的对象称为 BeanBean 根据 Spring 配置文件中的信息创建。
二、基于XML方式管理bean对象
eg
<?xml version="1.0" encoding="UTF-8"?>
<beans xmlns="http://www.springframework.org/schema/beans"
       xmlns:xsi="http://www.w3.org/2001/XMLSchema-instance"
       xsi:schemaLocation="http://www.springframework.org/schema/beans
   http://www.springframework.org/schema/beans/spring-beans-3.0.xsd">

    <bean id="userEntity" class="com.qizekj.entity.UserEntity"></bean>

</beans>
XML 配置的 元素中可以包含多个属性或子元素常用的属性或子元素如下表所示
- idBean 的唯一标识符Spring IoC 容器对 Bean 的配置和管理都通过该属性完成。id 的值必须以字母开始可以使用字母、数字、下划线等符号不允许重复的。一般命名格式为类名称首字母小写。
- name该属性表示 Bean 的名称我们可以通过 name 属性为同一个 Bean 同时指定多个名称每个名称之间用逗号或分号隔开。Spring 容器可以通过 name 属性配置和管理容器中的 Bean。
- class该属性指定了 Bean 的具体实现类它必须是一个完整的类名即类的全限定名。
- scope表示 Bean 的作用域属性值可以为 singleton单例、prototype原型、request、session 和 global Session。默认值是 singleton。
- constructor-arg 元素的子元素我们可以通过该元素将构造参数传入以实现 Bean 的实例化。该元素的 index 属性指定构造参数的序号从 0 开始type 属性指定构造参数的类型。
- property元素的子元素用于调用 Bean 实例中的 setter 方法对属性进行赋值从而完成属性的注入。该元素的 name 属性用于指定 Bean 实例中相应的属性名。
- ref 和 等元素的子元索用于指定对某个 Bean 实例的引用即 元素中的 id 或 name 属性。
- value 和 等元素的子元素用于直接指定一个常量值。
- list用于封装 List 或数组类型的属性注入。
- set用于封装 Set 类型的属性注入。
- map用于封装 Map 类型的属性注入。
- entry
- init-method容器加载 Bean 时调用该方法类似于 Servlet 中的 init() 方法。
- destroy-method容器删除 Bean 时调用该方法类似于 Servlet 中的 destroy() 方法。该方法只在 scope=singleton 时有效。
- lazy-init 懒加载值为 true容器在首次请求时才会创建 Bean 实例值为 false容器在启动时创建 Bean 实例。该方法只在 scope=singleton 时有效。
三、Bean属性注入
Bean 属性注入就是将属性注入到 Bean 中的过程而这属性既可以普通属性也可以是一个对象Bean。
DI 依赖注入对象的属性注入值spring实现。
3.1、有参构造函数注入属性值
使用构造函数实现属性注入大致步骤如下
1在 Bean 中添加一个有参构造函数构造函数内的每一个参数代表一个需要注入的属性
eg
public class OrderEntity {
    private String orderId;
    private String orderName;

    public OrderEntity(String orderId, String orderName) {
        this.orderId = orderId;
        this.orderName = orderName;
    }

    @Override
    public String toString() {
        return "OrderEntity{" +
                "orderId='" + orderId + '\'' +
                ", orderName='" + orderName + '\'' +
                '}';
    }
}
2在 Spring 的 XML 配置文件中通过 及其子元素 对 Bean 进行定义
3在 元素内使用 元素对构造函数内的属性进行赋值Bean 的构造函数内有多少参数就需要使用多少个 元素。
eg
<!-- 第一种方式使用name指定参数列表名称 -->
<bean id="orderEntity" class="com.qizekJ.entity.OrderEntity">
	<constructor-arg name="orderId" value="1"></constructor-arg>
    <constructor-arg name="orderName" value="订单1"></constructor-arg>
</bean>
<!-- 第二种方式使用index指定参数列表索引 -->
<bean id="orderEntity" class="com.qizekJ.entity.OrderEntity">
    <constructor-arg index="0" value="2"></constructor-arg>
    <constructor-arg index="1" value="订单2"></constructor-arg>
</bean>
3.2、setter 注入属性值
在 Spring 实例化 Bean 的过程中IoC 容器首先会调用默认的构造方法无参构造方法实例化 BeanJava 对象然后通过 Java 的反射机制调用这个 Bean 的 setXxx() 方法将属性值注入到 Bean 中。
使用 setter 注入的方式进行属性注入大致步骤如下
1在 Bean 中提供一个默认的无参构造函数在没有其他带参构造函数的情况下可省略并为所有需要注入的属性提供一个 setXxx() 方法
eg
public class OrderEntity {
    private String orderId;
    private String orderName;

    public OrderEntity() {
    }

    public void setOrderId(String orderId) {
        this.orderId = orderId;
    }

    public void setOrderName(String orderName) {
        this.orderName = orderName;
    }

    @Override
    public String toString() {
        return "OrderEntity{" +
                "orderId='" + orderId + '\'' +
                ", orderName='" + orderName + '\'' +
                '}';
    }
}
2在 Spring 的 XML 配置文件中使用 及其子元素 对 Bean 进行定义
3在 元素内使用 元素对各个属性进行赋值。
eg
<bean id="bookEntity" class="com.qizekj.entity.OrderEntity">
    <property name="orderId" value="3"></property>
    <property name="orderName" value="订单3"></property>
</bean>
3.3、p 命名空间注入属性值
p 命名空间是 setter 方式属性注入的一种快捷实现方式。通过它我们能够以 bean 属性的形式实现 setter 方式的属性注入而不再使用嵌套的 元素以实现简化 Spring 的 XML 配置的目的。
使用p 命名空间实现属性注入大致步骤如下
1在配置文件的 元素中导入以下 XML 约束:
xmlns:p="http://www.springframework.org/schema/p"
2在导入 XML 约束后我们就能通过以下形式实现属性注入
<bean id="Bean 唯一标志符" class="包名+类名" p:普通属性="普通属性值" p:对象属性-ref="对象的引用">
eg
<bean id="orderEntity" class="com.qizekj.entity.OrderEntity" p:orderId="4" p:orderName="订单4">
</bean>
使用 p 命名空间注入依赖时须注意以下 3 点
- Java 类中必须有 setter 方法
- Java 类中必须有无参构造器类中不包含任何带参构造函数的情况无参构造函数默认存在
- 在使用 p 命名空间实现属性注入前XML 配置的 元素内必须先导入 p 命名空间的 XML 约束。
注入空值属性
<bean id="OrderEntity" class="com.qizekj.entity.OrderEntity">
    <property name="orderId" value="5">
    </property>
    <property name="orderName" >
        <null></null>
    </property>
</bean>
注入特殊符号
eg
(1)转移注入方式
<!-- 转移注入方式 -->
<bean id="OrderEntity" class="com.qizekj.entity.OrderEntity">
<property name="orderId" value="<<6>>"></property>
<property name="orderName">
<null></null>
</property>
</bean>
(2)Cdata注入方式
<!--  Cdata注入方式 -->
<bean id="OrderEntity" class="com.qizekj.entity.OrderEntity">
    <property name="orderId">
        <value><![CDATA[<<7>>]]></value>
    </property>
    <property name="orderName">
        <null></null>
    </property>
</bean>
3.4、c 命名空间注入
c 命名空间是构造函数注入的一种快捷实现方式。通过它我们能够以 属性的形式实现构造函数方式的属性注入而不再使用嵌套的 元素以实现简化 Spring 的 XML 配置的目的。
使用c 命名空间实现属性注入大致步骤如下
1在配置文件的 元素中导入以下 XML 约束
xmlns:c="http://www.springframework.org/schema/c"
2在导入 XML 约束后我们就能通过以下形式实现属性注入
<bean id="Bean 唯一标志符" class="包名+类名" c:普通属性="普通属性值" c:对象属性-ref="对象的引用">
使用 c 命名空间注入依赖时必须注意以下 2 点
- Java 类中必须包含对应的带参构造器
- 在使用 c 命名空间实现属性注入前XML 配置的 元素内必须先导入 c 命名空间的 XML 约束。
3.5、注入外部bean
接口UserDao
public interface UserDao {
    void addUser();
}
实现UserDao接口
public class UserDaoImpl implements  UserDao {
   public void addUser() {
       System.out.println("执行addUser");
    }
}
UserService业务类
import com.qizekj.dao.UserDao;
import com.qizekj.dao.UserDaoImpl;

public class UserService {
    private UserDao userDao;

    public UserDao getUserDao() {
        return userDao;
    }

    public void setUserDao(UserDao userDao) {
        this.userDao = userDao;
    }

    public void addUser() {
        userDao.addUser();
    }
}
xml配置文件
<?xml version="1.0" encoding="UTF-8"?>
<beans xmlns="http://www.springframework.org/schema/beans"
       xmlns:xsi="http://www.w3.org/2001/XMLSchema-instance"
       xsi:schemaLocation="http://www.springframework.org/schema/beans http://www.springframework.org/schema/beans/spring-beans.xsd">

    <!-- 注入useService  -->
    <bean id="userService" class="com.qizekj.service.UserService">
        <!--  注入userDaoname 属性值: 类中属性的名称ref创建UserDaoImpl类的 bean的id -->
        <property name="userDao" ref="userDao"></property>
    </bean>
    <bean id="userDao" class="com.qizekj.dao.UserDaoImpl"></bean>
</beans>
3.5、注入内部bean
员工对象
public class EmpEntity {

    private String name;
    private Integer age;
    /**
     * 员工属于那个部门
     */
    private  DeptEntity deptEntity;
    public void setName(String name) {
        this.name = name;
    }

    public String getName() {
        return name;
    }

    public Integer getAge() {
        return age;
    }

    public void setAge(Integer age) {
        this.age = age;
    }

    public void setDeptEntity(DeptEntity deptEntity) {
        this.deptEntity = deptEntity;
    }

    @Override
    public String toString() {
        return "EmpEntity{" +
                "name='" + name + '\'' +
                ", age=" + age +
                ", deptEntity=" + deptEntity +
                '}';
    }
}
部门对象
public class DeptEntity {
    private String name;
    public void setName(String name) {
        this.name = name;
    }
    public String getName() {
        return name;
    }

    @Override
    public String toString() {
        return "DeptEntity{" +
                "name='" + name + '\'' +
                '}';
    }
}
Xml相关配置
<!--内部bean -->
<bean id="empEntity" class="com.qizekj.entity.EmpEntity">
    <!--设置属性name/age -->
    <property name="name" value="qizekj"></property>
    <property name="age" value="32"></property>
    <!-- 嵌入部门bean-->
    <property name="deptEntity">
        <bean id="deptEntity" class="com.qizekj.entity.DeptEntity">
            <property name="name" value="技术部"></property>
        </bean>
    </property>
</bean>
3.6、注入级联赋值
方式一
<bean id="empEntity" class="com.qizekj.entity.EmpEntity">
    <!--两个属性-->
    <property name="name" value="qizekj"></property>
    <property name="addres" value="安徽省合肥市"></property>
    <!--级联赋值-->
    <property name="deptEntity" ref="deptEntity"></property>
</bean>
<bean id="deptEntity" class="com.qizekj.entity.DeptEntity">
    <property name="name" value="技术部"></property>
</bean>
方式二
方式二注意需要在员工类增加deptEntity的get方法。
<bean id="empEntity" class="com.qizekj.entity.EmpEntity">
    <!--两个属性-->
    <property name="name" value="qizekj"></property>
    <property name="addres" value="安徽省合肥市"></property>
    <!--级联赋值-->
    <property name="deptEntity" ref="deptEntity"></property>
    <property name="deptEntity.name" value="技术部"></property>
</bean>
<bean id="deptEntity" class="com.qizekj.entity.DeptEntity">
</bean>
3.7、注入数组、集合类型属性
学生类
import java.util.Arrays;
import java.util.List;
import java.util.Map;
import java.util.Set;

public class StuEntity {
    //1.数组属性
    private String[] arrays;
    //2.list集合属性
   private List<String> list;
    //3.Map
    private Map<String,String> map;
    //4.Set
    private Set<String> set;

    public void setArrays(String[] arrays) {
        this.arrays = arrays;
    }

    public void setList(List<String> list) {
        this.list = list;
    }

    public void setMap(Map<String, String> map) {
        this.map = map;
    }

    public void setSet(Set<String> set) {
        this.set = set;
    }

    @Override
    public String toString() {
        return "StuEntity{" +
                "arrays=" + Arrays.toString(arrays) +
                ", list=" + list +
                ", map=" + map +
                ", set=" + set +
                '}';
    }
}
xml配置文件
<bean id="stuEntity" class="com.mayikt.entity.StuEntity">
    <!--数组类型注入-->
    <property name="arrays">
        <array>
            <value>mayikt01</value>
            <value>mayikt02</value>
        </array>
    </property>
    <!--list-->
    <property name="list">
        <list>
            <value>语文</value>
            <value>数学</value>
        </list>
    </property>
    <!--Map-->
    <property name="map">
       <map>
           <entry key="余胜军" value="23"></entry>
           <entry key="小薇" value="25"></entry>
       </map>
    </property>
    <!--Set-->
    <property name="Set">
       <set>
           <value>01</value>
           <value>02</value>
       </set>
    </property>
</bean>
四、IOC操作Bean的管理
Spring中两种类型bean一种是为普通bean另外一种是工厂bean
普通Bean在配置文件中定义什么类型与返回的类型需一致
工厂Bean在配置文件中定义Bean类型与返回类型可以不一致。
eg
创建一个工厂Bean类实现FactoryBean接口
public class QizekjBean implements FactoryBean {

    public UserEntity getObject() throws Exception {
        return new UserEntity();
    }

    public Class<?> getObjectType() {
        return null;
    }
}
配置文件spring_factory.xml
<?xml version="1.0" encoding="UTF-8"?>
<beans xmlns="http://www.springframework.org/schema/beans"
       xmlns:xsi="http://www.w3.org/2001/XMLSchema-instance"
       xsi:schemaLocation="http://www.springframework.org/schema/beans http://www.springframework.org/schema/beans/spring-beans.xsd">

    <!--spring ioc管理-->
    <bean id="qizekjBean" class="com.qizekj.factorybean.QizekjBean"> </bean>
</beans>
测试类
public class factoryTest {
    public static void main(String[] args) {
        ClassPathXmlApplicationContext classPathXmlApplicationContext =
                new ClassPathXmlApplicationContext("spring_factory.xml");
        //QizekjBean qizekjBean = (QizekjBean) classPathXmlApplicationContext.getBean("qizekjBean");
        UserEntity qizekjBean = (UserEntity) classPathXmlApplicationContext.getBean("qizekjBean");
        System.out.println(qizekjBean);
    }
}
当工厂Bean类实现FactoryBean接口重写了getObject()方法返回类型为UserEntity时测试类中再用xml配置的QizekjBean就会报错了。
五、Bean作用域
单例的作用域每次在调用getbean方法获取对象都是同一个对象
多例的作用域每次在调用getbean方法获取对象都是一个新的对象。
默认情况下所有的 Spring Bean 都是单例的也就是说在整个 Spring 应用中 Bean 的实例只有一个。
在 元素中添加 scope 属性来配置 Spring Bean 的作用范围。
单例在同一个jvm中该bean对象只会创建一次
多例在同一个jvm中该bean对象可以被创建多次。
Spring 5 共提供了 6 种 scope 作用域
- singleton默认值单例模式表示在 Spring 容器中只有一个 Bean 实例。
- prototype原型模式表示每次通过 Spring 容器获取 Bean 时容器都会创建一个新的 Bean 实例。
- request每次 HTTP 请求容器都会创建一个 Bean 实例。该作用域只在当前 HTTP Request 内有效。
- session同一个 HTTP Session 共享一个 Bean 实例不同的 Session 使用不同的 Bean 实例。该作用域仅在当前 HTTP Session 内有效。
- application同一个 Web 应用共享一个 Bean 实例该作用域在当前 ServletContext 内有效。 与 singleton 类似但 singleton 表示每个 IoC 容器中仅有一个 Bean 实例而一个 Web 应用中可能会存在多个 IoC 容器但一个 Web 应用只会有一个 ServletContext也可以说 application 才是 Web 应用中货真价实的单例模式。
- websocketwebsocket 的作用域是 WebSocket 即在整个 WebSocket 中有效。
注意在以上 6 种 Bean 作用域中除了 singleton 和 prototype 可以直接在常规的 Spring IoC 容器例如 ClassPathXmlApplicationContext中使用外剩下的都只能在基于 Web 的 ApplicationContext 实现例如 XmlWebApplicationContext中才能使用否则就会抛出一个 IllegalStateException 的异常。
1singleton
singleton 是 Spring 容器默认的作用域。当 Bean 的作用域为 singleton 时Spring IoC 容器中只会存在一个共享的 Bean 实例。这个 Bean 实例将存储在高速缓存中所有对于这个 Bean 的请求和引用只要 id 与这个 Bean 定义相匹配都会返回这个缓存中的对象实例。
如果一个 Bean 定义的作用域为 singleton 那么这个 Bean 就被称为 singleton bean。在 Spring IoC 容器中singleton bean 是 Bean 的默认创建方式可以更好地重用对象节省重复创建对象的开销。
在 Spring 配置文件中可以使用 元素的 scope 属性将 Bean 的作用域定义成 singleton其配置方式如下所示
<bean id="..." class="..." scope="singleton"/>
2prototype
如果一个 Bean 定义的作用域为 prototype那么这个 Bean 就被称为 prototype bean。对于 prototype bean 来说Spring 容器会在每次请求该 Bean 时都创建一个新的 Bean 实例。
在 Spring 配置文件中可以使用 元素的 scope 属性将 Bean 的作用域定义成 prototype其配置方式如下所示
<bean id="..." class="..." scope="prototype"/>
eg
配置文件
<?xml version="1.0" encoding="UTF-8"?>
<?xml version="1.0" encoding="UTF-8"?>
<beans xmlns="http://www.springframework.org/schema/beans"
       xmlns:xsi="http://www.w3.org/2001/XMLSchema-instance"
       xsi:schemaLocation="http://www.springframework.org/schema/beans http://www.springframework.org/schema/beans/spring-beans.xsd">

    <!--spring ioc管理-->
    <bean id="qizekjBean" class="com.qizekj.factorybean.QizekjBean"> </bean>
</beans>
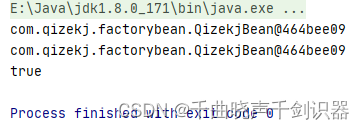
测试类
public class factoryTest {
    public static void main(String[] args) {
        ClassPathXmlApplicationContext classPathXmlApplicationContext =
                new ClassPathXmlApplicationContext("spring_factory.xml");
        QizekjBean qizekjBean1 = (QizekjBean) classPathXmlApplicationContext.getBean("qizekjBean");
        QizekjBean qizekjBean2 = (QizekjBean) classPathXmlApplicationContext.getBean("qizekjBean");
        System.out.println(qizekjBean1);
        System.out.println(qizekjBean2);
        System.out.println(qizekjBean1 == qizekjBean2);
    }
}
结果
userEntity1与userEntity2完全相等
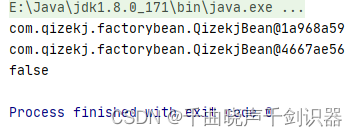
将配置文件中bean改为多例模式
<?xml version="1.0" encoding="UTF-8"?>
<beans xmlns="http://www.springframework.org/schema/beans"
       xmlns:xsi="http://www.w3.org/2001/XMLSchema-instance"
       xsi:schemaLocation="http://www.springframework.org/schema/beans http://www.springframework.org/schema/beans/spring-beans.xsd">

    <!--spring ioc管理-->
    <bean id="qizekjBean" class="com.qizekj.factorybean.QizekjBean" scope="prototype"> </bean>
</beans>
运行测试类得到结果为
userEntity1与userEntity2不相等不是同一个bean
六、Bean继承
在 Spring 中Bean 和 Bean 之间也存在继承关系。我们将被继承的 Bean 称为父 Bean将继承父 Bean 配置信息的 Bean 称为子 Bean。
Spring Bean 的定义中可以包含很多配置信息例如构造方法参数、属性值。子 Bean 既可以继承父 Bean 的配置数据也可以根据需要重写或添加属于自己的配置信息。
在 Spring XML 配置中我们通过子 Bean 的 parent 属性来指定需要继承的父 Bean配置格式如下
<!--父Bean-->
<bean id="parentBean" class="xxx.xxxx.xxx.ParentBean" >
    <property name="xxx" value="xxx"></property>
    <property name="xxx" value="xxx"></property>
</bean>
<!--子Bean-->
<bean id="childBean" class="xxx.xxx.xxx.ChildBean" parent="parentBean"></bean>
在父 Bean 的定义中有一个十分重要的属性那就是 abstract 属性。如果一个父 Bean 的 abstract 属性值为 true则表明这个 Bean 是抽象的。
抽象的父 Bean 只能作为模板被子 Bean 继承它不能实例化也不能被其他 Bean 引用更不能在代码中根据 id 调用 getBean() 方法获取否则就会返回错误。
在父 Bean 的定义中既可以指定 class 属性也可以不指定 class 属性。如果父 Bean 定义没有明确地指定 class 属性那么这个父 Bean 的 abstract 属性就必须为 true。
七、Spring Bean的生命周期
7.1 Bean的生命周期
周期简单分为实例化→属性赋值→初始化→销毁
生命周期的原理
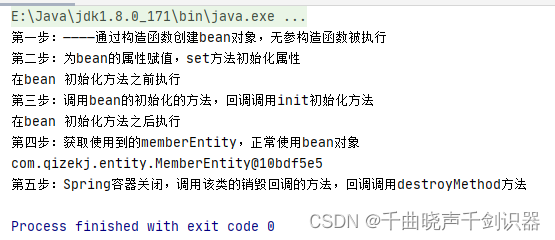
1通过构造函数创建bean对象默认执行无参构造函数底层基于反射实现
2为bean的属性赋值 使用反射调用set方法
3调用bean的初始化的方法需要单独在类中配置初始化的方法
4正常使用bean对象
5Spring容器关闭调用该类的销毁回调的方法需要单独在类中配置销毁的方法
eg
public class MemberEntity {
    private String name;
    public MemberEntity(){
        System.out.println("第一步————通过构造函数创建bean对象无参构造函数被执行");
    }

    public void setName(String name) {
        System.out.println("第二步为bean的属性赋值set方法初始化属性");
        this.name = name;
    }

    public void initMethod(){
        System.out.println("第三步调用bean的初始化的方法回调调用init初始化方法");
    }

    public void destroyMethod(){
        System.out.println("第五步Spring容器关闭调用该类的销毁回调的方法回调调用destroyMethod方法");
    }
}
配置文件配置bean并赋值设置initMethod、destroyMethod方法
<?xml version="1.0" encoding="UTF-8"?>
<beans xmlns="http://www.springframework.org/schema/beans"
       xmlns:xsi="http://www.w3.org/2001/XMLSchema-instance"
       xsi:schemaLocation="http://www.springframework.org/schema/beans http://www.springframework.org/schema/beans/spring-beans.xsd">

    <bean id="memberEntity" class="com.qizekj.entity.MemberEntity" init-method="initMethod" destroy-method="destroyMethod">
        <property name="name" value="qizekj"></property>
    </bean>
</beans>
测试类
public static void main(String[] args) {
    ClassPathXmlApplicationContext classPathXmlApplicationContext =
            new ClassPathXmlApplicationContext("spring_02.xml");
    MemberEntity memberEntity = (MemberEntity) classPathXmlApplicationContext.getBean("memberEntity");
    System.out.println("第四步获取使用到的memberEntity正常使用bean对象");
    System.out.println(memberEntity);
    // 手动让bean容器销毁
    classPathXmlApplicationContext.close();
}
运行结果

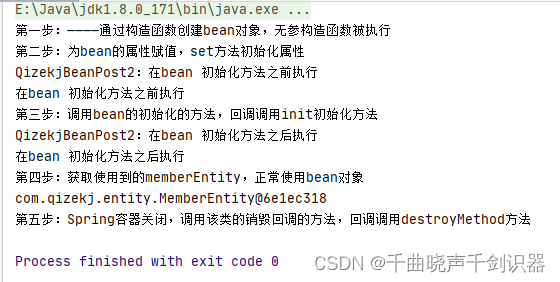
7.2 Bean的后置处理器
Bean的后置处理器 作用提供更多的扩展功能。
import org.springframework.beans.BeansException;
import org.springframework.beans.factory.config.BeanPostProcessor;

/**
 * @author chenqun
 * @date 2023/1/14 17:11
 */
public class QizekjBeanPost implements BeanPostProcessor {
    /**
     * 调用初始化方法之前执行
     * @param bean
     * @param beanName
     * @return
     * @throws BeansException
     */
    public Object postProcessBeforeInitialization(Object bean, String beanName) throws BeansException {
        System.out.println("在bean 初始化方法之前执行");
        return bean;
    }

    /**
     * 调用初始化方法之后执行
     * @param bean
     * @param beanName
     * @return
     * @throws BeansException
     */
    public Object postProcessAfterInitialization(Object bean, String beanName) throws BeansException {
        System.out.println("在bean 初始化方法之后执行");
        return bean;
    }
}
配置文件
<?xml version="1.0" encoding="UTF-8"?>
<beans xmlns="http://www.springframework.org/schema/beans"
       xmlns:xsi="http://www.w3.org/2001/XMLSchema-instance"
       xsi:schemaLocation="http://www.springframework.org/schema/beans http://www.springframework.org/schema/beans/spring-beans.xsd">

    <bean id="memberEntity" class="com.qizekj.entity.MemberEntity" init-method="initMethod" destroy-method="destroyMethod">
        <property name="name" value="qizekj"></property>
    </bean>

    <bean id="mayiktBeanPost" class="com.qizekj.entity.QizekjBeanPost"></bean>
</beans>
测试方法
public class Test04 {
    public static void main(String[] args) {
        ClassPathXmlApplicationContext classPathXmlApplicationContext =
                new ClassPathXmlApplicationContext("spring_02.xml");
        MemberEntity memberEntity = (MemberEntity) classPathXmlApplicationContext.getBean("memberEntity");
        System.out.println("第四步获取使用到的memberEntity正常使用bean对象");
        System.out.println(memberEntity);
        // 手动让bean容器销毁
        classPathXmlApplicationContext.close();
    }
}
运行结果
7.3 Bean的后置处理器底层原理
配置多个BeanPostProcessor
import org.springframework.beans.BeansException;
import org.springframework.beans.factory.config.BeanPostProcessor;
import org.springframework.core.Ordered;

/**
 * @author chenqun
 * @date 2023/1/14 17:11
 */
public class QizekjBeanPost implements BeanPostProcessor, Ordered {
    /**
     * 调用初始化方法之前执行
     * @param bean
     * @param beanName
     * @return
     * @throws BeansException
     */
    public Object postProcessBeforeInitialization(Object bean, String beanName) throws BeansException {
        System.out.println("在bean 初始化方法之前执行");
        return bean;
    }

    /**
     * 调用初始化方法之后执行
     * @param bean
     * @param beanName
     * @return
     * @throws BeansException
     */
    public Object postProcessAfterInitialization(Object bean, String beanName) throws BeansException {
        System.out.println("在bean 初始化方法之后执行");
        return bean;
    }

    public int getOrder() {
        return 1;
    }
}
import org.springframework.beans.BeansException;
import org.springframework.beans.factory.config.BeanPostProcessor;
import org.springframework.core.Ordered;

/**
 * @author chenqun
 * @date 2023/1/14 17:18
 */
public class QizekjBeanPost2 implements BeanPostProcessor, Ordered {
    /**
     * 调用初始化方法之前执行
     * @param bean
     * @param beanName
     * @return
     * @throws BeansException
     */
    public Object postProcessBeforeInitialization(Object bean, String beanName) throws BeansException {
        System.out.println("QizekjBeanPost2在bean 初始化方法之前执行");
        return bean;
    }

    /**
     * 调用初始化方法之后执行
     * @param bean
     * @param beanName
     * @return
     * @throws BeansException
     */
    public Object postProcessAfterInitialization(Object bean, String beanName) throws BeansException {
        System.out.println("QizekjBeanPost2在bean 初始化方法之后执行");
        return bean;
    }

    public int getOrder() {
        return 0;
    }
}
配置文件
<?xml version="1.0" encoding="UTF-8"?>
<beans xmlns="http://www.springframework.org/schema/beans"
       xmlns:xsi="http://www.w3.org/2001/XMLSchema-instance"
       xsi:schemaLocation="http://www.springframework.org/schema/beans http://www.springframework.org/schema/beans/spring-beans.xsd">

    <bean id="memberEntity" class="com.qizekj.entity.MemberEntity" init-method="initMethod" destroy-method="destroyMethod">
        <property name="name" value="qizekj"></property>
    </bean>

    <!-- 后置处理器-->
    <bean id="mayiktBeanPost" class="com.qizekj.entity.QizekjBeanPost"></bean>
    <bean id="mayiktBeanPost2" class="com.qizekj.entity.QizekjBeanPost2"></bean>
</beans>
测试类
public class Test04 {
    public static void main(String[] args) {
        ClassPathXmlApplicationContext classPathXmlApplicationContext =
                new ClassPathXmlApplicationContext("spring_02.xml");
        MemberEntity memberEntity = (MemberEntity) classPathXmlApplicationContext.getBean("memberEntity");
        System.out.println("第四步获取使用到的memberEntity正常使用bean对象");
        System.out.println(memberEntity);
        // 手动让bean容器销毁
        classPathXmlApplicationContext.close();
    }
}
运行结果
实现Ordered接口的getOrder方法值越小越优先加载。
八、SpringBean的自动装配
根据指定装配规则属性名称或者属性的类型spring自动将匹配属性的值注入。
1根据属性的名称注入autowire=“byName”bean的id名称与属性的名称一致
eg
<?xml version="1.0" encoding="UTF-8"?>
<beans xmlns="http://www.springframework.org/schema/beans"
       xmlns:xsi="http://www.w3.org/2001/XMLSchema-instance"
       xmlns:util="http://www.springframework.org/schema/util"
       xsi:schemaLocation="http://www.springframework.org/schema/beans
       http://www.springframework.org/schema/beans/spring-beans.xsd
        http://www.springframework.org/schema/util
       http://www.springframework.org/schema/util/spring-util.xsd">

    <!-- 根据属性的名称注入bean的id名称与属性的名称一致 -->
    <bean id="empEntity" class="com.qizekj.entity.EmpEntity" autowire="byName">
    </bean>

    <bean id="deptEntity" class="com.qizekj.entity.DeptEntity">
        <property name="name" value="技术部"></property>
    </bean>
</beans>
根据属性的类型注入autowire=“byType”bean的类型与属性类型一致
eg
<?xml version="1.0" encoding="UTF-8"?>
<beans xmlns="http://www.springframework.org/schema/beans"
       xmlns:xsi="http://www.w3.org/2001/XMLSchema-instance"
       xmlns:util="http://www.springframework.org/schema/util"
       xsi:schemaLocation="http://www.springframework.org/schema/beans
       http://www.springframework.org/schema/beans/spring-beans.xsd
        http://www.springframework.org/schema/util
       http://www.springframework.org/schema/util/spring-util.xsd">

    <!-- 根据属性的类型注入bean的类型与属性类型一致 -->
    <bean id="empEntity" class="com.mayikt.entity.EmpEntity" autowire="byType">
    </bean>

    <bean id="deptEntity" class="com.mayikt.entity.DeptEntity">
        <property name="name" value="教育部门"></property>
    </bean>
</beans>