

SpringBoot整合Swagger
| 阿里云国内75折 回扣 微信号:monov8 |
| 阿里云国际,腾讯云国际,低至75折。AWS 93折 免费开户实名账号 代冲值 优惠多多 微信号:monov8 飞机:@monov6 |
接口文档与我们说的interface是不一样的需要由前后端工程师共同定义、编写接口文档(如 接口的请求路径、请求方式、请求参数、返回值类型等)之后大家都根据这个接口文档进行开发到项目结束前都要一直维护。
编写接口文档的工具Yapi、Swagger、Apipost等等。
前端技术框架
Node.js: 是一个基于 Chrome V8 引擎的 JavaScript 运行环境。(类似于java语言中的JDK)。
Vue : 目前最火的的一个前端javaScript框架。
ElementUI: 一套为开发者、设计师和产品经理准备的基于 Vue 2.0 的桌面端组件库通过ElementUI组件可以快速构建项目页面。
Mock: 生成随机数据拦截 Ajax 请求前端可以借助于Mock生成测试数据进行功能测试。
Webpack: 一个现代 JavaScript 应用程序的模块打包器(module bundler)分析你的项目结构找到JavaScript模块以及其它的一些浏览器不能直接运行的拓展语言SassTypeScript等并将其转换和打包为合适的格式供浏览器使用。
一、Yapi
1. Yapi概述

YApi 是高效、易用、功能强大的 api 管理平台旨在为开发、产品、测试人员提供更优雅的接口管理服务。可以帮助开发者轻松创建、发布、维护 APIYApi 还为用户提供了优秀的交互体验开发人员只需利用平台提供的接口数据写入工具以及简单的点击操作就可以实现接口的管理。
YApi让接口开发更简单高效让接口的管理更具可读性、可维护性让团队协作更合理。
官网地址https://yapi.pro/
源码地址: https://github.com/YMFE/yapi
官方文档: https://hellosean1025.github.io/yapi/
2. Yapi使用
2.1 定义接口
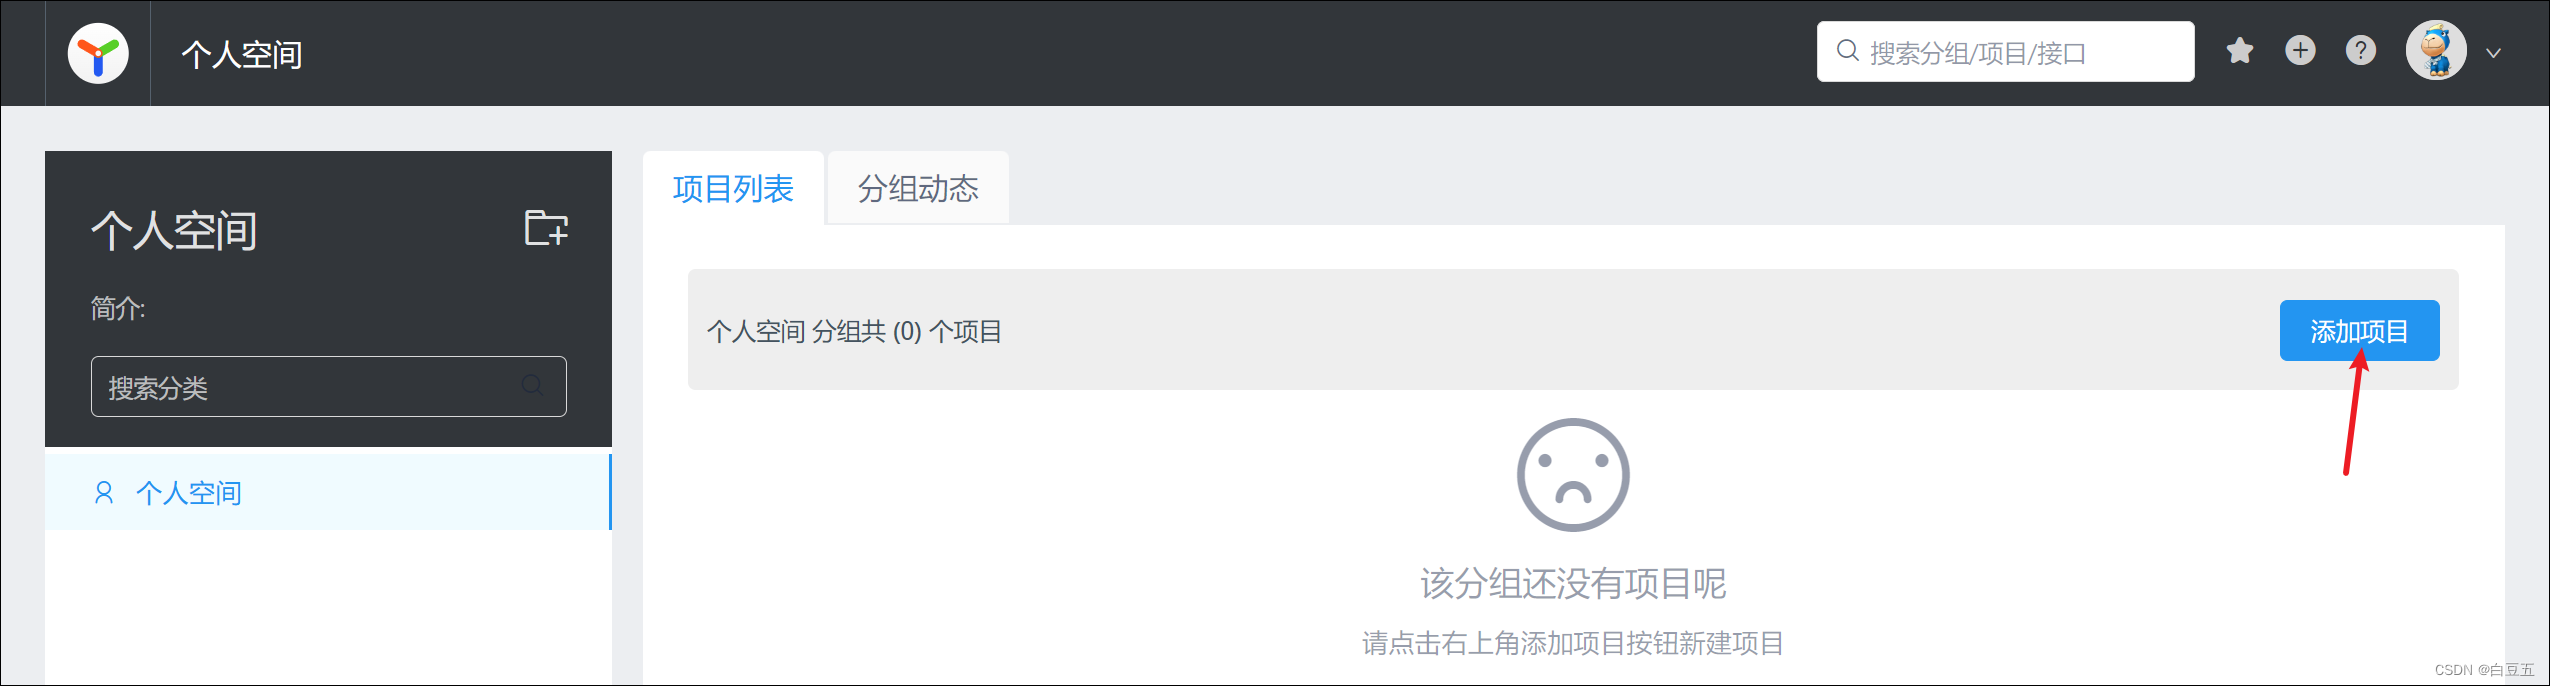
1、注册账号Yapi官网https://yapi.pro/
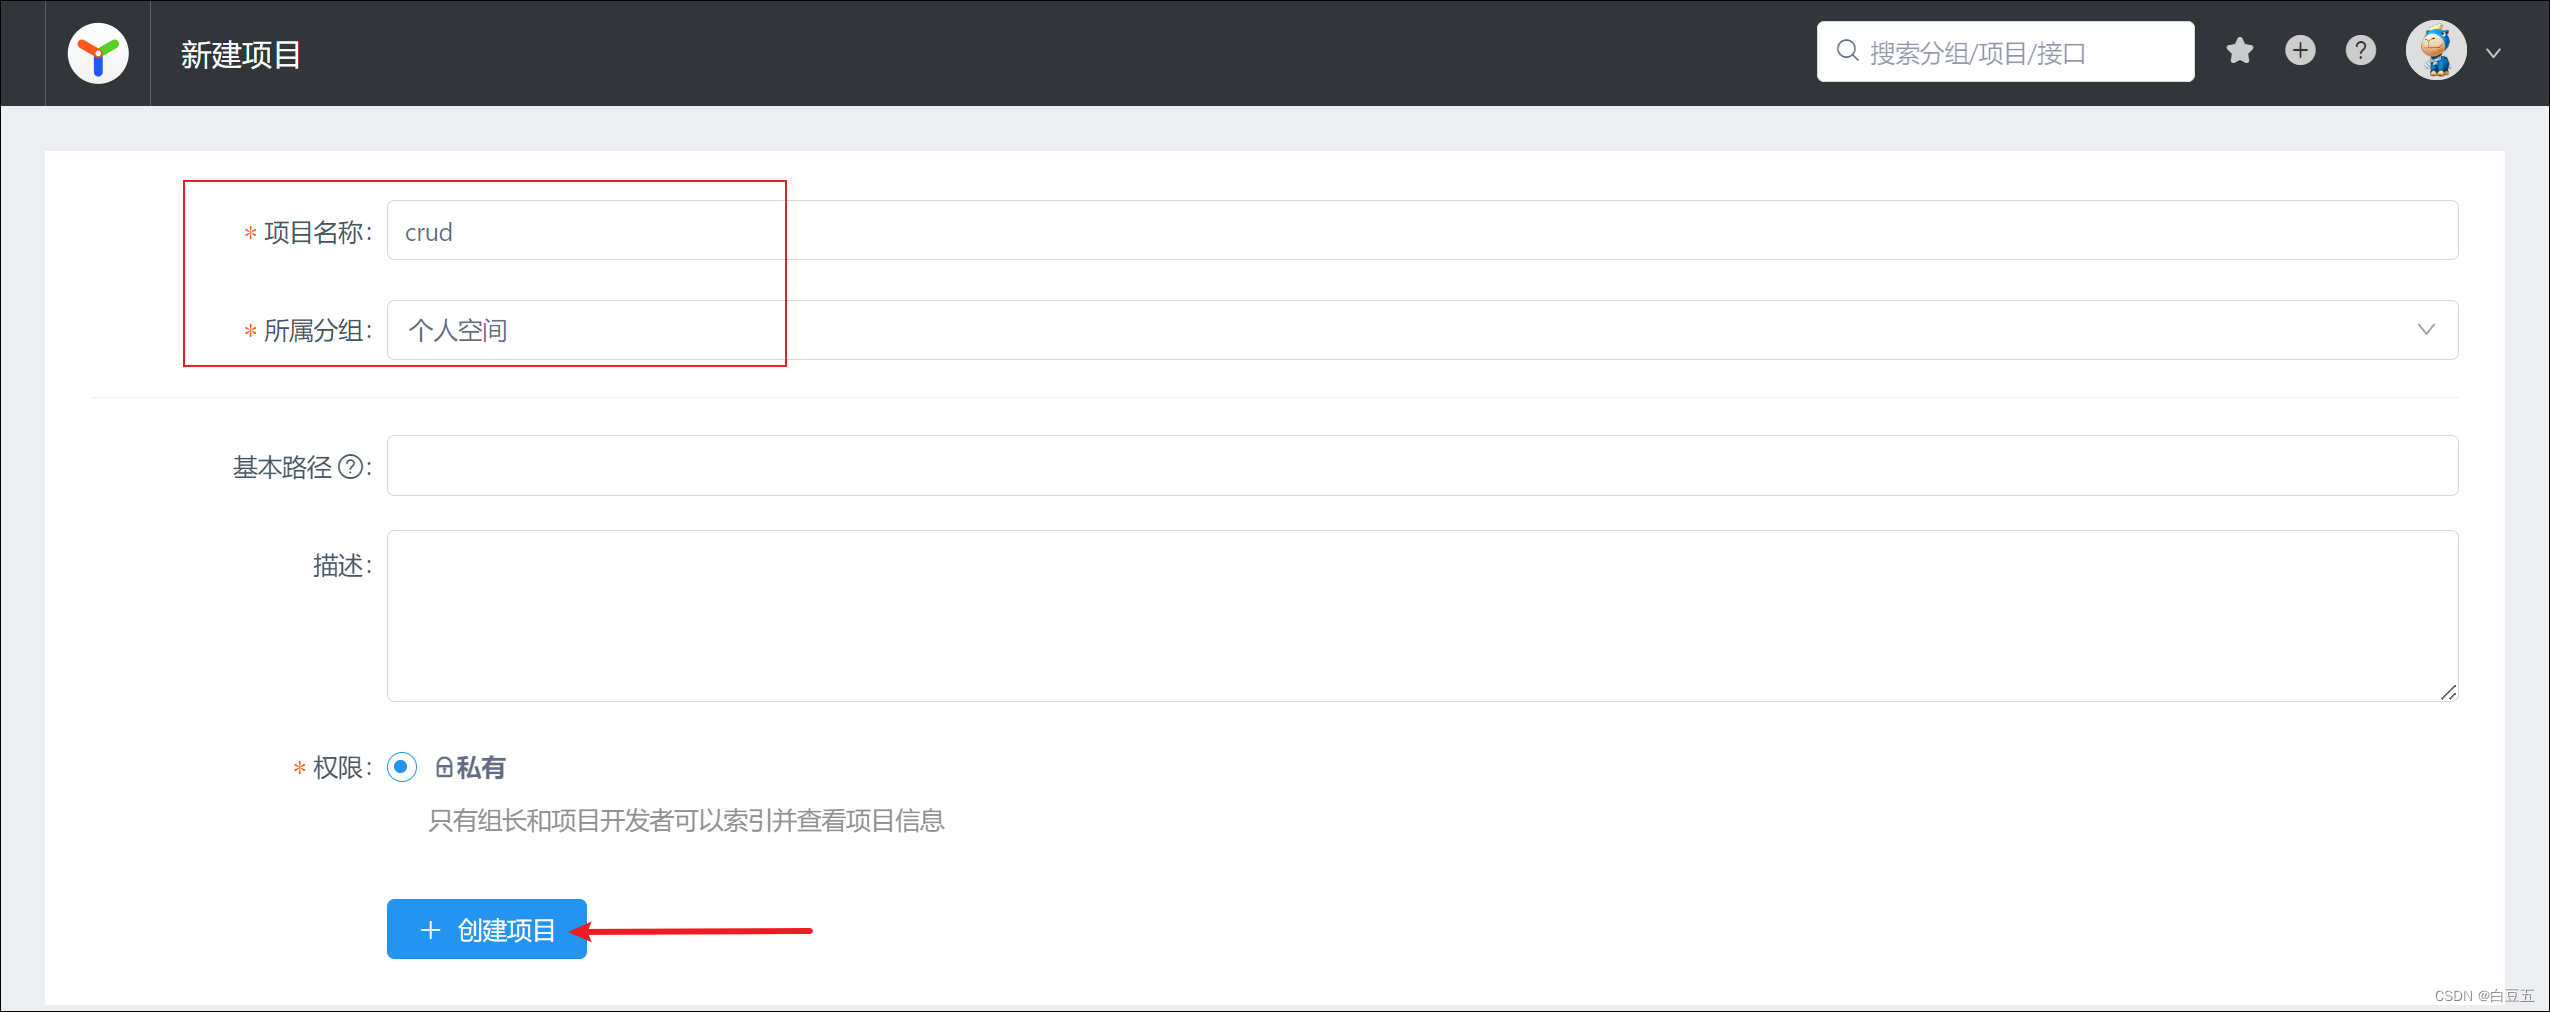
2、创建项目
3、添加分类 对接口进行统一管理每个模块都对应一个分类


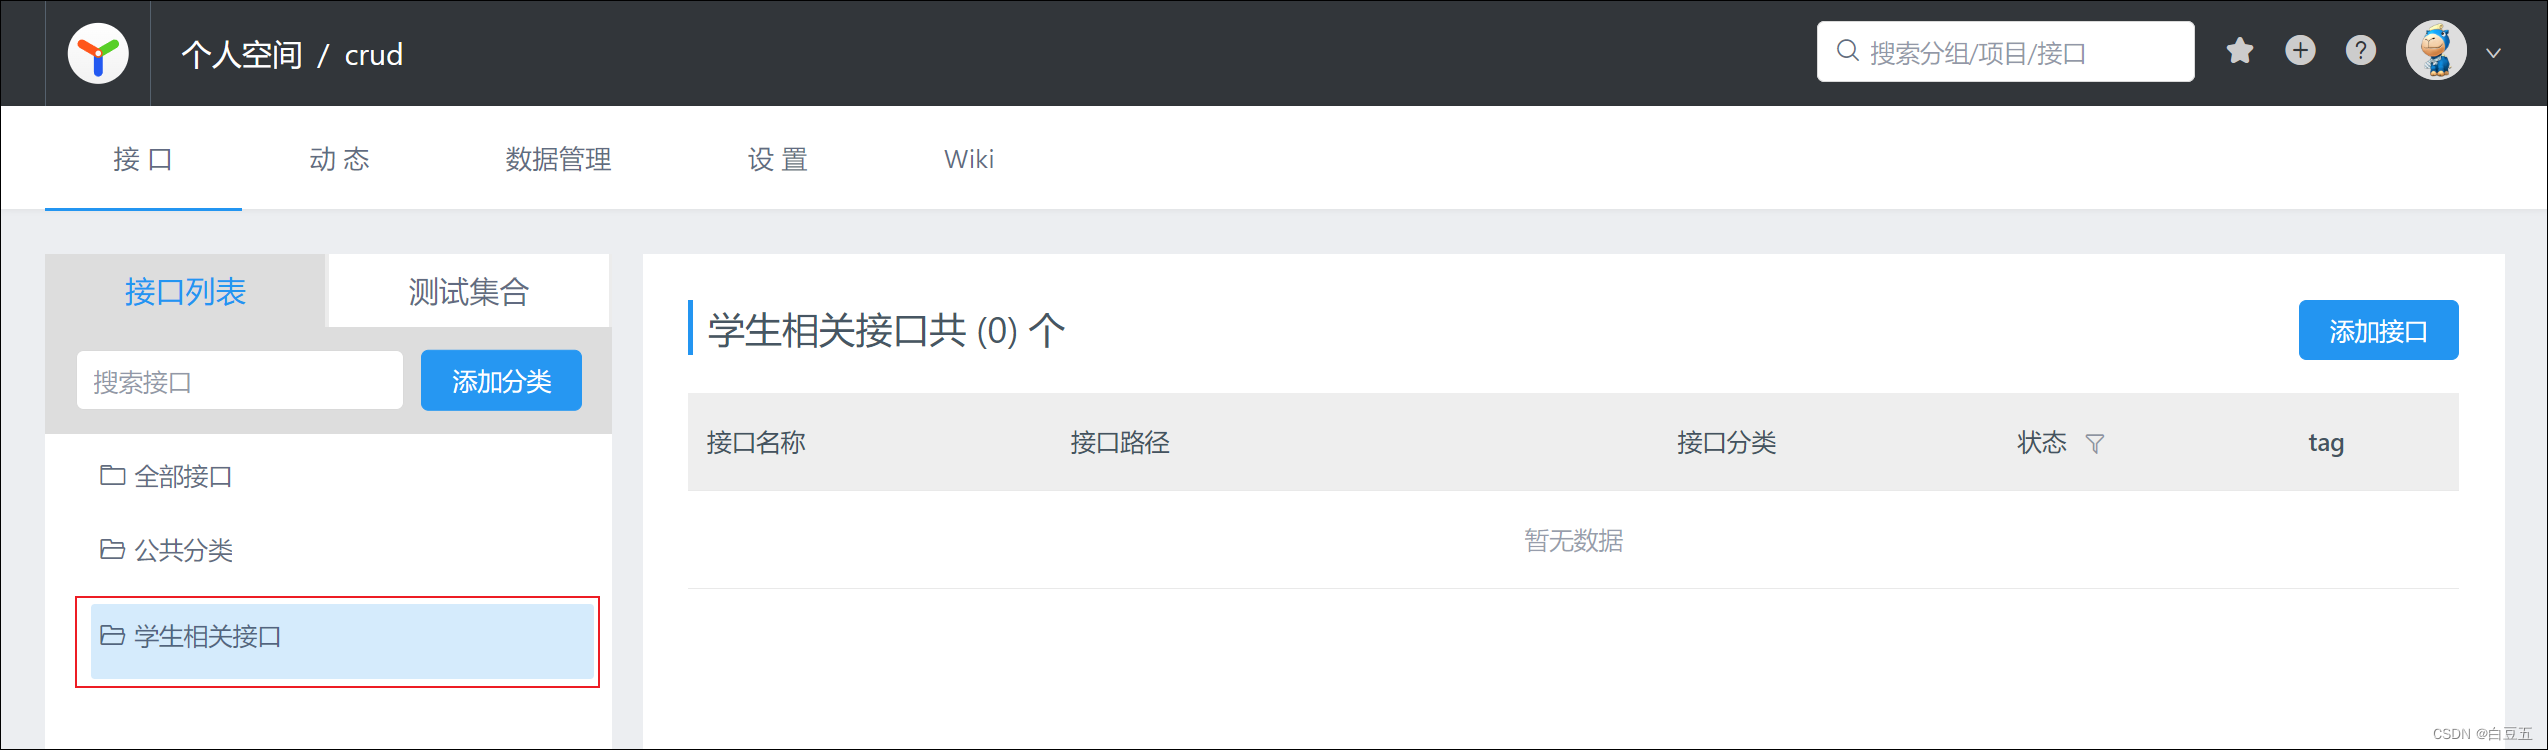
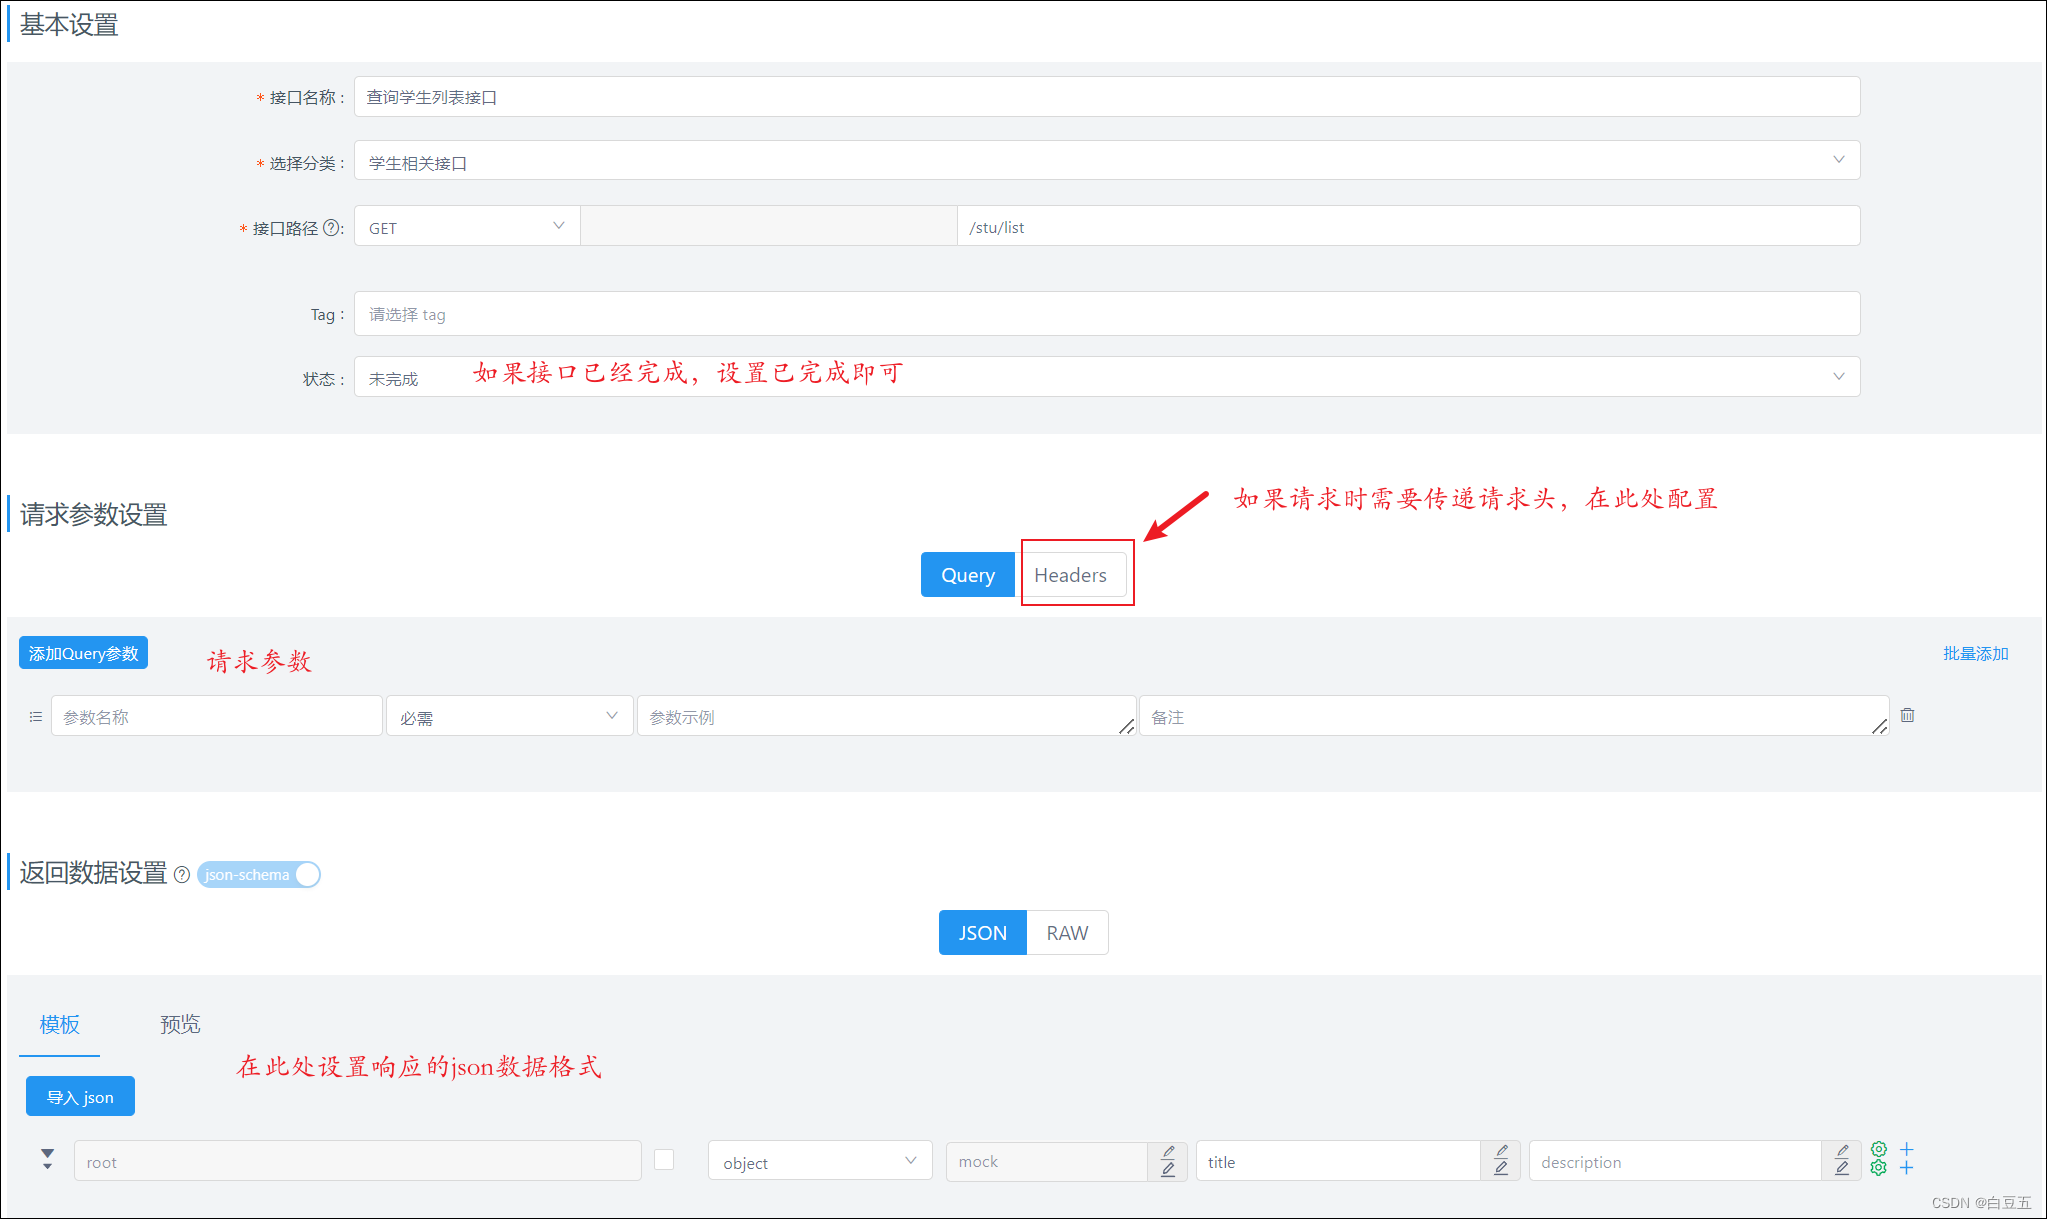
4、添加接口
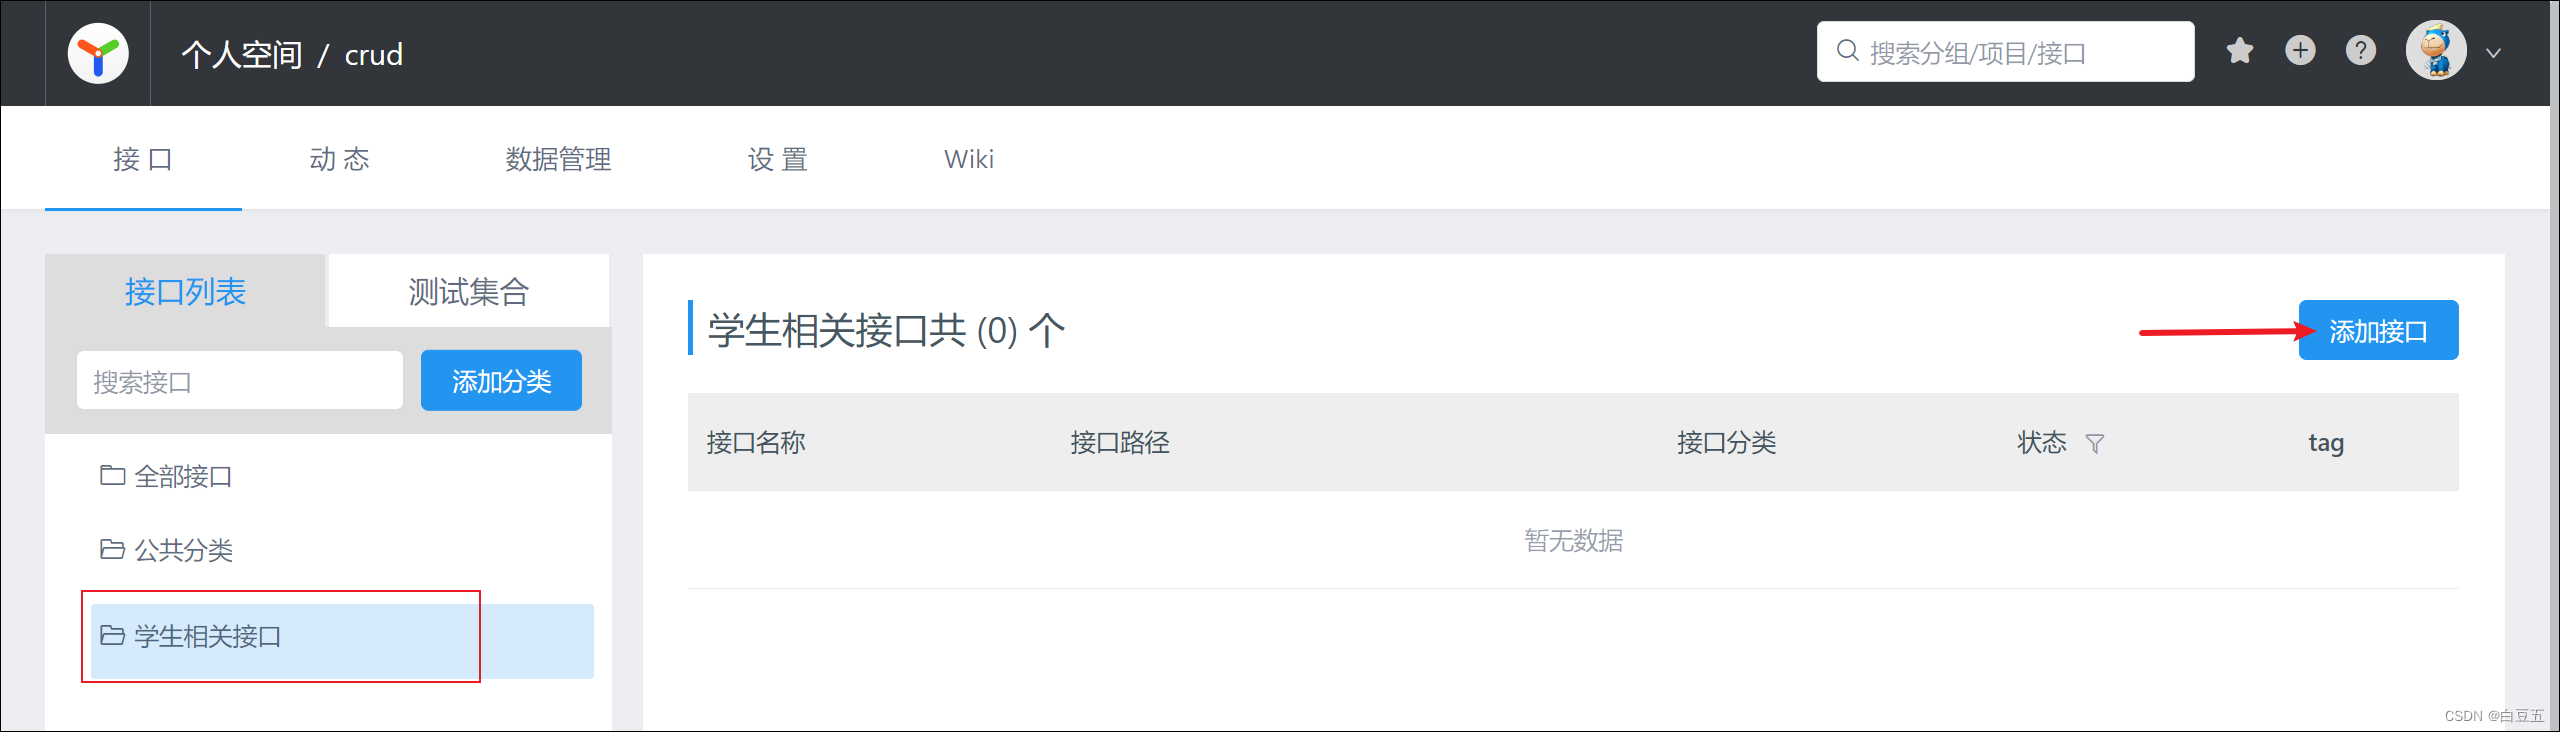
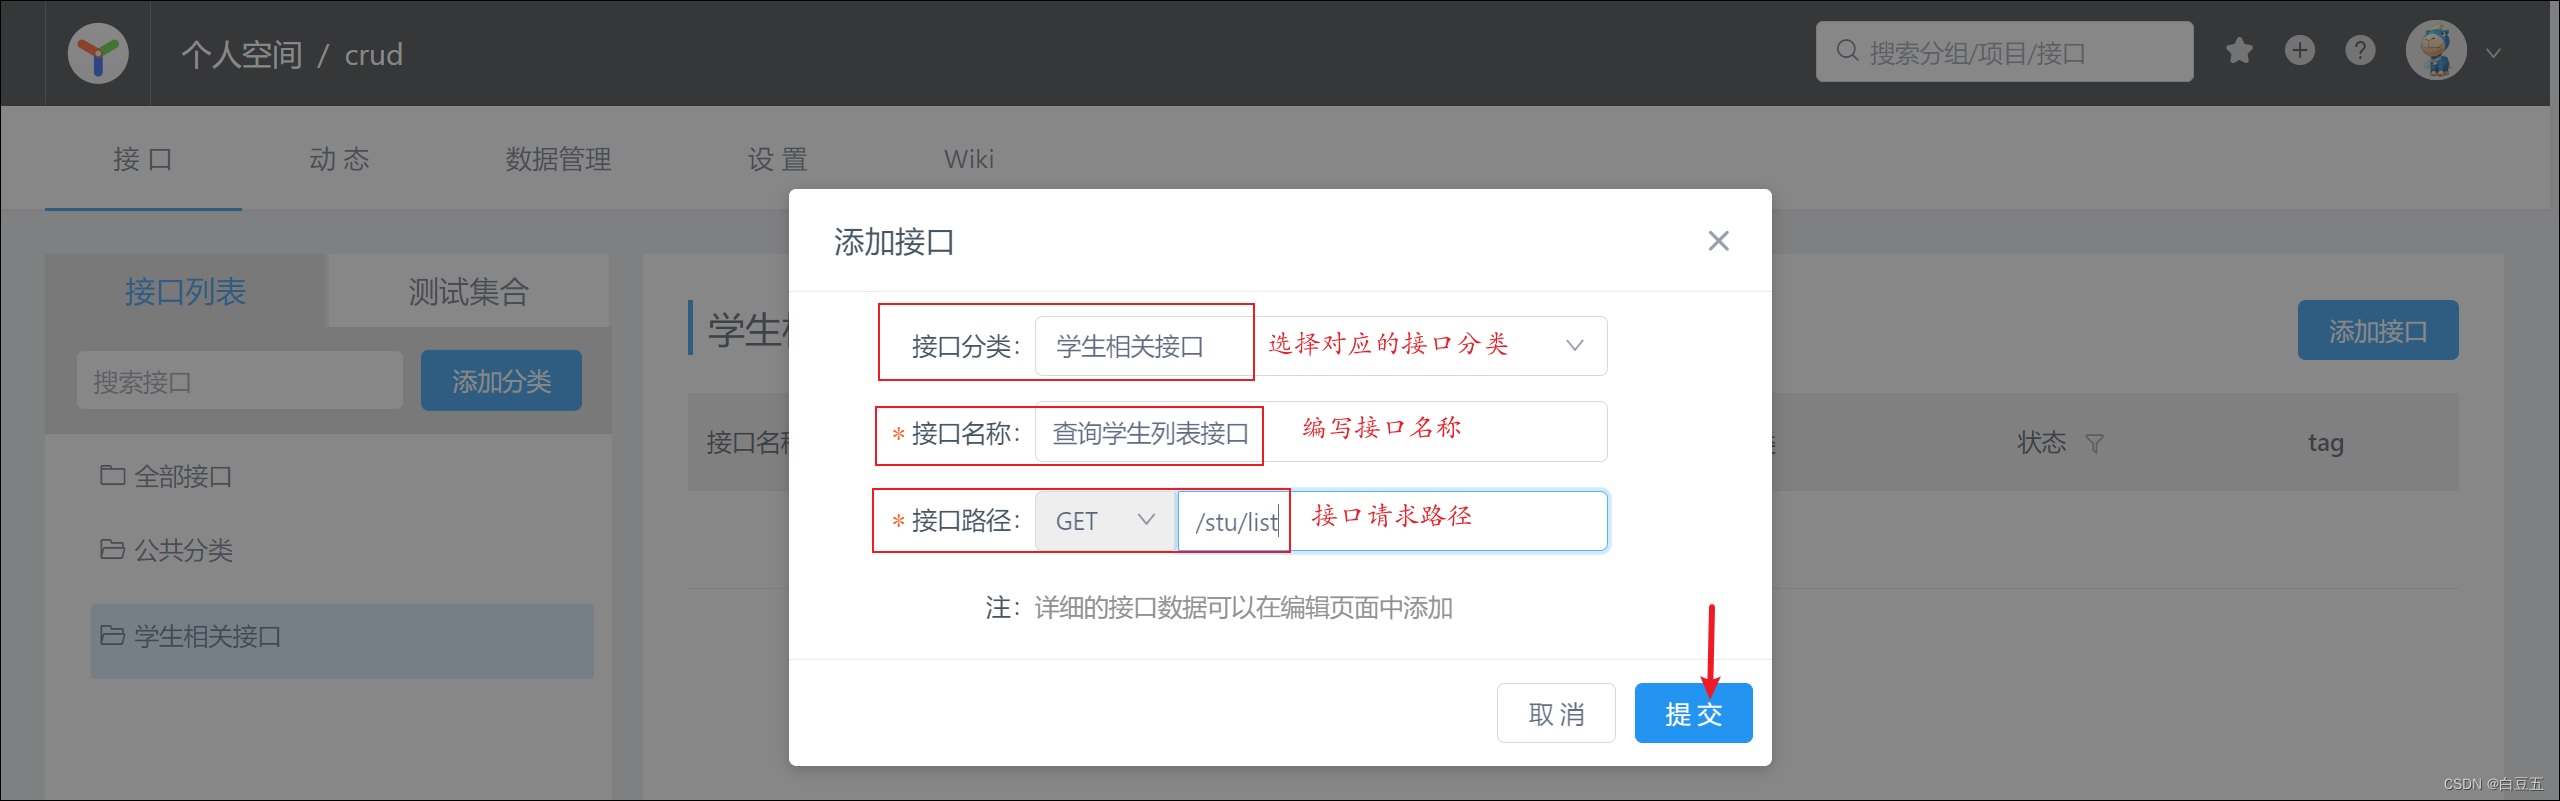
接下来我们需要指定接口的请求参数、响应数据等信息点击【编辑】对该接口详情进行编辑处理
然后点击保存。
5、运行接口需要安装chrome插件https://juejin.cn/post/6844904057707085832


在Yapi中将接口文档定义完成后前后端开发人员就需要根据接口文档的描述信息进行前端和后端功能开发。
2.2 导出接口文档
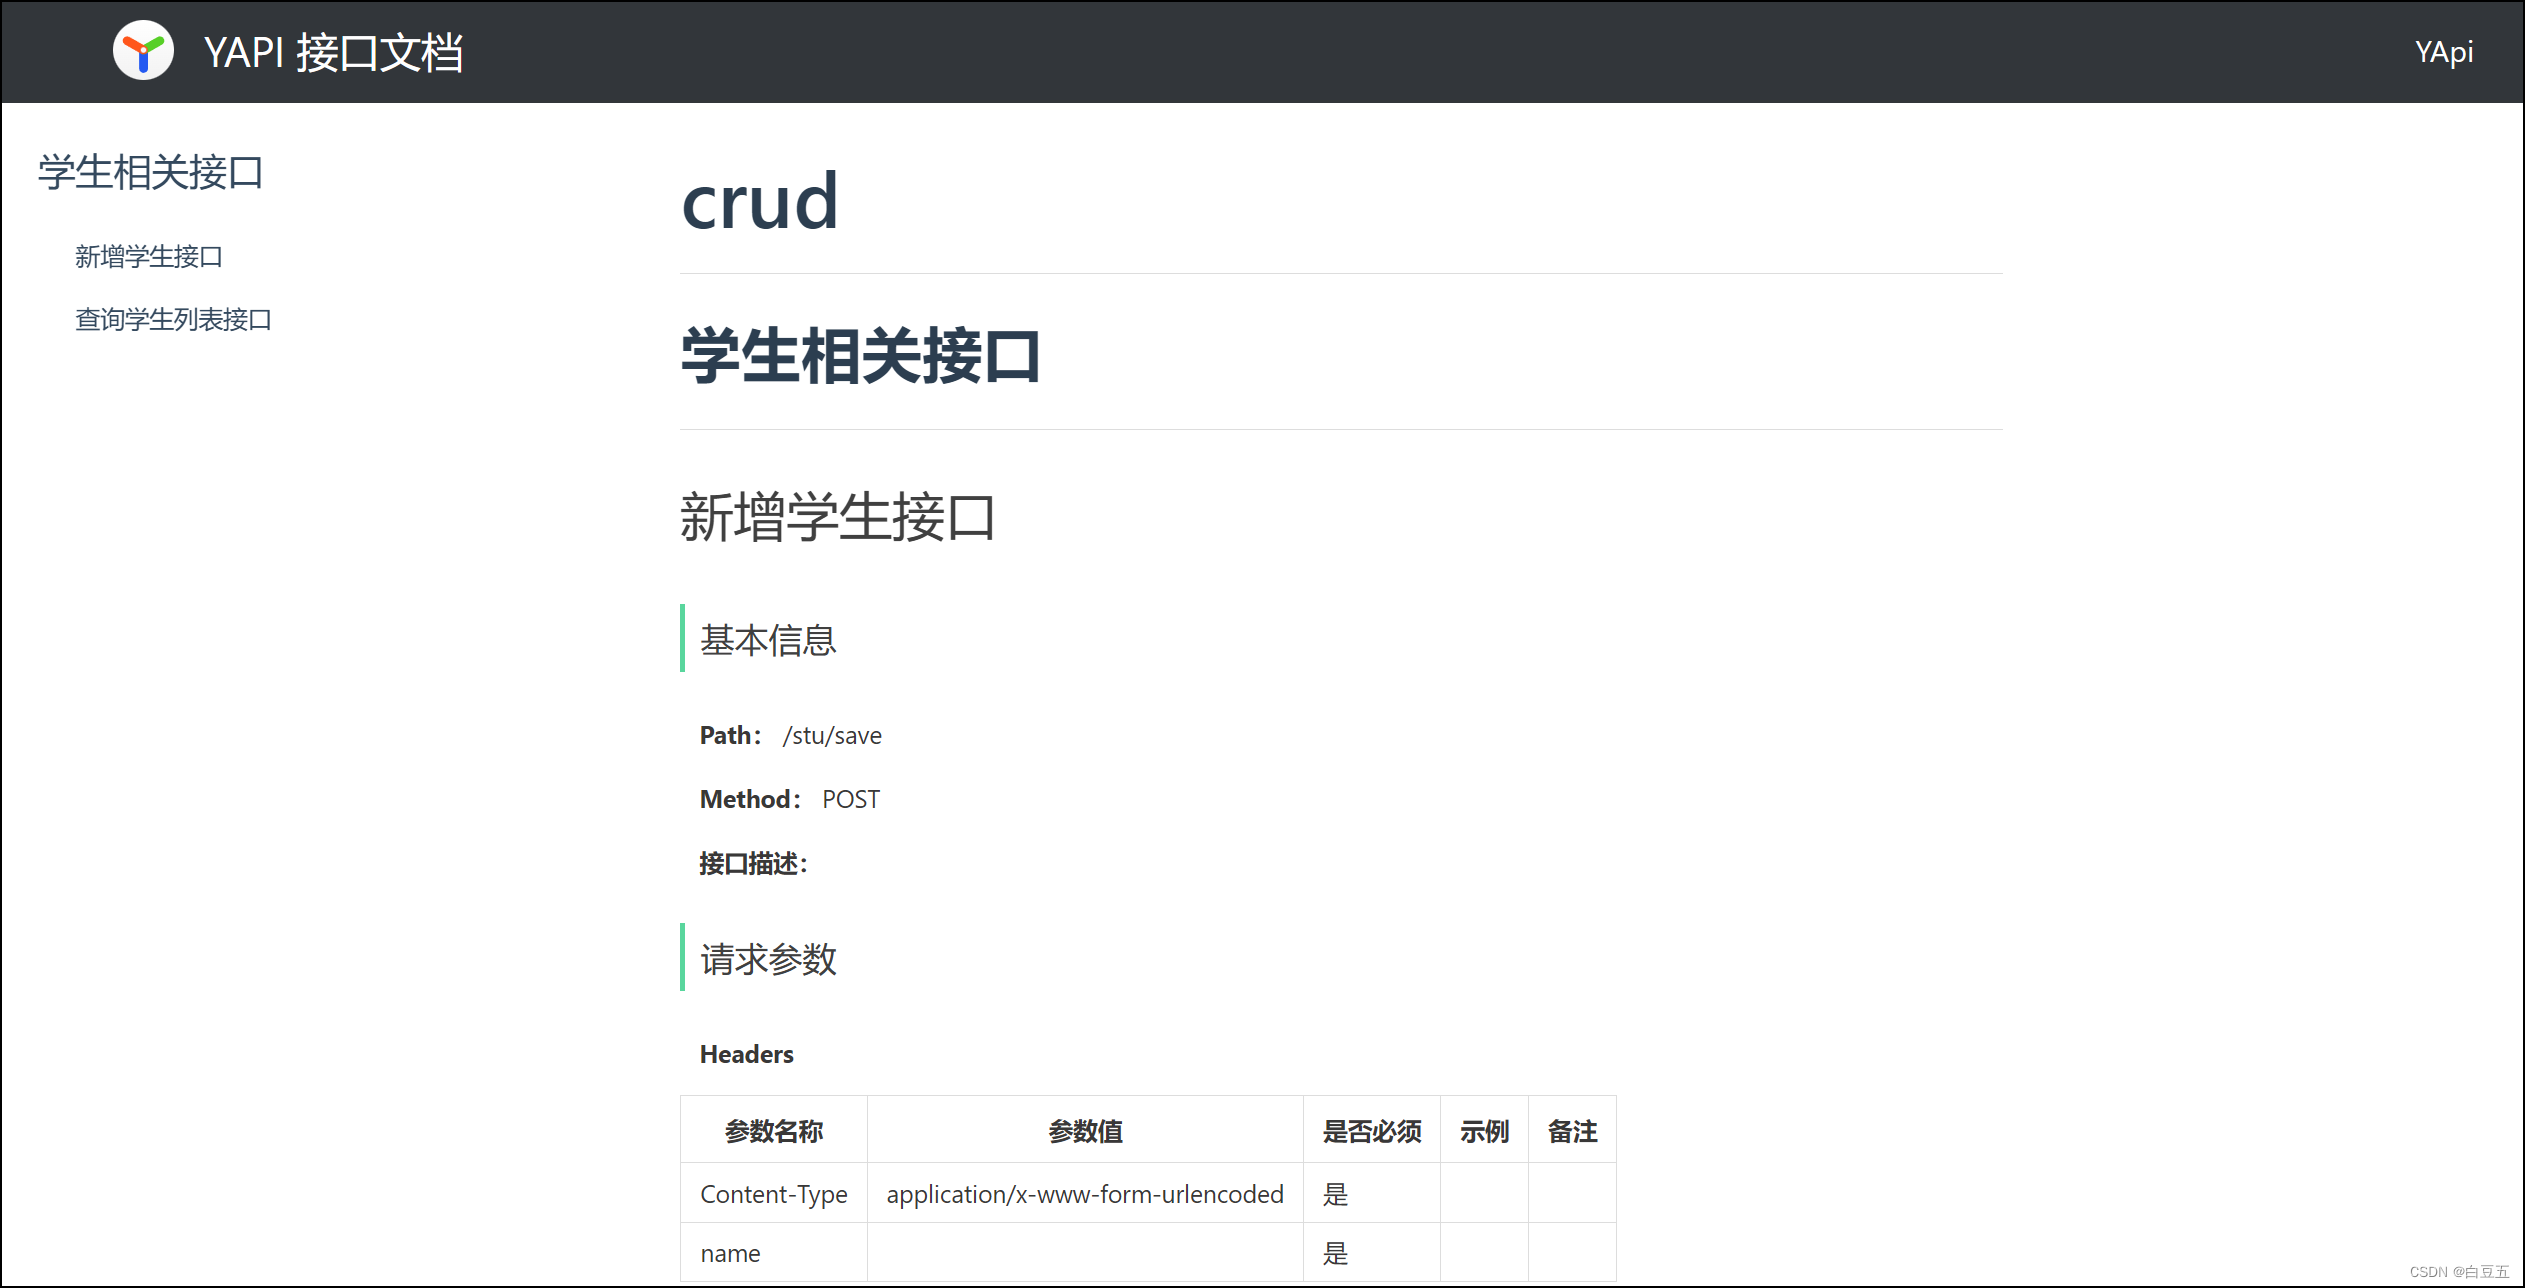
在Yapi平台中我们不仅可以在线阅读文档还可以将Yapi中维护的文档直接导出来可以导出mdjsonhtml格式在导出时自行选择即可 。
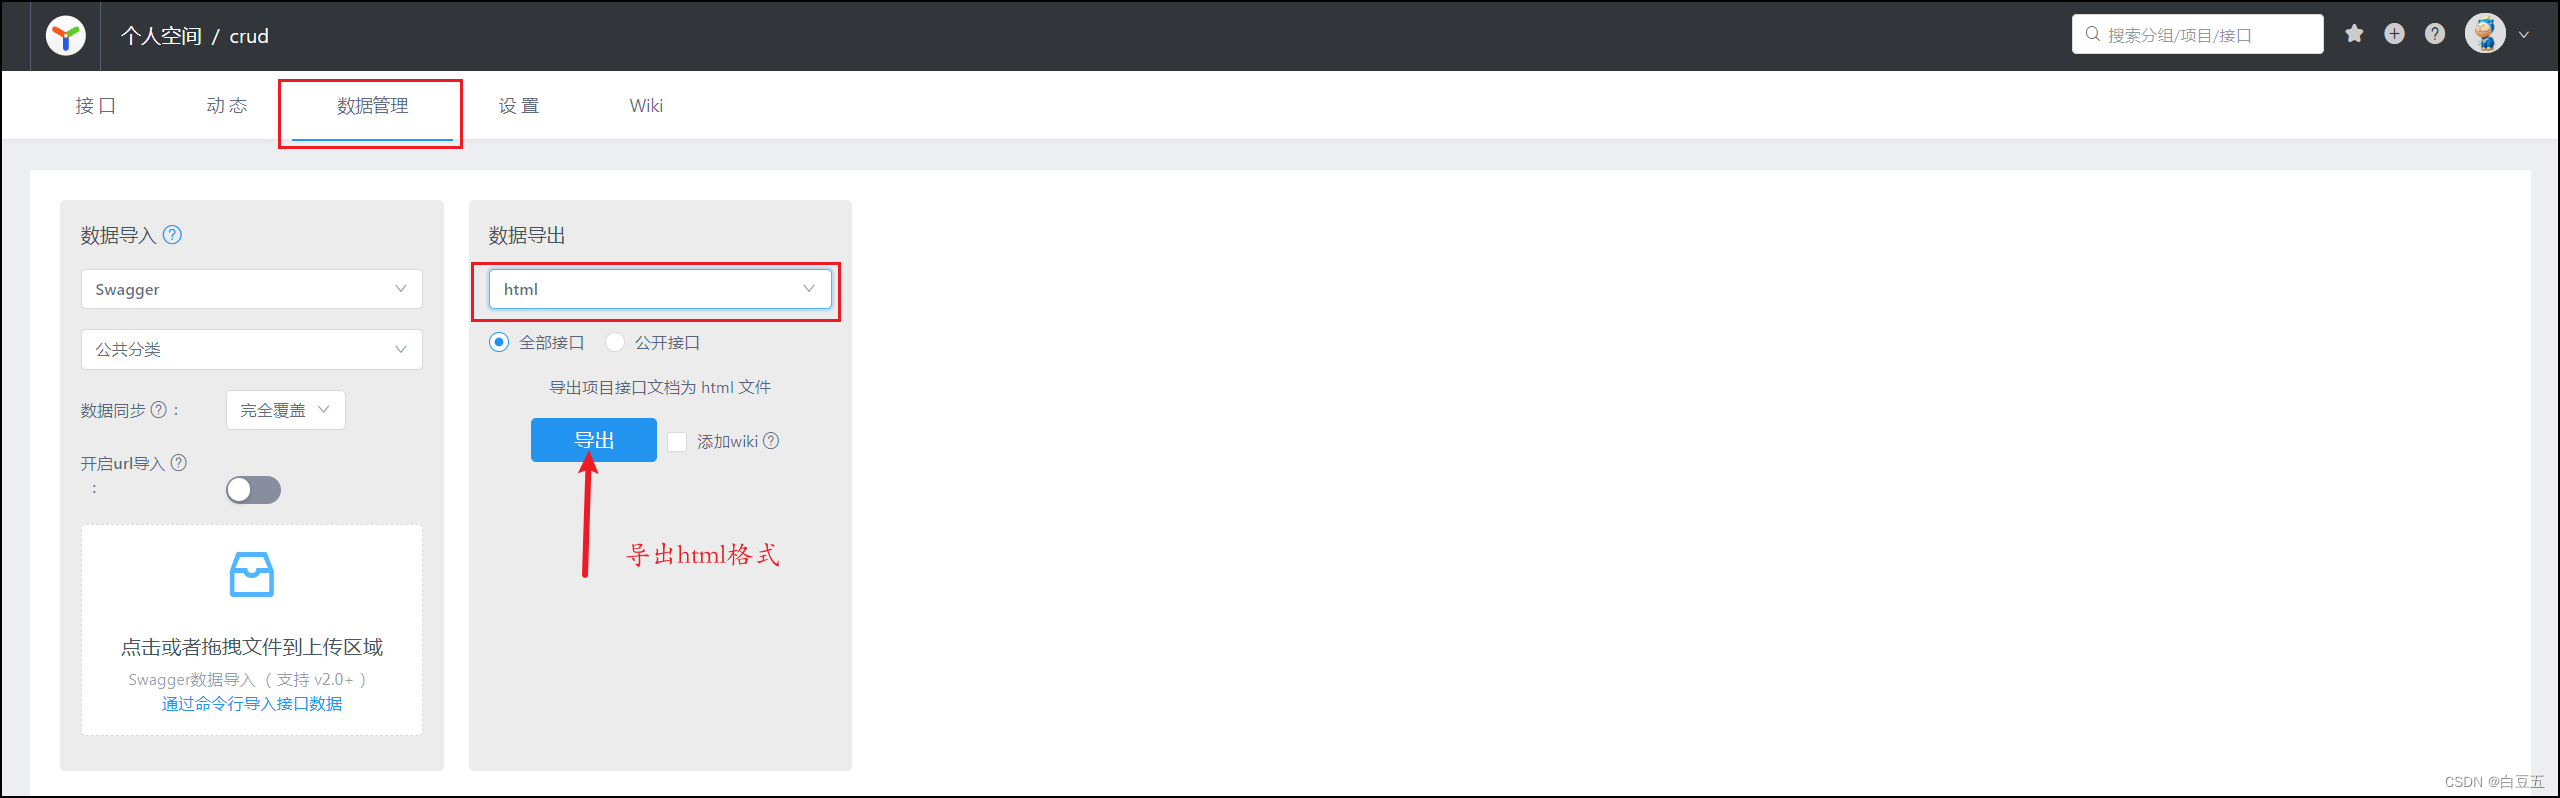
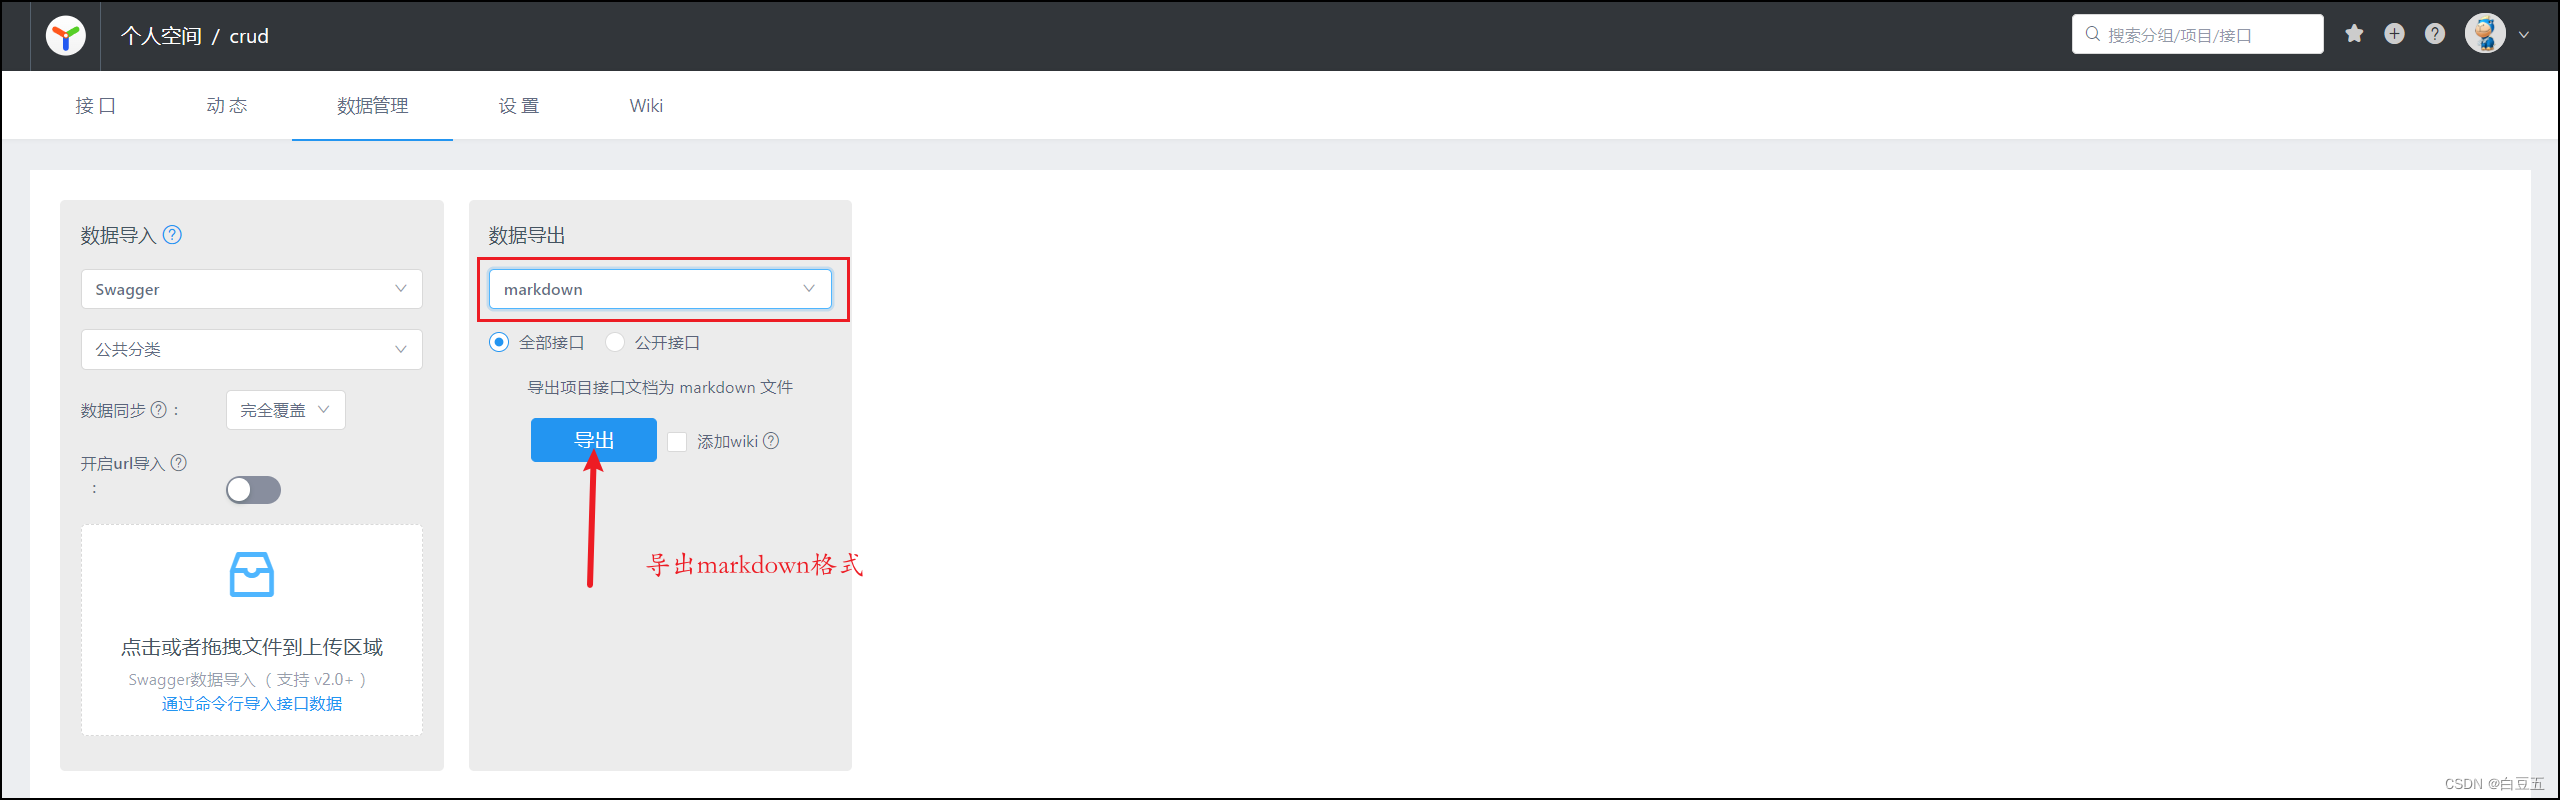
里面包含接口的基本信息如 请求路径、请求方式、接口描述、请求参数、返回数据等。
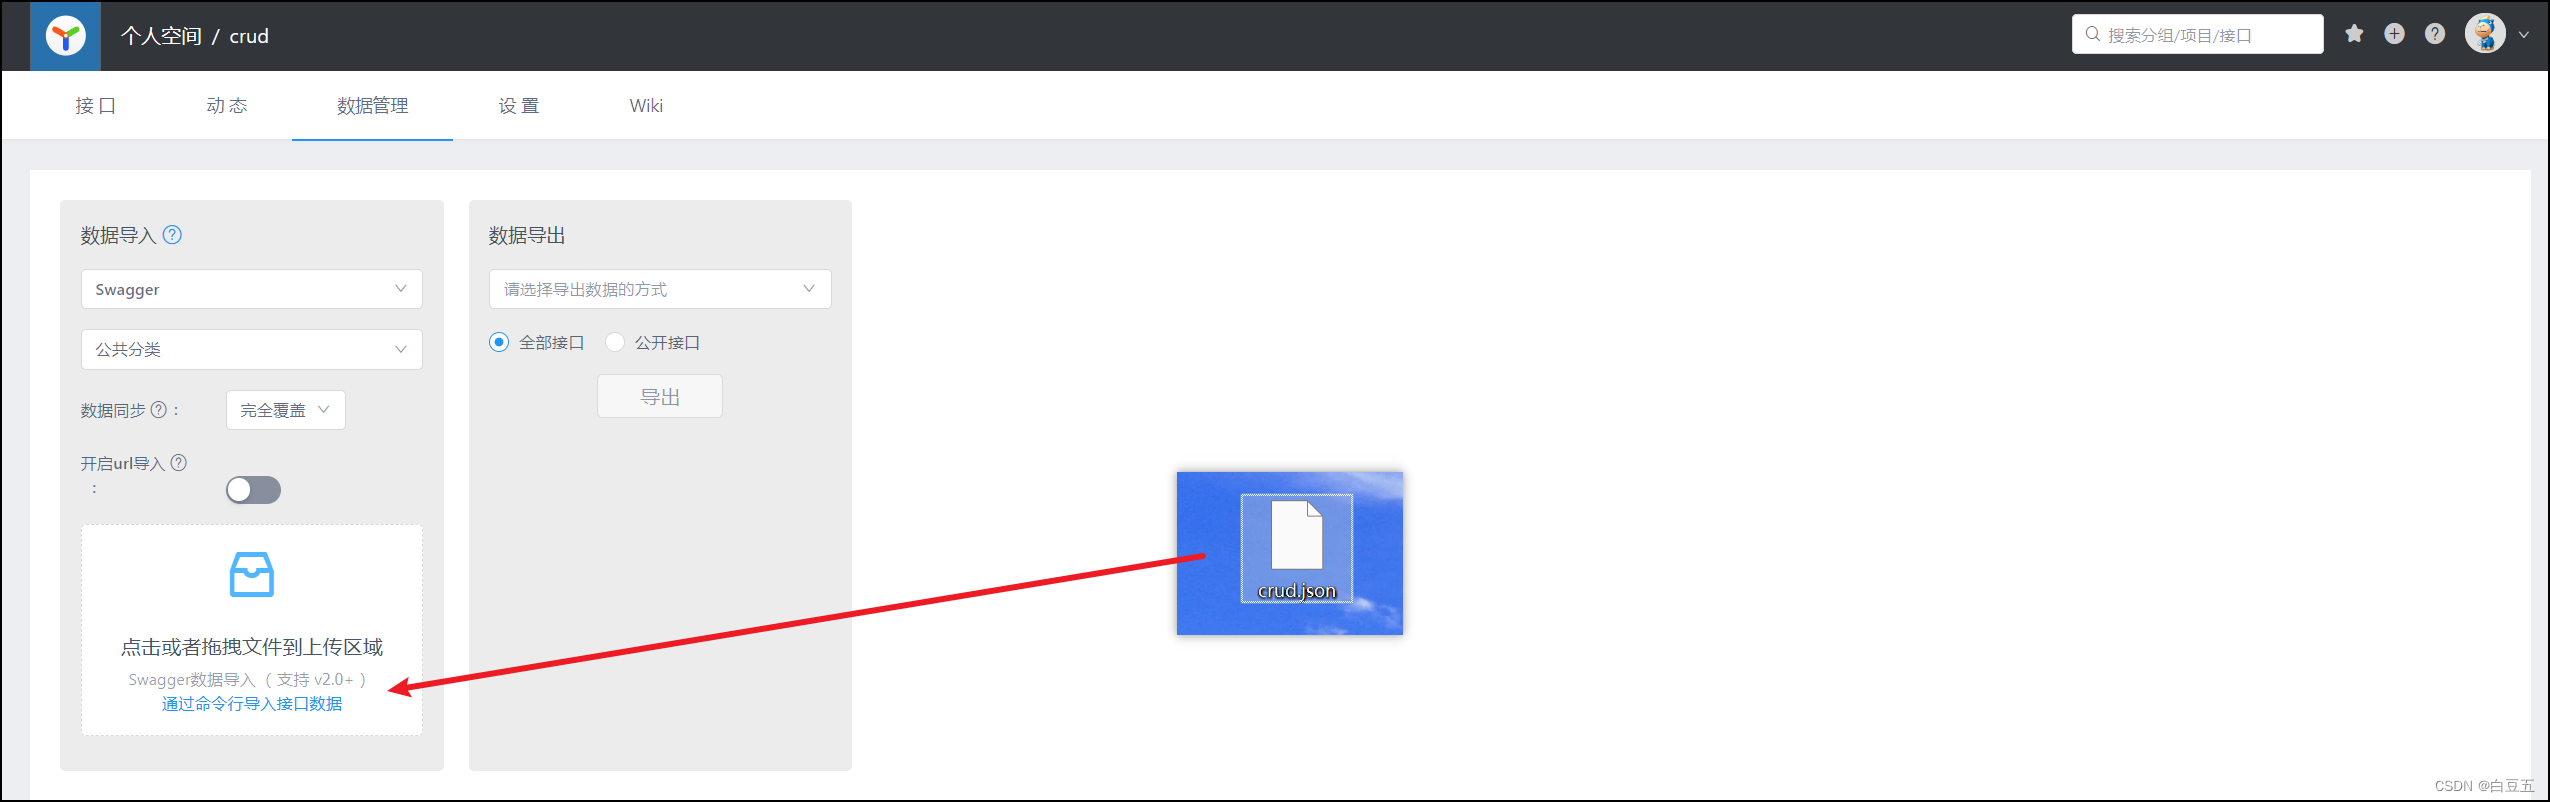
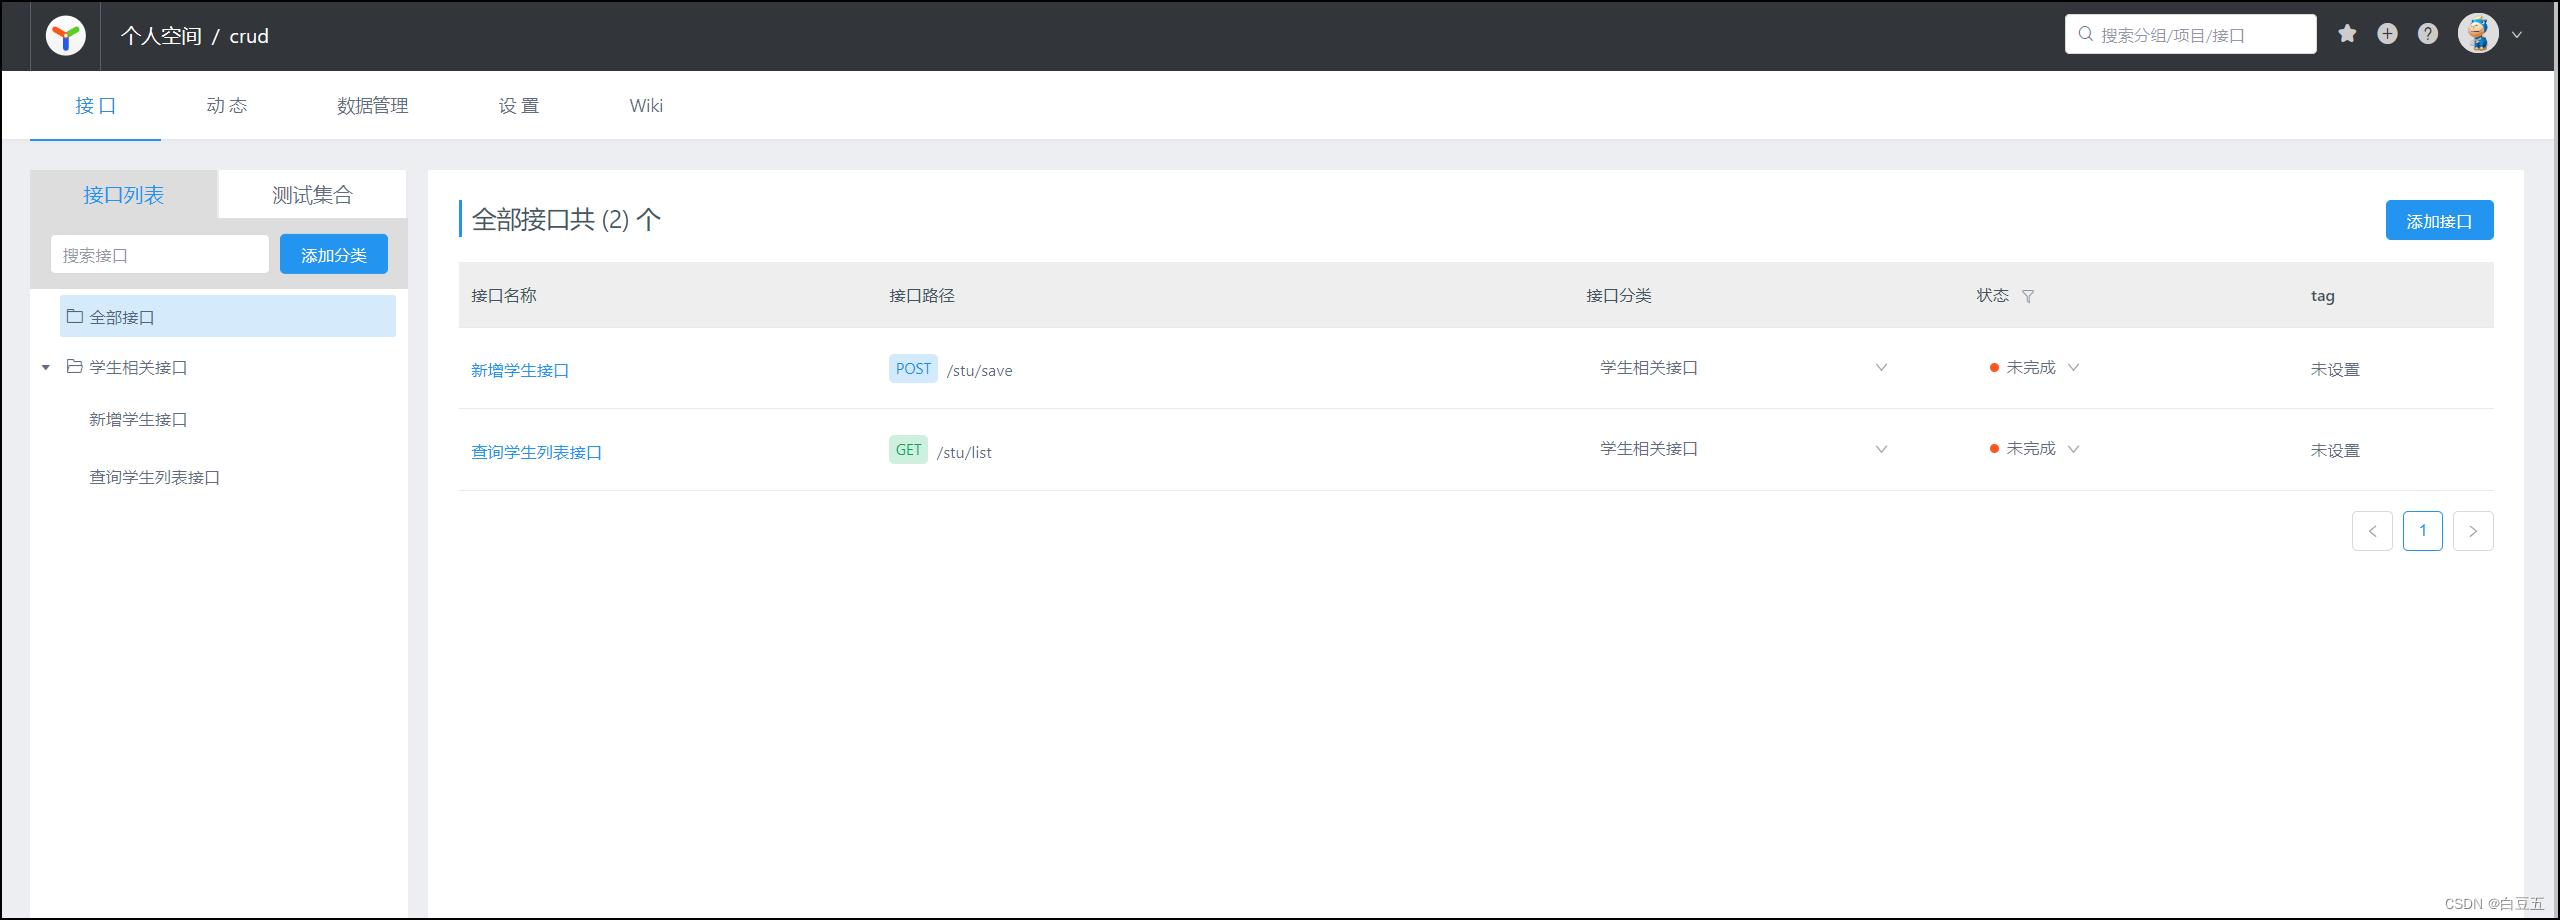
2.3 导入接口文档
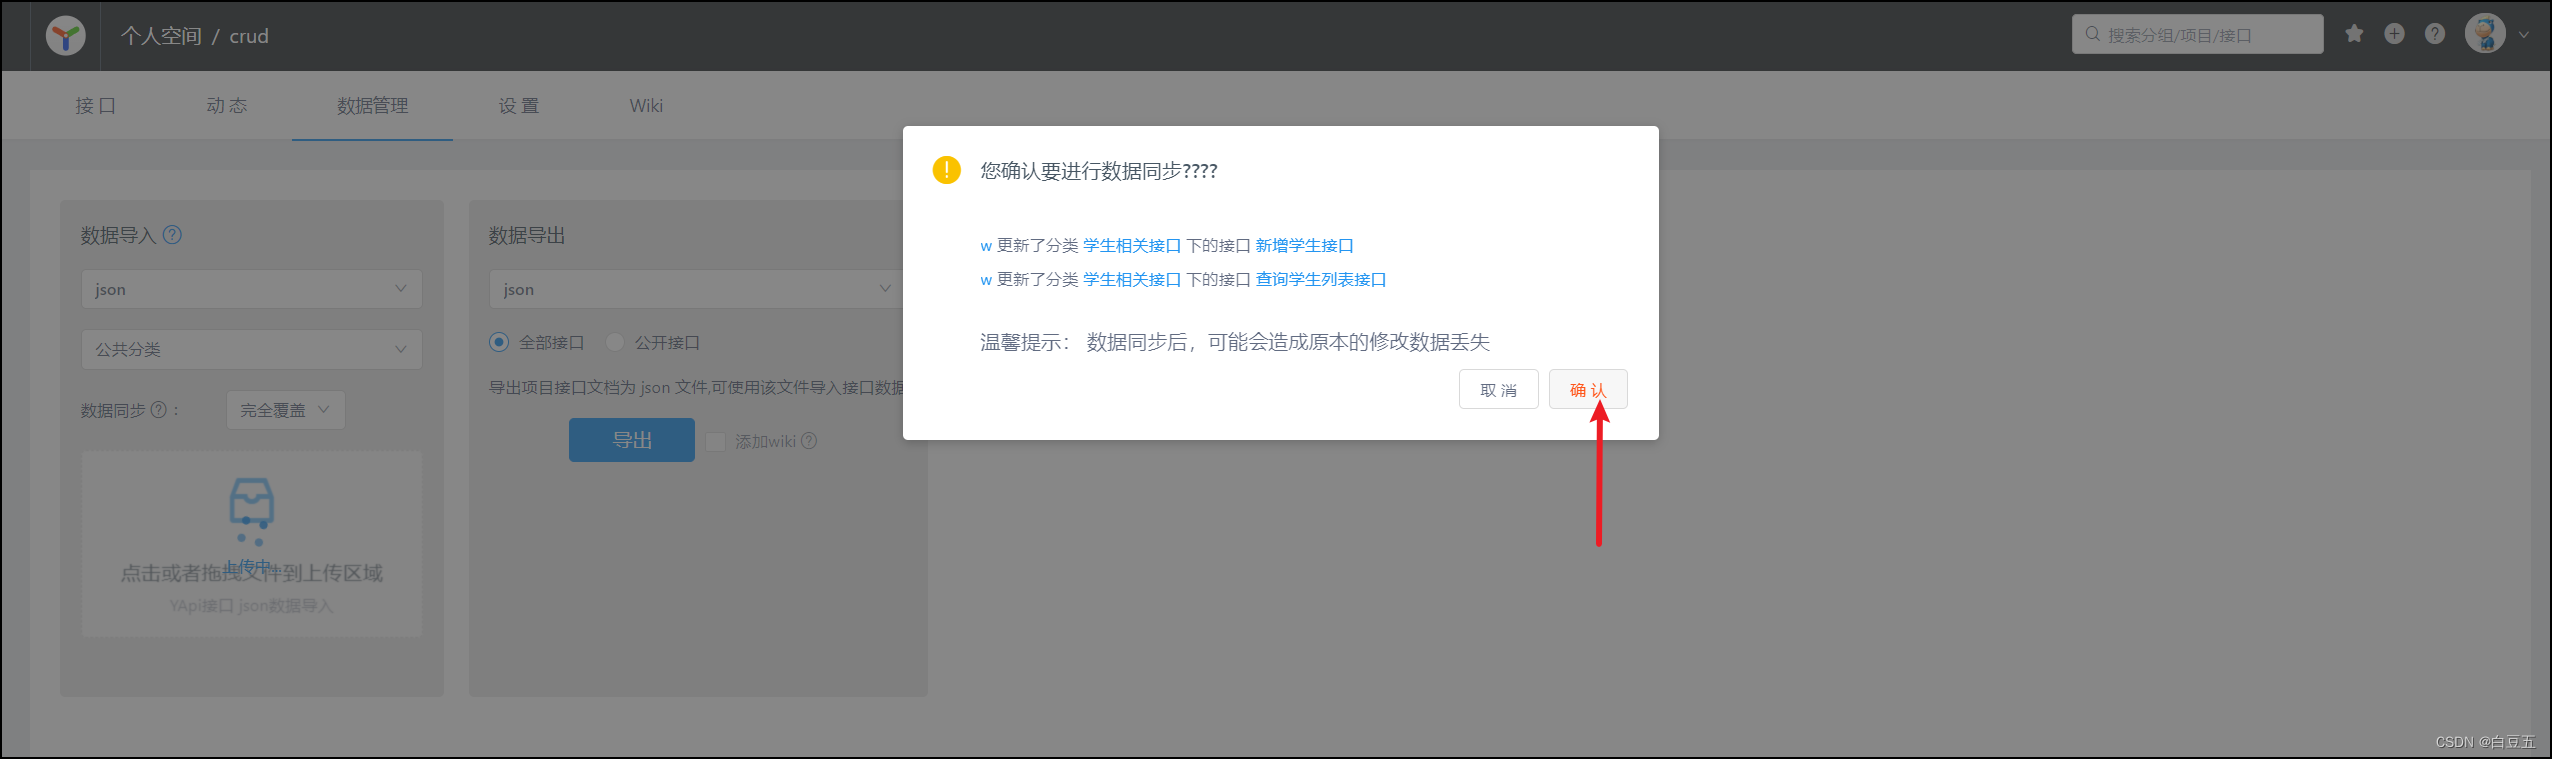
导入成功之后我们就可以在Yapi平台查看到已导入的接口。
crud.json:
[
  {
    "index": 0,
    "name": "学生相关接口",
    "desc": null,
    "add_time": 1674278871,
    "up_time": 1674278871,
    "list": [
      {
        "query_path": {
          "path": "/stu/save",
          "params": []
        },
        "edit_uid": 0,
        "status": "undone",
        "type": "static",
        "req_body_is_json_schema": true,
        "res_body_is_json_schema": true,
        "api_opened": false,
        "index": 0,
        "tag": [],
        "_id": 473770,
        "method": "POST",
        "catid": 123948,
        "title": "新增学生接口",
        "path": "/stu/save",
        "project_id": 12402,
        "req_params": [],
        "res_body_type": "json",
        "uid": 23923,
        "add_time": 1674280614,
        "up_time": 1674281534,
        "req_query": [
          {
            "required": "1",
            "_id": "63cb823ea8bf226edb4ea5c9",
            "name": "name",
            "example": "",
            "desc": "姓名"
          },
          {
            "required": "1",
            "_id": "63cb823ea8bf22f9e04ea5c8",
            "name": "password",
            "example": "",
            "desc": "密码"
          },
          {
            "required": "1",
            "_id": "63cb823ea8bf227f664ea5c7",
            "name": "age",
            "example": "",
            "desc": "年龄"
          },
          {
            "required": "1",
            "_id": "63cb823ea8bf2256354ea5c6",
            "name": "tel",
            "example": "",
            "desc": "电话"
          }
        ],
        "req_headers": [
          {
            "required": "1",
            "_id": "63cb823ea8bf22695d4ea5cb",
            "name": "Content-Type",
            "value": "application/x-www-form-urlencoded"
          },
          {
            "required": "1",
            "_id": "63cb823ea8bf22f13e4ea5ca",
            "name": "name",
            "value": ""
          }
        ],
        "req_body_form": [
          {
            "required": "1",
            "_id": "63cb823ea8bf22537a4ea5cf",
            "name": "name",
            "type": "text",
            "desc": "姓名"
          },
          {
            "required": "1",
            "_id": "63cb823ea8bf2219984ea5ce",
            "name": "password",
            "type": "text",
            "example": "",
            "desc": "密码"
          },
          {
            "required": "1",
            "_id": "63cb823ea8bf2265c34ea5cd",
            "name": "age",
            "type": "text",
            "example": "",
            "desc": "年龄"
          },
          {
            "required": "1",
            "_id": "63cb823ea8bf22d5a54ea5cc",
            "name": "tel",
            "type": "text",
            "example": "",
            "desc": "电话"
          }
        ],
        "__v": 0,
        "desc": "",
        "markdown": "",
        "req_body_type": "form",
        "res_body": "{\"type\":\"object\",\"title\":\"title\",\"properties\":{}}"
      },
      {
        "query_path": {
          "path": "/stu/list",
          "params": []
        },
        "edit_uid": 0,
        "status": "undone",
        "type": "static",
        "req_body_is_json_schema": true,
        "res_body_is_json_schema": true,
        "api_opened": false,
        "index": 0,
        "tag": [],
        "_id": 473768,
        "method": "GET",
        "catid": 123948,
        "title": "查询学生列表接口",
        "path": "/stu/list",
        "project_id": 12402,
        "req_params": [],
        "res_body_type": "json",
        "uid": 23923,
        "add_time": 1674279248,
        "up_time": 1674279896,
        "req_query": [],
        "req_headers": [],
        "req_body_form": [],
        "__v": 0,
        "desc": "",
        "markdown": "",
        "res_body": ""
      }
    ]
  }
]
二、Swagger
Swagger官网地址https://swagger.io/
Swagger 是一个规范和完整的框架用于生成、描述、调用和可视化 RESTful 风格的 Web 服务。功能主要包含以下几点:
-
使得前后端分离开发更加方便有利于团队协作。
-
接口文档在线自动生成降低后端开发人员编写接口文档的负担。
-
接口功能测试。
使用Swagger只需要按照它的规范去定义接口及接口相关的信息再通过Swagger衍生出来的一系列项目和工具就可以做到生成各种格式的接口文档以及在线接口调试页面等等。
Knife4j小刀 four javalog4j哈哈
如果直接使用Swagger需要按照Swagger的规范定义接口实际上就是编写Json文件编写起来比较繁琐、并不方便。
而在项目中使用我们一般会选择一些现成的框架来简化文档的编写而这些框架是基于Swagger的例如 knife4j)。
Knife4j是一款基于Swagger的增强工具官网地址https://doc.xiaominfo.com/
使用knife4j只需在pom.xml中引入如下依赖即可
<dependency>
    <groupId>com.github.xiaoymin</groupId>
    <artifactId>knife4j-spring-boot-starter</artifactId>
    <version>3.0.2</version>
</dependency>
1. 使用方式
1、导入knife4j起步依赖:
<dependency>
    <groupId>com.github.xiaoymin</groupId>
    <artifactId>knife4j-spring-boot-starter</artifactId>
    <version>3.0.2</version>
</dependency>
2、编写Swagger配置类:
package com.baidou.config;
import com.github.xiaoymin.knife4j.spring.annotations.EnableKnife4j;
import org.springframework.context.annotation.Bean;
import org.springframework.context.annotation.Configuration;
import springfox.documentation.builders.ApiInfoBuilder;
import springfox.documentation.builders.PathSelectors;
import springfox.documentation.builders.RequestHandlerSelectors;
import springfox.documentation.service.ApiInfo;
import springfox.documentation.service.Contact;
import springfox.documentation.spi.DocumentationType;
import springfox.documentation.spring.web.plugins.Docket;
import springfox.documentation.swagger2.annotations.EnableSwagger2;
/**
* Swagger2配置类生成接口文档
*
* @author 白豆五
* @version 2023/1/21
* @since JDK8
*/
@Configuration
@EnableSwagger2 //开启swagger2注解支持
@EnableKnife4j //开启Knife4j注解支持
public class SwaggerConfig {
@Bean
public Docket webApiConfig() { //生成接口文档的清单
// 文档类型
return new Docket(DocumentationType.SWAGGER_2)
.groupName("webApi")
.apiInfo(webApiInfo())
.select()
//指定controller包扫描路径
.apis(RequestHandlerSelectors.basePackage("com.baidou.controller"))
.paths(PathSelectors.any())
.build();
}
//配置api信息
private ApiInfo webApiInfo() {
return new ApiInfoBuilder()
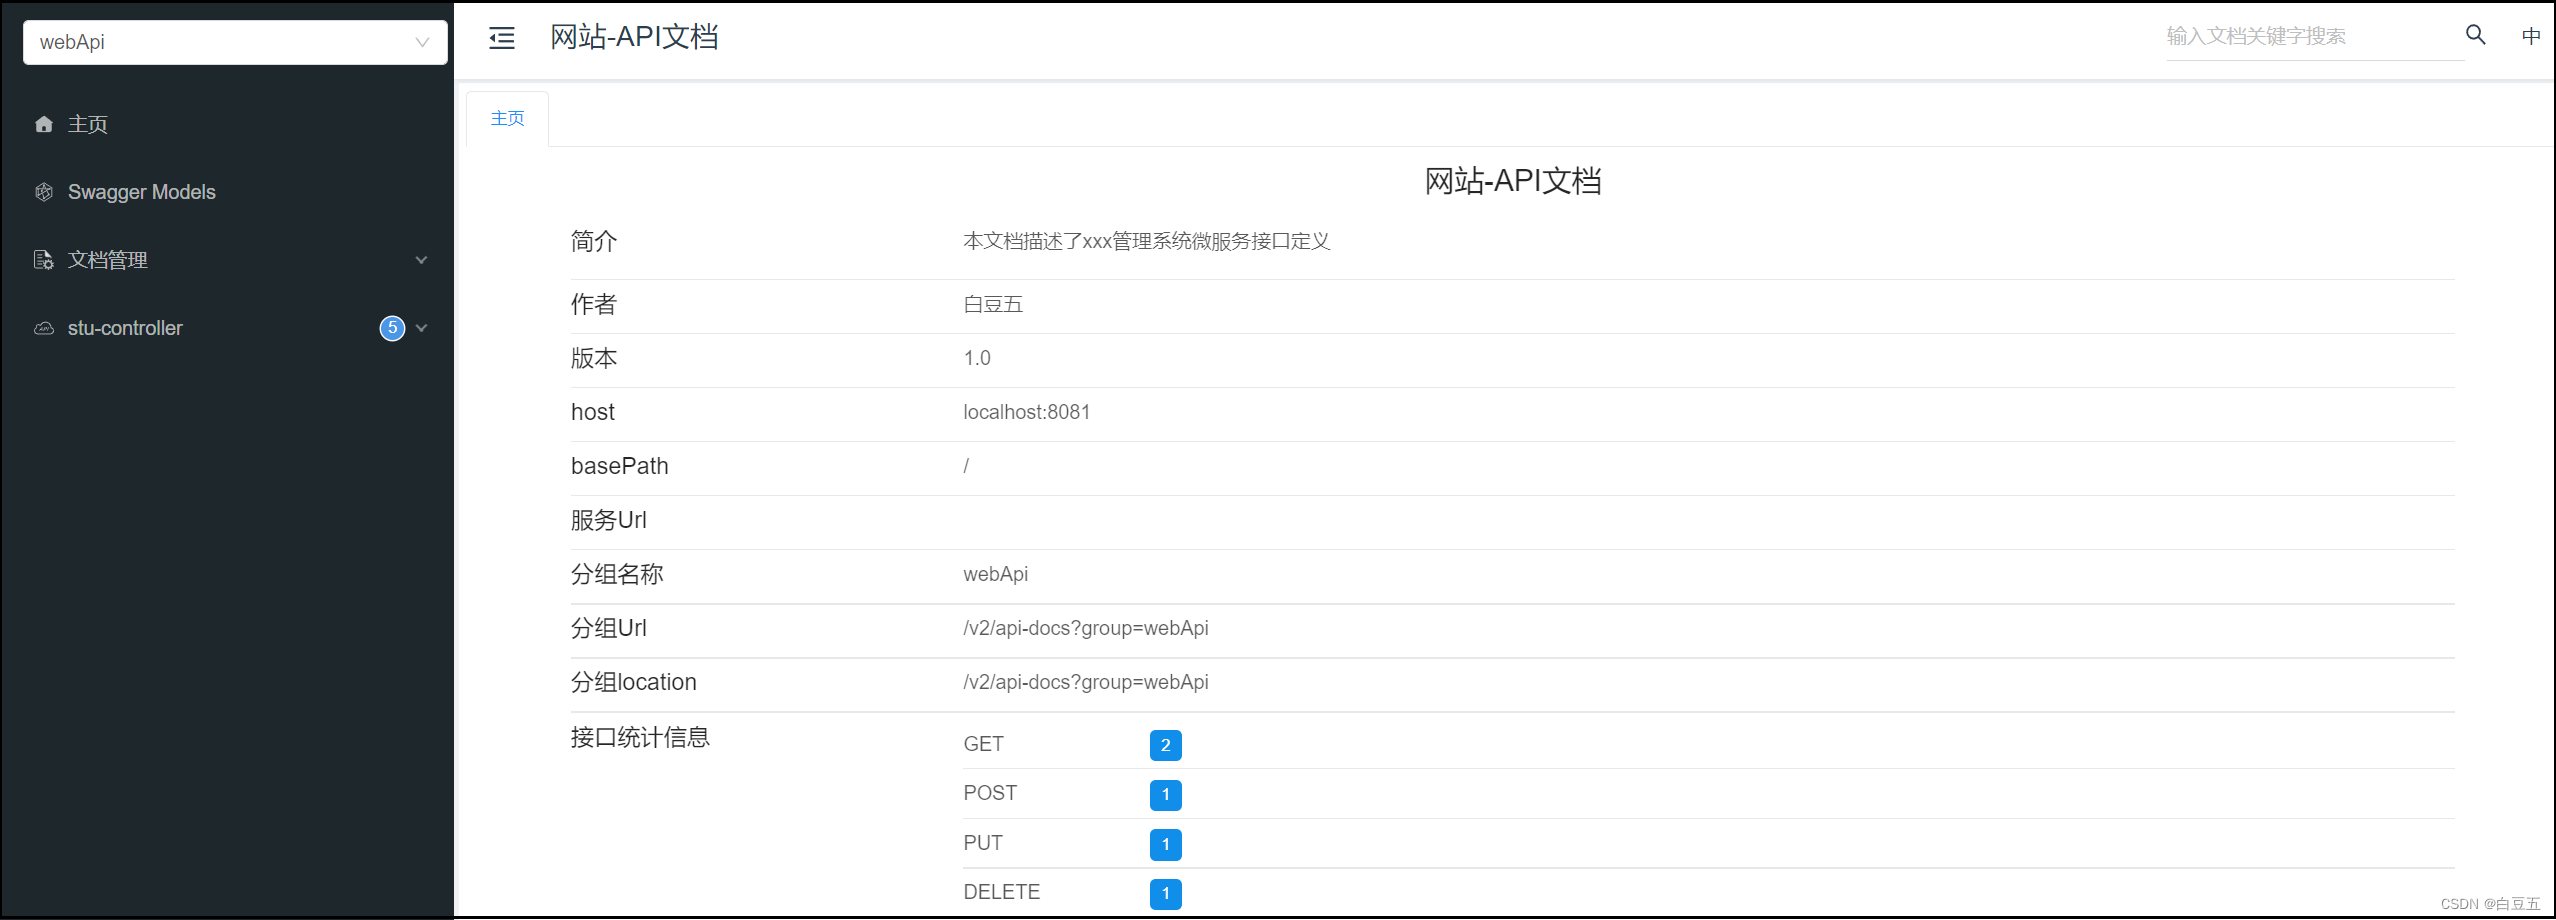
.title("网站-API文档")
.description("本文档描述了xxx管理系统微服务接口定义")
.version("1.0")
.contact(new Contact("白豆五", "https://blog.csdn.net/qq_46921028", "13212341234@163.com"))
.build();
}
}
注意 Docket声明时有一个包扫描的路径该路径指定的是Controller所在包的路径。因为Swagger在生成接口文档时就是根据这里指定的包路径自动的扫描该包下的@Controller @RestController @RequestMapping等SpringMVC的注解依据这些注解来生成对应的接口文档。
3、 设置静态资源映射对Swagger的静态资源放行
由于Swagger生成的在线文档中涉及到很多静态资源这些静态资源需要添加静态资源映射否则接口文档页面无法访问。
@Configuration
public class WebMvcConfig implements WebMvcConfigurer {

    // 静态资源放行
    @Override
    public void addResourceHandlers(ResourceHandlerRegistry registry) {
        registry.addResourceHandler("/web/**").addResourceLocations("classpath:/web/");

        // 对swaggger静态资源放行
        registry.addResourceHandler("/doc.html").addResourceLocations("classpath:/META-INF/resources/");
        registry.addResourceHandler("/webjars/**").addResourceLocations("classpath:/META-INF/resources/webjars/");

    }
}
如果配置拦截器需要对以下资源放行
"/doc.html",
"/webjars/**",
"/swagger-resources",
"/v2/api-docs"
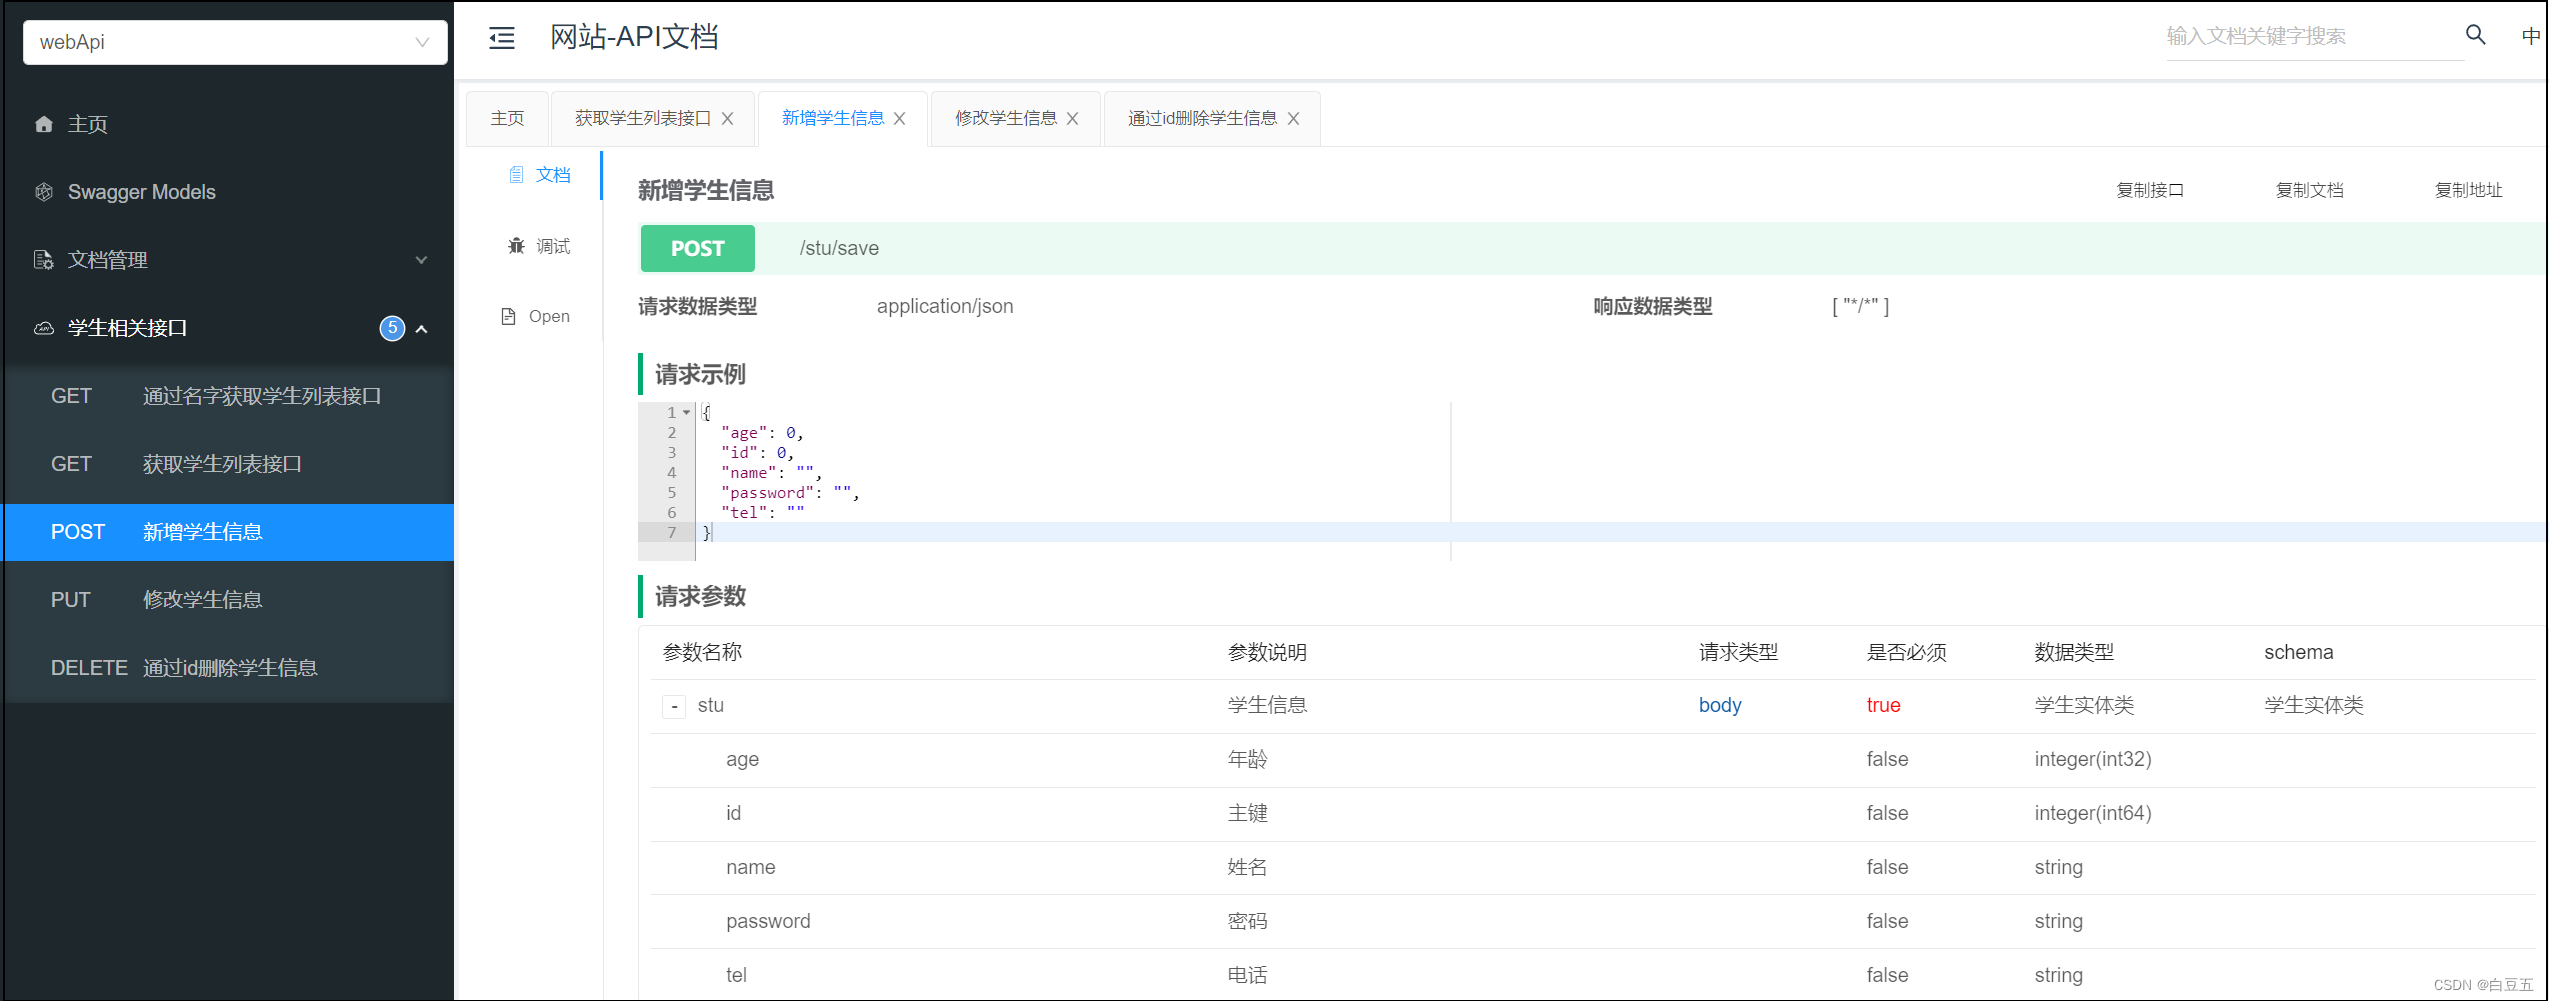
4、访问swaggerhttp://localhost:8081/doc.html
2. 常用注解
Swagger提供了很多的注解通过这些注解我们可以更好更清晰的描述我们的接口包含接口的请求参数、响应数据、数据模型等。核心的注解主要包含以下几个
| 注解 | 位置 | 说明 |
|---|---|---|
| @Api | 类 | 添加到Controller类上表示对类的说明 |
| @ApiModel | 类(通常是实体类) | 描述实体类的作用 |
| @ApiModelProperty | 属性 | 描述实体类的属性 |
| @ApiOperation | 方法 | 说明方法的用途、作用 |
| @ApiImplicitParams | 方法 | 表示一组参数说明 |
| @ApiImplicitParam | 方法 | 用在@ApiImplicitParams注解中指定一个请求参数的各个方面的属性 |
| @@ApiParam | 方法形参上 | 描述接口方法的形参 |
示例注解的使用
在实体类中使用
@Data
@AllArgsConstructor
@NoArgsConstructor
@ApiModel("学生实体类")
public class Stu implements Serializable {

    private static final long serialVersionUID = 1L;

    @ApiModelProperty("主键")
    private Long id;

    @ApiModelProperty("姓名")
    private String name;

    @ApiModelProperty("密码")
    private String password;

    @ApiModelProperty("年龄")
    private Integer age;

    @ApiModelProperty("电话")
    private String tel;
}
在Controller类中使用
@RestController
@RequestMapping("/stu")
@Api(tags = "学生相关接口")
public class StuController {
@Autowired
StuMapper stuMapper;
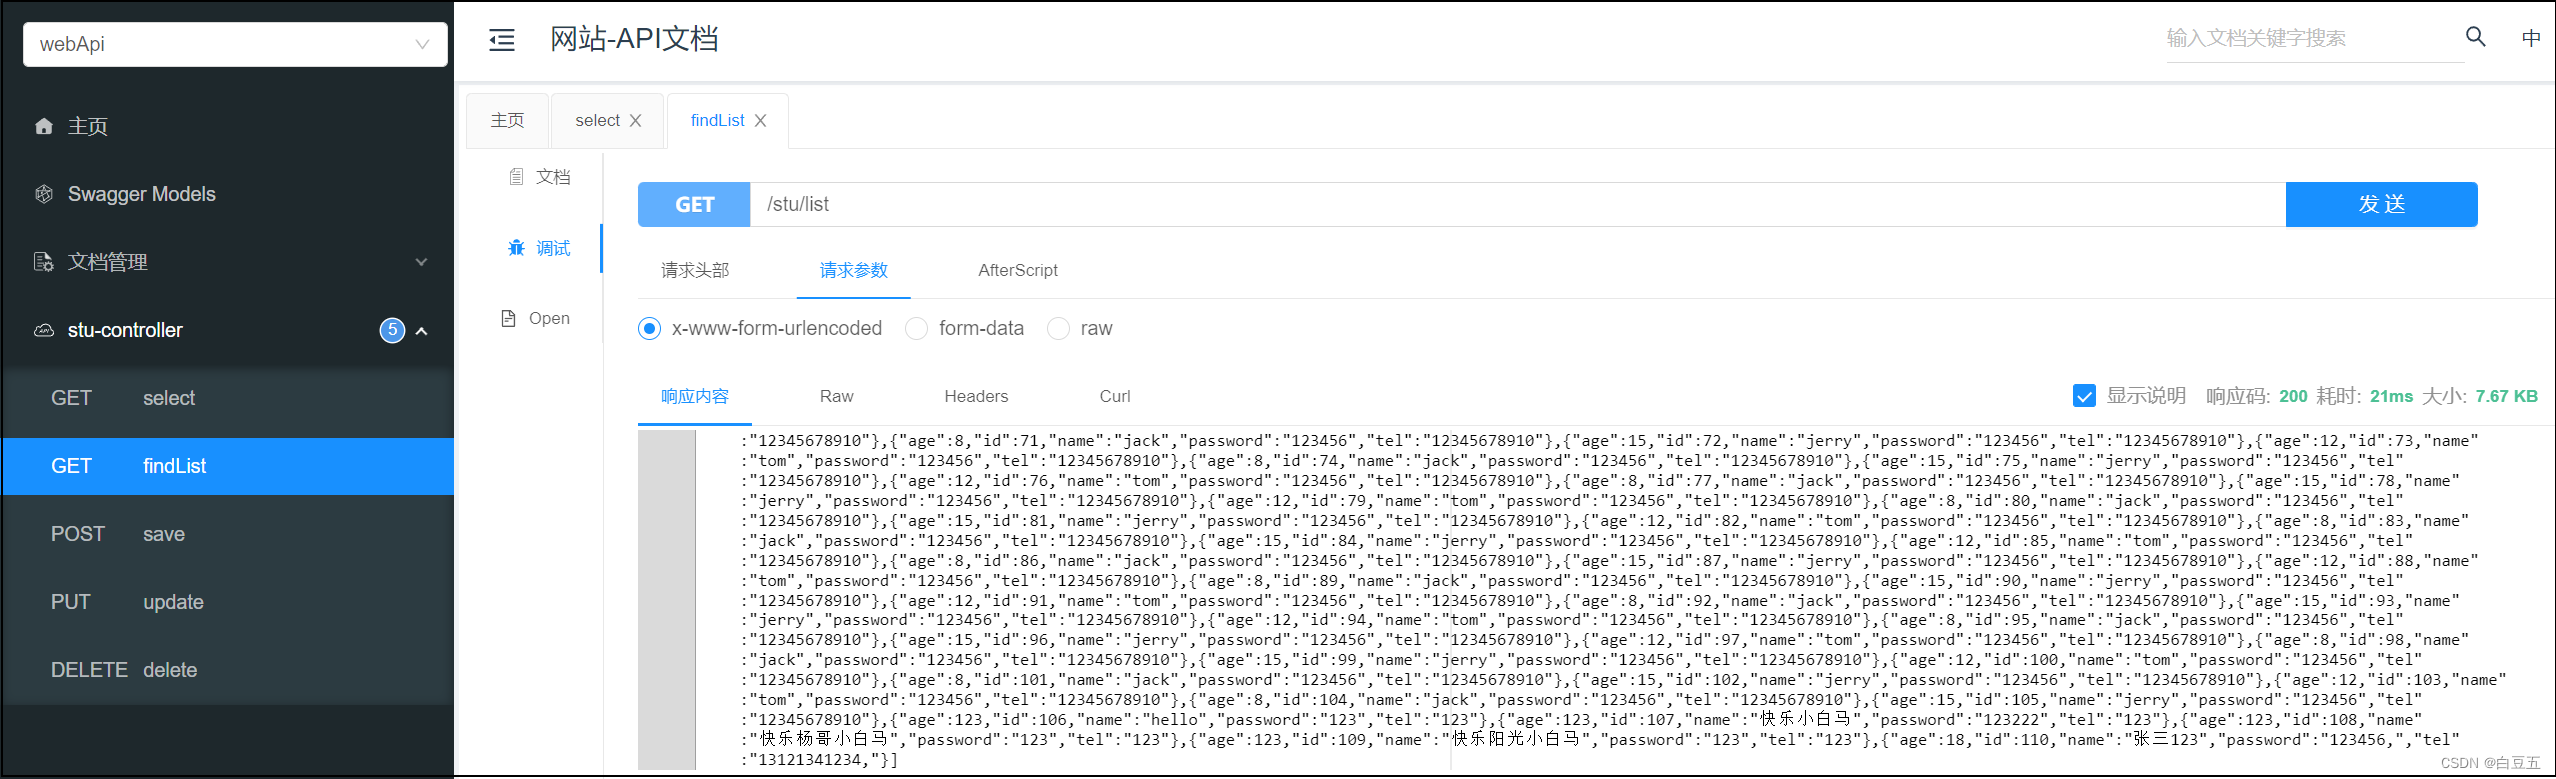
@GetMapping("/list")
@ApiOperation(value = "获取学生列表接口")
public String findList() {
List<Stu> list = stuMapper.selectAll();
return JSON.toJSONString(list);
}
@GetMapping()
@ApiOperation(value = "通过名字获取学生列表接口")
// required = true 表示必须传递参数
public String select( @ApiParam(value = "学生姓名",required = true) @RequestParam String name) {
List<Stu> list = stuMapper.select(name);
return JSON.toJSONString(list);
}
@DeleteMapping("/{id}")
@ApiOperation(value = "通过id删除学生信息")
public String delete(@ApiParam(value = "学生id") @PathVariable Long id) {
int row = stuMapper.deleteStu(id);
return row == 1 ? "ok" : "error";
}
@PostMapping("/save")
@ApiOperation(value = "新增学生信息")
public String save(@ApiParam("学生信息") @RequestBody Stu stu) {
int row = stuMapper.save(stu);
return row == 1 ? "ok" : "error";
}
@PutMapping("/update")
@ApiOperation(value = "修改学生信息")
public String update(@ApiParam("学生信息")@RequestBody Stu stu) {
int row = stuMapper.update(stu);
return row == 1 ? "ok" : "error";
}
}
只需使用Swagger提供的注解便可生成接口文档。
| 阿里云国内75折 回扣 微信号:monov8 |
| 阿里云国际,腾讯云国际,低至75折。AWS 93折 免费开户实名账号 代冲值 优惠多多 微信号:monov8 飞机:@monov6 |