

RabbitMQ使用教程
| 阿里云国内75折 回扣 微信号:monov8 |
| 阿里云国际,腾讯云国际,低至75折。AWS 93折 免费开户实名账号 代冲值 优惠多多 微信号:monov8 飞机:@monov6 |
1、RabbitMq简介
RabbitMQ 是一个由 Erlang 语言开发的 AMQP 的开源实现。
AMQP Advanced Message Queue高级消息队列协议。它是应用层协议的一个开放标准为面向消息的中间件设计基于此协议的客户端与消息中间件可传递消息并不受产品、开发语言等条件的限制。
2、队列(Queue)
队列是常用的数据结构之一是一种特殊的线性表特殊之处在于它只允许在表的前端(front)进行删除操作而在表的后端(rear)进行插入操作。进行插入操作的端称为队尾进行删除操作的端称为对头。
3、消息队列(Message Queue)
消息计算机/应用 间传送的数据单位可以非常简单例如只包含文本字符串也可以很复杂可能包含嵌入对象。
消息队列在消息的传输过程中保存消息的容器
消息传输时先发送到队列队列的主要目的是提供路由并保证消息的传递如果发送消息时接收者不可用消息队列会保留消息直到可以成功的传递它。
可以把消息队列理解成快递公司你需要寄一个物件消息给你的朋友快递公司收到物件会保证物件送到你的朋友手中可能存在多次寄送才送达成功的情况比如第一次送过去你朋友不在家
消息队列中间件是分布式系统中重要的组件
解决 应用耦合、异步消息、流量削锋 等问题
实现 高性能、高可用、可伸缩 和 最终一致性
4、RabbitMQ安装及配置
因为RabbitMQ是基于Erlang语言开发的所以我们要先安装Erlang环境
并保持版本匹配版本匹配网址https://www.rabbitmq.com/which-erlang.html
4.1、安装Erlang环境
Erlang下载地址https://www.erlang.org/downloads
右键 otp_win64_20.2.exe 以管理员身份运行

傻瓜式安装一路next
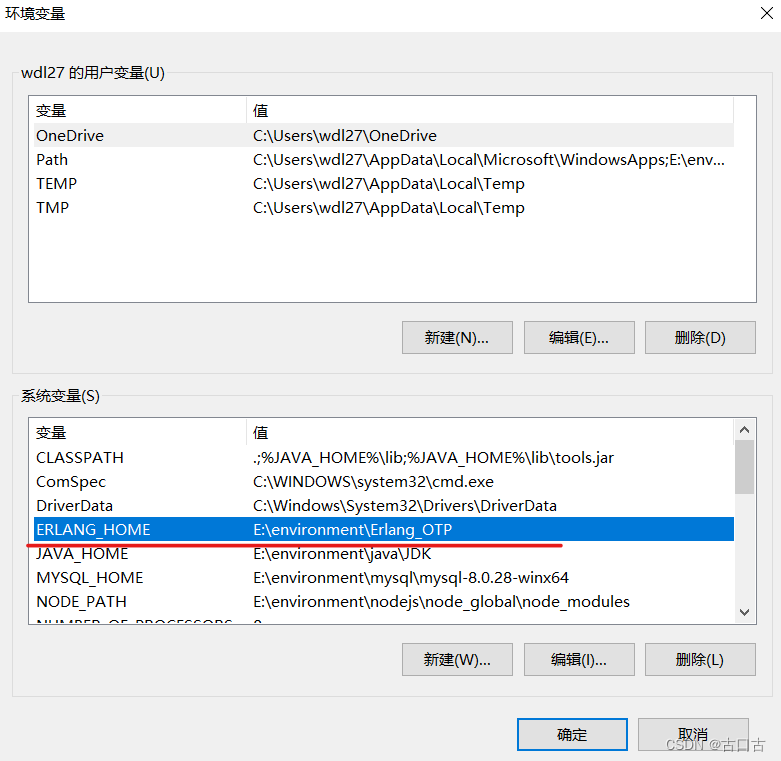
检查环境变量是否存在ERLANG_HOME若不存在则进行设置
4.2、安装RabbitMQ
RabbitMQ下载地址https://www.rabbitmq.com/install-windows.html
安装rabbitmq-server-3.7.4.exe 傻瓜式安装
注意不要安装在包含中文和空格的目录下安装后window服务中就存在rabbitMQ了并且是启动状态。
安装完成后执行以下命令激活 管理界面插件RabbitMQ Manage Plugin
-
进入rabbitMQ安装目录的sbin目录
-
点击上方的路径框输入cmd按下回车键
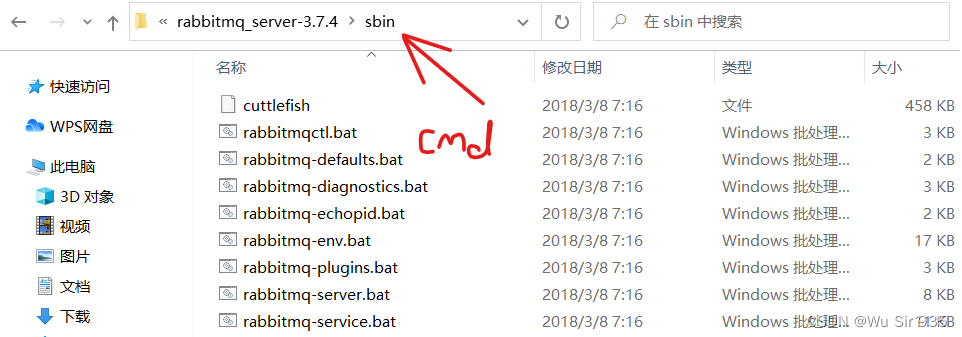
-
输入命令点击回车
rabbitmq-plugins enable rabbitmq_management -
重启服务双击rabbitmq-server.bat双击后稍等片刻
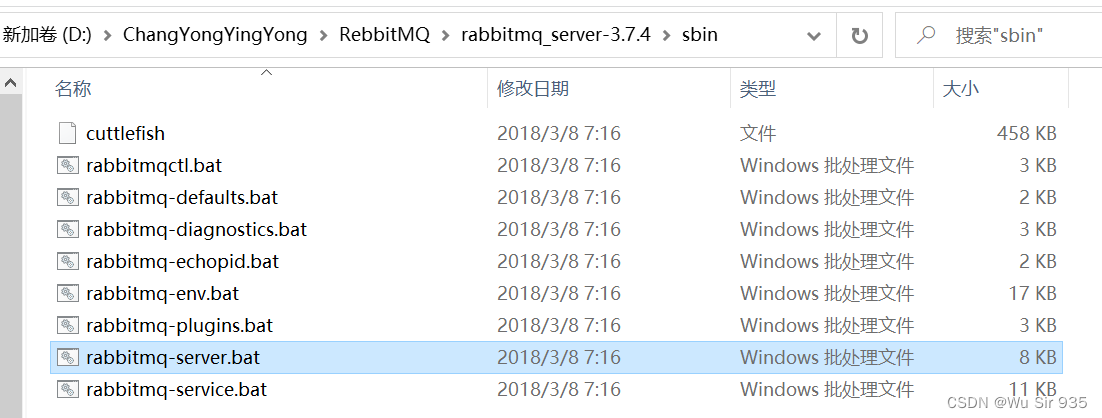
-
浏览器输入http://127.0.0.1:15672 , 即可看到rabbitmq管理界面的登陆页
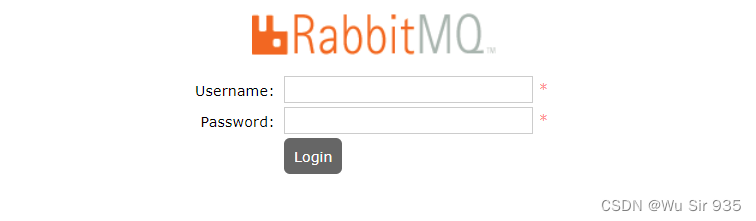
-
输入用户名和密码登录默认都为guest
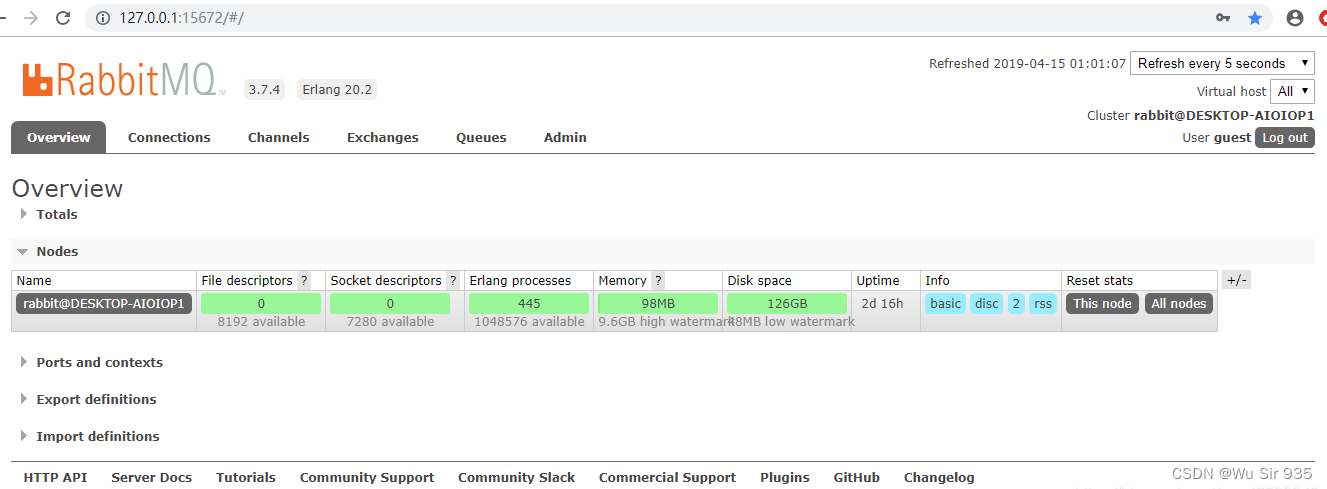
最上侧的导航以此是概览、连接、信道、交换器、队列、用户管理
使用压缩文件安装
- 解压下载的文件
- 安装插件
- 安装服务以管理员身份打开命令窗口
E:\environment\rabbitmq\rabbitmq_server-3.10.9\sbin>rabbitmq-service.bat install
E:\environment\Erlang_OTP\erts-13.0\bin\erlsrv: Service RabbitMQ added to system.
到此RabbitMQ的安装就算完成了其中有几个默认值
默认的端口号5672
默认的用户是 guest guest
管理后台的默认端口号15672
4.3、卸载RabbitMQ
- 停止rabbitMq服务任务管理器停止服务
- 控制面 => 卸载程序 => 卸载rabbitMqerlang otp
- 任务管理器中查找进程epmd.exe详细信息。 如果在运行右键单击然后“结束任务”。
- 删除RabbitMQ和Erlang的所有安装目录
- 使用Everything查找rabbitmq删除c盘相关文件
- 删除文件 C:Windows文件夹下的erlang.cookie文件如果存在转到用户文件夹删除文件.erlang.cookie
- 在用户User文件夹中转到AppDataRoamingRabbitMQ 删除文件夹
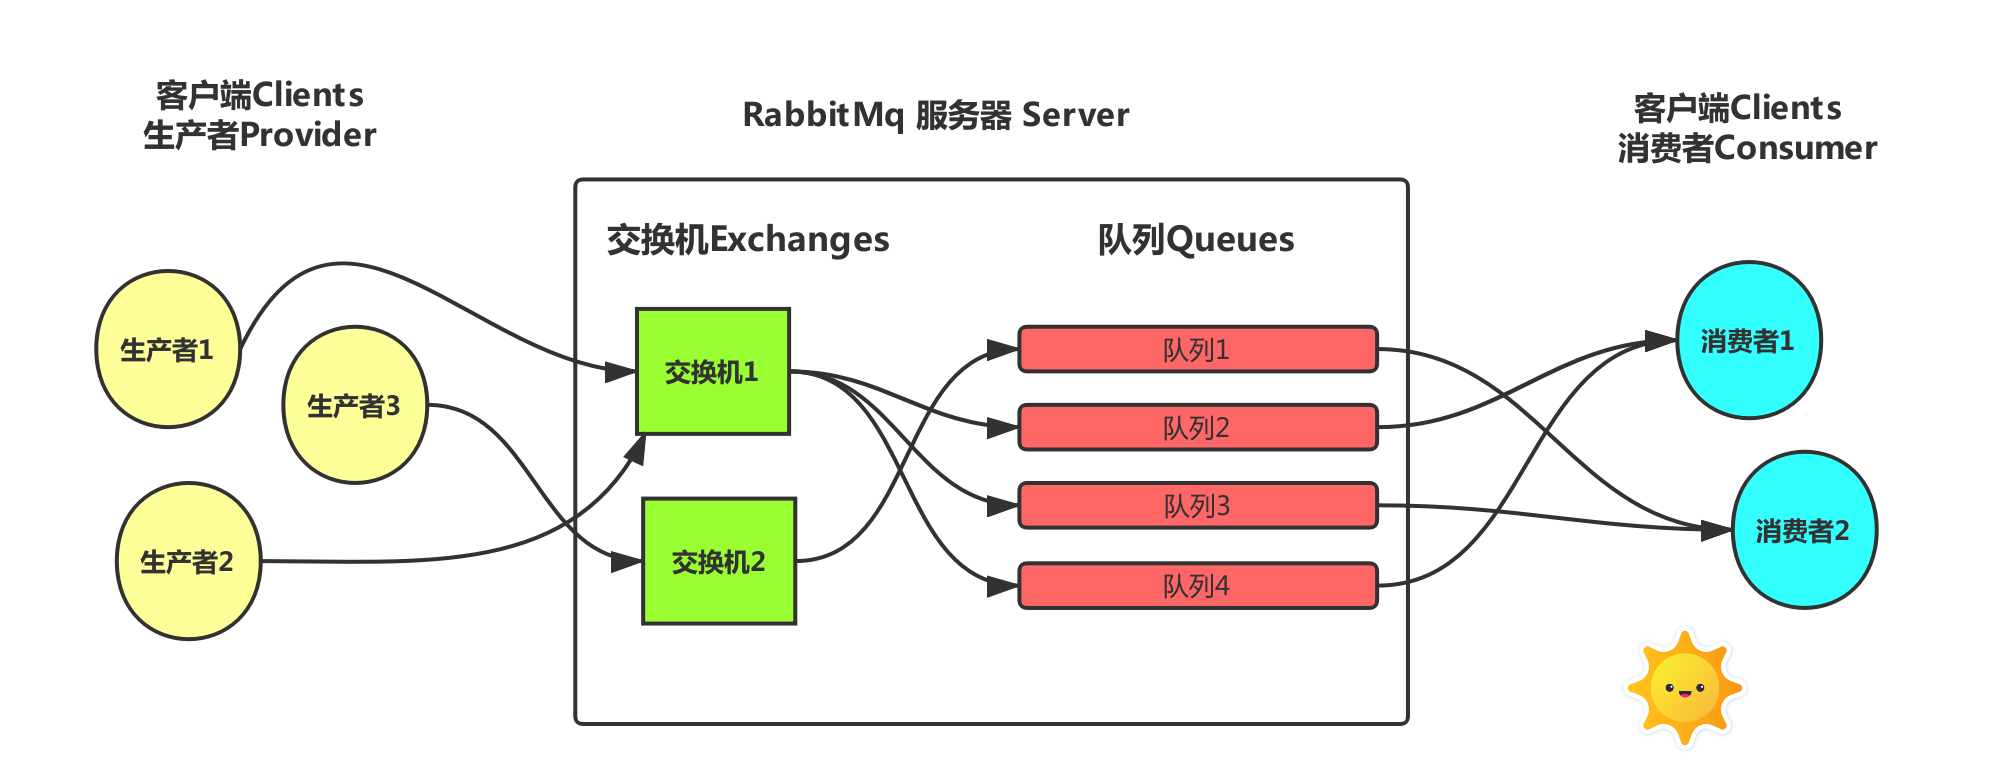
5、RabbitMQ概念

- Broker:又称server它提供一种传输服务,它的角色就是维护一条从生产者到消费者的路线保证数据能按照指定的方式进行传输,
- Exchange消息交换机,它指定消息按什么规则,路由到哪个队列。
- Queue:消息的载体,每个消息都会被投到一个或多个队列。
- Binding:绑定它的作用就是把exchange和queue按照路由规则绑定起来.
- Routing Key:路由关键字,exchange根据这个关键字进行消息投递。
- vhost:虚拟主机,一个broker里可以有多个vhost用作不同用户的权限分离。
- Producer:消息生产者,就是投递消息的程序.
- Consumer:消息消费者,就是接受消息的程序.
- Channel:消息通道,在客户端的每个连接里,可建立多个channel。几乎所有的操作都在channel中完成
6、支持的消息类型
消息模型https://www.rabbitmq.com/getstarted.html

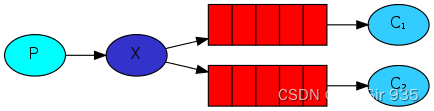
6.1、简单模式 Simple

Pproducer/ publisher生产者一个发送消息的用户应用程序。
Cconsumer消费者消费和接收的意思消费者是一个主要用来等待接收消息的用户应用程序
队列红色区域rabbitmq内部类似于邮箱的一个概念。虽然消息流经rabbitmq和你的应用程序但是它们只能存储在队列中。队列只受主机的内存和磁盘限制实质上是一个大的消息缓冲区。许多生产者可以发送消息到一个队列许多消费者可以尝试从一个队列接收数据。
总之生产者将消息发送到队列消费者从队列中获取消息队列是存储消息的缓冲区。
6.2、工作模式 Work
工作模式又称竞争消费者模式
主要思想就是避免执行资源密集型任务时必须等待它执行完成。相反我们需要稍后完成任务我们将任务封装为消息并将其发送到队列。 在后台运行的工作进程将获取任务并最终执行作业。当你运行许多消费者时任务将在他们之间共享但是一个消息只能被一个消费者获取。

P生产者任务的发布者
C1消费者1
C2消费者2
如何避免消息堆积
1、采用workqueue多个消费者监听同一队列。
2、接收到消息以后而是通过线程池异步消费。
6.3、发布订阅模式广播机制扇型交换机
1个生产者多个消费者每一个消费者都有自己的队列生产者没有将消息直接发送到队列而是发送到了交换机每个队列都要绑定到交换机生产者发送的消息经过交换机到达队列实现一个消息被多个消费者获取的目的 如果没有任何队列与Exchange绑定或者没有符合路由规则的队列那么消息会丢失
交换机Exchange【蓝色圆圈】:
一方面接收生产者发送的消息。另一方面知道如何处理消息如递交给某个特别队列、递交给所有队列、还是将消息丢弃。到底如何操作取决于交换机的类型。Exchange只负责转发消息不具备存储消息的能力。
Exchange类型只要由以下三种
-
Direct Exchange直连型交换机
根据消息携带的路由键将消息投递给对应队列。
大致流程为有一个队列绑定到一个直连交换机上同时赋予一个路由键 key 。然后当一个消息携带着路由键 key这个消息通过生产者发送给交换机时交换机就会根据这个路由值 key 去寻找绑定值也是 key 的队列。 -
Fanout Exchange扇型交换机
这个交换机没有路由键概念就算你绑了路由键也是无视的。 这个交换机在接收到消息后会直接转发到绑定到它上面的所有队列。 -
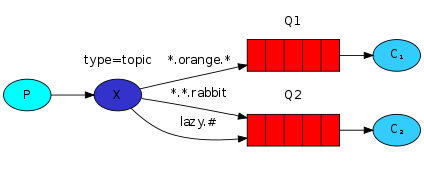
Topic Exchange主题交换机
这个交换机其实跟直连交换机流程差不多但是它的特点就是在它的路由键和绑定键之间是有规则的。(星号 * ) 用来表示一个单词 (必须出现的)
(井号 # ) 用来表示任意数量零个或多个单词举例
队列Q1 绑定键为*.TT.*
队列Q2绑定键为TT.#
如果一条消息携带的路由键为A.TT.B那么队列Q1将会收到
如果一条消息携带的路由键为TT.AA.BB那么队列Q2将会收到当一个队列的绑定键为 “#” 的时候这个队列将会无视消息的路由键接收所有的消息。
当 * 和 # 这两个特殊字符都未在绑定键中出现的时候此时主题交换机就拥有的直连交换机的行为。
所以主题交换机也就实现了扇形交换机的功能和直连交换机的功能。
除了以上常用交换机还有Header Exchange头交换机 Default Exchange默认交换机 和 Dead Letter Exchange 死信交换机
6.4、 路由模式直连交换机
在广播模式中生产者发布消息所有消费者都可以获取所有消息。
在某些场景下我们希望不同的消息被不同的队列消费。这时就要用到Direct类型的Exchange。
在Direct模型下队列与交换机的绑定不能是任意绑定了而是指定一个Routing Key路由key
消息的发送方在向Exchange发送消息时也必须指定消息的routing key。
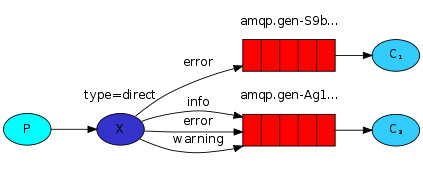
P生产者向Exchange发送消息发送消息时会指定一个routing key。
XExchange交换机接收生产者的消息然后把消息递交给与routing key完全匹配的队列
C1消费者其所在队列指定了需要routing key 为 error 的消息
C2消费者其所在队列指定了需要routing key 为 info、error、warning 的消息
在这种情况下一个消息在布时指定了路由键为error将会只被c1下消耗路由键为info和error和warning的消息都将被c2消耗其他的消息都将被丢失。
6.5、主题模式 Topic主题交换机
Topic类型的Exchange与Direct相比都是可以根据RoutingKey把消息路由到不同的队列。
只不过Topic类型Exchange可以让队列在绑定Routing key 的时候使用通配符
7、消息持久化
目的是为了避免消息丢失
消息丢失
-
消费者的ACK机制。可以防止消费者丢失消息。
消费者领取消息后还没执行操作就挂掉了呢或者抛出了异常消息消费失败但是RabbitMQ无从得知这样消息就丢失了
因此RabbitMQ有一个ACK机制。当消费者获取消息后会向RabbitMQ发送回执ACK告知消息已经被接收。不过这种回执ACK分两种情况
1、自动ACK消息一旦被接收消费者自动发送ACK
2、手动ACK消息接收后不会发送ACK需要手动调用 -
如果在消费者消费之前MQ就宕机了消息就没了。
消息持久化前提是队列、Exchange都持久化
Exchange持久化

队列持久化

消息持久

8、代码示例
- 引入依赖
<dependency> <groupId>org.springframework.boot</groupId> <artifactId>spring-boot-starter-amqp</artifactId> <version>2.5.13</version> </dependency> - 修改配置文件
配置文件详解spring: # rabbitmq配置 rabbitmq: host: 127.0.0.1 port: 5672 username: guest password: guestspring: rabbitmq: host: 127.0.0.1 #ip port: 5672 #端口 username: guest #账号 password: guest #密码 virtualHost: #链接的虚拟主机 addresses: 127.0.0.1:5672 #多个以逗号分隔与host功能一样。 requestedHeartbeat: 60 #指定心跳超时单位秒0为不指定默认60s publisherConfirms: true #发布确认机制是否启用 publisherReturns: #发布返回是否启用 connectionTimeout: #链接超时。单位ms。0表示无穷大不超时 ### ssl相关 ssl: enabled: #是否支持ssl keyStore: #指定持有SSL certificate的key store的路径 keyStoreType: #key store类型 默认PKCS12 keyStorePassword: #指定访问key store的密码 trustStore: #指定持有SSL certificates的Trust store trustStoreType: #默认JKS trustStorePassword: #访问密码 algorithm: #ssl使用的算法例如TLSv1.1 verifyHostname: #是否开启hostname验证 ### cache相关 cache: channel: size: #缓存中保持的channel数量 checkoutTimeout: #当缓存数量被设置时从缓存中获取一个channel的超时时间单位毫秒如果为0则总是创建一个新channel connection: mode: #连接工厂缓存模式CHANNEL 和 CONNECTION size: #缓存的连接数只有是CONNECTION模式时生效 ### listener listener: type: #两种类型SIMPLEDIRECT ## simple类型 simple: concurrency: #最小消费者数量 maxConcurrency: #最大的消费者数量 transactionSize: #指定一个事务处理的消息数量最好是小于等于prefetch的数量 missingQueuesFatal: #是否停止容器当容器中的队列不可用 ## 与direct相同配置部分 autoStartup: #是否自动启动容器 acknowledgeMode: #表示消息确认方式其有三种配置方式分别是none、manual和auto默认auto prefetch: #指定一个请求能处理多少个消息如果有事务的话必须大于等于transaction数量 defaultRequeueRejected: #决定被拒绝的消息是否重新入队默认是true与参数acknowledge-mode有关系 idleEventInterval: #container events发布频率单位ms ##重试机制 retry: stateless: #有无状态 enabled: #是否开启 maxAttempts: #最大重试次数,默认3 initialInterval: #重试间隔 multiplier: #对于上一次重试的乘数 maxInterval: #最大重试时间间隔 direct: consumersPerQueue: #每个队列消费者数量 missingQueuesFatal: #...其余配置看上方公共配置 ## template相关 template: mandatory: #是否启用强制信息默认false receiveTimeout: #`receive()`接收方法超时时间 replyTimeout: #`sendAndReceive()`超时时间 exchange: #默认的交换机 routingKey: #默认的路由 defaultReceiveQueue: #默认的接收队列 ## retry重试相关 retry: enabled: #是否开启 maxAttempts: #最大重试次数 initialInterval: #重试间隔 multiplier: #失败间隔乘数 maxInterval: #最大间隔
8.1、简单模式
8.1.1、配置类
import org.springframework.amqp.core.Queue;
import org.springframework.context.annotation.Bean;
import org.springframework.context.annotation.Configuration;

/**
 * 简单模式配置
 */
@Configuration
public class RabbitMqConfig {

    public static final String QUEUE_NAME = "my_queue"; //队列名称

    /**
     * Queue队列
     */
    @Bean
    public Queue simpleQueue() {
       /**
         * name队列名称。
         * durable是否持久化,默认是false,持久化队列内部会有一个actualName: 队列的真实名称默认用name参数如果name为空则根据规则生成一个
         * exclusive默认也是false只能被当前创建的连接使用而且当连接关闭后队列即被删除。此参考优先级高于durable
         * autoDelete是否自动删除当没有生产者或者消费者使用此队列该队列会自动删除。
         * arguments设置队列的属性参数
         *  1、x-message-ttl消息的过期时间单位毫秒
         *  2、x-expires队列过期时间队列在多长时间未被访问将被删除单位毫秒
         *  3、x-max-length队列最大长度超过该最大值则将从队列头部开始删除消息
         *  4、x-max-length-bytes队列消息内容占用最大空间受限于内存大小超过该阈值则从队列头部开始删除消息
         *  5、x-overflow设置队列溢出行为。这决定了当达到队列的最大长度时消息会发生什么。有效值是drop-head、reject-publish或reject-publish-dlx。仲裁队列类型仅支持drop-head
         *  6、x-dead-letter-exchange死信交换器名称过期或被删除因队列长度超长或因空间超出阈值的消息可指定发送到该交换器中
         *  7、x-dead-letter-routing-key死信消息路由键在消息发送到死信交换器时会使用该路由键如果不设置则使用消息的原来的路由键值
         *  8、x-single-active-consumer表示队列是否是单一活动消费者true时注册的消费组内只有一个消费者消费消息其他被忽略false时消息循环分发给所有消费者(默认false)
         *  9、x-max-priority队列要支持的最大优先级数;如果未设置队列将不支持消息优先级
         * 10、x-queue-modeLazy mode将队列设置为延迟模式在磁盘上保留尽可能多的消息以减少RAM的使用;如果未设置队列将保留内存缓存以尽可能快地传递消息
         * 11、x-queue-master-locator在集群模式下设置镜像队列的主节点信息。
         */
        return new Queue(QUEUE_NAME, true, false, false, null);
    }

}
8.1.2、消费者
import org.springframework.amqp.rabbit.annotation.RabbitHandler;
import org.springframework.amqp.rabbit.annotation.RabbitListener;
import org.springframework.stereotype.Component;
import java.util.Map;

/**
 * 简单模式
 * 消息消费者
 */
@Component
@RabbitListener(queues = "my_queue")//监听的队列名称
//@RabbitListener(queuesToDeclare = @Queue("simple_queue"))  //如果simple_queue队列不存在则创建simple_queue队列。默认队列是持久化非独占式的
public class SimpleConsumer {

	//消费者如果监听到消息队列有消息传入则会自动消费
    @RabbitHandler
    public void receive(Map message) {
        System.out.println("简单模式 -> 消费者收到map类型消息  : " + testMessage.toString());
    }

 	@RabbitHandler
    public void receive2(String message) {
        System.out.println("简单模式 -> 消费者收到string类型消息  : " + testMessage.toString());
    }
}
@RabbitListener 注解属性的作用
queuesToDeclare如果 simple_queue 队列不存在则会自动创建simple_queue队列。默认队列是持久化非独占式的
queues里面的队列必须存在否则就会报错
@RabbitListener(queues = {“simple_queue2”})如果队列 simple_queue2 不存在那么启动消费者就会报错
注意
@RabbitListener 既可以标记在类上也可以标记在方法上
标记在类上 需配合 @RabbitHandler 注解一起使用。当有收到消息的时候就交给 @RabbitHandler 的方法处理具体使用哪个方法处理根据 MessageConverter 转换后的参数类型入参类型进行决定
标记在方法上 就由指定的方法进行处理
8.1.3、生产者
/**
 * 简单模式
 * 消息生产者
 */
@Controller
@RequestMapping(value = "simple")
public class SimpleProducer {

    @Autowired
    RabbitTemplate rabbitTemplate;  //使用RabbitTemplate,这提供了接收/发送等等方法

    /**
     * 向rabbitMq发送消息
     */
    @RequestMapping(value = "sendMsg")
    @ResponseBody
    public String send(String messageId,String messageData) {
        SimpleDateFormat simpleDateFormat  = new SimpleDateFormat("yyyy-MM-dd HH:mm:ss");
        String createTime = simpleDateFormat.format(new Date());
        Map<String,Object> map=new HashMap<>();
        map.put("messageId",messageId);
        map.put("messageData",messageData);
        map.put("createTime",createTime);
        //将消息发送到队列my_queue中
        rabbitTemplate.convertAndSend("my_queue", map);
        //receive将接收到消息
        System.out.println("rabbitMQ 简单模式消息发送成功");
        return "true";
    }

}
8.1.3、消息手动确认
-
yml文件添加配置
listener: simple: concurrency: 1 max-concurrency: 1 acknowledge-mode: manual prefetch: 1 -
消费者代码修改
/**
 * 简单模式
 * 消息消费者
 */
@Component
public class SimpleConsumer {

    @RabbitListener(queues = "my_queue")//监听的队列名称
    public void process(Message message, Channel channel) throws IOException {
        String str = new String(message.getBody());
        JSONObject msgData = (JSONObject) JSON.parse(str);
        Object messageId = msgData.get("messageId");
        if (null==messageId || messageId.toString().equals("")) {
            /**
             * 有异常就拒收消息
             * basicNack(long deliveryTag, boolean multiple, boolean requeue)
             * deliveryTag:当前消息在队列中的的索引;
             * multiple:为true的话就是批量确认
             * requeue:true将消息重返当前消息队列,重新发送给消费者;
             *         false将消息丢弃
             */
            channel.basicNack(message.getMessageProperties().getDeliveryTag(),false,true);
            System.out.println("简单模式 -> 消费者拒收消息 : " + msgData.toString());
        }else {
            /**
             * 没有异常就确认消息
             * basicAck(long deliveryTag, boolean multiple)
             * deliveryTag:当前消息在队列中的的索引;
             * multiple:为true的话就是批量确认
             */
            channel.basicAck(message.getMessageProperties().getDeliveryTag(),false);
            System.out.println("简单模式 -> 消费者收到消息  : " + msgData.toString());
        }
    }

}
消息确认机制
① 自动确认
这也是默认的消息确认情况。 AcknowledgeMode.NONERabbitMQ成功将消息发出即将消息成功写入TCP Socket中立即认为本次投递已经被正确处理不管消费者端是否成功处理本次投递。
所以这种情况如果消费端消费逻辑抛出异常也就是消费端没有处理成功这条消息那么就相当于丢失了消息。一般这种情况我们都是使用try catch捕捉异常后打印日志用于追踪数据这样找出对应数据再做后续处理。③ 手动确认
这个比较关键也是我们配置接收消息确认机制时多数选择的模式。
消费者收到消息后手动调用basic.ack/basic.nack/basic.reject后RabbitMQ收到这些消息后才认为本次投递成功。
basic.ack用于肯定确认
basic.nack用于否定确认注意这是AMQP 0-9-1的RabbitMQ扩展
basic.reject用于否定确认但与basic.nack相比有一个限制:一次只能拒绝单条消息channel.basicReject(deliveryTag, true) 拒绝消费当前消息
第一个参数是当前消息在队列中的的索引
第二参数传入true就是将数据重新丢回队列里那么下次还会消费这消息。
第二参数传入false就是告诉服务器我已经知道这条消息数据了因为一些原因拒绝它而且服务器也把这个消息丢掉就行。 下次不想再消费这条消息了。使用拒绝后重新入列这个确认模式要谨慎因为一般都是出现异常的时候catch异常再拒绝入列选择是否重入列。如果使用不当会导致一些每次都被你重入列的消息一直消费-入列-消费-入列这样循环会导致消息积压。
channel.basicNack(deliveryTag, false, true) 否定消费确认
第一个参数是当前消息在队列中的的索引
第二个参数是指是否针对多条消息如果是true也就是说一次性针对当前通道的消息的tagID小于当前这条消息的都拒绝确认。
第三个参数是指是否重新入列也就是指不确认的消息是否重新丢回到队列里面去。同样使用不确认后重新入列这个确认模式要谨慎因为这里也可能因为考虑不周出现消息一直被重新丢回去的情况导致积压。
8.1.4、消息回调
ConfirmCallback 当消息到达交换机触发回调
ReturnsCallback消息(带有路由键routingKey)到达交换机与交换机的所有绑定键进行匹配触发回调
若要使用消息回调
- 修改配置
publisher-confirm-type: correlated publisher-returns: true - 设置mandatory
设置rabbitTemplate的mandatory为true 或者在配置中设置 rabbitmq.template.mandatory=true
配置文件新增代码
@Bean
public RabbitTemplate createRabbitTemplate(ConnectionFactory connectionFactory) {
     RabbitTemplate rabbitTemplate = new RabbitTemplate();
     rabbitTemplate.setConnectionFactory(connectionFactory);
     //设置开启Mandatory,才能触发回调函数,无论消息推送结果怎么样都强制调用回调函数
     rabbitTemplate.setMandatory(true);
     //确认消息发送到交换机
     rabbitTemplate.setConfirmCallback(new RabbitTemplate.ConfirmCallback() {
         @Override
         public void confirm(CorrelationData correlationData, boolean ack, String cause) {
             System.out.println("=======================> ConfirmCallback <=======================");
             System.out.println("ConfirmCallback ===>"+"相关数据"+correlationData);
             System.out.println("ConfirmCallback ===>"+"确认情况"+ack);
             System.out.println("ConfirmCallback ===>"+"原因"+cause);
         }
     });
     //确认消息已发送到队列
     rabbitTemplate.setReturnsCallback(new RabbitTemplate.ReturnsCallback() {
         @Override
         public void returnedMessage(ReturnedMessage returnedMessage) {
             Message message = returnedMessage.getMessage();
             int replyCode = returnedMessage.getReplyCode();
             String replyText = returnedMessage.getReplyText();
             String exchange = returnedMessage.getExchange();
             String routingKey = returnedMessage.getRoutingKey();
             System.out.println("=======================> ReturnsCallback <=======================");
             System.out.println("ReturnCallback ===>"+"消息"+message.toString());
             System.out.println("ReturnCallback ===>"+"回应码"+replyCode);
             System.out.println("ReturnCallback ===>"+"回应信息"+replyText);
             System.out.println("ReturnCallback ===>"+"交换机"+exchange);
             System.out.println("ReturnCallback ===>"+"路由键"+routingKey);
         }
     });
     return rabbitTemplate;
 }
8.2、工作模式
运行许多消费者任务在他们之间共享但是一个消息只能被一个消费者获取。
设置prefetchCount值为1。 这告诉RabbitMQ一次不要向消费者发送多于一条的消息。
换句话说不要向消费者发送新消息直到它处理并确认了前一个消息。 相反它会将其分派给不是忙碌的下一个消费者。
当有多个消费者时我们的消息会被哪个消费者消费呢我们又该如何均衡消费者消费信息的多少呢
主要有两种模式
轮询模式的分发一个消费者一条按均分配关闭手动应答开启自动应答
公平分发根据消费者的消费能力进行公平分发处理快的处理的多处理慢的处理的少按劳分配关闭自动应答开启手动应答
- yml文件添加 prefetch
listener: simple: prefetch: 1 - 创建两个消费者生产者配置类不变
/**
 * 简单模式
 * 消息消费者
 */
@Component
public class SimpleConsumer {

    @RabbitListener(queues = "my_queue")//监听的队列名称
    public void process(Message message, Channel channel) throws IOException, InterruptedException {
        String str = new String(message.getBody());
        JSONObject msgData = (JSONObject) JSON.parse(str);
        Object messageId = msgData.get("messageId");
        if (null==messageId || messageId.toString().equals("")) {
            /**
             * 有异常就拒收消息
             * basicNack(long deliveryTag, boolean multiple, boolean requeue)
             * deliveryTag:当前消息在队列中的的索引;
             * multiple:为true的话就是批量确认
             * requeue:true将消息重返当前消息队列,重新发送给消费者;
             *         false将消息丢弃
             */
            channel.basicNack(message.getMessageProperties().getDeliveryTag(),false,true);
            System.out.println("简单模式 -> 消费者拒收消息 : " + msgData.toString());
        }else {
            /**
             * 没有异常就确认消息
             * basicAck(long deliveryTag, boolean multiple)
             * deliveryTag:当前消息在队列中的的索引;
             * multiple:为true的话就是批量确认
             */
            Thread.sleep(2000);
            channel.basicAck(message.getMessageProperties().getDeliveryTag(),false);
            System.out.println("简单模式 process -> 消费者收到消息  : " + msgData.toString());
        }
    }

    @RabbitListener(queues = "my_queue")//监听的队列名称
    public void process2(Message message, Channel channel) throws IOException, InterruptedException {
        String str = new String(message.getBody());
        JSONObject msgData = (JSONObject) JSON.parse(str);
        Object messageId = msgData.get("messageId");
        if (null==messageId || messageId.toString().equals("")) {
            /**
             * 有异常就拒收消息
             * basicNack(long deliveryTag, boolean multiple, boolean requeue)
             * deliveryTag:当前消息在队列中的的索引;
             * multiple:为true的话就是批量确认
             * requeue:true将消息重返当前消息队列,重新发送给消费者;
             *         false将消息丢弃
             */
            channel.basicNack(message.getMessageProperties().getDeliveryTag(),false,true);
            System.out.println("简单模式 -> 消费者拒收消息 : " + msgData.toString());
        }else {
            /**
             * 没有异常就确认消息
             * basicAck(long deliveryTag, boolean multiple)
             * deliveryTag:当前消息在队列中的的索引;
             * multiple:为true的话就是批量确认
             */
            Thread.sleep(5000);
            channel.basicAck(message.getMessageProperties().getDeliveryTag(),false);
            System.out.println("简单模式 process2 -> 消费者收到消息  : " + msgData.toString());
        }
    }

}
8.3、订阅模型-Fanout
8.3.1、配置类
import org.springframework.amqp.core.Binding;
import org.springframework.amqp.core.BindingBuilder;
import org.springframework.amqp.core.FanoutExchange;
import org.springframework.amqp.core.Queue;
import org.springframework.context.annotation.Bean;
import org.springframework.context.annotation.Configuration;

/**
 * 订阅模式-fanout
 * 扇型交换机
 * 创建三个队列 fanout_queue1   fanout_queue2  fanout_queue3
 * 将三个队列都绑定在交换机 fanout_exchange 上
 * 因为是扇型交换机, 路由键无需配置,配置也不起作用
 */
@Configuration
public class FanoutRabbitMqConfig {
    //队列名称常量
    public static final String QUEUE_NAME1 = "fanout_queue1";
    public static final String QUEUE_NAME2 = "fanout_queue2";
    public static final String QUEUE_NAME3 = "fanout_queue3";
    //交换机名称常量
    public static final String EXCHANGE_NAME = "fanout_exchange";

    /**
     * 声明队列 Queue
     */
    @Bean
    public Queue fanoutQueue1() {
        return new Queue(QUEUE_NAME1, true, false, false, null);
    }

    /**
     * 声明队列 Queue
     */
    @Bean
    public Queue fanoutQueue2() {
        return new Queue(QUEUE_NAME2, true, false, false, null);
    }

    /**
     * 声明队列 Queue
     */
    @Bean
    public Queue fanoutQueue3() {
        return new Queue(QUEUE_NAME3, true, false, false, null);
    }

    /**
     * 声明交换机
     */
    @Bean
    FanoutExchange fanoutExchange() {
        return new FanoutExchange(EXCHANGE_NAME,true,false,null);
    }

    /**
     * 交换机队列绑定
     */
    @Bean
    Binding bindingExchange1() {
        return BindingBuilder.bind(fanoutQueue1()).to(fanoutExchange());
    }

    @Bean
    Binding bindingExchange2() {
        return BindingBuilder.bind(fanoutQueue2()).to(fanoutExchange());
    }

    @Bean
    Binding bindingExchange3() {
        return BindingBuilder.bind(fanoutQueue3()).to(fanoutExchange());
    }

}
8.3.2、生产者
声明Exchange不再声明Queue
发送消息到Exchange不再发送到Queue
import com.alibaba.fastjson.JSONObject;
import org.springframework.amqp.rabbit.core.RabbitTemplate;
import org.springframework.beans.factory.annotation.Autowired;
import org.springframework.stereotype.Controller;
import org.springframework.web.bind.annotation.RequestMapping;
import org.springframework.web.bind.annotation.ResponseBody;
import java.text.SimpleDateFormat;
import java.util.Date;

@Controller
@RequestMapping(value = "fanout")
public class FanoutProducer {

    @Autowired
    RabbitTemplate rabbitTemplate;

    /**
     * 向rabbitMq发送消息
     */
    @RequestMapping(value = "sendMsg")
    @ResponseBody
    public String send(String messageId,String messageData) {
        SimpleDateFormat simpleDateFormat  = new SimpleDateFormat("yyyy-MM-dd HH:mm:ss");
        String createTime = simpleDateFormat.format(new Date());
        JSONObject jsonObject = new JSONObject();
        jsonObject.put("messageId",messageId);
        jsonObject.put("messageData",messageData);
        jsonObject.put("createTime",createTime);
        //将消息发送到队列my_queue中
        rabbitTemplate.convertAndSend("fanout_exchange",null, jsonObject.toString());
        System.out.println("rabbitMQ 简单模式消息发送成功");
        return "true";
    }
}
8.3.3、消费者
import com.rabbitmq.client.Channel;
import org.springframework.amqp.core.Message;
import org.springframework.amqp.rabbit.annotation.RabbitListener;
import org.springframework.stereotype.Component;
import java.io.IOException;

@Component
public class FanoutReceiver {

    @RabbitListener(queues = "fanout_queue1")
    public void receive1(String msgData, Message message, Channel channel) throws IOException {
        channel.basicAck(message.getMessageProperties().getDeliveryTag(),false);
        System.out.println("fanout_queue1消费者收到消息  : " +msgData);
    }

    @RabbitListener(queues = "fanout_queue2")
    public void receive2(String msgData, Message message, Channel channel) throws IOException {
        channel.basicAck(message.getMessageProperties().getDeliveryTag(),false);
        System.out.println("fanout_queue2消费者收到消息  : " +msgData);
    }

    @RabbitListener(queues = "fanout_queue3")
    public void receive3(String msgData, Message message, Channel channel) throws IOException {
        channel.basicAck(message.getMessageProperties().getDeliveryTag(),false);
        System.out.println("fanout_queue3消费者收到消息  : " +msgData);
    }

}
8.3.4、发送消息后台结果
rabbitMQ 简单模式消息发送成功
fanout_queue3消费者收到消息  : {"createTime":"2022-10-06 23:02:29","messageId":"55","messageData":"bhhh"}
fanout_queue1消费者收到消息  : {"createTime":"2022-10-06 23:02:29","messageId":"55","messageData":"bhhh"}
fanout_queue2消费者收到消息  : {"createTime":"2022-10-06 23:02:29","messageId":"55","messageData":"bhhh"}
rabbitMQ 简单模式消息发送成功
fanout_queue2消费者收到消息  : {"createTime":"2022-10-06 23:03:03","messageId":"66","messageData":"就立刻"}
fanout_queue1消费者收到消息  : {"createTime":"2022-10-06 23:03:03","messageId":"66","messageData":"就立刻"}
fanout_queue3消费者收到消息  : {"createTime":"2022-10-06 23:03:03","messageId":"66","messageData":"就立刻"}
8.4、订阅模型-Direct
8.4.1、配置类
import org.springframework.amqp.core.*;
import org.springframework.context.annotation.Bean;
import org.springframework.context.annotation.Configuration;

/**
 * 订阅模式-direct
 * 直连交换机
 * 创建三个队列 direct_queue1   direct_queue2  direct_queue3
 * 将三个队列都绑定在交换机 direct_exchange 上
 */
@Configuration
public class DirectRabbitMqConfig {
    //队列名称常量
    public static final String QUEUE_NAME1 = "direct_queue1";
    public static final String QUEUE_NAME2 = "direct_queue2";
    public static final String QUEUE_NAME3 = "direct_queue3";
    //交换机名称常量
    public static final String EXCHANGE_NAME = "direct_exchange";

    /**
     * 声明队列 Queue
     */
    @Bean
    public Queue directQueue1() {
        return new Queue(QUEUE_NAME1, true, false, false, null);
    }

    /**
     * 声明队列 Queue
     */
    @Bean
    public Queue directQueue2() {
        return new Queue(QUEUE_NAME2, true, false, false, null);
    }

    /**
     * 声明队列 Queue
     */
    @Bean
    public Queue directQueue3() {
        return new Queue(QUEUE_NAME3, true, false, false, null);
    }

    /**
     * 声明交换机
     */
    @Bean
    DirectExchange directExchange() {
        return new DirectExchange(EXCHANGE_NAME,true,false,null);
    }

    /**
     * 交换机队列绑定
     */
    @Bean
    Binding bindingDirectExchange1() {
        return BindingBuilder.bind(directQueue1()).to(directExchange()).with("info");
    }

    @Bean
    Binding bindingDirectExchange2() {
        return BindingBuilder.bind(directQueue2()).to(directExchange()).with("error");
    }

    @Bean
    Binding bindingDirectExchange3() {
        return BindingBuilder.bind(directQueue3()).to(directExchange()).with("warn");
    }

}
8.4.2、生产者
import com.alibaba.fastjson.JSONObject;
import org.springframework.amqp.rabbit.core.RabbitTemplate;
import org.springframework.beans.factory.annotation.Autowired;
import org.springframework.stereotype.Controller;
import org.springframework.web.bind.annotation.RequestMapping;
import org.springframework.web.bind.annotation.ResponseBody;
import java.text.SimpleDateFormat;
import java.util.Date;

@Controller
@RequestMapping(value = "direct")
public class DirectProducer {

    @Autowired
    RabbitTemplate rabbitTemplate;

    /**
     * 向rabbitMq发送消息
     */
    @RequestMapping(value = "sendMsg")
    @ResponseBody
    public String send(String messageId,String messageData,String routingKey) {
        SimpleDateFormat simpleDateFormat  = new SimpleDateFormat("yyyy-MM-dd HH:mm:ss");
        String createTime = simpleDateFormat.format(new Date());
        JSONObject jsonObject = new JSONObject();
        jsonObject.put("messageId",messageId);
        jsonObject.put("messageData",messageData);
        jsonObject.put("createTime",createTime);
        //将消息发送到交换机
        rabbitTemplate.convertAndSend("direct_exchange",routingKey, jsonObject.toString());
        System.out.println("rabbitMQ 简单模式消息发送成功");
        return "true";
    }
}
8.4.3、消耗者
import com.rabbitmq.client.Channel;
import org.springframework.amqp.core.Message;
import org.springframework.amqp.rabbit.annotation.RabbitListener;
import org.springframework.stereotype.Component;
import java.io.IOException;

@Component
public class DirectReceiver {

    @RabbitListener(queues = "direct_queue1")
    public void receive1(String msgData, Message message, Channel channel) throws IOException {
        channel.basicAck(message.getMessageProperties().getDeliveryTag(),false);
        System.out.println("direct_queue1消费者收到消息  : " +msgData);
    }

    @RabbitListener(queues = "direct_queue2")
    public void receive2(String msgData, Message message, Channel channel) throws IOException {
        channel.basicAck(message.getMessageProperties().getDeliveryTag(),false);
        System.out.println("direct_queue2消费者收到消息  : " +msgData);
    }

    @RabbitListener(queues = "direct_queue3")
    public void receive3(String msgData, Message message, Channel channel) throws IOException {
        channel.basicAck(message.getMessageProperties().getDeliveryTag(),false);
        System.out.println("direct_queue3消费者收到消息  : " +msgData);
    }

}
8.4.4、发送消息后台结果
消息发送成功路由键warn
direct_queue3消费者收到消息  : {"createTime":"2022-10-07 11:31:45","messageId":"1","messageData":"sacascsac"}
消息发送成功路由键info
direct_queue1消费者收到消息  : {"createTime":"2022-10-07 11:31:54","messageId":"1","messageData":"sacascsac"}
消息发送成功路由键error
direct_queue2消费者收到消息  : {"createTime":"2022-10-07 11:31:59","messageId":"1","messageData":"sacascsac"}
消息发送成功路由键error1 (消息被丢弃)
8.5、订阅模型-Topic
8.5.1、配置类
import org.springframework.amqp.core.Binding;
import org.springframework.amqp.core.BindingBuilder;
import org.springframework.amqp.core.Queue;
import org.springframework.amqp.core.TopicExchange;
import org.springframework.context.annotation.Bean;
import org.springframework.context.annotation.Configuration;

/**
 * 订阅模式-topic
 * 主题交换机
 * 创建三个队列 topic_queue1   topic_queue2  topic_queue3
 * 将三个队列都绑定在交换机 topic_exchange 上
 */
@Configuration
public class TopicRabbitMqConfig {
    //队列名称常量
    public static final String QUEUE_NAME1 = "topic_queue1";
    public static final String QUEUE_NAME2 = "topic_queue2";
    public static final String QUEUE_NAME3 = "topic_queue3";
    //交换机名称常量
    public static final String EXCHANGE_NAME = "topic_exchange";

    /**
     * 声明队列 Queue
     */
    @Bean
    public Queue topicQueue1() {
        return new Queue(QUEUE_NAME1, true, false, false, null);
    }

    /**
     * 声明队列 Queue
     */
    @Bean
    public Queue topicQueue2() {
        return new Queue(QUEUE_NAME2, true, false, false, null);
    }

    /**
     * 声明队列 Queue
     */
    @Bean
    public Queue topicQueue3() {
        return new Queue(QUEUE_NAME3, true, false, false, null);
    }

    /**
     * 声明交换机
     */
    @Bean
    TopicExchange topicExchange() {
        return new TopicExchange(EXCHANGE_NAME,true,false,null);
    }

    /**
     * 交换机队列绑定
     * 路由键使用通配符
     */
    @Bean
    Binding bindingTopicExchange1() {
        //消息携带的路由键是以"topic."开头,就会分发到该队列
        return BindingBuilder.bind(topicQueue1()).to(topicExchange()).with("topic.#");
    }

    @Bean
    Binding bindingTopicExchange2() {
        //消息携带的路由键是包含.topic.,就会分发到该队列
        return BindingBuilder.bind(topicQueue2()).to(topicExchange()).with("*.topic.*");
    }

    @Bean
    Binding bindingTopicExchange3() {
        //消息携带的路由键是以".topic"结尾,就会分发到该队列
        return BindingBuilder.bind(topicQueue3()).to(topicExchange()).with("#.topic");
    }

}
8.5.2、生产者
import com.alibaba.fastjson.JSONObject;
import org.springframework.amqp.rabbit.core.RabbitTemplate;
import org.springframework.beans.factory.annotation.Autowired;
import org.springframework.stereotype.Controller;
import org.springframework.web.bind.annotation.RequestMapping;
import org.springframework.web.bind.annotation.ResponseBody;

import java.text.SimpleDateFormat;
import java.util.Date;

@Controller
@RequestMapping(value = "topic")
public class TopicProducer {

    @Autowired
    RabbitTemplate rabbitTemplate;

    /**
     * 向rabbitMq发送消息
     */
    @RequestMapping(value = "sendMsg")
    @ResponseBody
    public String send(String messageId,String messageData,String routingKey) {
        SimpleDateFormat simpleDateFormat  = new SimpleDateFormat("yyyy-MM-dd HH:mm:ss");
        String createTime = simpleDateFormat.format(new Date());
        JSONObject jsonObject = new JSONObject();
        jsonObject.put("messageId",messageId);
        jsonObject.put("messageData",messageData);
        jsonObject.put("createTime",createTime);
        //将消息发送到队列my_queue中
        rabbitTemplate.convertAndSend("topic_exchange",routingKey, jsonObject.toString());
        System.out.println("消息发送成功路由键"+routingKey);
        return "true";
    }
}
8.5.3、消费者
import com.rabbitmq.client.Channel;
import org.springframework.amqp.core.Message;
import org.springframework.amqp.rabbit.annotation.RabbitListener;
import org.springframework.stereotype.Component;
import java.io.IOException;

@Component
public class TopicReceiver {

    @RabbitListener(queues = "topic_queue1")
    public void receive1(String msgData, Message message, Channel channel) throws IOException {
        channel.basicAck(message.getMessageProperties().getDeliveryTag(),false);
        System.out.println("topic_queue1消费者收到消息  : " +msgData);
    }

    @RabbitListener(queues = "topic_queue2")
    public void receive2(String msgData, Message message, Channel channel) throws IOException {
        channel.basicAck(message.getMessageProperties().getDeliveryTag(),false);
        System.out.println("topic_queue2消费者收到消息  : " +msgData);
    }

    @RabbitListener(queues = "topic_queue3")
    public void receive3(String msgData, Message message, Channel channel) throws IOException {
        channel.basicAck(message.getMessageProperties().getDeliveryTag(),false);
        System.out.println("topic_queue3消费者收到消息  : " +msgData);
    }

}
8.5.4、发送消息后台结果
消息发送成功路由键topic.one
topic_queue1消费者收到消息  : {"createTime":"2022-10-07 12:05:17","messageId":"1","messageData":"sacascsac"}
消息发送成功路由键A.topic.B
topic_queue2消费者收到消息  : {"createTime":"2022-10-07 12:05:46","messageId":"1","messageData":"sacascsac"}
消息发送成功路由键C.topic
topic_queue3消费者收到消息  : {"createTime":"2022-10-07 12:06:02","messageId":"1","messageData":"sacascsac"}
消息发送成功路由键SFC.topic.AFBGB
topic_queue2消费者收到消息  : {"createTime":"2022-10-07 12:06:52","messageId":"1","messageData":"sacascsac"}
消息发送成功路由键S.D.FC.topic.A.S.D.F (消息被丢弃)
9、一个简单的消息推送到接收的流程
生产者产生消息将消息推送到中间方框里面也就是rabbitMq的服务器然后经过服务器里面的交换机、队列等各种关系将数据处理入列后最终由右边的消费者获取对应监听的消息进行消耗处理。