

【Linux】基础:进程间通信
| 阿里云国内75折 回扣 微信号:monov8 |
| 阿里云国际,腾讯云国际,低至75折。AWS 93折 免费开户实名账号 代冲值 优惠多多 微信号:monov8 飞机:@monov6 |
【Linux】基础进程间通信
摘要本文主要介绍进程间通信的基础知识首先将会对进程间通信进行简单概述其中包括本质目的和方法分类。再介绍对于方法的实现过程其中有三大类方法管道、System V、POSIX这里只会对管道和System V的共享内存进行具体介绍由于消息队列的过于复杂且不实用将进行简单介绍而信号量由于基础知识储备不足将会在后段时间补充线程相关知识后再做介绍。
文章目录
一、概述
1.1 前提本质
在进程之间可能存在各种特定的协同工作常见需要吧一个进程的数据交付给另外一个进程让其进行处理这个过程称为进程间的通信。可是进程是具有独立性的一个进程是看不到另外一个进程的资源的如果直接交付可能成本很高。为此进程间需要进行相互通信操作系统则是安排了一份公共的资源这份资源不属于各个进程而只属于操作系统并且该资源是一段内存。这份资源可能是文件方式提供可能是以队列方式提供也可能是通过提供原始内存块完成造就了通信方式的多样性。为此可以得出进程通信的前提本质即是有操作系统参与提供一份所有通信进程能看到的公共资源而操作系统需要设计相应的通信方式。
1.2 目的
- 数据传输一个进程需要将数据发送给另一个进程
- 资源共享多个进程之间共享同样的资源。
- 通知事件一个进程需要向另一个或一组进程发送消息通知它它们发生了某种事件如进程终止时要通知父进程。
- 进程控制有些进程希望完全控制另一个进程的执行如Debug进程此时控制进程希望能够拦截另一个进程的所有陷入和异常并能够及时知道它的状态改变。
1.3 分类
管道
- 匿名管道pipe
- 命名管道
System V IPC
- System V 消息队列
- System V 共享内存
- System V 信号量
POSIX IPC
- 消息队列
- 共享内存
- 信号量
- 互斥量
- 条件变量
- 读写锁
二、管道
2.1 概述
管道是Unix中最古老的进程间通信的形式把从一个进程连接到另一个进程的一个数据流称为一个管道。而且管道是一个只能单向通信的信道。
管道分为匿名管道与命名管道。匿名管道的原理是通过父子或有血缘关系的进程可以继承文件标识符表从而读取相同的文件内核缓冲区的内容完成管道通信需要掌握五种特点与四种使用情况。而命名管道则是相对于匿名管道而言通过相应的系统调用完成匿名管道的建立其中该管道内容是写入内存中的否则写入磁盘会极其的影响效率。
2.2 匿名管道
基本原理
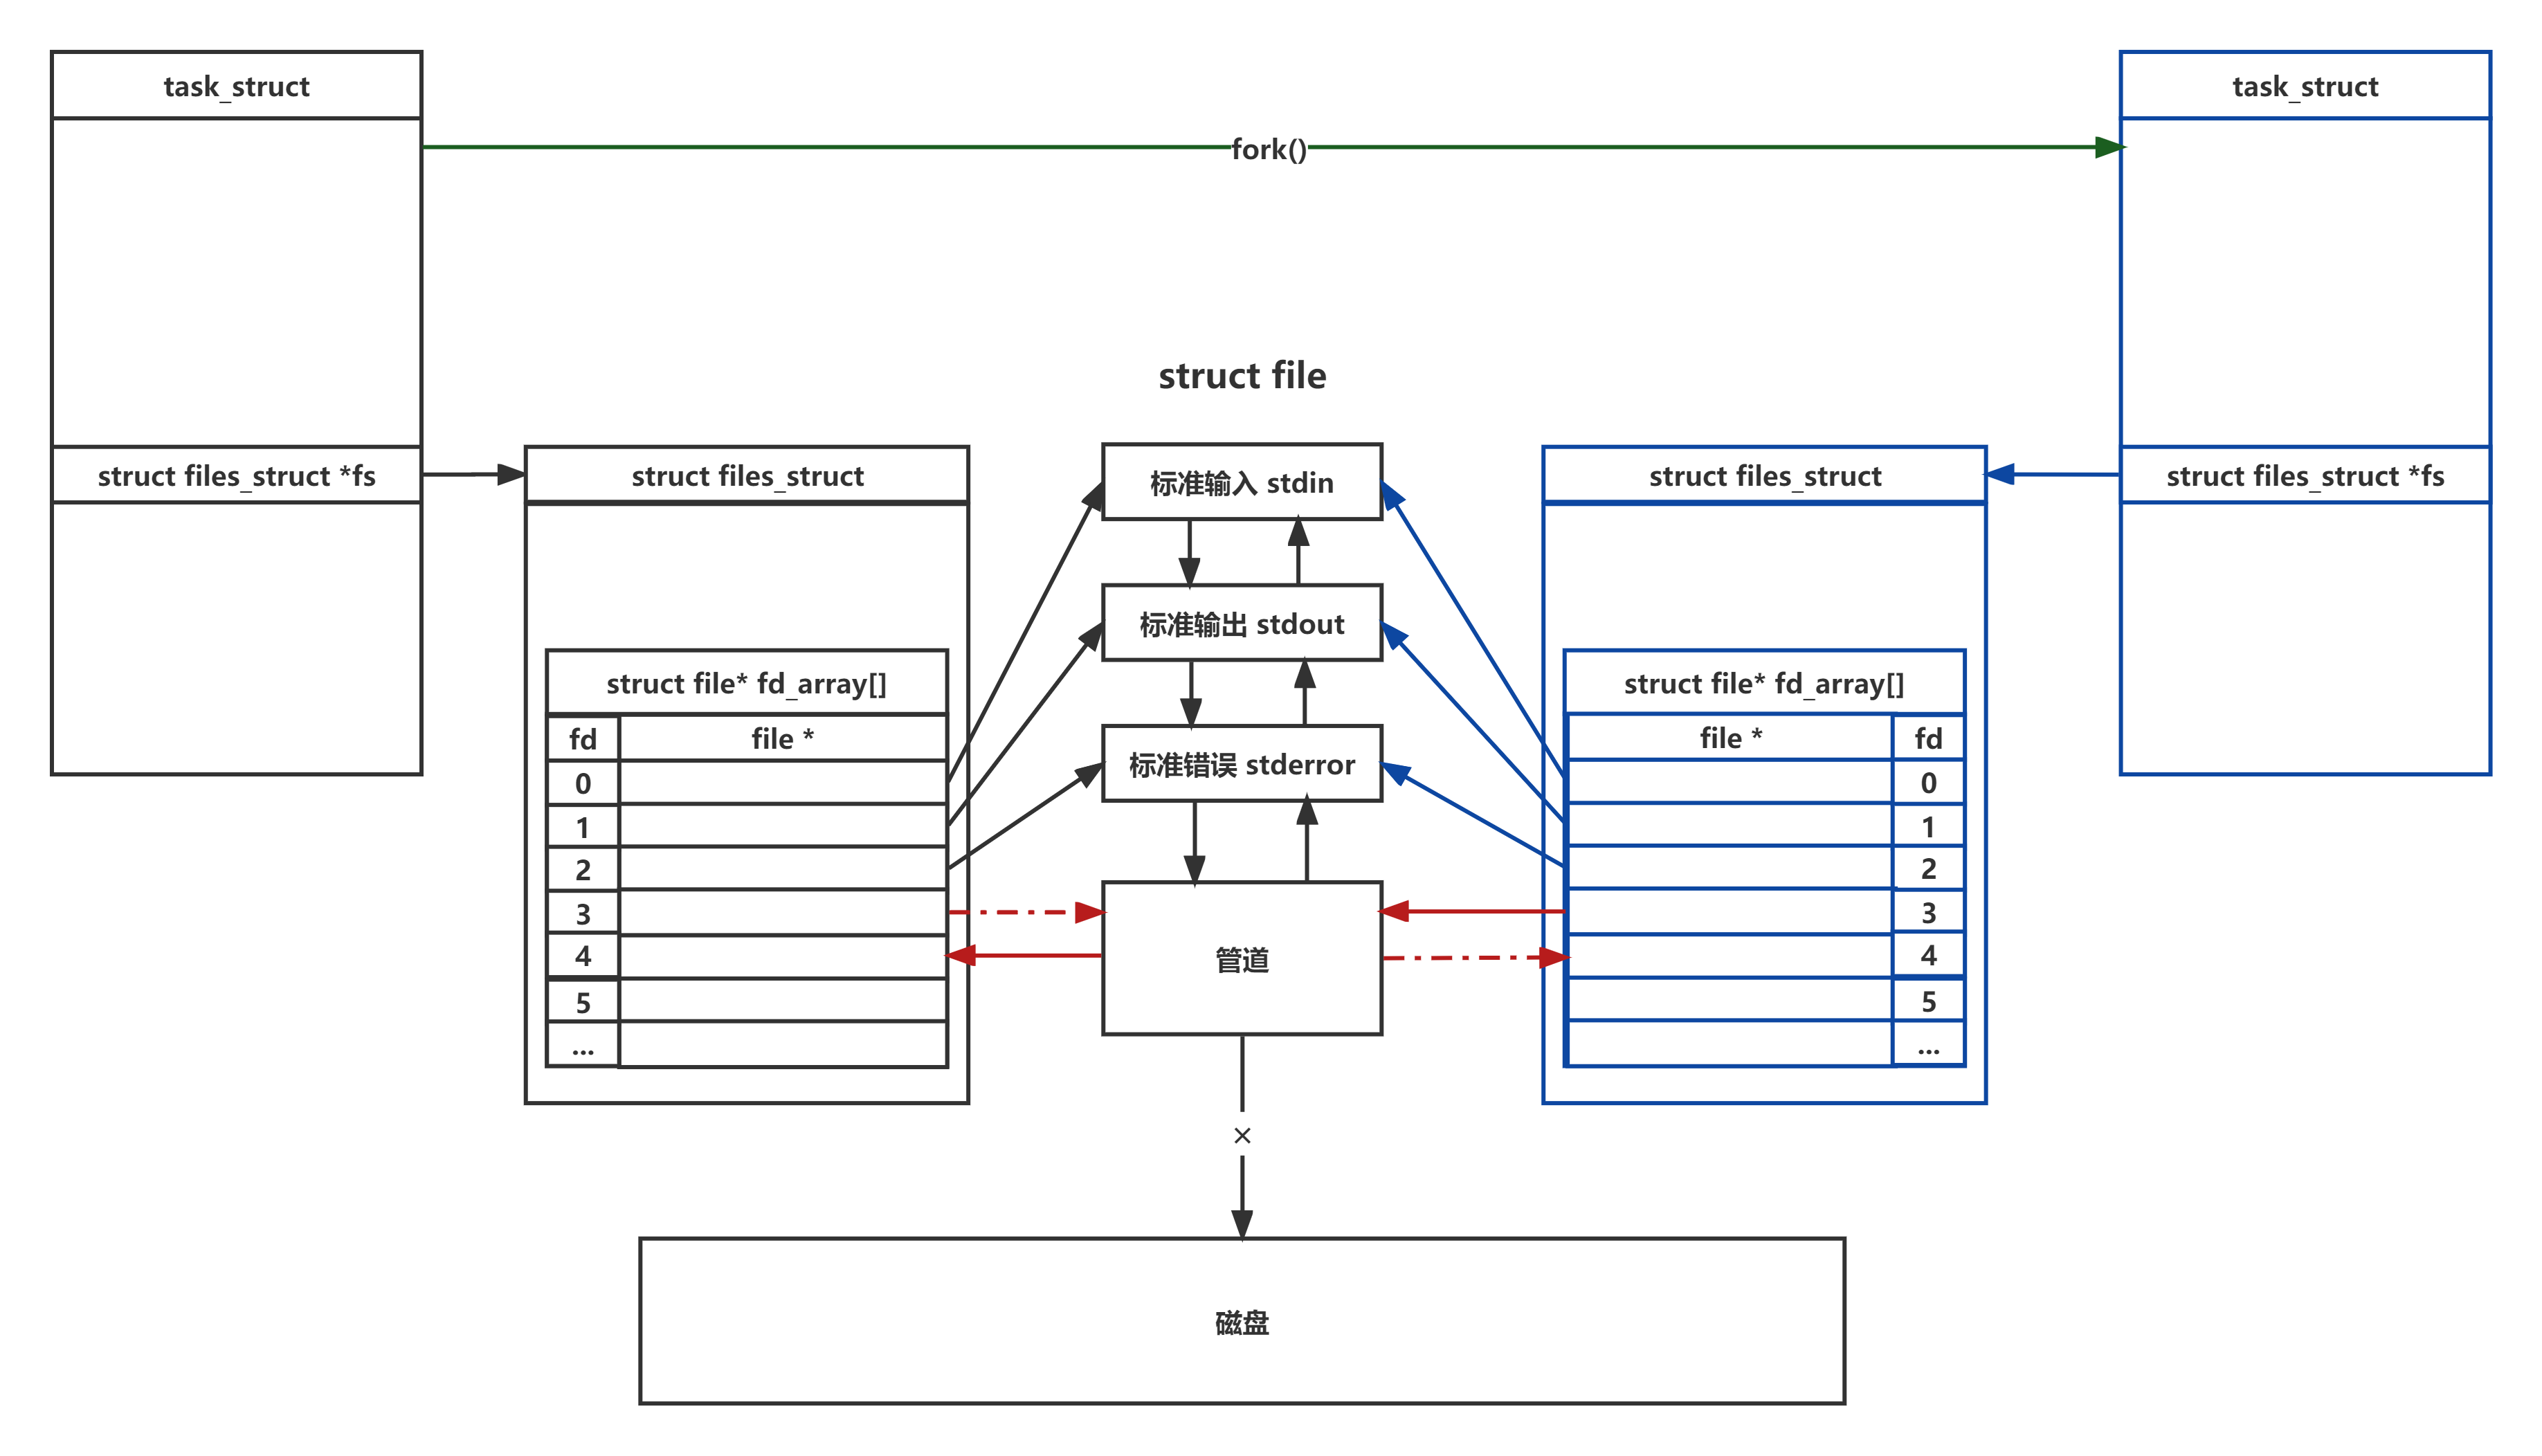
- 匿名管道是一种基于文件的通信方式对于父进程而言其创建之初会同时创建进程描述符其中会存在关于记录文件信息的数据结构在Linux中存在结构体指针
struct file_struct *fs指向储存该进程文件信息的结构体。该结构体中存在结构体指针数组struct *file fd_array[]通过文件描述符指向对应文件结构体从而达到管理文件的目的。- 当创建子进程后该关于进程管理的数据结构同样会拷贝新的一份在内存中但是对于管理的打开后的文件将不再赋值而是通过指针指向因此父子进程此时存在共同的共享资源文件。
- 而父子进程通过对于文件描述符的管理和使用通过该共享文件进行进程间的通信过程。
2.2.1 pipe系统调用
头文件#include <unistd.h>
定义int pipe(int pipefd[2]);
作用创建一个匿名管道
参数
- fd文件描述符数组,其中fd[0]表示读端, fd[1]表示写端
- 返回值成功返回0失败返回错误代码
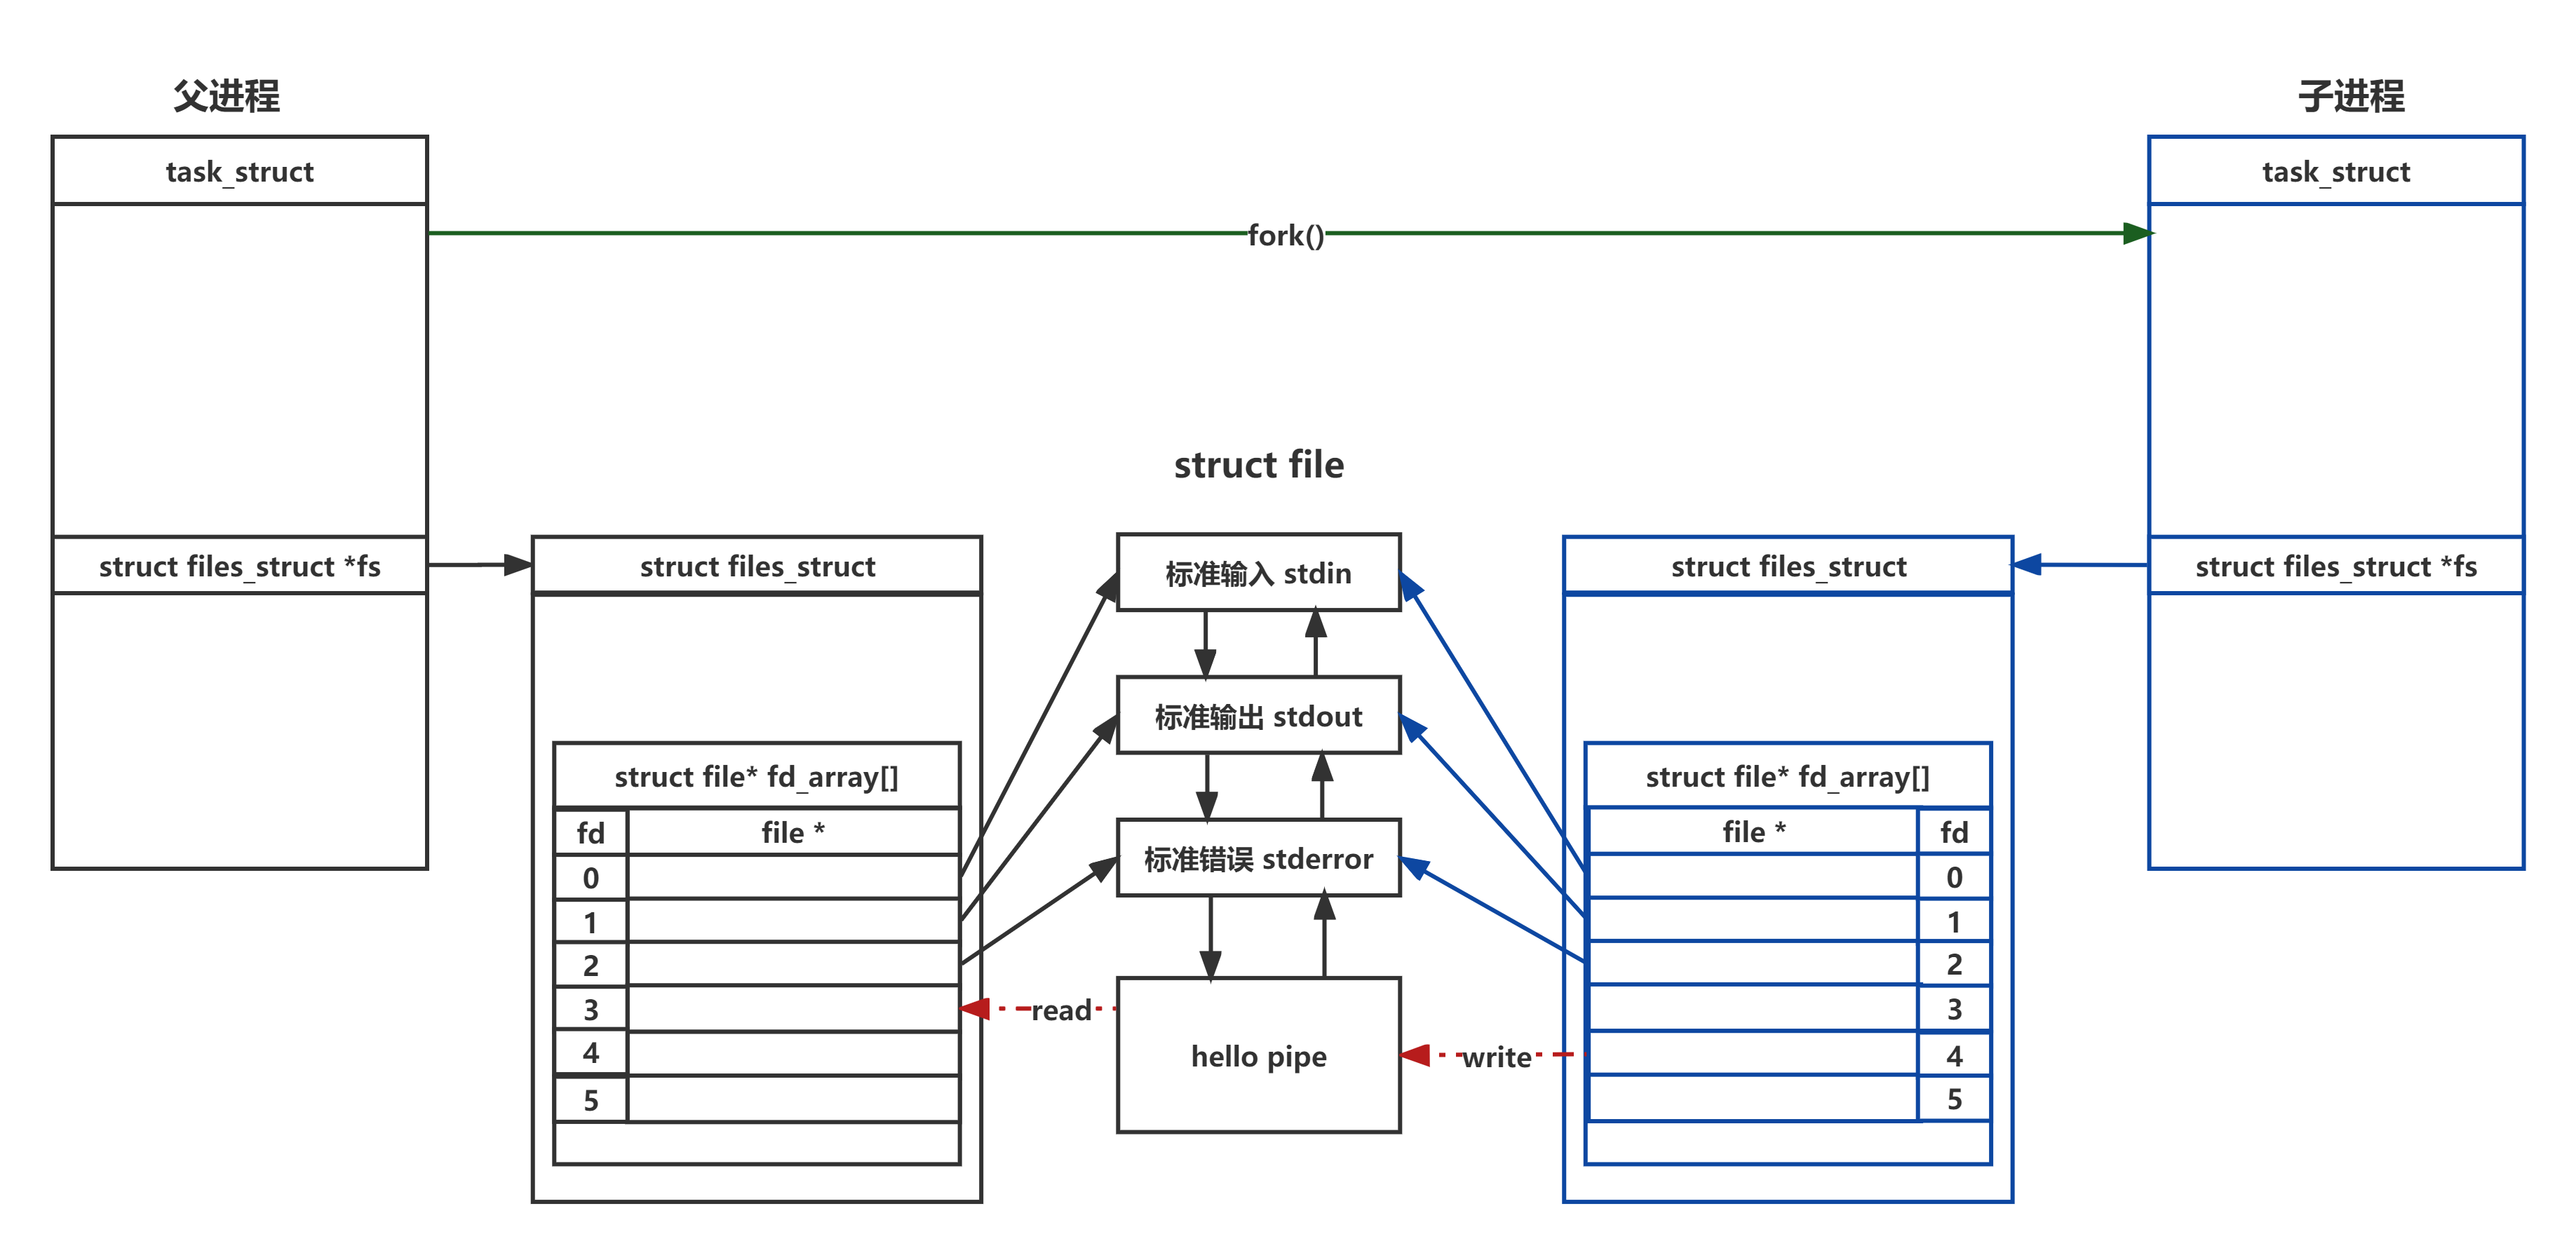
实例在父进程中通过系统调用pipe创建一个管道并打印管道对应的文件描述符。创建子进程作为写端首先关闭子进程的读端并通过循环使用系统调用write持续写入信息语句。对于父进程而言作为读端关闭写端后通过系统调用read不断从信道中读取内容并打印。
#include<stdio.h>
#include<unistd.h>
#include<string.h>
#include <stdlib.h>

int main(){
	int pipefd[2] = {0};
	if(pipe(pipefd) != 0){
		perror("pipe error");
		return 1;
	}

	printf("pipefd[0]:%d\n",pipefd[0]);
	printf("pipefd[1]:%d\n",pipefd[1]);

	if(fork() == 0){
        // 关闭读端
		close(pipefd[0]);

		const char* msg = "hello pipe\n";
		while(1){
			write(pipefd[1],msg,strlen(msg));
			sleep(1);
		}
		exit(0);
	}
	// 关闭写端
	close(pipefd[1]);
	while(1){
		char buffer[64] = {0};
		ssize_t s = read(pipefd[0],buffer,sizeof(buffer) - 1);
		if(s == 0){
			// 文件描述符关闭或文件到达结尾
			break;
		}
		else if(s>0){
			buffer[s - 1] = 0;
			printf("child ---> father :%s\n",buffer);
		}
		else{
			// 错误
			break;
		}
	}
	return 0;
}
[root@VM-12-7-centos pipe]# ./pipe_test
pipefd[0]:3
pipefd[1]:4
child ---> father :hello pipe
child ---> father :hello pipe
child ---> father :hello pipe
2.2.2 匿名管道的读写情况分类
-
读端不读或者读端读写较慢写端需要等待读端
对于实例进行修改子进程写入不进行等待而父进程读数据需要等待或者不读并对写入的字节数进行计数代码示例如下。其结果为当写入65536个字节后将不再读写并且在读端读取数据后仍然不进行读写。
#include<stdio.h>
#include<unistd.h>
#include<string.h>
#include <stdlib.h>
int main(){
	int pipefd[2] = {0};
	if(pipe(pipefd) != 0){
		perror("pipe error");
		return 1;
	}
	printf("pipefd[0]:%d\n",pipefd[0]);
	printf("pipefd[1]:%d\n",pipefd[1]);
	if(fork() == 0){
		int count = 0;
		close(pipefd[0]);
		while(1){
			write(pipefd[1],"a",1);
			count++;
			printf("count:%d\n",count);
		}
		exit(0);
	}
	close(pipefd[1]);
	while(1){
		sleep(10);
		char buffer[64] = {0};
		ssize_t s = read(pipefd[0],buffer,sizeof(buffer) - 1);
		if(s == 0){
			// 意味着文件描述符关闭或文件到达结尾
			printf("child quit\n");
			break;
		}
		else if(s>0){
			buffer[s - 1] = 0;
			printf("child ---> father :%s\n",buffer);
		}
		else{
			// 错误
			printf("read error\n");
			break;
		}
	}
	return 0;
}
count:65534 count:65535 count:65536 child ---> father :aaaaaaaaaaaaaaaaaaaaaaaaaaaaaaaaaaaaaaaaaaaaaaaaaaaaaaaaaaaaaa由此可以说明管道大小是有限的当写满64KB时写端不再写入可是如何继续写入将读端的读取数量更改更大时再次进行实验。
#include<stdio.h>
#include<unistd.h>
#include<string.h>
#include <stdlib.h>
int main(){
	int pipefd[2] = {0};
	if(pipe(pipefd) != 0){
		perror("pipe error");
		return 1;
	}
	printf("pipefd[0]:%d\n",pipefd[0]);
	printf("pipefd[1]:%d\n",pipefd[1]);
	if(fork() == 0){
		int count = 0;
		close(pipefd[0]);
		while(1){
			write(pipefd[1],"a",1);
			count++;
			printf("count:%d\n",count);
		}
		exit(0);
	}
	close(pipefd[1]);
	while(1){
		sleep(10);
		char buffer[64] = {0};
		ssize_t s = read(pipefd[0],buffer,sizeof(buffer) - 1);
		if(s == 0){
			// 意味着文件描述符关闭或文件到达结尾
			printf("child quit\n");
			break;
		}
		else if(s>0){
			buffer[s - 1] = 0;
			printf("child ---> father :%s\n",buffer);
		}
		else{
			// 错误
			printf("read error\n");
			break;
		}
	}
	return 0;
}
运行上述C语言代码发现当读端数据达到一定量时就会继续就会继续写入由此说明管道是自带同步机制的当要写入的数据量不大于PIPE_BUF4KB时linux将保证写入的原子性。当要写入的数据量大于PIPE_BUF时linux将不再保证写入的原子性。
-
读端关闭写端收到SIGNPIPE信号直接终止
通过进程等待获取相应信号完成实例实验示例如下
#include<stdio.h> #include<unistd.h> #include<string.h> #include <stdlib.h> #include <sys/types.h> #include <sys/wait.h> int main(){ int pipefd[2] = {0}; if(pipe(pipefd) != 0){ perror("pipe error"); return 1; } printf("pipefd[0]:%d\n",pipefd[0]); printf("pipefd[1]:%d\n",pipefd[1]); if(fork() == 0){ close(pipefd[0]); const char* msg = "hello pipe"; while(1){ write(pipefd[1],msg,strlen(msg)); sleep(1); } close(pipefd[1]); exit(0); } close(pipefd[1]); while(1){ sleep(1); char buffer[64] = {0}; ssize_t s = read(pipefd[0],buffer,sizeof(buffer)); if(s == 0){ // 意味着文件描述符关闭或文件到达结尾 printf("writer quit\n"); break; } else if(s>0){ buffer[s] = 0; printf("child ---> father :%s\n",buffer); break; } else{ // 错误 printf("read error\n"); break; } } close(pipefd[0]); // 获取退出信息 int status = 0; waitpid(-1,&status,0); printf("exit code: %d\n",(status>>8) & 0xFF); printf("exit signal: %d\n",(status) & 0x7F); return 0; }[root@VM-12-7-centos pipe]# ./pipe_test pipefd[0]:3 pipefd[1]:4 child ---> father :hello pip exit code: 0 exit signal: 13可以发现写端受到了13号信号此处的13号信号就是
13) SIGPIPE信号。原理在于当读端关闭时写端还在写入在操作系统层面无人是读取该数据的是在浪费操作系统的资源因此操作系统会终止精华才能发送信号。[root@VM-12-7-centos pipe]# kill -l 1) SIGHUP 2) SIGINT 3) SIGQUIT 4) SIGILL 5) SIGTRAP 6) SIGABRT 7) SIGBUS 8) SIGFPE 9) SIGKILL 10) SIGUSR1 11) SIGSEGV 12) SIGUSR2 13) SIGPIPE 14) SIGALRM 15) SIGTERM 16) SIGSTKFLT 17) SIGCHLD 18) SIGCONT 19) SIGSTOP 20) SIGTSTP 21) SIGTTIN 22) SIGTTOU 23) SIGURG 24) SIGXCPU 25) SIGXFSZ 26) SIGVTALRM 27) SIGPROF 28) SIGWINCH 29) SIGIO 30) SIGPWR 31) SIGSYS 34) SIGRTMIN 35) SIGRTMIN+1 36) SIGRTMIN+2 37) SIGRTMIN+3 38) SIGRTMIN+4 39) SIGRTMIN+5 40) SIGRTMIN+6 41) SIGRTMIN+7 42) SIGRTMIN+8 43) SIGRTMIN+9 44) SIGRTMIN+10 45) SIGRTMIN+11 46) SIGRTMIN+12 47) SIGRTMIN+13 48) SIGRTMIN+14 49) SIGRTMIN+15 50) SIGRTMAX-14 51) SIGRTMAX-13 52) SIGRTMAX-12 53) SIGRTMAX-11 54) SIGRTMAX-10 55) SIGRTMAX-9 56) SIGRTMAX-8 57) SIGRTMAX-7 58) SIGRTMAX-6 59) SIGRTMAX-5 60) SIGRTMAX-4 61) SIGRTMAX-3 62) SIGRTMAX-2 63) SIGRTMAX-1 64) SIGRTMAX -
写端不写或者写的较慢读端要等待写端
通过修改实例模拟写端不写或者写的较慢读端要等待写端的场景可以发现读端需要等待写端并且具有自带的同步机制不会出现新老数据覆盖的问题
-
写端关闭读端读完pipe内部的数据然后再读会读到0表示读到文件结尾
示例代码如下
#include<stdio.h> #include<unistd.h> #include<string.h> #include <stdlib.h> int main(){ int pipefd[2] = {0}; if(pipe(pipefd) != 0){ perror("pipe error"); return 1; } printf("pipefd[0]:%d\n",pipefd[0]); printf("pipefd[1]:%d\n",pipefd[1]); if(fork() == 0){ close(pipefd[0]); const char* msg = "hello pipe"; while(1){ write(pipefd[1],msg,strlen(msg)); sleep(5); break; } close(pipefd[1]); exit(0); } close(pipefd[1]); while(1){ sleep(1); char buffer[1] = {0}; ssize_t s = read(pipefd[0],buffer,sizeof(buffer)); if(s == 0){ // 意味着文件描述符关闭或文件到达结尾 printf("writer quit\n"); break; } else if(s>0){ printf("child ---> father :%s\n",buffer); } else{ // 错误 printf("read error\n"); break; } } return 0; }[root@VM-12-7-centos pipe]# ./pipe_test pipefd[0]:3 pipefd[1]:4 child ---> father :h child ---> father :e child ---> father :l child ---> father :l child ---> father :o child ---> father : child ---> father :p child ---> father :i child ---> father :p child ---> father :e writer quit
2.2.3 匿名管道读写规则
无数据可读
- O_NONBLOCK disableread调用阻塞即进程暂停执行一直等到有数据来到为止。
- O_NONBLOCK enableread调用返回-1errno值为EAGAIN。
管道满
- O_NONBLOCK disable write调用阻塞直到有进程读走数据
- O_NONBLOCK enable调用返回-1errno值为EAGAIN
当管道关闭时
- 如果所有管道写端对应的文件描述符被关闭则read返回0
- 如果所有管道读端对应的文件描述符被关闭则write操作会产生信号SIGPIPE,进而可能导致write进程退出
原子性
- 当要写入的数据量不大于PIPE_BUF时linux将保证写入的原子性。
- 当要写入的数据量大于PIPE_BUF时linux将不再保证写入的原子性。
2.2.4 匿名管道的特点
- 匿名管道是一个只能单向通信的信道当需要进行管道通信时需要关闭一端的读端和一端的写端
- 匿名管道是面向字节流的
- 匿名管道是仅限于父子进程或具有血缘关系的进程间的通信
- 匿名管道匿名管道自带同步机制进行的是原子性写入
- 管道的生命周期是随进程的
2.3 命名管道
命名管道是为了解决匿名管道只能进行父子通信的问题而产生的之所以称为匿名管道是在用户层面可以通过唯一的文件标识路径来命名标志管道所在位置。命名管道的创建是依靠指令mkfifo来完成的该管道的数据时写入内存中而不写入磁盘中大幅提高进程间的通信效率命名管道是一种特殊类型的文件。
2.3.1 指令mkfifo
作用创建一个命名管道
语句mkfifo [OPTION]... NAME...
示例通过输入重定向将数据发送至管道再通过cat命令获取管道内容
[root@VM-12-7-centos pipe_named]# mkfifo fifo
[root@VM-12-7-centos pipe_named]# ll
total 0
prw-r--r-- 1 root root 0 Jan  8 17:56 fifo
[root@VM-12-7-centos pipe_named]# echo "hello world" > fifo
[root@VM-12-7-centos pipe_named]# cat fifo
hello world
2.3.2 系统调用mkfifo
头文件
#include <sys/types.h>
#include <sys/stat.h>
定义int mkfifo(const char *pathname, mode_t mode);
作用创建一个命名管道
参数
- pathname文件路径依参数pathname建立特殊的FIFO文件
- mode权限设置注意umask掩码(mode & ~umask)。
返回值 若成功则返回0否则返回-1错误原因存于errno中。
实例:
通过命名管道来完成服务端与客户端之间的对话并且完成对于客户端传来的对话内容完成部分业务逻辑操作。步骤如下
创建service.c client.c comm.h分别放置源代码以及共同的头文件宏定义
编写Makefile文件生成两个可执行文件通过伪目标完成编译工作
.PHONY:all
all:client server

client:client.c
	gcc -o $@ $^

server:server.c
	gcc -o $@ $^

.PHONY:clean
	rm -f client serve
编写server.c文件该文件用于创建一个命名管道而剩下的业务逻辑识别ls命令与打印客户端方发来的信息通过文件操作来完成即可代码如下
#include "comm.h"

int main(){
    umask(0);
    if(mkfifo(FIFO,0666) < 0){
        perror("mkfifo error");
        return 1;
    }
    int fd = open(FIFO,O_RDONLY);
    if(fd < 0){
        perror("open");
        return 2;
    }
    // 进行文件操作即可
    while(1){
       char buffer[64] = { 0 };
       ssize_t s = read(fd,buffer,sizeof(buffer) - 1);
       // 业务逻辑
       if(s > 0){
        if(strcmp(buffer,"please ls") == 0){
            if(fork()==0){
                execl("/usr/bin/ls","ls","-l",NULL);
                exit(1);
            }
            waitpid(-1,NULL,0);
        }
        buffer[s] = 0;
        printf("[client-->]# : %s\n",buffer);
       }
       else if(s == 0){
        printf("client quite\n");
        break;
       }
       else{
        printf("read error\n");
        break;
       }
    }
    return 0;
}
编写client.c文件从标准输入中获取数据并写入管道中
#include "comm.h"

int main(){
    int fd = open(FIFO,O_WRONLY);
    if(fd < 0){
        perror("open error");
        return 1;
    }

    // 通过文件操作完成业务逻辑
    while(1){
        printf("[client ]# ");
        fflush(stdout);
        char buffer[64] = {0};
        // 将数据从标准输入拿到client内部
        ssize_t s = read(0,buffer,sizeof(buffer) - 1);
        if(s > 0){
            buffer[s-1] = 0;
            printf("%s\n",buffer);
            write(fd,buffer,strlen(buffer));
        }
    }
    close(fd);
    return 0;
}
统一头文件至comm.h
#pragma once
#include<stdio.h>
#include<unistd.h>
#include<sys/stat.h>
#include<sys/types.h>
#include<fcntl.h>
#include <sys/wait.h>
#include <stdlib.h>
#include<string.h>

#define FIFO "./fifo"
实验过程
[root@VM-12-7-centos pipe_named]# ./client [client ]# hello hello [client ]# please ls please ls [client ]# ^C[root@VM-12-7-centos pipe_named]# ./server [client-->]# : hello total 56 -rwxr-xr-x 1 root root 17880 Jan 8 20:33 client -rw-r--r-- 1 root root 563 Jan 8 20:29 client.c -rw-r--r-- 1 root root 195 Jan 8 20:22 comm.h prw-rw-rw- 1 root root 0 Jan 8 20:33 fifo -rw-r--r-- 1 root root 138 Jan 8 20:23 makefile -rwxr-xr-x 1 root root 18040 Jan 8 20:33 server -rw-r--r-- 1 root root 838 Jan 8 20:29 server.c [client-->]# : please ls client quite
2.4 对比
匿名管道也是文件不过该文件时没有名字的通过继承的方式查看同一份资源不需要通过标识符来标识同一份资源
命名管道是需要有名字的为了保证不同进程看到的是同一文件在用户层方面通过文件唯一标识符来进行标识。
三、System V IPC
3.1 概述
System V是一种方案在操作系统层面专门为进程设计了一个方案为了给予用户层面使用而操作系统是不信任任何用户的因此给予用户使用的使用采用调用系统调用的方法。
对于System V标准完成进程间通信有三种方案分别为共享内存、消息队列和信号量三种方式。其中在本文中主要介绍共享内存而消息队列不会介绍信号量只是在概念层面进行说明在后续线程学习后的文章进行介绍。
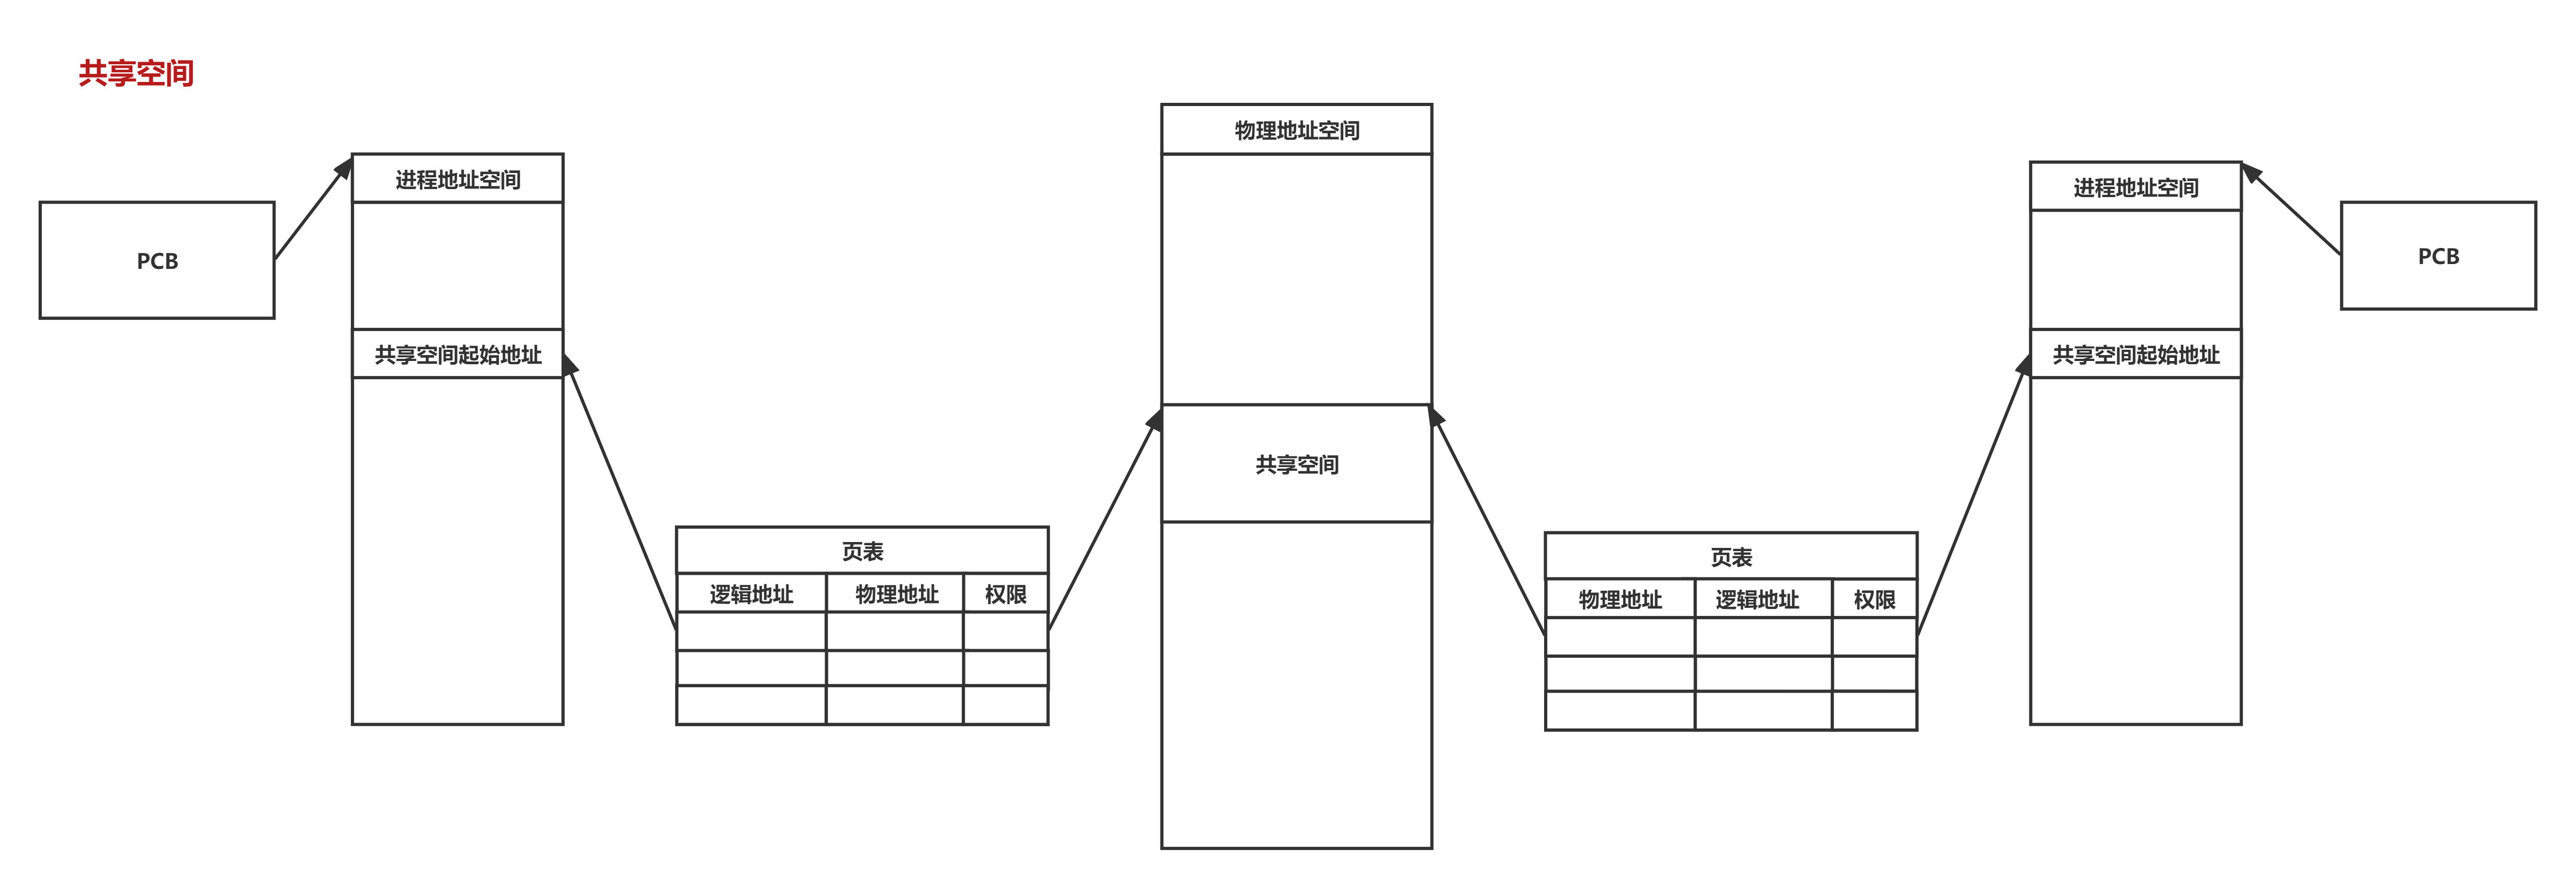
对于进程间通信的本质是让不同的进程看到同一份资源而共享内存亦是如此。对于进程而言操作系统将会创建相应的进程控制块和相应的数据结构而进程控制块中将会记录了进程的地址空间进程地址空间将会通过页表来映射逻辑地址与物理地址的关系。而共享内存则是在物理空间中开辟出一部分空间而进程将其挂接在该共享空间上并在页表上建立逻辑空间与物理空间的映射关系进程地址空间中记录了逻辑空间的起始地址。图示如下
系统调用所需要完成的是在内存中创建一份内存空间让参与通信的多个进程”挂接“到这份新开辟的内存空间上若不需要进行进程间通信的话则需要去关联以及进行释放共享内存。
对于操作系统来说同样也需要对这些不同的共享内存进行管理因此操作系统会存在对这些共享内存进行描述和组织的相应数据结构其中最为重要的是对于共享内存的标识符通过这个唯一标识符让需要进行通信的进程看到同一份共享内存这一描述符将会存储于描述共享内存的数据结构中。在文章的后续内容将会对其进行简单的介绍。
3.2 共享内存——调用接口
3.2.1 shmget
作用得到一个共享内存标识符或创建一个共享内存对象并返回共享内存标识符
头文件
#include <sys/ipc.h>
#include <sys/shm.h>
定义int shmget(key_t key, size_t size, int shmflg);
参数
key用于标识共享内存的键值0(IPC_PRIVATE)会建立新共享内存对象当大于0的32位整数通过参数shmflg来确定操作通常要求此值来源于ftok返回的IPC键值。
补充
ftok可以用于形成key值作为参数传给key其定义为key_t ftok(const char *pathname, int proj_id);参数pathname为自定义路径名参数proj_id为自定义项目ID头文件为
#include <sys/types.h>
#include <sys/ipc.h>
此处的key会设置进内核关于shm的内核数据结构中通过可以相同形成key的算法和原始数据一致来形成一个ID从而让不同进程查看到同一共享内存空间
size建立共享内存的大小建议大小为4KB。在分配共享内存是时会以页为单位进行分配而一页大小为4KB但是当不足时会向上取整进行分页但是基于共享内存的大小不是按页的大小决定而是根据参数所需要的进行限定。
shmflgshmflg是权限标志只需关注部分常用选项当
IPC_CREAT单独使用或flg为0时创建一个内存空间如果创建的内存空间存在则返回当前已经存在的内存空间当为IPC_CREAT | IPC_EXCL表示如果不存在共享内存空间则会创建内存空间如果已经有内存空间则会返回出错。使用时需要与IPC对象存取权限进行|运算来确定信号量集的存取权限可以在ipcs中的perm中查看。
返回值成功返回共享内存的标识符失败出错-1错误原因存于error中
实例通过系统调用shmget其中生成key的方法为调用ftok将其中的自定义参数与自定义项目ID写在comm.h中并将生成共享内存的代码写入server.c中。
补充可以通过ipcs -m指令查看共享内存。其中bytes表示内存快的大小nattach表示与共享内存快连接的进程个数。通过ipcrm -m shmid来删除共享内存空间。
.PHONY:all
all:client server

client:client.c
	gcc -o $@ $^

server:server.c
	gcc -o $@ $^

.PHONY:clean
clean:
	rm -f client server
#pragma once

#include <stdio.h>
#include <sys/ipc.h>
#include <sys/shm.h>

#define PATH_NAME "./"
#define PROJ_ID 0x666
#define SIZE 4096
#include "comm.h"

int main(){
    key_t key = ftok(PATH_NAME,PROJ_ID);
    if(key < 0){
	    perror("ftok");
	    return 1;
    }
    int shmid = shmget(key ,SIZE, IPC_CREAT|IPC_EXCL);
    if(shmid < 0){
	    perror("shmget");
	    return 2;
    }
    printf("key: %u,shmid: %d\n",key,shmid);
    return 0;
}
[root@VM-12-7-centos share_memory]# ./server
key: 1711347423,shmid: 0
[root@VM-12-7-centos share_memory]# ./server
shmget: File exists
[root@VM-12-7-centos share_memory]# ipcs -m

------ Shared Memory Segments --------
key        shmid      owner      perms      bytes      nattch     status
0x660116df 0          root       0          4096       0
[root@VM-12-7-centos share_memory]# ipcrm -m 0
[root@VM-12-7-centos share_memory]# ipcs -m

------ Shared Memory Segments --------
key        shmid      owner      perms      bytes      nattch     status
3.2.2 删除共享内存空间ipcrm、shmctl
system V的IPC资源是不属于任何一个进程的而生命周期是随内核的只能通过用户层进行显示释放命令或系统调用或者是将操作系统重启。
命令删除
通过命令可以使用ipcrm -m shmid来删除共享内存空间。实例如下
[root@VM-12-7-centos share_memory]# ipcs -m

------ Shared Memory Segments --------
key        shmid      owner      perms      bytes      nattch     status
0x660116df 0          root       0          4096       0
[root@VM-12-7-centos share_memory]# ipcrm -m 0
[root@VM-12-7-centos share_memory]# ipcs -m

------ Shared Memory Segments --------
key        shmid      owner      perms      bytes      nattch     status
而在此使用的shmid来删除共享内存块原因是key是用来在系统层面进行标识唯一性不能用来管理shm而shmid是操作系统返回给用户的id对于用户层shell来说可以通过此来管理shm。
系统调用删除shmctl
头文件
#include <sys/ipc.h>
#include <sys/shm.h>
定义int shmctl(int shmid, int cmd, struct shmid_ds *buf);
作用控制共享内存此处只介绍删除
参数
-
shmid共享内存标识符
-
cmdIPC_RMID删除这片共享内存
-
buf 共享内存管理结构体在
man 2 shmclt中可以查看到具体内容如下struct shmid_ds { struct ipc_perm shm_perm; /* Ownership and permissions */ size_t shm_segsz; /* Size of segment (bytes) */ time_t shm_atime; /* Last attach time */ time_t shm_dtime; /* Last detach time */ time_t shm_ctime; /* Last change time */ pid_t shm_cpid; /* PID of creator */ pid_t shm_lpid; /* PID of last shmat(2)/shmdt(2) */ shmatt_t shm_nattch; /* No. of current attaches */ ... };
返回值成功返回共享内存的标识符失败出错-1错误原因存于error中
实例对创建后的共享内存空间进行通过系统调用的删除
#include "comm.h"
int main(){
key_t key = ftok(PATH_NAME,PROJ_ID);
if(key < 0){
perror("ftok");
return 1;
}
// 创建
int shmid = shmget(key ,SIZE, IPC_CREAT|IPC_EXCL|0666);
if(shmid < 0){
perror("shmget");
return 2;
}
printf("key: %u,shmid: %d\n",key,shmid);
sleep(10);
// 删除
shmctl(shmid,IPC_RMID,NULL);
printf("key: 0x%x, shmid: %d -> shm delete success\n",key ,shmid);
sleep(10);
return 0;
}
[root@VM-12-7-centos share_memory]# ./server
key: 1711347423,shmid: 3
key: 0x660116df, shmid: 3 -> shm delete success
3.2.3 shmat
头文件
#include <sys/types.h>
#include <sys/shm.h>
定义void *shmat(int shmid, const void *shmaddr, int shmflg);
作用将共享内存段连接到进程地址空间
参数
- shmid共享内存标识
- shmaddr指定连接的地址如果shmaddr 是NULL系统将自动选择一个合适的地址
- shmflgshm_flg是一组标志位通常为0在flag中指定了SHM_RDONLY位则以只读方式连接此段否则以读写的方式连接此段。
返回值成功返回一个指针指向共享内存第一个节失败返回-1
说明
- shmaddr为NULL核心自动选择一个地址
- shmaddr不为NULL且shmflg无SHM_RND标记则以shmaddr为连接地址。
- shmaddr不为NULL且shmflg设置了SHM_RND标记则连接的地址会自动向下调整为SHMLBA的整数倍。公式shmaddr - (shmaddr % SHMLBA)
- shmflg=SHM_RDONLY表示连接操作用来只读共享内存
实例
#include "comm.h"
int main(){
key_t key = ftok(PATH_NAME,PROJ_ID);
if(key < 0){
perror("ftok");
return 1;
}
// 创建
int shmid = shmget(key ,SIZE, IPC_CREAT|IPC_EXCL|0666);
if(shmid < 0){
perror("shmget");
return 2;
}
printf("key: %u,shmid: %d\n",key,shmid);
// 连接
char *mem = shmat(shmid , NULL , 0);
printf("attaches shm success\n");
sleep(5);
// 删除
shmctl(shmid,IPC_RMID,NULL);
printf("key: 0x%x, shmid: %d -> shm delete success\n",key ,shmid);
sleep(5);
return 0;
}
[root@VM-12-7-centos share_memory]# ./server
key: 1711347423,shmid: 4
attaches shm success
key: 0x660116df, shmid: 4 -> shm delete success
3.2.4 shmdt
头文件
#include <sys/types.h>
#include <sys/shm.h>
定义int shmdt(const void *shmaddr);
作用将共享内存段与当前进程脱离
参数shmaddr由shmat所返回的指针
返回值成功返回0失败返回-1
注意将共享内存段与当前进程脱离不等于删除共享内存段
实例
#include "comm.h"
int main(){
key_t key = ftok(PATH_NAME,PROJ_ID);
if(key < 0){
perror("ftok");
return 1;
}
// 创建
int shmid = shmget(key ,SIZE, IPC_CREAT|IPC_EXCL|0666);
if(shmid < 0){
perror("shmget");
return 2;
}
printf("key: %u,shmid: %d\n",key,shmid);
// 连接
char *mem = shmat(shmid , NULL , 0);
printf("attaches shm success\n");
// 解除
shmdt(mem);
printf("detaches shm success\n");
// 删除
shmctl(shmid,IPC_RMID,NULL);
printf("key: 0x%x, shmid: %d -> shm delete success\n",key ,shmid);
return 0;
}
[root@VM-12-7-centos share_memory]# ./server
key: 1711347423,shmid: 5
attaches shm success
detaches shm success
key: 0x660116df, shmid: 5 -> shm delete success
3.2.5 实例
实现客户端与服务端进行的通信
在实例中可以发现并未使用向管道那样的系统调用接口共享内存一旦建立好并映射到进程的地址空间该进程可以直接看到该共享内存同C语言那样直接使用该内存地址空间即可不需要使用任何系统调用接口。
服务端
#include "comm.h"
int main(){
key_t key = ftok(PATH_NAME,PROJ_ID);
if(key < 0){
perror("ftok");
return 1;
}
// 创建
int shmid = shmget(key ,SIZE, IPC_CREAT|IPC_EXCL|0666);
if(shmid < 0){
perror("shmget");
return 2;
}
printf("key: %u,shmid: %d\n",key,shmid);
// 连接
char *mem = shmat(shmid , NULL , 0);
printf("attaches shm success\n");
// 业务逻辑
while(1){
sleep(1);
printf("%s\n",mem);
}
// 解除
shmdt(mem);
printf("detaches shm success\n");
// 删除
shmctl(shmid,IPC_RMID,NULL);
printf("key: 0x%x, shmid: %d -> shm delete success\n",key ,shmid);
return 0;
}
客户端
#include "comm.h"
int main(){
//生成key
key_t key = ftok(PATH_NAME,PROJ_ID);
if(key < 0){
perror("ftok");
return 1;
}
printf("%u\n",key);
// 获取shmid
int shmid = shmget(key,SIZE,IPC_CREAT);
if(shmid < 0){
perror("shmget");
return 1;
}
// 连接
char *mem = (char*)shmat(shmid,NULL,0);
printf("client process attaches success\n");
// 业务逻辑
char c = 'A';
while(c <= 'E'){
// 在内存中写入字符
mem[c - 'A'] = c;
// char 字符 ++
c++;
// 内存尾写入文件描述符
mem[c - 'A'] = 0;
sleep(1);
}
// 解除
shmdt(mem);
printf("client process detaches success\n");
return 0;
}
实验结果
[lht@VM-12-7-centos share_memory]$ ./server
key: 1711347423,shmid: 9
attaches shm success
A
AB
ABC
ABCD
ABCDE
ABCDE
......
[lht@VM-12-7-centos share_memory]$ ./client
1711347423
client process attaches success
client process detaches success
3.3 共享内存——特点
共享内存是不提供任何同步或互斥机制的需要程序员自行保证数据安全但是共享内存由于是不需要调用任何系统调用接口而是直接访问对应的地址空间因此相对来说共享内存是所有进程间通信方法中速率最快的。
3.4 ipc资源的数据结构
通过man命令可以查看到所有System V标准的IPC资源每一个命名皆以id_ds结尾其中仔细观察可以发现描述这些资源的数据结构其中接口显示数据结构的第一个结构类型完全相同皆为struct ipc_perm,具体如下
struct shmid_ds {
    struct ipc_perm shm_perm;    /* Ownership and permissions */
    size_t          shm_segsz;   /* Size of segment (bytes) */
    time_t          shm_atime;   /* Last attach time */
    time_t          shm_dtime;   /* Last detach time */
    time_t          shm_ctime;   /* Last change time */
    pid_t           shm_cpid;    /* PID of creator */
    pid_t           shm_lpid;    /* PID of last shmat(2)/shmdt(2) */
    shmatt_t        shm_nattch;  /* No. of current attaches */
    ...
};
The ipc_perm structure is defined as follows (the highlighted fields are settable using IPC_SET):
struct ipc_perm {
key_t __key; /* Key supplied to shmget(2) */
uid_t uid; /* Effective UID of owner */
gid_t gid; /* Effective GID of owner */
uid_t cuid; /* Effective UID of creator */
gid_t cgid; /* Effective GID of creator */
unsigned short mode; /* Permissions + SHM_DEST and
SHM_LOCKED flags */
unsigned short __seq; /* Sequence number */
};
The msqid_ds data structure is defined in <sys/msg.h> as follows:

struct msqid_ds {
    struct ipc_perm msg_perm;     /* Ownership and permissions */
    time_t          msg_stime;    /* Time of last msgsnd(2) */
    time_t          msg_rtime;    /* Time of last msgrcv(2) */
    time_t          msg_ctime;    /* Time of last change */
    unsigned long   __msg_cbytes; /* Current number of bytes in
                                                queue (nonstandard) */
    msgqnum_t       msg_qnum;     /* Current number of messages
                                                in queue */
    msglen_t        msg_qbytes;   /* Maximum number of bytes
                                                allowed in queue */
    pid_t           msg_lspid;    /* PID of last msgsnd(2) */
    pid_t           msg_lrpid;    /* PID of last msgrcv(2) */
};

The ipc_perm structure is defined as follows (the highlighted fields are settable using IPC_SET):

struct ipc_perm {
    key_t          __key;       /* Key supplied to msgget(2) */
    uid_t          uid;         /* Effective UID of owner */
    gid_t          gid;         /* Effective GID of owner */
    uid_t          cuid;        /* Effective UID of creator */
    gid_t          cgid;        /* Effective GID of creator */
    unsigned short mode;        /* Permissions */
    unsigned short __seq;       /* Sequence number */
};
The semid_ds data structure is defined in <sys/sem.h> as follows:

struct semid_ds {
    struct ipc_perm sem_perm;  /* Ownership and permissions */
    time_t          sem_otime; /* Last semop time */
    time_t          sem_ctime; /* Last change time */
    unsigned long   sem_nsems; /* No. of semaphores in set */
};

The ipc_perm structure is defined as follows (the highlighted fields are settable using IPC_SET):

struct ipc_perm {
    key_t          __key; /* Key supplied to semget(2) */
    uid_t          uid;   /* Effective UID of owner */
    gid_t          gid;   /* Effective GID of owner */
    uid_t          cuid;  /* Effective UID of creator */
    gid_t          cgid;  /* Effective GID of creator */
    unsigned short mode;  /* Permissions */
    unsigned short __seq; /* Sequence number */
};
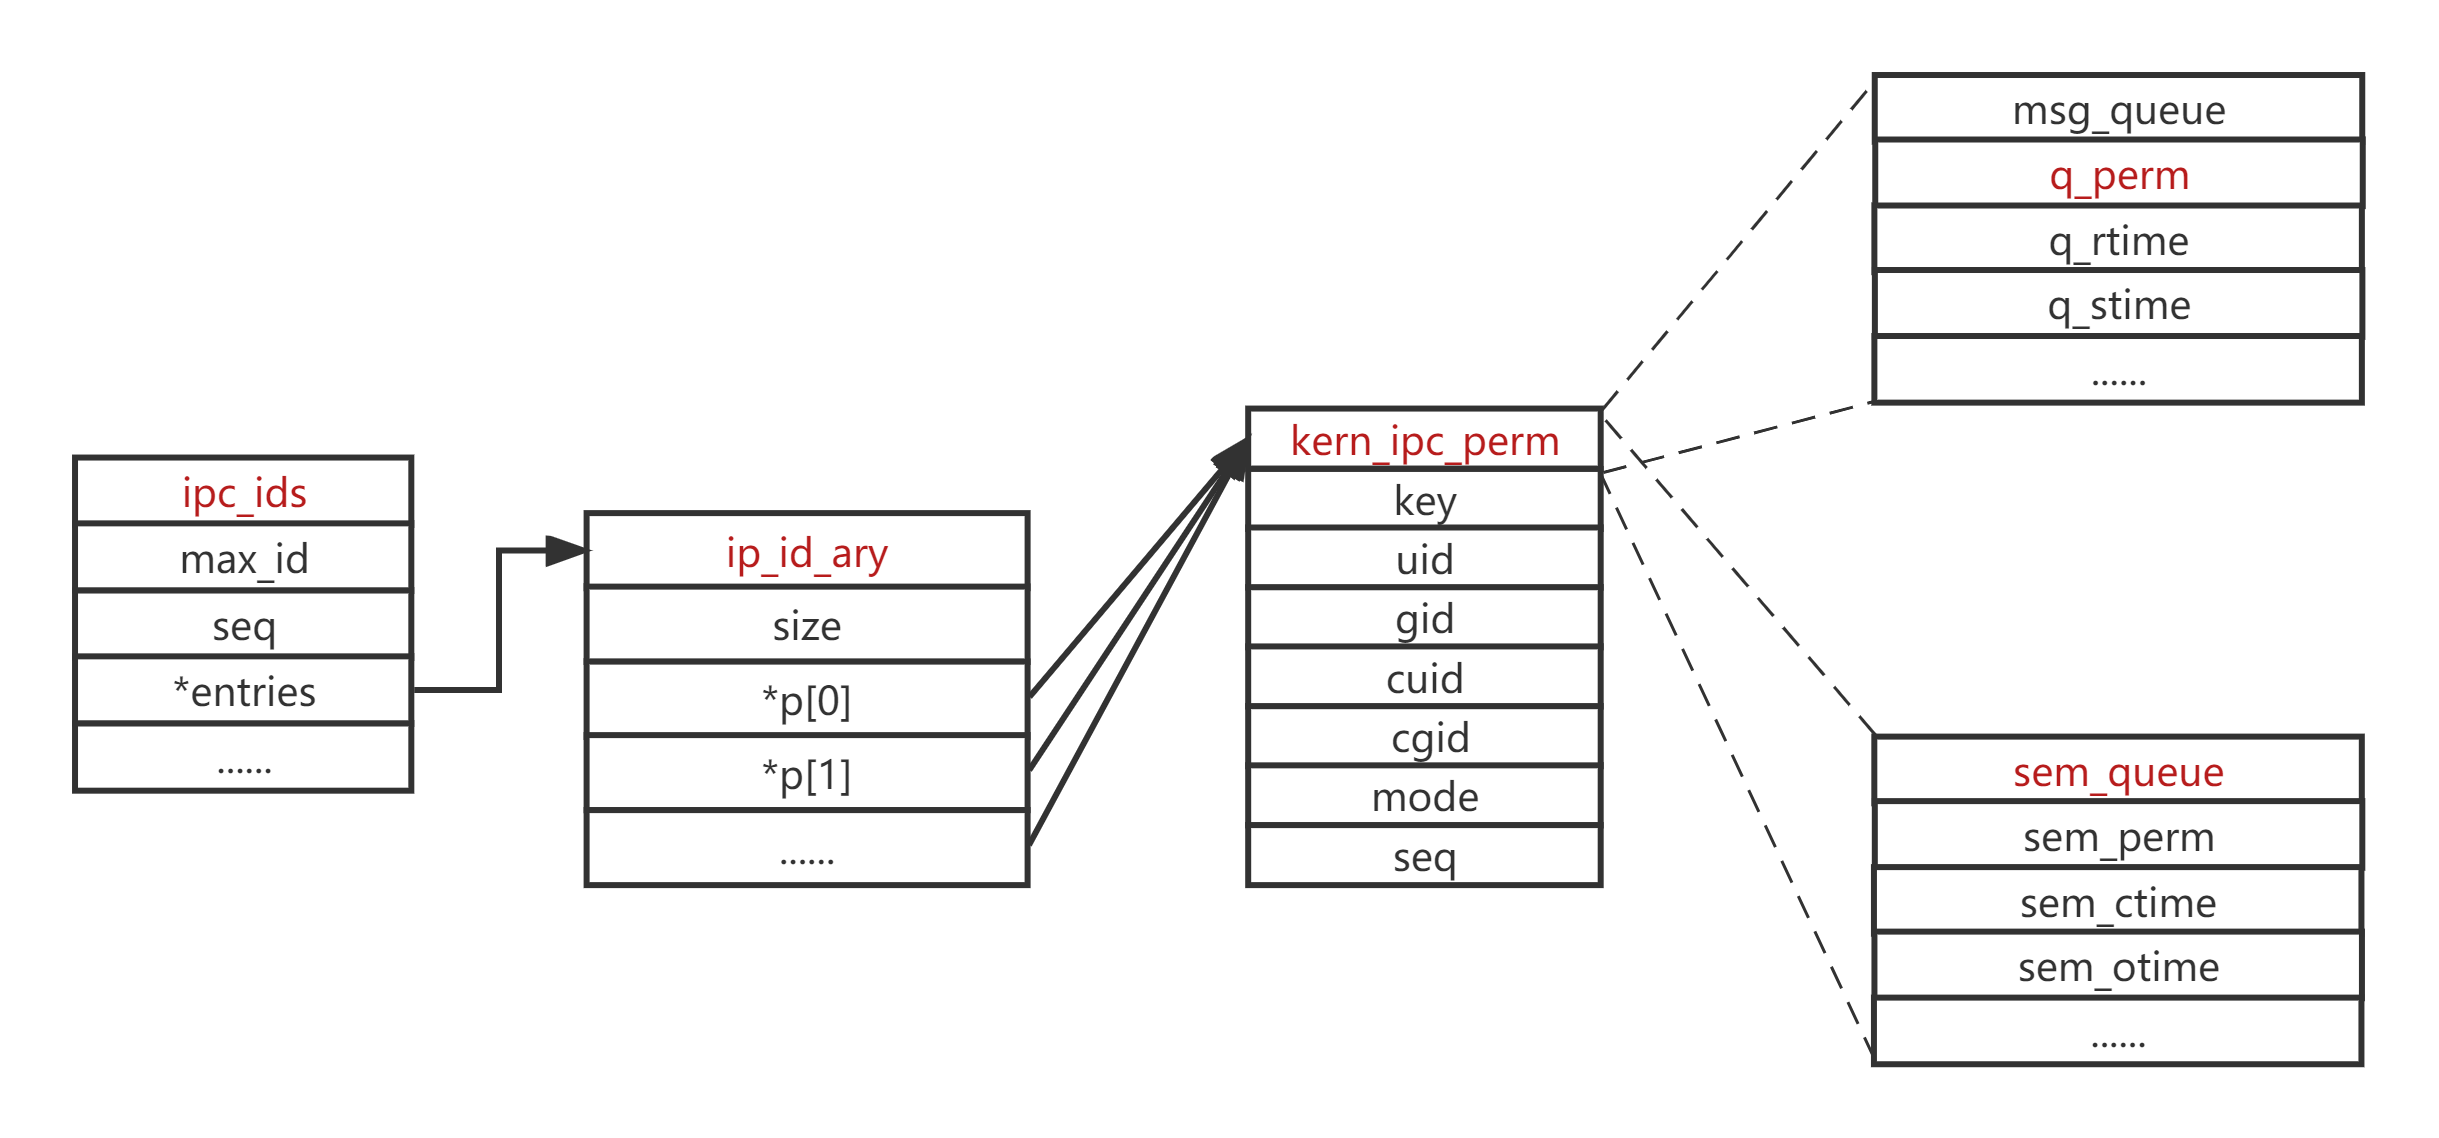
而操作系统通过一个柔性数组指向一个一个IPC资源结构体的指针这些数组的类型为struct ipc_perm可以直接访问每个IPC资源的第一个数据结构struct ipc_perm当需要访问整个IPC资源时则会将其进行类型转换完成对其他属性的访问。示例图如下
3.5 消息队列
消息队列提供了一个从一个进程向另外一个进程发送一块数据的方法每个数据块都被认为是有一个类型接收者进程接收的数据块可以有不同的类型值。
3.6 信号量
背景知识
- 临界资源凡是被多个执行流同时访问的资源就是临界资源如向显示器打印进程间通信用的管道共享资源消息队列等。
- 临界区进程中用于访问临界区的代码叫做临界区
- 原子性一件事要么做完要么不做不存在中间状态
- 互斥在人一个时刻只允许一个执行流进入临界资源执行自己的临界区代码。
信号量信号量不是以数据传输为目的通过共享资源的方式来达到多个进程的同步与互斥的目的。其本质是一个计数器表示临界资源中的资源数目通过原子操作P和V来控制信号量的大小即资源数目的使用情况其中的主要方法为二元信号量因此信号量本身也是资源。
具体信号量内容将在后续文章中进行具体介绍。
补充
- 代码将会放到 https://gitee.com/liu-hongtao-1/c–c–review.git 欢迎查看
- 欢迎各位点赞、评论、收藏与关注大家的支持是我更新的动力我会继续不断地分享更多的知识