

Linux (open、write、read、close、lseek、chmod、sync)操作文件的函数详解
| 阿里云国内75折 回扣 微信号:monov8 |
| 阿里云国际,腾讯云国际,低至75折。AWS 93折 免费开户实名账号 代冲值 优惠多多 微信号:monov8 飞机:@monov6 |
目录
7. sync、syncfs、fsync、fdatasync
linux中一切皆文件网络设备除外
硬件设备也“是”文件通过文件来使用设备
目录文件夹也是一种文件
这篇文章将记录open、write、read、close、lseek等Linux系统函数的用法。
补充time 命令
time命令分别输出:
real - 程序总的执行时间
usr - 该程序本身所消耗的时间
sys - 系统调用所消耗的时间.
例
一、文件操作方式
1. 文件描述符 fd
是一个 >= 0 的整数
每打开一个文件就创建一个文件描述符通过文件描述符来操作文件
多次打开同一个文件可得到多个不同的文件描述符。
预定义的文件描述符(具体请看下面 课外补充)
0标准输入(stdin)对应于已打开的标准输入设备键盘
1标准输出(stdout)对应于已打开的标准输出设备控制台
2标准错误(stderr) 对应于已打开的标准错误输出设备控制台
这里可以使用write在控制台输出信息跟printf性质一样例
#include <unistd.h>
#include <stdio.h>
#include <string.h>

int main(void) {

    char buf[1024];

    memset(buf, 0, sizeof(buf));
    read(0, buf, sizeof(buf));     // 标准输入

    printf("%s", buf);             // 输出到控制台

    write(1, buf, sizeof(buf));    // 标准输出到控制台

    write(2, buf, sizeof(buf));    // 标准错误输出到控制台

    return 0;
}
运行结果
ygt@YGT:~/echo_server/test$ gcc demo1.c -o demo1
ygt@YGT:~/echo_server/test$ ./demo1
使用read输入。。。。
使用read输入。。。。
使用read输入。。。。
使用read输入。。。。
ygt@YGT:~/echo_server/test$第一条信息是我们手动输入的因为程序运行后read函数通过 0 这个文件描述符在等待我们输入
第二条输出信息是printf函数输出的
第三条输出信息是write函数通过 1 这个文件描述符输出的
第四条输出信息是write函数通过 2 这个文件描述符输出的。
1 和 2 都是一样输出到控制台就他们的性质不一样而已。
2. 使用底层文件操作系统调用
比如read、write
可使用man 2 查看
将在下面进行讲解
3. 使用I/O库函数
比如fread
可使用man 3 查看
就是C语言的文件操作函数这里不进行讲解
课外补充
我们运行以下程序
#include <unistd.h>

int main(void) {

    char buf[1024] = "0, 1, 2 到底是个什么\n";
    while (1) {
        write(1, buf, sizeof(buf));
        sleep(1);
    }

    return 0;
}
编译运行
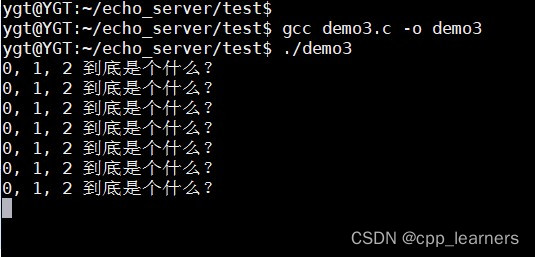
可以看到其每一秒都会向控制台输出一段字符串。
接下来我们重写打开一个终端在终端运行以下命令查看demo3程序的进程号
ps -ef | grep demo3 注意demo3是上面运行的程序名字

可以看到./demo3的程序的进程号是 6893.
然后执行以下命令
ll /proc/6893/fd/
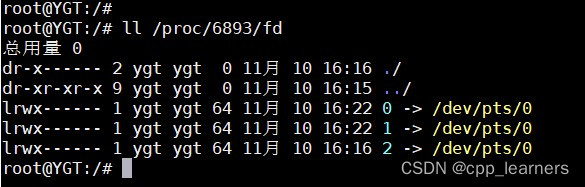
我们通过查看对应程序进程号里的fd文件夹就可以看出Linux系统已经给./demo3这个程序默认创建了三个fd分别是012他们分别对应也就是标准输入标准输出标准出错
所以这也就是为什么我们可以使用 write 和 read 函数和 012 进行输入和输出的操作了。
注意
/proc/6898/ 这个文件夹是Linux系统为程序./demo3临时创建的文件夹当这个程序结束Linux也会随之将他们删除掉。
任何程序已启动Linux系统都会为他们创建一个属于他们自己的对应进程号的文件夹这个进程号是随机的文件夹的名字是对应进程号的。
例
将./demo3这个程序退出后再次运行命令ll /proc/6893/fd/

二、Linux底层文件操作
1. open
#include <sys/types.h>
#include <sys/stat.h>
#include <fcntl.h>
int open (const char *pathname, int flags);
int open (const char *pathname, int flags, mode_t mode);
描述打开指定路径的文件返回一个文件描述符。
pathname
文件路径名
flags
打开文件的方式
mode
设置文件的权限
返回值
成功返回新的文件描述符
失败-1并且设置错误编号 errno 可用( strerror(errno) ) 查看
注意
返回的文件描述符是该进程未打开的最小的文件描述符
(1) 描述
在Linux中使用命令man 2 open
(2) 打开方式
O_RDONLY    只读

O_WRONLY    只写

O_RDWR      读写

O_CREAT     如果文件不存在则创建该文件并使用第3个参数设置权限,如果文件存在 则只打开文件;

O_EXCL      如果同时使用O_CREAT而且该文件又已经存在时则返回错误, 用途以防止多个进程同时创建同一个文件;

O_APPEND    尾部追加方式打开后文件指针指向文件的末尾;

O_TRUNC     若文件存在则长度被截为0属性不变.
例: open("/dev/hello", O_RDONLY|O_CREAT|O_EXCL, 0777)
多个设置可用 “|” 进行分割。
(3) 参数3 (设置权限
当参数2使用了O_CREAT时就得使用参数3
S_I(R/W/X)(USR/GRP/OTH)
S_IRWXU  00700  用户拥有 读 写 执行 权限

S_IRUSR  00400  用户拥有 读 权限

S_IWUSR  00200  用户拥有 写 权限

S_IXUSR  00100  用户拥有 执行 权限

S_IRWXG  00070  同组拥有 读 写 执行 权限

S_IRGRP  00040  同组拥有 读 权限

S_IWGRP  00020  同组拥有 写 权限

S_IXGRP  00010  同组拥有 执行 权限

S_IRWXO  00007  其他人拥有 读 写 执行 权限

S_IROTH  00004  其他人拥有 读 权限

S_IWOTH  00002  其他人拥有 写 权限

S_IXOTH 00001 其他人拥有 执行 权限可以发现读写执行权限是由 读 + 写 + 执行 而得来的
例如用户的 00700是由 00400 + 00200 + 00100 而得来的。
例
S_IRUSR | S_IWUSR 文件的所有者对该文件可读可写
(八进制表示法)00600 文件的所有者对该文件可读可写
多个设置可用 “|” 进行分割。
代码示例
#include <stdio.h>
#include <sys/types.h>
#include <sys/stat.h>
#include <fcntl.h>
#include <string.h>
#include <stdlib.h>
#include <errno.h>

int main(void) {

    int fd = 0;
    char fileName[] = "test.txt";

    // 读写如果文件不存在则创建如果文件存在则报错(O_EXCL)
    // 设置本用户拥有读写执行权限同组用户拥有读写权限其他人拥有读权限
    // fd = open(fileName, O_RDWR|O_CREAT|O_EXCL, 00764); // 可以使用数字代替参数三
    fd = open(fileName, O_RDWR|O_CREAT|O_EXCL, S_IRWXU|S_IRGRP|S_IWGRP|S_IROTH);
    if (-1 == fd) {
        fprintf(stderr, "open %s fail. reason: %s\n", fileName, strerror(errno));
        exit(-1);
    }

    printf("open %s successful!\n", fileName);

    // 关闭文件
    close(fd);

    return 0;
}
运行结果
ygt@YGT:~/echo_server/test$ gcc open.c -o open
ygt@YGT:~/echo_server/test$ ./open
open test.txt successful!

ygt@YGT:~/echo_server/test$ ll
-rwxrwxr-x 1 ygt  ygt  8945 11月 10 16:02 open*
-rw-rw-r-- 1 ygt  ygt   554 11月 10 16:02 open.c
-rwxrw-r-- 1 ygt  ygt     0 11月 10 16:02 test.txt*
可以看出文件已正确运行且test.txt的权限也是正确设置的 -rwxrw-r--.
test.txt 文件已经存在当我们再一次运行 ./open 会怎么样呢

出现报错了报错提示“File exists”文件已经存在了。
因为我们设置了O_EXCL当文件存在时他会进行报错处理
2. write
#include <unistd.h>
ssize_t write (int fd, const void *buf, size_t count);
描述write()从指向buf的缓冲区向文件描述符fd引用的文件写入count个字节。
fd:
文件描述符
buf:
需要写入的数据
count
指定最多写入的大小;
返回值
成功 返回写入的字节数
失败 返回 -1并且设置错误编号 errno 可用( strerror(errno) ) 查看.
描述
在Linux中使用命令man 2 write
注意是从文件的当前指针位置写入文件刚打开时文件的位置指针指向文件头.
代码示例
#include <unistd.h>
#include <string.h>
#include <stdlib.h>
#include <errno.h>
#include <stdio.h>
#include <sys/types.h>
#include <sys/stat.h>
#include <fcntl.h>


#define W_LEN   1024

int main(void) {

    int ret = 0;
    int fd = -1;
    char fileName[] = "test.txt";
    char buf[W_LEN] = "这是要写入的内容Hello write";

    // 打开以文件只写方式打开不懂00764是什么意思上面open介绍
    fd = open(fileName, O_WRONLY|O_CREAT|O_EXCL, 00764);
    if (-1 == fd) {
        fprintf(stderr, "open %s fail. reason: %s\n", fileName, strerror(errno));
        exit(-1);
    }

    // 往文件中写入数据
    ret = write(fd, buf, strlen(buf));
    if(-1 == ret) {
        fprintf(stderr, "write error. reason: %s\n", strerror(errno));
        exit(-2);
    }

    printf("write successful! write lenght: %d\n", ret);

    close(fd);

    return 0;
}
运行结果
ygt@YGT:~/echo_server/test$ gcc write.c -o write
ygt@YGT:~/echo_server/test$ ./write
write successful! write lenght: 41
ygt@YGT:~/echo_server/test$
ygt@YGT:~/echo_server/test$ cat test.txt
这是要写入的内容Hello writeygt @YGT:~/echo_server/test$
ygt@YGT:~/echo_server/test$
3. read
#include <unistd.h>
ssize_t read (int fd, void *buf, size_t count);
描述read()尝试从文件描述符fd上读取数据放入buf中读count字节。
fd:
文件描述符
buf:
存储读取到的数据一般传char *类型或字符数组
count
指定最多读取的大小表示最多能接受的字节数而不是指一定要读取的字节数
返回值
成功 返回读取到的字节数如果返回 0表示文件读完了
失败 返回 -1并且设置错误编号 errno 可用( strerror(errno) ) 查看.
描述
在Linux中使用命令man 2 read
注意是从文件的当前指针位置读取文件刚打开时文件的位置指针指向文件头.
代码示例
#include <unistd.h>
#include <string.h>
#include <stdlib.h>
#include <errno.h>
#include <stdio.h>
#include <sys/types.h>
#include <sys/stat.h>
#include <fcntl.h>


#define R_LEN   1024

int main(void) {

    int ret = 0;
    int fd = -1;
    char fileName[] = "test.txt";
    char buf[R_LEN] = { '\0' };

    // 打开以文件只读方式打开不懂00764是什么意思上面open介绍
    fd = open(fileName, O_RDONLY, 00764);
    if (-1 == fd) {
        fprintf(stderr, "open %s fail. reason: %s\n", fileName, strerror(errno));
        exit(-1);
    }

    // 从文件中读取数据
    ret = read(fd, buf, sizeof(buf));
    if(-1 == ret) {
        fprintf(stderr, "read error. reason: %s\n", strerror(errno));
        exit(-2);
    }

    printf("read successful! read lenght: %d\n", ret);
    printf("%s\n", buf);
    //write(1, buf, strlen(buf));

    close(fd);

    return 0;
}
运行结果
ygt@YGT:~/echo_server/test$ gcc read.c -o read
ygt@YGT:~/echo_server/test$ ./read
read successful! read lenght: 41
这是要写入的内容Hello write
ygt@YGT:~/echo_server/test$
4. close
#include <unistd.h>
int close (int fd);
描述close()关闭一个文件描述符这样它就不再引用任何文件可以被重用。
fd:
文件描述符
返回值
成功 返回 0
失败 返回 -1并且设置错误编号 errno 可用( strerror(errno) ) 查看.
描述
在Linux中使用命令man 2 close
终止指定文件描述符与对应文件之间的关联并释放该文件描述符即该文件描述符可被重新使用.
当出现错误后错误形式有三种
(1). EBADF fd不是有效的打开文件描述符;
(2). EINTR close()调用被一个信号打断;
(3). EIO I/O错误.
代码示例
#include <sys/types.h>
#include <sys/stat.h>
#include <fcntl.h>
#include <string.h>
#include <stdlib.h>
#include <errno.h>
int main(void) {
int ret = -1;
int fd = 0;
char fileName[] = "test.txt";
fd = open(fileName, O_RDWR|O_CREAT, 00764);
if (-1 == fd) {
fprintf(stderr, "open %s fail. reason: %s\n", fileName, strerror(errno));
exit(-1);
}
printf("open %s successful!\n", fileName);
// 关闭文件
ret = close(fd);
if (-1 == ret) {
int err = errno;
fprintf(stderr, "close error. reason: %s\n", strerror(err));
// 错误原因
if (EBADF == err) {
printf("fd不是有效的打开文件描述符\n");
} else if (EINTR == err) {
printf("close()调用被一个信号打断\n");
} else if (EIO == err) {
printf("I/O错误\n");
}
exit(-2);
}
printf("close fd successful!\n");
return 0;
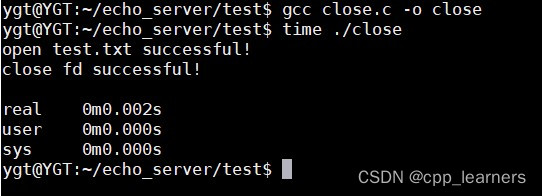
}运行结果
ygt@YGT:~/echo_server/test$ gcc close.c -o close
ygt@YGT:~/echo_server/test$ ./close
open test.txt successful!
close fd successful!
ygt@YGT:~/echo_server/test$
我们模拟将错误的文件描述符传参给close函数
在 ret = close(fd); 这行代码前面加上fd = -1;
然后再运行程序运行结果如下

达到我们的预期
注意
如果在日常的demo中close()之后程序就结束了那么也就无需对close的返回进行判断了因为程序结束后系统会回收所有资源但是如果是在大型项目中close之后还有很多其他操作且文件fd的开销很大时得进行返回值的判断否则有可能会造成不必要的资源浪费。例如报错是EINTR我们可以再一次调用close进行关闭fd
5. lseek
#include <sys/types.h>
#include <unistd.h>
off_t lseek (int fd, off_t offset, int whence);
描述移动文件光标偏移。
fd:
文件描述符
offset:
文件指针(光标)移动的大小往文件头部移动设负数往文件尾部移动设正数
whence:
文件指针(光标)移动的依据
返回值
成功 返回 移动后文件指针的所在位置
失败 返回 -1并且设置错误编号 errno 可用( strerror(errno) ) 查看.
描述
在Linux中使用命令man 2 lseek
移动文件光标指针在文件的位置方便read和write操作
文件指针移动的依据
SEEK_SET 相对于文件头部开始偏移
例移动文件指针(光标)到第100个位置处
sleek(fd, 100, SEEK_SET); // 直接从开头位置往文件尾部移动100即可
SEEK_CUR 从当前位置开始偏移
例文件指针已经再100位置了现在把他移动到80的位置
sleek(fd, -20, SEEK_CUR); // 在文件指针当前位置往文件头部移动-20个位置即可
SEEK_END 相对于文件尾部开始偏移
例文件指针已经再80位置了现在把他移动到倒数第5个位置
sleek(fd, -5, SEEK_END); // 直接在文件尾部往文件头部移动-5个位置即可
代码示例
需求移动文件光标到100的位置然后读取100个字节打印输出。
#include <unistd.h>
#include <string.h>
#include <stdlib.h>
#include <errno.h>
#include <stdio.h>
#include <sys/types.h>
#include <sys/stat.h>
#include <fcntl.h>


#define R_LEN           1024
#define READ_LEN        100

int main(void) {

    int ret = 0;
    int fd = -1;
    char fileName[] = "lseek.c";
    char buf[R_LEN] = { '\0' };

    fd = open(fileName, O_RDONLY);
    if (-1 == fd) {
        fprintf(stderr, "open %s fail. reason: %s\n", fileName, strerror(errno));
        exit(-1);
    }

    // 从文件头部往文件尾部移动100位置
    ret = lseek(fd, 100, SEEK_SET);
    if (-1 == ret) {
        fprintf(stderr, "lseek error. reason: %s\n", strerror(errno));
        exit(-2);
    }

    // 从文件中读取100个字节
    ret = read(fd, buf, READ_LEN);
    if(-1 == ret) {
        fprintf(stderr, "read error. reason: %s\n", strerror(errno));
        exit(-3);
    }

    printf("read successful! read lenght: %d\n", ret);
    printf("%s\n", buf);
    //write(1, buf, strlen(buf));

    close(fd);

    return 0;
}
运行结果
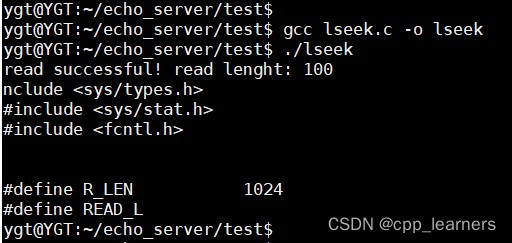
可以通过SEEK_END来获取文件大小
int fileSize = lseek(fd, 0, SEEK_END);6. chmod
#include <sys/stat.h>
int chmod (const char *path, mode_t mode);
int fchmod (int fd, mode_t mode);
描述修改文件的权限。
fd:
文件描述符
path
文件路径名
mode
修改的文件的权限
返回值
成功返回 0
失败-1并且设置错误编号 errno 可用( strerror(errno) ) 查看
(1) 描述
在Linux中使用命令man 2 chmod
当文件已打开那么使用fchmod函数如果文件没打开那么使用chmod函数。
(2) 参数二 mode (修改的权限
S_I(R/W/X)(USR/GRP/OTH)
S_IRWXU  00700  用户拥有 读 写 执行 权限

S_IRUSR  00400  用户拥有 读 权限

S_IWUSR  00200  用户拥有 写 权限

S_IXUSR  00100  用户拥有 执行 权限

S_IRWXG  00070  同组拥有 读 写 执行 权限

S_IRGRP  00040  同组拥有 读 权限

S_IWGRP  00020  同组拥有 写 权限

S_IXGRP  00010  同组拥有 执行 权限

S_IRWXO  00007  其他人拥有 读 写 执行 权限

S_IROTH  00004  其他人拥有 读 权限

S_IWOTH  00002  其他人拥有 写 权限

S_IXOTH 00001 其他人拥有 执行 权限可以发现读写执行权限是由 读 + 写 + 执行 而得来的
例如用户的 00700是由 00400 + 00200 + 00100 而得来的。
例
S_IRUSR | S_IWUSR 文件的所有者对该文件可读可写
(八进制表示法)00600 文件的所有者对该文件可读可写
多个设置可用 “|” 进行分割。
例
新建文件 test.txt, 查看其权限
touch test.txt

可以看到默认的权限是 读写|读|读
即本用户有 读写 权限同组其他用户有 读 的权限其他组用户有 读 的权限。
fchmod将test.txt文件的权限修改为 执行|执行|执行
#include <stdio.h>
#include <sys/types.h>
#include <fcntl.h>
#include <string.h>
#include <stdlib.h>
#include <errno.h>
#include <sys/stat.h>

int main(void) {

    int ret = 0;
    int fd = 0;
    char fileName[1024] = "test.txt";

    //fd = open(fileName, O_RDWR|O_CREAT|O_EXCL, S_IRWXU|S_IRGRP|S_IWGRP|S_IROTH);
    fd = open(fileName, O_RDWR, 00764); // 权限读写执行|读写|读
    if (-1 == fd) {
        fprintf(stderr, "open %s fail. reason: %s\n", fileName, strerror(errno));
        exit(-1);
    }


    // 修改文件权限
    //ret = fchmod(fd, S_IXUSR|S_IXGRP|S_IXOTH);
    ret = fchmod(fd, 00111);    // 修改权限为执行|执行|执行
    if (-1 == ret) {
        fprintf(stderr, "fchmod %s fail. reason: %s\n", fileName, strerror(errno));
        exit(-2);
    }

    printf("fchmod successful!\n");

    close(fd);

    return 0;
}
运行结果
root@YGT:/home/ygt/echo_server/test# gcc fchmod.c -o fchmod
root@YGT:/home/ygt/echo_server/test# ./fchmod
fchmod successful!
root@YGT:/home/ygt/echo_server/test#
root@YGT:/home/ygt/echo_server/test# ll
---x--x--x 1 root root    0 11月 16 12:04 test.txt*
root@YGT:/home/ygt/echo_server/test#
可以看到test.txt文件的权限已经被修改为 执行|执行|执行 了即用户只有 执行 权限同组的用户也只有 执行 权限其他组的用户也只有 执行 权限。
chmod将test.txt文件的权限修改为 读|读|读
#include <stdio.h>
#include <string.h>
#include <stdlib.h>
#include <errno.h>
#include <sys/stat.h>   // chmod

int main(void) {

    int ret = 0;

    // 修改文件权限
    //ret = chmod("test.txt", S_IRUSR|S_IRGRP|S_IROTH);
    ret = chmod("test.txt", 00444);     // 修改权限为读|读|读
    if (-1 == ret) {
        fprintf(stderr, "fchmod %s fail. reason: %s\n", "test.txt", strerror(errno));
        exit(-1);
    }

    printf("fchmod successful!\n");

    return 0;
}
运行结果
root@YGT:/home/ygt/echo_server/test# gcc chmod.c -o chmod
root@YGT:/home/ygt/echo_server/test# ./chmod
fchmod successful!
root@YGT:/home/ygt/echo_server/test#
root@YGT:/home/ygt/echo_server/test# ll
-r--r--r-- 1 root root    0 11月 16 12:04 test.txt
root@YGT:/home/ygt/echo_server/test#
可以看到test.txt文件的权限已经被修改为 读|读|读 了即用户只有 读 权限同组的用户也只有 读 权限其他组的用户也只有 读 权限。
7. sync、syncfs、fsync、fdatasync
Linux同步机制。
简单来讲使用上面介绍的write后或者做其他对文件有修改的操作后需要进行同步将数据从内核缓冲区写入磁盘否则如果断电或系统宕机即使已经调用了write或fwrite函数数据都还没有写入磁盘。
#include <unistd.h>
1. sync
void sync(void);
描述将所有修改过的块缓冲区排入写队列然后就返回它并不等待实际写磁盘操作结束 sync不会执行失败
2. syncfs
int syncfs(int fd);
描述syncfs()类似于sync()但只同步包含由打开的文件描述符fd引用的文件的文件系统。
fd:
文件描述符
返回值
成功 返回 0
失败 返回 -1并且设置错误编号 errno 可用( strerror(errno) ) 查看.
3. fsync
int fsync(int fd); // 推荐使用
描述fsync()将文件描述符fd引用的文件(即修改的缓冲区缓存页)的所有修改的内核数据传输(“刷新”)到磁盘设备(或其他永久存储设备)以便即使在系统崩溃或重新启动后也可以检索所有更改的信息。这包括写入磁盘缓存或刷新磁盘缓存(如果存在的话)。他会一直阻塞直到执行完毕
fd:
文件描述符
返回值
成功 返回 0
失败 返回 -1并且设置错误编号 errno 可用( strerror(errno) ) 查看.
4. fdatasync
int fdatasync(int fd);
描述fdatasync()类似于fsync()但它只影响文件的数据部分。而除数据外fsync还会同步更新文件的属性。
fd:
文件描述符
返回值
成功 返回 0
失败 返回 -1并且设置错误编号 errno 可用( strerror(errno) ) 查看.
使用案例一C语言 I/O
FILE *fp = NULL;
fp = fopen(filename,"rw" );

// 函数int fileno(FILE*stream) 把文件流描述符fp转换为文件描述符fd
int fd = fileno(fp);

char buff[64] = "hello world";
fwrite(buff, sizeof(buff), 1, fp);

fflush(fp);
fsync(fd);
fclose(fp);
使用案例二Linux系统调用
int fd = open(filename, O_RDWR);
char buff[64] = "hello world";

write(fd, buffsizeof(buff));

fsync(fd);
close(fd);
三、 Linux 系统调用
根据我个人的理解系统调用就是调用Linux内核中的函数。
Linux系统中分为 用户空间 和 内核空间
用户空间是我们程序运行所在的空间
例如我们的程序中有个open函数open函数内部会调用函数syscall函数这个函数就会调用系统内部的sys_open函数进入内核空间进行相应操作然后再将相应返回值进行返回
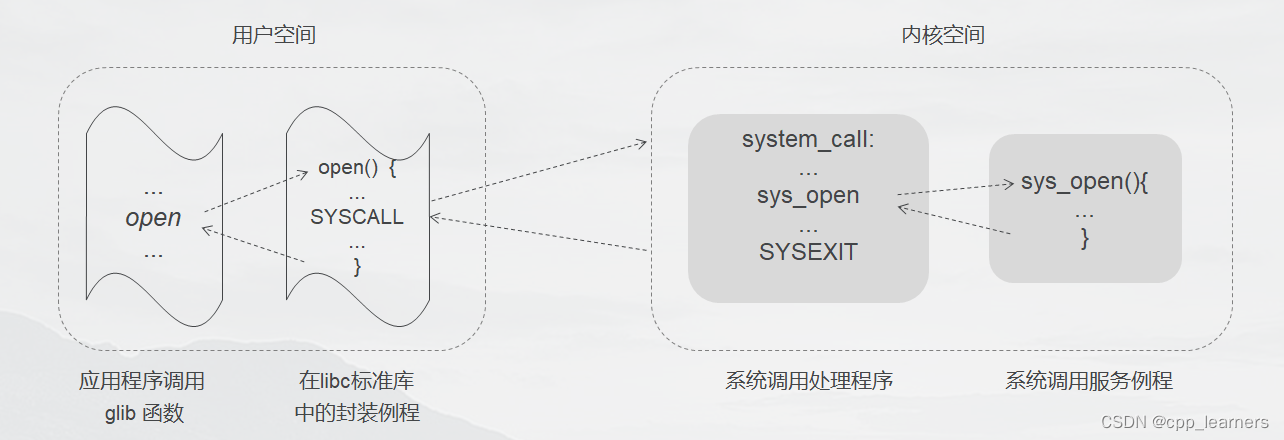
每执行一次上面介绍的open、write、read等函数就是再执行一次系统调用
为什么要有系统调用
1. 举个例子我们所用的硬盘有很多品牌但每个品牌所用的读取写入参数接口函数可能都是不一样的(硬件编码)将用户与底层分离开来用户只需调用read、write等函数即可对所有类型的硬盘做操作
2. 为了安全性。分为用户空间和内核空间用户没法直接对内核空间做操作确保系统的安全性
3. 可移植性。不同平台不同硬件不同Linux系统他们的内核都差不多都会有open、write等函数。
系统调用两个关键要素
1. 系统调用号
每个系统调用被赋予一个系统调用号与具体的系统调用相关联。

2. 系统调用表
内核维护系统调用表保存系统调用函数的起始地址系统调用号对应系统调用在调用表中的偏移量。

系统调用会影响效率嘛
会频繁使用底层系统调用会影响程序的执行效率。
因为频繁的从用户空间去到内核空间去访问然后再返回到用户空间去继续执行会有消耗。
例
两个程序写一个1G的文件定义数组buf大小为2048和16循环每次往数组写入2048和16字节大小比较两次所耗费的时间。
#define W_LEN 16
#define W_LEN 2048
循环次数
一个程序写入次数1024*1024*1000 / 16 == 65,536,000 次
一个程序写入次数1024*1024*1000 / 2048 == 512,000 次
#include <stdio.h>
#include <sys/types.h>
#include <sys/stat.h>
#include <fcntl.h>


//#define W_LEN           16
#define W_LEN           2048
#define FILE_SIZE       (1024*1024*1000)

int main(void) {

    int ret = 0;
    int fd = -1;
    char fileName[] = "test.txt";
    char buf[W_LEN];


    // 打开以文件只写方式打开不懂00764是什么意思上面open介绍
    fd = open(fileName, O_WRONLY|O_CREAT|O_EXCL, 00764);
    if (-1 == fd) {
        fprintf(stderr, "open %s fail. reason: %s\n", fileName, strerror(errno));
        exit(-1);
    }

    memset(buf, '6', sizeof(buf));

    int count = FILE_SIZE / sizeof(buf);    // 次数
    int i = 0;
    for (; i < count; i++) {
        // 往文件中写入数据
        ret = write(fd, buf, strlen(buf));
        if(-1 == ret) {
            fprintf(stderr, "write error. reason: %s\n", strerror(errno));
            exit(-2);
        }
    }

    printf("write successful!\n");

    close(fd);

    return 0;
}
运行程序通过上面所介绍的使用time参数去显示程序运行所耗费的时间
gcc systemCall_2048.c -o systemCall_2048      // #define W_LEN    2048

gcc systemCall_2048.c -o systemCall_16        // #define W_LEN    16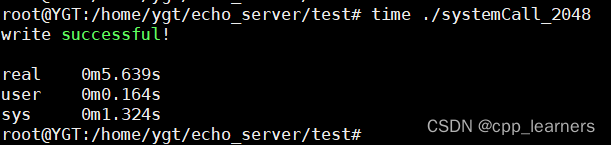
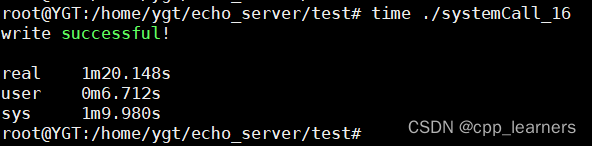
可以看出系统调用执行的次数越多所耗费的时间就越长所以以此证明多次执行系统调用是会耗费资源的。
那如何解决这样的问题呢
尽可能少调用系统接口能一次搞定的避免多次
另外网上说如果多调用GLIBC库 和 GLIB库
反正不会的话就直接用C语言的 I/O 文件操作函数即可即fopen、fwrite、fread等这类函数
四、总结
Linux操作文件的函数已经介绍完毕。
我们学会的同时也要注意系统调用带来的后果只要有了这方面的意识在写C/C++代码时就会注意到就不会写出效率慢的代码。