

思科路由器基本配置
| 阿里云国内75折 回扣 微信号:monov8 |
| 阿里云国际,腾讯云国际,低至75折。AWS 93折 免费开户实名账号 代冲值 优惠多多 微信号:monov8 飞机:@monov6 |
CSDN话题挑战赛第2期![]() https://marketing.csdn.net/p/7b6697fd9dd3795a268d1a6f2fe75012
https://marketing.csdn.net/p/7b6697fd9dd3795a268d1a6f2fe75012
参赛话题学习笔记![]() https://activity.csdn.net/creatActivity?id=10213
https://activity.csdn.net/creatActivity?id=10213
目录
*简写命令是在命令唯一的前提下才行
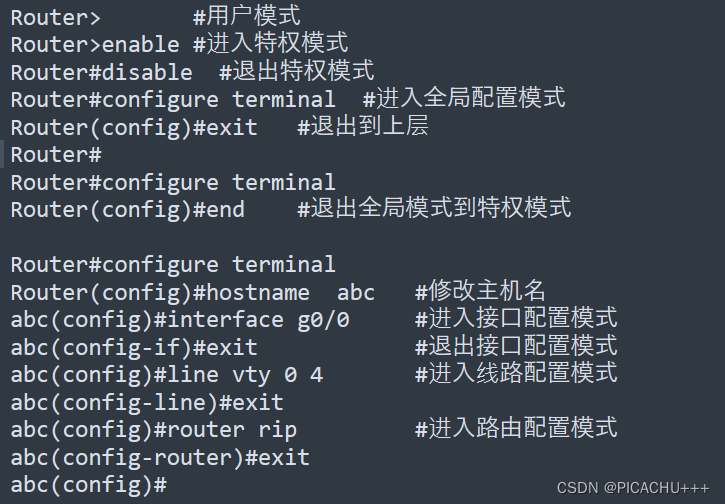
一、用户模式
(user mode) ">"

可以做一些简单的查询
二、特权模式
privilgede mode) "#"

进入方法在用户模式下输入enable(en)即可进入disable(dis)即可退出![]()

三、全局模式 (global config mode)
"router(config)#"

在特权模式下输入config t即可进入
四、子模式 (sub-mode)
1接口模式interface mode)
router(config-if)#
2线路模式 (line mode)
routerconfig-line)#
3路由模式router mode)
router(config-router)#
五、Setup模式*
在控制台提供了交互式的对话帮助新的用户创建初次的基本配置。
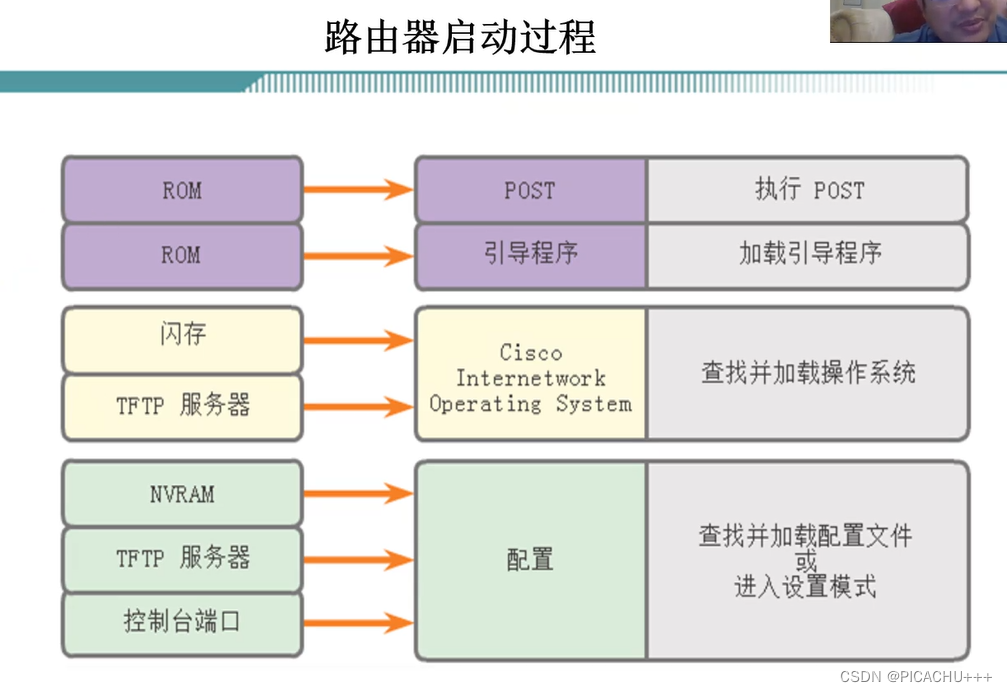
六、ROMMON模式*
可以用来恢复密码和升级IOS
七、Router工作模式转换实例

八、配置命令
1.命名路由器
Router(config)#hostname 名字2.设置enable密码
先用conf t进入全局模式配置完成之后exit退出可用show running查看配置文件

R1(config)#enable password cisco

R1#Show run

enable password cisco明文未加密

R1#(config)#enable secret cisco

R1#Show run

enable secret 5 $1$emBK$WxqLahy7YO(密码被加密)
3.配置控制台密码
R1(config)#line console 0

R1(config-line)#password cisco

R1(config-line)#login
4.配置VTY密码
R1(config)#line vty 0 4 0 4:允许5个终端同时远程登录

R1(config-line)#password cisco

R1(config-line)#login

R1(config-line)#privilege level 15配置登录权限默认1,15表示直接进图特权模式

R1(config -line)#transport input ssh telnet配置远程登录方式为ssh何telnetssh更安全)
5.启用SSH
配置enable密码

SSH-S(config)#enable password 1234567

1更改路由器名字配置IP域名

Router(config)#hostname SSH-S

SSH-S(config)#ip domain-name Test.com

2生成单向密钥

SSH-S(config)#crypto key generate rsa general-keys modulus 2048

3检验或创建本地数据库条目

SSH-S(config)#username ABC secret qq1234we!

4启用VTY入站SSH会话

SSH-S(config)#line vty 0 4

SSH-S(config-line)#login local

SSH-S(config-line)#transport input ssh

SSH-S(config-line)#exit

SSH-S(config)#inter g0/0

SSH-S(config-if)#ip address 192.168.11.1 255.255.255.0

SSH-S(config-if)#no shutdown
6.配置串行口
R1 # config t
R1(config)# interface s0/0/0 (进入串行口模式)
R1(config-if)# clock rate 64000 (DCE端配置时钟)
R1(config-if)# ip address 192.168.100.1 255.255.255.0(配置接口IP地址和网络掩码)
R1(config-if)# no shut (开启接口)
R1(config-if)# description connect to R2 (配置接口描述)
7.配置以太口
R1# config t

R1(config)# interface g0/0 进入以太口模式

R1(config-if)# ip address 10.1.1.1 255.255.255.0配置接口IP地址和网络掩码

R1(config-if)# no shut 开启接口

R1(config-if)# description LAN Engineering, Bldg.2配置接口描述
九、整体配置命令的切换
实践telnet服务配置

1.在路由器上完成1接口IP地址配置
2enable密码配置 明文 123456
3配置Telnet服务
4配置路由器hostname 为自己名字拼音
2.在pc上 1配置IP地址
2用Telnet测试路由的Telnet服务
首先配置路由器的IP地址与子网掩码
enable
conf t #进入全局模式
interface g0/0 #进入串行接口模式
ip address 172.16.111.1 255.255.0.0 #配置路由器IP地址和子网掩码
no shutdown #激活接口路由器接口默认关闭
然后配置路由器telnet服务
在interface g0/0所在的config-if模式下输入
line vty 0 4 #进入vty模式
password 1111 #配置vty密码
no login #配置登录检查
enable password 123456 #配置路由器特权口令
最后检查双方的IP地址是否正确然后进入PC端的终端输入
telnet 172.16.111.1路由器的IP地址
出现try 172.16.111.1...open及配置成功可以在PC终端中操作路由器配置命令。
十、配置登录提示信息
Router(config)#banner motd #提示信息#
十一、解决命令输错后的域名查找
快捷键ctrl+shift+6
命令全局模式下输入in ip domain-lookup
是路由器不适用DNS服务器解析主机的IP地址
十二、show命令

十三、保存、删除、查看配置文件
1.保存配置文件
copy running-config startup-config
Write
2.删除配置文件
erase nvram
erase startup-config
3.查看配置文件
show startup-config
show running-config