

将Bean创建到Spring容器,从Spring容器拿出Bean
| 阿里云国内75折 回扣 微信号:monov8 |
| 阿里云国际,腾讯云国际,低至75折。AWS 93折 免费开户实名账号 代冲值 优惠多多 微信号:monov8 飞机:@monov6 |
目录
一、XML文件中将Bean创建到Spring容器
1. 基本类型注册
@Data
@NoArgsConstructor
@AllArgsConstructor
public class Student{
	private String name;
	private Address address;
	private String[] books;
	private List<String> hobbys;
	private Map<String String> card;
	private Set<String> games;
	private String wife;
	private Properties info;
}
<bean id="student" class="com.kuang.pojo.Student">
	<!--1. 普通注入-->
	<property name="name" value="狂神说"/>

	<!--2. 数组注入-->
	<property name="books">
		<array>
			<value>红楼梦</value>
			<value>西游记</value>
			<value>水浒传</value>
		</array>
	</property>

	<!--3. List注入-->
	<property name="hobbys">
		<list>
			<value>看书</value>
			<value>听歌</value>
			<value>打球</value>
		</list>
	</property>

	<!--4. Map注入-->
	<property name="card">
		<map>
			<entry key=“身份证” value=“12315454512312”/>
			<entry key=“银行卡” value=“15465415123156”/>
		</map>
	</property>

	<!--5. 数组注入-->
	<property name="games">
		<set>
			<value>红楼梦</value>
			<value>西游记</value>
			<value>水浒传</value>
		</set>
	</property>

	<!--6. 空值注入-->
	<property name="wife">
		<null/>
	</property>

	<!--7. Properties注入-->
	<property name="info">
		<props>
			<prop key="driver">20190525</prop>
			<prop key="url">男/prop>
			<prop key="username">root</prop>
			<prop key="password">123456</prop>
		</props>
	</property>
</bean>
2. 类装配
<!--1. 类装配-->
	<!--csBean类有两个属性title和author-->
    <bean name="cdBean" class="com.my.spring.bean.CDBean">
        <property name="title" value="The World!!"/>
        <property name="author" value="Mr.D"/>
    </bean>
     <!--csPlayer类有一个属性cdBean-->
     <!--对csPlayer的属性csBean进行依赖注入称为Bean装配或者依赖关系注入-->
    <bean name="cdPlayer" class="com.my.spring.service.impl.CDPlayerImpl">
        <property name="cdBean" ref="cdBean"/>
    </bean>
3. 有参构造方法装配
<!--2. 有参构造方法1-->
    <bean id="hello" class="com.kuang.pojo.Hello">
        <constructor-arg index="0" value="方法1"/>
    </bean>
<!--3. 有参构造方法2-->
    <bean id="hello" class="com.kuang.pojo.Hello">
        <constructor-arg type="java.lang.String" value="方法2"/>
    </bean>
<!--4. 有参构造方法3-->
    <bean id="hello" class="com.kuang.pojo.Hello">
        <constructor-arg name="name" value="方法3"/>
    </bean>
4. 扩展注入
- p命名空间注入
1. 先在beans框架中加入支持xmlns:p="http://www/springframework.org/schema/p"
<!--p命名空间注入可以直接注入属性的值property-->
<bean id="user" class="com.kuang.pojo.User" p:name="小李" p:age="10"/>
- c命名空间注入
1. 先在beans框架中加入支持xmlns:c="http://www/springframework.org/schema/c"
2. 其次使用c注入的Bean必须存在有参构造器
<!--c命名空间注入通过构造器注入construct-args-->
<bean id="user" class="com.kuang.pojo.User" c:name="小李" c:age="10"/>
5. Bean的作用域
- 单例模式Spring默认机制从Spring容器中get的每个对象都是同一个对象。
<bean id="user" class="com.kuang.pojo.User" scope="singleton"/>
ApplicationContext context = new ClassPathXmlApplicationContext("userbeans.xml");
User user1 = context.getBean("user");
User user2 = context.getBean("user");
System.out.println(user1==user2);	//true
- 原型模式每次从容器中get的时候都会产生一个新对象
<bean id="user" class="com.kuang.pojo.User" scope="prototype"/>
ApplicationContext context = new ClassPathXmlApplicationContext("userbeans.xml");
User user1 = context.getBean("user");
User user2 = context.getBean("user");
System.out.println(user1==user2);	//false
6. Bean的其他配置
6.1. 别名
<!--别名如果添加了别名我们可以使用别名获取这个对象-->
<alias name="user" alias="userNew">

<!--
	idbean的唯一标识符也就是相当于我们学的对象名
	classbean对象所对应的全限定名包名+类型
	name也是别名而且那么可以同时取多个别名
-->
	<bean id="user" class="com.kuang.pojo.user" name="user1,user2,user3">
	<property name="name" value="狂神说"/>
	</bean>
6.2 Import一般用于团队开发使用他可以将多个配置文件导入合并为一个
注意如果导入的文件中bean重名了那么就会把重名的bean合并成一个所以不会因为不同的bean.xml存在重名而发生冲突
<import resource="beans1.xml"/>
<import resource="beans2.xml"/>
<import resource="beans3.xml"/>
二、配置类中将Bean创建到Spring容器
1. 在mapper、service、controller中创建等着被componentScan扫描到Spring容器中
/*
	在Spring容器中创建一个bean
	<bean id="orderService" class="com.kuang.Service.OrderService">
*/
@Component
public class OrderService{
}
2. 在JavaConfig配置类中创建Bean
/*
	在Spring容器中创建一个bean
	<bean id="orderService1" class="com.kuang.Service.OrderService">
*/
@Configuration
@ComponentScan
public class AppConfig{
	@Bean
	public OrderService orderService1(){
		return new OrderService();
	}
}
三、Spring的三种装配机制XML、JavaConfig、自动装配
1. 在xml中显式装配
<!--1. 类装配-->
	<!--csBean类有两个属性title和author-->
    <bean name="cdBean" class="com.my.spring.bean.CDBean">
        <property name="title" value="The World!!"/>
        <property name="author" value="Mr.D"/>
    </bean>
     <!--csPlayer类有一个属性cdBean-->
     <!--对csPlayer的属性csBean进行依赖注入称为Bean装配或者依赖关系注入-->
    <bean name="cdPlayer" class="com.my.spring.service.impl.CDPlayerImpl">
        <property name="cdBean" ref="cdBean"/>
    </bean>
2. 在JavaConfig配置类中显式装配
- 实体类
@Component
public class User {
    private String name;
    public String getName() {
        return name;
    }
    @Value("黑心白莲") //属性注入值
    public void setName(String name) {
        this.name = name;
    }
    @Override
    public String toString() {
        return "User{" +
                "name='" + name + '\'' +
                '}';
    }
}
- 配置类
// @Configuration代表这是一个配置类就和我们之前看的beans.xml
@Configuration
@ComponentScan
public class KuangConfig {
    /*
    	@bean == bean标签
    	方法名字 == bean标签中id属性
    	方法返回值 == bean标签中的class属性
	*/
    @Bean
    public User user(){
        return new User();
    }
}
- 测试类
public class MyTest {
    public static void main(String[] args) {
        //如果完全使用了配置类方式去做我们就只能通过 AnnotationConfig 上下文来获取容器通过配置类的class对象加载
        ApplicationContext context = new AnnotationConfigApplicationContext(KuangConfig.class);
        User user = context.getBean("user", User.class);
        System.out.println(user.getName());
    }
}
3. 自动装配
3.1 xml方式自动装配
byName: 会自动在容器上下文查找和自己对象set方法后面的值对应的bean id通过id匹配
//实体类
@Data
public class Pepole {
    private String name;
    private Books books;
    private Hobbies hobbies;
    <bean id="books" class="com.lmy.pojo.Books"/>
    <bean id="hobbies" class="com.lmy.pojo.Hobbies"/>

    <bean id="pepole" class="com.lmy.pojo.Pepole" autowire="byName">
        <property name="name" value="zhangSan"/>
    </bean>
byType会自动在容器上下文中查找和自己对象属性类型相同的bean通过class匹配
注意使用autowire byType首先需要保证同一类型的bean对象在spring容器中唯一。如果不唯一会报不唯一的异常。
    <bean id="books" class="com.lmy.pojo.Books"/>
    <bean id="hobbies" class="com.lmy.pojo.Hobbies"/>

    <bean id="pepole" class="com.lmy.pojo.Pepole" autowire="byType">
        <property name="name" value="zhangSan"/>
    </bean>
3.1 使用注解自动装配
注解开发注意事项
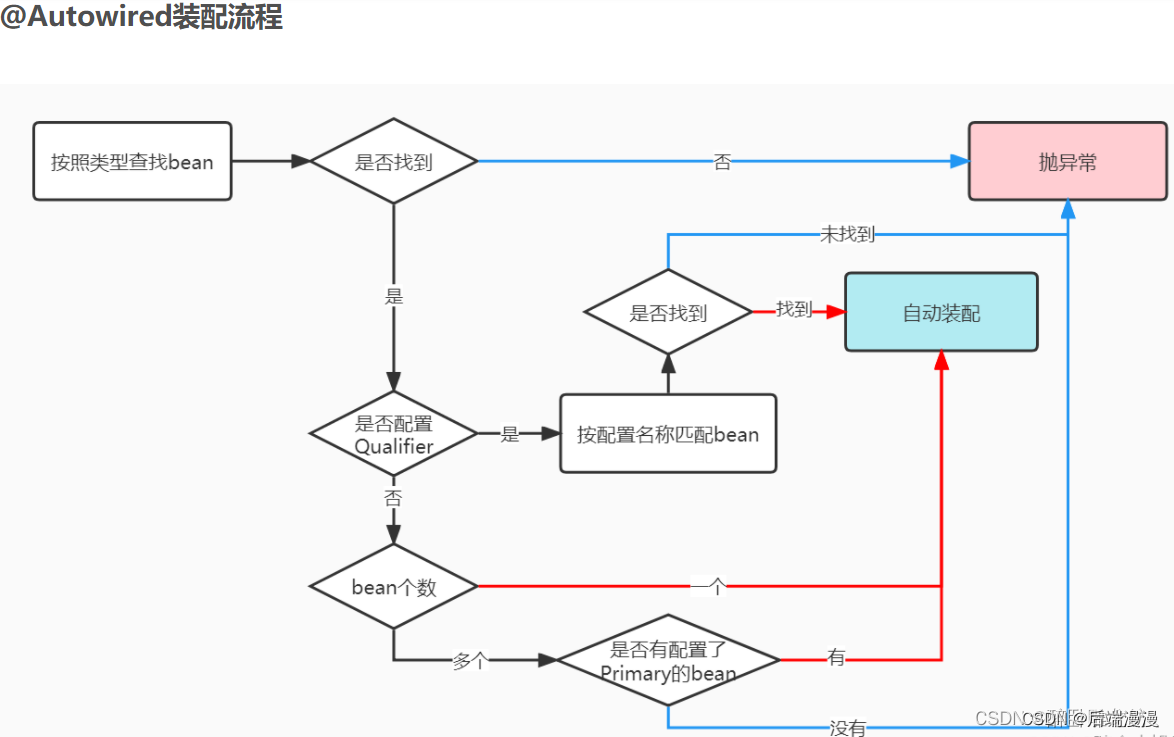
@Autowied装配方式
按类型装配默认使用的装配方式。
按名称装配结合@Qualifier注解使用。
public class Pepole {
    private String name;
//1. 通过名字装配
    @Autowired
    @Qualifier("books1")
    private Books books;
//2. 通过类型装配
    @Autowired
    private Hobbies hobbies;
}
	<!--开启属性注解支持-->
    <context:annotation-config/>

    <bean id="books2" class="com.lmy.pojo.Books"/>
    <bean id="books1" class="com.lmy.pojo.Books"/>
    <bean id="hobbies" class="com.lmy.pojo.Hobbies"/>
    <bean id="pepole" class="com.lmy.pojo.Pepole"/>
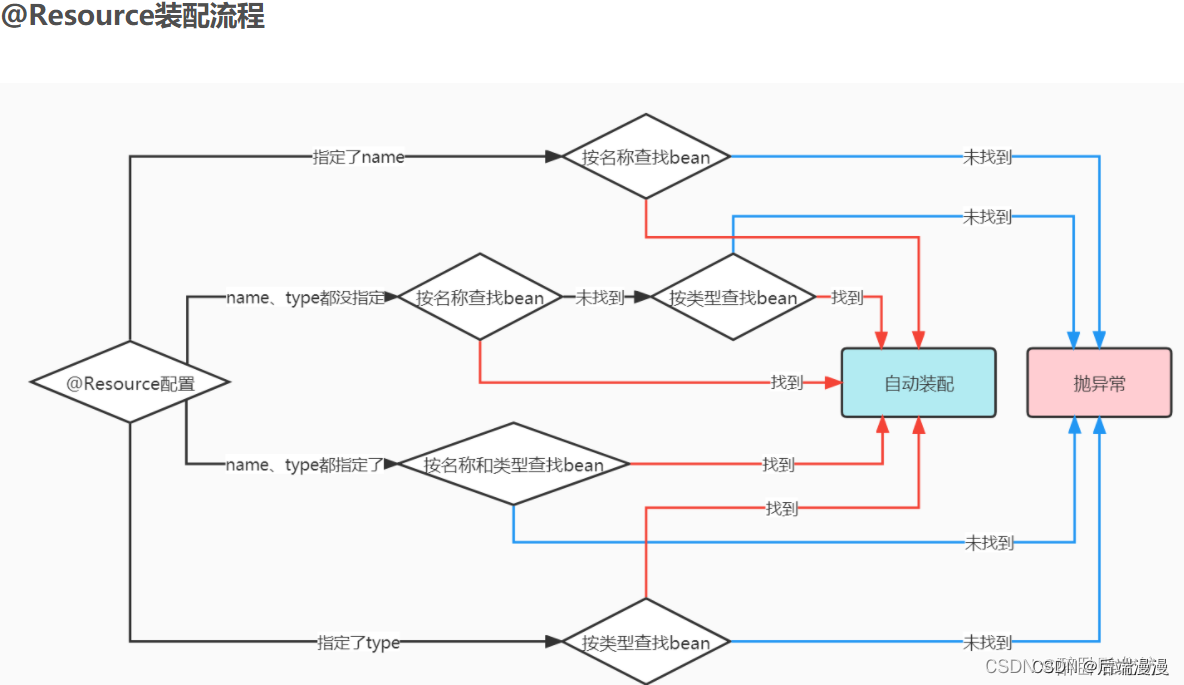
@Resource装配方式
@Resource指定按type自动装配
    @Resource(type = Books.class)
    private Books books;
@Resource指定按name自动装配
    @Resource(name = "books")
    private Books books;
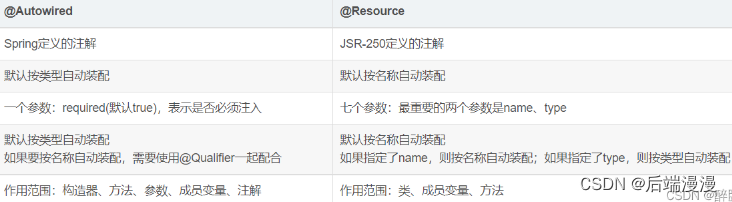
@Autowired与@Resource区别
四、Bean创建的原理
这段代码中@mapper实际上执行了Spring创建Bean对象并放入Spring容器的过程
@mapper
public class UserService{
	@Autowired
	private OrderService orderService;
	public void test(){
		System.out.println(orderService);
	}
}
- UserService实例化无参构造方法生成普通对象
- 对普通对象依赖注入- - - - - - - - - - - - - - - - - - - - - - - - - - - - - - - - - - - - - - -【根据@Autowired判断是否对属性注入依赖】
- 初始化- - - - - - - - - - - - - - - - - - - - - - - - - - - - - - - - - - - - - - - - - - - - - - - - -【执行所有方法】
- 初始化后AOP生成代理对象 - - - - - - - - - - - - - - - - - - - - - - - - - - - - -【切面编程】
- 将普通对象或者代理对象放入Map<beanNameBean对象>单例池 -【即注册Bean对象】
1. UserService实例化生成普通对象
这里的UserService实例化可不是说让你自己在main()方法里面手动做一个UserService userService的实例化。而是说你在public class UserService“头顶”上加了注解@Mapper的时候Spring“背地里”进行了第一步将UserService实例化了
2. 使用@Autowired对普通对象的属性进行依赖注入
- 在UserService对象中有一个属性OrderServiceSpring也对该属性进行了实例化OrderService orderService。但是实例化出来的普通对象orderService是没有值的通过@Autowired的依赖注入向普通对象orderService注入普通对象orderService就有了值
3. 初始化执行UserService中的所有方法
//初始化执行UserService中的所有方法全都成功后才能将Bean对象创建并放入Map
if (userService instanceof InitializingBean){
	((InitializingBean) userService).afterPropertiesSet();
}
为什么要执行初始化这个步骤呢换句话说为什么要执行所有方法呢
//1. 通过执行方法来为创建的实例的属性admin注入值为xxx
@Override
public void afterPropertiesSet() throws Exception{
	this.admin = "xxx";
}

//2. 通过执行方法来检验创建的实例是否满足
public void afterPropertiesSet() throws Exception{
	if(sqlSession == null){
		throw new NullPointerException();
	}
}

/*
3. 个人项目经历每个属性都要get/set方法若是缺失了某个属性的get/set方法
Spring启动就会报错这也说明了初始化执行了Bean对象的所有方法
*/
4. 初始化后AOP创建代理对象
AOP就是对注入依赖后的普通对象进行切面编程从而生成代理对象。至于什么是切面编程AOP读者就自行搜索一下吧因为我也只是一知半解。
5. 将普通对象或者代理对象放入Map<beanNameBean对象>
- 我们先看到回到上面Spring创建Bean对象的过程会发现有普通对象和代理对象。两者的区别大家可以认为是普通对象经过了“加工”变成了更多功能的代理对象。
- 现在我们要将普通对象或者代理对象放入Map并将代理对象放入Map<beanNameBean对象>中。
- 如果没有进行AOP生成代理对象那么这时候就是将普通对象放入Map中普通对象成为Bean对象如果进行了AOP生成代理对象那么这时候就是将代理对象放入Map中代理对象成为Bean对象
- 将普通对象或者代理对象放入Map这个动作完成了才是真正意义上生成了Bean对象也就是注册了Bean
五、创建Bean过程中推断所使用的构造方法
情形1. 没有写出构造器默认存在一个无参构造器
@Service
public class UserService{
	private OrderService orderService;
	public void test(){				//初始化会自动执行全部方法所以test方法会被自动执行
		System.out.println(orderService);
	}
}
执行UserService userService = (UserService) applicationContext.getBean(“UserService”);
输出null
情形2. 写一个有参构造器那么构造器就只有这个有参构造器
@Service
public class UserService{
	private OrderService orderService;
	public UserService(OrderService orderService){
		this.orderService = orderService;
		System.out.println(1);
	}
	public void test(){
		System.out.println(orderService);
	}
}
执行UserService userService = (UserService) applicationContext.getBean(“UserService”);
输出1、#{orderService指针编号}
情形3. 写一个无参构造器和一个有参构造器那么就存在两个构造器
@Service
public class UserService{
	private OrderService orderService;
	public UserService(){
		System.out.println(0);
	}
	public UserService(OrderService orderService){
		this.orderService = orderService;
		System.out.println(1);
	}
	public void test(){
		System.out.println(orderService);
	}
}
执行UserService userService = (UserService) applicationContext.getBean(“UserService”);
输出0、null
情形4. 编写一个有参构造器那么就存在一个有参构造器
@Service
public class UserService{
	private OrderService orderService;
	public UserService(OrderService orderService1,OrderService orderService2){
		this.orderService = orderService;
		System.out.println(2);
	}
	public void test(){
		System.out.println(orderService);
	}
}
执行UserService userService = (UserService) applicationContext.getBean(“UserService”);
输出2、#{orderService指针编号}
情形5. 编写如下两个有参构造器
@Service
public class UserService{
	private OrderService orderService;
	public UserService(OrderService orderService){
		this.orderService = orderService;
		System.out.println(1);
	}
	public UserService(OrderService orderService1,OrderService orderService2){
		this.orderService = orderService;
		System.out.println(2);
	}
	public void test(){
		System.out.println(orderService);
	}
}
执行UserService userService = (UserService) applicationContext.getBean(“UserService”);
报错Caused bycom.zhouyu.service.UserService.< init >()
总结
- 如果没有重写构造方法那么创建Bean对象就会用无参构造方法
- 如果重写了一个有参构造方法那么创建Bean对象就会用该有参构造方法
- 如果重写了两个有参构造方法那么创建Bean对象不知道用哪个有参构造方法就会去寻找无参构造方法如果没有无参构造方法就报错。如果存在无参构造方法就执行无参构造方法。
情形6. 那么有没有办法使用指定的构造方法通过@Autowired实现
@Service
public class UserService{
	private OrderService orderService;

	@Autowired		//指定使用该构造方法即使存在无参构造器也要使用这个有参构造器
	public UserService(OrderService orderService){
		this.orderService = orderService;
		System.out.println(1);
	}
	public UserService(OrderService orderService1,OrderService orderService2){
		this.orderService = orderService;
		System.out.println(2);
	}
	public void test(){
		System.out.println(orderService);
	}
}
执行UserService userService = (UserService) applicationContext.getBean(“UserService”);
输出1、#{orderService指针编号}
7. 谁向有参构造器public UserService(OrderService orderService)中传入参数
- 当我们创建Bean对象userService时需要用到有参构造方法Spring就会在Map中寻找Bean对象OrderService并且注入到构造方法的参数orderService中。
- 如果将@Component去掉那么OrderService就无法成为Bean对象那么Spring也拿不出Bean对象来传给UserService的有参构造方法的参数orderService那么orderService就为空。但是Spring规定了不能向有参构造方法的参数传null。所以这种情况运行就会出现报错No qualifying bean of type ‘com.zhouyu.service.OrderService’
8. Spring怎样从Map<beanNameBean对象>中找到合适的Bean对象传入有参构造器的参数中
- 如果通过参数的类OrderService找出beanName唯一那就直接将Bean对象注入orderService。
- 如果通过参数的类OrderService找出beanName不唯一那就通过参数名orderService找出唯一的beanName然后将Bean对象注入orderService参数
- 如果这样都找不到那就报错
- 如下这三个orderServiceorderService1orderService2分别是可选的beanName将构造器public UserService(OrderService orderService)的参数orderService改成上述之一即可不报错expected single matching bean but found 3orderServiceorderService1orderService2
//1. 注册了一个类型为OrderService名字为orderService的Bean
public class OrderService{
}

//2. 注册了一个类型为OrderService名字为orderService1的Bean
public class AppConfig{
	@Bean
	public OrderService orderService1(){
	}
}
9. 循环依赖
@Component
public class OrderService{
	private UserService userService;
	public OrderService(UserService userService){
		this.userService = userService;
	}
}
@Service
public class UserService{
	private OrderService orderService;
	public UserService(OrderService orderService){
		this.orderService = orderService;
	}
}
报错Is there an unresolvable circular reference
我们来看一下过程当我要将UserService创建为Bean对象时那么就需要传入OrderService的Bean对象给orderService。那么OrderService要提前被Spring创建为Bean对象是不是那我们看看OrderService要提前被Spring创建为Bean对象也是用到有参构造器需要传入UserService的Bean对象那么UserService要提前被Spring创建为Bean对象…这样就陷入了循环了circular reference
六、依赖注入
先根据类型type再根据id
- 为Spring容器中注册以下两个类
/*
	在Spring容器中创建一个bean
	<bean id="orderService1" class="com.kuang.Service.OrderService">
	<bean id="orderService2" class="com.kuang.Service.OrderService">

*/
@Configuration
@ComponentScan
public class AppConfig{
	@Bean
	public OrderService orderService1(){
		return new OrderService();
	}
	@Bean
	public OrderService orderService2(){
		return new OrderService();
	}

}
- 从Spring容器中取出Bean
public class UserService{
	//1. 属性注入先根据OrderService类名再根据orderService1参数名寻找BeanName
	@Autowired
	private OrderService orderService1;

	//2. set方法注入先根据OrderService类名再根据orderService参数名寻找BeanName
	@Autowired
	public void setOrderService(OrderService orderService1){
		this.orderService1 = orderService1;
	}

	//3. 有参构造器方法注入先根据OrderService类名再根据orderService参数名寻找BeanName
	public UserService(OrderService orderService1){
		this.orderService = orderService1;
	}
}