Ubuntu18 sqlyog配置mysql5.7远程连接
| 阿里云国内75折 回扣 微信号:monov8 |
| 阿里云国际,腾讯云国际,低至75折。AWS 93折 免费开户实名账号 代冲值 优惠多多 微信号:monov8 飞机:@monov6 |
mysql 配置远程连接
1. mysql安装和配置
sudo apt-get install mysql-server-5.7
systemctl status mysql
service mysql status
修改mysql的配置文件
sudo vim /etc/mysql/mysql.conf.d/mysqld.cnf
以下为mysqld.cnf文件主要内容这里的skip-grant-tables 用于跳过验证直接登录
如果是设置default_authentication_plugin=mysql_native_password则必须在登录时存在密码
bind-address = 0.0.0.0这个值如果设置为0.0.0.0则是设置了支持外部连接也就是使用其静态IP如果设置为127.0.0.1则只能由本地连接。
[mysqld_safe]
socket		= /var/run/mysqld/mysqld.sock
nice		= 0

[mysqld]
#
# * Basic Settings
#
default_authentication_plugin=mysql_native_password
user		= mysql
pid-file	= /var/run/mysqld/mysqld.pid
socket		= /var/run/mysqld/mysqld.sock
port		= 3306
basedir		= /usr
datadir		= /var/lib/mysql
tmpdir		= /tmp
lc-messages-dir	= /usr/share/mysql
skip-external-locking
#skip-grant-tables

bind-address		= 0.0.0.0

#
# * Fine Tuning
#
key_buffer_size		= 16M
max_allowed_packet	= 16M
thread_stack		= 192K
thread_cache_size       = 8
# This replaces the startup script and checks MyISAM tables if needed
# the first time they are touched
myisam-recover-options  = BACKUP
#max_connections        = 100
#table_open_cache       = 64
#thread_concurrency     = 10
#
# * Query Cache Configuration
#
query_cache_limit	= 1M
query_cache_size        = 16M

log_error = /var/log/mysql/error.log

expire_logs_days	= 10
max_binlog_size   = 100M
2. mysql设置跳过验证
- 删除skip-grant-tables 前面的#并且注释掉default_authentication_plugin=mysql_native_password然后通过“systemctl restart mysql 用于跳过验证直接登录,
3. mysql修改密码和配置IP
在mysql5.7修改密码的方式为
执行2中的跳过验证直接登录root
mysql -u root -p
# 无需输入密码
mysql>use mysql
mysql> update user set authentication_string=password("123456") ,plugin='mysql_native_password' where user='root';
# 其中的plugin='mysql_native_password'设置了激活root的密码并且设置为123456
mysql> flush privileges;
mysql>exit
systemctl restart mysql
# 修改mysql.cnf文件内容改回不跳过输入密码
# skip-grant-tables
systemctl restart mysql
# 重启后执行
mysql -u root -p
此时会提示输入密码输入123456后正常登录输入其他无法登录
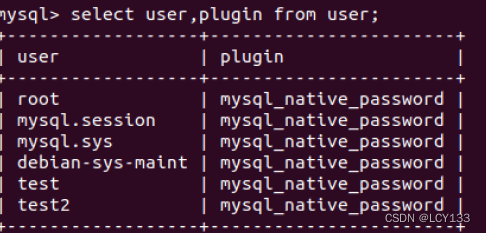
- 检查当前用户名情况select user,plugin from user;
在之前版本设置密码方式为
UPDATE user SET Password = PASSWORD('newpassword') WHERE user = 'root';
# 在mysql5.7中因为没有password 字段所以会报错
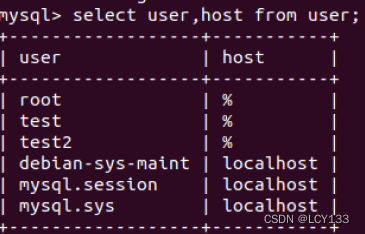
- 查看user 和允许连接的IP
mysql>select user,host from user;
host处如果为localhost时只允许本地使用改成 % 即可远程使用
update user set host='%' where user='root';
# 查看
select user,host from user;
4. 远程连接mysql
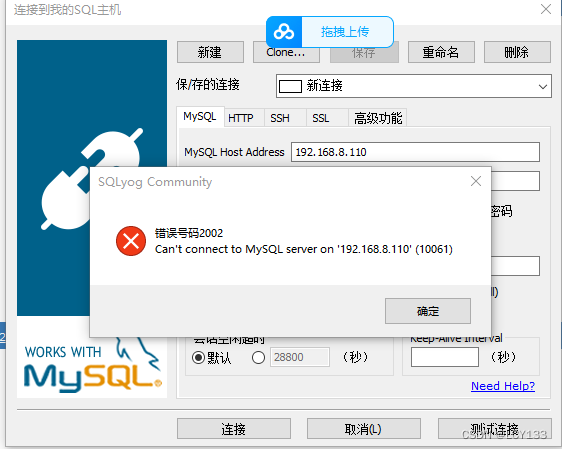
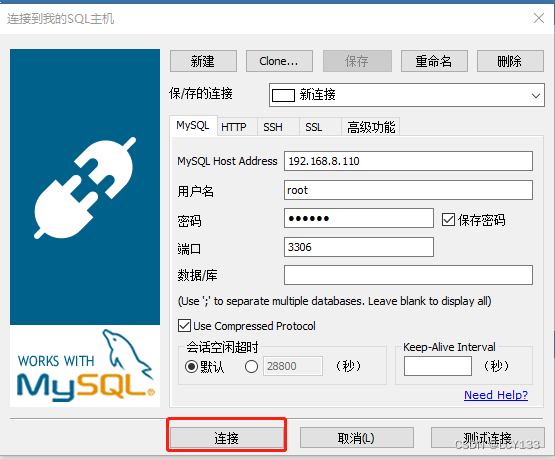
选择sqlyog设置IP192.168.8.110用户名root密码123456端口3306 即可登录不过在此之前如果没有以上的设置这样登录才正常否则会报各种错误
比如如果没有设置bind-address就会因为无法找到这个IP而错无号码2002