MyBatis查询数据库(1)
| 阿里云国内75折 回扣 微信号:monov8 |
| 阿里云国际,腾讯云国际,低至75折。AWS 93折 免费开户实名账号 代冲值 优惠多多 微信号:monov8 飞机:@monov6 |
前言
❤️❤️❤️SSM专栏更新中各位大佬觉得写得不错支持一下感谢了❤️❤️❤️
经过前⾯的学习咱们 Spring 系列的基本操作已经实现的差不多了接下来咱们来学习更重要的知识将前端传递的数据存储起来或者查询数据库里面的数据。
一、MyBatis 是什么
MyBatis 是⼀款优秀的持久层框架它支持自定义 SQL、存储过程以及高级映射。MyBatis 去除了几乎所有的 JDBC 代码以及设置参数和获取结果集的工作。MyBatis可以通过简单的 XML 或注解来配置 和映射原始类型、接口和 Java POJOPlain Old Java Objects普通老式 Java 对象为数据库中的记录。 简单来说MyBatis 是更简单完成程序和数据库交互的工具也就是更简单的操作和读取数据库工具。
二、为什么要学习 MyBatis
对于后端开发来说程序是由以下两个重要的部分组成的
- 后端程序
- 数据库

而这两个重要的组成部分要通讯就要依靠数据库连接工具那数据库连接⼯具有哪些比如之前我们学习的 JDBC还有今天我们将要介绍的 MyBatis那已经有了 JDBC 了为什么还要学习 MyBatis 这是因为 JDBC 的操作太繁琐了我们回顾⼀下 JDBC 的操作流程
-
创建数据库连接池 DataSource
-
通过 DataSource 获取数据库连接 Connection
-
编写要执行带 ? 占位符的 SQL 语句
-
通过 Connection 及 SQL 创建操作命令对象 Statement
-
替换占位符指定要替换的数据库字段类型占位符索引及要替换的值
-
使用 Statement 执行 SQL 语句
-
查询操作返回结果集 ResultSet更新操作返回更新的数量
-
处理结果集
-
释放资源
三、怎么学MyBatis
MyBatis 学习只分为两部分
- 配置 MyBatis 开发环境
- 使用 MyBatis 模式和语法操作数据库
四、第⼀个MyBatis查询
开始搭建 MyBatis 之前我们先来看⼀下 MyBatis 在整个框架中的定位框架交互流程图
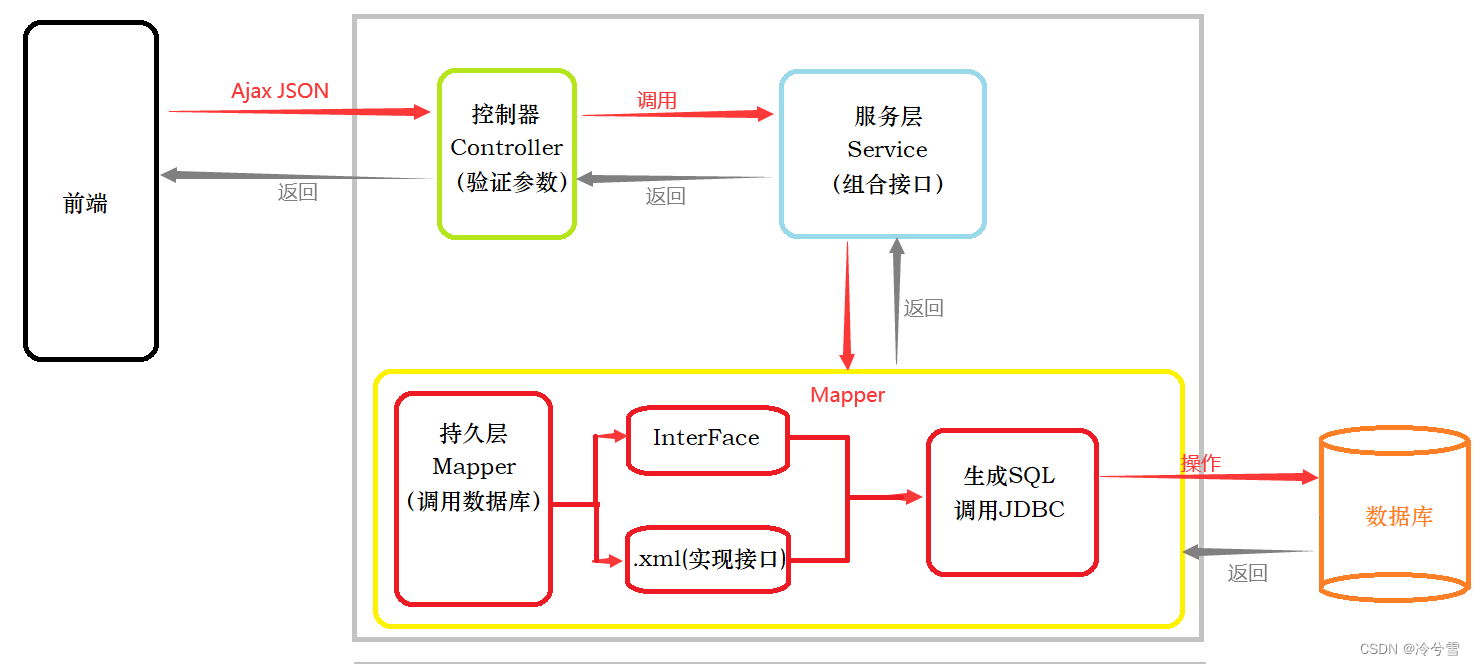
MyBatis 也是⼀个 ORM 框架ORMObject Relational Mapping即对象关系映射。在面向对象编程语言中将关系型数据库中的数据与对象建立起映射关系进而自动的完成数据与对象的互相转换
1. 将输入数据即传入对象+SQL 映射成原生SQL
2. 将结果集映射为返回对象即输出对象ORM 把数据库映射为对象
ORM 把数据库映射为对象
- 数据库表table--> 类class
- 记录record行数据--> 对象object
- 字段field --> 对象的属性attribute
⼀般的 ORM 框架会将数据库模型的每张表都映射为⼀个 Java 类。 也就是说使用 MyBatis 可以像操作对象⼀样来操作数据库中的表可以实现对象和数据库表之间的转换接下来我们来看 MyBatis 的使用吧。
1、添加MyBatis框架支持
添加 MyBatis 框架支持分为两种情况⼀种情况是对自己之前的 Spring 项目进行升级另⼀种情况是创建⼀个全新的 MyBatis 和 Spring Boot 的项目下面我们分别来演示这两种情况的具体实现
Ⅰ、老项目添加MyBatis
<!-- 添加 MyBatis 框架 -->
        <dependency>
            <groupId>org.mybatis.spring.boot</groupId>
            <artifactId>mybatis-spring-boot-starter</artifactId>
            <version>2.3.1</version>
        </dependency>
        <!-- 添加 MySQL 驱动 -->
        <dependency>
            <groupId>com.mysql</groupId>
            <artifactId>mysql-connector-j</artifactId>
            <scope>runtime</scope>
        </dependency>
添加了 MyBatis 之后为什么还需要添加 MySQL 驱动呢
MyBatis 就像⼀个平台类似京东而数据库相当于商家有很多种不止有 MySQL还有 SQL Server、DB2 等等.....因此这两个都是需要添加的。
扩展在老项目中快速添加框架更简单的操作方式是使用EditStarters插件前面已经说过了
Spring Boot日志文件_springboot日志文件_冷兮雪的博客-CSDN博客
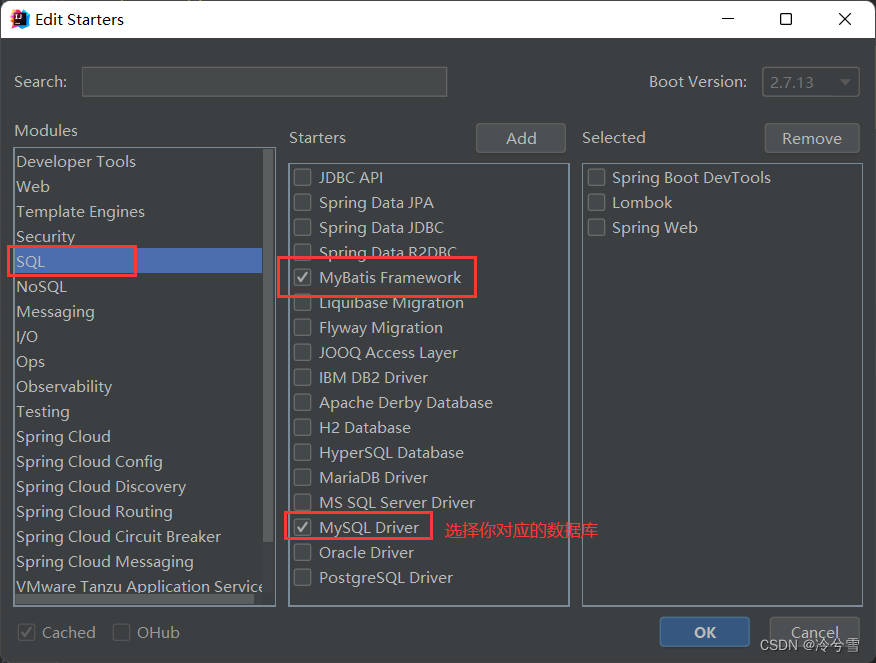
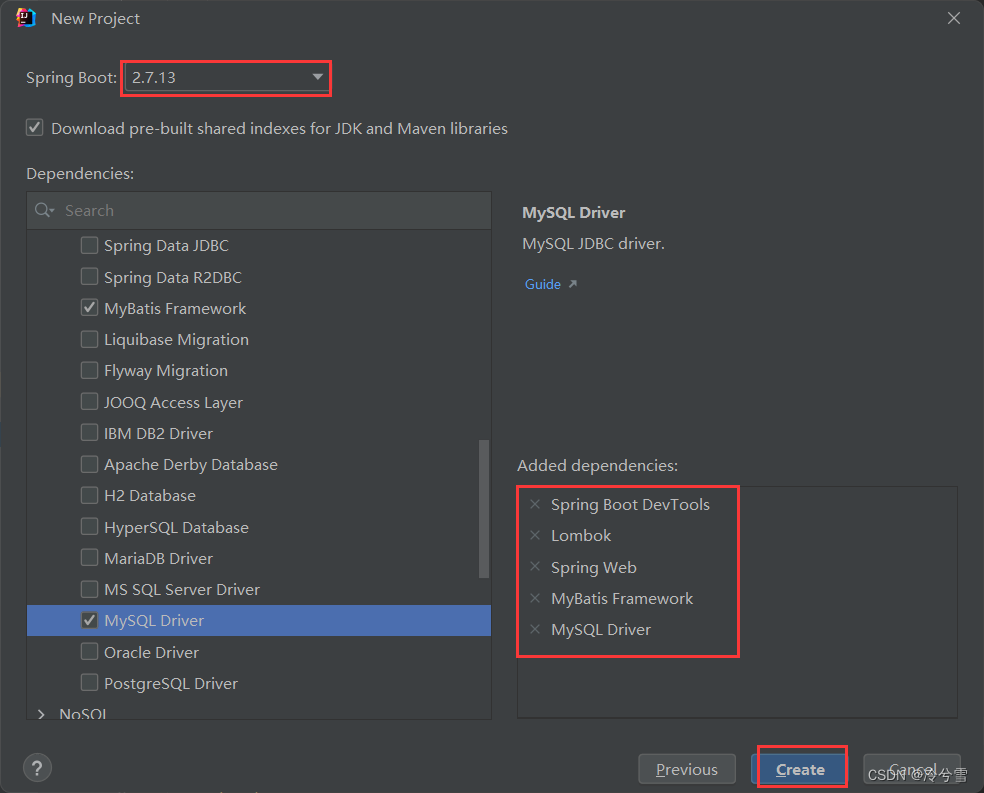
Ⅱ、新项目添加MyBatis
如果是新项目创建 Spring Boot 项目的时候添加引用就可以了如下图所示
我们创建完新的ssm项目直接去启动时一定会报错 因为你添加了数据库依赖而没有连接数据库配置数据库的连接信息
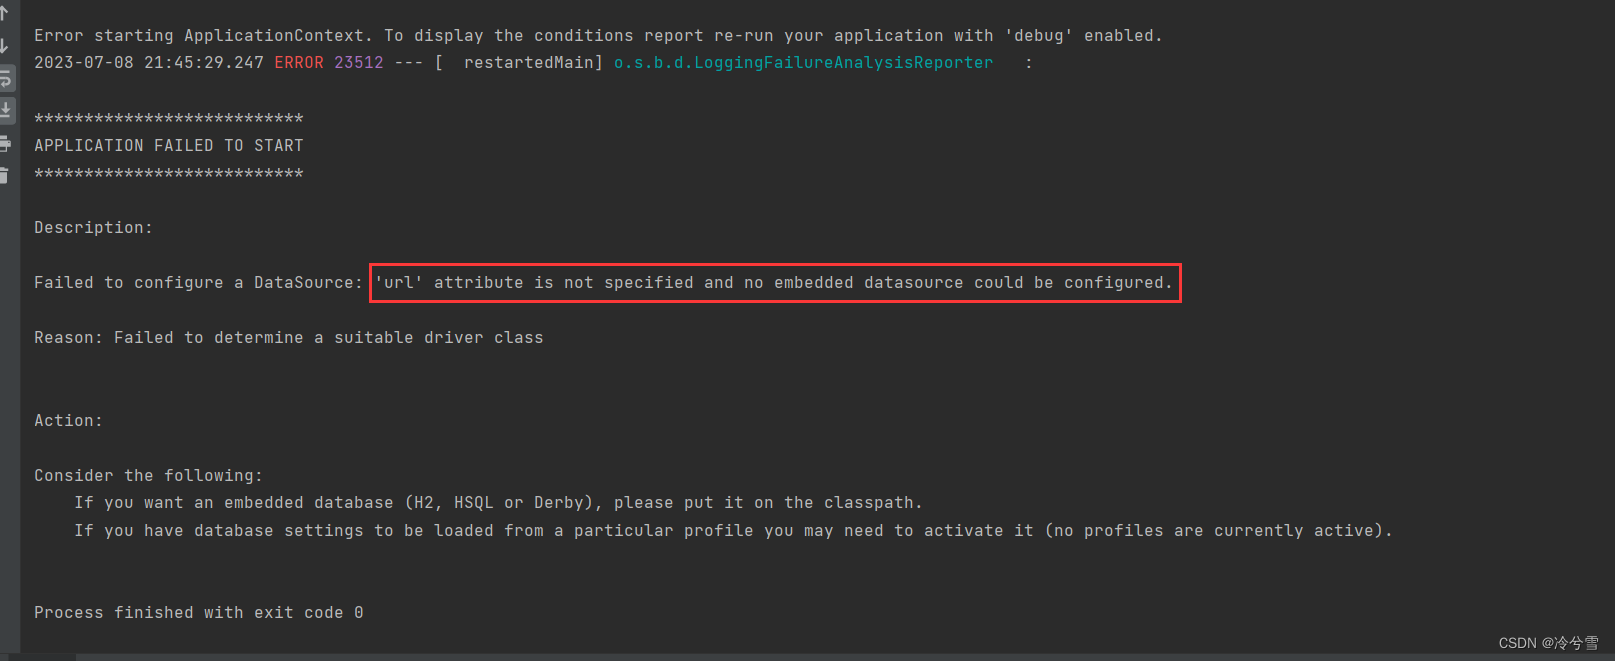
下面我们就来配置数据库的连接信息。
2、配置连接字符串和MyBatis
此步骤需要进行两项设置数据库连接字符串设置和 MyBatis 的 XML 文件配置
Ⅰ、配置连接字符串
如果是 application.yml 添加如下内容
# 数据库连接配置
spring:
  datasource:
    url: jdbc:mysql://localhost:3306/mycnblog?characterEncoding=utf8&useSSL=false
    username: root
    password: 123456
    driver-class-name: com.mysql.cj.jdbc.Driver
application.properties
spring.datasource.hikari.jdbc-url=jdbc:mysql://localhost:3306/mycnblog?characterEncoding=utf8&useSSL=false
spring.datasource.username=root
#数据库密码
spring.datasource.password=123456
spring.datasource.driver-class-name=com.mysql.cj.jdbc.Driver注意事项如果使用 mysql-connector-java 是 5.x 之前的使用的是“com.mysql.jdbc.Driver” 如果是大于 5.x 使用的是“com.mysql.cj.jdbc.Driver” 。
Ⅱ、配置 MyBatis 中的 XML 路径
MyBatis 组成2部分
- 接口表的使用操作方法给程序其他类调用的
- xml实现接口写具体SQL语句
MyBatis 的 XML 中保存是查询数据库的具体操作 SQL配置如下
#mybatis xml 保存路径
# 配置 mybatis xml 的⽂件路径在 resources/mapper 创建所有表的 xml ⽂件
mybatis:
  mapper-locations: classpath:mapper/*Mapper.xml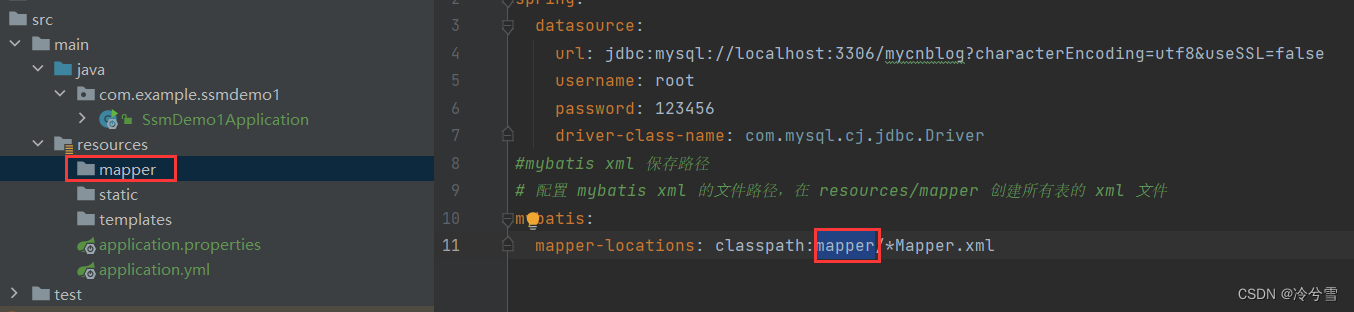
五、添加业务代码
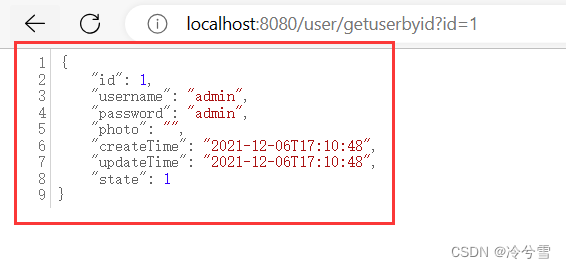
下面按照后端开发的工程思路也就是下面的流程来实现 MyBatis 查询所有用户的功能
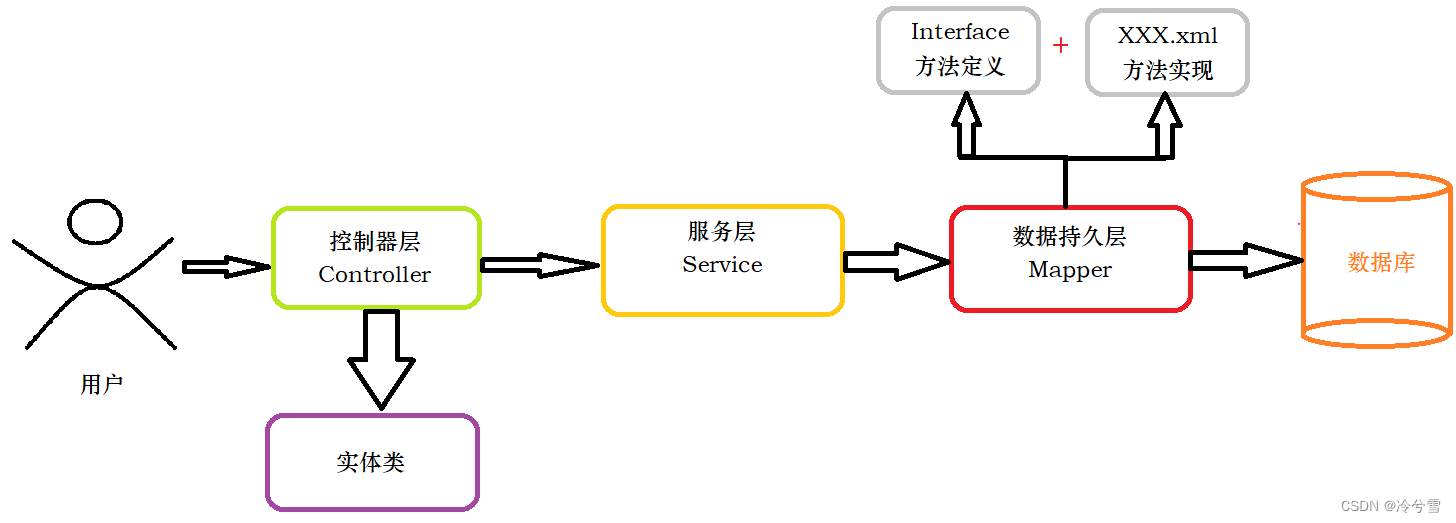
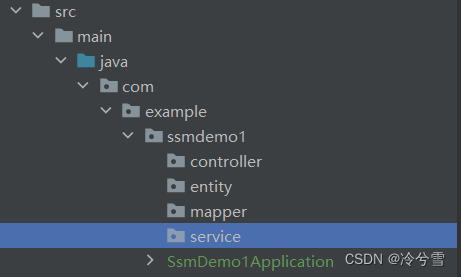
目录结构需要在和启动类在同一个目录下约定大于配置
下面所需要使用的 MySQL代码
-- 创建数据库
drop database if exists mycnblog;
create database mycnblog DEFAULT CHARACTER SET utf8mb4;

-- 使用数据
use mycnblog;

-- 创建表[用户表]
drop table if exists userinfo;
create table userinfo(
 id int primary key auto_increment,
 username varchar(100) not null,
 password varchar(32) not null,
 photo varchar(500) default '',
 createtime datetime default now(),
 updatetime datetime default now(),
 `state` int default 1
) default charset 'utf8mb4';

-- 创建文章表
drop table if exists articleinfo;
create table articleinfo(
 id int primary key auto_increment,
 title varchar(100) not null,
 content text not null,
 createtime datetime default now(),
 updatetime datetime default now(),
 uid int not null,
 rcount int not null default 1,
 `state` int default 1
)default charset 'utf8mb4';

-- 创建视频表
drop table if exists videoinfo;
create table videoinfo(
 vid int primary key,
 `title` varchar(250),
 `url` varchar(1000),
createtime datetime default now(),
updatetime datetime default now(),
 uid int
)default charset 'utf8mb4';

-- 添加一个用户信息
INSERT INTO `mycnblog`.`userinfo` (`id`, `username`, `password`, `photo`,
`createtime`, `updatetime`, `state`) VALUES(1, 'admin', 'admin', '', '2021-12-06 17:10:48', '2021-12-06 17:10:48', 1);

-- 文章添加测试数据
insert into articleinfo(title,content,uid) values('Java','Java正文',1);

-- 添加视频
insert into videoinfo(vid,title,url,uid) values(1,'java title','http://www.baidu.com',1);
Ⅰ、添加实体类
先添加用户的实体类
package com.example.ssmdemo1.entity;

import lombok.Data;

import java.time.LocalDateTime;

@Data
public class Userinfo {
    //数据库中用户信息的七个变量
    private Integer id;
    private String username;
    private String password;
    private String photo;//头像
    private LocalDateTime createTime;
    private LocalDateTime updateTime;
    private Integer state;
}
Ⅱ、添加 mapper 接口
数据持久层的接口定义
package com.example.ssmdemo1.mapper;

import com.example.ssmdemo1.entity.Userinfo;
import org.apache.ibatis.annotations.Mapper;

@Mapper//需要添加 @Mapper 注解
public interface UserMapper {
    Userinfo getUserById(Integer id);
}
Ⅲ、添加 UserMapper.xml
<?xml version="1.0" encoding="UTF-8"?>
<!DOCTYPE mapper PUBLIC "-//mybatis.org//DTD Mapper 3.0//EN" "http://mybatis.org/dtd/mybatis-3-mapper.dtd">
<mapper namespace="com.example.ssmdemo1.mapper.UserMapper">

</mapper>
安装MybatisX插件实现快速导航
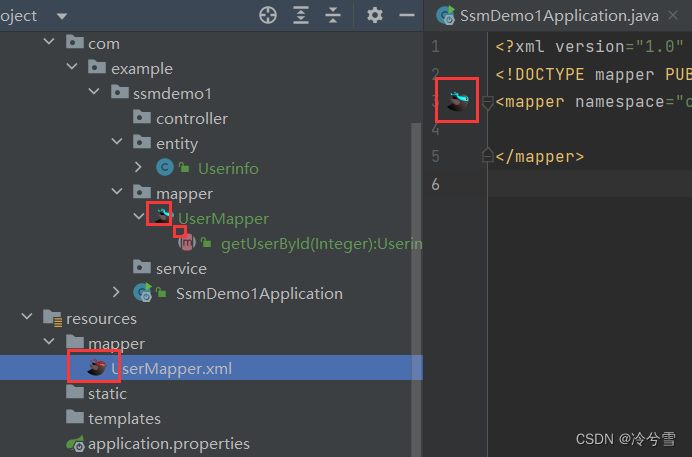
UserMapper.xml 查询所有用户的具体实现 SQL
<?xml version="1.0" encoding="UTF-8"?>
<!DOCTYPE mapper PUBLIC "-//mybatis.org//DTD Mapper 3.0//EN" "http://mybatis.org/dtd/mybatis-3-mapper.dtd">
<mapper namespace="com.example.ssmdemo1.mapper.UserMapper">
    <select id="getUserById" resultType="com.example.ssmdemo1.entity.Userinfo">
        select * from userinfo where id=${id}
    </select>
</mapper>
UserMapper接口添加 @param 注解
package com.example.ssmdemo1.mapper;

import com.example.ssmdemo1.entity.Userinfo;
import org.apache.ibatis.annotations.Mapper;
import org.apache.ibatis.annotations.Param;

@Mapper//需要添加 @Mapper 注解
public interface UserMapper {
    Userinfo getUserById(@Param("id") Integer id);
}

以下是对以上标签的说明
<mapper>标签需要指定 namespace 属性表示命名空间值为 mapper 接口的全限定 名包括全包名.类名。
<select>查询标签是⽤来执⾏数据库的查询操作的
id是和 Interface接⼝中定义的方法名称⼀样的表示对接口的具体实现方法。
resultType是返回的数据类型也就是开头我们定义的实体类
Ⅳ、添加 Service
package com.example.ssmdemo1.service;

import com.example.ssmdemo1.entity.Userinfo;
import com.example.ssmdemo1.mapper.UserMapper;
import org.springframework.beans.factory.annotation.Autowired;
import org.springframework.stereotype.Service;

@Service
public class UserService {
    @Autowired
    private UserMapper userMapper;

    public Userinfo getUserById(Integer id){
        return userMapper.getUserById(id);
    }

}
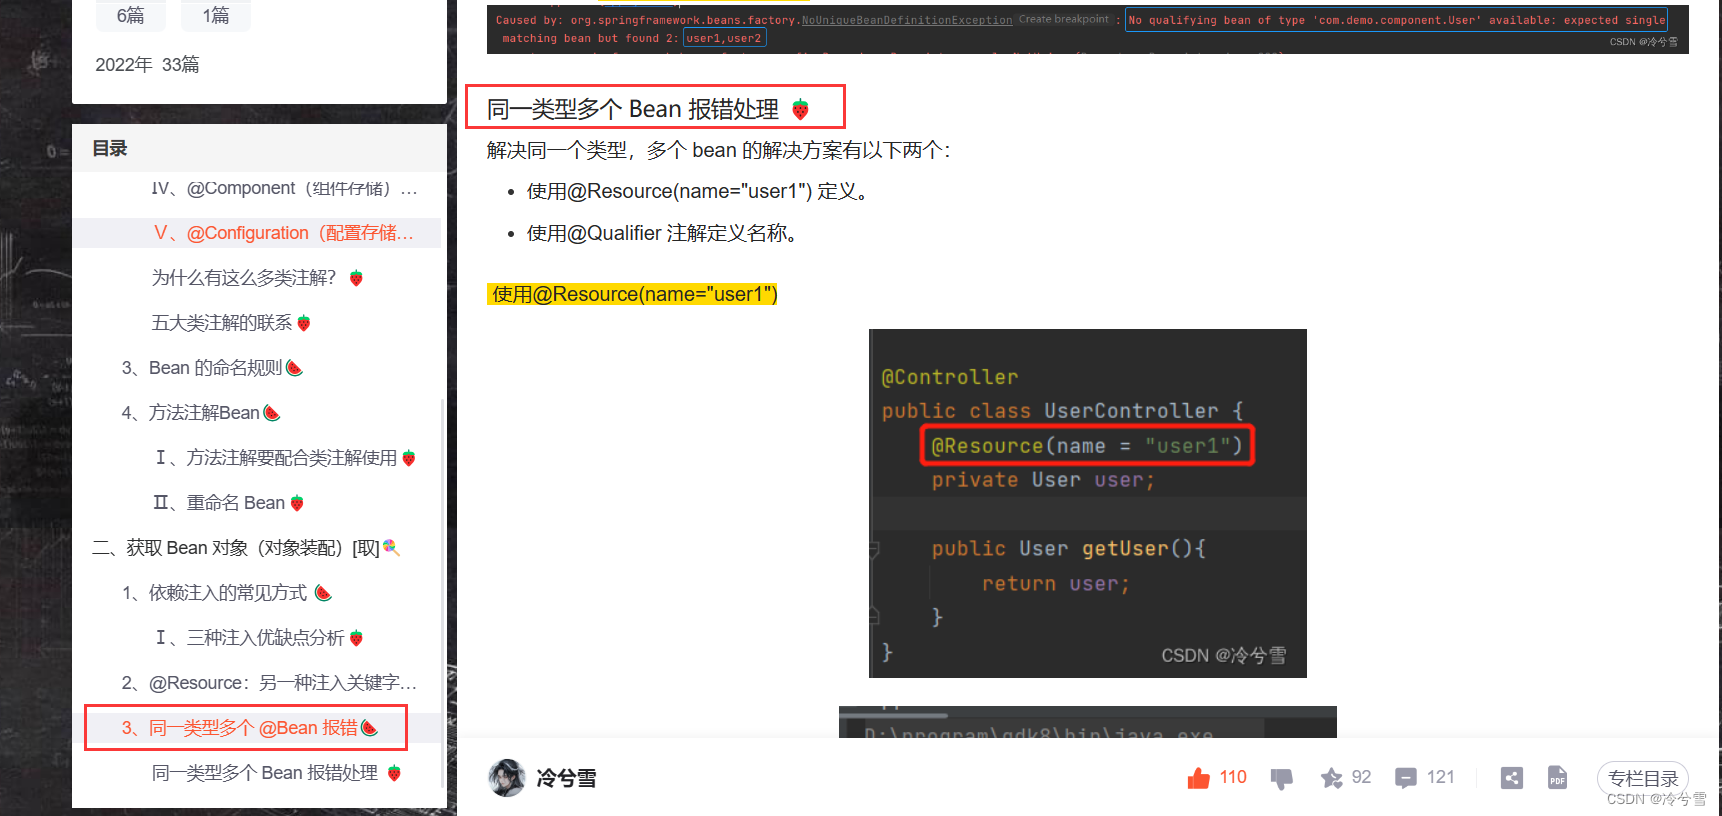
注入可以注入普通对象也可以注入接口Spring会直接去找它的实现类然后引入使用 。
如果接口有多个实现类这个时候程序就会报错因为程序不知道你要注入的是哪个类这种问题 又回到了 同一个类型注入多次我应该怎么去解决
Ⅴ、添加 Controller
控制器层的实现代码如下
package com.example.ssmdemo1.controller;

import com.example.ssmdemo1.entity.Userinfo;
import com.example.ssmdemo1.service.UserService;
import org.springframework.beans.factory.annotation.Autowired;
import org.springframework.web.bind.annotation.RequestMapping;
import org.springframework.web.bind.annotation.RestController;

@RestController
@RequestMapping("/user")
public class UserController {
    @Autowired
    private UserService userService;

    //url 路径名直接全部小写即可
    @RequestMapping("/getuserbyid")
    public Userinfo geUserById(Integer id){
        if (id==null)
            return null;
        return userService.getUserById(id);
    }
}
运行代码