

【操作系统】多线程与多进程通信之深入理解【2023.01.31】
| 阿里云国内75折 回扣 微信号:monov8 |
| 阿里云国际,腾讯云国际,低至75折。AWS 93折 免费开户实名账号 代冲值 优惠多多 微信号:monov8 飞机:@monov6 |
基本概念
首先假设这么一个场景进程A有线程Thread_A1和线程Thread_A2进程B有线程Thread_B1和Thread_B2。举个例子系统中进程的内存是独立的也就是一台内存为4G的计算机除了系统占用的1G部分A进程可以申请到的内存是3G。B进程也可以申请到3G内存。可用内存只有3G如何满足两个进程6G的要求
实际上是通过映射的方式A进程与B进程申请到的内存是虚拟内存只有当进程被调度的时候才会真正映射到具体的物理内存。重点要清楚的是进程A和进程B所申请的内存空间是独立的也就是进程A里面0x6666FFFF所对应的数据和进程B里面0x6666FFFF地址所对应的数据是“八竿子打不着的”。
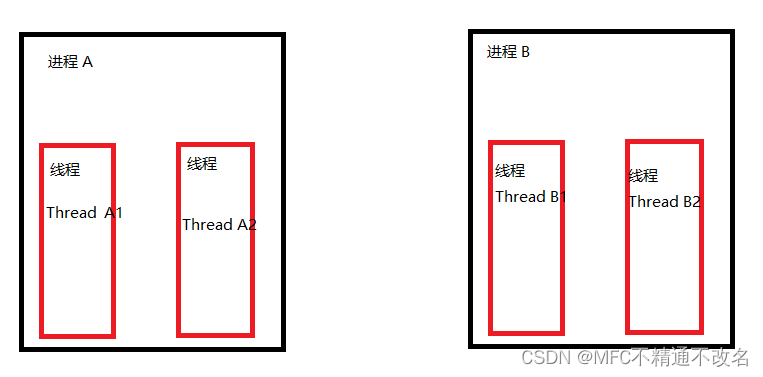
要知道在操作系统里面进程是线程的容器线程是执行任务的最小单元。一个进程里面最少有一个线程叫做主线程否则单单一个容器是什么都做不了的。结合生活理解比如一个小公司肯定至少得有一个老板吧至少也得有一个员工干活吧。如果没有员工的话老板就是员工。这里把老板理解为进程员工理解为线程。
通信分类
首先要对通信有个全面的理解一般把传输收、发数据叫通信而传输线程状态的信号叫同步。
1“同一个进程”的多个线程进行通信
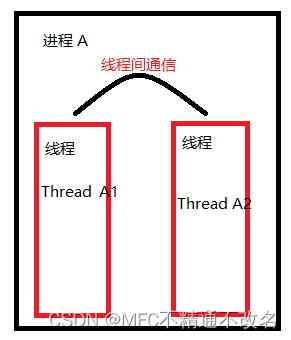
一个老板可以有多个员工。多个员工要“可靠”通信比如说两个员工A1和员工A2要讨论项目的方案怎么办很简单公司都有文件柜通过文件的形式同一个公司的员工A1与A2可以访问文件柜里的文件两个员工的通信通过文件的形式就可以了。
对应到程序里面因为进程是线程的容器一个进程的多个线程都是在一片内存区里面比如一个线程在堆上的申请的内存存放变量global_Var地址是0x8888FFFF该进程中的其它线程通过该地址访问到的是同一个变量global_Var。
😙这样的话线程通信就很简单了啊我只要有变量的指针就可以访问了啊。代码如下
#include <QCoreApplication>
#include <iostream>
#include <thread>
#include <QDateTime>
#include <QDebug>
void fun(char* out,const char * caller)
{
    using namespace std;
    cout << caller << out;
}
int main(int argc, char *argv[])
{
    using namespace std;
    QCoreApplication a(argc, argv);
    char * out = "Hello My baby!\n";

    thread t1(fun,out,"Thread1:");
    thread t2(fun,out,"Thread2:");
    t1.join();
	t2.join();
    return a.exec();
}
程序输出
Thread1:Hello My baby!
Thread2:Hello My baby!
上面的例子仅仅说明了同一个进程下的多个线程可以通过一个指向堆内存的指针进行访问事实上栈区内存也可以。
😤比如我们把刚刚的线程数量增加一些代码改成下面这样子
#include <QCoreApplication>
#include <iostream>
#include <thread>
#include <QDateTime>
#include <QDebug>


void fun(char* out,const char * caller)
{
    using namespace std;
    cout << caller << out;
    if(0 == strcmp(caller,"Thread1:"))//**我们对线程1进行sleep操作让其挂起一会
    {
        std::this_thread::sleep_for(std::chrono::seconds(5));
    }
}

int main(int argc, char *argv[])
{
    using namespace std;
    QCoreApplication a(argc, argv);
    char * out = "Hello My baby!\n";

    thread t1(fun,out,"Thread1:");
    thread t2(fun,out,"Thread2:");
    thread t3(fun,out,"Thread3:");
    thread t4(fun,out,"Thread4:");
    thread t5(fun,out,"Thread5:");

    qDebug() << QDateTime::currentDateTime().toString();
    t1.join();
    qDebug() << QDateTime::currentDateTime().toString();
    t2.join();
    t3.join();
    t4.join();
    t5.join();
    return a.exec();
}
程序输出
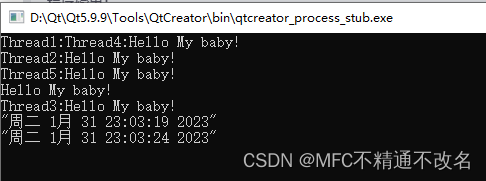
现象分析多核CPU下的多线程程序是可以并发执行的上面的结果产生的原因是cout到控制台的“打印”资源是唯一的也就是多个线程都往控制台打印如果不对资源进行保护的话就存在线程1还没打印完线程2又开始打印了。
多线程并发执行时互斥资源的同步问题
什么是同步呢
答同步是指对于多线程程序在一定的时间内只允许某一个线程来访问某个资源。而在此时间内不允许其他的线程访问该资源。
比如说两个员工A1和员工A2两人要共用一个打印机打印文档。如果没有保护机制A1正在打印过程中A2强行打印他的文档…岂不是要打起来喽。
实际上是这样处理的公司把打印机放到一个简易的房子里留了一个锁孔。

A员工要用打印机就锁住打印机的门等到打印完了再把锁撤销掉。A正在打印的时候B员工就加不了锁了从而避免了冲突。
对应到程序里面Linux系统下使用互斥锁Mutex、条件变量condition variable、读写锁reader-writer lock、信号量semaphore都可以用来同步资源。Windows系统下还可以使用临界区进行同步。
1️⃣临界区
一个进程里的多个线程进行同步Windows下用的最多的“锁”是临界区window系统支持Linux不支持对此的理解是Linux进程比Windows的进程机制不同。🚩注意临界区只能用于对象在同一进程里线程间的互斥访问也就是临界区只能用于保证同一个公司的不同员工互斥的访问。还是对上面的代码进行改造。代码如下
#include <QCoreApplication>
#include <iostream>
#include <thread>
#include <QDateTime>
#include <QDebug>
#include <windows.h>

using namespace std;

CRITICAL_SECTION cs;//1.定义临界区对象

void fun(char* out,const char * caller)
{
    EnterCriticalSection(&cs);//{{ 进入临界区 本临界区保护的是唯一的cout资源
    cout << caller << out;
    LeaveCriticalSection(&cs);//{{ 离开临界区
    if(0 == strcmp(caller,"Thread1:"))//**我们对线程1进行sleep操作让其挂起一会
    {
        std::this_thread::sleep_for(std::chrono::seconds(5));
    }
}

int main(int argc, char *argv[])
{
    QCoreApplication a(argc, argv);
    InitializeCriticalSection(&cs);//2.初始化临界区

    char * out = "Hello My baby!\n";

    thread t1(fun,out,"Thread1:");
    thread t2(fun,out,"Thread2:");
    thread t3(fun,out,"Thread3:");
    thread t4(fun,out,"Thread4:");
    thread t5(fun,out,"Thread5:");

    qDebug() << QDateTime::currentDateTime().toString();
    t1.join();
    qDebug() << QDateTime::currentDateTime().toString();
    t2.join();
    t3.join();
    t4.join();
    t5.join();

    DeleteCriticalSection(&cs);//5.删除临界区
    return a.exec();
}
2️⃣互斥锁
互斥锁也很简单创建了互斥锁对象之后进行加锁解锁就行了。与临界区的不同之处是多个进程的线程间也可以用互斥锁进行同步。其实也不难理解互斥锁mutex是内核对象是系统内核进行管理的而临界区是为了提高性能实现的一个用户态的对象。代码如下
#include <QCoreApplication>
#include <iostream>
#include <thread>
#include <QDateTime>
#include <QDebug>
#include <windows.h>
#include <mutex>

using namespace std;

mutex g_mtx;

void fun(char* out,const char * caller)
{
    g_mtx.lock();// 1.加锁
    cout << caller << out;
    g_mtx.unlock();// 2.释放锁
    if(0 == strcmp(caller,"Thread1:"))//**我们对线程1进行sleep操作让其挂起一会
    {
        std::this_thread::sleep_for(std::chrono::seconds(5));
    }
}

int main(int argc, char *argv[])
{
    QCoreApplication a(argc, argv);
    char * out = "Hello My baby!\n";

    thread t1(fun,out,"Thread1:");
    thread t2(fun,out,"Thread2:");
    thread t3(fun,out,"Thread3:");
    thread t4(fun,out,"Thread4:");
    thread t5(fun,out,"Thread5:");

    qDebug() << QDateTime::currentDateTime().toString();
    t1.join();
    qDebug() << QDateTime::currentDateTime().toString();
    t2.join();
    t3.join();
    t4.join();
    t5.join();

    return a.exec();
}
3️⃣条件变量
条件变量的主要使用场景是生产者消费者模型条件变量是多线程程序中用来实现等待和唤醒常用的方法。
举例妈妈做好饭了需要通知所有家人吃饭家人们也要知道妈妈是否做好饭了不能一直问“妈饭好了吗”、“老婆饭好了吗”…。而应该等待妈妈通知“饭做好了”这里的条件变量就是表征饭是否做好了。
程序中c++标准库中条件变量condition_variable是要用到unique_lock,unique_lock依赖构造和析构机制进行自动的mutex的lock和unlock操作。先看❌错误代码
#include <QCoreApplication>
#include <iostream>
#include <thread>
#include <QDateTime>
#include <QDebug>
#include <windows.h>
#include <mutex>
#include <condition_variable>
using namespace std;
mutex g_mtx;//互斥量
condition_variable g_cond;//条件变量

void fun(char* out,const char * caller)
{
    unique_lock<mutex> ulck(g_mtx);//这里需要了解下独占锁
    g_cond.wait(ulck); //wait函数会阻塞等待信号同时会unlock g_mtx对象让其他线程可以通过g_mtx进行加锁;当wait有信号后会对g_mtx进行加锁。

    cout << caller << out;

    if(0 == strcmp(caller,"Thread1:"))//**我们对线程1进行sleep操作让其挂起一会
    {
        std::this_thread::sleep_for(std::chrono::seconds(5));
    }
}

int main(int argc, char *argv[])
{
    QCoreApplication a(argc, argv);
    char * out = "Hello My baby!\n";

    thread t1(fun,out,"Thread1:");
    thread t2(fun,out,"Thread2:");
    thread t3(fun,out,"Thread3:");
    thread t4(fun,out,"Thread4:");
    thread t5(fun,out,"Thread5:");

    //g_cond.notify_one(); 这样的话只会唤醒一个线程
    g_cond.notify_all();//唤醒所有通过wait阻塞的线程。
    t1.join();
    t2.join();
    t3.join();
    t4.join();
    t5.join();

    return a.exec();
}
程序结果如下图
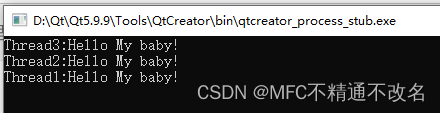
这是什么鬼👻?
⭐️有两种可能的原因
🖕情况1线程notify发出通知消息的时线程还未执行导致通知消息被丢失。
🖕情况2线程的虚假唤醒也就是操作系统会把阻塞的线程进行“错误”唤醒具体机制很复杂暂时知道有这个bug就行。如果线程被虚假唤醒则对输出到控制台的资源就失去了保护。
正确的代码如下
#include <QCoreApplication>
#include <iostream>
#include <thread>
#include <QDateTime>
#include <QDebug>
#include <windows.h>
#include <mutex>
#include <condition_variable>

using namespace std;

bool g_flag = false;//注意这里全局变量多线程访问为啥不用加锁线程安全吗这是因为本例只有一个线程对其写值。

mutex g_mtx;//互斥量
condition_variable g_cond;//条件变量

void fun(char* out,const char * caller)
{
    unique_lock<mutex> ulck(g_mtx);//这里需要了解下独占锁
    g_cond.wait(ulck,[](){  return g_flag; }); //wait函数会阻塞等待信号同时会unlock g_mtx对象让其他线程可以通过g_mtx进行加锁;当wait有信号后会对g_mtx进行加锁。

    cout << caller << out;

    if(0 == strcmp(caller,"Thread1:"))//**我们对线程1进行sleep操作让其挂起一会
    {
        std::this_thread::sleep_for(std::chrono::seconds(5));
    }
}

int main(int argc, char *argv[])
{
    QCoreApplication a(argc, argv);
    char * out = "Hello My baby!\n";

    thread t1(fun,out,"Thread1:");
    thread t2(fun,out,"Thread2:");
    thread t3(fun,out,"Thread3:");
    thread t4(fun,out,"Thread4:");
    thread t5(fun,out,"Thread5:");

    {
        unique_lock<mutex> ulck(g_mtx);//仅对花括号里面的两条语句进行加锁
        g_flag = true;//通过标记位1、防止线程虚假唤醒2、防止信号丢失lambda表达式会在while循环里不断执行。
        g_cond.notify_all();//唤醒所有通过wait阻塞的线程。
    }

    //qDebug() << QDateTime::currentDateTime().toString();
    t1.join();
    //qDebug() << QDateTime::currentDateTime().toString();
    t2.join();
    t3.join();
    t4.join();
    t5.join();

    return a.exec();
}
4️⃣读写锁
临界区、互斥锁、条件变量所保护的资源一次只能被一个线程所使用。但是对于一些变量我们读的次数远大于写的次数而读又不会导致冲突。杨超越一次只能有一个老公但是粉丝可以有无数的呀粉丝只是欣赏美貌看看而已。
读写锁就是这么来滴。如果是读操作的话是可以重复加锁成功的但是只要有锁不管读锁还是写锁加成功了写锁就加不进去了。
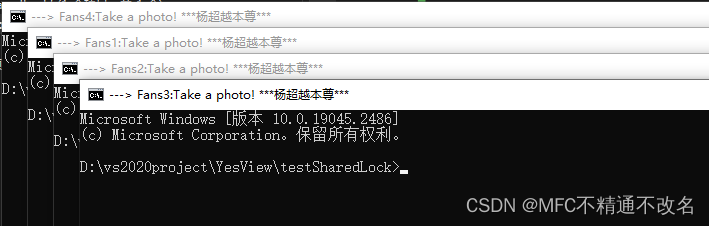
👧程序加读锁的小例子
// testSharedLock.cpp : 此文件包含 "main" 函数。程序执行将在此处开始并结束。
//

#include <iostream>
#include <shared_mutex>
#include <thread>
#include <string>
#include <stdlib.h>

using namespace std;

string g_RealBody("***杨超越本尊***");


void fun(const char* ch)
{
    shared_lock<shared_mutex> slck;
    string str("start ");

    str += "\"---> ";
    str += string(ch);
    str += g_RealBody;// 相当于对全局变量 加 读 锁
    str += " \"";
    system(str.c_str());
}


int main()
{

    thread t1(fun,"Fans1:Take a photo! ");
    thread t2(fun, "Fans2:Take a photo! ");
    thread t3(fun, "Fans3:Take a photo! ");
    thread t4(fun, "Fans4:Take a photo! ");


    t1.join(); t2.join(); t3.join(); t4.join();
    std::cout << "Hello World!\n";
}
程序执行结果如下图注意看窗口名字我四个粉丝共享读锁并发进行拍照需自己脑补一下。
👫程序加写锁的例子
// testSharedLock.cpp : 此文件包含 "main" 函数。程序执行将在此处开始并结束。
//

#include <iostream>
#include <shared_mutex>
#include <thread>
#include <string>
#include <stdlib.h>
#include <windows.h>
using namespace std;

string g_RealBody("***杨超越本尊***");

shared_mutex g_mtx;

void fun(const char* ch)
{
    shared_lock<shared_mutex> slck(g_mtx);
    string str("start ");

    str += "\"---> ";
    str += string(ch);
    str += g_RealBody;// 相当于对全局变量 加 读 锁
    str += " \"";
    system(str.c_str());
}


int main()
{
    thread t0( [](){
        unique_lock<shared_mutex> ulck(g_mtx);//独占锁 占住不释放其他读锁也不能进行
        while (1)
        {
            cout << "超越正在度蜜月粉丝们 No 拍照\n";
            Sleep(100);
        }
    });
    thread t1(fun,"Fans1:Take a photo! ");
    thread t2(fun, "Fans2:Take a photo! ");
    thread t3(fun, "Fans3:Take a photo! ");
    thread t4(fun, "Fans4:Take a photo! ");


    t0.join(); t1.join(); t2.join(); t3.join(); t4.join();
    std::cout << "Hello World!\n";
}
程序执行结果如下写锁占住超越之后具有独占性导致其他读锁无法访问。
