

ASP.NET Core MVC 从入门到精通之自动映射(一)
阿里云国际版折扣https://www.yundadi.com |
| 阿里云国际,腾讯云国际,低至75折。AWS 93折 免费开户实名账号 代冲值 优惠多多 微信号:monov8 飞机:@monov6 |
随着技术的发展ASP.NET Core MVC也推出了好长时间经过不断的版本更新迭代已经越来越完善本系列文章主要讲解ASP.NET Core MVC开发B/S系统过程中所涉及到的相关内容适用于初学者在校毕业生或其他想从事ASP.NET Core MVC 系统开发的人员。 经过前几篇文章的讲解初步了解ASP.NET Core MVC项目创建启动运行以及命名约定创建控制器视图模型接收参数传递数据ViewDataViewBag路由页面布局wwwroot和客户端库Razor语法EnityFrameworkCore与数据库HttpContextRequestResponseSession序列化文件上传等内容今天继续讲解ASP.NET Core MVC 中自动映射等相关内容仅供学习分享使用。

手动映射
在实际应用中随着程序复杂度越来越高分层已经是必然趋势对象的传递与映射也变得很频繁。在小项目中一般采用手动映射赋值如将StudentViewModel对象的属性值赋值给Student。手动映射如下所示
[HttpPost]
public IActionResult Add(StudentViewModel studentViewModel)
{
    var student = new Student()
    {
        Id = studentViewModel.Id,
        Name = studentViewModel.Name,
        Age = studentViewModel.Age,
        Sex = studentViewModel.Sex,
    };
    studentService.Add(student);
    return View();
}
手动映射需要逐个属性进行赋值灵活度高但也容易出错。如果项目中存在很多需要映射传递的地方则工作量和复杂度也会随之增加。
自动映射快速入门
自动映射就是由程序自动匹配属性名并进行赋值。步骤如下
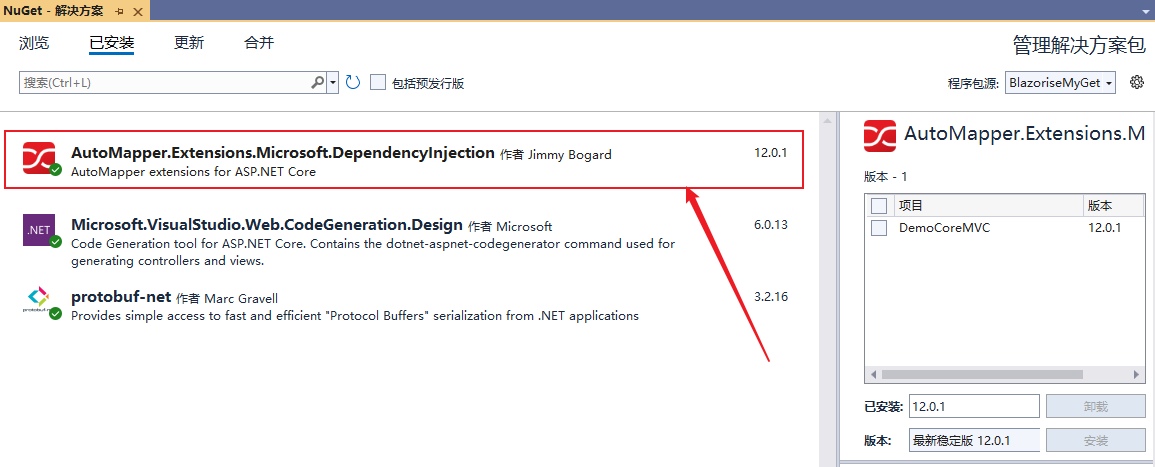
1. 安装自动映射包
首先通过NuGet包管理器安装自动映射第三方库【AutoMapper.Extensions.Microsoft.DependencyInjection】目前版本为12.0.1如下所示
2. 创建自动映射关系
创建自动映射关系类AutomapProfile并继承自Profile如下所示
using AutoMapper;
using DemoCoreMVC.ViewModels;
using DemoCoreMVC.Models;

namespace DemoCoreMVC.Profiles
{
    public class AutomapProfile:Profile
    {
        public AutomapProfile()
        {
            //创建映射关系
            CreateMap<StudentViewModel, Student>();
        }
    }
}
3. 注册自动映射服务
在Program启动文件中添加自动映射服务在服务中添加映射关系类如下所示
builder.Services.AddAutoMapper(cfg =>
{
   cfg.AddProfile<AutomapProfile>();
});
//或者
//builder.Services.AddAutoMapper(typeof(AutomapProfile));
4. 注入IMapper接口
在需要使用自动映射服务的地方注入IMapper服务如控制器中如下所示
private readonly IMapper mapper;

public StudentController(IStudentService studentService,IMapper mapper)
{
    this.studentService = studentService;
    this.mapper = mapper;
}
5. 调用映射方法
在需要映射的地方调用IMapper接口的Map方法如下所示
[HttpPost]
public IActionResult Add(StudentViewModel studentViewModel)
{
    var student =  mapper.Map<StudentViewModel, Student>(studentViewModel);
    studentService.Add(student);
    return View();
}
6. 自动映射示例
经过上述步骤自动映射已经完成经过测试如下所示

多个关系映射文件
在实际应用中会有很多对象需要映射通常会根据不同的类型创建多个关系映射类则在项目启动注册自动映射服务时需要加载多个映射类如下所示
builder.Services.AddAutoMapper(cfg =>
{
cfg.AddProfile<AutomapProfile>();
cfg.AddProfile<CompanyProfile>();
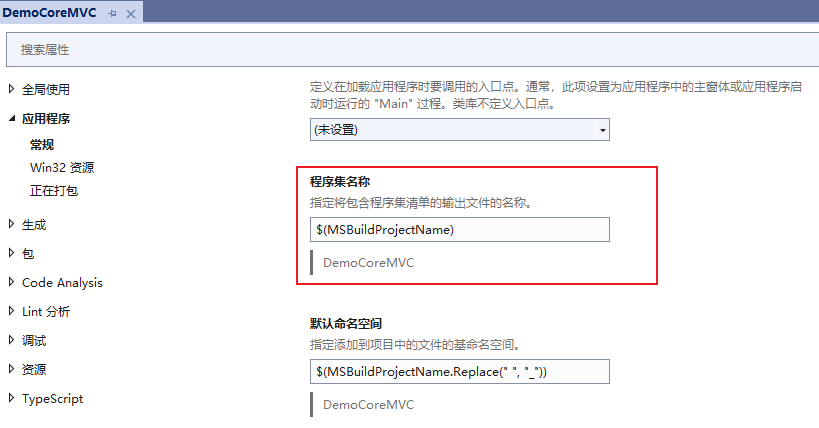
});也可以通过扫描程序集的方式加载映射文件可以配置程序集名称程序会自动扫描继承了Profile类的文件。如下所示
builder.Services.AddAutoMapper(cfg =>
{
    cfg.AddMaps("DemoCoreMVC");
});
注意AddMaps参数配置的是程序集名称而不是命名空间程序集名称可通过项目属性获取如下所示
自动映射匹配
默认情况下自动映射的数据源和目标的属性必须要一致才能进行映射但是在实际应用中属性名之间可能会存在差异如书写格式【Class_Name和ClassName之间的差异】等如果不加处理的话默认是无法自动映射成功的。失败示例如下所示

在映射时进行配置源的命名格式和目标命名格式如下所示
namespace DemoCoreMVC.Profiles
{
    public class AutomapProfile:Profile
    {
        public AutomapProfile()
        {
            SourceMemberNamingConvention = new LowerUnderscoreNamingConvention();
            DestinationMemberNamingConvention = new PascalCaseNamingConvention();
            //创建映射关系
            CreateMap<StudentViewModel, Student>();
        }
    }
}
注意其中
SourceMemberNamingConvention 源类型成员命名规则
Ex: SourceMemberNamingConvention = new LowerUnderscoreNamingConvention(); //下划线命名法
DestinationMemberNamingConvention :目标类型成员命名规则
Ex: cfg.DestinationMemberNamingConvention = new PascalCaseNamingConvention(); //帕斯卡命名法
经过设置源类型和目标类型的命名规则后则发现已经可以适配成功。如下所示

经过测试以下全局配置命名规则不生效具体原因不知
builder.Services.AddAutoMapper(cfg =>
{
    cfg.AddProfile<AutomapProfile>();
    cfg.SourceMemberNamingConvention = new LowerUnderscoreNamingConvention();
    cfg.DestinationMemberNamingConvention = new PascalCaseNamingConvention();
});
以上就是ASP.NET Core MVC从入门到精通之自动映射第一部分内容。旨在抛砖引玉一起学习共同进步。