

Centos,ELK避坑版
阿里云国际版折扣https://www.yundadi.com |
| 阿里云国际,腾讯云国际,低至75折。AWS 93折 免费开户实名账号 代冲值 优惠多多 微信号:monov8 飞机:@monov6 |
1、root用户配置系统参数
1.1 root用户编辑 vi /etc/sysctl.conf
添加 vm.max_map_count=262144
重新加载生效配置 sysctl -p
1.2 输入:vi /etc/security/limits.conf
末尾追加
- soft nofile 65536
- hard nofile 65536
- soft nproc 4096
- hard nproc 4096
2、创建elk普通用户,root用户授权
useradd elk
chown -R elk:elk /usr/local/elk
3、ELK安装(从官网上下载对应的版本,我这里是7.17.1)
下载ElasticSearch,Kibana,Logstash,Filebeat(统一一个版本)
3.1 ElasticSearch
3.1.1 上传到/usr/local/elk中
解压:tar -zxvf elasticsearch-7.17.1-linux-x86_64.tar.gz
改名: mv elasticsearch-7.17.1 elasticsearch 1.
配置config/elasticsearch.yml
ingest.geoip.downloader.enabled: false
xpack.security.enabled: true
xpack.security.authc.api_key.enabled: true
xpack.security.transport.ssl.enabled: true
cluster.name: es-cluster
node.name: node-1
path.data: /usr/local/elasticsearch/data(提前创建文件夹)
path.logs: /usr/local/elasticsearch/logs(提前创建文件夹)
bootstrap.memory_lock: false
network.host: 0.0.0.0
http.port: 9200
http.cors.enabled: true
http.cors.allow-origin: "*"
cluster.initial_master_nodes: ["node-1"]
切换elk用户,
转到bin文件夹下运行elasticsearch
运行查看是否有报错: ./elasticsearch ,
查看控制台日志,无异常,在浏览器里查看是否正常运行 http://ip:9200 ,
后台运行: ./elasticsearch -d
3.1.2 设置密码(确保elasticsearch在运行中)
运行(可以root用户进行设置) ./bin/elasticsearch-setup-passwords interactive
将密码全部都设置成123456。
3.1.3 在浏览器中打开http://****:9200 要求输入用户名和密码,输入elastic / 123456
就可看到elasticsearch的版本信息
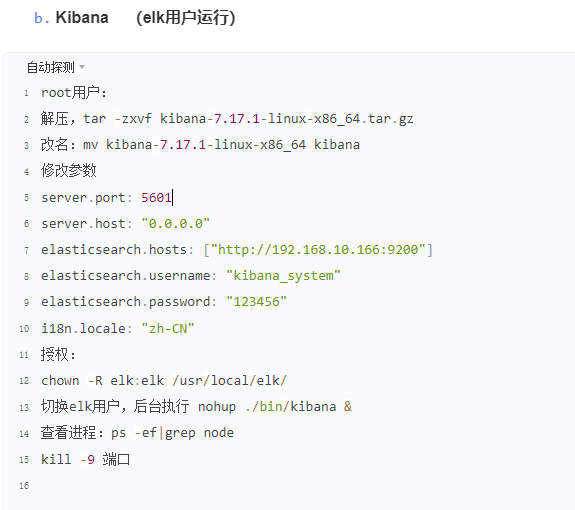
3.2 Kibana
3.3 Logstash
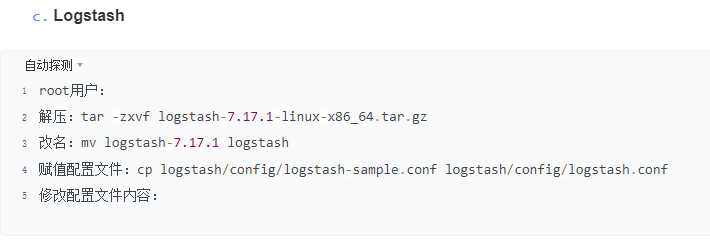
3.3.1 配置Lostash.conf
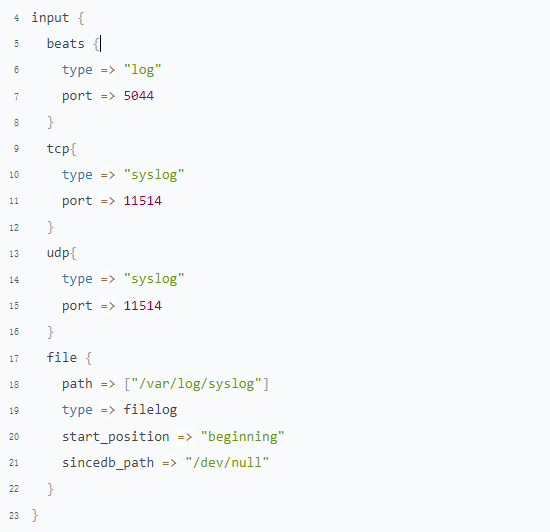
input:
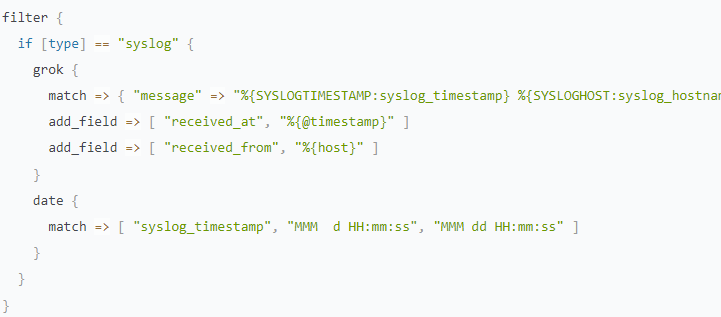
filter:
filter { if [type] == "syslog" { grok { match => { "message" => "%{SYSLOGTIMESTAMP:syslog_timestamp} %{SYSLOGHOST:syslog_hostname} %{DATA:syslog_program}(?:\[%{POSINT:syslog_pid}\])?: %{GREEDYDATA:syslog_message}" } add_field => [ "received_at", "%{@timestamp}" ] add_field => [ "received_from", "%{host}" ] } date { match => [ "syslog_timestamp", "MMM d HH:mm:ss", "MMM dd HH:mm:ss" ] } } }
output:
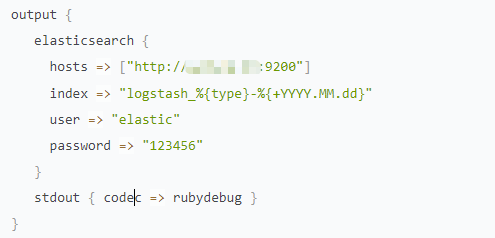
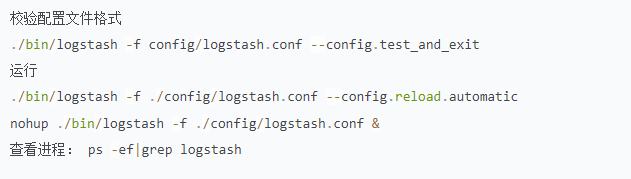
配置完成,验证配置文件,并运行Logstash
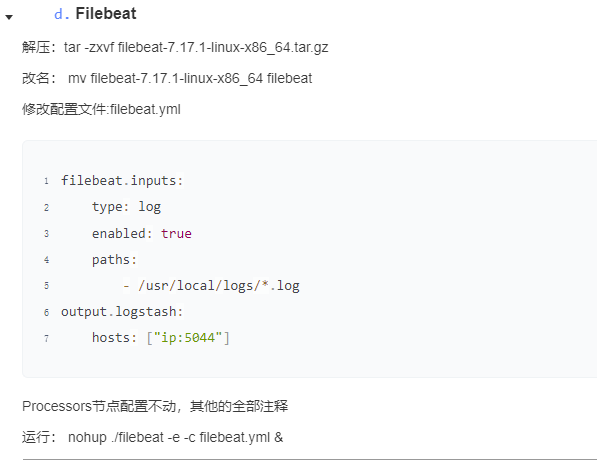
3.4 Filebeat
阿里云国际版折扣https://www.yundadi.com |
| 阿里云国际,腾讯云国际,低至75折。AWS 93折 免费开户实名账号 代冲值 优惠多多 微信号:monov8 飞机:@monov6 |