

使用kubeadm搭建高可用k8s集群
| 阿里云国内75折 回扣 微信号:monov8 |
| 阿里云国际,腾讯云国际,低至75折。AWS 93折 免费开户实名账号 代冲值 优惠多多 微信号:monov8 飞机:@monov6 |
使用kubeadm搭建高可用k8s集群
方案选型
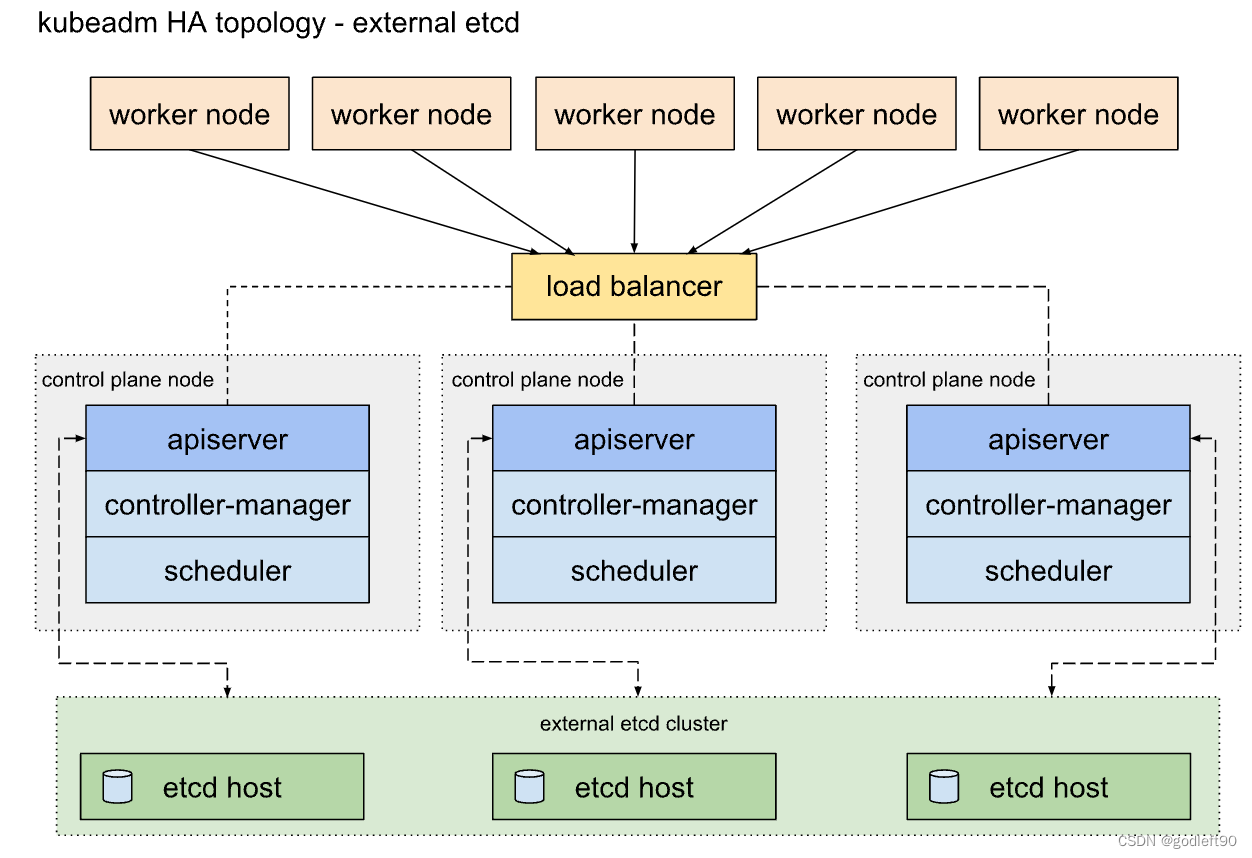
外部etcd集群 + LoadBalanceHaproxy+keepalived+ K8s集群
| 机器IP | hostname | role | 组件 |
|---|---|---|---|
| 192.168.20.1 | master01 | master | etcd,haproxy,apiserver,controller-manager,scheduler |
| 192.168.20.2 | master02 | master | etcd,haproxy,apiserver,controller-manager,scheduler |
| 192.168.20.3 | master03 | master | etcd,haproxy,apiserver,controller-manager,scheduler |
| 192.168.20.4 | worker01 | worker | app |
| 192.168.20.5 | wroker02 | worker | app |
| 192.168.20.121 | virtual_ip | VIP | LB |
安装脚本及步骤见github
使用外部etcd集群部署的k8s集群拓扑结构图
操作系统及软件版本信息
- CentOS 7
- Linux 3.10
- kubernetes v1.24
- docker-ce 3:20.10.17-3.el7
- kubelet v1.24.2
- kubeadm v1.24.2
- kubectl v1.24.2
部署流程
- 所有机器统一配置(打通ssh免密登录关闭防火墙软件源配置时间同步内核更新等操作)
- 部署etcd集群
- 部署负载均衡 (haproxy + keepalived)
- 部署k8s集群
高可用k8s集群部署
准备工作
开始部署之前需要对所有服务器进行以下操作以满足部署前置条件
- 关闭防火墙
- 打通ssh免密登录
- 安装iptables
- 关闭selinux
- 禁止交换分区
- 配置yum源为国内源如果无法访问外网
- 设置时间同步
- 更新内核
- 支持ipvs
- 配置host
服务器统一配置
# 所有机器均需要安装
echo "step1 关闭防火墙"
systemctl disable firewalld
systemctl stop firewalld
echo "success 关闭防火墙"

echo "step2 安装iptables"
yum -y install iptables-services
# 在 iptables 添加规则开放 6443 端口在 /etc/sysconfig/iptables 文件内容中修改
# 添加 6443 端口开放记录(在 COMMIT 前面添加)
# -A INPUT -m state --state NEW -m tcp -p tcp --dport 6443 -j ACCEPT
systemctl start iptables
systemctl enable iptables
iptables -F
service iptables save
iptables -L
echo "success 安装iptables"

echo "step3 关闭selinux"
# 临时禁用selinux
setenforce 0
# 永久关闭 修改/etc/sysconfig/selinux文件设置
sed -i 's/SELINUX=enforcing/SELINUX=disabled/g' /etc/sysconfig/selinux
sed -i "s/SELINUX=enforcing/SELINUX=disabled/g" /etc/selinux/config
echo "success 关闭selinux"

echo "step4 禁用交换分区"
swapoff -a
# 永久禁用打开/etc/fstab注释掉swap那一行。
sed -i 's/.*swap.*/#&/g' /etc/fstab
echo "success 禁用交换分区"

echo "step5 执行配置CentOS阿里云源"
rm -rfv /etc/yum.repos.d/*
curl -o /etc/yum.repos.d/CentOS-Base.repo http://mirrors.aliyun.com/repo/Centos-7.repo
echo "success 执行配置CentOS阿里云源"

echo "step6 时间同步"
yum install -y chrony
systemctl enable chronyd.service
systemctl restart chronyd.service
systemctl status chronyd.service

echo "step7 更新内核"
curl -o /etc/yum.repos.d/epel.repo http://mirrors.aliyun.com/repo/epel-7.repo
rpm --import https://www.elrepo.org/RPM-GPG-KEY-elrepo.org
yum install -y https://www.elrepo.org/elrepo-release-7.0-4.el7.elrepo.noarch.rpm
# 设置内核
#更新yum源仓库
yum -y update
#查看可用的系统内核包
yum --disablerepo="*" --enablerepo=elrepo-kernel list available
#安装内核注意先要查看可用内核我安装的是5.19版本的内核
yum --enablerepo=elrepo-kernel install  kernel-ml -y
# yum --enablerepo=elrepo-kernel install kernel-ml -y
#查看目前可用内核
awk -F\' '$1=="menuentry " {print i++ " : " $2}' /etc/grub2.cfg
echo "使用序号为0的内核序号0是前面查出来的可用内核编号"
grub2-set-default 0
#生成 grub 配置文件并重启
grub2-mkconfig -o /boot/grub2/grub.cfg
echo "success 更新内核"

# 集群内无法 ping 通 ClusterIP或 ServiceName
echo "step6 配置服务器支持开启ipvs"
cat > /etc/sysconfig/modules/ipvs.modules <<EOF
#!/bin/bash
modprobe -- ip_vs
modprobe -- ip_vs_rr
modprobe -- ip_vs_wrr
modprobe -- ip_vs_sh
modprobe -- nf_conntrack_ipv4
EOF
chmod 755 /etc/sysconfig/modules/ipvs.modules && bash /etc/sysconfig/modules/ipvs.modules && lsmod | grep -e ip_vs -e nf_conntrack_ipv4

yum install -y ipset ipvsadm
echo "success 配置服务器支持开启ipvs"

cat <<EOF | sudo tee /etc/modules-load.d/k8s.conf
overlay
br_netfilter
EOF

sudo modprobe overlay
sudo modprobe br_netfilter

# sysctl params required by setup, params persist across reboots
cat <<EOF | sudo tee /etc/sysctl.d/k8s.conf
net.bridge.bridge-nf-call-iptables  = 1
net.bridge.bridge-nf-call-ip6tables = 1
net.ipv4.ip_forward                 = 1
EOF

# Apply sysctl params without reboot
sudo sysctl --system

echo "重启服务器"
reboot
配置hostname
在相应的服务器 上设置hostname
192.168.20.1: hostnamectl set-hostname master01
192.168.20.2: hostnamectl set-hostname master02
192.168.20.3: hostnamectl set-hostname master03
192.168.20.4: hostnamectl set-hostname worker01
192.168.20.5: hostnamectl set-hostname worker02
所有服务器 配置hosts文件/etc/hosts
192.168.20.1 master01
192.168.20.2 master02
192.168.20.3 master03
192.168.20.4 worker01
192.168.20.5 worker02
打通ssh免密登录
在相应的服务器* 上生成ssh密钥文件
ssh-keygen
一路enter即可然后分别在每台服务器上将ssh的公钥拷贝到其余服务器上。
例如在服务器192.168.20.1上的操作
ssh-copy-id -i ~/.ssh/id_rsa.pub 192.168.20.2
ssh-copy-id -i ~/.ssh/id_rsa.pub 192.168.20.3
ssh-copy-id -i ~/.ssh/id_rsa.pub 192.168.20.4
ssh-copy-id -i ~/.ssh/id_rsa.pub 192.168.20.5
其他机器类似。完成之后便可以在这些机器之间实现免密登录
完成这些配置后重启服务器。
部署etcd集群
etcd集群在master01、master02、master03三个服务器上进行部署
step1 在master01上生成配置相关文件
etcd1=192.168.20.1
etcd2=192.168.20.2
etcd3=192.168.20.3

TOKEN=abcd1234
ETCDHOSTS=($etcd1 $etcd2 $etcd3)
NAMES=("master01" "master02" "master03")
for i in "${!ETCDHOSTS[@]}"; do
HOST=${ETCDHOSTS[$i]}
NAME=${NAMES[$i]}
cat << EOF > /tmp/$NAME.conf
# [member]
ETCD_NAME=$NAME
ETCD_DATA_DIR="/var/lib/etcd/default.etcd"
ETCD_LISTEN_PEER_URLS="http://$HOST:2380"
ETCD_LISTEN_CLIENT_URLS="http://$HOST:2379,http://127.0.0.1:2379"
#[cluster]
ETCD_INITIAL_ADVERTISE_PEER_URLS="http://$HOST:2380"
ETCD_INITIAL_CLUSTER="${NAMES[0]}=http://${ETCDHOSTS[0]}:2380,${NAMES[1]}=http://${ETCDHOSTS[1]}:2380,${NAMES[2]}=http://${ETCDHOSTS[2]}:2380"
ETCD_INITIAL_CLUSTER_STATE="new"
ETCD_INITIAL_CLUSTER_TOKEN="$TOKEN"
ETCD_ADVERTISE_CLIENT_URLS="http://$HOST:2379"
EOF
done
ls /tmp/master*
scp /tmp/master02.conf $etcd2:/etc/etcd/etcd.conf
scp /tmp/master03.conf $etcd3:/etc/etcd/etcd.conf
cp /tmp/master01.conf /etc/etcd/etcd.conf
rm -f /tmp/master*.conf
step2 每台服务器上启动etcd服务
echo "启动etcd服务"
yum install -y etcd
systemctl enable etcd --now
step3 检查etcd集群是否正常
echo "验证etcd集群"
etcdctl member list
etcdctl cluster-health
结果如下说明成功
member 35f923e23a443e3d is healthy: got healthy result from http://192.168.20.1:2379
member 83061a96c7f09e99 is healthy: got healthy result from http://192.168.20.2:2379
member f4d71112ff618b3a is healthy: got healthy result from http://192.168.20.3:2379
cluster is healthy
至此etcd集群搭建完成
部署负载均衡 (haproxy + keepalived)
haproxy + keepalived可以使用本地部署或static pod的方式部署。
我们这里使用本地部署的方式。
step1 下载haproxy与keepalived
yum install -y haproxy keepalived
step2 分别配置keepalived与haproxy服务的配置文件
keepalived配置文件keepalived.conf
不同服务器上的配置内容会有些许不同
参考示例keepalived.conf
! /etc/keepalived/keepalived.conf
! Configuration File for keepalived
global_defs {
    router_id LVS_DEVEL
}
vrrp_script check_apiserver {
  script "/etc/keepalived/check_apiserver.sh"
  interval 3
  weight -2
  fall 10
  rise 2
}

vrrp_instance VI_1 {
    state ${STATE}
    interface ${INTERFACE}
    virtual_router_id ${ROUTER_ID}
    priority ${PRIORITY}
    authentication {
        auth_type PASS
        auth_pass ${AUTH_PASS}
    }
    virtual_ipaddress {
        ${APISERVER_VIP}
    }
    track_script {
        check_apiserver
    }
}
参数说明
- ${STATE} is MASTER for one and BACKUP for all other hosts, hence the virtual IP will initially be assigned to the MASTER.
- ${INTERFACE} is the network interface taking part in the negotiation of the virtual IP, e.g. eth0.
- ${ROUTER_ID} should be the same for all keepalived cluster hosts while unique amongst all clusters in the same subnet. Many distros pre-configure its value to 51.
- ${PRIORITY} should be higher on the control plane node than on the backups. Hence 101 and 100 respectively will suffice.
- ${AUTH_PASS} should be the same for all keepalived cluster hosts, e.g. 42
- ${APISERVER_VIP} is the virtual IP address negotiated between the keepalived cluster hosts.
/etc/keepalived/check_apiserver.sh如下
#!/bin/sh

errorExit() {
    echo "*** $*" 1>&2
    exit 1
}

curl --silent --max-time 2 --insecure https://localhost:${APISERVER_DEST_PORT}/ -o /dev/null || errorExit "Error GET https://localhost:${APISERVER_DEST_PORT}/"
if ip addr | grep -q ${APISERVER_VIP}; then
    curl --silent --max-time 2 --insecure https://${APISERVER_VIP}:${APISERVER_DEST_PORT}/ -o /dev/null || errorExit "Error GET https://${APISERVER_VIP}:${APISERVER_DEST_PORT}/"
fi
参数说明
- ${APISERVER_VIP} is the virtual IP address negotiated between the keepalived cluster hosts.
- ${APISERVER_DEST_PORT} the port through which Kubernetes will talk to the API Server.
haproxy配置文件haproxy.cfg
参考示例haproxy.cfg
# /etc/haproxy/haproxy.cfg
#---------------------------------------------------------------------
# Global settings
#---------------------------------------------------------------------
global
    log /dev/log local0
    log /dev/log local1 notice
    daemon

#---------------------------------------------------------------------
# common defaults that all the 'listen' and 'backend' sections will
# use if not designated in their block
#---------------------------------------------------------------------
defaults
    mode                    http
    log                     global
    option                  httplog
    option                  dontlognull
    option http-server-close
    option forwardfor       except 127.0.0.0/8
    option                  redispatch
    retries                 1
    timeout http-request    10s
    timeout queue           20s
    timeout connect         5s
    timeout client          20s
    timeout server          20s
    timeout http-keep-alive 10s
    timeout check           10s

#---------------------------------------------------------------------
# apiserver frontend which proxys to the control plane nodes
#---------------------------------------------------------------------
frontend apiserver
    bind *:${APISERVER_DEST_PORT}
    mode tcp
    option tcplog
    default_backend apiserver

#---------------------------------------------------------------------
# round robin balancing for apiserver
#---------------------------------------------------------------------
backend apiserver
    option httpchk GET /healthz
    http-check expect status 200
    mode tcp
    option ssl-hello-chk
    balance     roundrobin
        server ${HOST1_ID} ${HOST1_ADDRESS}:${APISERVER_SRC_PORT} check
        # [...]
参数说明
- ${APISERVER_DEST_PORT} the port through which Kubernetes will talk to the API Server.
- ${APISERVER_SRC_PORT} the port used by the API Server instances
- ${HOST1_ID} a symbolic name for the first load-balanced API Server host
- ${HOST1_ADDRESS} a resolvable address (DNS name, IP address) for the first load-balanced API Server host
- additional server lines, one for each load-balanced API Server host
step3 启动haproxy与keepalived服务
$master01:
cp keepalived_1.conf /etc/keepalived/keepalived.conf
cp haproxy.cfg /etc/haproxy
$master02:
cp keepalived_2.conf /etc/keepalived/keepalived.conf
cp haproxy.cfg /etc/haproxy
$master03:
cp keepalived_3.conf /etc/keepalived/keepalived.conf
cp haproxy.cfg /etc/haproxy
启动服务
systemctl enable haproxy --now
systemctl enable keepalived --now
部署k8s集群
部署流程
- 安装kubernets软件
- 安装CRI (docker + cri-dockerd)
- 生成集群初始化配置yaml文件
- 启动第一个控制节点
- 加入其他控制(master)节点
- 加入worker节点
Container Runtime 使用的是Docker Engine, 根据官方推荐CRI我们使用 cri-dockerd
step1 所有服务器上安装kubernets相关软件
cat <<EOF > /etc/yum.repos.d/kubernetes.repo
[kubernetes]
name=Kubernetes
baseurl=https://mirrors.aliyun.com/kubernetes/yum/repos/kubernetes-el7-x86_64/
enabled=1
gpgcheck=0
repo_gpgcheck=0
gpgkey=https://mirrors.aliyun.com/kubernetes/yum/doc/yum-key.gpg https://mirrors.aliyun.com/kubernetes/yum/doc/rpm-package-key.gpg
EOF
# 安装kubeadm、kubectl、kubelet
version=1.24.2-0
yum install -y kubectl-$version kubeadm-$version kubelet-$version --disableexcludes=kubernetes
# kubelet服务
systemctl enable kubelet
step2 所有服务器上安装docker与cri-dockerd
安装docker
# 使用docker engine作为CRI, 使用docker进行容器管理
# 安装docker所需的工具
yum install -y yum-utils device-mapper-persistent-data lvm2 bash-completion net-tools gcc
# 配置阿里云的docker源
yum-config-manager --add-repo http://mirrors.aliyun.com/docker-ce/linux/centos/docker-ce.repo
yum install -y docker-ce
echo "启动docker"
systemctl daemon-reload
systemctl enable docker && systemctl start docker && systemctl status docker
安装cri-dockerd
安装cri-dockerd参考https://github.com/Mirantis/cri-dockerd
1 编译cri-dockerd
git clone https://github.com/Mirantis/cri-dockerd.git
# 编译安装需要使用go环境安装go环境
yum install -y golang
# vim /etc/profile
# 添加
export GOROOT=/usr/lib/golang
export GOPATH=/home/gopath/
export GO111MODULE=on
export PATH=$PATH:$GOROOT/bin:$GOPATH/bin
# source /etc/profile
#
go env -w GOPROXY=https://goproxy.io,direct
cd cri-dockerd
mkdir bin
go get && go build -o bin/cri-dockerd
mkdir -p /usr/local/bin
install -o root -g root -m 0755 bin/cri-dockerd /usr/local/bin/cri-dockerd
cp -a packaging/systemd/* /etc/systemd/system
sed -i -e 's,/usr/bin/cri-dockerd,/usr/local/bin/cri-dockerd,' /etc/systemd/system/cri-docker.service
2 修改cri-dockerd配置
修改/etc/systemd/system/cri-docker.service
将下段命令复制到上述文件对应的位置:
ExecStart=/usr/local/bin/cri-dockerd --network-plugin=cni --pod-infra-container-image=registry.aliyuncs.com/google_containers/pause:3.7
vim /etc/systemd/system/cri-docker.service
ExecStart=/usr/local/bin/cri-dockerd --network-plugin=cni --pod-infra-container-image=registry.aliyuncs.com/google_containers/pause:3.7
3 启动cri-dockerd
systemctl daemon-reload
systemctl enable cri-docker.service
systemctl enable --now cri-docker.socket
systemctl status cri-docker.service
systemctl status cri-docker.socket
step3 生成集群init配置文件
查看不同kind的默认配置
kubeadm config print init-defaults --component-configs KubeletConfiguration
kubeadm config print init-defaults --component-configs InitConfiguration
kubeadm config print init-defaults --component-configs ClusterConfiguration
配置文件样例cluster_conf.yaml
---
apiVersion: kubeadm.k8s.io/v1beta3
bootstrapTokens:
- groups:
  - system:bootstrappers:kubeadm:default-node-token
  token: abcdef.0123456789abcdef
  ttl: 24h0m0s
  usages:
  - signing
  - authentication
kind: InitConfiguration
localAPIEndpoint:
  advertiseAddress: $master01_ip # 这里我使用master01节点作为第一个控制节点启动集群所以使用master01的IP
  bindPort: 6443
nodeRegistration:
  criSocket: unix:///var/run/cri-dockerd.sock # 这里的criSocket使用cri-dockerd
---
apiVersion: kubeadm.k8s.io/v1beta3
kind: ClusterConfiguration
kubernetesVersion: 1.24.2
networking:
  dnsDomain: cluster.local
  podSubnet: 10.244.0.0/16
  serviceSubnet: 10.96.0.0/12
scheduler: {}
imageRepository: registry.aliyuncs.com/google_containers # 使用了国内阿里源
apiServerCertSANs:
- 192.168.20.121 # 使用负载均衡的VIP
controlPlaneEndpoint: "192.168.20.121:16443" # 使用负载均衡的VIP
etcd:
  external:
    endpoints:
      - http://192.168.20.1:2379 # change ETCD_0_IP appropriately
      - http://192.168.20.2:2379 # change ETCD_1_IP appropriately
      - http://192.168.20.3:2379 # change ETCD_2_IP appropriately
---
apiVersion: kubeproxy.config.k8s.io/v1alpha1
kind: KubeProxyConfiguration
featureGates:
  SupportIPVSProxyMode: true
mode: ipvs
---
apiVersion: kubelet.config.k8s.io/v1beta1
authentication:
  anonymous:
    enabled: false
  webhook:
    cacheTTL: 0s
    enabled: true
  x509:
    clientCAFile: /etc/kubernetes/pki/ca.crt
authorization:
  mode: Webhook
  webhook:
    cacheAuthorizedTTL: 0s
    cacheUnauthorizedTTL: 0s
cgroupDriver: systemd
clusterDNS:
- 10.96.0.10
clusterDomain: cluster.local
cpuManagerReconcilePeriod: 0s
evictionPressureTransitionPeriod: 0s
fileCheckFrequency: 0s
healthzBindAddress: 127.0.0.1
healthzPort: 10248
httpCheckFrequency: 0s
imageMinimumGCAge: 0s
kind: KubeletConfiguration
logging:
  flushFrequency: 0
  options:
    json:
      infoBufferSize: "0"
  verbosity: 0
memorySwap: {}
nodeStatusReportFrequency: 0s
nodeStatusUpdateFrequency: 0s
rotateCertificates: true
runtimeRequestTimeout: 0s
shutdownGracePeriod: 0s
shutdownGracePeriodCriticalPods: 0s
staticPodPath: /etc/kubernetes/manifests
streamingConnectionIdleTimeout: 0s
syncFrequency: 0s
volumeStatsAggPeriod: 0s
step4 启动master01节点
注意如果不是第一次启动需要确保以下2点
- 关闭kubelet服务systemctl stop kubelet
- 删除kubernets目录下的所有文件, rm -rf /etc/kubernetes/*
kubeadm init --config cluster_conf.yaml --upload-certs --v=9
若出现下面的输出内容则说明启动成功
Your Kubernetes control-plane has initialized successfully!

To start using your cluster, you need to run the following as a regular user:

  mkdir -p $HOME/.kube
  sudo cp -i /etc/kubernetes/admin.conf $HOME/.kube/config
  sudo chown $(id -u):$(id -g) $HOME/.kube/config

Alternatively, if you are the root user, you can run:

  export KUBECONFIG=/etc/kubernetes/admin.conf

You should now deploy a pod network to the cluster.
Run "kubectl apply -f [podnetwork].yaml" with one of the options listed at:
  https://kubernetes.io/docs/concepts/cluster-administration/addons/

You can now join any number of the control-plane node running the following command on each as root:

  kubeadm join 192.168.20.121:16443 --token abcdef.0123456789abcdef \
        --discovery-token-ca-cert-hash sha256:d48abff778cc0c2f6be87d07b182d1b10426aab393a149fd649c14220bcac53c \
        --control-plane --certificate-key 2a77eef911983d84b7671882fe7d60028a177687c421d74a487de793fbd6b2a5

Please note that the certificate-key gives access to cluster sensitive data, keep it secret!
As a safeguard, uploaded-certs will be deleted in two hours; If necessary, you can use
"kubeadm init phase upload-certs --upload-certs" to reload certs afterward.

Then you can join any number of worker nodes by running the following on each as root:

kubeadm join 192.168.20.121:16443 --token abcdef.0123456789abcdef \
        --discovery-token-ca-cert-hash sha256:d48abff778cc0c2f6be87d07b182d1b10426aab393a149fd649c14220bcac53c
kubectl配置
mkdir -p $HOME/.kube
sudo cp -i /etc/kubernetes/admin.conf $HOME/.kube/config
sudo chown $(id -u):$(id -g) $HOME/.kube/config
export KUBECONFIG=/etc/kubernetes/admin.conf
安装网络插件CNI flannel
kubectl apply -f https://github.com/coreos/flannel/raw/master/Documentation/kube-flannel.yml
step5 加入master02/master03控制节点
1 将集群的证书从master01节点拷贝到这两个节点
在master01节点上执行
USER=root
CONTROL_PLANE_IPS=("192.168.20.2" "192.168.20.3")
for host in ${CONTROL_PLANE_IPS}; do
    scp /etc/kubernetes/pki/ca.crt "${USER}"@$host:/etc/kubernetes/pki
    scp /etc/kubernetes/pki/ca.key "${USER}"@$host:/etc/kubernetes/pki
    scp /etc/kubernetes/pki/sa.key "${USER}"@$host:/etc/kubernetes/pki
    scp /etc/kubernetes/pki/sa.pub "${USER}"@$host:/etc/kubernetes/pki
    scp /etc/kubernetes/pki/front-proxy-ca.crt "${USER}"@$host:/etc/kubernetes/pki
    scp /etc/kubernetes/pki/front-proxy-ca.key "${USER}"@$host:/etc/kubernetes/pki
done
2 加入master02/master03节点
分别登录到master02/03节点执行下面的命令
kubeadm join 192.168.20.121:16443 --token abcdef.0123456789abcdef \
        --discovery-token-ca-cert-hash sha256:d48abff778cc0c2f6be87d07b182d1b10426aab393a149fd649c14220bcac58c \
        --control-plane --certificate-key 2a77eef911983d84b7671882fe7d60028a177687c421d74a487de793fbd6b2a5 \
        --cri-socket unix:///var/run/cri-dockerd.sock
出现下述输出说明加入成功
[mark-control-plane] Marking the node master03 as control-plane by adding the labels: [node-role.kubernetes.io/control-plane node.kubernetes.io/exclude-from-external-load-balancers]
[mark-control-plane] Marking the node master03 as control-plane by adding the taints [node-role.kubernetes.io/master:NoSchedule node-role.kubernetes.io/control-plane:NoSchedule]

This node has joined the cluster and a new control plane instance was created:

* Certificate signing request was sent to apiserver and approval was received.
* The Kubelet was informed of the new secure connection details.
* Control plane label and taint were applied to the new node.
* The Kubernetes control plane instances scaled up.


To start administering your cluster from this node, you need to run the following as a regular user:

        mkdir -p $HOME/.kube
        sudo cp -i /etc/kubernetes/admin.conf $HOME/.kube/config
        sudo chown $(id -u):$(id -g) $HOME/.kube/config

Run 'kubectl get nodes' to see this node join the cluster.
3 master01节点上确认这两个节点是否加入成功
kubectl get nodes
NAME       STATUS   ROLES           AGE     VERSION
master01   Ready    control-plane   46m     v1.24.2
master02   Ready    control-plane   4m58s   v1.24.2
master03   Ready    control-plane   2m8s    v1.24.2
step6 加入worker节点
登录worker节点执行下述命令
kubeadm join 192.168.20.121:16443 --token abcdef.0123456789abcdef \
        --discovery-token-ca-cert-hash sha256:d48abff778cc0c2f6be87d07b182d1b10426aab393a149fd649c14220bcac58c \
        --cri-socket unix:///var/run/cri-dockerd.sock
到此整个集群便部署成功
参考文档
- https://nieoding-dis-doc.readthedocs.io/zh/latest/k8s-ha/#haproxy
- https://zhuanlan.zhihu.com/p/106531282
- https://kubernetes.io/docs/setup/production-environment/tools/kubeadm/high-availability/
- https://kubernetes.io/docs/setup/production-environment/tools/kubeadm/setup-ha-etcd-with-kubeadm/
- https://github.com/kubernetes/kubeadm/blob/main/docs/ha-considerations.md#options-for-software-load-balancing
- https://kubernetes.io/docs/setup/production-environment/tools/kubeadm/high-availability/