

通过cri-o部署k8s集群环境-CSDN博客
| 阿里云国内75折 回扣 微信号:monov8 |
| 阿里云国际,腾讯云国际,低至75折。AWS 93折 免费开户实名账号 代冲值 优惠多多 微信号:monov8 飞机:@monov6 |
目录
| 192.168.2.190 | master |
|---|---|
| 192.168.2.191 | node2-191.com |
| 192.168.2.193 | node4-193.com |
一.基础环境配置每个节点都做
1.hosts解析
[root@master ~]# tail -3 /etc/hosts
192.168.2.190 master
192.168.2.191 node2-191.com
192.168.2.193 node4-193.com
2.防火墙和selinux
[root@master ~]# systemctl status firewalld.service;getenforce
● firewalld.service - firewalld - dynamic firewall daemon
   Loaded: loaded (/usr/lib/systemd/system/firewalld.service; disabled; vendor preset: enabled)
   Active: inactive (dead)
     Docs: man:firewalld(1)
Disabled
#临时
systemctl stop firewalld
setenforce 0
#禁用
systemctl disable firewalld
sed -i '/^SELINUX=/ c SELINUX=disabled' /etc/selinux/config
3.安装基本软件并配置时间同步
[root@master ~]# yum install -y wget tree bash-completion lrzsz psmisc net-tools vim chrony
[root@master ~]# vim /etc/chrony.conf
:3,6 s/^/#      #注释掉原有行
server ntp1.aliyun.com iburst
[root@node1-190 ~]# systemctl restart chronyd
[root@node1-190 ~]# chronyc sources
210 Number of sources = 1
MS Name/IP address         Stratum Poll Reach LastRx Last sample
===============================================================================
^* 120.25.115.20                 2   8   341   431   -357us[ -771us] +/-   20ms
4.禁用swap分区
[root@master ~]# swapoff -a && sed -i 's/.*swap.*/#&/' /etc/fstab && free -m
              total        used        free      shared  buff/cache   available
Mem:          10376         943        8875          11         557        9178
Swap:             0           0           0
5.更改内核参数
[root@node1-190 ~]# cat >> /etc/sysctl.d/k8s.conf << EOF
vm.swappiness=0
net.bridge.bridge-nf-call-ip6tables = 1
net.bridge.bridge-nf-call-iptables = 1
net.ipv4.ip_forward = 1
EOF
[root@node1-190 ~]# modprobe br_netfilter &&  modprobe overlay && sysctl -p /etc/sysctl.d/k8s.conf
vm.swappiness = 0
net.bridge.bridge-nf-call-ip6tables = 1
net.bridge.bridge-nf-call-iptables = 1
net.ipv4.ip_forward = 1
6.配置ipvs
[root@node1-190 ~]# yum install ipset ipvsadm -y
[root@node1-190 ~]# cat <<EOF >  /etc/sysconfig/modules/ipvs.modules
#!/bin/bash
modprobe -- ip_vs
modprobe -- ip_vs_rr
modprobe -- ip_vs_wrr
modprobe -- ip_vs_sh
modprobe -- nf_conntrack
EOF
# 为脚本文件添加执行权限并运行验证是否加载成功
[root@node1-190 ~]# chmod +x /etc/sysconfig/modules/ipvs.modules && /bin/bash /etc/sysconfig/modules/ipvs.modules && lsmod | grep -e ip_vs -e nf_conntrack_ipv4
nf_conntrack_ipv4      15053  2
nf_defrag_ipv4         12729  1 nf_conntrack_ipv4
ip_vs_sh               12688  0
ip_vs_wrr              12697  0
ip_vs_rr               12600  0
ip_vs                 145458  6 ip_vs_rr,ip_vs_sh,ip_vs_wrr
nf_conntrack          139264  7 ip_vs,nf_nat,nf_nat_ipv4,xt_conntrack,nf_nat_masquerade_ipv4,nf_conntrack_netlink,nf_conntrack_ipv4
libcrc32c              12644  4 xfs,ip_vs,nf_nat,nf_conntrack
7.k8s下载
1配置镜像下载相关软件
[root@master ~]# cat <<EOF > /etc/yum.repos.d/kubernetes.repo
[kubernetes]
name=Kubernetes
baseurl=http://mirrors.aliyun.com/kubernetes/yum/repos/kubernetes-el7-x86_64
enabled=1
gpgcheck=0
repo_gpgcheck=0
gpgkey=http://mirrors.aliyun.com/kubernetes/yum/doc/yum-key.gpg
http://mirrors.aliyun.com/kubernetes/yum/doc/rpm-package-key.gpg
EOF
[root@master ~]# yum install -y kubeadm kubelet kubectl
[root@master ~]# kubeadm version
kubeadm version: &version.Info{Major:"1", Minor:"28", GitVersion:"v1.28.2", GitCommit:"89a4ea3e1e4ddd7f7572286090359983e0387b2f", GitTreeState:"clean", BuildDate:"2023-09-13T09:34:32Z", GoVersion:"go1.20.8", Compiler:"gc", Platform:"linux/amd64"}2配置kubelet上的cgroup
[root@master ~]# cat <<EOF > /etc/sysconfig/kubelet
KUBELET_EXTRA_ARGS="--cgroup-driver=systemd"
KUBE_PROXY_MODE="ipvs"
EOF
[root@master ~]# systemctl start kubelet
[root@master ~]# systemctl enable kubelet
Created symlink from /etc/systemd/system/multi-user.target.wants/kubelet.service to /usr/lib/systemd/system/kubelet.service.
二.下载cri-o包所有节点做
1.在线下载
[root@master ~]# VERSION=1.25
[root@master ~]# curl -L -o /etc/yum.repos.d/devel:kubic:libcontainers:stable.repo https://download.opensuse.org/repositories/devel:/kubic:/libcontainers:/stable/CentOS_7/devel:kubic:libcontainers:stable.repo
ners:stable:cri-o:${VERSION}.repo https://download.opensuse.org/repositories/devel:kubic:libcontainers:stable:cri-o:${VERSION}/CentOS_7/devel:kubic:libcontainers:stable:cri-o:${VERSION}.repo  % Total    % Received % Xferd  Average Speed   Time    Time     Time  Current
                                 Dload  Upload   Total   Spent    Left  Speed
100   359  100   359    0     0    293      0  0:00:01  0:00:01 --:--:--   293
[root@master ~]# curl -L -o /etc/yum.repos.d/devel:kubic:libcontainers:stable:cri-o:${VERSION}.repo https://download.opensuse.org/repositories/devel:kubic:libcontainers:stable:cri-o:${VERSION}/CentOS_7/devel:kubic:libcontainers:stable:cri-o:${VERSION}.repo
  % Total    % Received % Xferd  Average Speed   Time    Time     Time  Current
                                 Dload  Upload   Total   Spent    Left  Speed
100   425  100   425    0     0    353      0  0:00:01  0:00:01 --:--:--   353
100   426  100   426    0     0    185      0  0:00:02  0:00:02 --:--:--  4840
100   427  100   427    0     0    166      0  0:00:02  0:00:02 --:--:--   166
100   428  100   428    0     0    151      0  0:00:02  0:00:02 --:--:--   151
100   429  100   429    0     0    138      0  0:00:03  0:00:03 --:--:--     0
100   381  100   381    0     0    112      0  0:00:03  0:00:03 --:--:--   112
[root@master ~]# yum install -y cri-o
2.本地下载
链接百度网盘 请输入提取码 提取码i7ih
三.配置文件所有节点做
1.修改crio配置文件
找到下面两处位置进行修改
[root@master ~]# vim /etc/crio/crio.conf
pause_image = "registry.cn-hangzhou.aliyuncs.com/google_containers/pause:3.9"
insecure_registries = ["docker.mirrors.ustc.edu.cn","dockerhub.azk8s.cn","hub-mirror.c.163.com"] 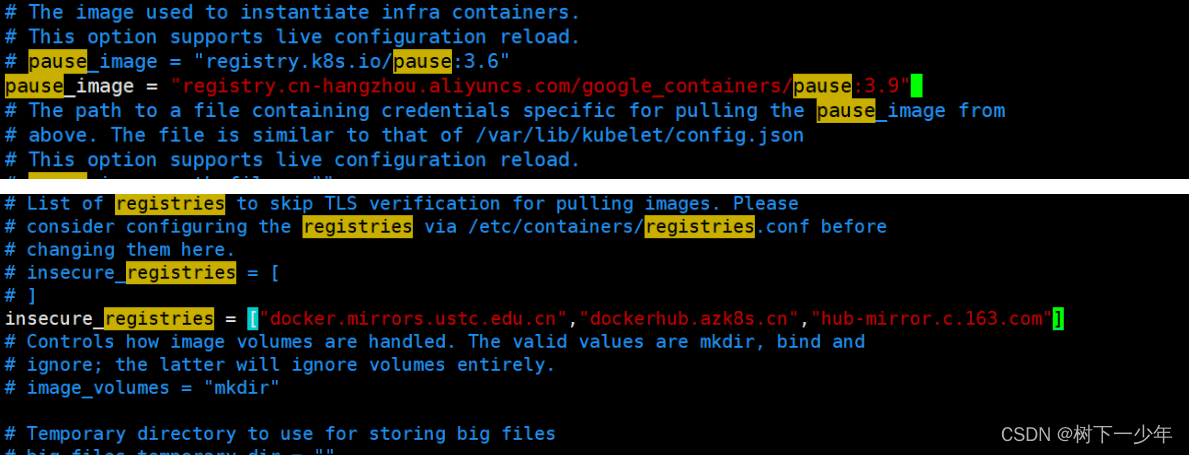
2.修改kubelet参数所有节点做
将原有的KUBELET_EXTRA_ARGS修改
[root@master ~]# vim /etc/sysconfig/kubelet
KUBELET_EXTRA_ARGS="--cgroup-driver=systemd --container-runtime-endpoint='unix:///var/run/crio/crio.sock' --runtime-request-timeout=5m" 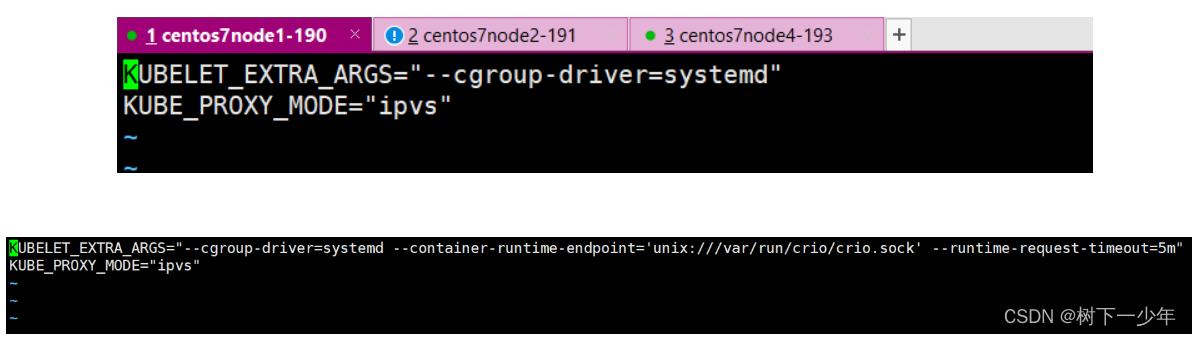
3.重启crio和kubelet
[root@master ~]# systemctl start crio
[root@master ~]# systemctl enable crio
[root@master ~]# systemctl restart crio kubelet
四.master节点初始化master节点做
#若初始化失败使用这个kubeadm reset命令进行重置
[root@master ~]# kubeadm init --kubernetes-version=v1.28.2 --pod-network-cidr=10.224.0.0/16 \
> --apiserver-advertise-address=192.168.2.190 \ #修改为自己master节点的IP
> --service-cidr=10.96.0.0/12 \
> --cri-socket unix:///var/run/crio/crio.sock \
> --image-repository registry.aliyuncs.com/google_containers
......
Your Kubernetes control-plane has initialized successfully!
To start using your cluster, you need to run the following as a regular user:
mkdir -p $HOME/.kube #master上是普通用户操作
sudo cp -i /etc/kubernetes/admin.conf $HOME/.kube/config
sudo chown $(id -u):$(id -g) $HOME/.kube/config
Alternatively, if you are the root user, you can run:
export KUBECONFIG=/etc/kubernetes/admin.conf #master上是普root用户操作
You should now deploy a pod network to the cluster.
Run "kubectl apply -f [podnetwork].yaml" with one of the options listed at:
https://kubernetes.io/docs/concepts/cluster-administration/addons/
Then you can join any number of worker nodes by running the following on each as root:
kubeadm join 192.168.2.190:6443 --token jxl4ka.4umrziv1a7xf1dpn \
--discovery-token-ca-cert-hash sha256:6903b8d024842b24fd9c25848df5980d93c42d0fcd7838fdc24ef123c5eba794
#node节点使用这行命令加入master
[root@master ~]# export KUBECONFIG=/etc/kubernetes/admin.conf五.node节点加入node节点做
#若加入失败使用这个kubeadm reset命令进行重置
[root@node2-191 ~]# kubeadm join 192.168.2.190:6443 --token jxl4ka.4umrziv1a7xf1dpn \
> --discovery-token-ca-cert-hash sha256:6903b8d024842b24fd9c25848df5980d93c42d0fcd7838fdc24ef123c5eba794
[preflight] Running pre-flight checks
[preflight] Reading configuration from the cluster...
[preflight] FYI: You can look at this config file with 'kubectl -n kube-system get cm kubeadm-config -o yaml'
[kubelet-start] Writing kubelet configuration to file "/var/lib/kubelet/config.yaml"
[kubelet-start] Writing kubelet environment file with flags to file "/var/lib/kubelet/kubeadm-flags.env"
[kubelet-start] Starting the kubelet
[kubelet-start] Waiting for the kubelet to perform the TLS Bootstrap...
This node has joined the cluster:
* Certificate signing request was sent to apiserver and a response was received.
* The Kubelet was informed of the new secure connection details.
Run 'kubectl get nodes' on the control-plane to see this node join the cluster.
[root@master ~]# kubectl get nodes
NAME STATUS ROLES AGE VERSION
master Ready control-plane 36m v1.28.2
node2-191.com Ready <none> 70s v1.28.2
node4-193.com Ready <none> 16s v1.28.2六.添加网络插件master节点做
1.应用calico.yaml
[root@master ~]# wget --no-check-certificate https://projectcalico.docs.tigera.io/archive/v3.25/manifests/calico.yaml找到这行增加以下内容
[root@master ~]# vim calico.yaml
- name: IP_AUTODETECTION_METHOD
              value: "interface=ens33"      #ens33处为你的网卡名称
[root@master ~]# kubectl apply -f calico.yaml 
2.查看验证
#等待初始完成即可
[root@master ~]# kubectl get pod -A
NAMESPACE     NAME                                       READY   STATUS     RESTARTS   AGE
kube-system   calico-kube-controllers-658d97c59c-8ww2m   1/1     Running    0          3m43s
kube-system   calico-node-86787                          1/1     Running    0          3m43s
kube-system   calico-node-jgz7g                          1/1     Running    0          3m43s
kube-system   calico-node-lwxg5                          1/1     Running    0          3m43s
kube-system   coredns-66f779496c-9tvjh                   1/1     Running    0          89m
kube-system   coredns-66f779496c-qzqv9                   1/1     Running    0          89m
kube-system   etcd-master                                1/1     Running    0          89m
kube-system   kube-apiserver-master                      1/1     Running    0          89m
kube-system   kube-controller-manager-master             1/1     Running    0          89m
kube-system   kube-proxy-8nf9q                           1/1     Running    0          54m
kube-system   kube-proxy-sczts                           1/1     Running    0          89m
kube-system   kube-proxy-vrms2                           1/1     Running    0          53m
kube-system   kube-scheduler-master                      1/1     Running    0          89m