

如何使用 Python比较两张图像并获得准确度?
| 阿里云国内75折 回扣 微信号:monov8 |
| 阿里云国际,腾讯云国际,低至75折。AWS 93折 免费开户实名账号 代冲值 优惠多多 微信号:monov8 飞机:@monov6 |
本文将带你了解如何使用 Python、OpenCV 和人脸识别模块比较两张图像并获得这些图像之间的准确度水平。
首先你需要了解我们是如何比较两个图像的。我们正在使用Face Recognition python 模块来获取两张图像的128 个面部编码我们将比较这些编码。比较结果返回 True 或 False。如果结果为True 那么两个图像将是相同的。如果是False则两个图像将不相同。
128 种面部编码将如下所示👇🏻
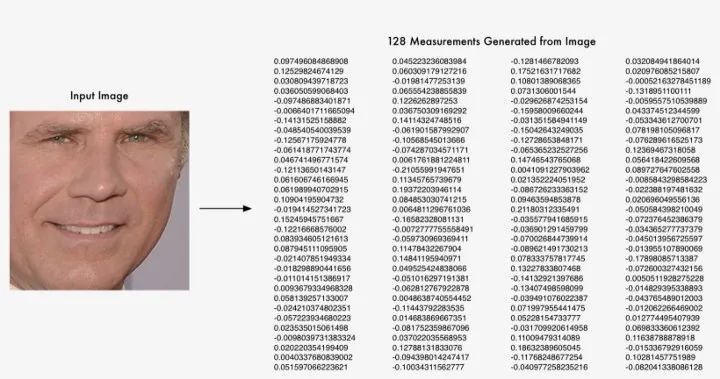
128 个人脸编码人脸标志
仅当比较结果返回 True 值时才会打印准确度级别。
现在让我们进入本主题的编码部分
为了实现这一点我们需要安装几个 python 模块。为此只需打开命令提示符或终端键入以下内容。
pip install opencv-python
pip install face-recognition
安装后现在是时候导入这些模块了。然后我们需要创建一个名为 find_face_encodings(image_path) 的新函数它获取图像位置路径并返回 128 个面部编码这在比较图像时非常有用。
find_face_encodings(image_path) 函数将使用 OpenCV 模块从我们作为参数传递的路径中读取图像然后返回使用 face_recognition 模块中的 face_encodings() 函数获得的 128 个人脸编码。
import cv2
import face_recognition
def find_face_encodings(image_path):
    # reading image
    image = cv2.imread(image_path)

    # get face encodings from the image
    face_enc = face_recognition.face_encodings(image)

    # return face encodings
    return face_enc[0]
现在使用两个不同的图像路径调用 find_face_encodings(image_path) 函数并将其存储在两个不同的变量中image_1和image_2
# getting face encodings for first image
image_1 = find_face_encodings("image_1.jpg")

# getting face encodings for second image
image_2  = find_face_encodings("image_2.jpg")
现在我们可以使用编码执行比较和查找这些图像的准确性等操作。
比较将通过使用 face_recognition 中的 compare_faces() 函数来完成。
通过找到 100 和 face_distance 之间的差异来确定准确性。
# checking both images are same
is_same = face_recognition.compare_faces([image_1], image_2)[0]
print(f"Is Same: {is_same}")
if is_same:
    # finding the distance level between images
    distance = face_recognition.face_distance([image_1], image_2)
    distance = round(distance[0] * 100)

    # calcuating accuracy level between images
    accuracy = 100 - round(distance)

    print("The images are same")
    print(f"Accuracy Level: {accuracy}%")
else:
    print("The images are not same")
输出——案例 1


Is Same: True
The images are same
Accuracy Level: 64%
输出——案例 2


Is Same: False
The images are not same
☆ END ☆
如果看到这里说明你喜欢这篇文章请转发、点赞。微信搜索「uncle_pn」欢迎添加小编微信「 woshicver」每日朋友圈更新一篇高质量博文。
↓扫描二维码添加小编↓
