

【学习笔记】RabbitMQ02:交换机,以及结合springboot快速开始-CSDN博客
| 阿里云国内75折 回扣 微信号:monov8 |
| 阿里云国际,腾讯云国际,低至75折。AWS 93折 免费开户实名账号 代冲值 优惠多多 微信号:monov8 飞机:@monov6 |
参考资料
文章目录
四、RabbitMQ Exchange 交换机
4.1 交换机类型
Exchange 简称X翻译为交换机、交换器、路由器…
注意交换机并不是所有消息中间件都有但是是一个很好的概念
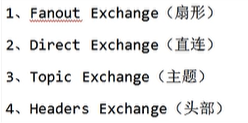
交换机分为以下四个类型
- 扇形交换机Fanout Exchange
- 直连
- 主题
- 头部
4.2 扇形交换机 Fanout Exchange
4.2.1 概念
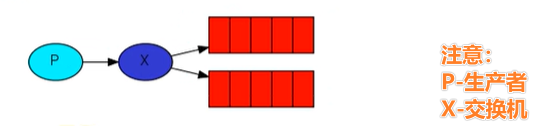
扇形交换机会将生产者的消息投递到所有绑定的队列中不需要路由键更不需要路由键匹配相当于广播群发。
4.2.1 实例生产者
环境jdk1.8ieda2022.3.3springboot版本2.5.2
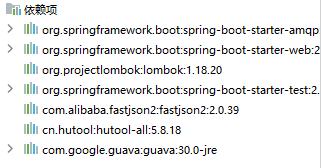
4.2.1.1 添加起步依赖
<dependency>
    <groupId>org.springframework.boot</groupId>
    <artifactId>spring-boot-starter-amqp</artifactId>
</dependency>
项目用到的几个依赖
4.2.1.2 配置文件
application.yml
spring:
  rabbitmq:
    host: 192.168.3.10
    port: 5672
    username: admin
    password: huiju@2022!
    virtual-host: hc-test
注意和控制台端口做出区分控制台是15672服务器端口是5672
4.2.1.3 JavaBean进行配置
思路整理
- 定义一个扇形交换机 命名
- 定义一个队列A 命名queueA
- 定义一个队列A 命名queueB
- 核心配置绑定交换机和队列
具体代码
import org.springframework.amqp.core.Binding;
import org.springframework.amqp.core.BindingBuilder;
import org.springframework.amqp.core.FanoutExchange;
import org.springframework.amqp.core.Queue;
import org.springframework.context.annotation.Bean;
import org.springframework.context.annotation.Configuration;

/**
 * @Author zhuhuacong
 * @Date: 2023/10/13/ 17:25
 * @description rmq交换机配置
 */
@Configuration
public class ExchangeConfig {
    // 定义交换机
    @Bean
    public FanoutExchange fanoutExchange(){
        return new FanoutExchange("xcong.fanout");
    }

    // 定义两个不同的队列
    @Bean
    public Queue queueA(){
        return new Queue("xcong.fanout.A");
    }
    @Bean
    public Queue queueB(){
        return new Queue("xcong.fanout.B");
    }

    // 绑定队列注意参数名称
    @Bean
    public Binding bindingA(FanoutExchange fanoutExchange , Queue queueA){
        return BindingBuilder.bind(queueA).to(fanoutExchange);
    }
    @Bean
    public Binding bindingB(FanoutExchange fanoutExchange , Queue queueB){
        return BindingBuilder.bind(queueB).to(fanoutExchange);
    }
}
注意
- 绑定队列时注意传入的参数名称要和bean 的名称一致
- 不需要特意到rabbitmq界面里创建队列只需要发送消息就会自动创建
- 但是要求创建好virtual host
4.2.1.4 创建一个发送消息的业务
package com.zhc.rabbitmqdemo.demos.service;

import lombok.extern.slf4j.Slf4j;
import org.springframework.amqp.rabbit.core.RabbitTemplate;
import org.springframework.web.bind.annotation.GetMapping;
import org.springframework.web.bind.annotation.PathVariable;
import org.springframework.web.bind.annotation.RequestMapping;
import org.springframework.web.bind.annotation.RestController;

import javax.annotation.Resource;
import java.nio.charset.StandardCharsets;

/**
 * @Author zhuhuacong
 * @Date: 2023/10/13/ 17:39
 * @description 扇形X
 */
@RestController
@Slf4j
@RequestMapping("/fanout")
public class FanoutController {
    @Resource
    private RabbitTemplate rabbitTemplate;

    @GetMapping("/{msg}")
    public void sendMessage(@PathVariable("msg") String msg){
        rabbitTemplate.convertAndSend("xcong.fanout","",msg.getBytes(StandardCharsets.UTF_8));
        log.info("成功发送消息 {} " ,msg);
    }
}
成功启动后访问http://localhost:12378/fanout/jjjj
可以检测是否发送成功
-
控制台消息如下
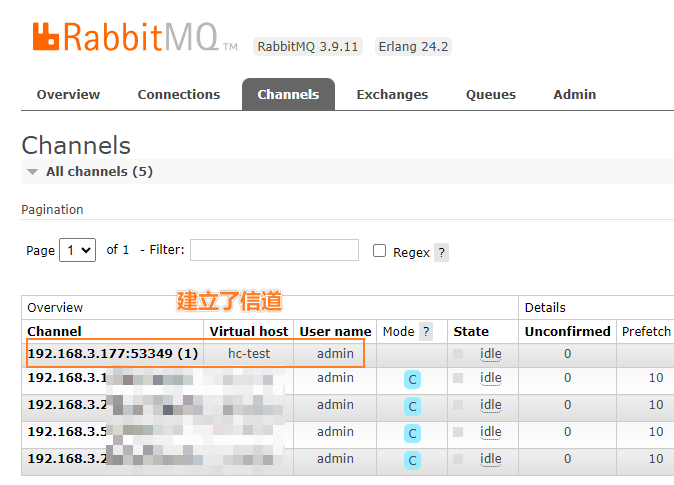
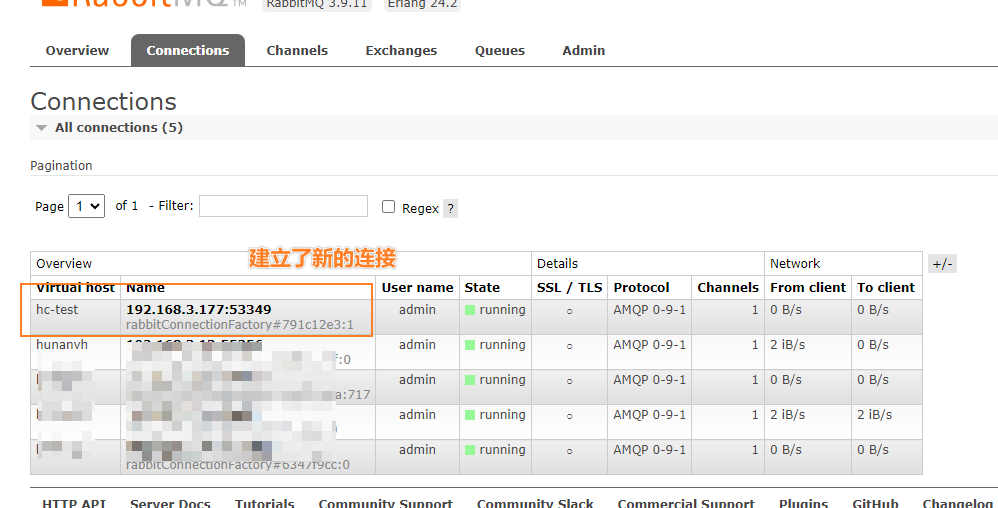
2023-10-13 17:47:53.593  INFO 30476 --- [io-12378-exec-2] o.s.a.r.c.CachingConnectionFactory       : Attempting to connect to: [192.168.3.10:5672]
2023-10-13 17:47:53.608  INFO 30476 --- [io-12378-exec-2] o.s.a.r.c.CachingConnectionFactory       : Created new connection: rabbitConnectionFactory#791c12e3:1/SimpleConnection@69c9eb7c [delegate=amqp://admin@192.168.3.10:5672/hc-test, localPort= 53349]
2023-10-13 17:47:53.675  INFO 30476 --- [io-12378-exec-2] c.z.r.demos.service.FanoutController     : 成功发送消息 jjjj
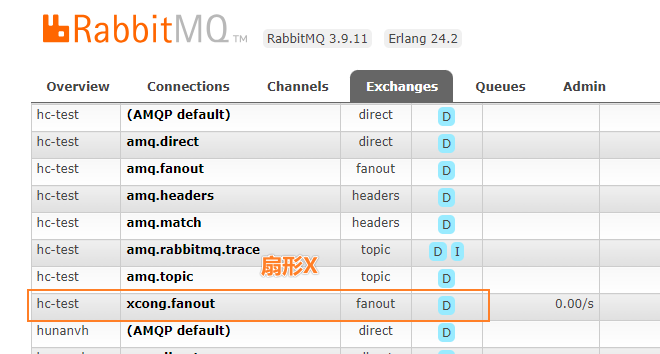
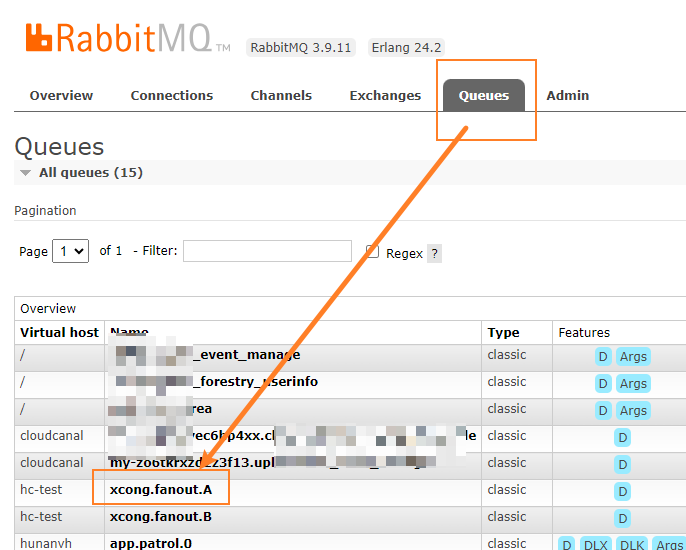
4.2.1.5 查看mq后台
- 使用client发送队列消息后mq会自动帮我们创建交换机和队列并进行绑定
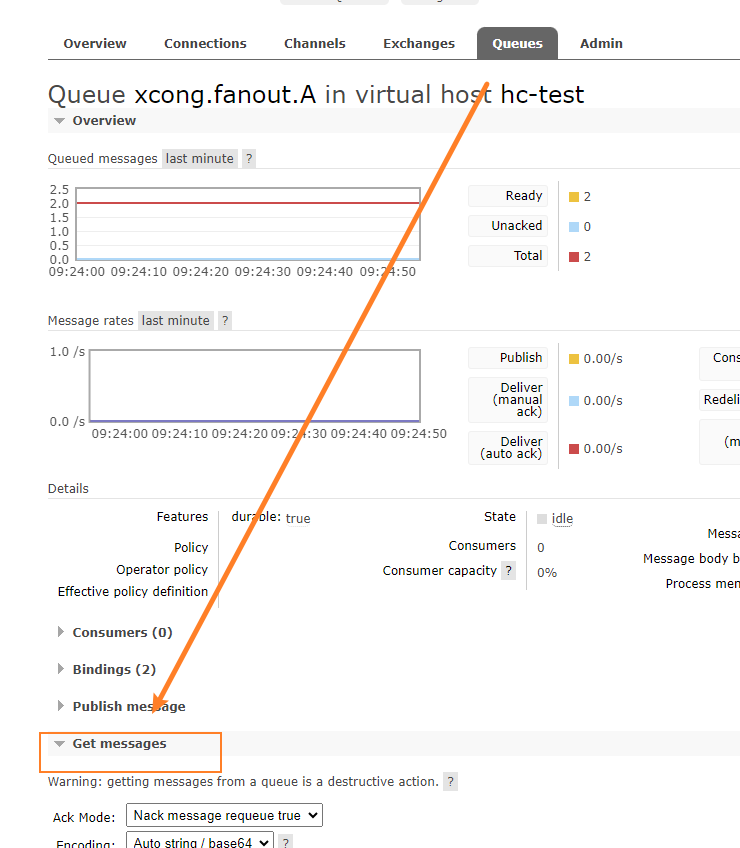
4.2.1.6 如何在后台查看队列中的消息
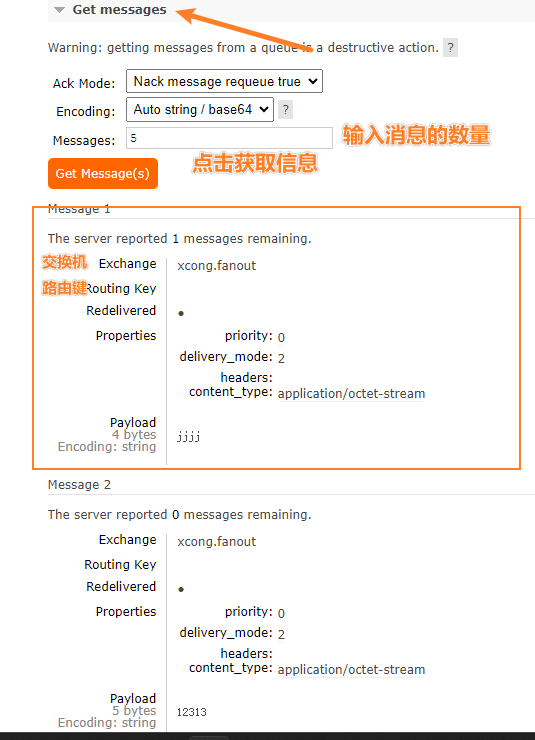
4.2.2 实例 消费者
4.2.2.1 依赖导入
<dependency>
    <groupId>org.springframework.boot</groupId>
    <artifactId>spring-boot-starter-amqp</artifactId>
</dependency>
4.2.2.2 配置文件
server:
  port: 12378

spring:
  rabbitmq:
    host: 192.168.3.10
    port: 5672
    username: admin
    password: huiju@2022!
    virtual-host: hc-test
4.2.2.3 添加消费者接受者类
注意使用几个关键注解
- 在对应的方法上添加
@RabbitListener - 可以传入参数queues属性为队列名可以多个
@Service
@Slf4j
public class ConsumerService {

    @RabbitListener(queues = {"xcong.fanout.A", "xcong.fanout.B"})
    public void revicerMsg(Message message) {
        byte[] body = message.getBody();
        MessageProperties messageProperties = message.getMessageProperties();
        String consumerQueue = messageProperties.getConsumerQueue();
        String receivedExchange = messageProperties.getReceivedExchange();

        log.info("接收到的消息{} . 消息队列 {} , 交换机名称{}",new String(body) , consumerQueue , receivedExchange);
    }
}
-
为了便于接受消息设置打印了参数信息
-
在生产者出产生消息然后控制台输出
接收到的消息一个普通的信息 . 消息队列 xcong.fanout.B , 交换机名称xcong.fanout
接收到的消息一个普通的信息 . 消息队列 xcong.fanout.A , 交换机名称xcong.fanout
成功接受消息
4.3 直连交换机 Direct Exchange
4.3.1 介绍
根据 路由键 匹配进行路由消息队列。
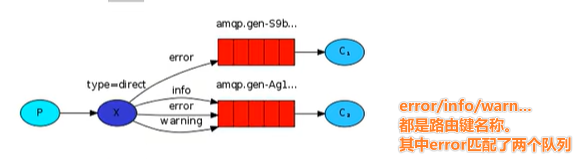
流程梳理如下
- 生产者将消息发送到交换机X
- 交换机会根据路由键匹配队列
- 并且同一个键也可以匹配多个队列
4.3.2 实例生产者
具体的依赖和配置都不变不做赘述了。接下来的示例只会解释不同的部分
4.3.2.1 配置交换机和队列
思路整理
- 可选引入spring提供的注解
@ConfigurationProperties从配置文件中读取属性 - 定义交换机
- 定义队列
- 绑定交换机和队列注意需要指定key
package com.zhc.rabbitmqdemo.demos.config;

import org.springframework.amqp.core.*;
import org.springframework.boot.context.properties.ConfigurationProperties;
import org.springframework.context.annotation.Bean;
import org.springframework.context.annotation.Configuration;

/**
 * @Author zhuhuacong
 * @Date: 2023/10/16/ 9:58
 * @description 直连交换机
 */
@Configuration
public class DirectExchangeConfig {
    public static String exchangeName = "xcong.direct";
    public static String queueC = "xcong.direct.C";
    public static String queueD = "xcong.direct.D";

    // 创建交换机
    @Bean
    public DirectExchange directExchange(){
        // 使用建造者模式
        return ExchangeBuilder.directExchange(exchangeName).build();
    }

    // 创建队列
    @Bean
    public Queue queueC(){
        return QueueBuilder.durable(queueC).build();
    }
    // 创建队列
    @Bean
    public Queue queueD(){
        return QueueBuilder.durable(queueD).build();
    }

    // 绑定队列
    @Bean
    public Binding bindingC(DirectExchange directExchange , Queue queueC){
        return BindingBuilder.bind(queueC).to(directExchange).with("error");
    }
    @Bean
    public Binding bindingD1(DirectExchange directExchange , Queue queueD){
        return BindingBuilder.bind(queueD).to(directExchange).with("error");
    }
    @Bean
    public Binding bindingD2(DirectExchange directExchange , Queue queueD){
        return BindingBuilder.bind(queueD).to(directExchange).with("info");
    }
    @Bean
    public Binding bindingD3(DirectExchange directExchange , Queue queueD){
        return BindingBuilder.bind(queueD).to(directExchange).with("warning");
    }

}
4.3.2.2 发送消息
@RestController
@Slf4j
@RequestMapping("/direct")
public class DirectController {
    @Resource
    private RabbitTemplate rabbitTemplate;

    @GetMapping("/{key}/{msg}")
    public void sentErrorMsg(@PathVariable("msg") String msg , @PathVariable("key")String key){
        log.info("准备发送的信息{}  路由键 :{}",msg , key);
        rabbitTemplate.convertAndSend(exchangeName , key , msg.getBytes(StandardCharsets.UTF_8));
        log.info("成功发送");
    }
}
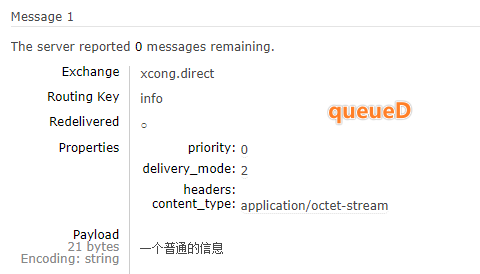
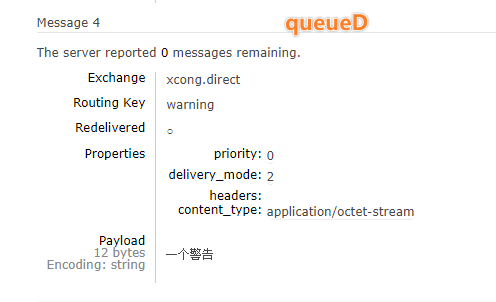
4.3.2.3 测试接口并查看后台
小结发送消息时的路由key和队列的key一致就可以将消息发送到指定的UI队列
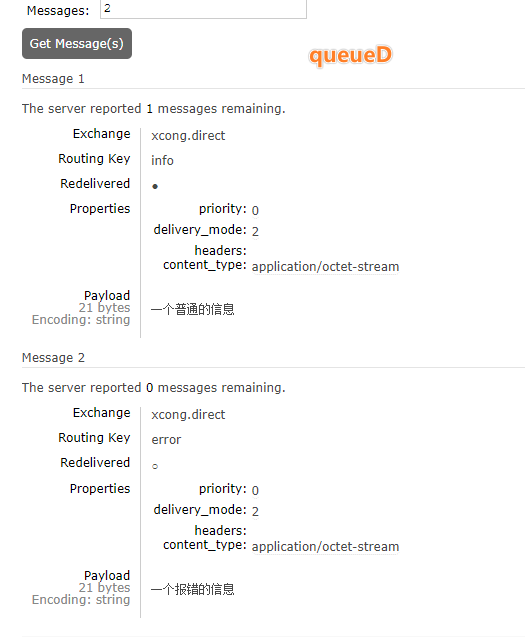
访问接口/direct/info/一个普通的信息队列D接收到消息
访问接口/direct/error/一个报错的信息队列CD都接收到消息
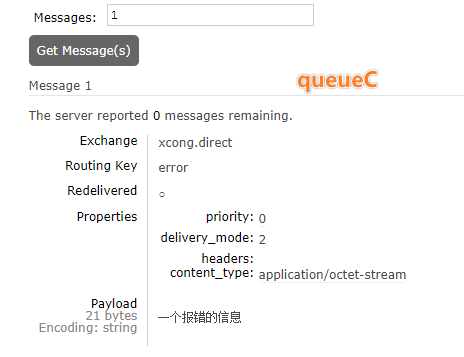
访问接口/direct/warning/一个警告队列D接收到消息
4.3.3 接收消息
接受消息代码一致截图展示一下结果

4.4 主题交换机 Topic Exchange
4.4.1 介绍
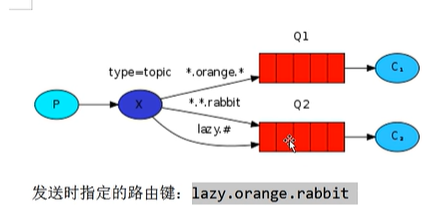
通配符匹配路由键相当于模糊查询
-
#匹配多个单词用来表示任意数量的单词一个或多个 -
*匹配一个单词必须且只有一个- 用
.来隔开为一个单词
- 用
举个例子左边是队列的路由键而右边是发送的路由键

4.4.2 实例
4.4.2.1 配置
@Configuration
public class TopicExchangeConfig {
    public static String exchangeName = "xcong.topic";
    public static String queue1 = "xcong.queue.1";
    public static String queue2 = "xcong.queue.2";

    @Bean
    public TopicExchange topicExchange(){
        return ExchangeBuilder.topicExchange(exchangeName).build();
    }

    @Bean
    public Queue queue1(){
        return QueueBuilder.durable(queue1).build();
    }
    @Bean
    public Queue queue2(){
        return QueueBuilder.durable(queue2).build();
    }


    @Bean
    public Binding binding1(TopicExchange topicExchange , Queue queue1){
        return BindingBuilder.bind(queue1).to(topicExchange).with("*.orange.*");
    }

    @Bean
    public Binding binding2A(TopicExchange topicExchange , Queue queue2){
        return BindingBuilder.bind(queue2).to(topicExchange).with("*.*.rabbit");
    }

    @Bean
    public Binding binding2B(TopicExchange topicExchange , Queue queue2){
        return BindingBuilder.bind(queue2).to(topicExchange).with("lazy.#");
    }
}
4.4.2.3 接口
@RestController
@Slf4j
@RequestMapping("/topic")
public class TopicController {
    @Resource
    private RabbitTemplate rabbitTemplate;

    @GetMapping("/{key}/{msg}")
    public void sendMsg(@PathVariable("key")String key , @PathVariable("msg")String msg){
        log.info("发送的信息{}发送的键{}", msg , key);
        Message message = MessageBuilder.withBody(msg.getBytes(StandardCharsets.UTF_8)).build();
        rabbitTemplate.convertAndSend(TopicExchangeConfig.exchangeName , key , message);

    }
}
4.4.2.4 测试
-
访问接口
/topic/ssss/一条普通的消息无法再后台查询到接受的消息无匹配 -
访问接口
/topic/lazy.orange.rabbit/一条普通的消息队列1和2都可查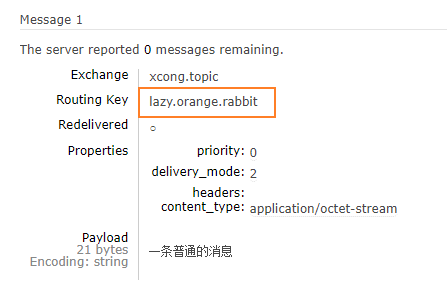
-
访问接口
/topic/A.orange.B/一条普通的消息:只有队列1接收到消息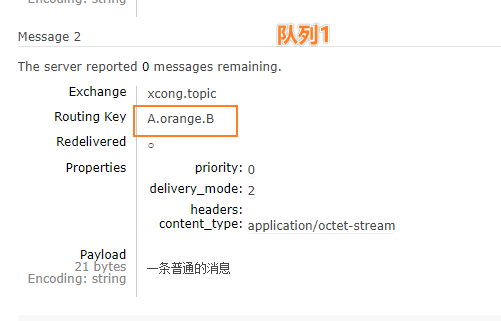
4.4.3 消费者实例略
4.5 头部交换机 Headers Exchanges
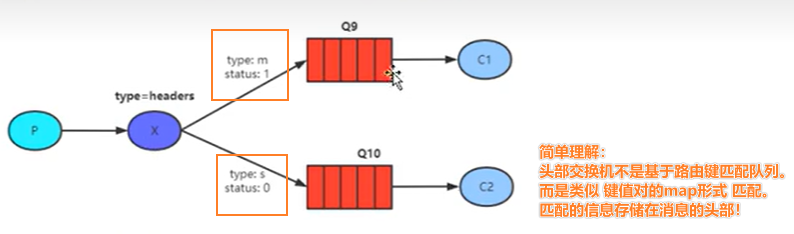
4.5.1 概述
头部交换机使用较少要知道每一次消息不只包含body还有头部信息headers。
4.5.2 生产者代码
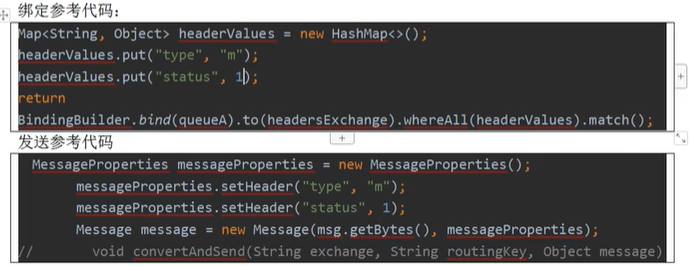
注意
- 头部交换机的不同之处在于在绑定交换机时配置的参数不一样
- 可以是string也可以是map<Stirngobject>
- 绑定的方法whereAll 和whereAny涉及到两种不同的匹配机制前者是全匹配后者是任意一个匹配即可
4.5.2.1 配置
@Configuration
public class HeaderExchangeConfig {
    public static String exchangeName = "xcong.header";

    @Bean
    public HeadersExchange headersExchange(){
        return ExchangeBuilder.headersExchange(exchangeName).build();
    }

    @Bean
    public Queue queue9(){
        return QueueBuilder.durable("xcong.queue.9").build();
    }
    @Bean
    public Queue queue10(){
        return QueueBuilder.durable("xcong.queue.10").build();
    }

    @Bean
    public Binding binding9(HeadersExchange headersExchange , Queue queue9){
        Map<String , Object> headers = new HashMap<>();
        headers.put("type" , "m");
        headers.put("status",1);

        return BindingBuilder.bind(queue9).to(headersExchange).whereAll(headers).match();
    }

    @Bean
    public Binding binding10(HeadersExchange headersExchange , Queue queue10){
        Map<String , Object> headers = new HashMap<>();
        headers.put("type" , "s");
        headers.put("status",2);

        return BindingBuilder.bind(queue10).to(headersExchange).whereAny(headers).match();
    }
}
访问控制台可以看到匹配规则
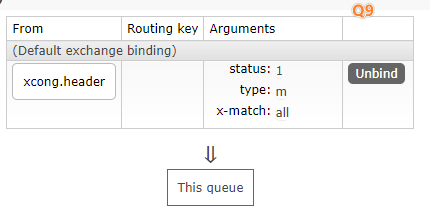
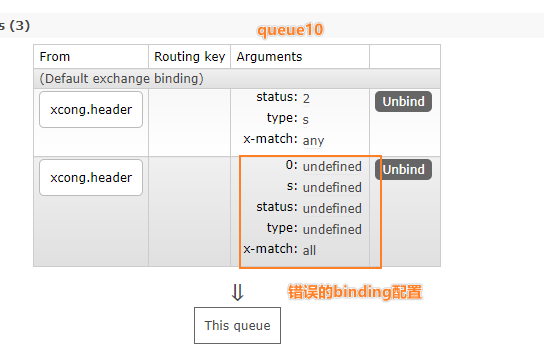
注意看q10是匹配规则就是all 而q10的规则是any
4.5.2.2 测试接口
@RestController
@Slf4j
@RequestMapping("/header")
public class HeadersController {
    @Resource
    private RabbitTemplate rabbitTemplate;

    @GetMapping("/{type}/{status}/{msg}")
    public void sendMsg(@PathVariable("type")String type , @PathVariable("status")Integer status , @PathVariable("msg")String msg){
        log.info("(头部交换器)发送的信息{}发送的头部为< type : {} , status : {}>", msg , type ,status);
        MessageProperties messageProperties = new MessageProperties();
        messageProperties.setHeader("type",type);
        messageProperties.setHeader("status" , status);
        Message message = MessageBuilder.withBody(msg.getBytes(StandardCharsets.UTF_8)).andProperties(messageProperties).build();
        rabbitTemplate.convertAndSend(HeaderExchangeConfig.exchangeName , "" , message);

    }
}
4.5.2.3 接口测试
- 访问
/header/k/1/一个普通的消息没有匹配 - 访问
/header/m/1/一个普通的消息匹配Q9 - 访问
/header/s/1/一个普通的消息匹配Q10走了任意匹配
4.5.3 消费者略
| 阿里云国内75折 回扣 微信号:monov8 |
| 阿里云国际,腾讯云国际,低至75折。AWS 93折 免费开户实名账号 代冲值 优惠多多 微信号:monov8 飞机:@monov6 |