【 uniapp - 黑马优购 | 登录与支付 1】登录组件布局实现、用户信息布局与渲染
| 阿里云国内75折 回扣 微信号:monov8 |
| 阿里云国际,腾讯云国际,低至75折。AWS 93折 免费开户实名账号 代冲值 优惠多多 微信号:monov8 飞机:@monov6 |

个人名片
🐼作者简介一名大二在校生讨厌编程🎋
🐻❄️个人主页🥇小新爱学习.
🐼个人WeChat见文末
🕊️系列专栏🖼️🐓每日一句🍭努力的意义是给所爱之人一个美好的未来
文章目录
10. 登录与支付
10.0 创建 settle 分支
- 运行如下的命令基于
master分支在本地创建settle子分支用来开发登录与支付相关的功能
git checkout -b settle
10.1 点击结算按钮进行条件判断
说明用户点击了结算按钮之后需要先后判断是否勾选了要结算的商品、是否选择了收货地址、是否登录。
- 在
my-settle组件中为结算按钮绑定点击事件处理函数
<!-- 结算按钮 -->
<view class="btn-settle" @click="settlement">结算({{checkedCount}})</view>
- 在
my-settle组件的methods节点中声明settlement事件处理函数如下
// 点击了结算按钮
settlement() {
  // 1. 先判断是否勾选了要结算的商品
  if (!this.checkedCount) return uni.$showMsg('请选择要结算的商品')

  // 2. 再判断用户是否选择了收货地址
  if (!this.addstr) return uni.$showMsg('请选择收货地址')

  // 3. 最后判断用户是否登录了
  if (!this.token) return uni.$showMsg('请先登录')
}
- 在
my-settle组件中使用mapGetters辅助函数从m_user模块中将addstr映射到当前组件中使用
export default {
  computed: {
    ...mapGetters('m_cart', ['total', 'checkedCount', 'checkedGoodsAmount']),
    // addstr 是详细的收货地址
    ...mapGetters('m_user', ['addstr']),
    isFullCheck() {
      return this.total === this.checkedCount
    },
  },
}
- 在
store/user.js模块的state节点中声明token字符串
export default {
  // 开启命名空间
  namespaced: true,

  // state 数据
  state: () => ({
    // 收货地址
    address: JSON.parse(uni.getStorageSync('address') || '{}'),
    // 登录成功之后的 token 字符串
    token: '',
  }),

  // 省略其它代码
}
- 在
my-settle组件中使用mapState辅助函数从m_user模块中将token映射到当前组件中使用
// 按需从 vuex 中导入 mapState 辅助函数
import { mapGetters, mapMutations, mapState } from 'vuex'

export default {
  computed: {
    ...mapGetters('m_cart', ['total', 'checkedCount', 'checkedGoodsAmount']),
    ...mapGetters('m_user', ['addstr']),
    // token 是用户登录成功之后的 token 字符串
    ...mapState('m_user', ['token']),
    isFullCheck() {
      return this.total === this.checkedCount
    },
  },
}
10.2 登录
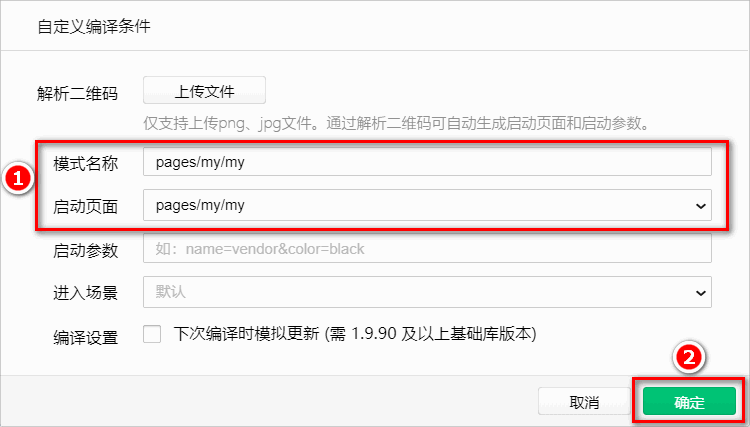
10.2.1 定义 my 页面的编译模式
- 点击
微信开发者工具工具栏上的编译模式下拉菜单选择添加编译模式
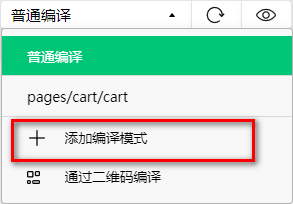
- 勾选启动页面的路径之后点击确定按钮
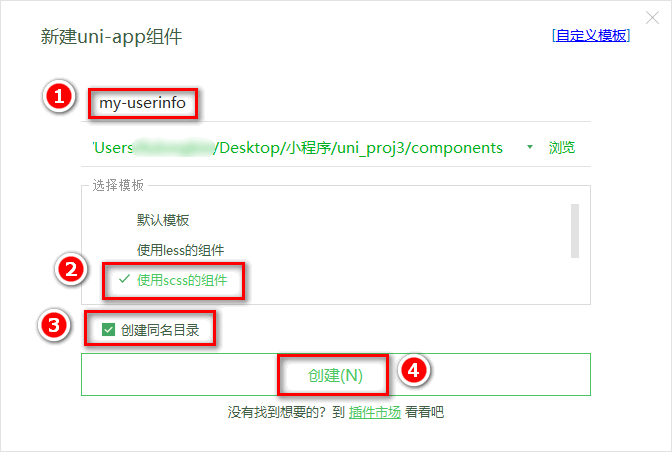
10.2.2 实现登录和用户信息组件的按需展示
-
在
components目录中新建登录组件 -
在
components目录中新建用户信息组件
- 在
my.vue页面中通过mapState辅助函数导入需要的token字符串
import badgeMix from '@/mixins/tabbar-badge.js'
// 1. 从 vuex 中按需导入 mapState 辅助函数
import { mapState } from 'vuex'

export default {
  mixins: [badgeMix],
  computed: {
    // 2. 从 m_user 模块中导入需要的 token 字符串
    ...mapState('m_user', ['token']),
  },
  data() {
    return {}
  },
}
- 在
my.vue页面中实现登录组件和用户信息组件的按需展示
<template>
  <view>

    <!-- 用户未登录时显示登录组件 -->
    <my-login v-if="!token"></my-login>

    <!-- 用户登录后显示用户信息组件 -->
    <my-userinfo v-else></my-userinfo>

  </view>
</template>
10.2.3 实现登录组件的基本布局
- 为 my-login 组件定义如下的 UI 结构
<template>
  <view class="login-container">
    <!-- 提示登录的图标 -->
    <uni-icons type="contact-filled" size="100" color="#AFAFAF"></uni-icons>
    <!-- 登录按钮 -->
    <button type="primary" class="btn-login">一键登录</button>
    <!-- 登录提示 -->
    <view class="tips-text">登录后尽享更多权益</view>
  </view>
</template>
- 美化登录组件的样式
.login-container {
  // 登录盒子的样式
  height: 750rpx;
  display: flex;
  flex-direction: column;
  align-items: center;
  justify-content: center;
  background-color: #f8f8f8;
  position: relative;
  overflow: hidden;

  // 绘制登录盒子底部的半椭圆造型
  &::after {
    content: ' ';
    display: block;
    position: absolute;
    width: 100%;
    height: 40px;
    left: 0;
    bottom: 0;
    background-color: white;
    border-radius: 100%;
    transform: translateY(50%);
  }

  // 登录按钮的样式
  .btn-login {
    width: 90%;
    border-radius: 100px;
    margin: 15px 0;
    background-color: #c00000;
  }

  // 按钮下方提示消息的样式
  .tips-text {
    font-size: 12px;
    color: gray;
  }
}
10.2.4 点击登录按钮获取微信用户的基本信息
需求描述需要获取微信用户的头像、昵称等基本信息。
- 为登录的
button按钮绑定open-type="getUserInfo"属性表示点击按钮时希望获取用户的基本信息
<!-- 登录按钮 -->
<!-- 可以从 @getuserinfo 事件处理函数的形参中获取到用户的基本信息 -->
<button type="primary" class="btn-login" open-type="getUserInfo" @getuserinfo="getUserInfo">一键登录</button>
- 在
methods节点中声明getUserInfo事件处理函数如下
methods: {
  // 获取微信用户的基本信息
  getUserInfo(e) {
    // 判断是否获取用户信息成功
    if (e.detail.errMsg === 'getUserInfo:fail auth deny') return uni.$showMsg('您取消了登录授权')

    // 获取用户信息成功 e.detail.userInfo 就是用户的基本信息
    console.log(e.detail.userInfo)
  }
}
10.2.5 将用户的基本信息存储到 vuex
- 在
store/user.js模块的state节点中声明userinfo的信息对象如下
// state 数据
state: () => ({
  // 收货地址
  // address: {}
  address: JSON.parse(uni.getStorageSync('address') || '{}'),
  // 登录成功之后的 token 字符串
  token: '',
  // 用户的基本信息
  userinfo: JSON.parse(uni.getStorageSync('userinfo') || '{}')
}),
- 在
store/user.js模块的mutations节点中声明如下的两个方法
// 方法
mutations: {
  // 省略其它代码...

  // 更新用户的基本信息
  updateUserInfo(state, userinfo) {
    state.userinfo = userinfo
    // 通过 this.commit() 方法调用 m_user 模块下的 saveUserInfoToStorage 方法将 userinfo 对象持久化存储到本地
    this.commit('m_user/saveUserInfoToStorage')
  },

  // 将 userinfo 持久化存储到本地
  saveUserInfoToStorage(state) {
    uni.setStorageSync('userinfo', JSON.stringify(state.userinfo))
  }
}
- 使用
mapMutations辅助函数将需要的方法映射到my-login组件中使用
// 1. 按需导入 mapMutations 辅助函数
import { mapMutations } from 'vuex'

export default {
  data() {
    return {}
  },
  methods: {
    // 2. 调用 mapMutations 辅助方法把 m_user 模块中的 updateUserInfo 映射到当前组件中使用
    ...mapMutations('m_user', ['updateUserInfo']),
    // 获取微信用户的基本信息
    getUserInfo(e) {
      // 判断是否获取用户信息成功
      if (e.detail.errMsg === 'getUserInfo:fail auth deny') return uni.$showMsg('您取消了登录授权')
      // 获取用户信息成功 e.detail.userInfo 就是用户的基本信息
      // console.log(e.detail.userInfo)

      // 3. 将用户的基本信息存储到 vuex 中
      this.updateUserInfo(e.detail.userInfo)
    },
  },
}
10.2.6 登录获取 Token 字符串
需求说明当获取到了微信用户的基本信息之后还需要进一步调用登录相关的接口从而换取登录成功之后的 Token 字符串。
- 在
getUserInfo方法中预调用this.getToken()方法同时把获取到的用户信息传递进去
// 获取微信用户的基本信息
getUserInfo(e) {
  // 判断是否获取用户信息成功
  if (e.detail.errMsg === 'getUserInfo:fail auth deny') return uni.$showMsg('您取消了登录授权')

  // 将用户的基本信息存储到 vuex 中
  this.updateUserInfo(e.detail.userInfo)

  // 获取登录成功后的 Token 字符串
  this.getToken(e.detail)
}
- 在 methods 中定义 getToken 方法调用登录相关的 API实现登录的功能
// 调用登录接口换取永久的 token
async getToken(info) {
  // 调用微信登录接口
  const [err, res] = await uni.login().catch(err => err)
  // 判断是否 uni.login() 调用失败
  if (err || res.errMsg !== 'login:ok') return uni.$showError('登录失败')

  // 准备参数对象
  const query = {
    code: res.code,
    encryptedData: info.encryptedData,
    iv: info.iv,
    rawData: info.rawData,
    signature: info.signature
  }

  // 换取 token
  const { data: loginResult } = await uni.$http.post('/api/public/v1/users/wxlogin', query)
  if (loginResult.meta.status !== 200) return uni.$showMsg('登录失败')
  uni.$showMsg('登录成功')
}
10.2.7 将 Token 存储到 vuex
- 在
store/user.js模块的mutations节点中声明如下的两个方法
mutations: {
  // 省略其它代码...

  // 更新 token 字符串
  updateToken(state, token) {
    state.token = token
    // 通过 this.commit() 方法调用 m_user 模块下的 saveTokenToStorage 方法将 token 字符串持久化存储到本地
    this.commit('m_user/saveTokenToStorage')
  },

  // 将 token 字符串持久化存储到本地
  saveTokenToStorage(state) {
    uni.setStorageSync('token', state.token)
  }
}
- 修改
store/user.js模块的
// state 数据
state: () => ({
  // 收货地址
  address: JSON.parse(uni.getStorageSync('address') || '{}'),
  // 登录成功之后的 token 字符串
  token: uni.getStorageSync('token') || '',
  // 用户的基本信息
  userinfo: JSON.parse(uni.getStorageSync('userinfo') || '{}')
}),
- 在
my-login组件中把vuex中的updateToken方法映射到当前组件中使用
methods: {
  // 1. 使用 mapMutations 辅助方法把 m_user 模块中的 updateToken 方法映射到当前组件中使用
  ...mapMutations('m_user', ['updateUserInfo', 'updateToken'])

  // 省略其它代码...

  // 调用登录接口换取永久的 token
  async getToken(info) {
    // 调用微信登录接口
    const [err, res] = await uni.login().catch(err => err)
    // 判断是否 uni.login() 调用失败
    if (err || res.errMsg !== 'login:ok') return uni.$showError('登录失败')

    // 准备参数对象
    const query = {
      code: res.code,
      encryptedData: info.encryptedData,
      iv: info.iv,
      rawData: info.rawData,
      signature: info.signature
    }

    // 换取 token
    const { data: loginResult } = await uni.$http.post('/api/public/v1/users/wxlogin', query)
    if (loginResult.meta.status !== 200) return uni.$showMsg('登录失败')

    // 2. 更新 vuex 中的 token
    this.updateToken(loginResult.message.token)
  }
}
10.3 用户信息
10.3.1 实现用户头像昵称区域的基本布局
- 在
my-userinfo组件中定义如下的UI结构
<template>
  <view class="my-userinfo-container">

    <!-- 头像昵称区域 -->
    <view class="top-box">
      <image src="" class="avatar"></image>
      <view class="nickname">xxx</view>
    </view>

  </view>
</template>
- 美化当前组件的样式
.my-userinfo-container {
  height: 100%;
  // 为整个组件的结构添加浅灰色的背景
  background-color: #f4f4f4;

  .top-box {
    height: 400rpx;
    background-color: #c00000;
    display: flex;
    flex-direction: column;
    align-items: center;
    justify-content: center;

    .avatar {
      display: block;
      width: 90px;
      height: 90px;
      border-radius: 45px;
      border: 2px solid white;
      box-shadow: 0 1px 5px black;
    }

    .nickname {
      color: white;
      font-weight: bold;
      font-size: 16px;
      margin-top: 10px;
    }
  }
}
- 在
my.vue页面中为最外层包裹性质的view容器添加class="my-container"的类名并美化样式如下
page,
.my-container {
  height: 100%;
}
#10.3.2 渲染用户的头像和昵称
在 my-userinfo 组件中通过 mapState 辅助函数将需要的成员映射到当前组件中使用

// 按需导入 mapState 辅助函数
import { mapState } from 'vuex'

export default {
  computed: {
    // 将 m_user 模块中的 userinfo 映射到当前页面中使用
    ...mapState('m_user', ['userinfo']),
  },
  data() {
    return {}
  },
}
- 将用户的头像和昵称渲染到页面中
<!-- 头像昵称区域 -->
<view class="top-box">
  <image :src="userinfo.avatarUrl" class="avatar"></image>
  <view class="nickname">{{userinfo.nickName}}</view>
</view>
10.3.3 渲染第一个面板区域
- 在
my-userinfo组件中定义如下的UI结构
<!-- 面板的列表区域 -->
<view class="panel-list">
  <!-- 第一个面板 -->
  <view class="panel">
    <!-- panel 的主体区域 -->
    <view class="panel-body">
      <!-- panel 的 item 项 -->
      <view class="panel-item">
        <text>8</text>
        <text>收藏的店铺</text>
      </view>
      <view class="panel-item">
        <text>14</text>
        <text>收藏的商品</text>
      </view>
      <view class="panel-item">
        <text>18</text>
        <text>关注的商品</text>
      </view>
      <view class="panel-item">
        <text>84</text>
        <text>足迹</text>
      </view>
    </view>
  </view>

  <!-- 第二个面板 -->

  <!-- 第三个面板 -->
</view>
- 美化第一个面板的样式
.panel-list {
  padding: 0 10px;
  position: relative;
  top: -10px;

  .panel {
    background-color: white;
    border-radius: 3px;
    margin-bottom: 8px;

    .panel-body {
      display: flex;
      justify-content: space-around;

      .panel-item {
        display: flex;
        flex-direction: column;
        align-items: center;
        justify-content: space-around;
        font-size: 13px;
        padding: 10px 0;
      }
    }
  }
}
10.3.4 渲染第二个面板区域
- 定义第二个面板区域的
UI结构
<!-- 第二个面板 -->
<view class="panel">
  <!-- 面板的标题 -->
  <view class="panel-title">我的订单</view>
  <!-- 面板的主体 -->
  <view class="panel-body">
    <!-- 面板主体中的 item 项 -->
    <view class="panel-item">
      <image src="/static/my-icons/icon1.png" class="icon"></image>
      <text>待付款</text>
    </view>
    <view class="panel-item">
      <image src="/static/my-icons/icon2.png" class="icon"></image>
      <text>待收货</text>
    </view>
    <view class="panel-item">
      <image src="/static/my-icons/icon3.png" class="icon"></image>
      <text>退款/退货</text>
    </view>
    <view class="panel-item">
      <image src="/static/my-icons/icon4.png" class="icon"></image>
      <text>全部订单</text>
    </view>
  </view>
</view>
- 对之前的 SCSS 样式进行改造从而美化第二个面板的样式
.panel-list {
  padding: 0 10px;
  position: relative;
  top: -10px;

  .panel {
    background-color: white;
    border-radius: 3px;
    margin-bottom: 8px;

    .panel-title {
      line-height: 45px;
      padding-left: 10px;
      font-size: 15px;
      border-bottom: 1px solid #f4f4f4;
    }

    .panel-body {
      display: flex;
      justify-content: space-around;

      .panel-item {
        display: flex;
        flex-direction: column;
        align-items: center;
        justify-content: space-around;
        font-size: 13px;
        padding: 10px 0;

        .icon {
          width: 35px;
          height: 35px;
        }
      }
    }
  }
}
10.3.5 渲染第三个面板区域
- 定义第三个面板区域的 UI 结构
<!-- 第三个面板 -->
<view class="panel">
  <view class="panel-list-item">
    <text>收货地址</text>
    <uni-icons type="arrowright" size="15"></uni-icons>
  </view>
  <view class="panel-list-item">
    <text>联系客服</text>
    <uni-icons type="arrowright" size="15"></uni-icons>
  </view>
  <view class="panel-list-item">
    <text>退出登录</text>
    <uni-icons type="arrowright" size="15"></uni-icons>
  </view>
</view>
- 美化第三个面板区域的样式
.panel-list-item {
  height: 45px;
  display: flex;
  justify-content: space-between;
  align-items: center;
  font-size: 15px;
  padding: 0 10px;
}
10.3.6 实现退出登录的功能
- 为第三个面板区域中的 退出登录 项绑定 click 点击事件处理函数
<view class="panel-list-item" @click="logout">
  <text>退出登录</text>
  <uni-icons type="arrowright" size="15"></uni-icons>
</view>
- 在
my-userinfo组件的methods节点中定义logout事件处理函数
// 退出登录
async logout() {
  // 询问用户是否退出登录
  const [err, succ] = await uni.showModal({
    title: '提示',
    content: '确认退出登录吗'
  }).catch(err => err)

  if (succ && succ.confirm) {
     // 用户确认了退出登录的操作
     // 需要清空 vuex 中的 userinfo、token 和 address
     this.updateUserInfo({})
     this.updateToken('')
     this.updateAddress({})
  }
}
使用 mapMutations 辅助方法将需要用到的 mutations 方法映射到当前组件中

// 按需导入辅助函数
import { mapState, mapMutations } from 'vuex'

export default {
  methods: {
    ...mapMutations('m_user', ['updateUserInfo', 'updateToken', 'updateAddress']),
  },
}
接推广、写手兼职详情添加下方wx备注来意