

登录页面的实现及跳转(vue-router)
| 阿里云国内75折 回扣 微信号:monov8 |
| 阿里云国际,腾讯云国际,低至75折。AWS 93折 免费开户实名账号 代冲值 优惠多多 微信号:monov8 飞机:@monov6 |
Vue-router
路由的核心改变URL页面不会整体刷新
一、创建项目
1、使用vite创建项目
npm init vue@latest
注意根据需求选择‘可选功能’完成安装具体安装步骤vue.md
2、项目结构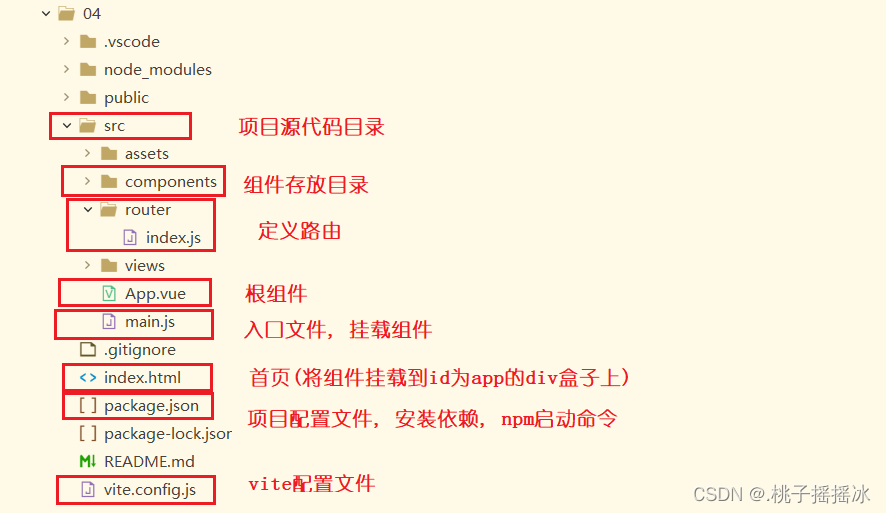
3、创建登录项目
<1>创建一个组件登录页面我们把这个组件称为单文件组件
位置规范情况下将组件写到components目录下
命名大驼峰式命名规则
格式三个部分
<script>
</script>
<template>
</template>
<style scoped>
</style>
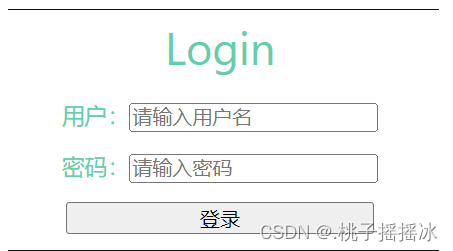
<2>Login.vue登录组件
<script>
export default {
    // 响应式数据 data() 函数
    data(){
        return{
            name:'',
            password:'',
            tip:'',
            // 设置标识
            flag:'false'
        }
    },
    // 方法书写在 methods 中
    methods:{
        sign(){
            // 先判断用户名和密码是否为空
            if(this.name === '' || this.password === ''){
                // 如果为空的弹出提示
                this.flag='false'
                this.tip='用户名和密码为空'
            } else if(this.name ==='admin' && this.password === '123456'){
                this.flag='true',
                this.tip=''
                // 跳转页面
                this.$router.push({
                    path:'/logins'
                })
            } else {
                this.flag='false',
                this.tip='账号名或密码错误'
            }
        }
    }
}
</script>
<template>
    <div class="box1">
        <div>
            <h1>Login</h1>
            <ul>
                <label>
                    <li>用户<input type="text" placeholder="请输入用户名" v-model.trim="name"></li>
                </label>
                <label>
                    <li>密码<input type="password" placeholder="请输入密码" v-model.trim="password"></li>
                </label>
                <li><button @click="sign">登录</button></li>
                <li v-show="flag" :class="{style1:flag}">
                    {{ this.tip }}
                </li>
            </ul>
        </div>
    </div>
</template>
// scoped 样式的作用域在本组件中
<style scoped>
div.box1 {
    height: 50%;
    width: 100%;
    /* background-color: red; */
}
.style1{
    color:red;
}
 div.box1 div{
    text-align: center;
    height: 50%;
    color:rgb(96, 207, 170);
    /* background-color: aqua; */
    border: 1px solid #111;
 }
    /* 注意使用弹性布局时内部所有的元素都会变成内联块 */
 div.box1 div ul li {
    margin-top: 10px;
    list-style: none;
    color:rgb(96, 207, 170)
 }
 div.box1 div ul li button {
    width: 35%;
 }
</style>
Tips
1、使用弹性布局时内部所有的元素都会变成内联块
2、在输入用户名和密码的时候在表单元素上进行数据的双向绑定v-model=‘响应式变量’进行去除前后空格的修饰操作.trim
3、在按钮上取消默认行为(.prevent,相当于事件对象event.defaultPrevent())并绑定点击事件触发sign函数
相当于v-on=‘sign’ 简写为@click=‘sign’
4、响应式数据 模块是 data函数返回一个对象
5、methods是一个对象在对象内部书写各种函数
①书写函数sign函数
        sign(){
            // 先判断用户名和密码是否为空
            if(this.name === '' || this.password === ''){
                // 如果为空的弹出提示
                this.flag='false'
                this.tip='用户名和密码为空'
            } else if(this.name ==='admin' && this.password === '123456'){
                this.flag='true',
                this.tip=''
                // 跳转页面
                this.$router.push({
                    path:'/logins'
                })
            } else {
                this.flag='false',
                this.tip='账号名或密码错误'
            }
        }
注意
1、函数中获取响应式数据需要使用this获取
2、通过一个标识来判断提示信息是否弹出使用v-show判断注意v-if和v-show的区别
-------v-if判断时不断的销毁重建
-------v-show相当于使用display:none
3、用户名和密码正确进行跳转页面
②页面的跳转
使用路由router进行页面的跳转用法this.$router 路由实例
this.$router.push()或replace()方法
启动项目打开页面直接进入login页面
**方式一**将Login组件作为App.vue的子组件
在APP.vue中引入Login组件并注册
<script>
import Login from './components/Login.vue'
export default {
  // 参数是对象
  components: {Login},
}
</script>

<template>
  // 组件一般都是大驼峰式和html标签区分
<Login></Login>
</template>
在使用时将原有的所有样式都清除src->assets->main.css
启动项目打开前端页面
问题在地址栏中输入任何内容都会跳转到登录页面
**原因**因为我们把Login组件作为了App.vue中模板的内容App.vue是根组件所以当我们的路径发生变化时只会显示Login组件。我们所使用的this.$router.push就会失效导致跳转不成功。
补充知识点路由router
路由是组件和路径的一一映射关系
位置我们将路由再写src->router->路由名称
①创建路由
创建路由对象通过createRouter函数创建首先引入方法
import { createRouter, createWebHashHistory } from "vue-router";通过createRouter函数创建路由
// 创建路由实例
const Router = createRouter({
    // 模式有两种createWebHashHistory()--路径中含有#createWebHistory()
    history: createWebHashHistory(),
    // 将每个路由映射到对应的组件
    routes: [
        {
            path:'/logins', // 路径
            name:'logins',
            component:LoginFirst // 组件--当访问'/'时就会显示LoginFirst组件中的内容
        }
    ]
});
要使用LoginFirst组件就需要引入组件
import LoginFirst from '../components/login/LoginFirst.vue'将路由导出
export default Router使用路由在main.js中引入路由使用路由
import Router from '../src/router/Router'
app.use(Router)
通过对路由知识的补充我们能够充分理解到方法一的问题为解决这个问题我们使用方式二
**方式二**应该要有路由显示的位置但是上面没有所以我们需要指定区域显示路由在App.vue中中使用显示我们的路由,也可以使用
<script>
import Login from './components/Login.vue'
export default {
  // 参数是对象
  components: {Login},
}
</script>
<template>
  // 显示路由的区域
  <RouterView></RouterView>
</template>
我们使用的是显示路由所以登录的组件Login.vue也需要和路径进行一一对应
因为我们需要打开页面就进入Login组件所以我们可以将路径设置为‘/’或者‘/login’
// 创建路由实例
const Router = createRouter({
    history: createWebHashHistory(),
    // 将每个路由映射到对应的组件
    routes: [
        {
            path:'/',
            // 设置别名
            alias:'/login'
            component:Login
        },
        {
            path:'/logins',
            name:'logins',
            component:LoginFirst
        }
    ]
});
当然Login组件也需要引用
import Login from '../components/Login.vue'
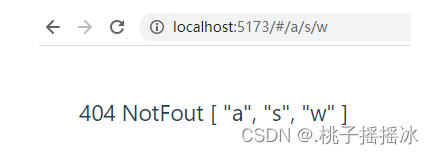
但是输入路径不对时出现空白。用户体验不好所以当输入别的路径时出现404NotFound。同样的我们在路由中进行设置
import { createRouter, createWebHashHistory } from "vue-router";
import NotFound from '../components/test/NotFound.vue'
import LoginFirst from '../components/login/LoginFirst.vue'
import Login from '../components/Login.vue'

// 创建路由实例
const Router = createRouter({
    history: createWebHashHistory(),
    // 将每个路由映射到对应的组件
    routes: [
        // 404
        {
            path: '/:paths(.*)*',
            component: NotFound
        },
        {
            path:'/',
            component:Login
        },
        {
            path:'/logins',
            name:'logins',
            component:LoginFirst
        }
    ]
});

export default Router
当路径不正确时出现NotFound组件。简单的写一个404页面。
<script>
</script>
<template>
    <div>
        404 NotFout
    </div>
</template>
<style>
</style>
详细解释匹配404路径知识
{
  path: '/:path(.*)*',
  component: NotFound
},
将所有匹配到的路径存放在 $route.params.path 下, 将非法路径的所有部分作为参数
我们使用$route.params.path获取动态路由参数
<template>
    <div>
        404 NotFout {{ this.$route.params.path }}
    </div>
</template>
区别
/:paths(.*)
如果是这样书写的意思是将/后所有的路径放入一个字符串中
![[外链图片转存失败,源站可能有防盗链机制,建议将图片保存下来直接上传(img-fBBnvpIT-1677066821432)(C:\Users\Administrator\AppData\Roaming\Typora\typora-user-images\image-20230221113043609.png)]](https://img-blog.csdnimg.cn/9996fb08c2e34a61a728210559937741.png)
/:paths(.*)*
如果是这样书写的意思是将/后所有路径以/分割将分割的内容放入数组中
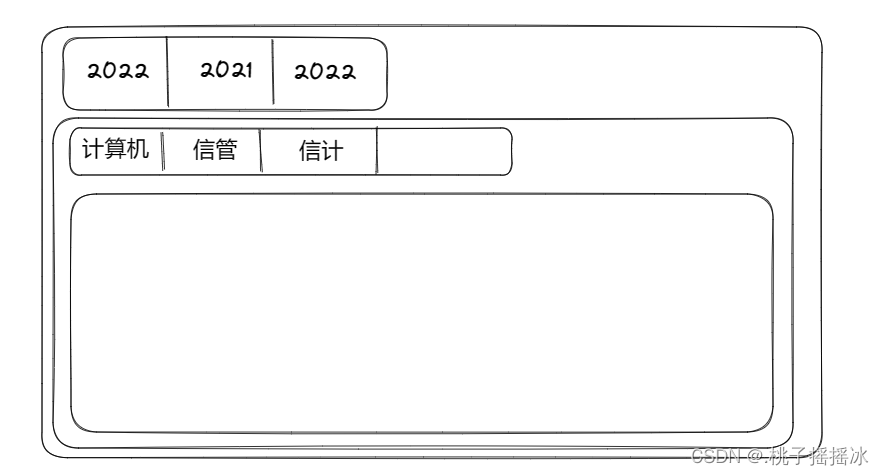
4、首页登录进去后的页面
<1>设计页面
注意这里就需要路由相关知识了
<2>创建路由
①一级标签可以做成超链接a链接但是点击a标签会进行整个页面的刷新性能低。我们需要点击时只刷新渲染局部。改变地址栏路径页面不会重新刷新
通过<router-link to=''></router-link> 来实现
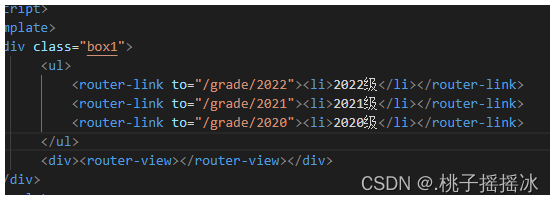
②我们修改LoginFirst.vue组件只导了template部分的代码
<template>
  <div class="box1">
        <ul>
            <router-link to="/grade2022"><li>2022级</li></router-link>
            <router-link to="/grade2021"><li>2021级</li></router-link>
            <router-link to="/grade2020"><li>2020级</li></router-link>
        </ul>
		 // 显示区
        <router-view></router-view>
  </div>
</template>
提示当点击2022时会在地址栏中显示/grade2022地址同时/grade2022会对应一个组件因此需要在路由中设置路径与组件的映射
③在路由Router中设置映射
创建三个Grade组件
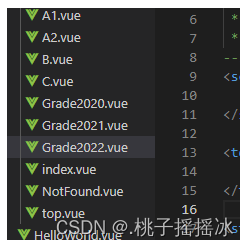
在路由中引入在完成路径和组件的映射
发现问题组件太多了三个组件的模板基本相同只是数据不同。因此可以写一个组件复用组件进行传参。
代码优化
<1>创建一个Grade组件显示参数

<2>在路由中引入Grade
<3>配置映射并传参
<4>修改router-link to 中的路径
二、完善需求
1、发现问题
当路径地址为/grade/2022时Grade组件显示在App.vue中的区域中但是我们的需求是想要Grade组件中的内容显示在LoginFirst组件列表的下方。
解决方法路由的嵌套
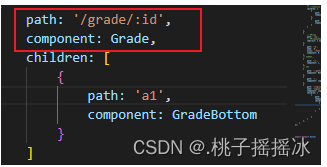
<1>修改路由我这里嵌套了三个路由—Login
{
            path: '/logins',
            name: 'logins',
            component: LoginFirst,
            children: [
                {
                    path: 'grade/:id',
                    component: Grade,
                    children: [
                        {
                            path: 'a1',
                            component: GradeBottom
                        }
                    ]
                }
            ]
        },
注意
1>使用children关键字值为数组数组中每一个元素都是路径与组件的映射
2>子路由中路径开始的地方不应该有/
<2>修改路径
![[外链图片转存失败,源站可能有防盗链机制,建议将图片保存下来直接上传(img-Z0tfLB4Y-1677066821435)(C:\Users\Administrator\AppData\Roaming\Typora\typora-user-images\image-20230221211714963.png)]](https://img-blog.csdnimg.cn/ba3581996d264a9996a626a23f858286.png)
访问结果
![[外链图片转存失败,源站可能有防盗链机制,建议将图片保存下来直接上传(img-VLHCXrMZ-1677066821436)(C:\Users\Administrator\AppData\Roaming\Typora\typora-user-images\image-20230222192337360.png)]](https://img-blog.csdnimg.cn/8aa2b5f838114b2fa28ad9d3b75387b9.png)
<3>修饰样式
LoginFirst.vue
<script>

</script>
<template>
  <div class="box1">
        <ul>
            <!-- class="router-link-active" 设置点击产生高亮行为 -->
            <router-link :to="{name:'grade',params:{id:1}}"><li>2022级</li></router-link>
            <router-link :to="{name:'grade',params:{id:2}}"><li>2021级</li></router-link>
            <router-link :to="{name:'grade',params:{id:3}}"><li>2020级</li></router-link>
        </ul>
        <div><router-view></router-view></div>
  </div>
</template>
<style scoped>
    *{
        margin: 0;
        padding: 0;
    }
    div.box1 ul li {
        display: inline-block;
        text-align: center;
        margin-left: 15px;
        width: 50px;
        height: 30px;
        line-height: 30px;
        background-color: rgb(228, 233, 233);
        list-style: none;
    }
    /* .router-link-active{
        background-color:red;
    } */
</style>
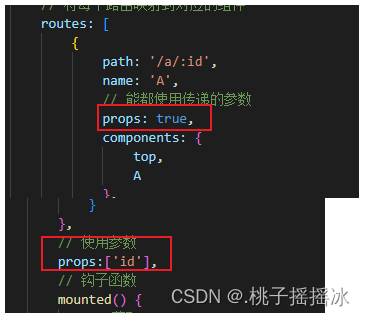
Grade.vue
<script>
// 导入数据
import data from '../../Data'
export default {
    // 定义一个数组接收数据
    data() {
        return {
            list: []
        }
    },
    // 使用参数
    props:['id'],
    // 钩子函数
    mounted() {
        // 获取id
        const id = this.$route.params.id
        // 使用list接收数据初始化
        this.list = data.filter(item => item.id === id)[0].items
    },
    updated() {
        const id = this.$route.params.id;
        // 更新时也要更新list
        this.list = data.filter(item => item.id === id)[0].items
    }

}
</script>

<template>
    <!-- <div class="topBox"> Grade---{{ this.$route.params.id }} </div> -->
    <div class="divBox">
        <router-link v-for='item of list' :to="{
            name: 'school',
            params: { id }
        }">{{ item }}</router-link>

        <router-view></router-view>
    </div>
</template>

<style scoped>
/* div.topBox {
    text-align: center;
} */

a {
    margin-left: 10px;
    color:rgb(81, 87, 82);
    font-size:14px
}
</style>
<4>显示二级标签就是路由的嵌套
 {
            path: '/logins',
            name: 'logins',
            // 当地址为/main时也是登录页面
            // 使用别名
            alias:'/main',
            // 使用重定向
            // redirect:{name:'logins'},
            component: LoginFirst,
            children: [
                {
                    path: 'grade/:id',
                    name:'grade',
                    // 方便传参数
                    props:true,
                    component: Grade,
                    children: [
                        {
                            path: 'a1',
                            name:'school',
                            component: GradeBottom
                        }
                    ]
                }
            ]
        },
效果图
![[外链图片转存失败,源站可能有防盗链机制,建议将图片保存下来直接上传(img-K6oD7fKS-1677066821436)(C:\Users\Administrator\AppData\Roaming\Typora\typora-user-images\image-20230222193105881.png)]](https://img-blog.csdnimg.cn/0f4c9ba7c6cd4e9e927ef259d12bcab6.png)
<5>为了让路由的使用更加方便我们可以给路由设置名称ps:前面的路由代码中已设置是使用了
<6>我们设置了名称后就可以在router-link中使用了传递参数方便
            <router-link :to="{name:'grade',params:{id:1}}"><li>2022级</li></router-link>
            <router-link :to="{name:'grade',params:{id:2}}"><li>2021级</li></router-link>
            <router-link :to="{name:'grade',params:{id:3}}"><li>2020级</li></router-link>
<7>在push(replace)中使用
this.$router.replace({name:'logins'})
tip:在编程式导航中可以使用replace替换当前位置它的作用类似于router.push唯一的不同是它在导航时不会向history添加新记录
2、新的需求
当点击一级菜单时显示对应的二级菜单二级菜单各不相同。
<1>如何在组件中获取参数
通过this.$route.param来获取参数
<2>在Grade组件中获取参数根据一级菜单不同加载对应的二级菜单因此需要使用生命周期函数mounted页面加载完成后的事情初始化的工作一般都在此函数中运行
    // 定义一个数组接收数据
    data() {
        return {
            list: []
        }
    },
    // 使用参数
    props:['id'],
    // 钩子函数
    mounted() {
        // 获取id
        const id = this.$route.params.id
        // 使用list接收数据初始化
        this.list = data.filter(item => item.id === id)[0].items
    },
注意data是声明的假数据真实的数据需要从后台获取
data.js假数据
// 数据
const data = [
    {
        id:'1',
        items:['计算机科学与技术','信息管理','信息与计算']
    },
    {
        id:'2',
        items:['人工智能','计算机科学','大数据']
    },
    {
        id:'3',
        items:['云存储','算法','信息与计算']
    }
];

export default  data
<3>参数更新后也要对数据进行更新使用updated函数
    updated() {
        const id = this.$route.params.id;
        // 更新时也要更新list
        this.list = data.filter(item => item.id === id)[0].items
    }
<4>动态渲染
<template>
    <!-- <div class="topBox"> Grade---{{ this.$route.params.id }} </div> -->
    <div class="divBox">
        <router-link v-for='item of list' :to="{
            name: 'school',
            params: { id }
        }">{{ item }}</router-link>

        <router-view></router-view>
    </div>
</template>
<5>为了方便使用参数可以将props路径中的参数传递给组件。
| 阿里云国内75折 回扣 微信号:monov8 |
| 阿里云国际,腾讯云国际,低至75折。AWS 93折 免费开户实名账号 代冲值 优惠多多 微信号:monov8 飞机:@monov6 |