

项目01—基于 lvs+nginx 负载均衡的双 vip 高可用 Web 集群
| 阿里云国内75折 回扣 微信号:monov8 |
| 阿里云国际,腾讯云国际,低至75折。AWS 93折 免费开户实名账号 代冲值 优惠多多 微信号:monov8 飞机:@monov6 |
文章目录
一.项目介绍
1.拓扑图

2.详细介绍
项目名称基于 lvs+nginx 负载均衡的双 vip 高可用 Web 集群
项目环境CentOS 7.9.2009Nginx 1.25.2keepalived 1.3.5ansible 2.9.27PrometheusGrafanaNFS等
项目描述模拟企业构建一个高可用并且高性能的web集群项目能处理大并发的web业务。使用Ansible实现软件环境的部署Nginx实现7层负载均衡和搭建web框架keepalived搭建双vip双master高可用架构Prometheus+Grafana实现对web集群以及负载均衡器的系统资源监控,NFS实现web集群的数据同源DNS搭建域名服务器实现对双vip地址进行解析。
项目步骤
1.准备10台全新虚拟机提前规划好ip并建立免密通道使用Ansible自动化批量部署nginx软件环境
2.在两台nginx7层负载均衡器上使用keepalived搭建双vip双master高可用架构并使用健康检测监控本机nginx进程后端Web集群通过NFS服务器实现网页数据同源
3.搭建DNS域名服务器增添两条负载均衡记录实现基于DNS的负载均衡访问同一URL解析出双vip地址
4.安装部署prometheus+grafana实现对Web服务器和load balance服务器的监控和出图
5.ab测试机对web集群和负载均衡器进行压力测试了解系统性能的瓶颈对系统性能资源(如内核参数、nginx参数 )进行调优提升系统性能
项目心得
1.提前规划好整个集群的架构可以提高项目开展时效率
2.对基于Nginx的web集群和高可用、高性能有了深入的理解同时对脑裂和vip漂移现象也有了更加深刻的体会和分析。
3.加强了对7层负载均衡和dns负载均衡的认识
4.认识到了系统性能资源的重要性对压力测试下整个集群的瓶颈有了一个整体概念
二.前期准备
1.项目环境
CentOS 7.9.2009Nginx 1.25.2keepalived 1.3.5ansible 2.9.27PrometheusGrafanaNFS等
2.IP划分
准备10台centos7.9的虚拟机并且分配IP地址
| 主机名 | IP |
|---|---|
| nginx域名配置服务器 | 192.168.98.144 |
| 负载均衡器LB1 | 192.168.98.143 |
| 负载均衡器LB2 | 192.168.98.138 |
| Web服务器1 | 192.168.98.142 |
| Web服务器2 | 192.168.98.140 |
| Web服务器3 | 192.168.98.135 |
| NFS | 192.168.98.131 |
| ansible | 192.168.98.141 |
| 监控服务器 | 192.168.98.147 |
| ab压力测试机 | 192.168.98.146 |
三. 项目步骤
1.ansible部署软件环境
准备11台全新虚拟机提前规划好ip并建立免密通道使用Ansible自动化批量部署nginx软件环境
1.1 安装ansible环境
[root@ansible ~]# yum install epel-release -y
[root@ansible ~]# yum install ansible -y
#修改配置文件只需要配置如下七台本地DNS、监控和压力测试机单独部署
[root@localhost ~]# vim /etc/ansible/hosts
[nginx]
192.168.98.143
192.168.98.138

[web]
192.168.98.135
192.168.98.142
192.168.98.140

[nfs]
192.168.98.131

[dns]
192.168.98.144
1.2 建立免密通道
[root@localhost ~]# ssh-keygen -t rsa
[root@localhost ~]# cd .ssh
[root@localhost .ssh]# ls
id_rsa  id_rsa.pub  known_hosts
[root@localhost .ssh]# ssh-copy-id -i id_rsa.pub root@192.168.98.144
[root@localhost .ssh]# ssh-copy-id -i id_rsa.pub root@192.168.98.143
[root@localhost .ssh]# ssh-copy-id -i id_rsa.pub root@192.168.98.138
[root@localhost .ssh]# ssh-copy-id -i id_rsa.pub root@192.168.98.142
[root@localhost .ssh]# ssh-copy-id -i id_rsa.pub root@192.168.98.140
[root@localhost .ssh]# ssh-copy-id -i id_rsa.pub root@192.168.98.135
[root@localhost .ssh]# ssh-copy-id -i id_rsa.pub root@192.168.98.131
1.3 批量部署nginx
1.3.1 在ansible机器上面创建nginx脚本
[root@localhost ~]#vim onekey_install_nginx.sh
#!/bin/bash

#新建文件夹存放nginx源码包
mkdir -p /nginx
cd /nginx

# 下载nginx压缩包
curl -O http://nginx.org/download/nginx-1.25.2.tar.gz
# 或者用wget
#wget http://nginx.org/download/nginx-1.25.2.tar.gz
# 解压
tar xf nginx-1.25.2.tar.gz
# 进入文件夹
cd nginx-1.25.2

# 新建用户,用于启动nginx进程名字自拟
useradd -s /sbin/nologin liaobo

# 安装依赖包
# ssh相关、gcc为编译需要、pcre正则相关、make编译相关
yum install -y epel-release openssl openssl-devel gcc pcre pcre-devel automake make net-tools vim

# configure是一个配置的脚本文件会根据指定的配置生成一个Makefile文件这个文件会影响后面make命令的编译相当于图纸
# configure可配置参数可以参考官方文档http://nginx.org/en/docs/configure.html
# 常用选项
# --with-*开启某个功能默认不安装	--without-*禁用某个功能默认安装
# --prefix=path指定路径			--conf-path=path指定配置文件路径,不指定会放到prefix路径下
# --user=name指定启动nginx worker进程的用户
# --with-http_ssl_moudle 开启https的功能下载ssl来进行公钥和私钥的认证
# --without-http——memcached_moudle 禁用http_memcached
# --with-http_realip_module 启用realip功能让后端知道通过代理访问的用户的ip
# --with-http_v2_module对http2.0版本的支持
# --with-threads开启线程池功能		--with-http_stub_status_moudle开启nginx状态统计功能可以知道多少访问
# --with-stream 支持tcp/udp反向代理即4层负载均衡
./configure --prefix=/usr/local/nginx --user=liaobo --with-http_ssl_module --with-http_realip_module --with-http_v2_module --with-threads --with-http_stub_status_module --with-stream

#编译开启2个进程同时编译
make -j 2

#安装
make install

#启动nginx
/usr/local/nginx/sbin/nginx
#修改PATH变量
PATH=$PATH:/usr/local/nginx/sbin
echo "PATH=$PATH:/usr/local/nginx/sbin" >>/root/.bashrc

#设置nginx的开机启动
echo "/usr/local/nginx/sbin/nginx" >>/etc/rc.local
chmod +x /etc/rc.d/rc.local

#selinux和firewalld防火墙都关闭
service firewalld stop
systemctl disable firewalld

#临时关闭selinux
setenforce 0
sed -i '/^SELINUX=/ s/enforcing/disabled/' /etc/selinux/config
1.3.2 在ansible机器上面创建node_exporter脚本为prometheus在node节点服务器上web和nginx采集数据
[root@ansible ~]# vim node_exporter.sh
#!/bin/bash
#进入root家目录
cd ~
#下载node_exporter源码(由于github无法访问故省略该步手动下载)
#curl -O https://github.com/prometheus/node_exporter/releases/download/v1.6.1/node_exporter-1.6.1.linux-amd64.tar.gz
#解压node_exporters源码包
tar xf node_exporter-1.6.1.linux-amd64.tar.gz
#改名
mv  node_exporter-1.6.1.linux-amd64 /node_exporter
cd /node_exporter
#修改PATH环境变量
PATH=/node_exporter:$PATH
echo "PATH=/node_exporter:$PATH" >>/root/.bashrc
#后台运行监听8090端口
nohup node_exporter --web.listen-address 0.0.0.0:8090  &
1.3.3 在ansible机器上面编写playbook批量部署nginx、keepalived、nfs、node_exporters、dns等软件
[root@ansible ~]# vim software_install.yaml
- hosts: nginx #nginx负载均衡服务器
  remote_user: root
  tasks:
  - name: install nginx #使用脚本一键编译安装nginx
    script:  /root/onekey_install_nginx.sh
  - name: install keepalived  #负载均衡器中安装keepalived实现高可用
    yum: name=keepalived state=installed

- hosts: web #web集群
  remote_user: root
  tasks:
  - name: install nginx  #web主机组中编译安装部署nginx集群
    script:  /root/onekey_install_nginx.sh #调用本地一键安装部署nginx脚本在远程主机上编译安装
  - name: install nfs  #web主机组中安装nfs访问nfs服务器实现数据同源
    yum: name=nfs-utils state=installed
  - name: start nfs  #启动nfs
    shell: service nfs start
    tags: start_nfs  #打标签方便后面直接跳转到此处批量启动nfs

- hosts: dns #dns服务器
  remote_user: root
  tasks:
  - name: install dns
    yum: name=bind.* state=installed

- hosts: nfs #NFS服务器
  remote_user: root
  tasks:
  - name: install nfs
    yum: name=nfs-utils state=installed

- hosts: web nginx #调用本地node_exporter脚本批量安装部署node_exporter为prometheus采集数据
  remote_user: root
  tasks:
  - name: install node_exporters
    script: /root/node_exporter.sh
    tags: install_exporter
  - name: start node_exporters  #后台运行node_exporters
    shell: nohup node_exporter --web.listen-address 0.0.0.0:8090 &
    tags: start_exporters  #打标签方便后面直接跳转到此处批量启动node_exporters
1.3.4 分发脚本给相应的机器并执行
[root@localhost ~]# ansible all -m copy -a "src=/root/onekey_install_nginx.sh dest=/root/"
[root@localhost ~]# ansible web  -m copy -a "src=/root/node_exporter.sh dest=/root/"
[root@localhost ~]# ansible nginx -m copy -a "src=/root/node_exporter.sh dest=/root/"
[root@localhost ~]# ansible-playbook software_install.yaml
2.配置NFS服务器和负载均衡器搭建keepalived
在两台nginx7层负载均衡器上使用keepalived搭建双vip双master高可用架构并使用健康检测监控本机nginx进程后端Web集群通过NFS服务器实现网页数据同源
2.1 修改nginx的index.html界面
[root@localhost ~]# cd /usr/local/nginx
[root@localhost nginx]# ls
client_body_temp  conf  fastcgi_temp  html  logs  proxy_temp  sbin  scgi_temp  uwsgi_temp
[root@localhost nginx]# cd html
[root@localhost html]# ls
50x.html  index.html
[root@localhost html]# vim index.html
将负载均衡器和Web服务器的界面分别修改便于区分就行
2.2 nginx实现七层负载均衡
两台nginx服务器上面分别配置
[root@localhost ~]# vim /usr/local/nginx/conf/nginx.conf
http {
 ...
 upstream  app{
        server  192.168.98.142; #web1
        server  192.168.98.140; #web2
        server  192.168.98.135; #web3
    }
    server {
        listen       80;
        location / {
                proxy_pass http://app;
        }
    }
}
[root@localhost ~]# nginx -s reload

2.4 使用keepalived搭建双vip双master高可用架构
负载均衡器1上配置
[root@localhost conf]# vim /etc/keepalived/keepalived.conf
! Configuration File for keepalived

global_defs {
   notification_email {
     acassen@firewall.loc
     failover@firewall.loc
     sysadmin@firewall.loc
   }
   notification_email_from Alexandre.Cassen@firewall.loc
   smtp_server 192.168.200.1
   smtp_connect_timeout 30
   router_id LVS_DEVEL
   vrrp_skip_check_adv_addr
   #vrrp_strict
   vrrp_garp_interval 0
   vrrp_gna_interval 0
}
vrrp_instance VI_1 {
    state MASTER
    interface ens33
    virtual_router_id 88
    priority 120
    advert_int 1
    authentication {
        auth_type PASS
        auth_pass 1111
    }
    virtual_ipaddress {
        192.168.200.16
    }
}
vrrp_instance VI_2 {
    state BACKUP
    interface ens33
    virtual_router_id 99
    priority 100
    advert_int 1
    authentication {
        auth_type PASS
        auth_pass 1111
    }
    virtual_ipaddress {
        192.168.200.17
    }
}
[root@localhost conf]# service keepalived restart
负载均衡器2上配置
[root@localhost conf]# vim /etc/keepalived/keepalived.conf
! Configuration File for keepalived

global_defs {
   notification_email {
     acassen@firewall.loc
     failover@firewall.loc
     sysadmin@firewall.loc
   }
   notification_email_from Alexandre.Cassen@firewall.loc
   smtp_server 192.168.200.1
   smtp_connect_timeout 30
   router_id LVS_DEVEL
   vrrp_skip_check_adv_addr
   vrrp_strict
   vrrp_garp_interval 0
   vrrp_gna_interval 0
}

vrrp_instance VI_1 {
    state MASTER
    interface ens33
    virtual_router_id 88
    priority 100
    advert_int 1
    authentication {
        auth_type PASS
        auth_pass 1111
    }
    virtual_ipaddress {
        192.168.200.16
    }
}
vrrp_instance VI_2 {
    state BACKUP
    interface ens33
    virtual_router_id 99
    priority 120
    advert_int 1
    authentication {
        auth_type PASS
        auth_pass 1111
    }
    virtual_ipaddress {
        192.168.200.17
    }
}
[root@localhost conf]# service keepalived restart

2.5 keepalived健康检测
2.5.1 编写监控nginx的脚本
[root@localhost ~]# vim check_nginx.sh
#!/bin/bash
#检测nginx是否正常运行
if  /usr/sbin/pidof  nginx  ;then
	exit 0
else
	exit 1
fi
[root@localhost ~]# ansible nginx  -m copy -a "src=/root/check_nginx.sh dest=/root/"
[root@localhost ~]# ansible nginx  -m shell -a "chmod +x /root/check_nginx.sh"
2.5.2 在keepalived里定义和调用监控脚本
负载均衡器1上配置
[root@localhost ~]# vim /etc/keepalived/keepalived.conf
! Configuration File for keepalived

global_defs {
   notification_email {
     acassen@firewall.loc
     failover@firewall.loc
     sysadmin@firewall.loc
   }
   notification_email_from Alexandre.Cassen@firewall.loc
   smtp_server 192.168.200.1
   smtp_connect_timeout 30
   router_id LVS_DEVEL
   vrrp_skip_check_adv_addr
   #vrrp_strict
   vrrp_garp_interval 0
   vrrp_gna_interval 0
}
#定义监控脚本chk_nginx
vrrp_script chk_nginx {
	#当脚本/nginx/check_nginx.sh脚本执行返回值为0的时候不执行下面的weight  -30的操作只有脚本执行失败返回值非0的时候就执行执行权重值减30的操作
	script "/nginx/check_nginx.sh"
	interval 1
	weight -30
}

vrrp_instance VI_1 {
    state MASTER
    interface ens33
    virtual_router_id 59
    priority 120
    advert_int 1
    authentication {
        auth_type PASS
        auth_pass 1111
    }
    virtual_ipaddress {
        192.168.227.188
    }
	#调用监控脚本
	track_script {
		chk_nginx
	}
}

vrrp_instance VI_2 {
    state BACKUP
    interface ens33
    virtual_router_id 60
    priority 100
    advert_int 1
    authentication {
        auth_type PASS
        auth_pass 1111
    }
    virtual_ipaddress {
        192.168.227.199
    }
}
[root@localhost ~]# service keepalived restart
负载均衡器2上配置
[root@localhost ~]# vim /etc/keepalived/keepalived.conf
! Configuration File for keepalived
global_defs {
notification_email {
acassen@firewall.loc
failover@firewall.loc
sysadmin@firewall.loc
}
notification_email_from Alexandre.Cassen@firewall.loc
smtp_server 192.168.200.1
smtp_connect_timeout 30
router_id LVS_DEVEL
vrrp_skip_check_adv_addr
vrrp_strict
vrrp_garp_interval 0
vrrp_gna_interval 0
}
#定义监控脚本chk_nginx
vrrp_script chk_nginx {
#当脚本/nginx/check_nginx.sh脚本执行返回值为0的时候不执行下面的weight -30的操作只有脚本执行失败返回值非0的时候就执行执行权重值减30的操
作
script "/nginx/check_nginx.sh"
interval 1
weight -30
}
vrrp_instance VI_1 {
state BACKUP
interface ens33
virtual_router_id 88
priority 100
advert_int 1
authentication {
auth_type PASS
auth_pass 1111
}
virtual_ipaddress {
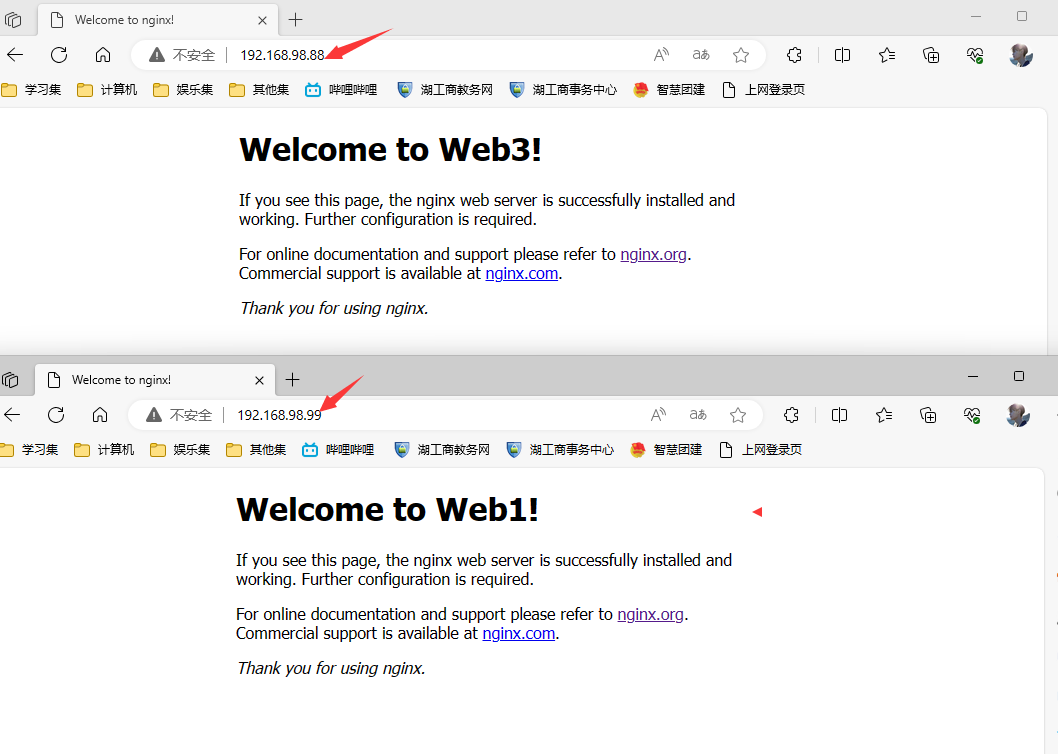
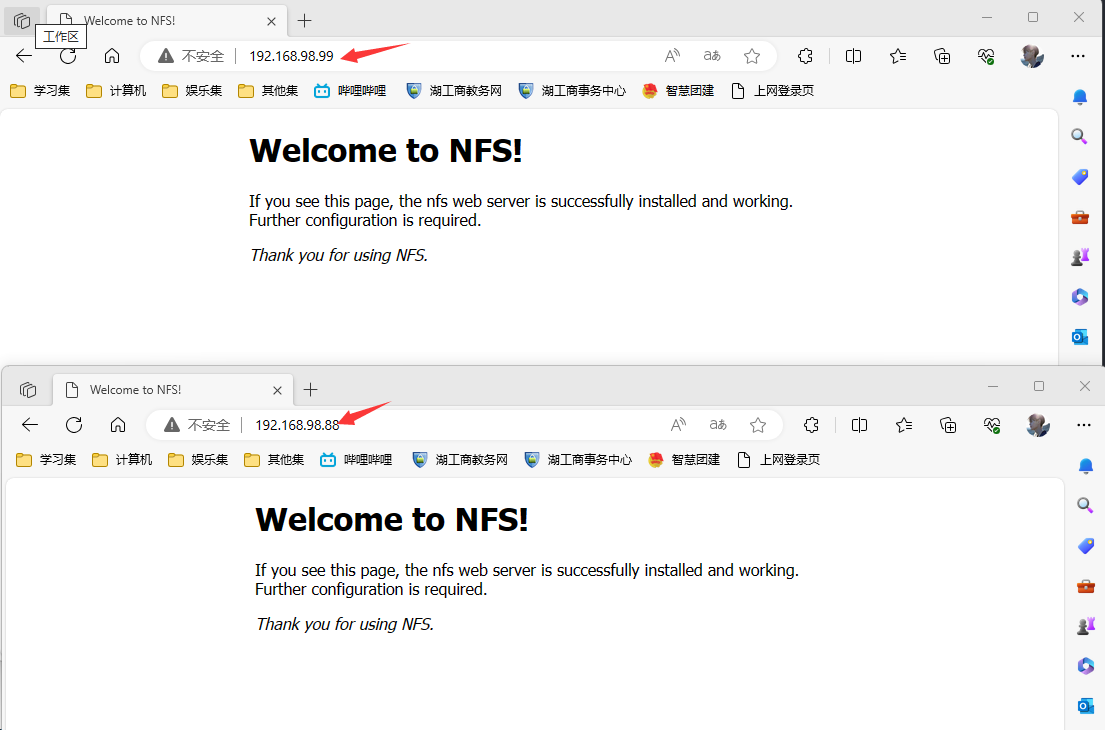
192.168.98.88
}
}
vrrp_instance VI_2 {
state MASTER
interface ens33
virtual_router_id 99
priority 120
advert_int 1
authentication {
auth_type PASS
auth_pass 1111
}
virtual_ipaddress {
192.168.98.99
}
#调用监控脚本
track_script {
chk_nginx
}
}
[root@localhost ~]# service keepalived restart
2.4 配置NFS服务器共享文件
2.4.1 编辑共享文件的配置文件/etc/exports写好具体的共享的目录和权限
[root@localhost ~]# vim /etc/exports
/web  192.168.98.0/24(rw,all_squash,sync)
[root@localhost ~]# mkdir /web
[root@localhost ~]# cd /web
[root@localhost web]# vim index.html
<!DOCTYPE html>
<html>
<head>
<title>Welcome to NFS!</title>
<style>
html { color-scheme: light dark; }
body { width: 35em; margin: 0 auto;
font-family: Tahoma, Verdana, Arial, sans-serif; }
</style>
</head>
<body>
<h1>Welcome to NFS!</h1>
<p>If you see this page, the nfs web server is successfully installed and
working. Further configuration is required.</p>

<p><em>Thank you for using NFS.</em></p>
</body>
</html>
2.4.2 刷新服务
[root@localhost web]# exportfs -rv
2.4.3 关闭防火墙和selinux
[root@localhost web]# service firewalld stop
[root@localhost web]# systemctl disable firewalld
[root@localhost web]# getenforce
Disabled
2.4.4 挂载nfs服务器上共享的/web目录到客户机上
#ansible同时操作三台web机器
#将nfs服务器上的/web目录挂载到客户机的/usr/local/nginx/html/目录上
[root@localhost ~]# ansible web -m shell -a "mount 192.168.98.131:/web /usr/local/nginx/html/"
3.搭建DNS域名服务器
搭建DNS域名服务器增添两条负载均衡记录实现基于DNS的负载均衡访问同一URL解析出双vip地址
1.安装软件bind该软件提供了很多的dns域名查询的命令->由于playbook已经批量安装过该处故省略
[root@localhost ~]# yum install bind* -y
2.关闭DNS域名服务器的防火墙服务和selinux
[root@localhost ~]# service firewalld stop
[root@localhost ~]#systemctl disable firewalld
#临时修改selinux策略
[root@localhost ~]# setenforce 0
3.设置named服务开机启动并且立马启动DNS服务
#设置named服务开机启动
[root@nameserver ~]# systemctl enable named
#立马启动named进程
[root@nameserver ~]# systemctl start named
4.修改dns配置文件任意ip可以访问本机的53端口并且允许dns解析
[root@localhost ~]# vim /etc/named.conf
options {
        listen-on port 53 { any; };  #修改
        listen-on-v6 port 53 { any; }; #修改
        directory       "/var/named";
        dump-file       "/var/named/data/cache_dump.db";
        statistics-file "/var/named/data/named_stats.txt";
        memstatistics-file "/var/named/data/named_mem_stats.txt";
        recursing-file  "/var/named/data/named.recursing";
        secroots-file   "/var/named/data/named.secroots";
        allow-query     { any; }; #修改
#重启named服务
[root@nameserver ~]# service named restart
5.编辑dns次要配置文件/etc/named.rfc1912.zones增加一条主域名记录
[root@localhost ~]# vim /etc/named.rfc1912.zones
zone "liaoobo.com" IN {
        type master; #类型为主域名
        file "liaoobo.com.zone"; #liaoobo.com域名的数据文件需要去/var/named/下创建
        allow-update { none; };
};
[root@localhost ~]# cd /var/named/
[root@localhost named]# cp -a named.localhost liaoobo.com.zone
[root@localhost named]# vim liaoobo.com.zone
$TTL 1D
@       IN SOA  @ rname.invalid. (
                                        0       ; serial
                                        1D      ; refresh
                                        1H      ; retry
                                        1W      ; expire
                                        3H )    ; minimum
        NS      @
        A       127.0.0.1
        AAAA    ::1
www IN  A       192.168.98.143
www IN  A       192.168.98.138
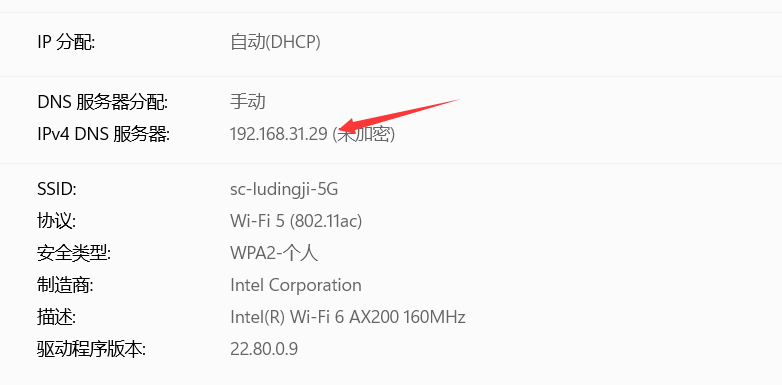
5.修改windows客户机的dns服务器的地址此处只是展示效果不用做
只有处于同一网段主机才能成功访问DNS服务器故需要将DNS服务器改成桥接模式此处该完后地址变为192.168.31.29

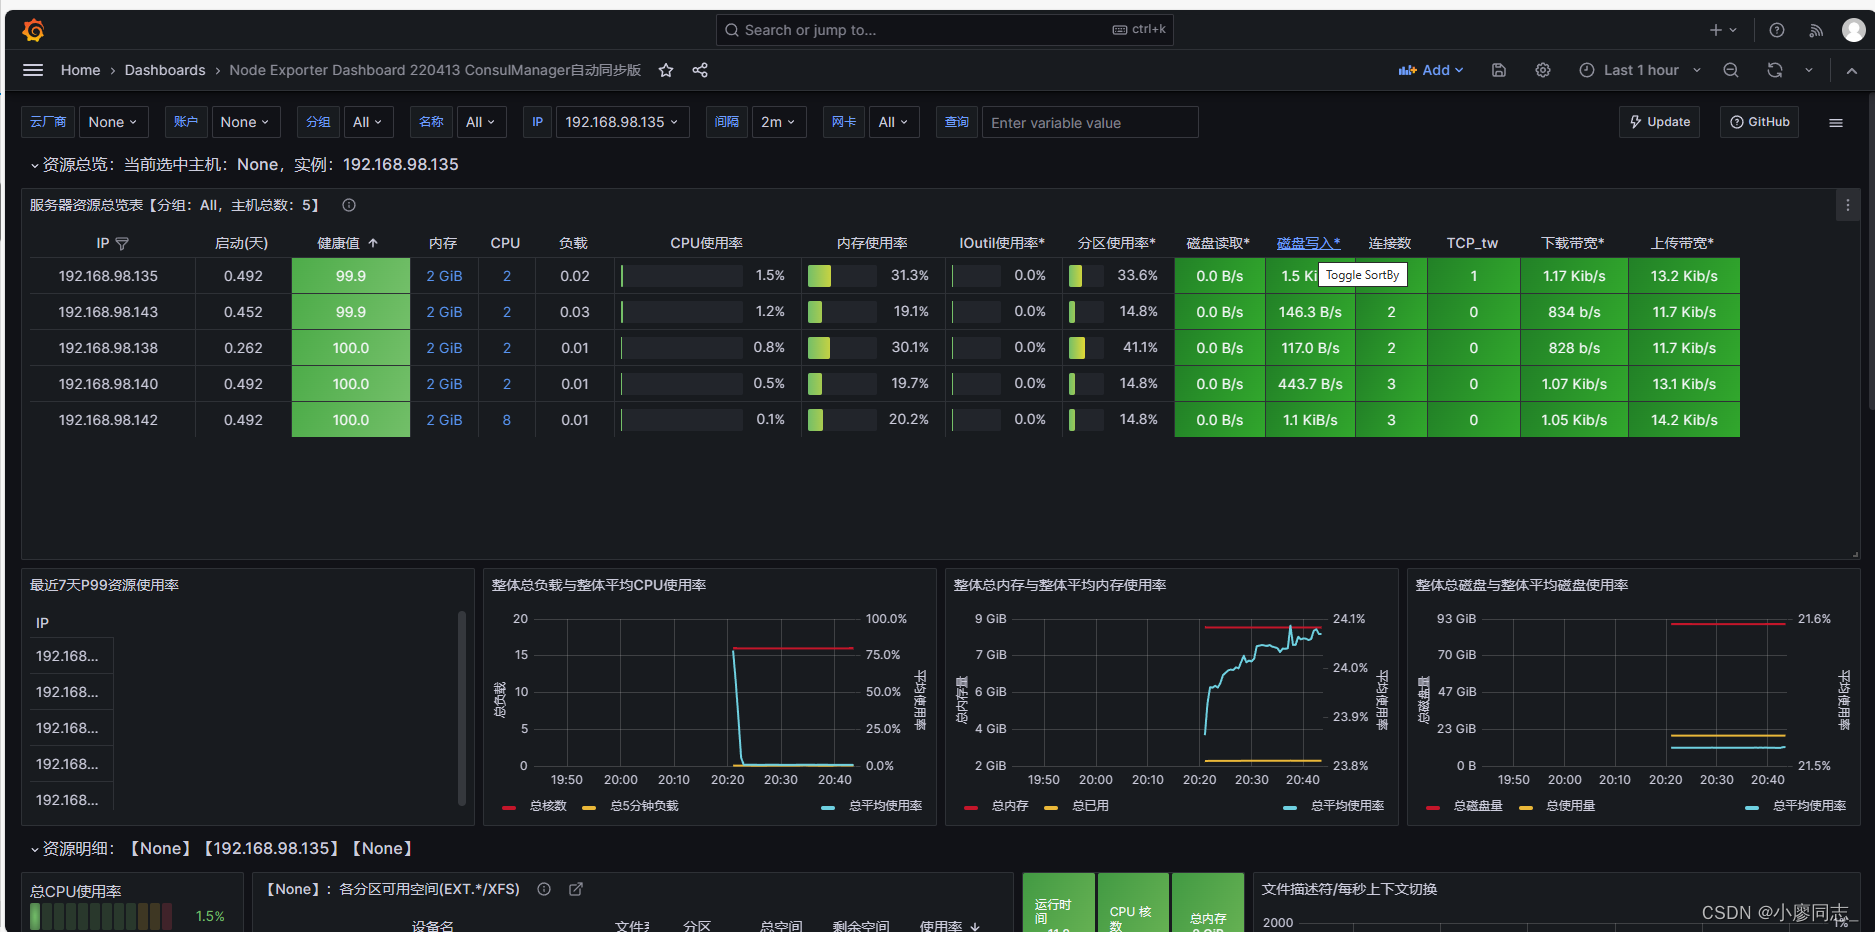
4.部署prometheus和grafana
安装部署prometheus+grafana实现对Web服务器和load balance服务器的监控和出图
4.1 安装prometheus server
1.一键源码安装prometheus
源码下载https://github.com/prometheus/prometheus/releases/download/v2.46.0/prometheus-2.46.0.linux-amd64.tar.gz
[root@localhost ~]# vim onekey_install_prometheus.sh
#!/bin/bash

#创建存放prometheus的目录
mkdir /prom

#下载prometheus源码(由于github无法访问故省略该步手动下载)
#curl -O https://github.com/prometheus/prometheus/releases/download/v2.47.0/prometheus-2.47.0.linux-amd64.tar.gz

#解压并改名
tar xf ./prometheus-2.47.0.linux-amd64.tar.gz -C /prom
mv /prom/prometheus-2.47.0.linux-amd64 /prom/prometheus

#添加到PATH变量
PATH=/prom/prometheus:$PATH
echo "PATH=/prom/prometheus:$PATH " >>/root/.bashrc

#nohub后台执行启动
nohup prometheus  --config.file=/prom/prometheus/prometheus.yml &

#关闭防火墙
service firewalld stop
systemctl disable firewalld
2.把prometheus做成一个服务来进行管理
[root@prometheus prometheus]# vim /usr/lib/systemd/system/prometheus.service
[Unit]
Description=prometheus

[Service]
ExecStart=/prom/prometheus/prometheus --config.file=/prom/prometheus/prometheus.yml
ExecReload=/bin/kill -HUP $MAINPID
KillMode=process
Restart=on-failure

[Install]
WantedBy=multi-user.target

#重新加载systemd相关的服务
[root@prometheus prometheus]# systemctl daemon-reload
第一次因为是使用nohup 方式启动的prometheus还是需要使用后kill 的方式杀死第一次启动的进程后面可以使用service方式管理prometheus了
[root@prometheus prometheus]# ps aux|grep prometheus
root       8431  0.2  3.2 782340 61472 pts/0    Sl   11:21   0:01 prometheus --config.file=/prom/prometheus/prometheus.yml
root       8650  0.0  0.0 112824   980 pts/0    S+   11:35   0:00 grep --color=auto prome
[root@prometheus prometheus]# kill -9 8431
[root@prometheus prometheus]#  service prometheus start
[root@prometheus prometheus]#  service prometheus stop
3 在node节点服务器上安装exporter程序->已经使用playbook安装完成
4.2 在prometheus server里添加安装了exporter程序的机器
[root@sc-prom prometheus]# vim /prom/prometheus/prometheus.yml

scrape_configs:

The job name is added as a label `job=<job_name>` to any timeseries scraped from this config.

  - job_name: "prometheus"
    static_configs:
      - targets: ["localhost:9090"]
  #添加下面的配置采集node-liangrui服务器的metrics
  - job_name: "Web1"
    static_configs:
      - targets: ["192.168.98.142:8090"]

  - job_name: "Web2"
    static_configs:
      - targets: ["192.168.98.140:8090"]

  - job_name: "Web3"
    static_configs:
      - targets: ["192.168.98.135:8090"]

  - job_name: "nginx1"
    static_configs:
      - targets: ["192.168.98.143:8090"]
  - job_name: "nginx2"
    static_configs:
      - targets: ["192.168.98.138:8090"]


#重启prometheus服务
[root@prometheus prometheus]# service  prometheus restart

4.3 grafana部署和安装
4.3.1 先去官方网站下载
wget https://dl.grafana.com/enterprise/release/grafana-enterprise-10.1.1-1.x86_64.rpm
4.3.2 安装
[root@sc-prom grafana]# ls
grafana-enterprise-8.4.5-1.x86_64.rpm
[root@sc-prom grafana]# yum install grafana-enterprise-10.1.1-1.x86_64.rpm -y
4.3.3 启动grafana
[root@sc-prom grafana]# service grafana-server start
设置grafana开机启动
[root@prometheus grafana]# systemctl enable grafana-server
监听的端口号是3000
4.3.4 登录在浏览器里登录
http://192.168.98.147:3000/
默认的用户名和密码是
用户名admin
密码admin
5.ab压力测试
ab测试机对web集群和负载均衡器进行压力测试了解系统性能的瓶颈对系统性能资源(如内核参数、nginx参数 )进行调优提升系统性能
[root@localhost ~]# yum install httpd-tools -y
#其中c表示并发数n表示请求数
[root@localhost ~]#  ab -c 1000  -n 1000  http://www.liaoobo.com/
Requests per second:    2802.38 [#/sec] (mean)
Time per request:       356.839 [ms] (mean)
Time per request:       0.357 [ms] (mean, across all concurrent requests)
Transfer rate:          1789.80 [Kbytes/sec] received
四. 项目总结
1.做项目时遇到的问题
1.脚本执行出错原因是github无法访问导致脚本执行失败
2.nfs实现网页数据同源时web服务器挂载共享文件失败原因是共享ip地址网段需要精确到网段
3.keepalived的虚拟ip无法访问时记得清除防火墙规则
4.DNS配置域名的数据文件时不能加注释
2.项目心得
1.提前规划好整个集群的架构可以提高项目开展时效率
2.对基于Nginx的web集群和高可用、高性能有了深入的理解同时对脑裂和vip漂移现象也有了更加深刻的体会和分析。
3.加强了对7层负载均衡和dns负载均衡的认识
4.认识到了系统性能资源的重要性对压力测试下整个集群的瓶颈有了一个整体概念
| 阿里云国内75折 回扣 微信号:monov8 |
| 阿里云国际,腾讯云国际,低至75折。AWS 93折 免费开户实名账号 代冲值 优惠多多 微信号:monov8 飞机:@monov6 |