

Spring cache整合Redis详解 动态设置失效时间
| 阿里云国内75折 回扣 微信号:monov8 |
| 阿里云国际,腾讯云国际,低至75折。AWS 93折 免费开户实名账号 代冲值 优惠多多 微信号:monov8 飞机:@monov6 |
文章目录
1.spring cache简介
Spring Cache是Spring框架提供的对缓存使用的抽象类Spring从3.1版本开始提供Cache和CacheManager来统一管理不同的缓存插件它使用注解的方式实现避免了代码的侵入性使业务代码和操作缓存的代码分离。支持集成的插件从CacheType中可以看到
public enum CacheType {

	GENERIC,
	JCACHE,
	EHCACHE,
	HAZELCAST,
	INFINISPAN,
	COUCHBASE,
	REDIS,
	CAFFEINE,
	SIMPLE,
	NONE

}
2.spring cache集成redis
项目中使用redis比较多此处实现集成redis的过程。
1引入依赖
在pom.xml中引入需要的依赖此处使用spring cloud项目实现版本号在父工程中定义子工程中引入具体需要的依赖。
父工程pom.xml引入依赖指定版本号
   <!--指定版本号-->
   <properties>
        <spring.boot.version>2.3.3.RELEASE</spring.boot.version>
        <lombok.version>1.18.20</lombok.version>
    </properties>

   <dependencies>
        <dependency>
            <groupId>org.projectlombok</groupId>
            <artifactId>lombok</artifactId>
            <version>${lombok.version}</version>
        </dependency>
        <!--使用redis时需要此jar包-->
        <dependency>
            <groupId>org.apache.commons</groupId>
            <artifactId>commons-pool2</artifactId>
        </dependency>
   </dependencies>

   <!--使用dependencyManagement来管理版本号子项目依赖parent后不需要添加版本号达到版本号的统一控制-->
   <dependencyManagement>
        <dependencies>
            <!--spring boot依赖jar-->
            <dependency>
                <groupId>org.springframework.boot</groupId>
                <artifactId>spring-boot-starter-parent</artifactId>
                <version>${spring.boot.version}</version>
                <type>pom</type>
                <scope>import</scope>
            </dependency>
   </dependencyManagement>
子工程pom.xml引入需要的依赖
    <!--继承了父项目不需要添加版本号-->
    <dependency>
        <groupId>org.springframework.boot</groupId>
        <artifactId>spring-boot-starter-web</artifactId>
    </dependency>

    <!--spring cache-->
    <dependency>
        <groupId>org.springframework.boot</groupId>
        <artifactId>spring-boot-starter-cache</artifactId>
    </dependency>

    <!--redis依赖-->
    <dependency>
        <groupId>org.springframework.boot</groupId>
        <artifactId>spring-boot-starter-data-redis</artifactId>
    </dependency>
2配置连接信息
在yml或者properties配置文件中配置上服务的端口信息、连接redis信息、spring cache配置信息。application.yml配置
#配置端口
server:
  port: 8090

#配置连接redis的信息
spring:
  redis:
    database: 1
    host: 127.0.0.1
    port: 6379
    password:
    timeout: 3000
    lettuce:
      pool:
        max-active: 20
        max-idle: 10
        max-wait: -1
        min-idle: 0

  #配置spring cache
  cache:
    #配置缓存组件类型分为generic、jcache、ehcache、hazelcast、infinispan、couchbase、redis、caffeine、simple、none
    type: redis
    #组件类型选择redis后对操作redis的一些配置信息
    redis:
      #是否允许存空值防止缓存穿透
      cache-null-values: true
      #缓存失效时间
      time-to-live: -1
      #存到redis中是否使用key前缀
      use-key-prefix: true
      #key前缀
      key-prefix: abc
3配置spring cache配置类
创建一个配置类用于配置CacheManager管理器以及添加到redis数据value的序列化方式、对象序列化的格式处理、设置过期时间、是否允许前缀、前缀的拼接等。使用@EnableCaching注解标识开启spring cache可以在配置类中声明也可以在Application启动类中声明。
//声明配置类
@Configuration
//开启spring cache
@EnableCaching
//添加缓存配置类yml或者properties中配置的cache相关信息使用CacheProperties接收从这里引入可以直接使用里面的字段值
@EnableConfigurationProperties(CacheProperties.class)
public class CacheConfig{

    //创建缓存管理类@Primary标识当有多个CacheManager管理器时默认以这个为主
    //redisConnectionFactory为连接redis的工厂在子类中已经创建并且使用@Bean标识
    //CacheProperties为配置的spring cache相关信息类被@ConfigurationProperties修饰
    @Bean
    @Primary
    public CacheManager cacheManager(RedisConnectionFactory redisConnectionFactory,CacheProperties cahceProperties){
        return RedisCacheManager.builder(redisConnectionFactory)
                .cacheDefaults(redisCacheConfiguration(cahceProperties,null))
                .build();
    }

    //设置rediscacheConfiguration配置类根据配置的失效时间等属性进行配置
    public RedisCacheConfiguration redisCacheConfiguration(CacheProperties cahceProperties,Long ttl) {
        //使用Jackson2JsonRedisSerializer的方式类序列化值
        Jackson2JsonRedisSerializer jackson2JsonRedisSerializer = new Jackson2JsonRedisSerializer(Object.class);
        ObjectMapper om = new ObjectMapper();
        om.setVisibility(PropertyAccessor.ALL, JsonAutoDetect.Visibility.ANY);
        om.activateDefaultTyping(LaissezFaireSubTypeValidator.instance , ObjectMapper.DefaultTyping.NON_FINAL, JsonTypeInfo.As.WRAPPER_ARRAY);
        om.configure(DeserializationFeature.FAIL_ON_UNKNOWN_PROPERTIES, false);

        //添加时间日期格式的处理
        JavaTimeModule javaTimeModule = new JavaTimeModule();
        DateTimeFormatter dtf = DateTimeFormatter.ofPattern("yyyy-MM-dd HH:mm:ss");
        javaTimeModule.addSerializer(LocalDateTime.class,
                new LocalDateTimeSerializer(dtf));
        javaTimeModule.addDeserializer(LocalDateTime.class,
                new LocalDateTimeDeserializer(dtf));
        om.registerModule(javaTimeModule);

        jackson2JsonRedisSerializer.setObjectMapper(om);
        //获取RedisCacheConfiguration,对它进行新值的设置默认序列化值使用SerializationPair.fromSerializer(new JdkSerializationRedisSerializer(classLoader))
        //这里设置序列化值的方式与redisTemple保持一致也必须保持一致否则有些使用spring cache存再使用redisTemple来取的时候格式就会存在问题
        RedisCacheConfiguration config = RedisCacheConfiguration.defaultCacheConfig()
                .serializeValuesWith( RedisSerializationContext.SerializationPair.fromSerializer(
                        jackson2JsonRedisSerializer));

        //获取配置的信息
        CacheProperties.Redis redisProperties = cahceProperties.getRedis();
        //设置过期时间
        if(null == ttl) {//传递的参数为空则使用配置文件中配置的过期时间
            if (null != redisProperties.getTimeToLive()) {
                config = config.entryTtl(redisProperties.getTimeToLive());
            }
        } else {
            config = config.entryTtl(Duration.ofMillis(ttl));
        }

        //是否允许设置为null值
        if (!redisProperties.isCacheNullValues()) {
            config = config.disableCachingNullValues();
        }
        //是否设置前缀
        if (redisProperties.isUseKeyPrefix()) {
            //设置前缀
            if (null != redisProperties.getKeyPrefix()) {
                config = config.computePrefixWith(CacheKeyPrefix.prefixed(redisProperties.getKeyPrefix()));//默认的前缀方式
            }
        } else {
            config = config.disableKeyPrefix();
        }
        return config;
    }
 }
3.spring cache与redisTemple统一格式
项目集成了spring cache操作缓存我们都使用spring cache注解的方式但是有些场景下我们没法使用spring cache。例如新增一条记录的时候接口的返回值是执行结果这个时候就没法使用spring cache来操作缓存会选择redisTemple操作。这样就会存在redisTemple存spring cache取或者spring cache存redisTemple取的情况这个时候就要求两种方式存的格式统一否则取的时候格式不统一没法转成需要的对象实体。spring cache对一个结果对象实体的存相当于redisTemple这样的方式存redisTemplate.opsForValue().set(“user:”+id,user)。
创建redis配置类设置对象序列化的方式与spring cache一致这样redisTemple和spring cache 交叉存取就没有格式问题
@Configuration
public class RedisConfig {

    @Bean
    public RedisTemplate<Object, Object> redisTemplate(RedisConnectionFactory factory) {
        RedisTemplate<Object, Object> redisTemplate = new RedisTemplate<>();
        redisTemplate.setConnectionFactory(factory);
        Jackson2JsonRedisSerializer jackson2JsonRedisSerializer = new Jackson2JsonRedisSerializer(Object.class);
        ObjectMapper om = new ObjectMapper();
        om.setVisibility(PropertyAccessor.ALL, JsonAutoDetect.Visibility.ANY);
        om.activateDefaultTyping(LaissezFaireSubTypeValidator.instance , ObjectMapper.DefaultTyping.NON_FINAL, JsonTypeInfo.As.WRAPPER_ARRAY);
        om.configure(DeserializationFeature.FAIL_ON_UNKNOWN_PROPERTIES, false);
        //添加时间日期格式的处理
        JavaTimeModule javaTimeModule = new JavaTimeModule();
        DateTimeFormatter dtf = DateTimeFormatter.ofPattern("yyyy-MM-dd HH:mm:ss");
        javaTimeModule.addSerializer(LocalDateTime.class,
                new LocalDateTimeSerializer(dtf));
        javaTimeModule.addDeserializer(LocalDateTime.class,
                new LocalDateTimeDeserializer(dtf));
        om.registerModule(javaTimeModule);
        jackson2JsonRedisSerializer.setObjectMapper(om);

        // 设置value的序列化规则和 key的序列化规则
        redisTemplate.setKeySerializer(new StringRedisSerializer());
        redisTemplate.setValueSerializer(jackson2JsonRedisSerializer);
        redisTemplate.setHashKeySerializer(new StringRedisSerializer());
        redisTemplate.setHashValueSerializer(jackson2JsonRedisSerializer);
        redisTemplate.afterPropertiesSet();
        return redisTemplate;
    }
}
4.SpEL标签
spring cache提供了一些供我们使用的SpEL上下文数据可以根据SpEL标签获取到参数值进行一些动态数据的组装例如获取到参数id的值作为redis的key。
| 名称 | 位置 | 描述 | 示例 |
|---|---|---|---|
| methodName | root对象 | 当前被访问的方法名 | #root.methodname |
| method | root对象 | 当前被调用的方法 | #root.method.name |
| target | root对象 | 当前被调用的目标对象实例 | #root.target |
| targetClass | root对象 | 当前被调用的目标对象的类 | #root.targetClass |
| args | root对象 | 当前被调用方法的参数列表 | #root.args[0] |
| caches | root对象 | 当前方法调用使用的缓存列表 | #root.caches[0].name |
| ArgumentName | 执行上下文 | 当前被调用方法的参数例如findUser(User user)可以通过#user.id获得参数的值 | #user.id |
| result | 执行上下文 | 方法执行后的返回值仅当方法执行后的判断有效例如unless=#result==null | #result |
5.Cacheable注解实现
这个注解一般用在查询方法上表示这个方法有了缓存的功能方法的返回值会被缓存下来下一次调用该方法前会去检查是否缓存中已经有此方法对应key的值如果有就直接返回不调用方法如果没有则调用方法并把结果缓存起来。支持配置的属性
| 属性/方法名 | 说明 |
|---|---|
| value | 缓存名必填它指定了缓存存放在哪块命名空间下 |
| cacheNames | 与value等价两者二选一即可 |
| key | 可选属性可以使用SpEL标签定义缓存的key |
| keyGenerator | key的生成器key/keyGenerator二选一即可 |
| cacheManager | 指定缓存管理器可以定义多个缓存管理器每个设置不同的特性例如过期时间 |
| cacheResolver | 指定缓存解析器可以自定义 |
| condition | 条件符合则缓存 |
| unless | 条件符合则不缓存 |
| sync | 是否使用异步模式默认为false |
为了处理查询缓存失效的方案
①缓存穿透spring cache配置文件的属性cache-null-valuestrue允许写入空值。
②缓存击穿@Cacheable(sync=true)查询加锁。
③缓存雪崩每个缓存配置不同的过期时间time-to-livexxx。
案例
    @PostMapping(value="getUserById1")
    @Cacheable(cacheNames = "aaaa",key = "#root.args[0]")
    public User getUserById1(Integer id){
        return olapService.getUserById(id);
    }

    @PostMapping(value="getUserById6")
    //unlessSpEL表达式 不满足条件才缓存数据
    @Cacheable(cacheNames = "ffff", key = "#root.args[0]",unless ="#result==null")
    public User getUserById6(Integer id){
        return olapService.getUserById(id);
    }
6.CachePut注解实现
使用该注解标识的方法每次都会执行并将返回值存入指定的缓存中若是之前已经有此key对应的value则再次执行相当于覆盖一般用在新增、修改方法上。支持配置的属性
| 属性/方法名 | 说明 |
|---|---|
| value | 缓存名必填它指定了缓存存放在哪块命名空间下 |
| cacheNames | 与value等价两者二选一即可 |
| key | 可选属性可以使用SpEL标签定义缓存的key |
| keyGenerator | key的生成器key/keyGenerator二选一即可 |
| cacheManager | 指定缓存管理器可以定义多个缓存管理器每个设置不同的特性例如过期时间 |
| cacheResolver | 指定缓存解析器可以自定义 |
| condition | 条件符合则缓存 |
| unless | 条件符合则不缓存 |
案例
    @PostMapping(value="insertUser")
    //CachePut每次都会执行并将结果存入缓存中常用于更新、插入中
    @CachePut(cacheNames = "gggg", key = "#user.id",unless ="#result==null")
    public User insertUser(@RequestBody User user){
        return olapService.insertUser(user);
    }
7.CacheEvict注解实现
使用该注解的方法会清空指定的缓存一般用在更新、删除方法上。支持配置的属性
| 属性/方法名 | 说明 |
|---|---|
| value | 缓存名必填它指定了缓存存放在哪块命名空间下 |
| cacheNames | 与value等价两者二选一即可 |
| key | 可选属性可以使用SpEL标签定义缓存的key |
| keyGenerator | key的生成器key/keyGenerator二选一即可 |
| cacheManager | 指定缓存管理器可以定义多个缓存管理器每个设置不同的特性例如过期时间 |
| cacheResolver | 指定缓存解析器可以自定义 |
| condition | 条件符合则缓存 |
| allEntries | 是否清空所用的缓存默认为false如果指定为true则方法调用后将清空所有命名空间为value或cacheNames配置值的数据 |
| beforeInvocation | 是否在方法执行前就清空默认为false如果指定为true则在方法执行前就会清空缓存 |
案例
    @PostMapping(value="deleteUser")
    //CacheEvict清空指定的缓存
    @CacheEvict(cacheNames = "gggg", key = "#root.args[0]")
    public boolean deleteUser(Integer id){
        return olapService.deleteUser(id);
    }

    @PostMapping(value="deleteUser1")
    //CacheEvict清空所有cacheNames命名空间下的数据
    @CacheEvict(cacheNames = "gggg", key = "#root.args[0]",allEntries = true)
    public boolean deleteUser1(Integer id){
        return olapService.deleteUser(id);
    }
8.Caching注解实现
该注解可以实现同一个方法上同时使用多种注解从Caching的源码可以看到支持Cacheable、CachePut、CacheEvict数组。Caching源码
public @interface Caching {

	Cacheable[] cacheable() default {};

	CachePut[] put() default {};

	CacheEvict[] evict() default {};

}
案例
   @PostMapping(value="deleteUserCaching")
    //Caching可以同时使用多个缓存参数为cacheable、put、evict
    @Caching(
        cacheable = {
            @Cacheable(cacheNames = "hhhh",key = "#root.args[0]"),
            @Cacheable(cacheNames = "iiii",key = "#root.args[0]"),
        },
        put = {
            @CachePut(cacheNames = "jjjj", key = "#root.args[0]"),
            @CachePut(cacheNames = "kkkk", key = "#root.args[0]")
        },
        evict = {
            @CacheEvict(cacheNames= "eeee",key = "#root.args[0]"),
            @CacheEvict(cacheNames= "ffff",key = "#root.args[0]"),
        }
    )
    public boolean deleteUserCaching(Integer id){
        return olapService.deleteUser(id);
    }
9.自定义key生成器KeyGenerator
缓存的key可以通过属性key进行配置也可以使用key生成器进行生成这样就不用每个key都去具体指定key和key生成器二选一就行。key生成器使用@Bean修饰当程序启动的时候会加载到spring容器中进行管理需要的时候直接使用即可。配置key生成器可以放在CacheConfig.java配置类中
@Bean
public KeyGenerator customKeyGenerator(){
return new KeyGenerator() {
//根据target类、调用的方法method、传递的参数params组织spring cache的key
@Override
public Object generate(Object target, Method method, Object... params) {
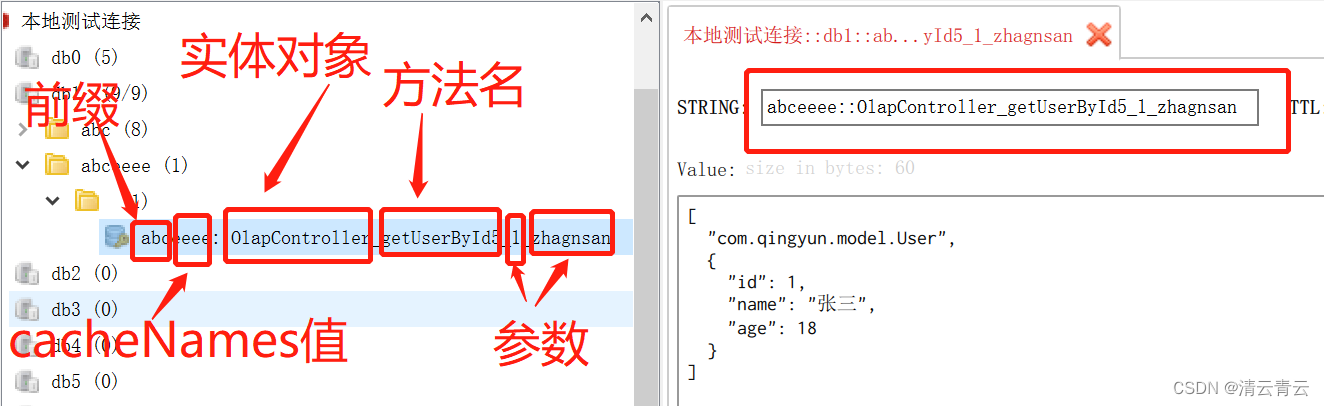
String key = target.getClass().getSimpleName() + "_" + method.getName() + "_" + StringUtils.arrayToDelimitedString(params, "_");
return key;
}
};
}
使用时通过属性keyGenerator指定key的生成器。
案例
    @PostMapping(value="getUserById5")
    //存到redis的key使用key生成器的方式生成配置属性key和keyGenerator二选一就行
    @Cacheable(cacheNames = "eeee", keyGenerator = "customKeyGenerator")
    public User getUserById5(Integer id,String name){
        return olapService.getUserById(id);
    }
redis存放情况
10.自定义前缀CacheKeyPrefix
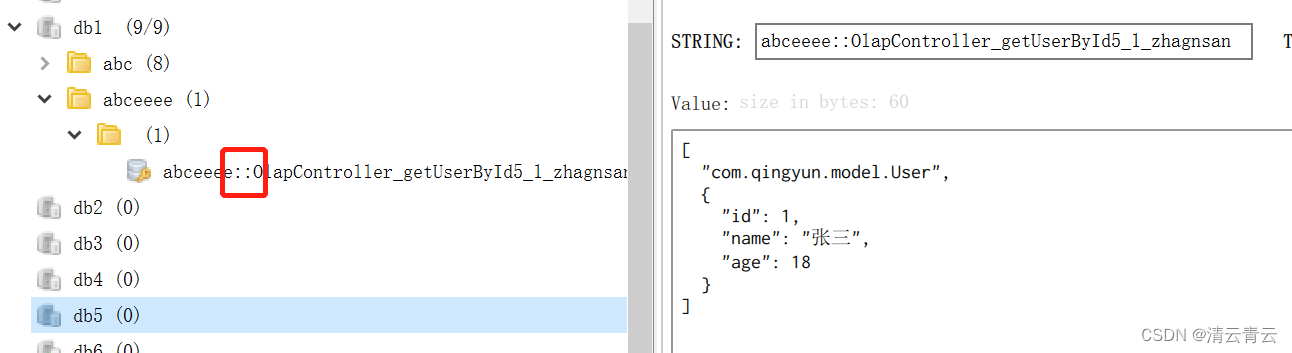
key是否需要加统一的前缀、以及设置统一的前缀字符都可以在yml或properties配置文件中配置spring.cache.redis.use-key-prefix配置是否使用前缀值为true则开启spring.cache.redis.key-prefix配置前缀字符。默认的前缀配置格式为key-prefix+cacheNames的值+::从CacheKeyPrefix的源码可以看出
 static CacheKeyPrefix prefixed(String prefix) {
        Assert.notNull(prefix, "Prefix must not be null!");
        return (name) -> {
            return prefix + name + "::";
        };
    }
默认key的格式
觉得这样的::连接符不美观的话可以自定义key的格式在RedisCacheConfiguration配置中可以重新配置key的格式。
 //添加上前缀也可以自定义一个方式默认是keyPrefix::的方式
 config = config.computePrefixWith(bulidPrefix(redisProperties.getKeyPrefix()));

 //重新构建key的连接格式
 private CacheKeyPrefix bulidPrefix(String keyPrefix){
        return (name) -> {
            StringBuffer str = new StringBuffer();
            str.append(keyPrefix);
            str.append(":");
            str.append(name);
            str.append(":");
            return str.toString();
        };
 }
11.多个CacheManager实现不同失效时间
有的时候我们想为不同的key设置不同的失效时间例如设置失效时间为一分钟、一个小时、一天等。为了达到这个需求可以定义不同的CacheManager管理器当配置缓存的时候用属性cacheManager来指定选择的CacheManager。
在CacheConfig.java配置类中配置需要的管理器使用 @Primary注解标识哪个是默认的管理器这样在不指定CacheManager的时候会使用默认的管理器。配置不同管理器的实现
    //创建缓存管理类@Primary标识当有多个CacheManager管理器时默认以这个为主
    //redisConnectionFactory为连接redis的工厂在子类中已经创建并且使用@Bean标识
    //CacheProperties为配置的spring cache相关信息类被@ConfigurationProperties修饰
    @Bean
    @Primary
    public CacheManager cacheManager(RedisConnectionFactory redisConnectionFactory,CacheProperties cahceProperties){
        return RedisCacheManager.builder(redisConnectionFactory)
                .cacheDefaults(redisCacheConfiguration(cahceProperties,null))
                .build();
    }

    //创建其它缓存管理类使用的时候根据cacheManager来指定使用哪个cache管理器默认使用被 @Primary修饰的。例如  @Cacheable(cacheNames = "xxxx",key = "#root.args[0]",cacheManager = "cacheManagerOneMinute")
    //这样就可以根据业务需要配置不同的cache管理器一般用于设置redis不同的失效时间此为设置失效时间为1分钟
    @Bean
    public CacheManager cacheManagerOneMinute(RedisConnectionFactory redisConnectionFactory,CacheProperties cahceProperties){
        return RedisCacheManager.builder(redisConnectionFactory)
                .cacheDefaults(redisCacheConfiguration(cahceProperties,60000L))
                .build();
    }

    //这样就可以根据业务需要配置不同的cache管理器一般用于设置redis不同的失效时间此为设置失效时间为1小时
    @Bean
    public CacheManager cacheManagerOneHour(RedisConnectionFactory redisConnectionFactory,CacheProperties cahceProperties){
        return RedisCacheManager.builder(redisConnectionFactory)
                .cacheDefaults(redisCacheConfiguration(cahceProperties,3600000L))
                .build();
    }
案例
    @PostMapping(value="getUserById2")
    //指定使用哪种cache管理器不指定使用默认的
    @Cacheable(cacheNames = "bbbb",key = "#root.args[0]",cacheManager = "cacheManagerOneHour")
    public User getUserById2(Integer id){
        return olapService.getUserById(id);
    }
12.自定义CacheResolver动态设置失效时间
不同的失效时间可以通过配置不同的CacheManager实现但是不灵活每次有一个新的失效时间都得创建一个新的CacheManager。若是每次操作缓存的时候都可以动态的配置失效时间或者配置今天内有效这样就特别方便了。spring cache是基于aop实现的我们也可以基于这个特性来动态设置失效时间。
自定义一个注解支持配置缓存失效时间、时间单位、是否今天失效有效时间从操作缓存这一刻到凌晨十二点。自定义注解CacheExpire
import java.lang.annotation.ElementType;
import java.lang.annotation.Retention;
import java.lang.annotation.RetentionPolicy;
import java.lang.annotation.Target;
import java.util.concurrent.TimeUnit;

/**
 * cache注解类可以配置cache失效时间
 */
//此注解作用于方法上
@Target(ElementType.METHOD)
//此注解保留到编译成class文件加载到jvm中也依然存在
@Retention(RetentionPolicy.RUNTIME)
public @interface CacheExpire {

    /**
     * 失效时间默认60秒
     */
    public long ttl() default 60L;

    /**
     * 失效单位默认秒
     */
    public TimeUnit unit() default TimeUnit.SECONDS;

    /**
     * 今天有效失效时间是从创建这一刻起到晚上凌晨12点整是一个动态的时间
     */
    public boolean today() default false;
}
重写CacheResolver缓存处理器的方法在处理缓存之前使用反射机制动态的修改RedisCacheConfiguration里面的失效时间这样就可以随意配置失效时间。新建一个处理器RedisExpireCacheResolver让其继承SimpleCacheResolver重写resolveCaches方法通过拦截执行的方法检查是否配置了自定义注解CacheExpire配置了CacheExpire注解则从对应字段取到失效时间配置了今天失效today为true则计算当前这一刻到12点的时长重新设置失效时间。RedisExpireCacheResolver.java实现代码
import org.springframework.cache.Cache;
import org.springframework.cache.CacheManager;
import org.springframework.cache.interceptor.CacheOperationInvocationContext;
import org.springframework.cache.interceptor.SimpleCacheResolver;
import org.springframework.data.redis.cache.RedisCache;
import org.springframework.data.redis.cache.RedisCacheConfiguration;
import org.springframework.util.ReflectionUtils;

import java.lang.reflect.Field;
import java.lang.reflect.Method;
import java.time.Duration;
import java.util.*;

/**
 * 使用继承的方式对cache处理器进行扩展
 */
public class RedisExpireCacheResolver extends SimpleCacheResolver {

    public RedisExpireCacheResolver(CacheManager cacheManager) {
        super(cacheManager);
    }

    //重写处理cache的方法
    @Override
    public Collection<? extends Cache> resolveCaches(CacheOperationInvocationContext<?> context) {
        //直接参考父父类AbstractCacheResolver的resolveCaches方法
        //获取当前注解中的缓存名通过父类进行获取
        Collection<String> cacheNames = getCacheNames(context);
        if (cacheNames == null) {
            return Collections.EMPTY_LIST;
        } else {
            Collection<Cache> result = new ArrayList(cacheNames.size());
            Iterator cacheIterator = cacheNames.iterator();
            while (cacheIterator.hasNext()) {
                String cacheName = (String) cacheIterator.next();
                //通过缓存名从缓存管理器中获取到缓存对象
                Cache cache = this.getCacheManager().getCache(cacheName);
                if (cache == null) {
                    throw new IllegalArgumentException("Cannot find cache named '" + cacheName + "' for " + context.getOperation());
                }
                //跟AbstractCacheResolver的resolveCaches方法比较只有这里新增解析注解反射替换RedisCacheConfiguration的处理
                this.parseCacheExpire(cache, context);

                result.add(cache);
            }
            return result;
        }
    }

    /**
     * 通过反射替换cache中的RedisCacheConfiguration类已经设置好的过期时间等的值
     * 解析自定义注解CacheExpire从注解中获取设置的过期时间给RedisCacheConfiguration重新赋值
     */
    private void parseCacheExpire(Cache cache, CacheOperationInvocationContext<?> context) {
        Method method = context.getMethod();
        //判断方法是否包含过期时间注解
        if (method.isAnnotationPresent(CacheExpire.class)) {  //包含CacheExpire注解再处理
            //获取到注解
            CacheExpire cacheExpire = method.getAnnotation(CacheExpire.class);
            Duration duration = null;
            //判断注解是否配置的过期时间为今天
            if(cacheExpire.today()){
                //当配置了过期时间为今天则计算从这一刻到凌晨12点还有多少时间
                duration = Duration.ofSeconds(getSecondsNextEarlyMorning());
            } else {
                //过期时间为用户自己配置则根据配置的来创建Duration
                duration = Duration.ofSeconds(cacheExpire.unit().toSeconds(cacheExpire.ttl()));
            }
            //转成RedisCache 这个时候cacheConfig是空的也就让反射有了可乘之机
            RedisCache redisCache = (RedisCache) cache;
            //获取cache里面的RedisCacheConfiguration
            RedisCacheConfiguration cacheConfiguration = redisCache.getCacheConfiguration();
            //新生成一个configuration
            RedisCacheConfiguration cacheConfig = cacheConfiguration;
            //参数需要对应修改
            cacheConfig = cacheConfig.entryTtl(duration);
            //通过反射获取到类型为RedisCacheConfiguration的字段cacheConfig
            Field field = ReflectionUtils.findField(RedisCache.class, "cacheConfig", RedisCacheConfiguration.class);
            //设置可以访问被private修饰的字段值
            field.setAccessible(true);
            //重新设置替换RedisCacheConfiguration
            ReflectionUtils.setField(field, redisCache, cacheConfig);
        }
    }

    //获取当前时间到第二天凌晨的秒数用于设置redis失效时间为当天
    private Long getSecondsNextEarlyMorning() {
        Calendar cal = Calendar.getInstance();
        cal.add(Calendar.DAY_OF_YEAR, 1);
        cal.set(Calendar.HOUR_OF_DAY, 0);
        cal.set(Calendar.SECOND, 0);
        cal.set(Calendar.MINUTE, 0);
        cal.set(Calendar.MILLISECOND, 0);
        return (cal.getTimeInMillis() - System.currentTimeMillis()) / 1000;
    }

}
我们需要把自定义的缓存处理类RedisExpireCacheResolver注册到spring容器中可以在CacheConfig.java中使用@Bean进行标识
 /**
     * 注册自定义的缓存处理类
     * cacheManager 为使用的缓存管理器
     * 使用CacheResolver来接收它属于父接口类
     * 使用方式指明处理器: @Cacheable(cacheNames = "yyyy",key = "#root.args[0]",cacheResolver = "redisExpireCacheResolver")
     */
    @Bean
    public CacheResolver redisExpireCacheResolver(CacheManager cacheManager){
        return new RedisExpireCacheResolver(cacheManager);
    }
在使用时配置上@CacheExpire注解的值通过属性cacheResolver来指定使用的缓存处理器。
案例
    @PostMapping(value="getUserById3")
    //指定使用哪种cache处理器
    @Cacheable(cacheNames = "cccc",key = "#root.args[0]",cacheResolver = "redisExpireCacheResolver")
    //设置过期时间值、单位
    @CacheExpire(ttl = 20,unit = TimeUnit.SECONDS)
    public User getUserById3(Integer id){
        return olapService.getUserById(id);
    }

    @PostMapping(value="getUserById9")
    //指定使用哪种cache处理器
    @Cacheable(cacheNames = "cccc",key = "#root.args[0]",cacheResolver = "redisExpireCacheResolver")
    //设置今天有效
    @CacheExpire(today = true)
    public User getUserById9(Integer id){
        return olapService.getUserById(id);
    }
13.完整核心代码
CacheConfig.java:
import com.fasterxml.jackson.annotation.JsonAutoDetect;
import com.fasterxml.jackson.annotation.JsonTypeInfo;
import com.fasterxml.jackson.annotation.PropertyAccessor;
import com.fasterxml.jackson.databind.DeserializationFeature;
import com.fasterxml.jackson.databind.ObjectMapper;
import com.fasterxml.jackson.databind.jsontype.impl.LaissezFaireSubTypeValidator;
import com.fasterxml.jackson.datatype.jsr310.JavaTimeModule;
import com.fasterxml.jackson.datatype.jsr310.deser.LocalDateTimeDeserializer;
import com.fasterxml.jackson.datatype.jsr310.ser.LocalDateTimeSerializer;
import org.springframework.boot.autoconfigure.cache.CacheProperties;
import org.springframework.boot.context.properties.EnableConfigurationProperties;
import org.springframework.cache.CacheManager;
import org.springframework.cache.annotation.EnableCaching;
import org.springframework.cache.interceptor.CacheResolver;
import org.springframework.cache.interceptor.KeyGenerator;
import org.springframework.context.annotation.Bean;
import org.springframework.context.annotation.Configuration;
import org.springframework.context.annotation.Primary;
import org.springframework.data.redis.cache.CacheKeyPrefix;
import org.springframework.data.redis.cache.RedisCacheConfiguration;
import org.springframework.data.redis.cache.RedisCacheManager;
import org.springframework.data.redis.connection.RedisConnectionFactory;
import org.springframework.data.redis.serializer.Jackson2JsonRedisSerializer;
import org.springframework.data.redis.serializer.RedisSerializationContext;
import org.springframework.util.StringUtils;

import java.lang.reflect.Method;
import java.time.Duration;
import java.time.LocalDateTime;
import java.time.format.DateTimeFormatter;

//声明配置类
@Configuration
//开启spring cache
@EnableCaching
//添加缓存配置类yml或者properties中配置的cache相关信息使用CacheProperties接收从这里引入可以直接使用里面的字段值
@EnableConfigurationProperties(CacheProperties.class)
public class CacheConfig{


    //创建缓存管理类@Primary标识当有多个CacheManager管理器时默认以这个为主
    //redisConnectionFactory为连接redis的工厂在子类中已经创建并且使用@Bean标识
    //CacheProperties为配置的spring cache相关信息类被@ConfigurationProperties修饰
    @Bean
    @Primary
    public CacheManager cacheManager(RedisConnectionFactory redisConnectionFactory,CacheProperties cahceProperties){
        return RedisCacheManager.builder(redisConnectionFactory)
                .cacheDefaults(redisCacheConfiguration(cahceProperties,null))
                .build();
    }

    //创建其它缓存管理类使用的时候根据cacheManager来指定使用哪个cache管理器默认使用被 @Primary修饰的。例如  @Cacheable(cacheNames = "xxxx",key = "#root.args[0]",cacheManager = "cacheManagerOneMinute")
    //这样就可以根据业务需要配置不同的cache管理器一般用于设置redis不同的失效时间此为设置失效时间为1分钟
    @Bean
    public CacheManager cacheManagerOneMinute(RedisConnectionFactory redisConnectionFactory,CacheProperties cahceProperties){
        return RedisCacheManager.builder(redisConnectionFactory)
                .cacheDefaults(redisCacheConfiguration(cahceProperties,60000L))
                .build();
    }

    //这样就可以根据业务需要配置不同的cache管理器一般用于设置redis不同的失效时间此为设置失效时间为1小时
    @Bean
    public CacheManager cacheManagerOneHour(RedisConnectionFactory redisConnectionFactory,CacheProperties cahceProperties){
        return RedisCacheManager.builder(redisConnectionFactory)
                .cacheDefaults(redisCacheConfiguration(cahceProperties,3600000L))
                .build();
    }

    //设置rediscacheConfiguration配置类根据配置的失效时间等属性进行配置
    public RedisCacheConfiguration redisCacheConfiguration(CacheProperties cahceProperties,Long ttl) {
        //使用Jackson2JsonRedisSerializer的方式类序列化值
        Jackson2JsonRedisSerializer jackson2JsonRedisSerializer = new Jackson2JsonRedisSerializer(Object.class);
        ObjectMapper om = new ObjectMapper();
        om.setVisibility(PropertyAccessor.ALL, JsonAutoDetect.Visibility.ANY);
        om.activateDefaultTyping(LaissezFaireSubTypeValidator.instance , ObjectMapper.DefaultTyping.NON_FINAL, JsonTypeInfo.As.WRAPPER_ARRAY);
        om.configure(DeserializationFeature.FAIL_ON_UNKNOWN_PROPERTIES, false);

        //添加时间日期格式的处理
        JavaTimeModule javaTimeModule = new JavaTimeModule();
        DateTimeFormatter dtf = DateTimeFormatter.ofPattern("yyyy-MM-dd HH:mm:ss");
        javaTimeModule.addSerializer(LocalDateTime.class,
                new LocalDateTimeSerializer(dtf));
        javaTimeModule.addDeserializer(LocalDateTime.class,
                new LocalDateTimeDeserializer(dtf));
        om.registerModule(javaTimeModule);

        jackson2JsonRedisSerializer.setObjectMapper(om);
        //获取RedisCacheConfiguration,对它进行新值的设置默认序列化值使用SerializationPair.fromSerializer(new JdkSerializationRedisSerializer(classLoader))
        //这里设置序列化值的方式与redisTemple保持一致也必须保持一致否则有些使用spring cache存再使用redisTemple来取的时候格式就会存在问题
        RedisCacheConfiguration config = RedisCacheConfiguration.defaultCacheConfig()
                .serializeValuesWith( RedisSerializationContext.SerializationPair.fromSerializer(
                        jackson2JsonRedisSerializer));

        //获取配置的信息
        CacheProperties.Redis redisProperties = cahceProperties.getRedis();
        //设置过期时间
        if(null == ttl) {//传递的参数为空则使用配置文件配置的过期时间
            if (null != redisProperties.getTimeToLive()) {
                config = config.entryTtl(redisProperties.getTimeToLive());
            }
        } else {
            config = config.entryTtl(Duration.ofMillis(ttl));
        }

        //是否允许设置为null值
        if (!redisProperties.isCacheNullValues()) {
            config = config.disableCachingNullValues();
        }
        //是否设置前缀
        if (redisProperties.isUseKeyPrefix()) {
            //设置前缀
            if (null != redisProperties.getKeyPrefix()) {
                //添加上前缀也可以自定义一个方式默认是kerPrefix::的方式
                config = config.computePrefixWith(bulidPrefix(redisProperties.getKeyPrefix()));  //自定义前缀
                //config = config.computePrefixWith(CacheKeyPrefix.prefixed(redisProperties.getKeyPrefix()));//默认的前缀方式
            }
        } else {
            config = config.disableKeyPrefix();
        }
        return config;
    }

    /**
     * 自定义前缀
     */
    private CacheKeyPrefix bulidPrefix(String keyPrefix){
        return (name) -> {
            StringBuffer str = new StringBuffer();
            str.append(keyPrefix);
            str.append(":");
            str.append(name);
            str.append(":");
            return str.toString();
        };
    }

    /**
     * 自定义缓存key生成方式
     */
    @Bean
    public KeyGenerator customKeyGenerator(){
        return new KeyGenerator() {
            //根据target类、调用的方法method、传递的参数params组织spring cache的key
            @Override
            public Object generate(Object target, Method method, Object... params) {
                String key = target.getClass().getSimpleName() + "_" + method.getName() + "_" + StringUtils.arrayToDelimitedString(params, "_");
                return key;
            }
        };
    }

    /**
     * 注册自定义的缓存处理类
     * cacheManager 为使用的缓存管理器
     * 使用CacheResolver来接收它属于父接口
     * 使用方式指明处理器: @Cacheable(cacheNames = "yyyy",key = "#root.args[0]",cacheResolver = "redisExpireCacheResolver")
     */
    @Bean
    public CacheResolver redisExpireCacheResolver(CacheManager cacheManager){
        return new RedisExpireCacheResolver(cacheManager);
    }
}
CacheExpire.java:
import java.lang.annotation.ElementType;
import java.lang.annotation.Retention;
import java.lang.annotation.RetentionPolicy;
import java.lang.annotation.Target;
import java.util.concurrent.TimeUnit;

/**
 * cache注解类可以配置cache失效时间
 */
//此注解作用于方法上
@Target(ElementType.METHOD)
//此注解保留到编译成class文件加载到jvm中也依然存在
@Retention(RetentionPolicy.RUNTIME)
public @interface CacheExpire {

    /**
     * 失效时间默认60秒
     */
    public long ttl() default 60L;

    /**
     * 失效单位默认秒
     */
    public TimeUnit unit() default TimeUnit.SECONDS;

    /**
     * 今天有效失效时间是从当创建这一刻起到晚上凌晨12点整是一个动态的时间
     */
    public boolean today() default false;
}
RedisConfig.java:
import com.fasterxml.jackson.annotation.JsonAutoDetect;
import com.fasterxml.jackson.annotation.JsonTypeInfo;
import com.fasterxml.jackson.annotation.PropertyAccessor;
import com.fasterxml.jackson.databind.DeserializationFeature;
import com.fasterxml.jackson.databind.ObjectMapper;
import com.fasterxml.jackson.databind.jsontype.impl.LaissezFaireSubTypeValidator;
import com.fasterxml.jackson.datatype.jsr310.JavaTimeModule;
import com.fasterxml.jackson.datatype.jsr310.deser.LocalDateTimeDeserializer;
import com.fasterxml.jackson.datatype.jsr310.ser.LocalDateTimeSerializer;
import org.springframework.context.annotation.Bean;
import org.springframework.context.annotation.Configuration;
import org.springframework.data.redis.connection.RedisConnectionFactory;
import org.springframework.data.redis.core.RedisTemplate;
import org.springframework.data.redis.serializer.Jackson2JsonRedisSerializer;
import org.springframework.data.redis.serializer.StringRedisSerializer;

import java.time.LocalDateTime;
import java.time.format.DateTimeFormatter;

/**
 * redis配置类
 */
@Configuration
public class RedisConfig {


    @Bean
    public RedisTemplate<Object, Object> redisTemplate(RedisConnectionFactory factory) {
        RedisTemplate<Object, Object> redisTemplate = new RedisTemplate<>();
        redisTemplate.setConnectionFactory(factory);
        Jackson2JsonRedisSerializer jackson2JsonRedisSerializer = new Jackson2JsonRedisSerializer(Object.class);
        ObjectMapper om = new ObjectMapper();
        om.setVisibility(PropertyAccessor.ALL, JsonAutoDetect.Visibility.ANY);
        om.activateDefaultTyping(LaissezFaireSubTypeValidator.instance , ObjectMapper.DefaultTyping.NON_FINAL, JsonTypeInfo.As.WRAPPER_ARRAY);
        om.configure(DeserializationFeature.FAIL_ON_UNKNOWN_PROPERTIES, false);
        //添加时间日期格式的处理
        JavaTimeModule javaTimeModule = new JavaTimeModule();
        DateTimeFormatter dtf = DateTimeFormatter.ofPattern("yyyy-MM-dd HH:mm:ss");
        javaTimeModule.addSerializer(LocalDateTime.class,
                new LocalDateTimeSerializer(dtf));
        javaTimeModule.addDeserializer(LocalDateTime.class,
                new LocalDateTimeDeserializer(dtf));
        om.registerModule(javaTimeModule);
        jackson2JsonRedisSerializer.setObjectMapper(om);

        // 设置value的序列化规则和 key的序列化规则
        redisTemplate.setKeySerializer(new StringRedisSerializer());
        redisTemplate.setValueSerializer(jackson2JsonRedisSerializer);
        redisTemplate.setHashKeySerializer(new StringRedisSerializer());
        redisTemplate.setHashValueSerializer(jackson2JsonRedisSerializer);
        redisTemplate.afterPropertiesSet();
        return redisTemplate;
    }
}
RedisExpireCacheResolver.java:
import org.springframework.cache.Cache;
import org.springframework.cache.CacheManager;
import org.springframework.cache.interceptor.CacheOperationInvocationContext;
import org.springframework.cache.interceptor.SimpleCacheResolver;
import org.springframework.data.redis.cache.RedisCache;
import org.springframework.data.redis.cache.RedisCacheConfiguration;
import org.springframework.util.ReflectionUtils;

import java.lang.reflect.Field;
import java.lang.reflect.Method;
import java.time.Duration;
import java.util.*;

/**
 * 使用继承的方式对cache处理器进行扩展
 */
public class RedisExpireCacheResolver extends SimpleCacheResolver {

    public RedisExpireCacheResolver(CacheManager cacheManager) {
        super(cacheManager);
    }

    //重写处理cache的方法
    @Override
    public Collection<? extends Cache> resolveCaches(CacheOperationInvocationContext<?> context) {
        //直接参考父父类AbstractCacheResolver的resolveCaches方法
        //获取当前注解中的缓存名通过父类进行获取
        Collection<String> cacheNames = getCacheNames(context);
        if (cacheNames == null) {
            return Collections.EMPTY_LIST;
        } else {
            Collection<Cache> result = new ArrayList(cacheNames.size());
            Iterator cacheIterator = cacheNames.iterator();
            while (cacheIterator.hasNext()) {
                String cacheName = (String) cacheIterator.next();
                //通过缓存名获取到缓存对象
                Cache cache = this.getCacheManager().getCache(cacheName);
                if (cache == null) {
                    throw new IllegalArgumentException("Cannot find cache named '" + cacheName + "' for " + context.getOperation());
                }
                //跟AbstractCacheResolver类的resolveCaches的方法比较只有这里新增解析注解反射替换RedisCacheConfiguration
                this.parseCacheExpire(cache, context);

                result.add(cache);
            }
            return result;
        }
    }

    /**
     * 通过反射替换cache中的RedisCacheConfiguration类已经设置好的过期时间等的值
     * 解析注解从注解中获取新设置的过期时间给RedisCacheConfiguration重新赋值
     */
    private void parseCacheExpire(Cache cache, CacheOperationInvocationContext<?> context) {
        Method method = context.getMethod();
        //判断方法是否包含过期时间注解
        if (method.isAnnotationPresent(CacheExpire.class)) {  //包含CacheExpire注解再处理
            //获取到注解
            CacheExpire cacheExpire = method.getAnnotation(CacheExpire.class);
            Duration duration = null;
            //判断注解是否配置的过期时间为今天
            if(cacheExpire.today()){
                //当配置了过期时间为今天则计算从这一刻到凌晨12点还有多少时间
                duration = Duration.ofSeconds(getSecondsNextEarlyMorning());
            } else {
                //过期时间为用户自己配置则根据配置的来创建Duration
                duration = Duration.ofSeconds(cacheExpire.unit().toSeconds(cacheExpire.ttl()));
            }
            //转成RedisCache 这个时候cacheConfig是空的也就让反射有了可乘之机
            RedisCache redisCache = (RedisCache) cache;
            //获取cache里面的RedisCacheConfiguration
            RedisCacheConfiguration cacheConfiguration = redisCache.getCacheConfiguration();
            //新生成一个configuration
            RedisCacheConfiguration cacheConfig = cacheConfiguration;
            //参数需要对应修改
            cacheConfig = cacheConfig.entryTtl(duration);
            //通过反射获取到类型为RedisCacheConfiguration的字段cacheConfig
            Field field = ReflectionUtils.findField(RedisCache.class, "cacheConfig", RedisCacheConfiguration.class);
            //设置可以访问被private修饰的字段值
            field.setAccessible(true);
            //重新设置替换RedisCacheConfiguration
            ReflectionUtils.setField(field, redisCache, cacheConfig);
        }
    }

    //获取当前时间到第二天凌晨的秒数用于设置redis失效时间为当天
    private Long getSecondsNextEarlyMorning() {
        Calendar cal = Calendar.getInstance();
        cal.add(Calendar.DAY_OF_YEAR, 1);
        cal.set(Calendar.HOUR_OF_DAY, 0);
        cal.set(Calendar.SECOND, 0);
        cal.set(Calendar.MINUTE, 0);
        cal.set(Calendar.MILLISECOND, 0);
        return (cal.getTimeInMillis() - System.currentTimeMillis()) / 1000;
    }

}