

J2EE项目部署与发布(Windows版本)-CSDN博客
| 阿里云国内75折 回扣 微信号:monov8 |
| 阿里云国际,腾讯云国际,低至75折。AWS 93折 免费开户实名账号 代冲值 优惠多多 微信号:monov8 飞机:@monov6 |

艳艳耶✌️个人主页
个人专栏 《Spring与Mybatis集成整合》《Vue.js使用》
⛺️ 越努力 越幸运。

1.单机项目的部署
1.1们需要将要进行部署的项目共享到虚拟机中

在部署项目之前我们先要检查一下sql脚本以及项目的本身是否有问题
将sql脚本导入

1.2.测试项目
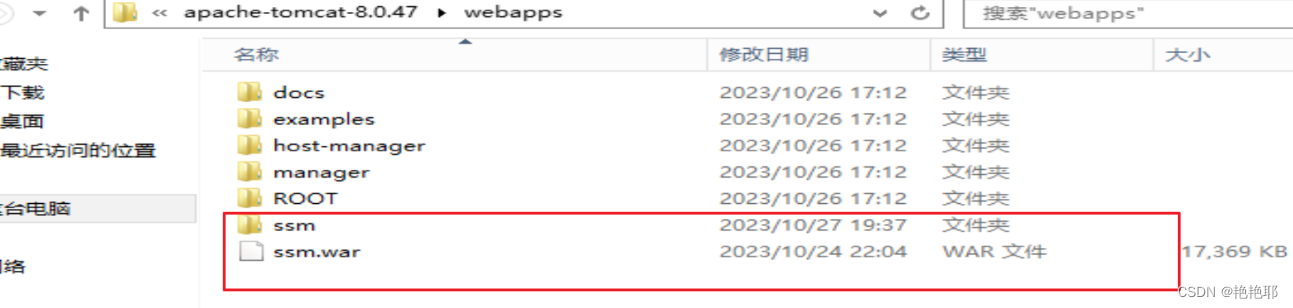
找到本地电脑中的tomcat打开至webapps这个目录将项目的war包拷贝进去

打开tomcat中的bin目录

运行好之后在浏览器输入地址

1.3.在虚拟机【客户的电脑】上面进行一样的部署工作
导入sql脚本
操作tomcat
然后效果就出来了。

但是出现了一个错误就是客户的数据库密码与本机的数据库密码不一致。
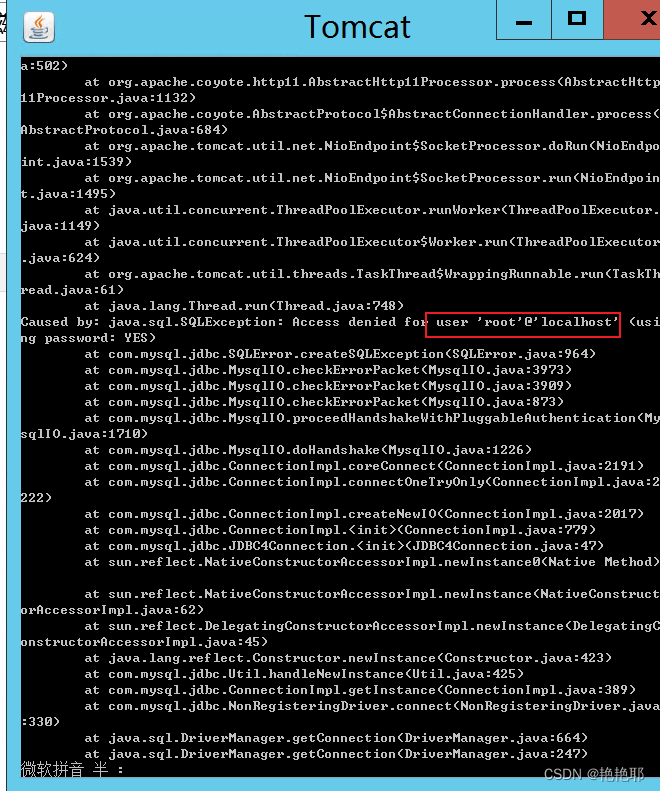
然后需要去修改一下密码在tomcat中已经将war自动解压了

接着需要找到关于数据库的配置文件【WEB-INF/classes/】

将密码修改成客户的密码虚拟机
然后就可以登录成功了。

2.前后端分离项目的部署 【Linux+Nginx】
前面已经有本机电脑进行演示我就直接将项目部署到虚拟机【客户的电脑】了。
2.1.导入sql脚本

2.2.操作tomcat
2.3.将数据库密码修改
2.4.配置nodejs环境
因为是前后端分离的项目所以需要用到nodejs
npm config set cache "D:\tools\nodejs\node-v10.15.3-win-x64\node-v10.15.3-win-x64\node_cache"
npm config set prefix "D:\tools\nodejs\node-v10.15.3-win-x64\node-v10.15.3-win-x64\node_global"//设置淘宝源
npm config set registry https://registry.npm.taobao.org/
5.启动后端

6.启动前端
但是出现了错项目启动不了
解决方法
nginx介绍
Nginx是一款高性能的Web服务器和反向代理服务器它可以处理高并发的请求支持多种协议和编程语言具有高度的可扩展性和稳定性。Nginx最初是由Igor Sysoev编写的于2004年首次发布。
在nginx文件中找到nginx.conf 文件将文件种的 location 进行修改将端口代理访问

#access_log  logs/host.access.log  main;

        location / {
            proxy_pass   http://localhost:8081;
        }

#error_page  404              /404.html;

nginx.conf全部代码
#user  nobody;
worker_processes  1;

#error_log  logs/error.log;
#error_log  logs/error.log  notice;
#error_log  logs/error.log  info;

#pid        logs/nginx.pid;


events {
    worker_connections  1024;
}


http {
    include       mime.types;
    default_type  application/octet-stream;

    #log_format  main  '$remote_addr - $remote_user [$time_local] "$request" '
    #                  '$status $body_bytes_sent "$http_referer" '
    #                  '"$http_user_agent" "$http_x_forwarded_for"';

    #access_log  logs/access.log  main;

    sendfile        on;
    #tcp_nopush     on;

    #keepalive_timeout  0;
    keepalive_timeout  65;

    #gzip  on;

    server {
        listen       80;
        server_name  localhost;

        #charset koi8-r;

        #access_log  logs/host.access.log  main;

        location / {
            proxy_pass   http://localhost:8081;
        }

        #error_page  404              /404.html;

        # redirect server error pages to the static page /50x.html
        #
        error_page   500 502 503 504  /50x.html;
        location = /50x.html {
            root   html;
        }

        # proxy the PHP scripts to Apache listening on 127.0.0.1:80
        #
        #location ~ \.php$ {
        #    proxy_pass   http://127.0.0.1;
        #}

        # pass the PHP scripts to FastCGI server listening on 127.0.0.1:9000
        #
        #location ~ \.php$ {
        #    root           html;
        #    fastcgi_pass   127.0.0.1:9000;
        #    fastcgi_index  index.php;
        #    fastcgi_param  SCRIPT_FILENAME  /scripts$fastcgi_script_name;
        #    include        fastcgi_params;
        #}

        # deny access to .htaccess files, if Apache's document root
        # concurs with nginx's one
        #
        #location ~ /\.ht {
        #    deny  all;
        #}
    }


    # another virtual host using mix of IP-, name-, and port-based configuration
    #
    #server {
    #    listen       8000;
    #    listen       somename:8080;
    #    server_name  somename  alias  another.alias;

    #    location / {
    #        root   html;
    #        index  index.html index.htm;
    #    }
    #}


    # HTTPS server
    #
    #server {
    #    listen       443 ssl;
    #    server_name  localhost;

    #    ssl_certificate      cert.pem;
    #    ssl_certificate_key  cert.key;

    #    ssl_session_cache    shared:SSL:1m;
    #    ssl_session_timeout  5m;

    #    ssl_ciphers  HIGH:!aNULL:!MD5;
    #    ssl_prefer_server_ciphers  on;

    #    location / {
    #        root   html;
    #        index  index.html index.htm;
    #    }
    #}

}
效果如图所示

第二种
在前端项目的路径中找到index.js文件将端口改为开放式的端口在前端路径下的跟目录中的 config 文件中.
打开 index. js 文件找到 location 配置端口的位置修改为 : 0.0.0.0

然后重启效果图:

