

Elasticsearch:关于在 Python 中使用 Elasticsearch 你需要知道的一切 - 8.x
| 阿里云国内75折 回扣 微信号:monov8 |
| 阿里云国际,腾讯云国际,低至75折。AWS 93折 免费开户实名账号 代冲值 优惠多多 微信号:monov8 飞机:@monov6 |
在本文中我们将讨论如何在 Python 中使用 Elasticsearch。 如果你还不了解 Elasticsearch可以阅读这篇文章 “Elasticsearch 简介” 进行快速介绍。在我之前的文章 “Elasticsearch使用最新的 Python client 8.0 来创建索引并搜索”我也有所介绍如何使用 Python 客户端来连接 Elasticsearch 并进行搜索。在今天的文章中我将使用一个比较完整的例子来进行展示。

作为一名数据工程师你可能需要使用一些脚本在 Python 中创建 Elasticsearch 文档。 作为一名软件工程师当你使用 Python 设计 API 时你需要对 Elasticsearch 进行 REST API 调用以获取数据。 因此如果你正在工作中使用 Elasticsearch 或打算学习它那么本文可能对你有所帮助。有关 Python 客户端开发的文档可以在地址找到。
在今天的展示中我将使用最新的 Elastic Stack 8.5.3 进行展示。为了方便大家的学习我把最终的代码放置于 https://github.com/liu-xiao-guo/py-elasticsearch8。
兼容性
Python 语言客户端向前兼容 这意味着客户端支持与 Elasticsearch 更大或相同的次要版本进行通信。 Elasticsearch 语言客户端仅向后兼容默认发行版并且不做任何保证。
前提条件
你需要在你的电脑上安装 python3并安装如下的 elasticsearch 包
python -m pip install elasticsearch
python -m pip install elasticsearch[async]
或者使用如下的命令来进行安装
pip3 install elasticsearch
pip3 install elasticsearch[async]
我们可以使用如下的命令来检查 elasticsearch 包的版本
pip list | grep elasticsearch$ pip list | grep elasticsearch
elasticsearch 8.0.0上面的命令表明我们的 elasticsearch 安装包版本是 8.0 的。
安装
Elasticsearch 及 Kibana
如果你还没有安装好自己的 Elasticsearch 及 Kibana 的话那么请参考我之前的文章
在今天的展示中我将使用 Elastic Stack 8.x 来进行展示。在安装的时候请参考相应的 Elastic Stack 8.x 的文章来进行安装。
连接到 Elasticsearch
在这里我们分几种不同的方式来连接。
不带任何安全的 Elasticsearch 连接
在默认的情况下Elastic Stack 的安装是带有 HTTPS 安全配置的。为了能够安装不含有任何安全的 Elasticsearch 集群我们可以有如下的两种方式
-
按照我之前的文章 “Elastic Stack 8.0 安装 - 保护你的 Elastic Stack 现在比以往任何时候都简单” 进行安装。请参考其中的 “如何配置 Elasticsearch 不带安全性” 章节
-
我们可以使用 Docker 来进行完成。详细的步骤我们可以参考文章 “Elasticsearch如何在 Docker 上运行 Elasticsearch 8.x 进行本地开发”
等安装完毕后我们可以在地址 http://localhost:9200 访问 Elasticsearch。我们使用如下的代码来访问 Elasticsearch。
main.py
# Import Elasticsearch package
from elasticsearch import Elasticsearch

# Connect to the elastic cluster
# The following does not work for elasticsearch 8.0
es = Elasticsearch("http://localhost:9200")
resp = es.info()
print(resp)
$ pwd
/Users/liuxg/python/py-elasticsearch8
$ ls
main.py
$ python main.py
{'name': 'ff5d9f224dcd', 'cluster_name': 'docker-cluster', 'cluster_uuid': '57LJYkD9T7WxARUEvVtXLg', 'version': {'number': '8.6.0', 'build_flavor': 'default', 'build_type': 'docker', 'build_hash': 'f67ef2df40237445caa70e2fef79471cc608d70d', 'build_date': '2023-01-04T09:35:21.782467981Z', 'build_snapshot': False, 'lucene_version': '9.4.2', 'minimum_wire_compatibility_version': '7.17.0', 'minimum_index_compatibility_version': '7.0.0'}, 'tagline': 'You Know, for Search'}上面的输出表明我们的连接是成功的。
连接到带有基本安全的集群
在有些情况下我们的集群只带有基本安全。 针对 Elastic Stack 8.x在默认的安装下集群是带有 HTTPS 的访问。我们可以通过参考文章 “Elastic Stack 8.0 安装 - 保护你的 Elastic Stack 现在比以往任何时候都简单” 中的 “如何配置 Elasticsearch 只带有基本安全” 章节来进行安装。在这种情况下我们可以使用 http://localhost:9200 来访问 Elasticsearch但是我们需要使用用户名及密码。
基本认证
要以编程方式设置集群端点、用户名和密码。
main.py
# Import Elasticsearch package
from elasticsearch import Elasticsearch

# Connect to the elastic cluster
es = Elasticsearch("http://localhost:9200", basic_auth=("elastic", "password"))
resp = es.info()
print(resp)
在上面我们通过 basic_auth 来配置用户名及密码。上面代码的输出为
$ pwd
/Users/liuxg/python/py-elasticsearch8
$ ls
main.py
$ python main.py
{'name': 'liuxgm.local', 'cluster_name': 'elasticsearch', 'cluster_uuid': 'jBt9oXsxT4y_2YOWOw8QRQ', 'version': {'number': '8.5.3', 'build_flavor': 'default', 'build_type': 'tar', 'build_hash': '4ed5ee9afac63de92ec98f404ccbed7d3ba9584e', 'build_date': '2022-12-05T18:22:22.226119656Z', 'build_snapshot': False, 'lucene_version': '9.4.2', 'minimum_wire_compatibility_version': '7.17.0', 'minimum_index_compatibility_version': '7.0.0'}, 'tagline': 'You Know, for Search'}
从上面的输出中我们可以看出来连接是成功的。
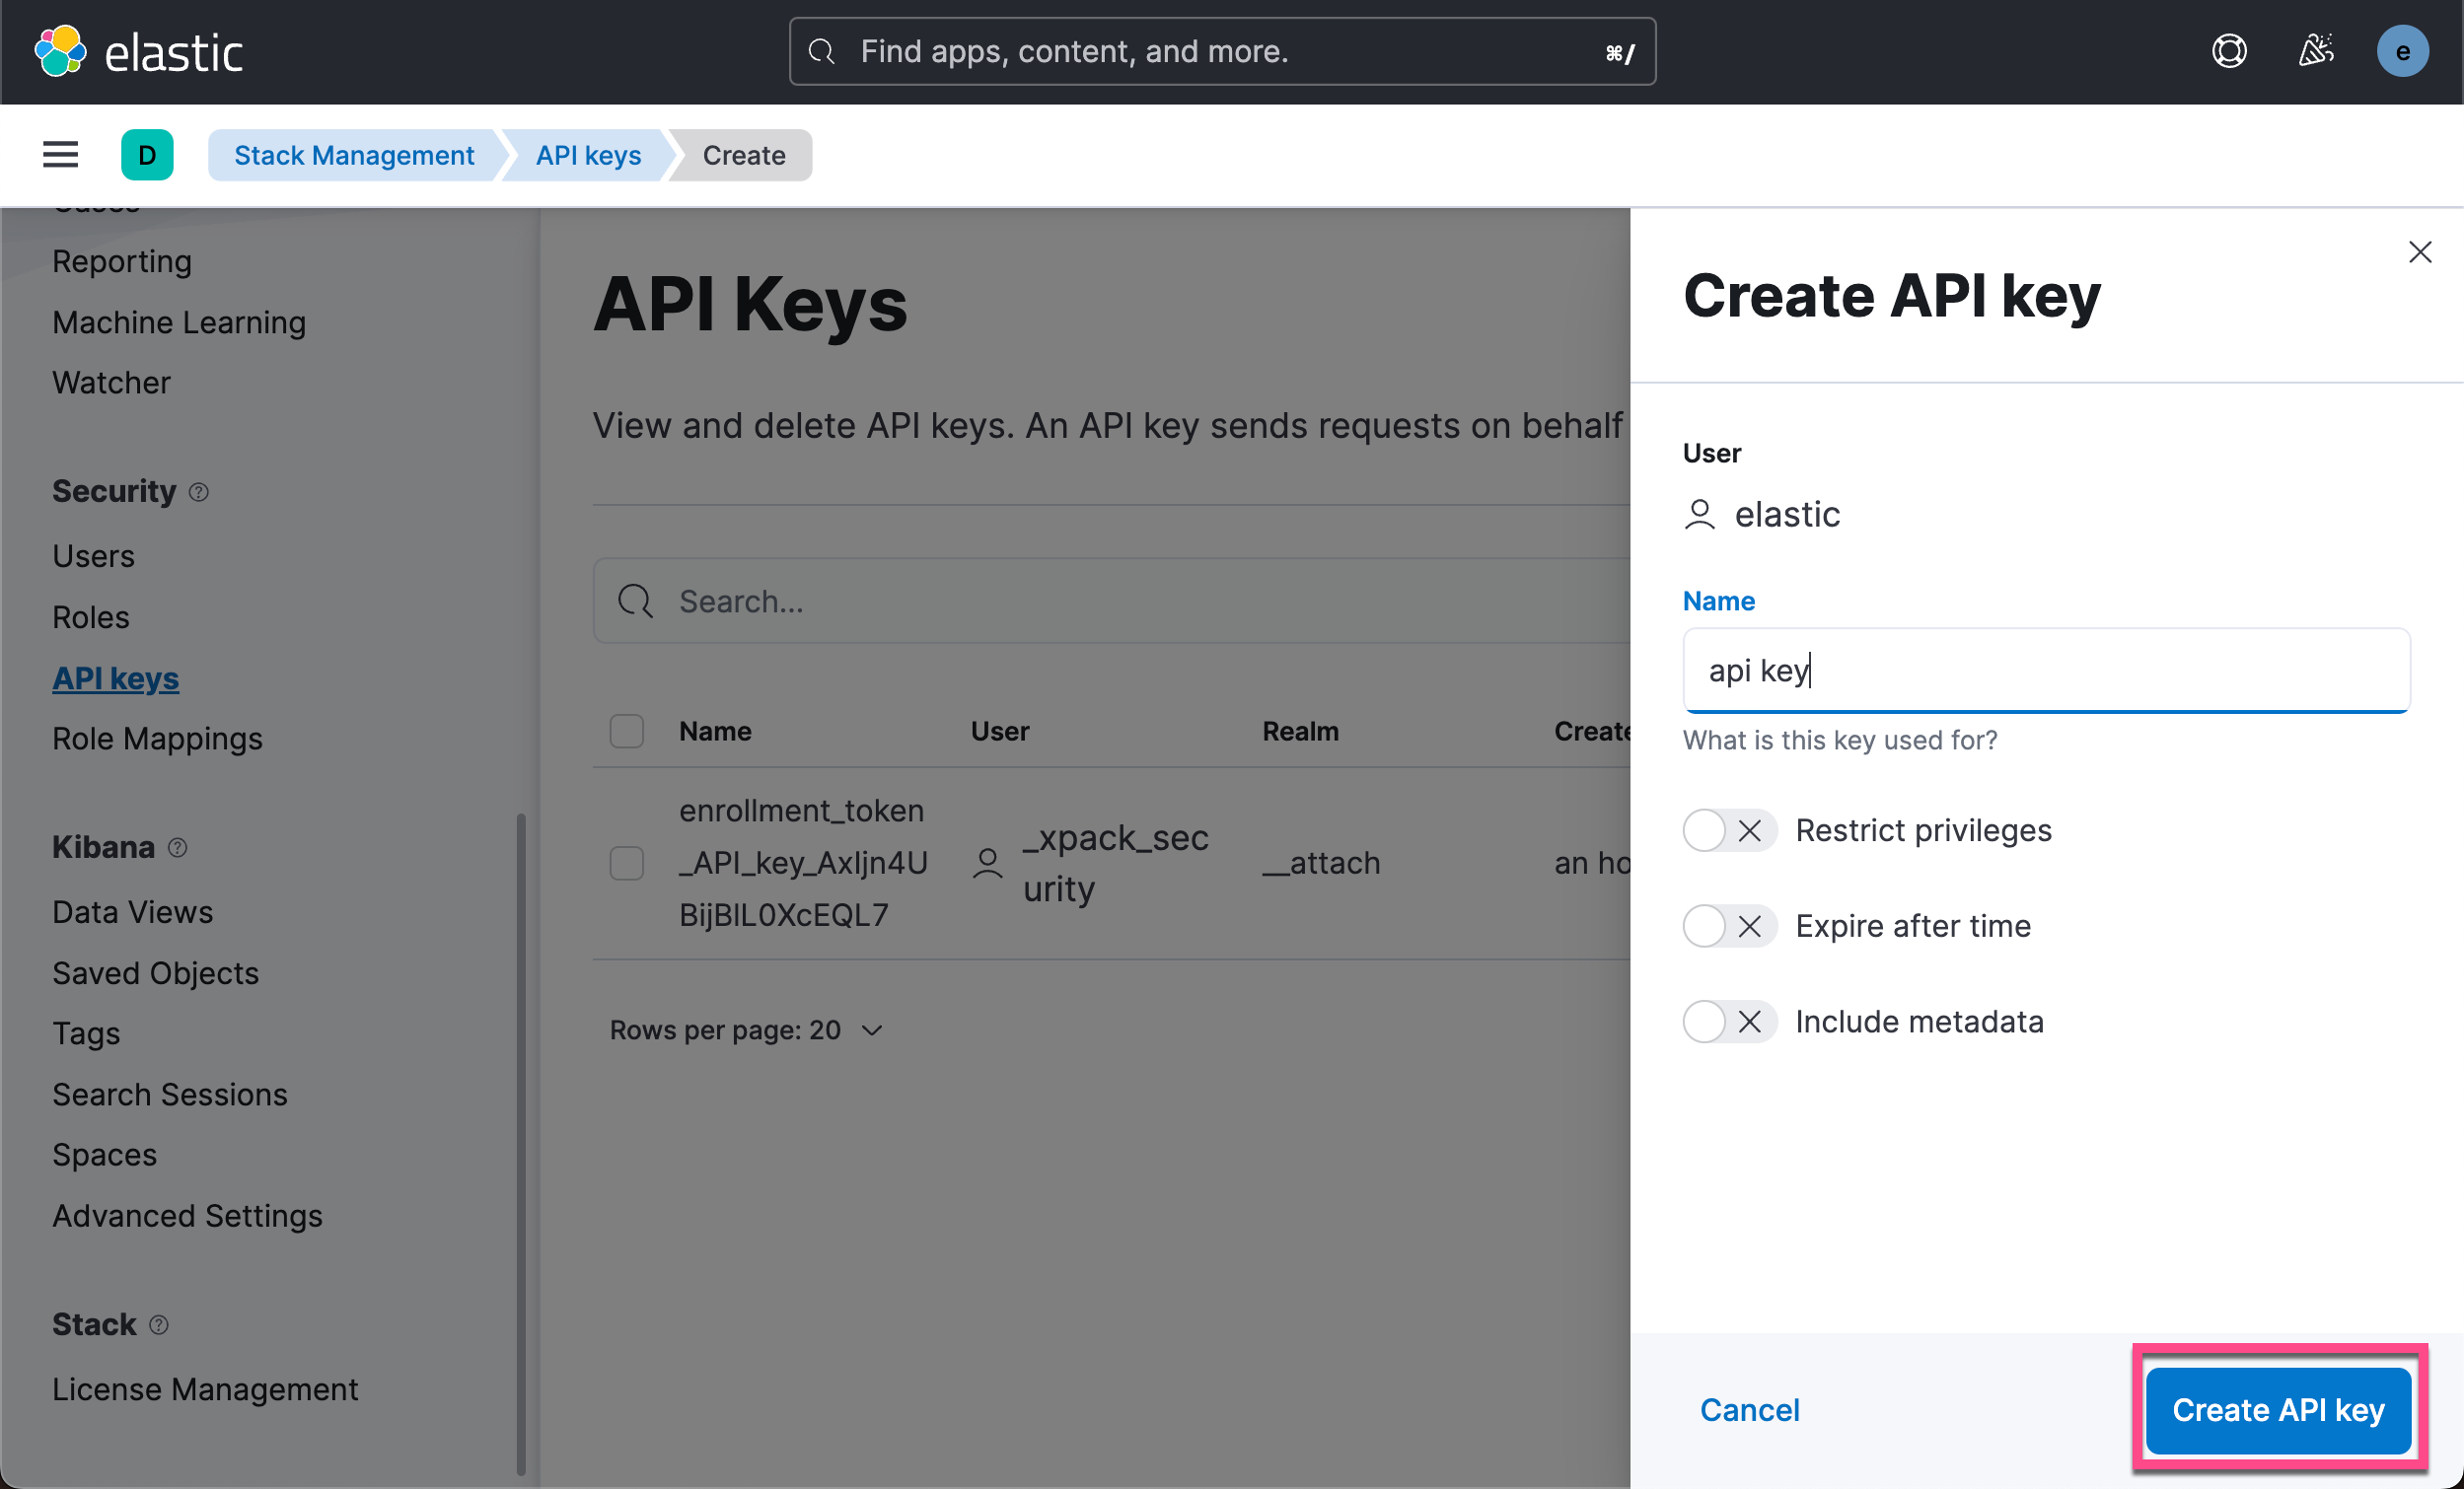
使用 API key 来进行访问
在实际的使用中我们更推荐使用 API key 来访问 Elasticsearch。其中的原因是我们可以为 API key 设置时效。我们甚至可以直接在 Kibana 中进行删除。 我们可以参考文章 “Elasticsearch创建 API key 接口访问 Elasticsearch” 来获取 API key。我们也可以使用如下的方法来获取 API key

我们把上面的 Base64 格式的 API key 写入到下面的代码中
main.py
# Import Elasticsearch package
from elasticsearch import Elasticsearch

# Connect to the elastic cluster
es = Elasticsearch("http://localhost:9200",
                   api_key='MmlZUXVZVUJkM3Jtd0cwZEVPdkE6XzdpLTRZUjhUbVdycGRuRGliUVFpQQ==')
resp = es.info()
print(resp)
我们执行上面的 python 代码
$ python main.py
{'name': 'liuxgm.local', 'cluster_name': 'elasticsearch', 'cluster_uuid': 'jBt9oXsxT4y_2YOWOw8QRQ', 'version': {'number': '8.5.3', 'build_flavor': 'default', 'build_type': 'tar', 'build_hash': '4ed5ee9afac63de92ec98f404ccbed7d3ba9584e', 'build_date': '2022-12-05T18:22:22.226119656Z', 'build_snapshot': False, 'lucene_version': '9.4.2', 'minimum_wire_compatibility_version': '7.17.0', 'minimum_index_compatibility_version': '7.0.0'}, 'tagline': 'You Know, for Search'}
从输出中我们可以看到连接是成功的。当然上面的连接格式也可以是如下的方式
from elasticsearch import Elasticsearch

# you can use the api key tuple
es = Elasticsearch(
    ['node-1', 'node-2', 'node-3'],
    api_key=('id', 'api_key'),
)
在上面我们可以通过 id 及 api_key 两个值来形成 api_key。具体操作请参考文章 “Elasticsearch创建 API key 接口访问 Elasticsearch”。
连接到带有 HTTPS 的集群
在 Elastic Stack 8.x 的默认安装中Elasticsearch 是带有 HTTPS 的访问权限的。特别是针对自签名证书的安装我们需要使用证书来进行连接。请按照如下的文档进行安装
在 Elasticsearch 第一次启动的时候

我们从上面可以看到超级用户 elastic 的信息。记下 elastic 用户密码和 HTTP CA 指纹。我们在下面的示例中将使用到。
根据具体情况有两种验证 HTTPS 连接的选项要么使用 CA 证书本身进行验证要么通过 HTTP CA 证书指纹进行验证。
使用 CA 证书来验证 HTTPS
生成的根 CA 证书可以在 Elasticsearch 配置位置 ($ES_CONF_PATH/certs/http_ca.crt) 的 certs 目录中找到。 如果你在 Docker 中运行 Elasticsearch则还有用于检索 CA 证书的其他文档。一旦你在某个地方获得了 http_ca.crt 文件就可以通过 CACert 将文件的内容传递给客户端
我们可以在 Elasticsearch 的安装目录中查看到证书的信息
$ pwd
/Users/liuxg/elastic/elasticsearch-8.5.3/config/certs
$ ls
http.p12      http_ca.crt   transport.p12
我们可以通过如下的方式来连接到 Elasticsearch
main.py
# Import Elasticsearch package
from elasticsearch import Elasticsearch

# Connect to the elastic cluster
# Password for the 'elastic' user generated by Elasticsearch
USERNAME = "elastic"
PASSWORD = "BzUHHkyIlvEtFQSuLLP3"
ELATICSEARCH_ENDPOINT = "localhost:9200"
ELASTCSEARCH_CERT_PATH = "/Users/liuxg/elastic/elasticsearch-8.5.3/config/certs/http_ca.crt"

url  = f'https://{USERNAME}:{PASSWORD}@{ELATICSEARCH_ENDPOINT}'
print("url: " + url)
es = Elasticsearch(url, ca_certs = ELASTCSEARCH_CERT_PATH, verify_certs = True)
resp = es.info()
print(resp)
运行上面的代码
$ python main.py
url: https://elastic:BzUHHkyIlvEtFQSuLLP3@localhost:9200
{'name': 'liuxgm.local', 'cluster_name': 'elasticsearch', 'cluster_uuid': 'kwCz_LAHS4SSD3mJ5jMaoQ', 'version': {'number': '8.5.3', 'build_flavor': 'default', 'build_type': 'tar', 'build_hash': '4ed5ee9afac63de92ec98f404ccbed7d3ba9584e', 'build_date': '2022-12-05T18:22:22.226119656Z', 'build_snapshot': False, 'lucene_version': '9.4.2', 'minimum_wire_compatibility_version': '7.17.0', 'minimum_index_compatibility_version': '7.0.0'}, 'tagline': 'You Know, for Search'}
从上面的输出中我们可以看出来连接是成功的。
使用 fingerprint 来验证 HTTPS
我们必须保证 python 的版本是 3.10 及以后。
我们可以在 Elasticsearch 的安装目录下运行如下的命令
openssl x509 -fingerprint -sha256 -in config/certs/http_ca.crt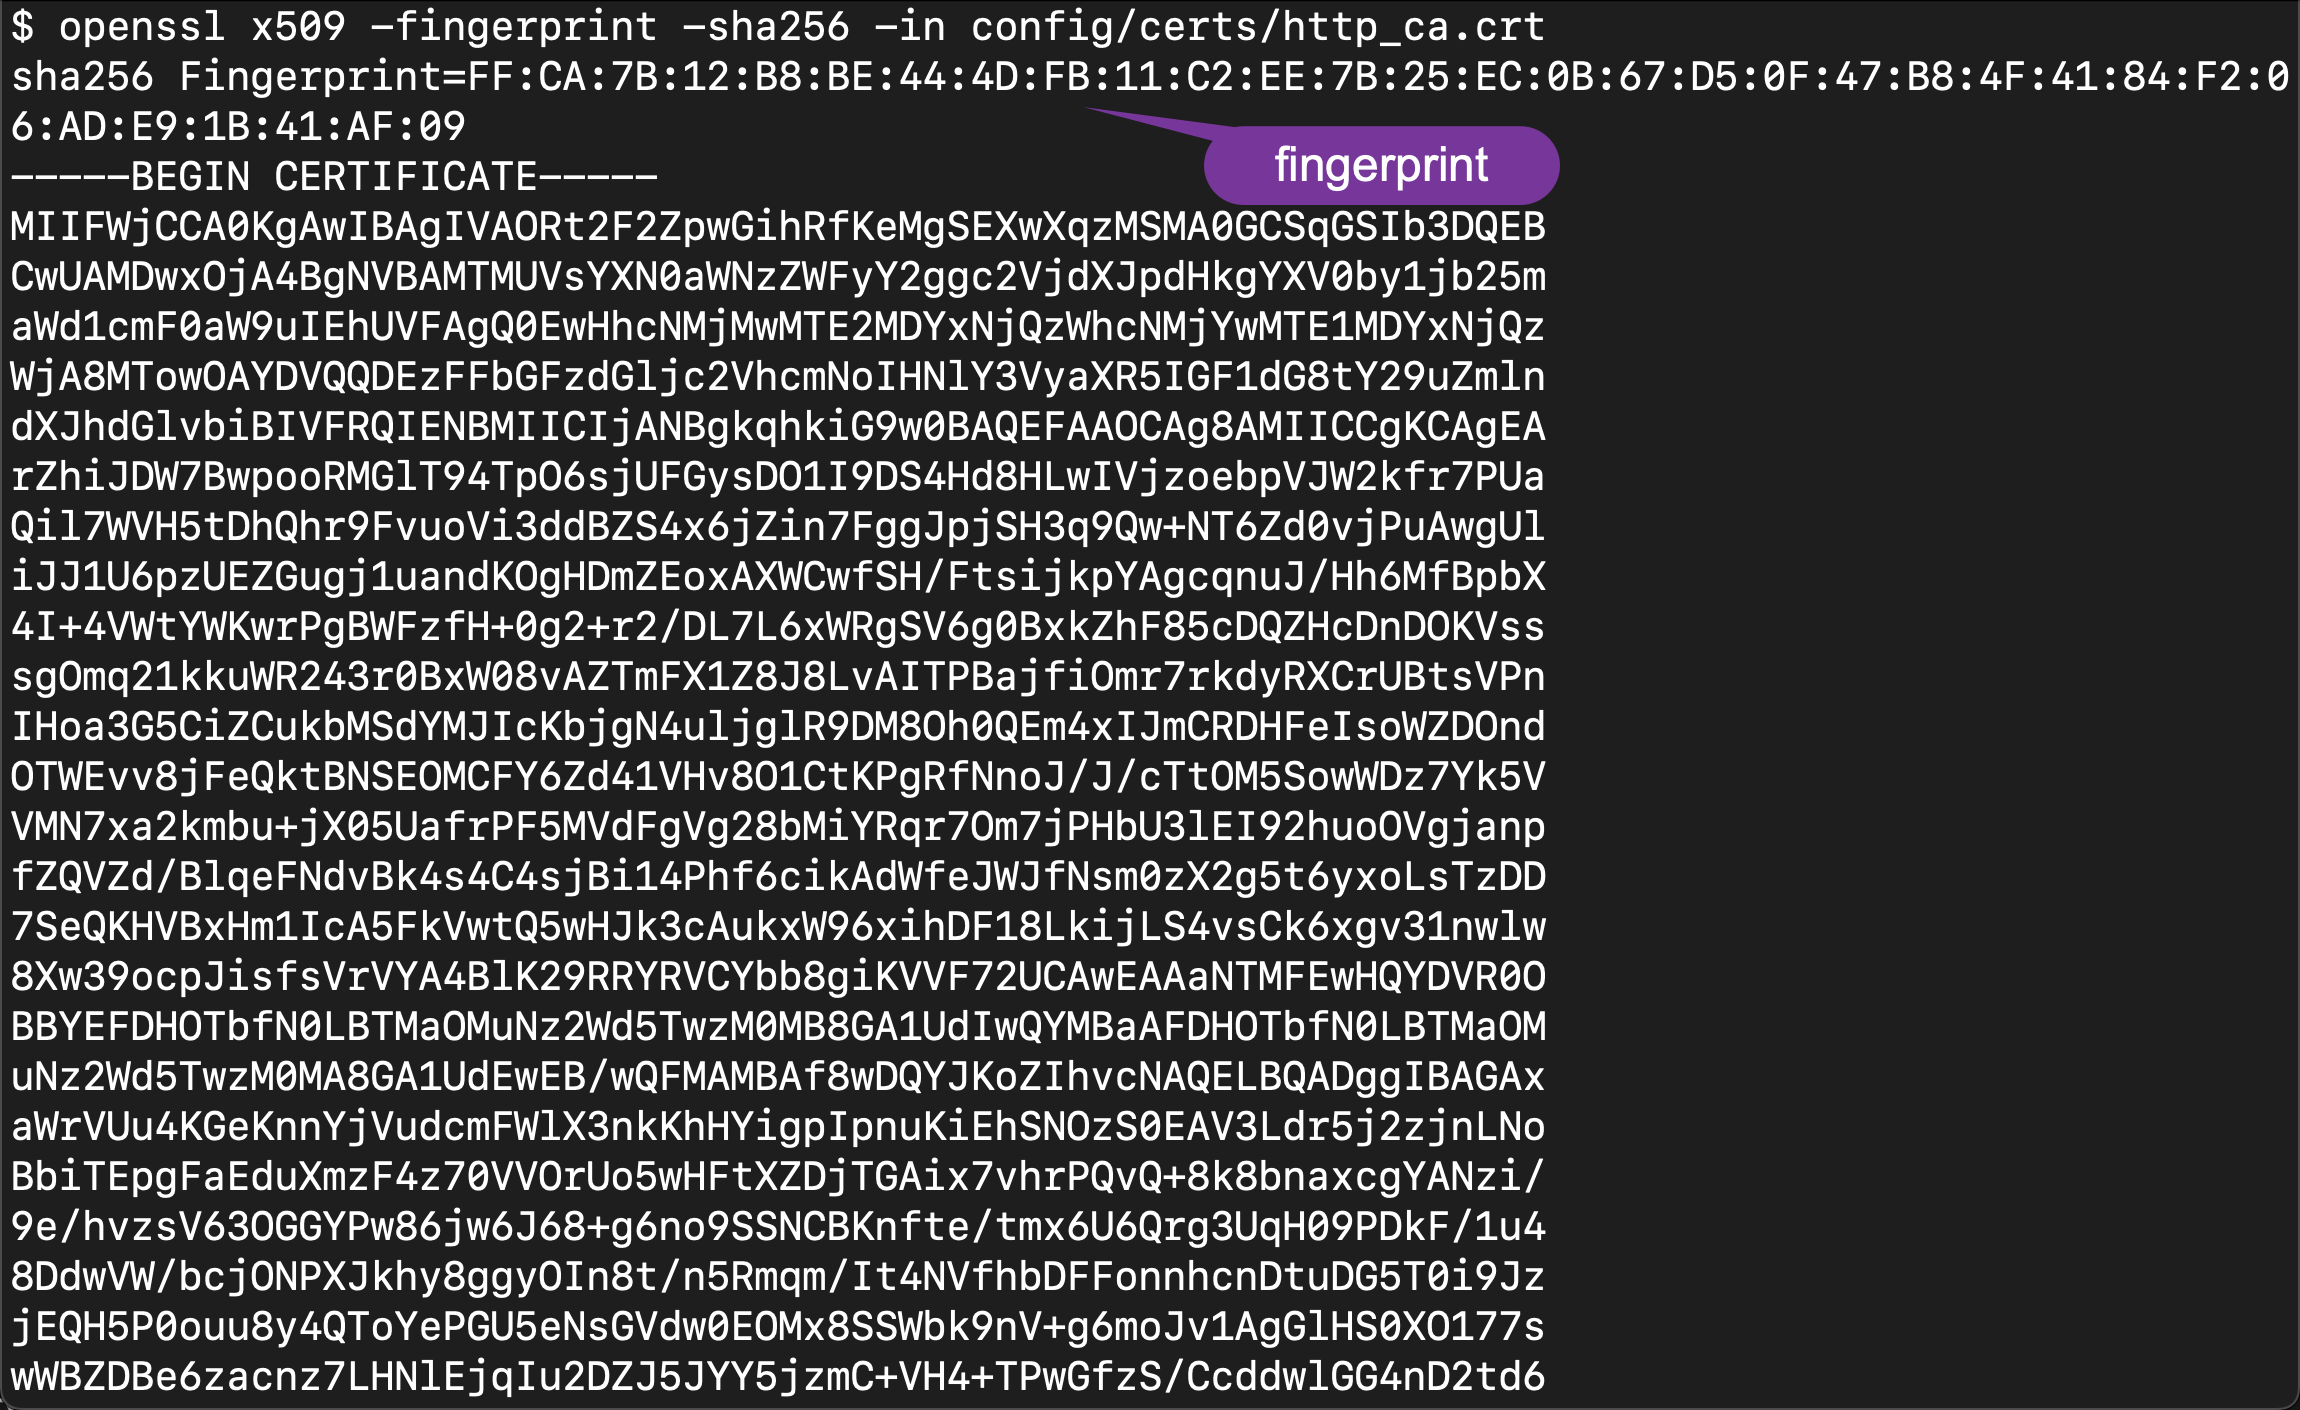
可以使用带有证书文件的 openssl x509 计算证书指纹
openssl x509 -fingerprint -sha256 -noout -in /path/to/http_ca.crtopenssl x509 -fingerprint -sha256 -noout -in config/certs/http_ca.crt
sha256 Fingerprint=FF:CA:7B:12:B8:BE:44:4D:FB:11:C2:EE:7B:25:EC:0B:67:D5:0F:47:B8:4F:41:84:F2:06:AD:E9:1B:41:AF:09如果你无权访问 Elasticsearch 生成的 CA 文件你可以使用以下脚本通过 openssl s_client 输出 Elasticsearch 实例的根 CA 指纹
# Replace the values of 'localhost' and '9200' to the
# corresponding host and port values for the cluster.
openssl s_client -connect localhost:9200 -servername localhost -showcerts </dev/null 2>/dev/null \
  | openssl x509 -fingerprint -sha256 -noout -in /dev/stdin
$ openssl s_client -connect localhost:9200 -servername localhost -showcerts </dev/null 2>/dev/null \
> | openssl x509 -fingerprint -sha256 -noout -in /dev/stdin
sha256 Fingerprint=24:13:73:02:45:20:15:4D:A6:F6:97:63:24:0A:AA:48:C1:33:08:4F:EA:46:AF:85:39:C1:F7:28:A4:D6:12:65在上面的代码中千万要注意的是我们代码中的 fingerprint 是没有冒号的。我们可以使用如下的命令来直接进行获得
$ pwd
/Users/liuxg/elastic/elasticsearch-8.5.3/config/certs
$ ls
http.p12      http_ca.crt   transport.p12
$ openssl x509 -in http_ca.crt -sha256 -fingerprint | grep sha256 | sed 's/://g'
sha256 Fingerprint=FFCA7B12B8BE444DFB11C2EE7B25EC0B67D50F47B84F4184F206ADE91B41AF09
我们使用如下的代码来访问 Elasticsearch
main.py
# Import Elasticsearch package
from elasticsearch import Elasticsearch

# Connect to the elastic cluster
# Password for the 'elastic' user generated by Elasticsearch
USERNAME = "elastic"
PASSWORD = "BzUHHkyIlvEtFQSuLLP3"
ELATICSEARCH_ENDPOINT = "https://localhost:9200"
CERT_FINGERPRINT = "FFCA7B12B8BE444DFB11C2EE7B25EC0B67D50F47B84F4184F206ADE91B41AF09"

es = Elasticsearch(ELATICSEARCH_ENDPOINT,
                   ssl_assert_fingerprint = (CERT_FINGERPRINT),
                   basic_auth=(USERNAME, PASSWORD),
                   verify_certs = False)
resp = es.info()
print(resp)
运行上面的代码我们可以看到如下的输出
$ python main.py
/Library/Frameworks/Python.framework/Versions/3.10/lib/python3.10/site-packages/elasticsearch/_sync/client/__init__.py:395: SecurityWarning: Connecting to 'https://localhost:9200' using TLS with verify_certs=False is insecure
  _transport = transport_class(
{'name': 'liuxgm.local', 'cluster_name': 'elasticsearch', 'cluster_uuid': '0Q8J3GSfSz2OE0EneqwdKw', 'version': {'number': '8.5.3', 'build_flavor': 'default', 'build_type': 'tar', 'build_hash': '4ed5ee9afac63de92ec98f404ccbed7d3ba9584e', 'build_date': '2022-12-05T18:22:22.226119656Z', 'build_snapshot': False, 'lucene_version': '9.4.2', 'minimum_wire_compatibility_version': '7.17.0', 'minimum_index_compatibility_version': '7.0.0'}, 'tagline': 'You Know, for Search'}
使用 API key 来进行访问
我们也可以使用 API key 的方法来进行验证。我们可以参考文章 “Elasticsearch创建 API key 接口访问 Elasticsearch” 来获取 API key。我们可以按照上面介绍的步骤来获取 API key然后修改我们代码如下
main.py
# Import Elasticsearch package
from elasticsearch import Elasticsearch

# Connect to the elastic cluster
# Password for the 'elastic' user generated by Elasticsearch
USERNAME = "elastic"
PASSWORD = "BzUHHkyIlvEtFQSuLLP3"
ELATICSEARCH_ENDPOINT = "localhost:9200"
ELASTCSEARCH_CERT_PATH = "/Users/liuxg/elastic/elasticsearch-8.5.3/config/certs/http_ca.crt"
API_KEY = "ZFM5R3VZVUJlUGR4M1VPY25QV2s6RmZEUktmMWtUNVNJVVZXVGdEY3E5QQ=="

url  = f'https://{USERNAME}:{PASSWORD}@{ELATICSEARCH_ENDPOINT}'
print("url: " + url)
es = Elasticsearch(url,
                   ca_certs = ELASTCSEARCH_CERT_PATH,
                   api_key = API_KEY,
                   verify_certs = True)
resp = es.info()
print(resp)
运行上面的代码
$ python main.py
url: https://elastic:BzUHHkyIlvEtFQSuLLP3@localhost:9200
{'name': 'liuxgm.local', 'cluster_name': 'elasticsearch', 'cluster_uuid': '0Q8J3GSfSz2OE0EneqwdKw', 'version': {'number': '8.5.3', 'build_flavor': 'default', 'build_type': 'tar', 'build_hash': '4ed5ee9afac63de92ec98f404ccbed7d3ba9584e', 'build_date': '2022-12-05T18:22:22.226119656Z', 'build_snapshot': False, 'lucene_version': '9.4.2', 'minimum_wire_compatibility_version': '7.17.0', 'minimum_index_compatibility_version': '7.0.0'}, 'tagline': 'You Know, for Search'}
HTTP Bearer 认证
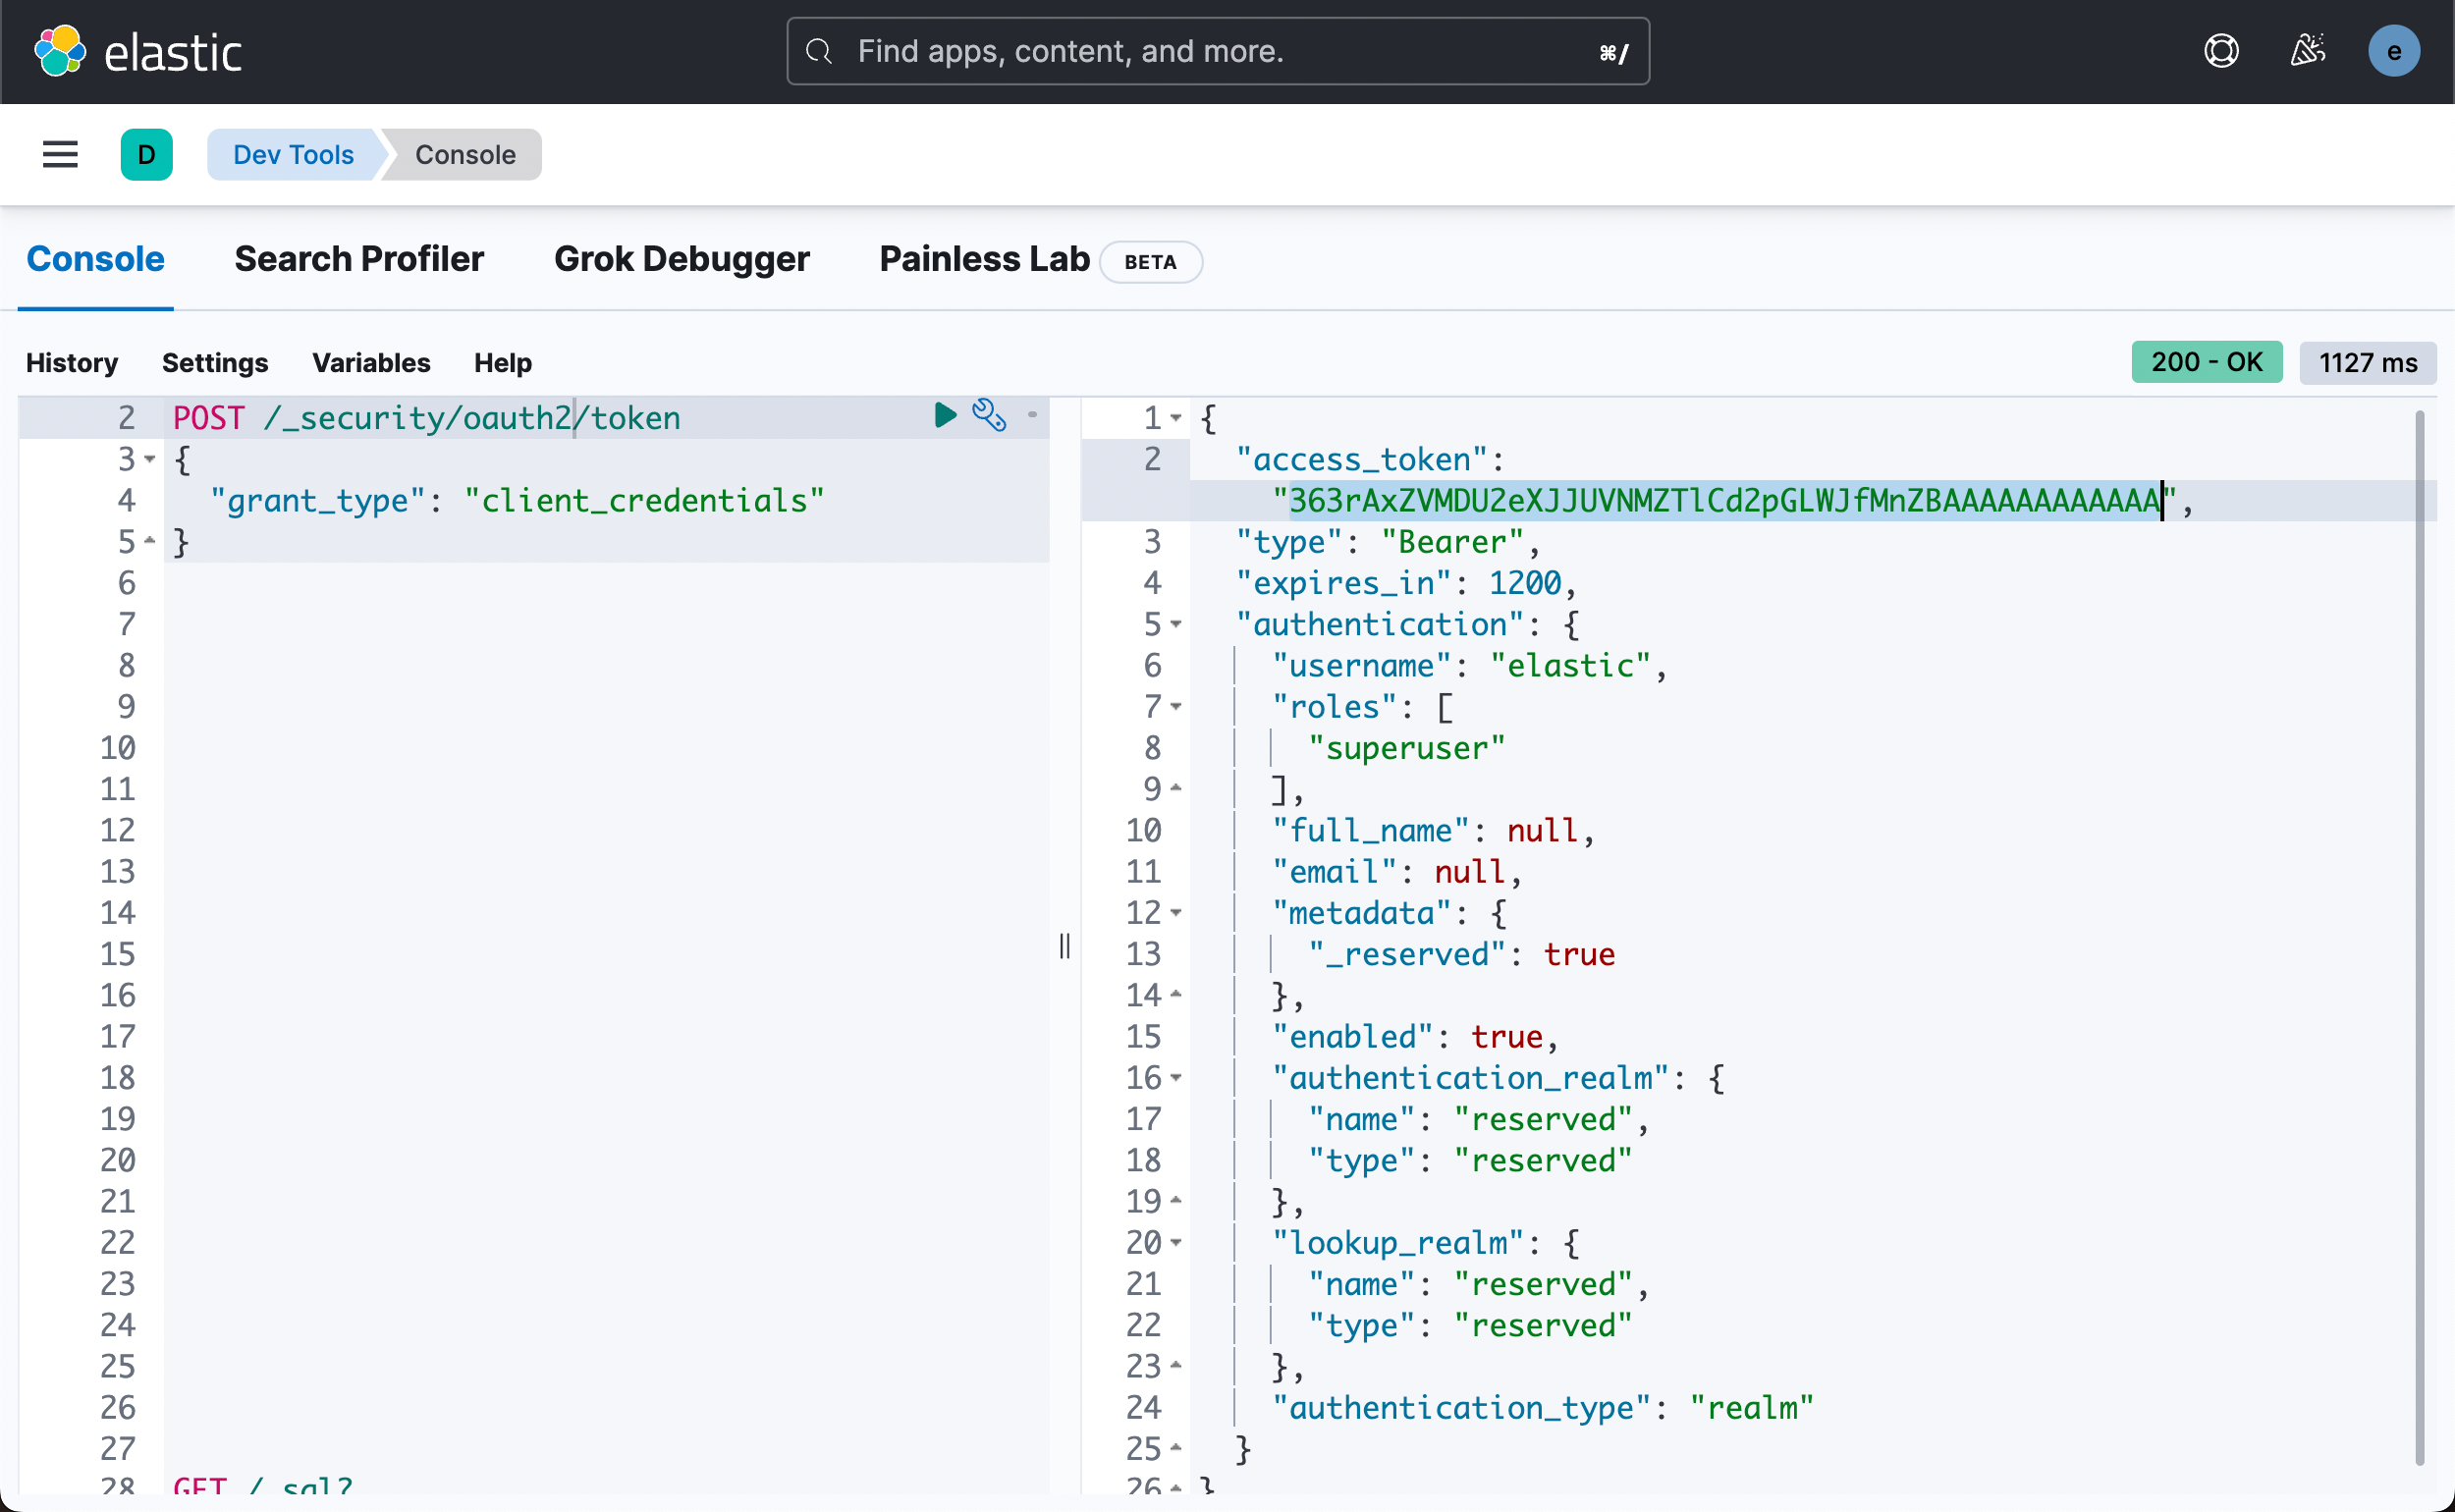
HTTP Bearer 身份验证通过将 token 作为字符串传递来使用 bearer_auth 参数。 HTTP Bearer 身份验证通过将令牌作为字符串传递来使用 ServiceToken 参数。 此身份验证方法由 Service Account Tokens 和 Bearer Tokens 使用。关于如何生成 service token请参考我之前的文章 “Elasticsearch无需基本身份验证即可创建用于访问的不记名令牌”。
POST /_security/oauth2/token
{
  "grant_type": "client_credentials"
}
main.py
# Import Elasticsearch package
from elasticsearch import Elasticsearch

# Connect to the elastic cluster
# Password for the 'elastic' user generated by Elasticsearch
USERNAME = "elastic"
PASSWORD = "BzUHHkyIlvEtFQSuLLP3"
ELATICSEARCH_ENDPOINT = "https://localhost:9200"
ELASTCSEARCH_CERT_PATH = "/Users/liuxg/elastic/elasticsearch-8.5.3/config/certs/http_ca.crt"
BEARER_AUTH = "363rAxZVMDU2eXJJUVNMZTlCd2pGLWJfMnZBAAAAAAAAAAAA"

es = Elasticsearch(ELATICSEARCH_ENDPOINT,
                   ca_certs = ELASTCSEARCH_CERT_PATH,
                   bearer_auth = BEARER_AUTH,
                   verify_certs = True)
resp = es.info()
print(resp)
连接到多个 Elasticsearch 端点
在有些时候我们希望能同时连接到多个 Elasticsearch 的端点。这个时候我们可以采用如下的格式
# Import Elasticsearch package
from elasticsearch import Elasticsearch

# Connect to the elastic cluster
# Password for the 'elastic' user generated by Elasticsearch
USERNAME = "elastic"
PASSWORD = "BzUHHkyIlvEtFQSuLLP3"
ELATICSEARCH_ENDPOINT = "localhost:9200"
ELASTCSEARCH_CERT_PATH = "/Users/liuxg/elastic/elasticsearch-8.5.3/config/certs/http_ca.crt"

url  = f'https://{USERNAME}:{PASSWORD}@{ELATICSEARCH_ENDPOINT}'
print("url: " + url)
es = Elasticsearch(hosts = [url], ca_certs = ELASTCSEARCH_CERT_PATH, verify_certs = True)
resp = es.info()
print(resp)
在上面我们可以看到 hosts 是一个数组的格式。我们可以把对个 url 放进这个数组中并进行连接。
要使用索引我们需要使用 IndicesClient。 要创建索引客户端我们需要传入上面创建的 Elasticsearch 客户端
写入数据
在上面我们已经成功地连接到 Elasticsearch 了。接下我们尝试写入一些数据到 Elasticsearch 中。在我们创建索引之前我们需要为其定义 settings 和 mappings。 创建索引不需要设置和映射。 然而在实际使用中你总是需要定义 settings 和 mappings使你的搜索引擎更健壮、更高效、更强大。 在本文中我们将使用这个演示配置
settings = {
    "index": {"number_of_replicas": 2},
    "analysis": {
        "filter": {
            "ngram_filter": {
                "type": "edge_ngram",
                "min_gram": 2,
                "max_gram": 15,
            }
        },
        "analyzer": {
            "ngram_analyzer": {
                "type": "custom",
                "tokenizer": "standard",
                "filter": ["lowercase", "ngram_filter"],
            }
        }
    }
}

mappings = {
    "properties": {
        "id": {"type": "long"},
        "name": {
            "type": "text",
            "analyzer": "standard",
            "fields": {
                "keyword": {"type": "keyword"},
                "ngrams": {"type": "text", "analyzer": "ngram_analyzer"},
            }
        },
        "brand": {
            "type": "text",
            "fields": {
                "keyword": {"type": "keyword"},
            }
        },
        "price": {"type": "float"},
        "attributes": {
            "type": "nested",
            "properties": {
                "attribute_name": {"type": "text"},
                "attribute_value": {"type": "text"},
            }
        }
    }
}
如果你想成为 Elasticsearch 的专家你需要了解更多关于索引的设置和映射的知识。
首先我们使用如下的代码来检查我们的索引 laptops-demo 是否已经存在。如果已经存在我们先删除这个索引。
if(es.indices.exists(index=INDEX_NAME)):
    print("The index has already existed, going to remove it")
es.options(ignore_status=404).indices.delete(index=INDEX_NAME)- ignore=404如果要删除的索引不存在则不会报错。
事实上我们甚至不需要检查索引存在如否这是因为我们添加了 ignore=404 选项。
然后我们再使用如下的命令来创建这个索引
# Create the index with the correct configurations
res = es.indices.create(index = INDEX_NAME, settings=settings,mappings=mappings)
print(res)
运行完上面的代码我们可以在 Kibana 中进行查看
GET laptops-demo 它将显示我们想要的索引配置。上面的 python 代码实现了类似如下的命令
PUT laptops-demo
{
  "mappings": {
    "properties": {
      "attributes": {
        "type": "nested",
        "properties": {
          "attribute_name": {
            "type": "text"
          },
          "attribute_value": {
            "type": "text"
          }
        }
      },
      "brand": {
        "type": "text",
        "fields": {
          "keyword": {
            "type": "keyword"
          }
        }
      },
      "id": {
        "type": "long"
      },
      "name": {
        "type": "text",
        "fields": {
          "keyword": {
            "type": "keyword"
          },
          "ngrams": {
            "type": "text",
            "analyzer": "ngram_analyzer"
          }
        },
        "analyzer": "standard"
      },
      "price": {
        "type": "float"
      }
    }
  },
  "settings": {
    "index": {
      "routing": {
        "allocation": {
          "include": {
            "_tier_preference": "data_content"
          }
        }
      },
      "number_of_shards": "1",
      "provided_name": "laptops-demo",
      "creation_date": "1673864468564",
      "analysis": {
        "filter": {
          "ngram_filter": {
            "type": "edge_ngram",
            "min_gram": "2",
            "max_gram": "15"
          }
        },
        "analyzer": {
          "ngram_analyzer": {
            "filter": [
              "lowercase",
              "ngram_filter"
            ],
            "type": "custom",
            "tokenizer": "standard"
          }
        }
      },
      "number_of_replicas": "2",
      "uuid": "zcJMvCihSdugilbc28tKBw",
      "version": {
        "created": "8050399"
      }
    }
  }
}
在这个例子中我们为我们的 Elasticsearch 定义了副本数这在本地开发环境中没有什么区别但在生产中多个副本可以提高可用性和容错性。
此外我们在映射部分定义文档的字段。 Elasticsearch 支持动态映射这意味着我们不需要提前定义字段类型Elasticsearch 会自动创建它们。 但是我们应该尽可能定义映射。 明确映射比隐含映射更好。 你对数据了解得越多搜索引擎就越强大。最后我们在设置部分定义了一个 ngram 过滤器和分析器它支持通过部分输入或自动完成搜索这将在后面进行演示。
运行完上面的代码我们可以看到
{'acknowledged': True, 'shards_acknowledged': True, 'index': 'laptops-demo'}它表明我们的索引已经被成功地创建。我们可以在 Kibana 中打入如下的命令来进行查看
GET _cat/indices
GET laptops-demo/_settings
GET laptops-demo/_mapping
再次回到 python我们可以使用以下命令为我们的索引创建一个别名。 你可以使用别名来访问索引就像访问索引本身一样。
# Create an alias for index.
res = es.indices.put_alias(index=INDEX_NAME, name="laptops")
print(res)
这条指令和如下的命令类似
PUT laptops-demo/_alias/laptop我们可以查看 laptops-demo 的设置
GET laptops-demo 
我们可以看到 laptops 已经被成功地设置为 alias 了。
我们可以使用如下的代码来查看该索引的 alias
# Get the aliases for the index
res = es.indices.get_alias(index=INDEX_NAME)
print(res)
上面的代码输出
{'laptops-demo': {'aliases': {'laptops': {}}}}要获取具有相同别名的所有索引只需将别名指定为索引名称即可
# Get all of the indices with the same alias laptops
res = es.indices.get_alias(index="laptops", allow_no_indices=True, ignore_unavailable=True)
print(res)
{'laptops-demo': {'aliases': {'laptops': {}}}}上面显示目前只有 laptops-demo 具有 laptops 这个别名。
- allow_no_indices=True如果存在具有指定别名的索引则不会引发错误。
- ignore_unavailable=True如果指定的索引或别名不存在则不会引发错误。
你还可以删除索引的别名
# Delete an alias for an index
res = es.indices.delete_alias(index=INDEX_NAME, name="laptops")
print(res)
现在我们已经创建了一个具有适当设置和映射的索引我们可以开始向其中添加文档。 要使用 Python 创建文档 手动创建单个文档我们可以使用客户端的index 方法
doc = {
    "id": 1,
    "name": "HP EliteBook Model 1",
    "brand": "HP",
    "price": 38842.00,
    "attributes": [
        {"attribute_name": "cpu", "attribute_value": "Intel Core i7"},
        {"attribute_name": "memory", "attribute_value": "8GB"},
        {"attribute_name": "storage", "attribute_value": "256GB"},
    ],
}

res = es.index(index=INDEX_NAME, id=1, document= doc)
print(res)
上面运行的结果是
{'_index': 'laptops-demo', '_id': '1', '_version': 1, 'result': 'created', '_shards': {'total': 3, 'successful': 1, 'failed': 0}, '_seq_no': 0, '_primary_term': 1}
上面的命令类似如下的命令
PUT laptops-demo/_doc/1
{
  "id": 1,
  "name": "HP EliteBook Model 1",
  "brand": "HP",
  "price": 38842,
  "attributes": [
    {
      "attribute_name": "cpu",
      "attribute_value": "Intel Core i7"
    },
    {
      "attribute_name": "memory",
      "attribute_value": "8GB"
    },
    {
      "attribute_name": "storage",
      "attribute_value": "256GB"
    }
  ]
}
我总是喜欢在 Kibana 中检查结果因为索引名称、字段名称和命令可以自动完成和格式化。 此外结果的格式也很好便于阅读。 在 Kibana 中运行
GET laptops-demo/_doc/1你可以看到如下的结果
{
  "took": 0,
  "timed_out": false,
  "_shards": {
    "total": 1,
    "successful": 1,
    "skipped": 0,
    "failed": 0
  },
  "hits": {
    "total": {
      "value": 1,
      "relation": "eq"
    },
    "max_score": 1,
    "hits": [
      {
        "_index": "laptops-demo",
        "_id": "1",
        "_score": 1,
        "_source": {
          "id": 1,
          "name": "HP EliteBook Model 1",
          "brand": "HP",
          "price": 38842,
          "attributes": [
            {
              "attribute_name": "cpu",
              "attribute_value": "Intel Core i7"
            },
            {
              "attribute_name": "memory",
              "attribute_value": "8GB"
            },
            {
              "attribute_name": "storage",
              "attribute_value": "256GB"
            }
          ]
        }
      }
    ]
  }
}
它显示我们已经成功地把文档写入进去了。
当然如果你愿意也可以使用 Python 检查结果
# Get the document with id = 1
res = es.get(index="laptops-demo", id=1)
print(res)
{'_index': 'laptops-demo', '_id': '1', '_version': 1, '_seq_no': 0, '_primary_term': 1, 'found': True, '_source': {'id': 1, 'name': 'HP EliteBook Model 1', 'brand': 'HP', 'price': 38842.0, 'attributes': [{'attribute_name': 'cpu', 'attribute_value': 'Intel Core i7'}, {'attribute_name': 'memory', 'attribute_value': '8GB'}, {'attribute_name': 'storage', 'attribute_value': '256GB'}]}}
我们还可以使用如下的命令来删除一个文档
# Delete teh doc with id = 1
print("Deleting a doc")
res = es.delete(index=INDEX_NAME, id=1)
print(res)
{'_index': 'laptops-demo', '_id': '1', '_version': 2, 'result': 'deleted', '_shards': {'total': 3, 'successful': 1, 'failed': 0}, '_seq_no': 1, '_primary_term': 1}
到目前为止你已经学习了如何在 Python 中创建单个 Elasticsearch 文档。 但是如果你只想创建一个或两个文档Python 就没那么有用了。 如果你只想手动对几个文档执行 CRUD 操作Kibana 会更有用。 Python 的真正强大之处在于批处理。 当你要创建大量文档时你可以编写一个脚本来完成。
假设你有一个需要索引的笔记本电脑的 CSV 提要文件。 你可以从此链接下载演示 CSV 文件。 批量创建文档需要使用客户端的批量方法。 要使用的格式与 bulk API 相同
{ "index" : { "_index" : "test", "_id" : "1" } }
{ "field1" : "value1" }
{ "create" : { "_index" : "test", "_id" : "2" } }
{ "field1" : "value3" }
{ "update" : {"_index" : "test", "_id" : "1" } }
{ "doc" : {"field2" : "value2"} }
{ "delete" : { "_index" : "test", "_id" : "2" } }- index 和 create 操作都会创建一个新索引并期望在下一行有一个 source。 不同之处在于如果目标中已存在具有相同 ID 的文档则 create 会失败而 index 会根据需要添加或替换文档。
- update 更新现有索引并期望字段在下一行更新。
- delete 删除文档并且不期望下一行有源。
要在 Python 中批量创建文档我们需要从 CSV 文件中读取数据并将数据转换为 bulk API 期望的格式。 我们可以使用以下代码在 Python 中读取数据、转换数据和创建文档
main.py
# Import Elasticsearch package
from elasticsearch import Elasticsearch
import csv
import json

# Connect to the elastic cluster
# Password for the 'elastic' user generated by Elasticsearch
USERNAME = "elastic"
PASSWORD = "BzUHHkyIlvEtFQSuLLP3"
ELATICSEARCH_ENDPOINT = "localhost:9200"
ELASTCSEARCH_CERT_PATH = "/Users/liuxg/elastic/elasticsearch-8.5.3/config/certs/http_ca.crt"

url  = f'https://{USERNAME}:{PASSWORD}@{ELATICSEARCH_ENDPOINT}'
print("url: " + url)
es = Elasticsearch(url, ca_certs = ELASTCSEARCH_CERT_PATH, verify_certs = True)
resp = es.info()
# print(resp)

settings = {
    "index": {"number_of_replicas": 2},
    "analysis": {
        "filter": {
            "ngram_filter": {
                "type": "edge_ngram",
                "min_gram": 2,
                "max_gram": 15,
            }
        },
        "analyzer": {
            "ngram_analyzer": {
                "type": "custom",
                "tokenizer": "standard",
                "filter": ["lowercase", "ngram_filter"],
            }
        }
    }
}

mappings = {
    "properties": {
        "id": {"type": "long"},
        "name": {
            "type": "text",
            "analyzer": "standard",
            "fields": {
                "keyword": {"type": "keyword"},
                "ngrams": {"type": "text", "analyzer": "ngram_analyzer"},
            }
        },
        "brand": {
            "type": "text",
            "fields": {
                "keyword": {"type": "keyword"},
            }
        },
        "price": {"type": "float"},
        "attributes": {
            "type": "nested",
            "properties": {
                "attribute_name": {"type": "text"},
                "attribute_value": {"type": "text"},
            }
        }
    }
}

configurations = {
    "settings": {
        "index": {"number_of_replicas": 2},
        "analysis": {
            "filter": {
                "ngram_filter": {
                    "type": "edge_ngram",
                    "min_gram": 2,
                    "max_gram": 15,
                }
            },
            "analyzer": {
                "ngram_analyzer": {
                    "type": "custom",
                    "tokenizer": "standard",
                    "filter": ["lowercase", "ngram_filter"],
                }
            }
        }
    },
    "mappings": {
        "properties": {
            "id": {"type": "long"},
            "name": {
                "type": "text",
                "analyzer": "standard",
                "fields": {
                    "keyword": {"type": "keyword"},
                    "ngrams": {"type": "text", "analyzer": "ngram_analyzer"},
                }
            },
            "brand": {
                "type": "text",
                "fields": {
                    "keyword": {"type": "keyword"},
                }
            },
            "price": {"type": "float"},
            "attributes": {
                "type": "nested",
                "properties": {
                    "attribute_name": {"type": "text"},
                    "attribute_value": {"type": "text"},
                }
            }
        }
    }
}


INDEX_NAME = "laptops-demo"

# check the existence of the index. If yes, remove it
if(es.indices.exists(index=INDEX_NAME)):
    print("The index has already existed, going to remove it")
    es.options(ignore_status=404).indices.delete(index=INDEX_NAME)

# Create the index with the correct configurations
res = es.indices.create(index=INDEX_NAME, settings=settings,mappings=mappings)
print(res)

# The following is another way to create the index, but it is deprecated
# es.indices.create(index = INDEX_NAME, body =configurations )

# Create an alias for an index.
res = es.indices.put_alias(index=INDEX_NAME, name="laptops")
print(res)

# Get the aliases for the index
res = es.indices.get_alias(index=INDEX_NAME)
print(res)

# Get all of the indices with the same alias laptops
res = es.indices.get_alias(index="laptops", allow_no_indices=True, ignore_unavailable=True)
print(res)

# Delete an alias for an index
res = es.indices.delete_alias(index=INDEX_NAME, name="laptops")
print(res)


doc = {
    "id": 1,
    "name": "HP EliteBook Model 1",
    "brand": "HP",
    "price": 38842.00,
    "attributes": [
        {"attribute_name": "cpu", "attribute_value": "Intel Core i7"},
        {"attribute_name": "memory", "attribute_value": "8GB"},
        {"attribute_name": "storage", "attribute_value": "256GB"}
    ]
}

res = es.index(index=INDEX_NAME, id=1, document= doc)
print(res)

# Get the document with id = 1
res = es.get(index="laptops-demo", id=1)
print(res)

# In the following, using bulk API to index a csc file
colums = ["id", "name", "price", "brand", "cpu", "memory", "storage"]

with open("data.csv", "r") as fi:
    reader = csv.DictReader(
        fi, fieldnames=colums, delimiter=",", quotechar='"'
    )

    # This skips the first row which is the header of the CSV file.
    next(reader)

    actions = []
    for row in reader:
        action = {"index": {"_index": INDEX_NAME, "_id": int(row["id"])}}
        doc = {
            "id": int(row["id"]),
            "name": row["name"],
            "price": float(row["price"]),
            "brand": row["brand"],
            "attributes": [
                {"attribute_name": "cpu", "attribute_value": row["cpu"]},
                {"attribute_name": "memory", "attribute_value": row["memory"]},
                {
                    "attribute_name": "storage",
                    "attribute_value": row["storage"],
                },
            ],
        }
        actions.append(json.dumps(action))
        actions.append(json.dumps(doc))

    with open("laptops_demo.json", "w") as fo:
        fo.write("\n".join(actions))

    es.bulk(operations="\n".join(actions))
关键点
- csv 模块读取 CSV 文件并将结果作为字典返回。
- json 模块将 Python 中的字典转换为批量 API 所需的 JSON 对象。
- 我们正在使用 index 关键字来创建文档。 index 操作可以根据需要添加或替换文档。 因此你可以多次运行代码并会得到相同的结果。因为相同的 id 重复 index 操作只会覆盖之前的版本。
- 对于每个 index 操作应该紧跟其后的文档。 该文档应根据本文开头定义的映射进行格式化。
运行代码后您可以在 Kibana 中查看结果
GET laptops-demo/_search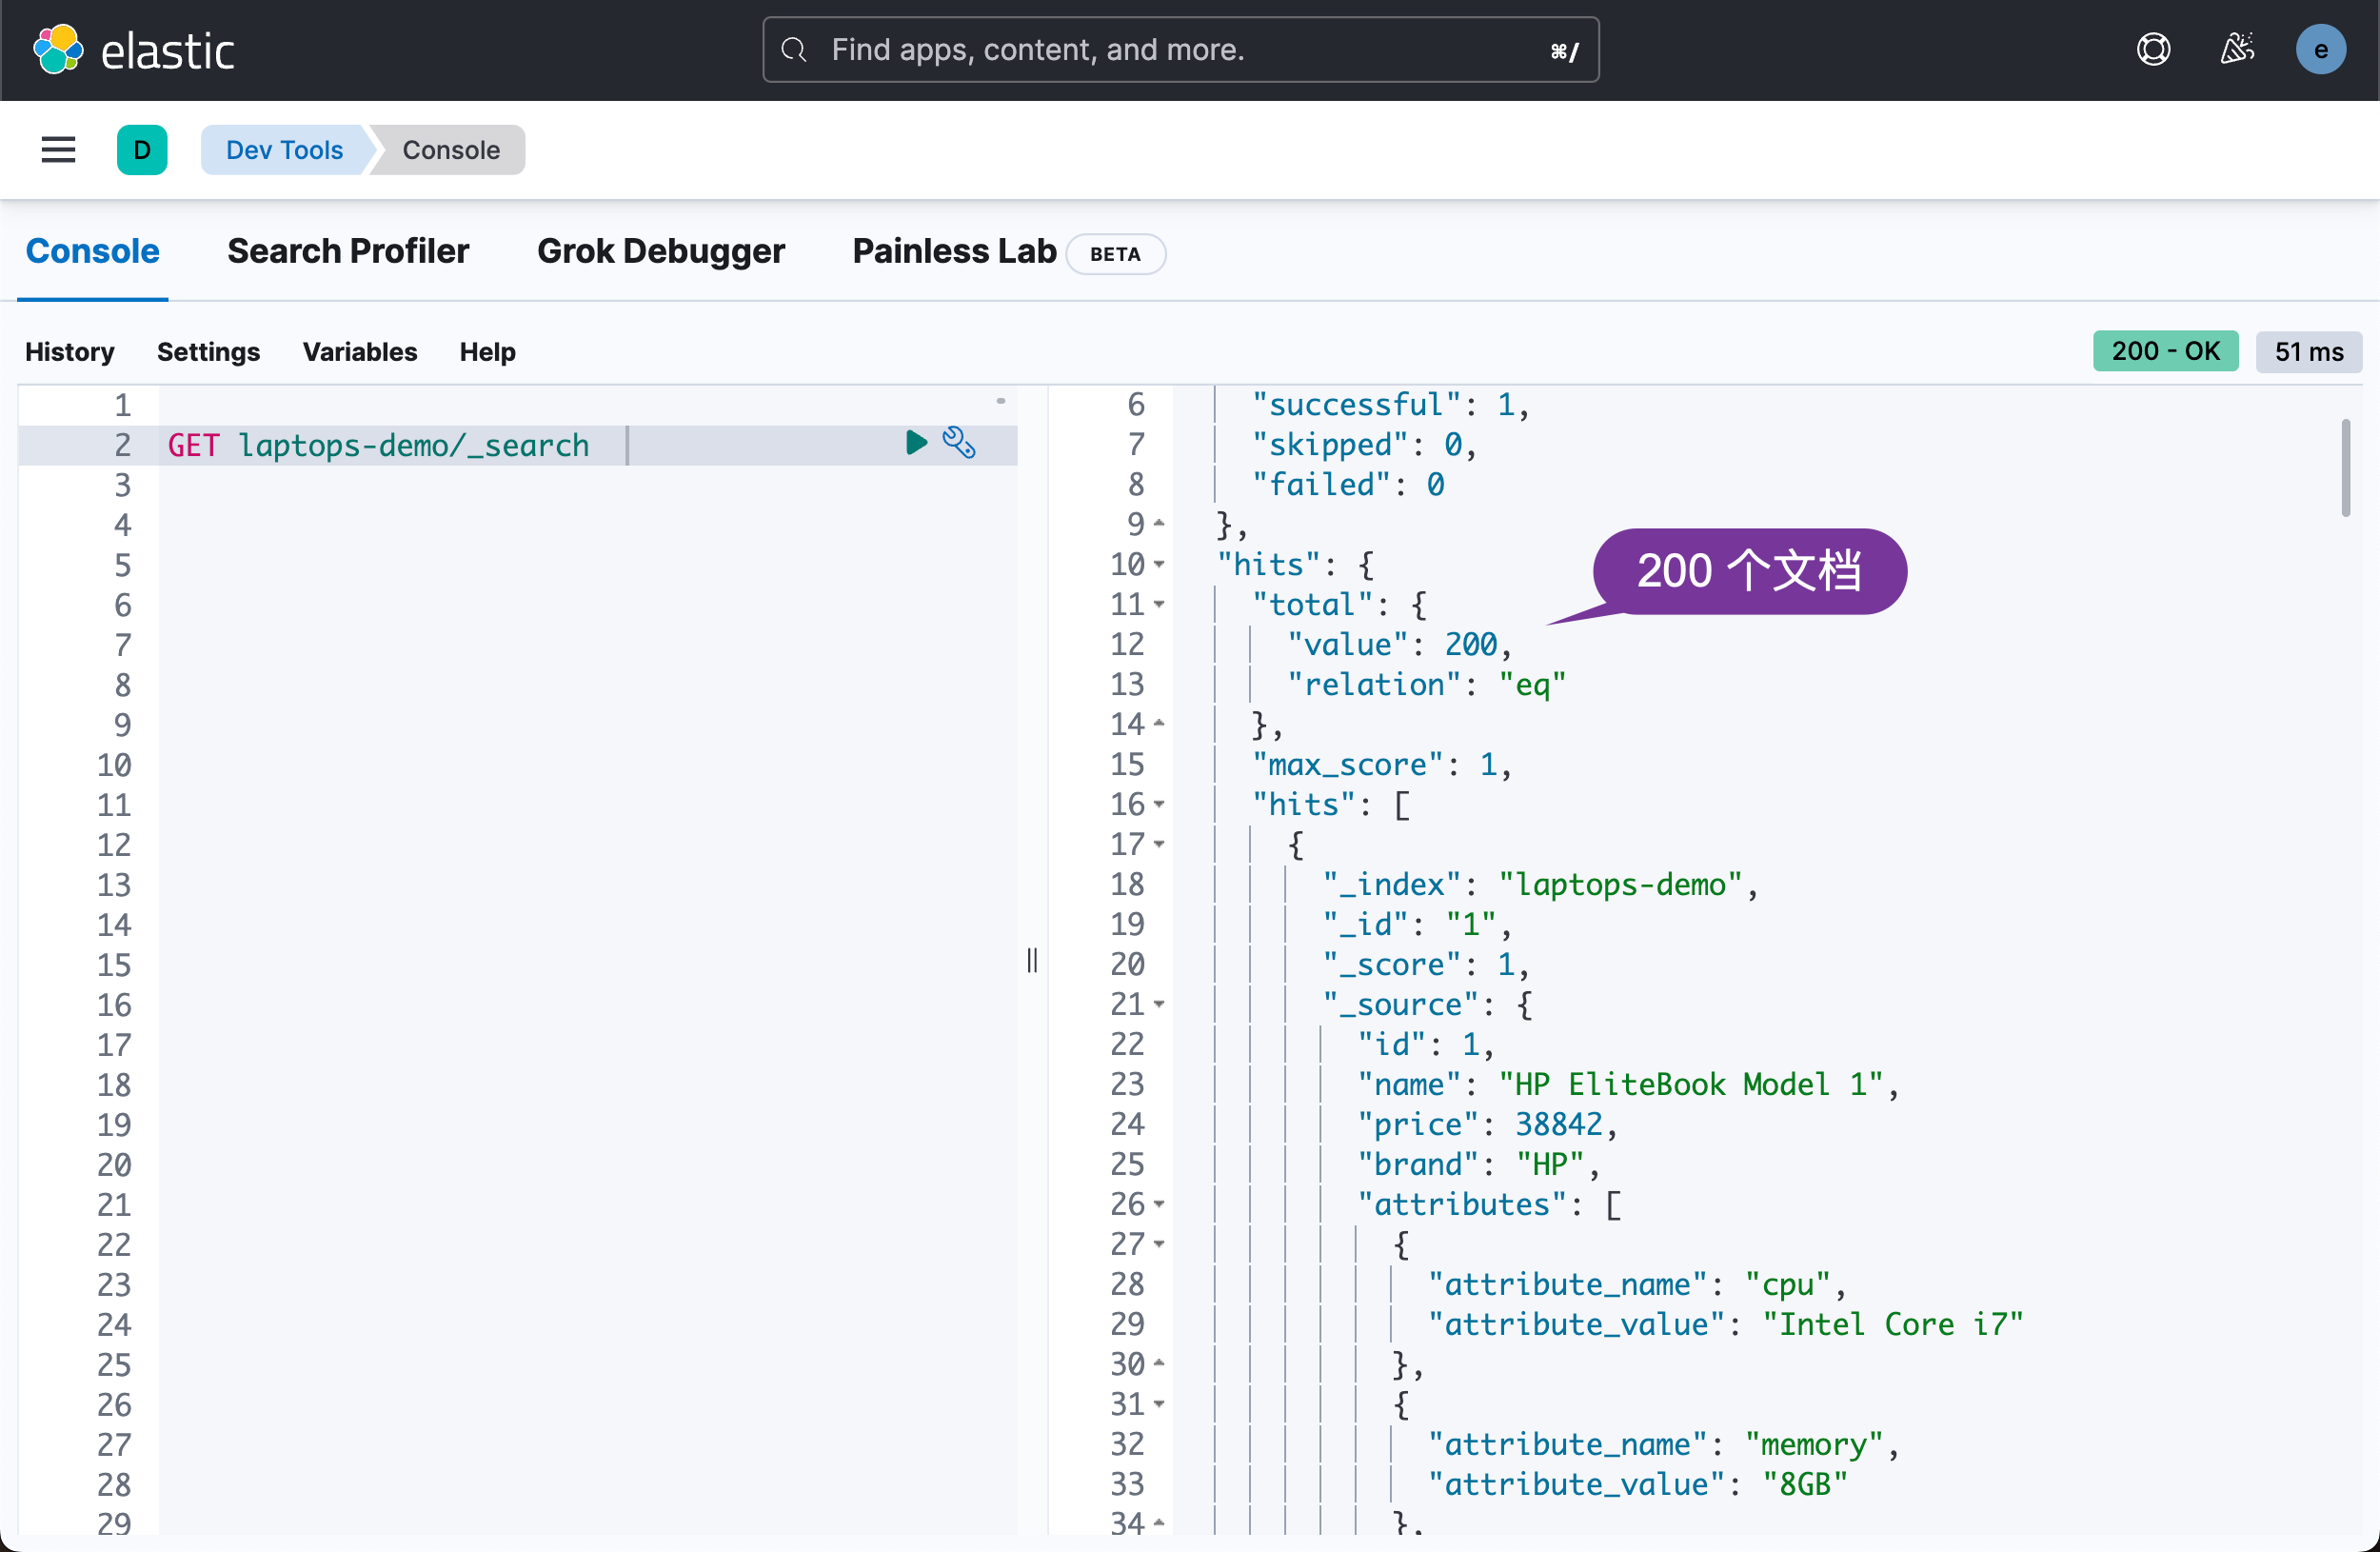
现在所有的文档都已经添加到我们的 Elasticsearch 索引中我们可以根据不同的条件搜索文档了。
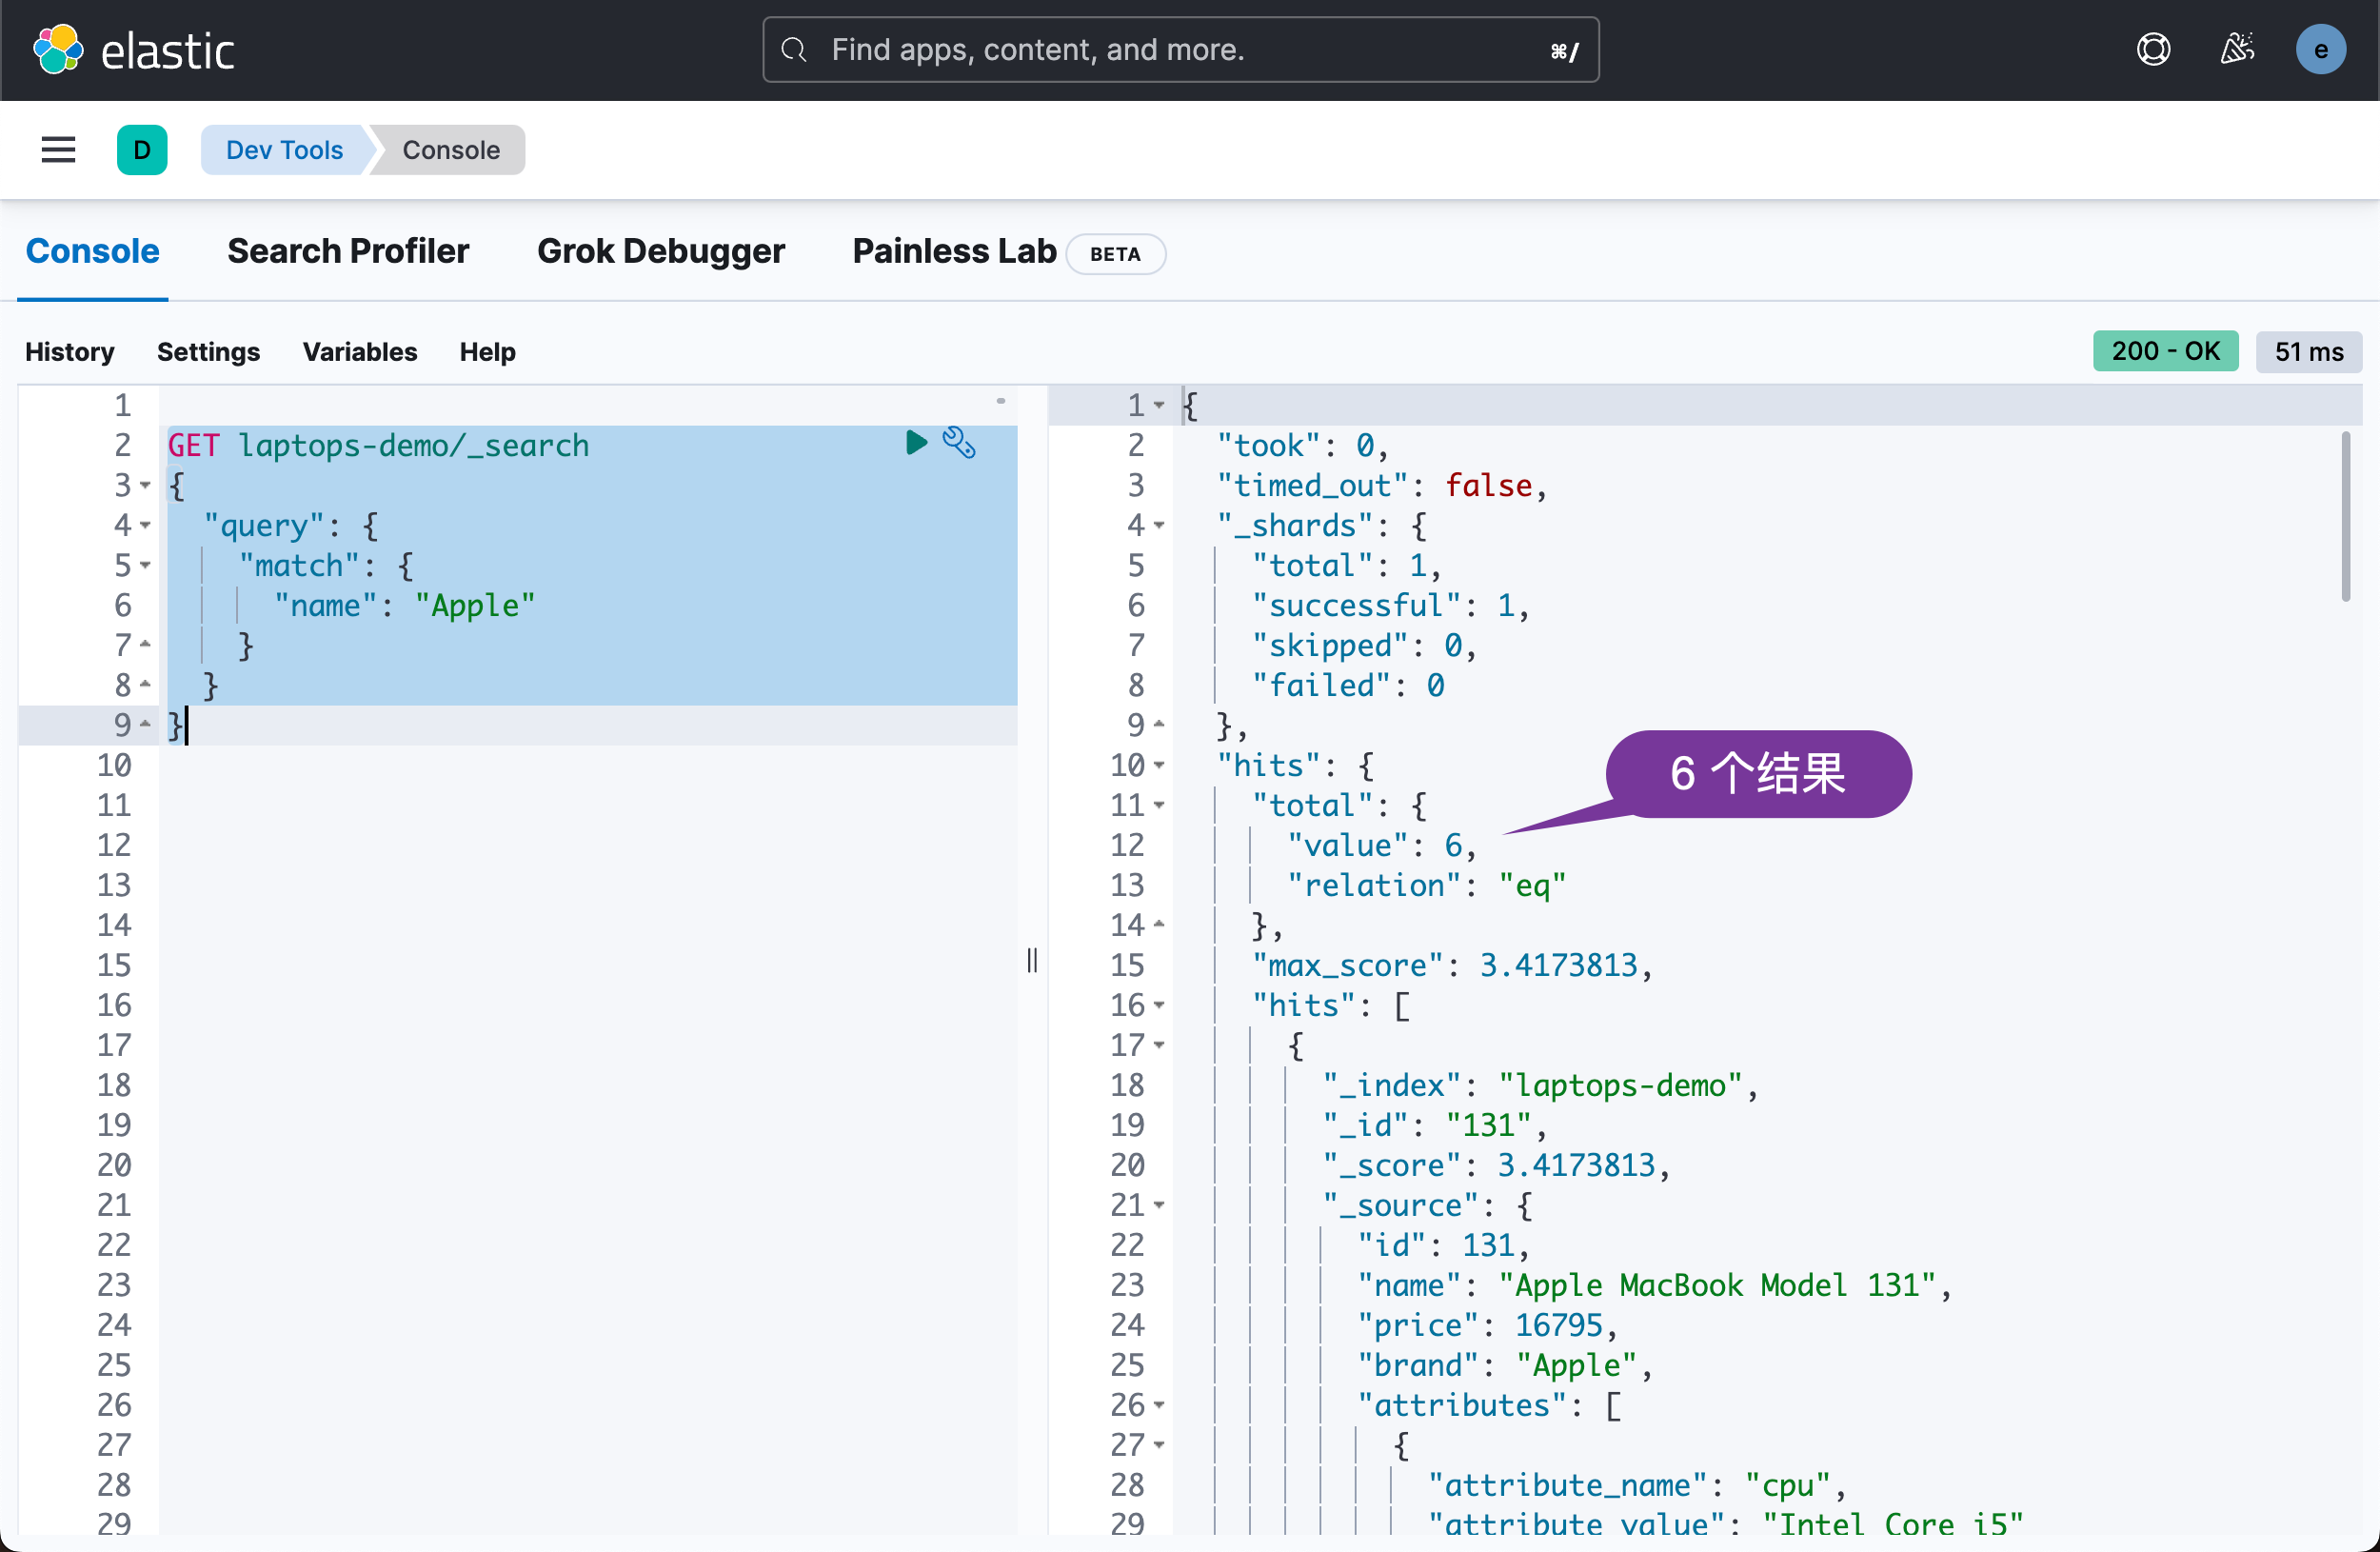
例如让我们搜索所有 MacBook 笔记本电脑。 在 Kibana 中要使用的查询是
GET laptops-demo/_search
{
  "query": {
    "match": {
      "name": "Apple"
    }
  }
}
它显示的结果是
我们也可以使用 Python 代码来实现
# In the following, search all of the docs with name matching "Apple"
search_query = {
    "match": {
      "name": "Apple"
    }
}

res = es.search(index=INDEX_NAME, query=search_query)
print(res['hits']['hits'])
上面运行显示的结果为
{'took': 0, 'timed_out': False, '_shards': {'total': 1, 'successful': 1, 'skipped': 0, 'failed': 0}, 'hits': {'total': {'value': 6, 'relation': 'eq'}, 'max_score': 3.4223948, 'hits': [{'_index': 'laptops-demo', '_id': '131', '_score': 3.4223948, '_source': {'id': 131, 'name': 'Apple MacBook Model 131', 'price': 16795.0, 'brand': 'Apple', 'attributes': [{'attribute_name': 'cpu', 'attribute_value': 'Intel Core i5'}, {'attribute_name': 'memory', 'attribute_value': '8GB'}, {'attribute_name': 'storage', 'attribute_value': '256GB'}]}}, {'_index': 'laptops-demo', '_id': '132', '_score': 3.4223948, '_source': {'id': 132, 'name': 'Apple MacBook Model 132', 'price': 18990.0, 'brand': 'Apple', 'attributes': [{'attribute_name': 'cpu', 'attribute_value': 'Intel Core i5'}, {'attribute_name': 'memory', 'attribute_value': '8GB'}, {'attribute_name': 'storage', 'attribute_value': '512GB'}]}}, {'_index': 'laptops-demo', '_id': '134', '_score': 3.4223948, '_source': {'id': 134, 'name': 'Apple MacBook Model 134', 'price': 16490.0, 'brand': 'Apple', 'attributes': [{'attribute_name': 'cpu', 'attribute_value': 'Intel Core i5'}, {'attribute_name': 'memory', 'attribute_value': '8GB'}, {'attribute_name': 'storage', 'attribute_value': '256GB'}]}}, {'_index': 'laptops-demo', '_id': '158', '_score': 3.4223948, '_source': {'id': 158, 'name': 'Apple MacBook Model 158', 'price': 30349.0, 'brand': 'Apple', 'attributes': [{'attribute_name': 'cpu', 'attribute_value': 'Intel Core i9'}, {'attribute_name': 'memory', 'attribute_value': '16GB'}, {'attribute_name': 'storage', 'attribute_value': '1024GB'}]}}, {'_index': 'laptops-demo', '_id': '159', '_score': 3.4223948, '_source': {'id': 159, 'name': 'Apple MacBook Model 159', 'price': 27489.0, 'brand': 'Apple', 'attributes': [{'attribute_name': 'cpu', 'attribute_value': 'Intel Core i7'}, {'attribute_name': 'memory', 'attribute_value': '16GB'}, {'attribute_name': 'storage', 'attribute_value': '512GB'}]}}, {'_index': 'laptops-demo', '_id': '184', '_score': 3.4223948, '_source': {'id': 184, 'name': 'Apple MacBook Model 184', 'price': 32989.0, 'brand': 'Apple', 'attributes': [{'attribute_name': 'cpu', 'attribute_value': 'Intel Core i9'}, {'attribute_name': 'memory', 'attribute_value': '16GB'}, {'attribute_name': 'storage', 'attribute_value': '1024GB'}]}}]}}
我们可以看到 5 个搜索的结果。
您可以在 Python 控制台中看到与在 Kibana 中相同的结果但我认为会同意 Kibana 中的结果更具可读性。
最后让我们做一个有趣的搜索。 由于我们在名称字段的过滤器和分析器中使用了 ngram因此我们可以进行按需搜索或自动完成搜索即我们可以通过作为确切数据一部分的查询进行搜索。 例如
# Search for "Appl"
search_query = {
    "match": {
      "name.ngrams": "Appl"
    }
}

res = es.search(index=INDEX_NAME, query=search_query)
print(res)
运行上面的代码
{'took': 0, 'timed_out': False, '_shards': {'total': 1, 'successful': 1, 'skipped': 0, 'failed': 0}, 'hits': {'total': {'value': 6, 'relation': 'eq'}, 'max_score': 6.36487, 'hits': [{'_index': 'laptops-demo', '_id': '131', '_score': 6.36487, '_source': {'id': 131, 'name': 'Apple MacBook Model 131', 'price': 16795.0, 'brand': 'Apple', 'attributes': [{'attribute_name': 'cpu', 'attribute_value': 'Intel Core i5'}, {'attribute_name': 'memory', 'attribute_value': '8GB'}, {'attribute_name': 'storage', 'attribute_value': '256GB'}]}}, {'_index': 'laptops-demo', '_id': '132', '_score': 6.36487, '_source': {'id': 132, 'name': 'Apple MacBook Model 132', 'price': 18990.0, 'brand': 'Apple', 'attributes': [{'attribute_name': 'cpu', 'attribute_value': 'Intel Core i5'}, {'attribute_name': 'memory', 'attribute_value': '8GB'}, {'attribute_name': 'storage', 'attribute_value': '512GB'}]}}, {'_index': 'laptops-demo', '_id': '134', '_score': 6.36487, '_source': {'id': 134, 'name': 'Apple MacBook Model 134', 'price': 16490.0, 'brand': 'Apple', 'attributes': [{'attribute_name': 'cpu', 'attribute_value': 'Intel Core i5'}, {'attribute_name': 'memory', 'attribute_value': '8GB'}, {'attribute_name': 'storage', 'attribute_value': '256GB'}]}}, {'_index': 'laptops-demo', '_id': '158', '_score': 6.36487, '_source': {'id': 158, 'name': 'Apple MacBook Model 158', 'price': 30349.0, 'brand': 'Apple', 'attributes': [{'attribute_name': 'cpu', 'attribute_value': 'Intel Core i9'}, {'attribute_name': 'memory', 'attribute_value': '16GB'}, {'attribute_name': 'storage', 'attribute_value': '1024GB'}]}}, {'_index': 'laptops-demo', '_id': '159', '_score': 6.36487, '_source': {'id': 159, 'name': 'Apple MacBook Model 159', 'price': 27489.0, 'brand': 'Apple', 'attributes': [{'attribute_name': 'cpu', 'attribute_value': 'Intel Core i7'}, {'attribute_name': 'memory', 'attribute_value': '16GB'}, {'attribute_name': 'storage', 'attribute_value': '512GB'}]}}, {'_index': 'laptops-demo', '_id': '184', '_score': 6.36487, '_source': {'id': 184, 'name': 'Apple MacBook Model 184', 'price': 32989.0, 'brand': 'Apple', 'attributes': [{'attribute_name': 'cpu', 'attribute_value': 'Intel Core i9'}, {'attribute_name': 'memory', 'attribute_value': '16GB'}, {'attribute_name': 'storage', 'attribute_value': '1024GB'}]}}]}}
从上面我们可以看出来共有 6 个结果。
总结
Elasticsearch 是一个非常强大的搜索引擎使用非常广泛。 本文的重点是使用 Python 批量创建 Elasticsearch 文档。 我们仅仅触及了 Elasticsearch 搜索查询的皮毛。 我有专门的文章介绍 Elasticsearch的 基本查询和高级查询用于搜索和分析。 Elasticsearch 原生语言中使用的查询与 Python 中使用的查询相同。 因此当你掌握了Kibana中的原生查询后你就可以在Python中自由使用了。