

13、Javaweb
| 阿里云国内75折 回扣 微信号:monov8 |
| 阿里云国际,腾讯云国际,低至75折。AWS 93折 免费开户实名账号 代冲值 优惠多多 微信号:monov8 飞机:@monov6 |
Filter过滤器
1. 概念
* 生活中的过滤器净水器,空气净化器土匪、
* web中的过滤器当访问服务器的资源时过滤器可以将请求拦截下来完成一些特殊的功能。
* 过滤器的作用
* 一般用于完成通用的操作。如登录验证、统一编码处理、敏感字符过滤...

2. 快速入门
1. 步骤
1. 定义一个类实现接口Filter
2. 复写方法
3. 配置拦截路径
1. web.xml
2. 注解
2. 代码
@WebFilter("/*")//访问所有资源之前都会执行该过滤器
注解配置
测试专用1
@WebServlet("/user/findAllServlet")
public class ServletDemo1 extends HttpServlet {
    protected void doPost(HttpServletRequest request, HttpServletResponse response) throws ServletException, IOException {
        System.out.println("findAllServlet...");
    }

    protected void doGet(HttpServletRequest request, HttpServletResponse response) throws ServletException, IOException {
        this.doPost(request, response);
    }
}
测试专用2
@WebServlet("/user/updateServlet")
public class ServletDemo2 extends HttpServlet {
    protected void doPost(HttpServletRequest request, HttpServletResponse response) throws ServletException, IOException {
        System.out.println("updateServlet...");

        //转发到index.jsp
        request.getRequestDispatcher("/index.jsp").forward(request,response);
    }

    protected void doGet(HttpServletRequest request, HttpServletResponse response) throws ServletException, IOException {
        this.doPost(request, response);
    }
}
测试网页
<%@ page contentType="text/html;charset=UTF-8" language="java" %>
<html>
  <head>
    <title>$Title$</title>
  </head>
  <body>
  index.jsp....

  <%

     out.println("index.jsp....");
  %>

  </body>
</html>
过滤器
/**
 * 过滤器快速入门程序
 */
//@WebFilter("/*")//访问所有资源之前都会执行该过滤器
public class FilterDemo1 implements Filter {
    @Override
    public void init(FilterConfig filterConfig) throws ServletException {

    }

    @Override
    public void doFilter(ServletRequest servletRequest, ServletResponse servletResponse, FilterChain filterChain) throws IOException, ServletException {
        System.out.println("filterDemo1被执行了....");


        //放行
        filterChain.doFilter(servletRequest,servletResponse);

    }

    @Override
    public void destroy() {

    }
}
3. 过滤器细节
1. web.xml配置
<filter>
<filter-name>demo1</filter-name>
<filter-class>cn.itcast.web.filter.FilterDemo1</filter-class>
</filter>
<filter-mapping>
<filter-name>demo1</filter-name>
<!-- 拦截路径 -->
<url-pattern>/*</url-pattern>
</filter-mapping>
web.xml 配置
<?xml version="1.0" encoding="UTF-8"?>
<web-app xmlns="http://xmlns.jcp.org/xml/ns/javaee"
         xmlns:xsi="http://www.w3.org/2001/XMLSchema-instance"
         xsi:schemaLocation="http://xmlns.jcp.org/xml/ns/javaee http://xmlns.jcp.org/xml/ns/javaee/web-app_3_1.xsd"
         version="3.1">
  <filter>
        <filter-name>demo1</filter-name>
        <filter-class>cn.itcast.web.filter.FilterDemo1</filter-class>
    </filter>
    <filter-mapping>
        <filter-name>demo1</filter-name>
        <url-pattern>/*</url-pattern>

    </filter-mapping>


</web-app>
2. 过滤器执行流程
1. 执行过滤器
2. 执行放行后的资源
3. 回来执行过滤器放行代码下边的代码
/@WebFilter("/*")
public class FilterDemo2 implements Filter {


    public void doFilter(ServletRequest req, ServletResponse resp, FilterChain chain) throws ServletException, IOException {
        //对request对象请求消息增强
        System.out.println("filterDemo2执行了....");

        //放行
        chain.doFilter(req, resp);
        //对response对象的响应消息增强
        System.out.println("filterDemo2回来了...");
    }

    public void init(FilterConfig config) throws ServletException {

    }

    public void destroy() {
    }

}
3. 过滤器生命周期方法
1. init:在服务器启动后会创建Filter对象然后调用init方法。只执行一次。用于加载资源
2. doFilter:每一次请求被拦截资源时会执行。执行多次
3. destroy:在服务器关闭后Filter对象被销毁。如果服务器是正常关闭则会执行destroy方法。只执行一次。用于释放资源
/*@WebFilter("/*")*/
public class FilterDemo3 implements Filter {

    /**
     * 每一次请求被拦截资源时会执行。执行多次
     * @param req
     * @param resp
     * @param chain
     * @throws ServletException
     * @throws IOException
     */
    public void doFilter(ServletRequest req, ServletResponse resp, FilterChain chain) throws ServletException, IOException {
        System.out.println("doFilter....");
        chain.doFilter(req, resp);
    }

    /**
     * 在服务器启动后会创建Filter对象然后调用init方法。只执行一次。用于加载资源
     * @param config
     * @throws ServletException
     */
    public void init(FilterConfig config) throws ServletException {
        System.out.println("init....");
    }

    /**
     * 在服务器关闭后Filter对象被销毁。如果服务器是正常关闭则会执行destroy方法。只执行一次。用于释放资源
     */
    public void destroy() {
        System.out.println("destroy....");
    }

}
4. 过滤器配置详解
* 拦截路径配置
1. 具体资源路径 /index.jsp 只有访问index.jsp资源时过滤器才会被执行
2. 拦截目录 /user/* 访问/user下的所有资源时过滤器都会被执行
3. 后缀名拦截 *.jsp 访问所有后缀名为jsp资源时过滤器都会被执行
4. 拦截所有资源/* 访问所有资源时过滤器都会被执行
* 拦截方式配置资源被访问的方式
* 注解配置
* 设置dispatcherTypes属性
1. REQUEST默认值。浏览器直接请求资源
2. FORWARD转发访问资源
3. INCLUDE包含访问资源
4. ERROR错误跳转资源
5. ASYNC异步访问资源
* web.xml配置
* 设置<dispatcher></dispatcher>标签即可
//@WebFilter("/index.jsp") //1. 具体资源路径 /index.jsp   只有访问index.jsp资源时过滤器才会被执行
//@WebFilter("/user/*") //2. 拦截目录 /user/*	访问/user下的所有资源时过滤器都会被执行
//@WebFilter("*.jsp")   //3. 后缀名拦截 *.jsp		访问所有后缀名为jsp资源时过滤器都会被执行
public class FilterDemo4 implements Filter {


    public void doFilter(ServletRequest req, ServletResponse resp, FilterChain chain) throws ServletException, IOException {
        System.out.println("filterDemo4....");
        chain.doFilter(req, resp);
    }

    public void init(FilterConfig config) throws ServletException {

    }

    public void destroy() {
    }

}
//浏览器直接请求index.jsp资源时该过滤器会被执行
//@WebFilter(value="/index.jsp",dispatcherTypes = DispatcherType.REQUEST)
//只有转发访问index.jsp时该过滤器才会被执行
//@WebFilter(value="/index.jsp",dispatcherTypes = DispatcherType.FORWARD)
//浏览器直接请求index.jsp或者转发访问index.jsp。该过滤器才会被执行
//@WebFilter(value="/*",dispatcherTypes ={ DispatcherType.FORWARD,DispatcherType.REQUEST})
public class FilterDemo5 implements Filter {
public void doFilter(ServletRequest req, ServletResponse resp, FilterChain chain) throws ServletException, IOException {
System.out.println("filterDemo5....");
chain.doFilter(req, resp);
}
public void init(FilterConfig config) throws ServletException {
}
public void destroy() {
}
}
5. 过滤器链(配置多个过滤器)
* 执行顺序如果有两个过滤器过滤器1和过滤器2
1. 过滤器1
2. 过滤器2
3. 资源执行
4. 过滤器2
5. 过滤器1
* 过滤器先后顺序问题
1. 注解配置按照类名的字符串比较规则比较值小的先执行
* 如 AFilter 和 BFilterAFilter就先执行了。
2. web.xml配置 <filter-mapping>谁定义在上边谁先执行
过滤器1
@WebFilter("/*")
public class FilterDemo6 implements Filter {


    public void doFilter(ServletRequest req, ServletResponse resp, FilterChain chain) throws ServletException, IOException {
        System.out.println("filterDemo6执行了...");

        chain.doFilter(req, resp);

        System.out.println("filterDemo6回来了...");
    }

    public void init(FilterConfig config) throws ServletException {

    }

    public void destroy() {
    }

}
过滤器2
@WebFilter("/*")
public class FilterDemo17 implements Filter {


    public void doFilter(ServletRequest req, ServletResponse resp, FilterChain chain) throws ServletException, IOException {
        System.out.println("filterDemo7执行了...");

        chain.doFilter(req, resp);

        System.out.println("filterDemo7回来了...");
    }

    public void init(FilterConfig config) throws ServletException {

    }

    public void destroy() {
    }

}
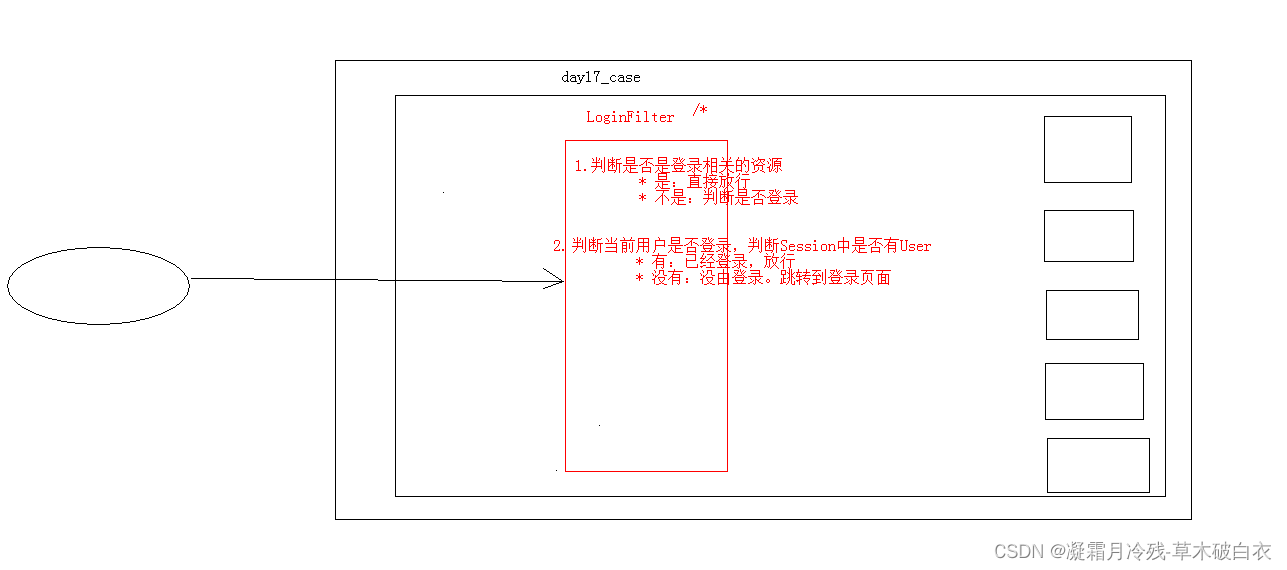
4. 案例1_登录验证
* 需求
1. 访问12Javaweb案例的资源。验证其是否登录
2. 如果登录了则直接放行。
3. 如果没有登录则跳转到登录页面提示"您尚未登录请先登录"。
/**
 * 登录验证的过滤器
 */
@WebFilter("/*")
public class LoginFilter implements Filter {


    public void doFilter(ServletRequest req, ServletResponse resp, FilterChain chain) throws ServletException, IOException {
        System.out.println(req);
        //0.强制转换
        HttpServletRequest request = (HttpServletRequest) req;

        //1.获取资源请求路径
        String uri = request.getRequestURI();
        //2.判断是否包含登录相关资源路径,要注意排除掉 css/js/图片/验证码等资源
        if(uri.contains("/login.jsp") || uri.contains("/loginServlet") || uri.contains("/css/") || uri.contains("/js/") || uri.contains("/fonts/") || uri.contains("/checkCodeServlet")  ){
            //包含用户就是想登录。放行
            chain.doFilter(req, resp);
        }else{
            //不包含需要验证用户是否登录
            //3.从获取session中获取user
            Object user = request.getSession().getAttribute("user");
            if(user != null){
                //登录了。放行
                chain.doFilter(req, resp);
            }else{
                //没有登录。跳转登录页面

                request.setAttribute("login_msg","您尚未登录请登录");
                request.getRequestDispatcher("/login.jsp").forward(request,resp);
            }
        }


        // chain.doFilter(req, resp);
    }

    public void init(FilterConfig config) throws ServletException {

    }

    public void destroy() {
    }

}
login.xml
<%@ page contentType="text/html;charset=UTF-8" language="java" %>
<!DOCTYPE html>
<html lang="zh-CN">
<head>
<meta charset="utf-8"/>
<meta http-equiv="X-UA-Compatible" content="IE=edge"/>
<meta name="viewport" content="width=device-width, initial-scale=1"/>
<title>管理员登录</title>
<!-- 1. 导入CSS的全局样式 -->
<link href="css/bootstrap.min.css" rel="stylesheet">
<!-- 2. jQuery导入建议使用1.9以上的版本 -->
<script src="js/jquery-2.1.0.min.js"></script>
<!-- 3. 导入bootstrap的js文件 -->
<script src="js/bootstrap.min.js"></script>
<script type="text/javascript">
//切换验证码
function refreshCode(){
//1.获取验证码图片对象
var vcode = document.getElementById("vcode");
//2.设置其src属性加时间戳
vcode.src = "${pageContext.request.contextPath}/checkCodeServlet?time="+new Date().getTime();
}
</script>
</head>
<body>
<div class="container" style="width: 400px;">
<h3 style="text-align: center;">管理员登录</h3>
<form action="${pageContext.request.contextPath}/loginServlet" method="post">
<div class="form-group">
<label for="user">用户名</label>
<input type="text" name="username" class="form-control" id="user" placeholder="请输入用户名"/>
</div>
<div class="form-group">
<label for="password">密码</label>
<input type="password" name="password" class="form-control" id="password" placeholder="请输入密码"/>
</div>
<div class="form-inline">
<label for="vcode">验证码</label>
<input type="text" name="verifycode" class="form-control" id="verifycode" placeholder="请输入验证码" style="width: 120px;"/>
<a href="javascript:refreshCode();">
<img src="${pageContext.request.contextPath}/checkCodeServlet" title="看不清点击刷新" id="vcode"/>
</a>
</div>
<hr/>
<div class="form-group" style="text-align: center;">
<input class="btn btn btn-primary" type="submit" value="登录">
</div>
</form>
<!-- 出错显示的信息框 -->
<div class="alert alert-warning alert-dismissible" role="alert">
<button type="button" class="close" data-dismiss="alert" >
<span>×</span>
</button>
<strong>${login_msg}</strong>
</div>
</div>
</body>
</html>loginServlet
@WebServlet("/loginServlet")
public class LoginServlet extends HttpServlet {
    protected void doPost(HttpServletRequest request, HttpServletResponse response) throws ServletException, IOException {
        System.out.println(request);

        //1.设置编码
        request.setCharacterEncoding("utf-8");

        //2.获取数据
        //2.1获取用户填写验证码
        String verifycode = request.getParameter("verifycode");

        //3.验证码校验
        HttpSession session = request.getSession();
        String checkcode_server = (String) session.getAttribute("CHECKCODE_SERVER");
        session.removeAttribute("CHECKCODE_SERVER");//确保验证码一次性
        if(!checkcode_server.equalsIgnoreCase(verifycode)){
            //验证码不正确
            //提示信息
            request.setAttribute("login_msg","验证码错误");
            //跳转登录页面
            request.getRequestDispatcher("/login.jsp").forward(request,response);

            return;
        }

        Map<String, String[]> map = request.getParameterMap();
        //4.封装User对象
        User user = new User();
        try {
            BeanUtils.populate(user,map);
        } catch (IllegalAccessException e) {
            e.printStackTrace();
        } catch (InvocationTargetException e) {
            e.printStackTrace();
        }


        //5.调用Service查询
        UserService service = new UserServiceImpl();
        User loginUser = service.login(user);
        //6.判断是否登录成功
        if(loginUser != null){
            //登录成功
            //将用户存入session
            session.setAttribute("user",loginUser);
            //跳转页面
            response.sendRedirect(request.getContextPath()+"/index.jsp");
        }else{
            //登录失败
            //提示信息
            request.setAttribute("login_msg","用户名或密码错误");
            //跳转登录页面
            request.getRequestDispatcher("/login.jsp").forward(request,response);

        }


    }

    protected void doGet(HttpServletRequest request, HttpServletResponse response) throws ServletException, IOException {
        this.doPost(request, response);
    }
}
验证码
/**
 * 验证码
 */
@WebServlet("/checkCodeServlet")
public class CheckCodeServlet extends HttpServlet {
	public void doGet(HttpServletRequest request, HttpServletResponse response)throws ServletException, IOException {

		//服务器通知浏览器不要缓存
		response.setHeader("pragma","no-cache");
		response.setHeader("cache-control","no-cache");
		response.setHeader("expires","0");

		//在内存中创建一个长80宽30的图片默认黑色背景
		//参数一长
		//参数二宽
		//参数三颜色
		int width = 80;
		int height = 30;
		BufferedImage image = new BufferedImage(width,height,BufferedImage.TYPE_INT_RGB);

		//获取画笔
		Graphics g = image.getGraphics();
		//设置画笔颜色为灰色
		g.setColor(Color.GRAY);
		//填充图片
		g.fillRect(0,0, width,height);

		//产生4个随机验证码12Ey
		String checkCode = getCheckCode();
		//将验证码放入HttpSession中
		request.getSession().setAttribute("CHECKCODE_SERVER",checkCode);

		//设置画笔颜色为黄色
		g.setColor(Color.YELLOW);
		//设置字体的小大
		g.setFont(new Font("黑体",Font.BOLD,24));
		//向图片上写入验证码
		g.drawString(checkCode,15,25);

		//将内存中的图片输出到浏览器
		//参数一图片对象
		//参数二图片的格式如PNG,JPG,GIF
		//参数三图片输出到哪里去
		ImageIO.write(image,"PNG",response.getOutputStream());
	}
	/**
	 * 产生4位随机字符串
	 */
	private String getCheckCode() {
		String base = "0123456789ABCDEFGabcdefg";
		int size = base.length();
		Random r = new Random();
		StringBuffer sb = new StringBuffer();
		for(int i=1;i<=4;i++){
			//产生0到size-1的随机值
			int index = r.nextInt(size);
			//在base字符串中获取下标为index的字符
			char c = base.charAt(index);
			//将c放入到StringBuffer中去
			sb.append(c);
		}
		return sb.toString();
	}
	public void doPost(HttpServletRequest request, HttpServletResponse response) throws ServletException, IOException {
		this.doGet(request,response);
	}
}
css
bootstrap.css
bootstrap-theme.css
js
jquery-2.1.0.min.js
bootstrap.min.js
bootstrap.js
fonts
glyphicons-halflings-regular.eot
glyphicons-halflings-regular.svg
glyphicons-halflings-regular.ttf
glyphicons-halflings-regular.woff
glyphicons-halflings-regular.woff2
2. 案例2_敏感词汇过滤
* 需求
1. 对day17_case案例录入的数据进行敏感词汇过滤
2. 敏感词汇参考《敏感词汇.txt》
3. 如果是敏感词汇替换为 ***
* 分析
1. 对request对象进行增强。增强获取参数相关方法
2. 放行。传递代理对象

* 增强对象的功能
* 设计模式一些通用的解决固定问题的方式
1. 装饰模式
2. 代理模式
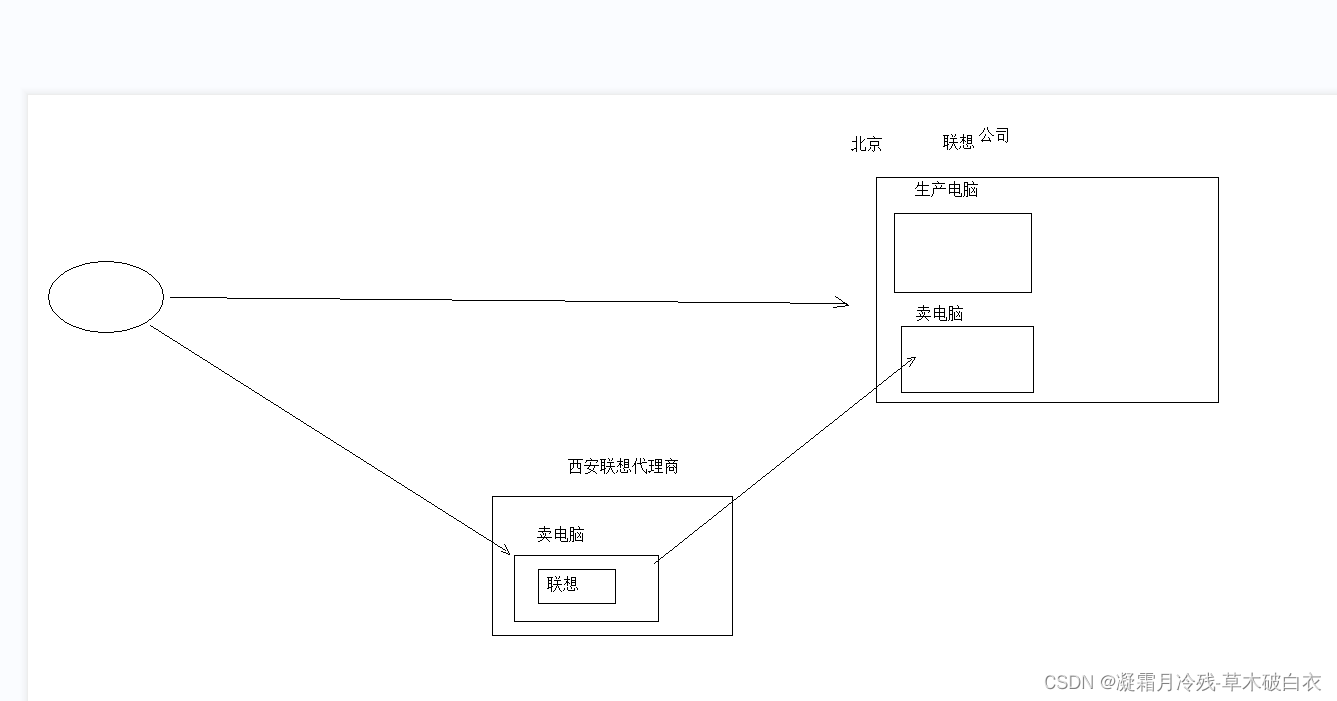
* 概念
1. 真实对象被代理的对象
2. 代理对象
3. 代理模式代理对象代理真实对象达到增强真实对象功能的目的
* 实现方式
1. 静态代理有一个类文件描述代理模式
2. 动态代理在内存中形成代理类
* 实现步骤
1. 代理对象和真实对象实现相同的接口
2. 代理对象 = Proxy.newProxyInstance();
3. 使用代理对象调用方法。
4. 增强方法
* 增强方式
1. 增强参数列表
2. 增强返回值类型
3. 增强方法体执行逻辑
SaleComputer 接口
package cn.itcast.proxy;

public interface SaleComputer {

    public String sale(double money);

    public void show();
}
SaleComputer 接口实现类
/**
 * 真实类
 */
public class Lenovo implements SaleComputer {
    @Override
    public String sale(double money) {

        System.out.println("花了"+money+"元买了一台联想电脑...");
        return "联想电脑";
    }

    @Override
    public void show() {
        System.out.println("展示电脑....");
    }
}
动态代理
public class ProxyTest {

    public static void main(String[] args) {
        //1.创建真实对象
        Lenovo lenovo = new Lenovo();

        //2.动态代理增强lenovo对象
        /*
            三个参数
                1. 类加载器真实对象.getClass().getClassLoader()
                2. 接口数组真实对象.getClass().getInterfaces()
                3. 处理器new InvocationHandler()
         */
        SaleComputer proxy_lenovo = (SaleComputer) Proxy.newProxyInstance(lenovo.getClass().getClassLoader(), lenovo.getClass().getInterfaces(), new InvocationHandler() {

            /*
                代理逻辑编写的方法代理对象调用的所有方法都会触发该方法执行
                    参数
                        1. proxy:代理对象
                        2. method代理对象调用的方法被封装为的对象
                        3. args:代理对象调用的方法时传递的实际参数
             */
            @Override
            public Object invoke(Object proxy, Method method, Object[] args) throws Throwable {
                /*System.out.println("该方法执行了....");
                System.out.println(method.getName());
                System.out.println(args[0]);


*/
                //判断是否是sale方法
                if(method.getName().equals("sale")){
                    //1.增强参数
                    double money = (double) args[0];
                    money = money * 0.85;
                    System.out.println("专车接你....");
                    //使用真实对象调用该方法
                    String obj = (String) method.invoke(lenovo, money);
                    System.out.println("免费送货...");
                    //2.增强返回值
                    return obj+"_鼠标垫";
                }else{
                    Object obj = method.invoke(lenovo, args);
                    return obj;
                }


            }
        });

        //3.调用方法

        String computer = proxy_lenovo.sale(8000);
        System.out.println(computer);

        proxy_lenovo.show();
    }
}
敏感词过滤器
/**
 * 敏感词汇过滤器
 */
@WebFilter("/*")
public class SensitiveWordsFilter implements Filter {


    public void doFilter(ServletRequest req, ServletResponse resp, FilterChain chain) throws ServletException, IOException {
        //1.创建代理对象增强getParameter方法

        ServletRequest proxy_req = (ServletRequest) Proxy.newProxyInstance(req.getClass().getClassLoader(), req.getClass().getInterfaces(), new InvocationHandler() {
            @Override
            public Object invoke(Object proxy, Method method, Object[] args) throws Throwable {
                //增强getParameter方法
                //判断是否是getParameter方法
                if(method.getName().equals("getParameter")){
                    //增强返回值
                    //获取返回值
                    String value = (String) method.invoke(req,args);
                    if(value != null){
                        for (String str : list) {
                            if(value.contains(str)){
                                value = value.replaceAll(str,"***");
                            }
                        }
                    }

                    return  value;
                }

                //判断方法名是否是 getParameterMap

                //判断方法名是否是 getParameterValue

                return method.invoke(req,args);
            }
        });

        //2.放行
        chain.doFilter(proxy_req, resp);
    }
    private List<String> list = new ArrayList<String>();//敏感词汇集合
    public void init(FilterConfig config) throws ServletException {

        try{
            //1.获取文件真实路径
            ServletContext servletContext = config.getServletContext();
            String realPath = servletContext.getRealPath("/WEB-INF/classes/敏感词汇.txt");
            //2.读取文件
            BufferedReader br = new BufferedReader(new FileReader(realPath));
            //3.将文件的每一行数据添加到list中
            String line = null;
            while((line = br.readLine())!=null){
                list.add(line);
            }

            br.close();

            System.out.println(list);

        }catch (Exception e){
            e.printStackTrace();
        }

    }

    public void destroy() {
    }

}
敏感词汇.txt 放在src目录下
傻瓜
笨蛋
Listener监听器
* 概念web的三大组件之一。
* 事件监听机制
* 事件 一件事情
* 事件源 事件发生的地方
* 监听器 一个对象
* 注册监听将事件、事件源、监听器绑定在一起。 当事件源上发生某个事件后执行监听器代码
* ServletContextListener:监听ServletContext对象的创建和销毁
* 方法
* void contextDestroyed(ServletContextEvent sce) ServletContext对象被销毁之前会调用该方法
* void contextInitialized(ServletContextEvent sce) ServletContext对象创建后会调用该方法
* 步骤
1. 定义一个类实现ServletContextListener接口
2. 复写方法
3. 配置
1. web.xml
<listener>
<listener-class>cn.itcast.web.listener.ContextLoaderListener</listener-class>
* 指定初始化参数<context-param>
<?xml version="1.0" encoding="UTF-8"?>
<web-app xmlns="http://xmlns.jcp.org/xml/ns/javaee"
         xmlns:xsi="http://www.w3.org/2001/XMLSchema-instance"
         xsi:schemaLocation="http://xmlns.jcp.org/xml/ns/javaee http://xmlns.jcp.org/xml/ns/javaee/web-app_3_1.xsd"
         version="3.1">
   <!-- <filter>
        <filter-name>demo1</filter-name>
        <filter-class>cn.itcast.web.filter.FilterDemo1</filter-class>
    </filter>
    <filter-mapping>
        <filter-name>demo1</filter-name>
        <url-pattern>/*</url-pattern>

    </filter-mapping>-->

   <!--
      配置监听器
   -->
   <listener>
      <listener-class>cn.itcast.web.listener.ContextLoaderListener</listener-class>
   </listener>

   <!-- 指定初始化参数 -->
   <context-param>
      <param-name>contextConfigLocation</param-name>
      <param-value>/WEB-INF/classes/applicationContext.xml</param-value>
   </context-param>

</web-app>
2. 注解
* @WebListener
@WebListener
public class ContextLoaderListener implements ServletContextListener {

    /**
     * 监听ServletContext对象创建的。ServletContext对象服务器启动后自动创建。
     *
     * 在服务器启动后自动调用
     * @param servletContextEvent
     */
    @Override
    public void contextInitialized(ServletContextEvent servletContextEvent) {
        //加载资源文件
        //1.获取ServletContext对象
        ServletContext servletContext = servletContextEvent.getServletContext();

        //2.加载资源文件
        String contextConfigLocation = servletContext.getInitParameter("contextConfigLocation");

        //3.获取真实路径
        String realPath = servletContext.getRealPath(contextConfigLocation);

        //4.加载进内存
        try{
            FileInputStream fis = new FileInputStream(realPath);
            System.out.println(fis);
        }catch (Exception e){
            e.printStackTrace();
        }
        System.out.println("ServletContext对象被创建了。。。");
    }

    /**
     * 在服务器关闭后ServletContext对象被销毁。当服务器正常关闭后该方法被调用
     * @param servletContextEvent
     */
    @Override
    public void contextDestroyed(ServletContextEvent servletContextEvent) {
        System.out.println("ServletContext对象被销毁了。。。");
    }
}
初始化文件: applicationContext.xml
<?xml version="1.0" encoding="UTF-8"?>
<bean></bean>