

Linux CentOS 8(HTTP的配置与管理)-CSDN博客
| 阿里云国内75折 回扣 微信号:monov8 |
| 阿里云国际,腾讯云国际,低至75折。AWS 93折 免费开户实名账号 代冲值 优惠多多 微信号:monov8 飞机:@monov6 |
Linux CentOS 8HTTP的配置与管理
目录
一、常见的 HTTPweb服务软件
-
Apache
Apache 可以运行在几乎所有广泛使用的计算机平台上。Apache 源于 NCSA httpd 服务器经过多次修改不仅简单、速度快、而且性能稳定还可以用来做代理服务器。 -
IIS
它是微软公司主推的服务器是一种 Web网页服务组件其中包括 Web 服务器、FTP 服务器、NNTP 服务器和 SMTP 服务器分别用于网页浏览、文件传输、新闻服务和邮件发送等方面它使得在网络包括互联网和局域网上发布信息成了一件很容易的事。它不是开源的。 -
Nginx
是一个高性能的 HTTP 和反向代理 web 服务器反向代理服务器位于用户与目标服务器之间但是对于用户而言反向代理服务器就相当于目标服务器即用户直接访问反向代理服务器就可以获得目标服务器的资源。在连接高并发的情况下Nginx 是 Apache 服务不错的替代品。能够支持高达 50,000 个并发连接数的响应。 -
Openrestry
一个基于 Nginx与 Lua 的可伸缩的高性能 Web 平台。360UPYUN阿里云新浪腾讯网去哪儿网酷狗音乐等都是 OpenResty 的深度用户。 -
Tengine
是淘宝基于Nginx开发的Web服务器项目。它在Nginx的基础上针对大访问量网站的需求添加了很多高级功能和特性。目的是打造一个高效、安全的Web平台。
二、基本的 Apache httpd 配置
1、安装Apache
[root@localhost ~]# yum -y install httpd

[root@localhost ~]# rpm -ql httpd | grep conf$       //查httpd的配置文件
与Apache服务器相关的主要目录和文件如下
/etc/httpd服务程序的根目录
/etc/httpd/conf/httpd.conf服务器的主配置文件
/var/www/html/网页文档的默认根目录网站根目录
/etc/init.d/httpd服务的控制脚本文件
/usr/sbin/httpd服务的主要执行程序
/var/log/httpd/access_log访问日志文件
/var/log/httpd/error_log错误日志文件
2、修改配置文件
[root@localhost ~]# vim /etc/httpd/conf/httpd.conf
3、建立测试网站
[root@localhost ~]# cd /var/www/html/
[root@localhost html]# echo“This is my Website!!” > index.html
4、检查Selinux上下文
[root@localhost ~]# chcon –R -t httpd_sys_content_t /var/www/html/index.html
或
[root@localhost ~]# restorecon –R /var/www/html/
//文件和目录的SELinux信息不匹配时使用restorecon来恢复网页主目录中所有文件的SELinux配置信息

如果网站文档存放在在其他目录如放在/opt/www目录则需要
[root@localhost ~]# semanage fcontext -a -t httpd_sys_content_t ‘/opt/www(/.*)?’
5、启动服务
[root@localhost ~]# systemctl enable httpd
[root@localhost ~]# systemctl start httpd
6、放通防火墙服务
[root@localhost~]# firewall-cmd --permanent --add-service=http --add-service=https
或
[root@localhost~]# firewall-cmd --permanent --add-port=80/tcp --add-port=443/tcp
//http和https的端口号分别为80和443
[root@localhost ~]# firewall-cmd --reload
7、测试
[root@localhost ~]# curl 192.168.21.128
This is my Website!!
三、httpd.conf 配置文件详解
1.切换到 /etc/httpd/conf 目录查看全局环境配置文件内容如图2-1所示。
[root@localhost ~]# grep -v '#' httpd.conf | grep -v '^$'
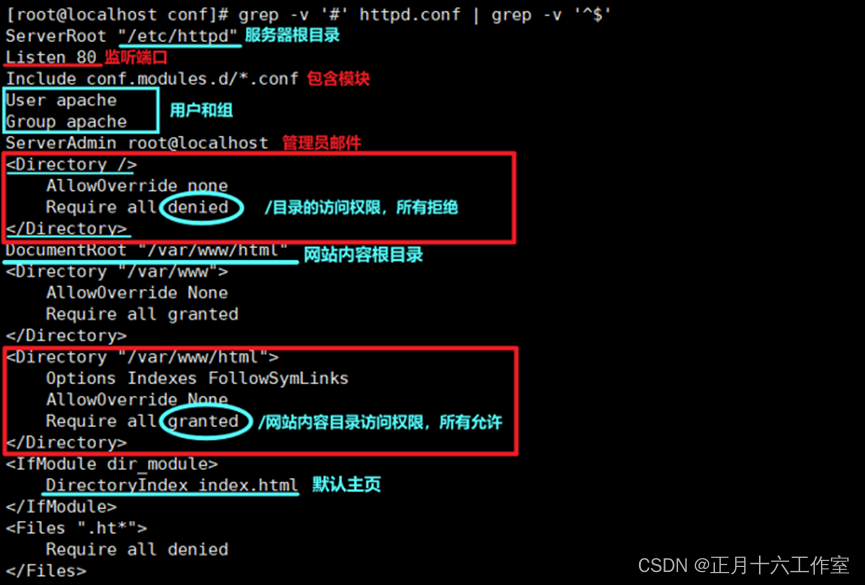
参数解析
-
ServerRoot用于指定Apache的运行目录httpd服务器的根目录包括了运行站点必需的目录和文件。服务启动之后自动将目录改变为当前目录在后面使用到的所有相对路径都是相对这个目录下。
-
Listen用于设置服务器监听的网络端口号默认为80。如有多块网卡默认监听所有网卡。
-
User/Group apache: 启动服务后转换的用户/组身份在启动服务时通常以root身份然后转换身份增加系统安全性。
-
ServerAdmin用于设置服务器管理员的E-Mail地址可以通过此地址及时联系服务器管理员。
-
ServerName 服务器名称完整主机名默认是不需要指定的服务器通过名字解析过程来获得自己的名字。
-
DocumentRoot网页文件存放的目录。
-
DircectoryIndex: 指定访问的主页的默认主页名字可以设置多个文件默认首页文件名为index.html。
-
ErrorLog错误日志存放的位置。
-
LogLevelApache日志的级别。
-
CustomLog说明日志记录的位置这里面使用了相对路径所以ServerRoot需要指出日志位置就存放在/etc/httpd/logs。
命令解析
[root@localhost ~]# cd /etc/httpd/conf
[root@localhost conf]# grep -v '#' httpd.conf | grep -v '^$'
#    -v 反选      ^ 以开头      $ 以结尾     ^$ 过滤空白符
注以上配置项是文件中最主要的全局配置项其他的配置项如需要使用可以查看服务器中的相关手册文档。以上详情部分来自https://www.cnblogs.com/carbon3/p/5616417.html
2、httpd.conf中的区域设置
控制目录的访问权限
<Directory "/var/www">
          AllowOverride None
          Require all granted
</Directory>

Require指令用于指定允许、拒绝列表
Require {all | local | ip | host} {granted | denied | 域名}
Require all granted    //允许所有访问
Require all denied      //拒绝所有访问
Require local           //允许本机访问
Require ip 10.0.0.1     //允许10.0.0.1这个地址访问
Require not ip 10.0.0.1     //不允许10.0.0.1这个地址访问

//如果是一条规则可以直接使用但是如果有多条规则则必须把这些规则包含在如下元素当中
举例1允许所有访问只拒绝10.0.0.1访问
                <RequireAll>
                    Require all granted
                    Require not ip 10.0.0.1
                </RequireAll>
举例2拒绝所有访问只允许10.0.0.1访问
                <RequireAny>
                    Require all denied
                    Require ip 10.0.0.1
                </RequireAny>
案例1
新建一个 web 站点网站内容放在/web目录且不允许 192.168.21.129访问允许其他所有访问。服务器名称 www.example.com发布端口82。构建过程参考如下
1、 修改主机名
[root@localhost ~]# hostnamectl set-hostname www.example.com
2、 域名解析
[root@www ~]# vim /etc/hosts
192.168.12.128   www.example.com   www
3、 创建站点的网页文件
[root@www ~]# mkdir /web
[root@www ~]# echo "This is a web dir" > /web/index.html
[root@www ~]# echo "This is a 1 dir" > /web/1.html
4、 安装httpd服务
[root@www ~]# yum -y install httpd
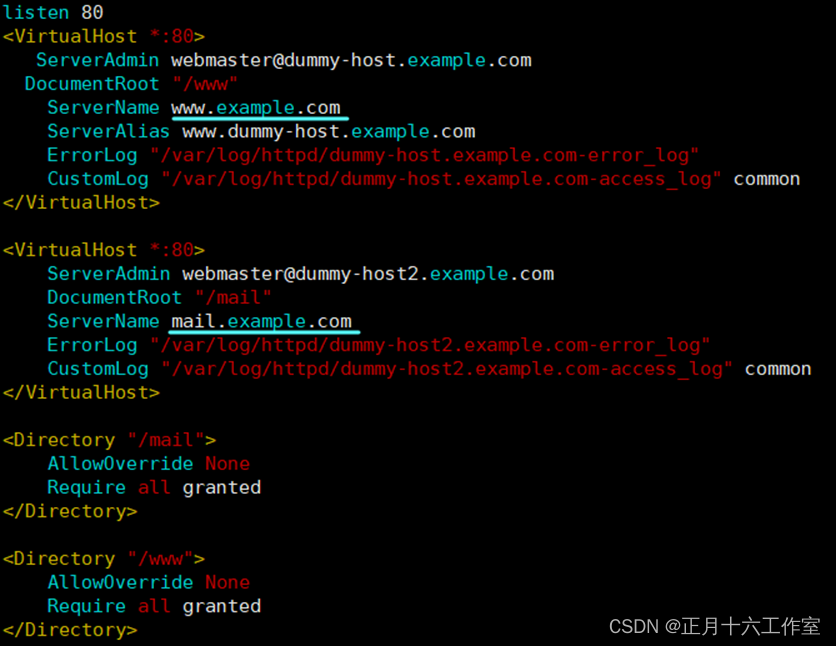
5、 修改主配置文件如图2-2
[root@www ~]# vim /etc/httpd/conf/httpd.conf

6、 开启httpd服务
[root@www ~]# systemctl enable httpd
[root@www ~]# systemctl start httpd
7、 修改文件安全上下文
[root@www ~]# chcon –R -t httpd_sys_content_t /web/index.html
[root@www ~]# chcon –R -t httpd_sys_content_t /web/1.html
8、 放通防火墙服务
[root@www ~]# firewall-cmd --permanent --add-service=82/tcp
[root@www ~]# firewall-cmd --reload
[root@www ~]# setenforce 0
9、 测试
1本机测试
[root@www ~]# curl 192.168.21.128:82
This is a web dir
[root@www ~]# curl 192.168.21.128:82/1.html
This is a 1 dir
2客户端IP地址为192.168.12.129测试
[root@localhost ~]# curl 192.168.12.128:82
curl: (7) Couldn't connect to server
[root@localhost ~]# curl 192.168.12.128:82/1.html
curl: (7) Couldn't connect to server
四、配置虚拟主机在一台主机发布多个站点
配置虚拟主机有三种方法
1、基于IP服务器上配多个IP一个IP发布一个站点(一般不用
192.168.12.128
192.168.12.129
2、基于端口相同IP+不同端口。
192.168.12.128:80
192.168.12.128:82
192.168.12.128:8080
3、基于域名虚拟主机相同IP+相同端口+不同主机名最常用
www.example.com 192.168.12.128:80
mail.example.com 192.168.12.128:80
案例2
本案例以实现两台虚拟主机www.example.com和mail.example.com为例其对应的服务器IP地址为192.168.12.128构建过程参考如下
1、 域名解析
[root@localhost ~]#  vim /etc/hosts
192.168.12.128   www.example.com  www
192.168.12.128   mail.example.com  mail
2、 创建虚拟站点的网页文件
[root@localhost ~]# mkdir /www /mail
[root@localhost ~]# echo www.example.com  > /www/index.html

[root@localhost ~]# echo mail.example.com > /mail/index.html
3、 制虚拟主机样版文件
[root@localhost ~]# cp /usr/share/doc/httpd/httpd-vhosts.conf /etc/httpd/conf.d/
4、 修改配置文件如图3-1
[root@localhost ~]# vim /etc/httpd/conf.d/httpd-vhosts.conf
5、 重启服务
[root@localhost ~]# systemctl restart httpd
6、 放通防火墙服务
[root@localhost ~]# firewall-cmd --permanent --add-service=80/tcp
[root@localhost ~]# firewall-cmd --reload
[root@localhost ~]# setenforce 0
7、测试
1主机测试
[root@localhost ~]# curl www.example.com
www.example.com
[root@localhost ~]# curl mail.example.com
mail.example.com
[root@localhost ~]# curl 192.168.12.128
www.example.com
注网站内容与/etc/httpd/conf.d/httpd-vhosts.conf的虚拟主机顺序有关图3-2中SeverName为www.example.com写在前。
2客户端IP为192.168.21.129测试
[root@localhost ~]# curl www.example.com
curl: (6) Could not resolve host: www.example.com

#客户端不能把域名解析成对应的IP需要在hosts文件内添加域名与IP的映射。

[root@localhost ~]# vim /etc/hosts
192.168.12.128   www.example.com   www
192.168.12.128   mail.example.com  mail

[root@localhost ~]# curl www.example.com
www.example.com

[root@localhost ~]# curl mail.example.com
mail.example.com
制作成员 何嘉愉
排版 裕新
初审 杨佳佳
复审 二月二
| 阿里云国内75折 回扣 微信号:monov8 |
| 阿里云国际,腾讯云国际,低至75折。AWS 93折 免费开户实名账号 代冲值 优惠多多 微信号:monov8 飞机:@monov6 |