

【图文详解】搭建 Spring Authorization Server + Resource + Client 完整Demo
| 阿里云国内75折 回扣 微信号:monov8 |
| 阿里云国际,腾讯云国际,低至75折。AWS 93折 免费开户实名账号 代冲值 优惠多多 微信号:monov8 飞机:@monov6 |
一个完整的Demo,有认证端,有资源端,有客户端;采用当前最新的技术。
非常感谢 码农小胖哥,仔细研读了他的很多文章。本项目中的很多逻辑和代码都源自于他。如果想深入学习OAuth2,强烈建议关注胖哥。
1、项目概述
1.1、概述
Server + Resource + Client
功能完善:
- 授权中心Server: 进行认证、授权,并发放token、刷新token,不负责token鉴权(由资源服务器自行鉴权);
- 资源服务器Resource:提供资源,需要携带token请求,可以自行鉴权;
- 客户端Client:面向用户的操作入口;向Server请求token,携带token访问Resource;
实现单点登录;让授权和鉴权解耦;所有授权操作统一由授权中心完成,资源服务(各微服务)只需要鉴别请求的权限,不需要关心它的权限哪里获取。
获取token的模式:授权码模式(用于用户访问资源)、客户端模式(用于微服务间相互访问)。
项目只关注核心流程,尽可能剥离无关的实现;如:数据库操作仅在授权中心中实现(jdbc),其余地方采用模拟数据。
在一些细节的实现上有不错的地方,也有不少拙的地方,欢迎批评指正。
各模块可以分别部署;本项目为了测试方便,采用单机部署。
由于oauth2底层实现错综复杂,想完全搞懂太难。本项目侧重于需求实现,并尽可能剖析原理。在demo的前提下,再深入理解领会底层。没有demo,一开始就想深入底层,这个路很难。
本人对学习oauth2总结的一点拙见:
1、先对oauth2有个总体上的认识,能说出个123来
2、再着力实现一个相对完整的demo
3、然后再结合实际需求,不断地debug,不断地优化,在此过程中学习的深度也得到了加强
1.2、整体架构图
整体架构图;具体实现中会有细节图
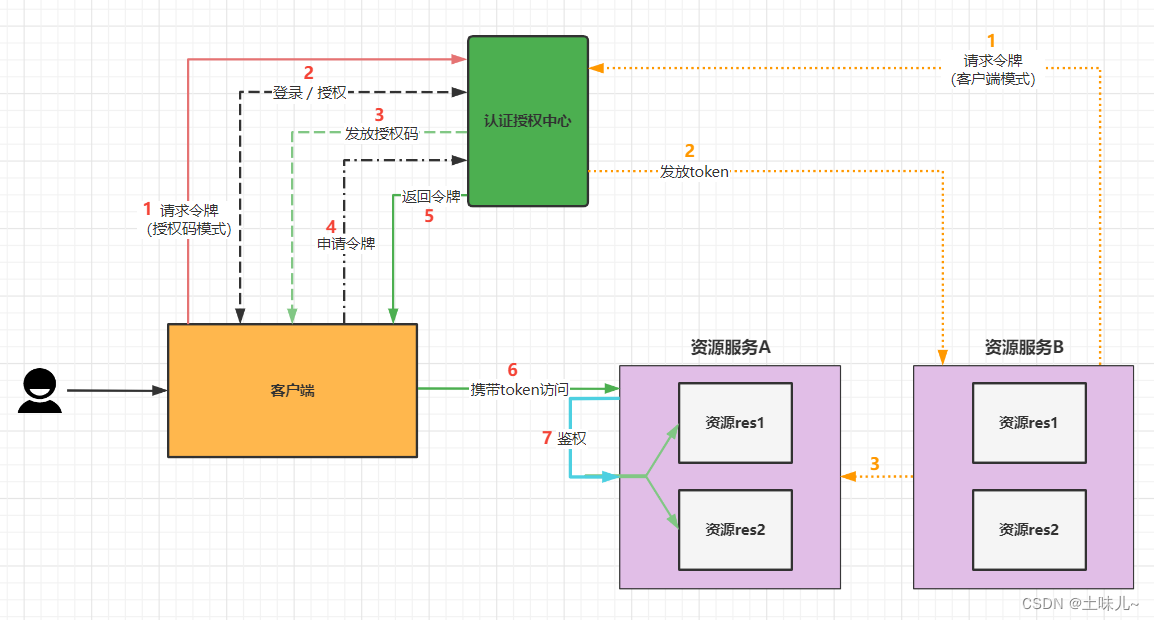
- 授权码模式:适用于用户访问;需要登录/授权,发放授权码,申请令牌,刷新令牌等等
- 客户端模式:适用于微服务(资源)间的相互访问;请求时只需要提供客户端ID、密钥,直接发放令牌
1.3、搭建环境
- Spring Security 5.6.3 (Client/Resource)
- Spring Authorization Server 0.2.3
- Spring Boot 2.6.7
- jdk 1.8
- mysql 5.7
- lombok、log4j、fastjson2 …
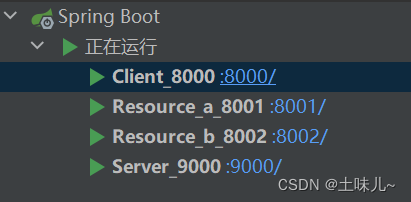
2、项目结构搭建
| 模块 | 端口 | 说明 |
|---|---|---|
| oauth2-server-resource-client | — | 父工程 |
| oauth2-client-8000 | 8000 | 项目首页(oauth2客户端) |
| oauth2-server-9000 | 9000 | 认证授权中心(oauth2服务端) |
| oauth2-resource-a-8001 | 8001 | 微服务A(oauth2资源服务器),受保护对象 |
| oauth2-resource-b-8002 | 8002 | 微服务B(oauth2资源服务器),受保护对象 |
2.1、父工程
创建普通meven工程 oauth2-server-resource-client;打包格式pom,删除 src
- pom.xml
<?xml version="1.0" encoding="UTF-8"?><project xmlns="http://maven.apache.org/POM/4.0.0"
         xmlns:xsi="http://www.w3.org/2001/XMLSchema-instance"
         xsi:schemaLocation="http://maven.apache.org/POM/4.0.0 http://maven.apache.org/xsd/maven-4.0.0.xsd">
    <modelVersion>4.0.0</modelVersion>

    <groupId>com.tuwer</groupId>
    <artifactId>oauth2-server-resource-client</artifactId>
    <version>1.0-SNAPSHOT</version>
    <packaging>pom</packaging>

    <properties>
        <maven.compiler.source>8</maven.compiler.source>
        <maven.compiler.target>8</maven.compiler.target>
        <mysql-connector-java.version>8.0.29</mysql-connector-java.version>
        <lombok.version>1.18.22</lombok.version>
        <log4j.version>1.2.17</log4j.version>
        <fastjson2.version>2.0.3</fastjson.version>
        <commons-lang.version>2.6</commons-lang.version>
    </properties>
    <dependencyManagement>
        <dependencies>
            <!--spring-cloud-dependencies-->
            <dependency>
                <groupId>org.springframework.cloud</groupId>
                <artifactId>spring-cloud-dependencies</artifactId>
                <version>2021.0.0</version>
                <type>pom</type>
                <scope>import</scope>
            </dependency>
            <!-- spring-boot-dependencies-->
            <dependency>
                <groupId>org.springframework.boot</groupId>
                <artifactId>spring-boot-dependencies</artifactId>
                <version>2.6.7</version>
                <type>pom</type>
                <!--<scope>provided</scope>-->
                <scope>import</scope>
            </dependency>
            <!-- Spring Security OAuth2 依赖 -->
            <!-- 授权服务器 Spring Authorization Server-->
            <dependency>
                <groupId>org.springframework.security</groupId>
                <artifactId>spring-security-oauth2-authorization-server</artifactId>
                <version>0.2.3</version>
            </dependency>
            <!-- mysql-connector-java -->
            <dependency>
                <groupId>mysql</groupId>
                <artifactId>mysql-connector-java</artifactId>
                <version>${mysql-connector-java.version}</version>
            </dependency>
            <!--fastjson-->
            <dependency>
                <groupId>com.alibaba.fastjson2</groupId>
                <artifactId>fastjson2</artifactId>
                <version>${fastjson2.version}</version>
            </dependency>
            <!--lombok-->
            <dependency>
                <groupId>org.projectlombok</groupId>
                <artifactId>lombok</artifactId>
                <version>${lombok.version}</version>
            </dependency>
            <!--日志-->
            <dependency>
                <groupId>log4j</groupId>
                <artifactId>log4j</artifactId>
                <version>${log4j.version}</version>
            </dependency>
            <!-- StringUtils -->
            <dependency>
                <groupId>commons-lang</groupId>
                <artifactId>commons-lang</artifactId>
                <version>${commons-lang.version}</version>
            </dependency>
        </dependencies>
    </dependencyManagement></project>
2.2、子模块
全部在父工程下创建,maven普通模块

3、资源服务初步实现
初步实现就是不包括安全策略的实现。
该部分不详细说明。可参考:SpringCloud_土味儿~的博客-CSDN博客
3.1、微服务A(资源服务器)
3.1.1、pom.xml
<?xml version="1.0" encoding="UTF-8"?><project xmlns="http://maven.apache.org/POM/4.0.0"
         xmlns:xsi="http://www.w3.org/2001/XMLSchema-instance"
         xsi:schemaLocation="http://maven.apache.org/POM/4.0.0 http://maven.apache.org/xsd/maven-4.0.0.xsd">
    <parent>
        <artifactId>oauth2-server-resource-client</artifactId>
        <groupId>com.tuwer</groupId>
        <version>1.0-SNAPSHOT</version>
    </parent>
    <modelVersion>4.0.0</modelVersion>

    <artifactId>oauth2-resource-a-8001</artifactId>

    <properties>
        <maven.compiler.source>8</maven.compiler.source>
        <maven.compiler.target>8</maven.compiler.target>
    </properties>
    <dependencies>
        <dependency>
            <groupId>org.springframework.boot</groupId>
            <artifactId>spring-boot-starter-web</artifactId>
        </dependency>
        <dependency>
                <groupId>com.alibaba.fastjson2</groupId>
                <artifactId>fastjson2</artifactId>
            </dependency>
        <dependency>
        <dependency>
            <groupId>org.projectlombok</groupId>
            <artifactId>lombok</artifactId>
        </dependency>
    </dependencies></project>
3.1.2、application.yml
server:
  port: 8001spring:
  application:
    # 应用名称
    name: oauth2-resource-a-8001
3.1.3、启动类
@SpringBootApplicationpublic class Resource_a_8001 {
    public static void main(String[] args) {
        SpringApplication.run(Resource_a_8001.class, args);
    }}
3.1.4、工具类Result.java
package com.tuwer.util;import lombok.AccessLevel;import lombok.Data;import lombok.Setter;import java.time.LocalDateTime;/**
 * <p>结果对象</p>
 *
 * @author 土味儿
 * Date 2022/5/18
 * @version 1.0
 * -----------
 * //@Setter(AccessLevel.NONE) 表示禁用set方法,防止篡改结果
 */@Data@Setter(AccessLevel.NONE)public class Result {
    /**
     * 返回码
     */
    private Integer code;
    /**
     * 数据
     */
    private Object data;
    /**
     * 时间
     */
    private LocalDateTime time;

    public Result(Integer code,Object data){
        this.code = code;
        this.data = data;
        this.time = LocalDateTime.now();
    }}
3.1.5、服务接口Controller
package com.tuwer.api;import com.alibaba.fastjson2.JSON;import com.tuwer.util.Result;import org.springframework.web.bind.annotation.GetMapping;import org.springframework.web.bind.annotation.RestController;import java.time.LocalDateTime;/**
* @author 土味儿
* Date 2022/5/18
* @version 1.0
*/@RestControllerpublic class ResourceController {
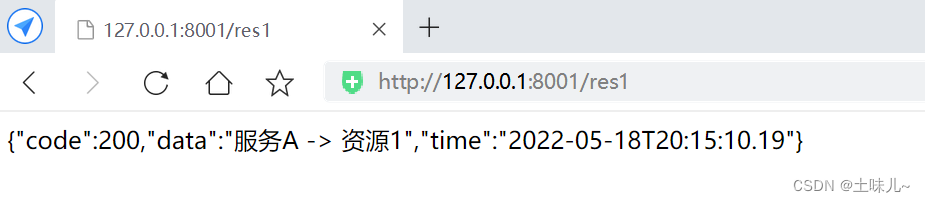
@GetMapping("/res1")
public String getRes1(){
return JSON.toJSONString(new Result(200, "服务A -> 资源1"));
}
@GetMapping("/res2")
public String getRes2(){
return JSON.toJSONString(new Result(200, "服务A -> 资源2"));
}}
3.1.6、测试
3.2、微服务B(资源服务器)
类似服务A;省略
4、搭建授权服务器
4.1、hosts中映射IP
这是前期自已遇到的一个坑!为查找原因,头都大了…
由于客户端向授权服务器申请授权过程中,需要有多次的重定向操作,但是同一域名下多端口网站共享cookie,会造成授权失败!
解决方案:在hosts文件指定授权服务器的IP映射(需要对hosts有操作权限)
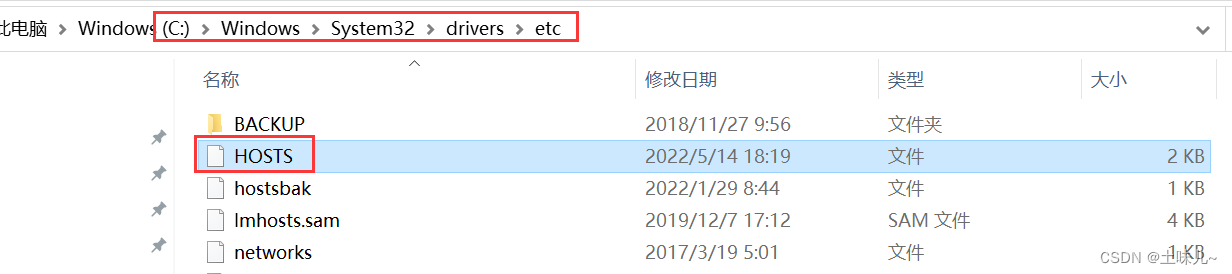
# 在文件中添加; os.com 就是自已的授权服务器域名127.0.0.1 os.com4.2、pom.xml
<?xml version="1.0" encoding="UTF-8"?><project xmlns="http://maven.apache.org/POM/4.0.0"
         xmlns:xsi="http://www.w3.org/2001/XMLSchema-instance"
         xsi:schemaLocation="http://maven.apache.org/POM/4.0.0 http://maven.apache.org/xsd/maven-4.0.0.xsd">
    <parent>
        <artifactId>oauth2-server-resource-client</artifactId>
        <groupId>com.tuwer</groupId>
        <version>1.0-SNAPSHOT</version>
    </parent>
    <modelVersion>4.0.0</modelVersion>

    <artifactId>oauth2-server-9000</artifactId>

    <properties>
        <maven.compiler.source>8</maven.compiler.source>
        <maven.compiler.target>8</maven.compiler.target>
    </properties>
    <dependencies>
        <!-- 授权服务 -->
        <dependency>
            <groupId>org.springframework.security</groupId>
            <artifactId>spring-security-oauth2-authorization-server</artifactId>
        </dependency>
        <!-- 资源服务可以省略;因为oauth2-authorization-server中已经存在 --><!--        <dependency>
            <groupId>org.springframework.security</groupId>
            <artifactId>spring-security-oauth2-resource-server</artifactId>
        </dependency>-->
        <!-- web -->
        <dependency>
            <groupId>org.springframework.boot</groupId>
            <artifactId>spring-boot-starter-web</artifactId>
        </dependency>
        <!--  数据库 -->
        <dependency>
            <groupId>org.springframework.boot</groupId>
            <artifactId>spring-boot-starter-jdbc</artifactId>
        </dependency>
        <dependency>
            <groupId>mysql</groupId>
            <artifactId>mysql-connector-java</artifactId>
        </dependency>
        <!--lombok-->
        <dependency>
            <groupId>org.projectlombok</groupId>
            <artifactId>lombok</artifactId>
        </dependency>
</dependencies></project>- 如果 jks、cer文件在编译时出错,可以尝试在pom.xml中加入下面代码。这也是一个坑,之前遇到过,排查花了很多时间。现在采用新的JWT实现(Nimbus),这个问题好像不存在了…
<build>
<resources>
<resource>
<directory>src/main/resources</directory>
<filtering>true</filtering>
<excludes>
<exclude>**/*.jks</exclude>
<exclude>**/*.cer</exclude>
</excludes>
</resource>
<resource>
<directory>src/main/resources</directory>
<filtering>false</filtering>
<includes>
<include>**/*.jks</include>
<include>**/*.cer</include>
</includes>
</resource>
</resources>
<plugins>
<plugin>
<!-- 打包插件 -->
<groupId>org.springframework.boot</groupId>
<artifactId>spring-boot-maven-plugin</artifactId>
</plugin>
</plugins>
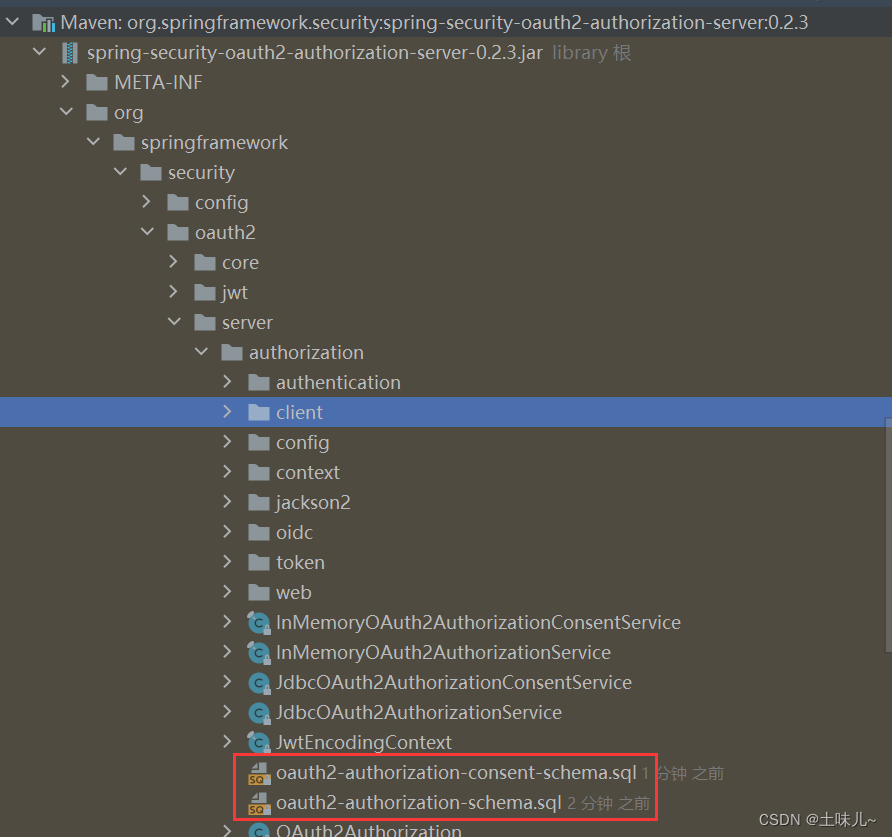
</build>4.3、建数据库表
数据库:oauth2-server-resource-client
这些建表语句由官方提供

-- Spring Authorization Server Mysql DDL-- 保存注册的客户端CREATE TABLE oauth2_registered_client(
    id                            varchar(100)                            NOT NULL,
    client_id                     varchar(100)                            NOT NULL,
    client_id_issued_at           timestamp     DEFAULT CURRENT_TIMESTAMP NOT NULL,
    client_secret                 varchar(200)  DEFAULT NULL,
    client_secret_expires_at      timestamp     DEFAULT NULL,
    client_name                   varchar(200)                            NOT NULL,
    client_authentication_methods varchar(1000)                           NOT NULL,
    authorization_grant_types     varchar(1000)                           NOT NULL,
    redirect_uris                 varchar(1000) DEFAULT NULL,
    scopes                        varchar(1000)                           NOT NULL,
    client_settings               varchar(2000)                           NOT NULL,
    token_settings                varchar(2000)                           NOT NULL,
    PRIMARY KEY (id));-- 记录用户确认授权记录CREATE TABLE oauth2_authorization_consent(
    registered_client_id varchar(100)  NOT NULL,
    principal_name       varchar(200)  NOT NULL,
    authorities          varchar(1000) NOT NULL,
    PRIMARY KEY (registered_client_id, principal_name));-- 记录发放令牌记录CREATE TABLE oauth2_authorization(
    id                            varchar(100) NOT NULL,
    registered_client_id          varchar(100) NOT NULL,
    principal_name                varchar(200) NOT NULL,
    authorization_grant_type      varchar(100) NOT NULL,
    attributes                    blob          DEFAULT NULL,
    state                         varchar(500)  DEFAULT NULL,
    authorization_code_value      blob          DEFAULT NULL,
    authorization_code_issued_at  timestamp     DEFAULT NULL,
    authorization_code_expires_at timestamp     DEFAULT NULL,
    authorization_code_metadata   blob          DEFAULT NULL,
    access_token_value            blob          DEFAULT NULL,
    access_token_issued_at        timestamp     DEFAULT NULL,
    access_token_expires_at       timestamp     DEFAULT NULL,
    access_token_metadata         blob          DEFAULT NULL,
    access_token_type             varchar(100)  DEFAULT NULL,
    access_token_scopes           varchar(1000) DEFAULT NULL,
    oidc_id_token_value           blob          DEFAULT NULL,
    oidc_id_token_issued_at       timestamp     DEFAULT NULL,
    oidc_id_token_expires_at      timestamp     DEFAULT NULL,
    oidc_id_token_metadata        blob          DEFAULT NULL,
    refresh_token_value           blob          DEFAULT NULL,
    refresh_token_issued_at       timestamp     DEFAULT NULL,
    refresh_token_expires_at      timestamp     DEFAULT NULL,
    refresh_token_metadata        blob          DEFAULT NULL,
    PRIMARY KEY (id));
4.4、application.yml
server:
  port: 9000spring:
  application:
    # 应用名称
    name: oauth2-server-9000

  datasource:
    driver-class-name: com.mysql.cj.jdbc.Driver    url: jdbc:mysql://127.0.0.1:3306/oauth2-server-resource-client?useUnicode=true&characterEncoding=utf8&zeroDateTimeBehavior=convertToNull&useSSL=true&serverTimezone=GMT%2B8
    username: root    password: 123456
4.5、生成jks和cer
- 打开cmd,切换至目标目录
- 创建密钥库
# keystore格式
# 密码统一为:123456
# 别名:mykey
keytool -genkeypair -alias mykey -keyalg RSA -keysize 2048 -validity 365 -keystore mykey.keystore
# 参数解释:
# storepass  keystore文件存储密码,不加这个参数会在后面要求你输入密码
# keypass  私钥加解密密码
# alias  实体别名(包括证书私钥)
# dname  证书个人信息
# keyalg  采用公钥算法,默认是DSA,这里采用RSA
# keysize  密钥长度(DSA算法对应的默认算法是sha1withDSA,不支持2048长度,此时需指定RSA)
# validity  有效期
# keystore  指定keystore文件储存位置
# jks格式
# 密码统一为:123456
# 别名:myjks
keytool -genkeypair -alias myjks -keyalg RSA -validity 365 -keystore myjks.jks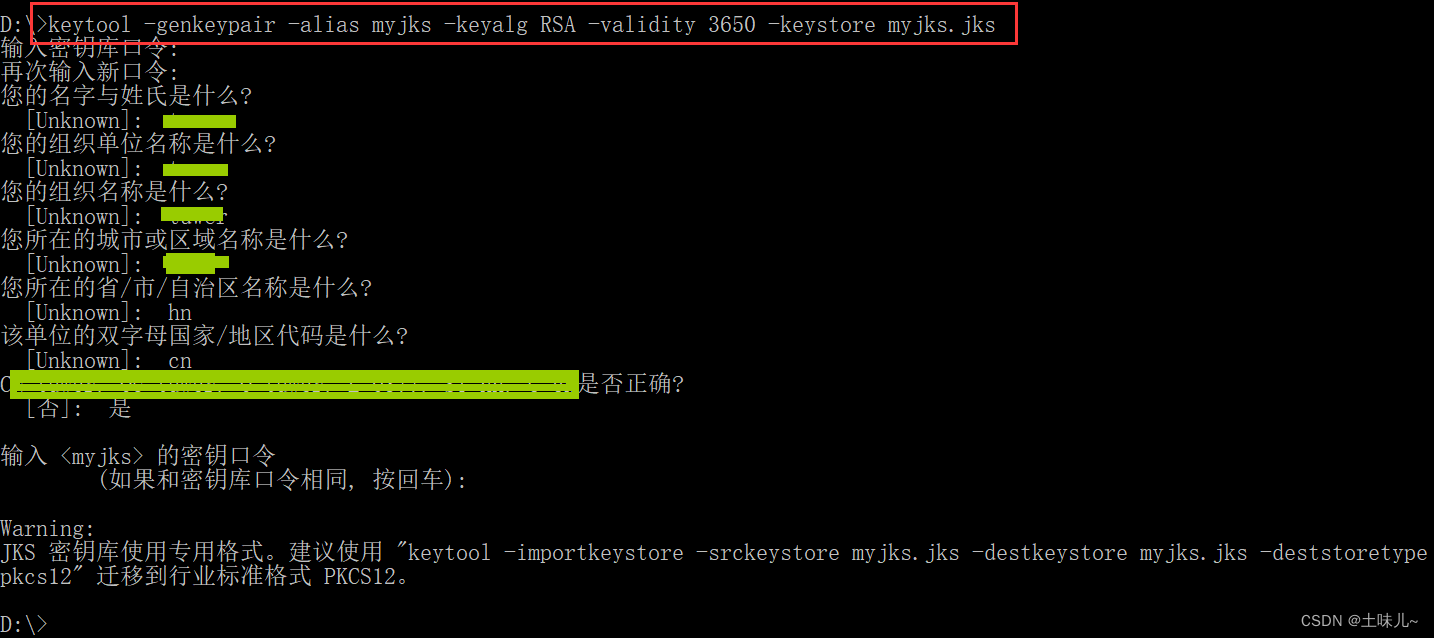
- 查看密钥库
# keystore格式
keytool -v -list -keystore myjks.keystore
# jks格式
keytool -v -list -keystore myjks.jks- 导出本地证书cer
# keystore格式导出
keytool -exportcert -keystore  myjks.keystore -file myjks.cer -alias myjks
# 参数解释:
# -export  表示证书导出操作
# -keystore  指定秘钥库文件
# -file  指定导出文件路径
# -storepass  输入密码
# -rfc  指定以Base64编码格式输出
# jks格式导出
keytool -exportcert -keystore myjks.jks -file myjks.cer -alias myjks

- 打印cer证书
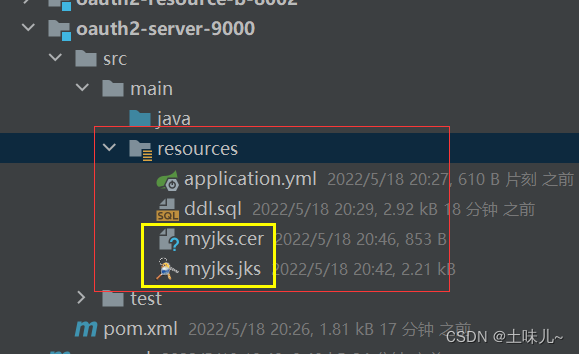
Keytool -printcert -file myjks.cer复制生成的
myjks.jks、myjks.cer到授权服务器的资源路径下;jks用于生成token时加密,cer用于解析token时解密
4.6、主启动类
@SpringBootApplicationpublic class Server_9000 {
    public static void main(String[] args) {
        SpringApplication.run(Server_9000.class, args);
    }}
4.7、安全策略配置
访问认证服务器的一些安全措施
package com.tuwer.config;import lombok.SneakyThrows;import org.springframework.context.annotation.Bean;import org.springframework.core.io.ClassPathResource;import org.springframework.security.config.annotation.web.builders.HttpSecurity;import org.springframework.security.config.annotation.web.configuration.EnableWebSecurity;import org.springframework.security.config.annotation.web.configuration.WebSecurityCustomizer;import org.springframework.security.core.userdetails.User;import org.springframework.security.core.userdetails.UserDetails;import org.springframework.security.core.userdetails.UserDetailsService;import org.springframework.security.crypto.factory.PasswordEncoderFactories;import org.springframework.security.oauth2.jwt.JwtDecoder;import org.springframework.security.oauth2.jwt.NimbusJwtDecoder;import org.springframework.security.provisioning.InMemoryUserDetailsManager;import org.springframework.security.web.SecurityFilterChain;import java.security.cert.Certificate;import java.security.cert.CertificateFactory;import java.security.interfaces.RSAPublicKey;/**
 * <p>授权服务器安全策略</p>
 *
 * @author 土味儿
 * Date 2022/5/10
 * @version 1.0
 */@EnableWebSecurity(debug = true)public class DefaultSecurityConfig {
    /**
     * 配置 请求授权
     *
     * @param http
     * @return
     * @throws Exception
     */
    @Bean
    SecurityFilterChain defaultSecurityFilterChain(HttpSecurity http) throws Exception {
        // 配置 请求授权
        http.authorizeRequests(authorizeRequests ->
                // 任何请求都需要认证(不对未登录用户开放)
                authorizeRequests.anyRequest().authenticated()
            )
                // 表单登录
                .formLogin()
            .and()
                .logout()
            .and()
                .oauth2ResourceServer().jwt();
        return http.build();
    }

    /**
     * 模拟用户
     *
     * @return
     */
    @Bean
    UserDetailsService users() {
        UserDetails user = User.builder()
                .username("admin")
                .password("123456")
                .passwordEncoder(PasswordEncoderFactories.createDelegatingPasswordEncoder()::encode)
                .roles("USER")
                //.authorities("SCOPE_userinfo")
                .build();
        return new InMemoryUserDetailsManager(user);
    }

    /**
     * jwt解码器
     * 客户端认证授权后,需要访问user信息,解码器可以从令牌中解析出user信息
     *
     * @return
     */
    @SneakyThrows
    @Bean
    JwtDecoder jwtDecoder() {
        CertificateFactory certificateFactory = CertificateFactory.getInstance("x.509");
        // 读取cer公钥证书来配置解码器
        ClassPathResource resource = new ClassPathResource("myjks.cer");
        Certificate certificate = certificateFactory.generateCertificate(resource.getInputStream());
        RSAPublicKey publicKey = (RSAPublicKey) certificate.getPublicKey();
        return NimbusJwtDecoder.withPublicKey(publicKey).build();
    }

    /**
     * 开放一些端点的访问控制
     * 不需要认证就可以访问的端口
     * @return
     */
    //@Bean/*    WebSecurityCustomizer webSecurityCustomizer() {
        return web -> web.ignoring().antMatchers("/actuator/health", "/actuator/info");
    }*/}
4.8、授权策略配置
核心类:用于授权、生成令牌;注册客户端,向数据库保存操作记录
package com.tuwer.config;import com.nimbusds.jose.jwk.JWKSet;import com.nimbusds.jose.jwk.RSAKey;import com.nimbusds.jose.jwk.source.JWKSource;import com.nimbusds.jose.proc.SecurityContext;import lombok.SneakyThrows;import org.springframework.context.annotation.Bean;import org.springframework.context.annotation.Configuration;import org.springframework.core.Ordered;import org.springframework.core.annotation.Order;import org.springframework.core.io.ClassPathResource;import org.springframework.jdbc.core.JdbcTemplate;import org.springframework.security.config.annotation.web.builders.HttpSecurity;import org.springframework.security.config.annotation.web.configurers.oauth2.server.authorization.OAuth2AuthorizationServerConfigurer;import org.springframework.security.crypto.factory.PasswordEncoderFactories;import org.springframework.security.oauth2.core.AuthorizationGrantType;import org.springframework.security.oauth2.core.ClientAuthenticationMethod;import org.springframework.security.oauth2.core.oidc.OidcScopes;import org.springframework.security.oauth2.server.authorization.JdbcOAuth2AuthorizationConsentService;import org.springframework.security.oauth2.server.authorization.JdbcOAuth2AuthorizationService;import org.springframework.security.oauth2.server.authorization.OAuth2AuthorizationConsentService;import org.springframework.security.oauth2.server.authorization.OAuth2AuthorizationService;import org.springframework.security.oauth2.server.authorization.client.JdbcRegisteredClientRepository;import org.springframework.security.oauth2.server.authorization.client.RegisteredClient;import org.springframework.security.oauth2.server.authorization.client.RegisteredClientRepository;import org.springframework.security.oauth2.server.authorization.config.ClientSettings;import org.springframework.security.oauth2.server.authorization.config.ProviderSettings;import org.springframework.security.oauth2.server.authorization.config.TokenSettings;import org.springframework.security.web.SecurityFilterChain;import org.springframework.security.web.util.matcher.RequestMatcher;import java.security.KeyStore;import java.time.Duration;import java.util.UUID;/**
* <p>授权服务配置</p>
*
* @author 土味儿
* Date 2022/5/10
* @version 1.0
*/@Configuration(proxyBeanMethods = false)public class AuthorizationServerConfiguration {
/**
* 授权配置
* // @Order 表示加载优先级;HIGHEST_PRECEDENCE为最高优先级
*
* @param http
* @return
* @throws Exception
*/
@Bean
@Order(Ordered.HIGHEST_PRECEDENCE)
public SecurityFilterChain authorizationServerSecurityFilterChain(HttpSecurity http) throws Exception {
// 定义授权服务配置器
OAuth2AuthorizationServerConfigurer<HttpSecurity> authorizationServerConfigurer =
new OAuth2AuthorizationServerConfigurer<>();
// 获取授权服务器相关的请求端点
RequestMatcher authorizationServerEndpointsMatcher =
authorizationServerConfigurer.getEndpointsMatcher();
http // 拦截对 授权服务器 相关端点的请求
.requestMatcher(authorizationServerEndpointsMatcher)
// 拦载到的请求需要认证确认(登录)
.authorizeRequests()
// 其余所有请求都要认证
.anyRequest().authenticated()
.and()
// 忽略掉相关端点的csrf(跨站请求):对授权端点的访问可以是跨站的
.csrf(csrf -> csrf .ignoringRequestMatchers(authorizationServerEndpointsMatcher))
//.and()
// 表单登录
.formLogin()
.and()
.logout()
.and()
// 应用 授权服务器的配置
.apply(authorizationServerConfigurer);
return http.build();
}
/**
* 注册客户端
*
* @param jdbcTemplate 操作数据库
* @return 客户端仓库
*/
@Bean
public RegisteredClientRepository registeredClientRepository(JdbcTemplate jdbcTemplate) {
// ---------- 1、检查当前客户端是否已注册
// 操作数据库对象
JdbcRegisteredClientRepository registeredClientRepository = new JdbcRegisteredClientRepository(jdbcTemplate);
/*
客户端在数据库中的几个记录字段的说明
------------------------------------------
id:仅表示客户端在数据库中的这个记录
client_id:唯一标示客户端;请求token时,以此作为客户端的账号
client_name:客户端的名称,可以省略
client_secret:密码
*/
String clientId_1 = "my_client";
// 查询客户端是否存在
RegisteredClient registeredClient_1 = registeredClientRepository.findByClientId(clientId_1);
// ---------- 2、添加客户端
// 数据库中没有
if (registeredClient_1 == null) {
registeredClient_1 = this.createRegisteredClientAuthorizationCode(clientId_1);
registeredClientRepository.save(registeredClient_1);
}
// ---------- 3、返回客户端仓库
return registeredClientRepository;
}
/**
* 定义客户端(令牌申请方式:授权码模式)
*
* @param clientId 客户端ID
* @return
*/
private RegisteredClient createRegisteredClientAuthorizationCode(final String clientId) {
// JWT(Json Web Token)的配置项:TTL、是否复用refrechToken等等
TokenSettings tokenSettings = TokenSettings.builder()
// 令牌存活时间:2小时
.accessTokenTimeToLive(Duration.ofHours(2))
// 令牌可以刷新,重新获取
.reuseRefreshTokens(true)
// 刷新时间:30天(30天内当令牌过期时,可以用刷新令牌重新申请新令牌,不需要再认证)
.refreshTokenTimeToLive(Duration.ofDays(30))
.build();
// 客户端相关配置
ClientSettings clientSettings = ClientSettings.builder()
// 是否需要用户授权确认
.requireAuthorizationConsent(false)
.build();
return RegisteredClient
// 客户端ID和密码
.withId(UUID.randomUUID().toString())
//.withId(id)
.clientId(clientId)
//.clientSecret("{noop}123456")
.clientSecret(PasswordEncoderFactories.createDelegatingPasswordEncoder().encode("123456"))
// 客户端名称:可省略
.clientName("my_client_name")
// 授权方法
.clientAuthenticationMethod(ClientAuthenticationMethod.CLIENT_SECRET_BASIC)
// 授权模式
// ---- 【授权码模式】
.authorizationGrantType(AuthorizationGrantType.AUTHORIZATION_CODE)
// ---------- 刷新令牌(授权码模式)
.authorizationGrantType(AuthorizationGrantType.REFRESH_TOKEN)
/* 回调地址:
* 授权服务器向当前客户端响应时调用下面地址;
* 不在此列的地址将被拒绝;
* 只能使用IP或域名,不能使用localhost
*/
.redirectUri("http://127.0.0.1:8000/login/oauth2/code/myClient")
.redirectUri("http://127.0.0.1:8000")
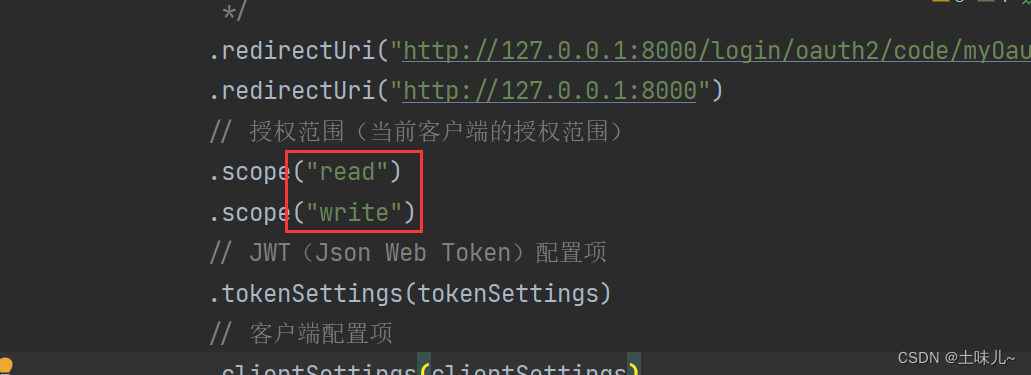
// 授权范围(当前客户端的授权范围)
.scope("read")
.scope("write")
// JWT(Json Web Token)配置项
.tokenSettings(tokenSettings)
// 客户端配置项
.clientSettings(clientSettings)
.build();
}
/**
* 令牌的发放记录
*
* @param jdbcTemplate 操作数据库
* @param registeredClientRepository 客户端仓库
* @return 授权服务
*/
@Bean
public OAuth2AuthorizationService auth2AuthorizationService(
JdbcTemplate jdbcTemplate,
RegisteredClientRepository registeredClientRepository) {
return new JdbcOAuth2AuthorizationService(jdbcTemplate, registeredClientRepository);
}
/**
* 把资源拥有者授权确认操作保存到数据库
* 资源拥有者(Resource Owner)对客户端的授权记录
*
* @param jdbcTemplate 操作数据库
* @param registeredClientRepository 客户端仓库
* @return
*/
@Bean
public OAuth2AuthorizationConsentService auth2AuthorizationConsentService(
JdbcTemplate jdbcTemplate,
RegisteredClientRepository registeredClientRepository) {
return new JdbcOAuth2AuthorizationConsentService(jdbcTemplate, registeredClientRepository);
}
/**
* 加载jwk资源
* 用于生成令牌
* @return
*/
@SneakyThrows
@Bean
public JWKSource<SecurityContext> jwkSource() {
// 证书的路径
String path = "myjks.jks";
// 证书别名
String alias = "myjks";
// keystore 密码
String pass = "123456";
ClassPathResource resource = new ClassPathResource(path);
KeyStore jks = KeyStore.getInstance("jks");
char[] pin = pass.toCharArray();
jks.load(resource.getInputStream(), pin);
RSAKey rsaKey = RSAKey.load(jks, alias, pin);
JWKSet jwkSet = new JWKSet(rsaKey);
return (jwkSelector, securityContext) -> jwkSelector.select(jwkSet);
}
/**
* <p>授权服务器元信息配置</p>
* <p>
* 授权服务器本身也提供了一个配置工具来配置其元信息,大多数都使用默认配置即可,唯一需要配置的其实只有授权服务器的地址issuer
* 在生产中这个地方应该配置为域名
*
* @return
*/
@Bean
public ProviderSettings providerSettings() {
return ProviderSettings.builder().issuer("http://os.com:9000").build();
}}- 客户端在数据库中的几个记录字段的说明
- id:仅表示客户端在数据库中的这个记录
- client_id:唯一标示客户端;请求token时,以此作为客户端的账号
- client_name:客户端的名称,可以省略
- client_secret:密码

4.9、user端口配置
就是客户认证授权后,获取user信息的接口
package com.tuwer.endpoint;import org.springframework.security.core.Authentication;import org.springframework.security.core.context.SecurityContextHolder;import org.springframework.web.bind.annotation.GetMapping;import org.springframework.web.bind.annotation.RequestMapping;import org.springframework.web.bind.annotation.RestController;/**
* <p>用户信息接口</p>
*
* @author 土味儿
* Date 2022/5/10
* @version 1.0
*/@RestController@RequestMapping("/oauth2")public class EndPointController {
/**
* 获取用户信息
* @return
*/
@GetMapping("/user")
public Authentication oauth2UserInfo(){
Authentication authentication = SecurityContextHolder.getContext().getAuthentication();
if(authentication == null){
throw new RuntimeException("无有效认证用户!");
}
return authentication;
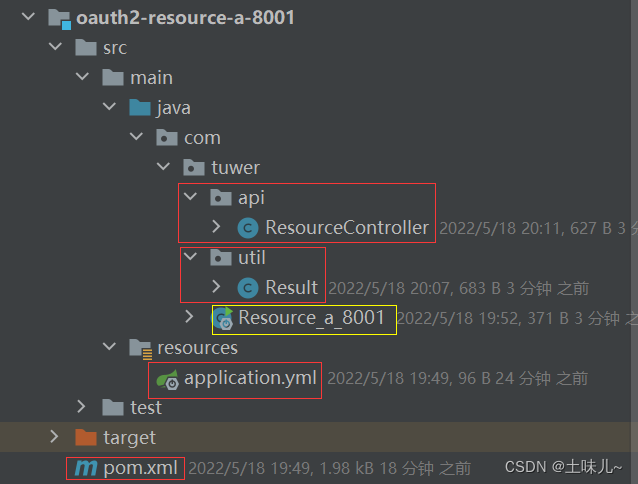
}}4.10、目录结构
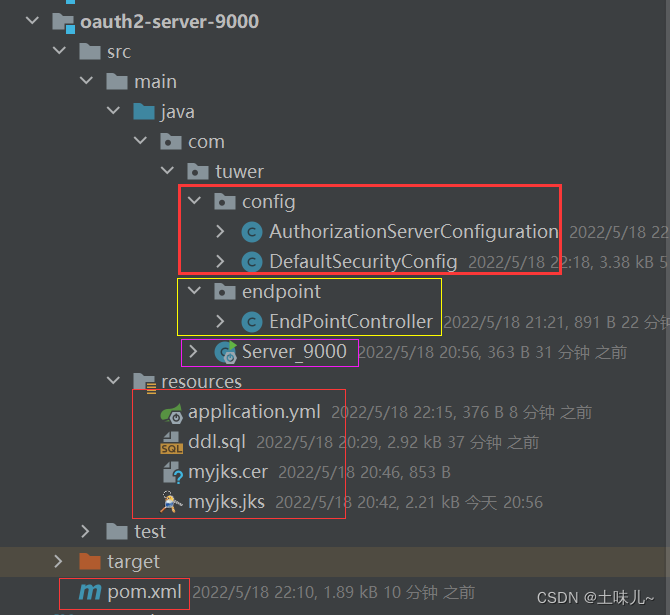
4.11、测试
借助于postman
- 请求授权码
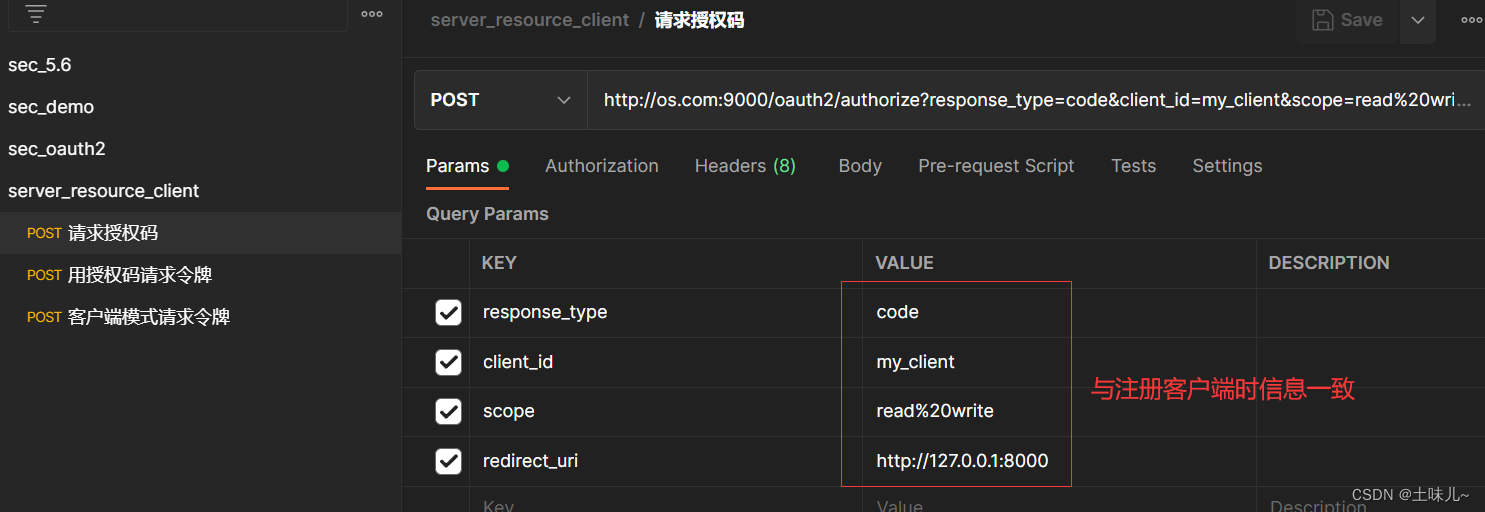
http://os.com:9000/oauth2/authorize?response_type=code&client_id=my_client&scope=read%20write&redirect_uri=http://127.0.0.1:8000 在浏览器地址栏中输入


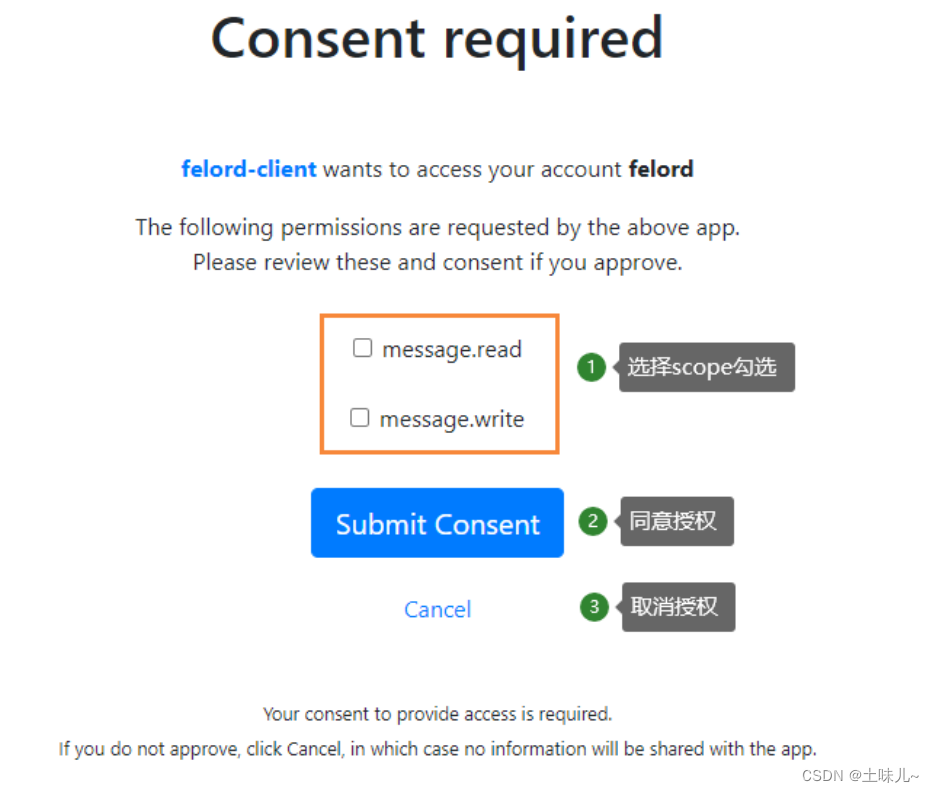
授权码的有效期默认5分钟,一次性的,在5分钟内申请令牌,申请完令牌之后就失效,不管申请是否成功。由于注册客户端配置时,关闭了用户确认授权,所以登录后,直接返回了授权码,跳过了授权确认页面。授权确认页面长这样的:
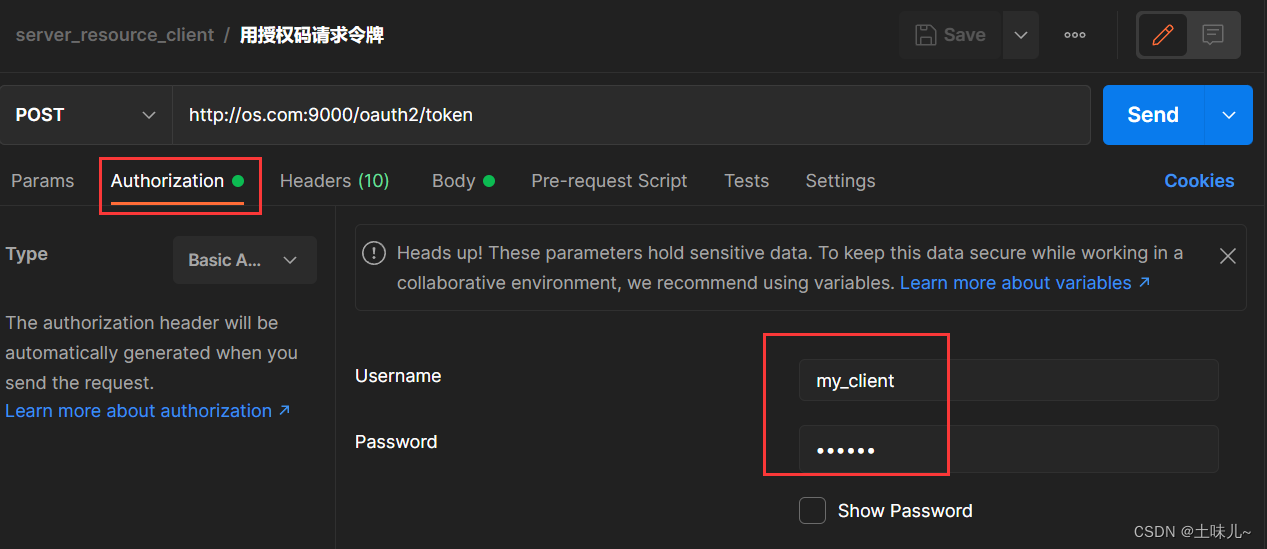
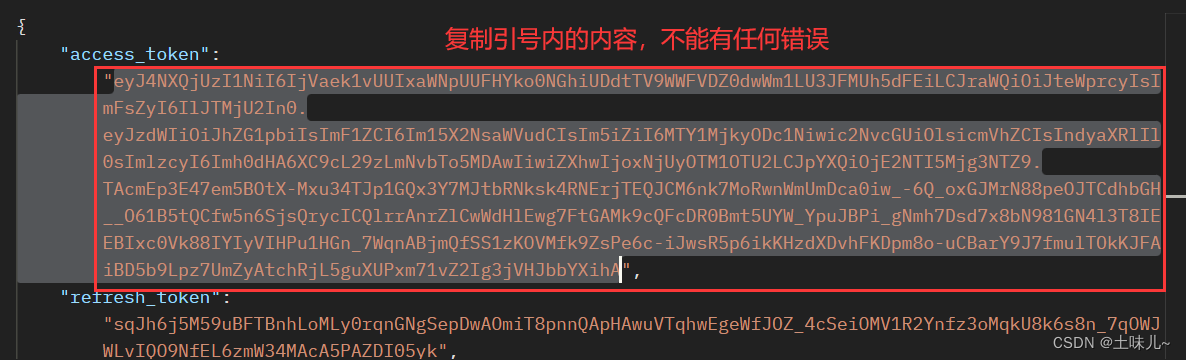
- 用授权码请求令牌
复制上一步中返回的授权码,在postman中申请令牌;
请求地址:授权服务器:端口/oauth2/token,再加下图中参数
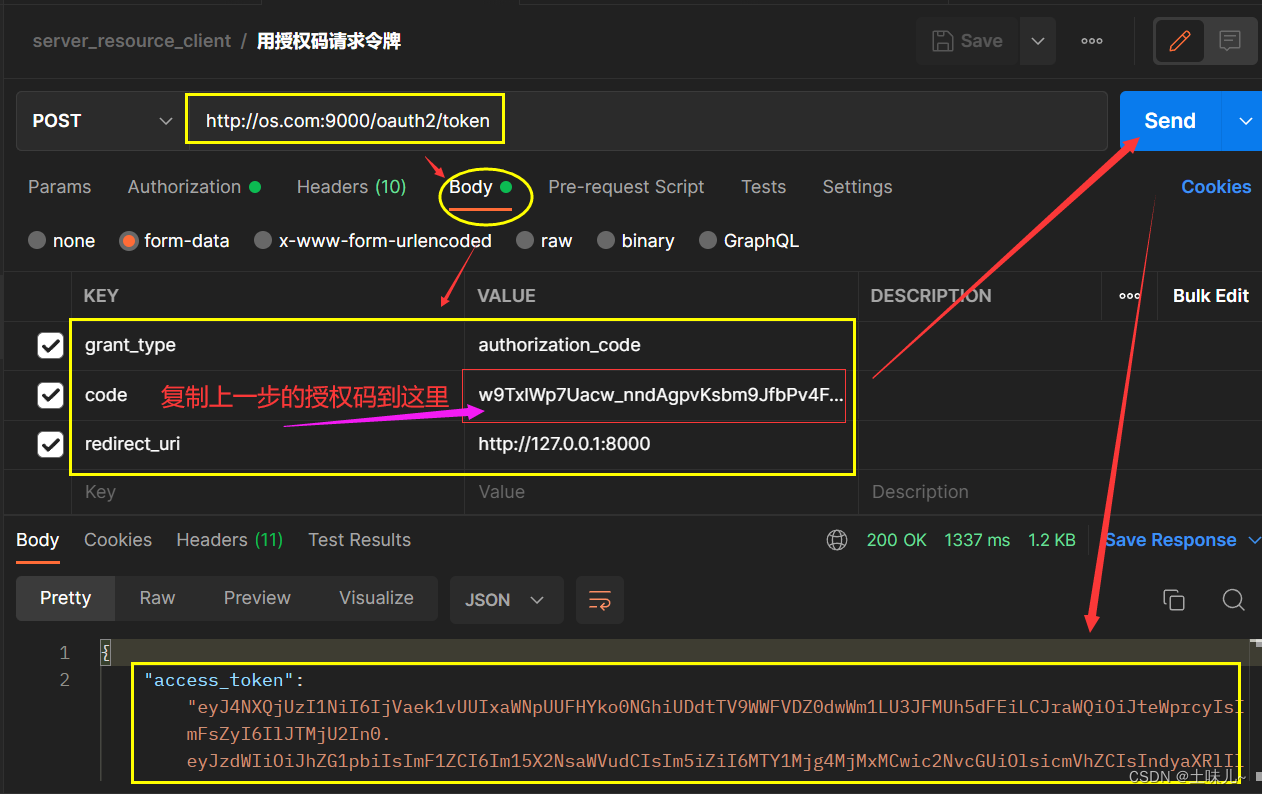

令牌有3部分:头部、载荷、校验码,以点号分隔;base64编码;可以保证不被篡改,但不能保证信息不被泄露
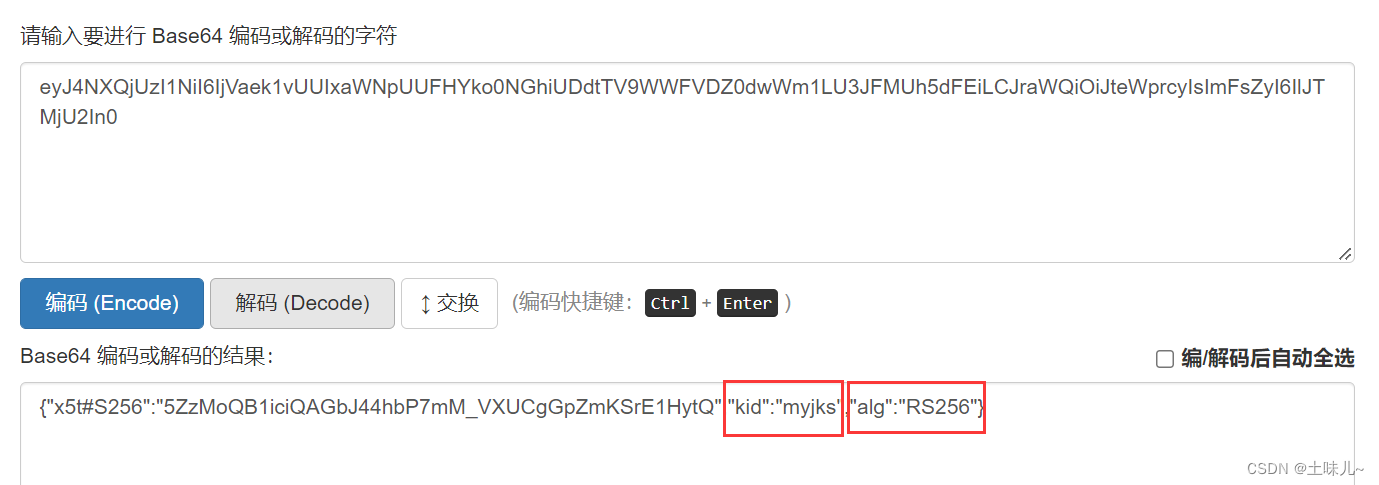
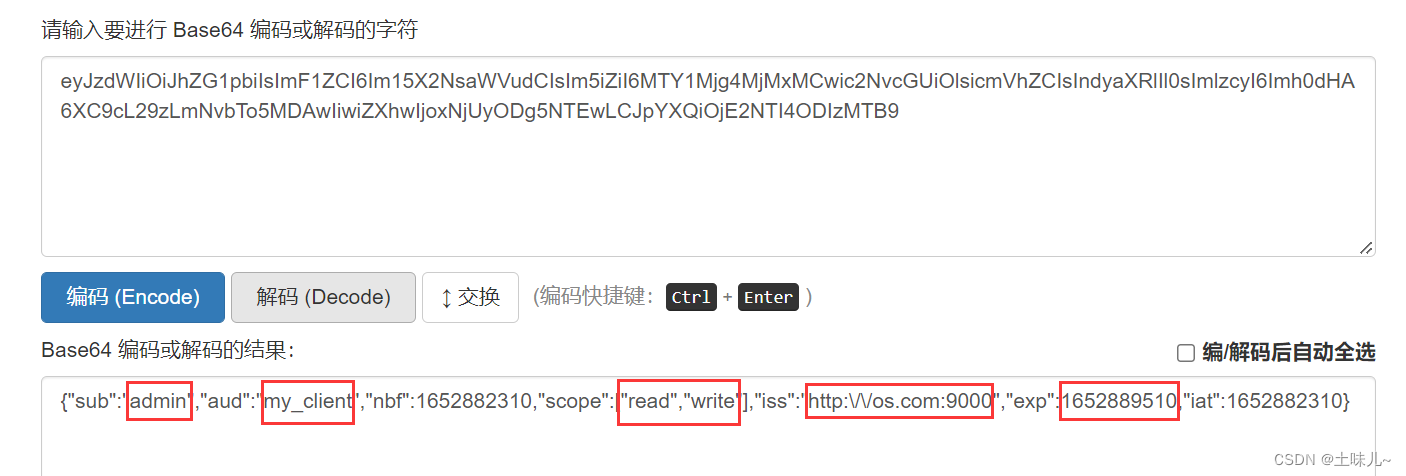
- 解码令牌
进入 Base64 在线编码解码 | Base64 加密解密 - Base64.us
分别复制令牌中的前两部分进行解码
- 访问user信息

至此,授权服务器基本搭建完成!
4.12、疑惑解析
- 授权服务中为什么也配有资源服务?
授权服务中也提供了资源服务;如:用户信息 /oauth2/user ,在认证授权后,可以通过该接口,获得用户信息。如果把该资源服务剥离出去,就可以去掉与资源服务相关的内容:cer公钥、解码器方法、user端口API等;
- 为什么要配置两个
SecurityFilterChain?
两个 SecurityFilterChain 职责不一样,且都是原型的。
一个是安全策略,访问授权服务器时的安全检查;
一个是授权策略,认证通过,进行授权、发放令牌等;
5、改造资源服务器
先只改造资源服务A
oauth2-resource-a-8001
5.1、添加依赖
在pom.xml中添加
<!-- 资源服务器 --><dependency>
    <groupId>org.springframework.boot</groupId>
    <artifactId>spring-boot-starter-oauth2-resource-server</artifactId></dependency>
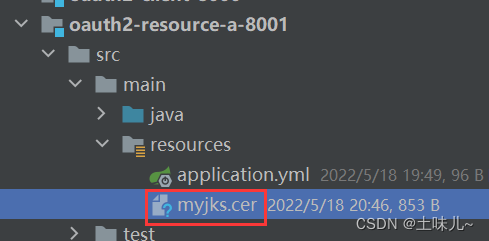
5.2、复制cer公钥到资源路径
5.3、解码器
5.3.1、自定义JWT属性配置类
关于有效期expiresAt的设定:设为0时,和令牌实际时间一致。 如果大于0,就是在原来过期时间的基础再加上这个值。所以没有必要配置这个值。
package com.tuwer.config.oauth2;import lombok.Data;import org.springframework.boot.context.properties.ConfigurationProperties;/**
 * <p>属性配置类</p>
 *
 * @author 土味儿
 * Date 2022/5/11
 * @version 1.0
 */@Data@ConfigurationProperties(prefix = "jwt")public class JwtProperties {
    /*
    ======= 配置示例 ======
    # 自定义 jwt 配置
    jwt:
        cert-info:
            # 证书存放位置
            public-key-location: myKey.cer
        claims:
            # 令牌的鉴发方:即授权服务器的地址
            issuer: http://os:9000
    */
    /**
     * 证书信息(内部静态类)
     * 证书存放位置...
     */
    private CertInfo certInfo;

    /**
     * 证书声明(内部静态类)
     * 发证方...
     */
    private Claims claims;

    @Data
    public static class Claims {
        /**
         * 发证方
         */
        private String issuer;
        /**
         * 有效期
         */
        //private Integer expiresAt;
    }

    @Data
    public static class CertInfo {
        /**
         * 证书存放位置
         */
        private String publicKeyLocation;
    }}
5.3.2、自定义JWT解码器
package com.tuwer.config.oauth2;import com.nimbusds.jose.jwk.RSAKey;import lombok.SneakyThrows;import org.springframework.beans.factory.annotation.Autowired;import org.springframework.beans.factory.annotation.Qualifier;import org.springframework.boot.context.properties.EnableConfigurationProperties;import org.springframework.context.annotation.Bean;import org.springframework.context.annotation.Configuration;import org.springframework.context.annotation.Primary;import org.springframework.core.io.ClassPathResource;import org.springframework.security.oauth2.core.DelegatingOAuth2TokenValidator;import org.springframework.security.oauth2.core.OAuth2TokenValidator;import org.springframework.security.oauth2.jwt.*;import java.io.InputStream;import java.security.cert.CertificateFactory;import java.security.cert.X509Certificate;import java.security.interfaces.RSAPublicKey;import java.util.Collection;/**
 * <p>自定义jwt解码器</p>
 * proxyBeanMethods = false 每次调用都创建新的对象
 *
 * @author 土味儿
 * Date 2022/5/11
 * @version 1.0
 */@EnableConfigurationProperties(JwtProperties.class)@Configuration(proxyBeanMethods = false)public class JwtDecoderConfiguration {
    /**
     * 注入 JwtProperties 属性配置类
     */
    @Autowired
    private JwtProperties jwtProperties;

    /**
     *  校验jwt发行者 issuer 是否合法
     *
     * @return the jwt issuer validator
     */
    @Bean
    JwtIssuerValidator jwtIssuerValidator() {
        return new JwtIssuerValidator(this.jwtProperties.getClaims().getIssuer());
    }

    /**
     *  校验jwt是否过期
     *
     * @return the jwt timestamp validator
     *//*    @Bean
    JwtTimestampValidator jwtTimestampValidator() {
        System.out.println("检测令牌是否过期!"+ LocalDateTime.now());
        return new JwtTimestampValidator(Duration.ofSeconds((long) this.jwtProperties.getClaims().getExpiresAt()));
    }*/

    /**
     * jwt token 委托校验器,集中校验的策略{@link OAuth2TokenValidator}
     *
     * // @Primary:自动装配时当出现多个Bean候选者时,被注解为@Primary的Bean将作为首选者,否则将抛出异常
     * @param tokenValidators the token validators
     * @return the delegating o auth 2 token validator
     */
    @Primary
    @Bean({"delegatingTokenValidator"})
    public DelegatingOAuth2TokenValidator<Jwt> delegatingTokenValidator(Collection<OAuth2TokenValidator<Jwt>> tokenValidators) {
        return new DelegatingOAuth2TokenValidator<>(tokenValidators);
    }

    /**
     * 基于Nimbus的jwt解码器,并增加了一些自定义校验策略
     *
     * // @Qualifier 当有多个相同类型的bean存在时,指定注入
     * @param validator DelegatingOAuth2TokenValidator<Jwt> 委托token校验器
     * @return the jwt decoder
     */
    @SneakyThrows
    @Bean
    public JwtDecoder jwtDecoder(@Qualifier("delegatingTokenValidator")
                                         DelegatingOAuth2TokenValidator<Jwt> validator) {
        // 指定 X.509 类型的证书工厂
        CertificateFactory certificateFactory = CertificateFactory.getInstance("X.509");
        // 读取cer公钥证书来配置解码器
        String publicKeyLocation = this.jwtProperties.getCertInfo().getPublicKeyLocation();
        // 获取证书文件输入流
        ClassPathResource resource = new ClassPathResource(publicKeyLocation);
        InputStream inputStream = resource.getInputStream();
        // 得到证书
        X509Certificate certificate = (X509Certificate) certificateFactory.generateCertificate(inputStream);
        // 解析
        RSAKey rsaKey = RSAKey.parse(certificate);
        // 得到公钥
        RSAPublicKey key = rsaKey.toRSAPublicKey();
        // 构造解码器
        NimbusJwtDecoder nimbusJwtDecoder = NimbusJwtDecoder.withPublicKey(key).build();
        // 注入自定义JWT校验逻辑
        nimbusJwtDecoder.setJwtValidator(validator);
        return nimbusJwtDecoder;
    }}
5.4、异常处理器
5.4.1、认证失败处理器
package com.tuwer.config.oauth2;import com.fasterxml.jackson.databind.ObjectMapper;import lombok.SneakyThrows;import org.springframework.http.MediaType;import org.springframework.security.core.AuthenticationException;import org.springframework.security.oauth2.server.resource.InvalidBearerTokenException;import org.springframework.security.web.AuthenticationEntryPoint;import javax.servlet.ServletException;import javax.servlet.http.HttpServletRequest;import javax.servlet.http.HttpServletResponse;import java.io.IOException;import java.io.PrintWriter;import java.util.HashMap;/**
 * <p>认证失败处理器</p>
 *
 * @author 土味儿
 * Date 2022/5/11
 * @version 1.0
 */public class SimpleAuthenticationEntryPoint implements AuthenticationEntryPoint {
    @SneakyThrows
    @Override
    public void commence(HttpServletRequest request,
                         HttpServletResponse response,
                         AuthenticationException authException    ) throws IOException, ServletException {
        if (authException instanceof InvalidBearerTokenException) {
            System.out.println("token失效");
            //todo token处理逻辑
        }
        //todo your business
        HashMap<String, String> map = new HashMap<>(2);
        map.put("uri", request.getRequestURI());
        map.put("msg", "认证失败");
        if (response.isCommitted()) {
            return;
        }
        response.setStatus(HttpServletResponse.SC_UNAUTHORIZED);
        response.setStatus(HttpServletResponse.SC_ACCEPTED);
        response.setCharacterEncoding("utf-8");
        response.setContentType(MediaType.APPLICATION_JSON_VALUE);
        ObjectMapper objectMapper = new ObjectMapper();
        String resBody = objectMapper.writeValueAsString(map);
        PrintWriter printWriter = response.getWriter();
        printWriter.print(resBody);
        printWriter.flush();
        printWriter.close();
    }}
5.4.2、拒绝访问处理器
package com.tuwer.config.oauth2;import com.fasterxml.jackson.databind.ObjectMapper;import lombok.SneakyThrows;import org.springframework.http.MediaType;import org.springframework.security.access.AccessDeniedException;import org.springframework.security.web.access.AccessDeniedHandler;import javax.servlet.ServletException;import javax.servlet.http.HttpServletRequest;import javax.servlet.http.HttpServletResponse;import java.io.IOException;import java.io.PrintWriter;import java.util.HashMap;/**
 * <p>拒绝访问处理器</p>
 *
 * @author 土味儿
 * Date 2022/5/11
 * @version 1.0
 */public class SimpleAccessDeniedHandler implements AccessDeniedHandler {
    @SneakyThrows
    @Override
    public void handle(HttpServletRequest request,
                       HttpServletResponse response,
                       AccessDeniedException accessDeniedException    ) throws IOException, ServletException {
        //todo your business
        HashMap<String, String> map = new HashMap<>(2);
        map.put("uri", request.getRequestURI());
        map.put("msg", "拒绝访问");
        response.setStatus(HttpServletResponse.SC_FORBIDDEN);
        response.setCharacterEncoding("utf-8");
        response.setContentType(MediaType.APPLICATION_JSON_VALUE);
        ObjectMapper objectMapper = new ObjectMapper();
        String resBody = objectMapper.writeValueAsString(map);
        PrintWriter printWriter = response.getWriter();
        printWriter.print(resBody);
        printWriter.flush();
        printWriter.close();
    }}
5.5、资源安全策略配置
package com.tuwer.config.oauth2;import org.springframework.boot.autoconfigure.condition.ConditionalOnBean;import org.springframework.context.annotation.Bean;import org.springframework.context.annotation.Configuration;import org.springframework.security.config.annotation.web.builders.HttpSecurity;import org.springframework.security.oauth2.jwt.JwtClaimNames;import org.springframework.security.oauth2.jwt.JwtDecoder;import org.springframework.security.oauth2.server.resource.authentication.JwtAuthenticationConverter;import org.springframework.security.oauth2.server.resource.authentication.JwtGrantedAuthoritiesConverter;import org.springframework.security.web.SecurityFilterChain;/**
 * <p>资源服务器配置</p>
 * 当解码器JwtDecoder存在时生效
 * proxyBeanMethods = false 每次调用都创建新的对象
 *
 * @author 土味儿
 * Date 2022/5/11
 * @version 1.0
 */@ConditionalOnBean(JwtDecoder.class)@Configuration(proxyBeanMethods = false)public class OAuth2ResourceServerConfiguration {
    /**
     * 资源管理器配置
     *
     * @param http the http
     * @return the security filter chain
     * @throws Exception the exception
     */
    @Bean
    SecurityFilterChain jwtSecurityFilterChain(HttpSecurity http) throws Exception {
        // 拒绝访问处理器 401
        SimpleAccessDeniedHandler accessDeniedHandler = new SimpleAccessDeniedHandler();
        // 认证失败处理器 403
        SimpleAuthenticationEntryPoint authenticationEntryPoint = new SimpleAuthenticationEntryPoint();

        return http                // security的session生成策略改为security不主动创建session即STALELESS
                .sessionManagement().sessionCreationPolicy(SessionCreationPolicy.STATELESS)
            .and()
                // 对 /res1 的请求,需要 SCOPE_read 权限
                .authorizeRequests()
                .antMatchers("/res1").hasAnyAuthority("SCOPE_read","SCOPE_all")
                .antMatchers("/res2").hasAnyAuthority("SCOPE_write1","SCOPE_all")
                // 其余请求都需要认证
                .anyRequest().authenticated()
             .and()
                // 异常处理
                .exceptionHandling(exceptionConfigurer -> exceptionConfigurer                        // 拒绝访问
                        .accessDeniedHandler(accessDeniedHandler)
                        // 认证失败
                        .authenticationEntryPoint(authenticationEntryPoint)
                )
                // 资源服务
                .oauth2ResourceServer(resourceServer -> resourceServer                        .accessDeniedHandler(accessDeniedHandler)
                        .authenticationEntryPoint(authenticationEntryPoint)
                        .jwt()
                )
                .build();
    }


    /**
     * JWT个性化解析
     *
     * @return
     */
    @Bean
    JwtAuthenticationConverter jwtAuthenticationConverter() {
        JwtAuthenticationConverter jwtAuthenticationConverter = new JwtAuthenticationConverter();
        JwtGrantedAuthoritiesConverter jwtGrantedAuthoritiesConverter = new JwtGrantedAuthoritiesConverter();//        如果不按照规范  解析权限集合Authorities 就需要自定义key//        jwtGrantedAuthoritiesConverter.setAuthoritiesClaimName("scopes");//        OAuth2 默认前缀是 SCOPE_     Spring Security 是 ROLE_//        jwtGrantedAuthoritiesConverter.setAuthorityPrefix("");
        jwtAuthenticationConverter.setJwtGrantedAuthoritiesConverter(jwtGrantedAuthoritiesConverter);
        // 用户名 可以放sub
        jwtAuthenticationConverter.setPrincipalClaimName(JwtClaimNames.SUB);
        return jwtAuthenticationConverter;
    }}
资源服务不涉及用户登录,仅靠token访问,不需要seesion;
把session生成策略改为不主动创建,即 STALELESS
http.sessionManagement().sessionCreationPolicy(SessionCreationPolicy.STATELESS)
5.6、yml中添加jwt配置
配置时注意命名规则;驼峰命名 与 短划线;如:
publicKeyLocation对应public-key-location
# 自定义 jwt 配置(校验jwt)jwt:
  cert-info:
    # 公钥证书存放位置
    public-key-location: myjks.cer  claims:
    # 令牌的鉴发方:即授权服务器的地址
    issuer: http://os.com:9000
    # 令牌有效时间(单位:秒);设为0时,和令牌实际时间一致。
    # 如果大于0,就是在原来过期时间的基础再加上这个值
    #expires-at: 0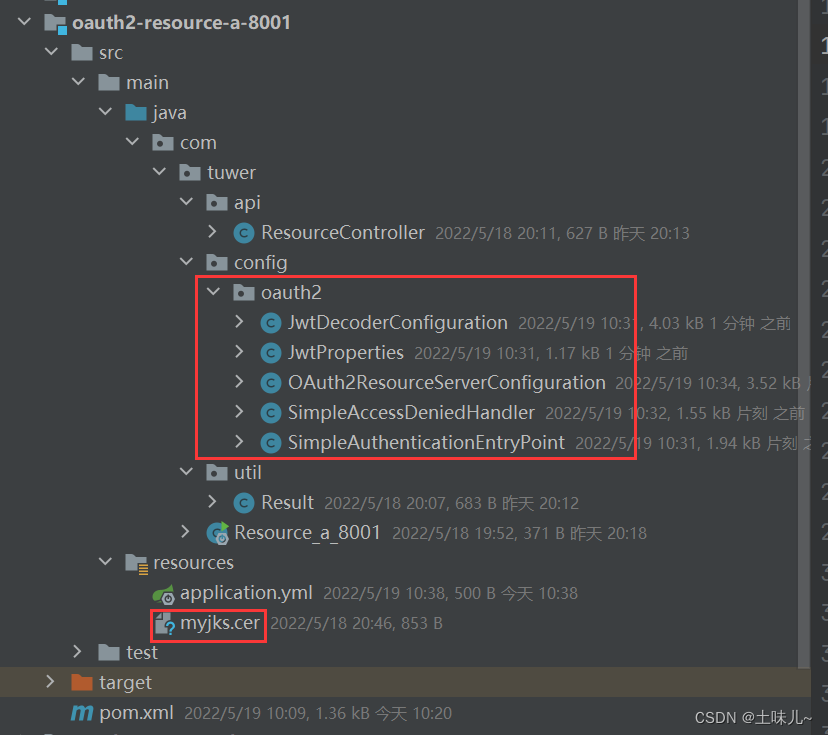
5.7、测试
5.7.1、权限说明
资源权限说明:
- 访问资源
res1,需要有read或all- 访问资源
res2,需要有write1或all

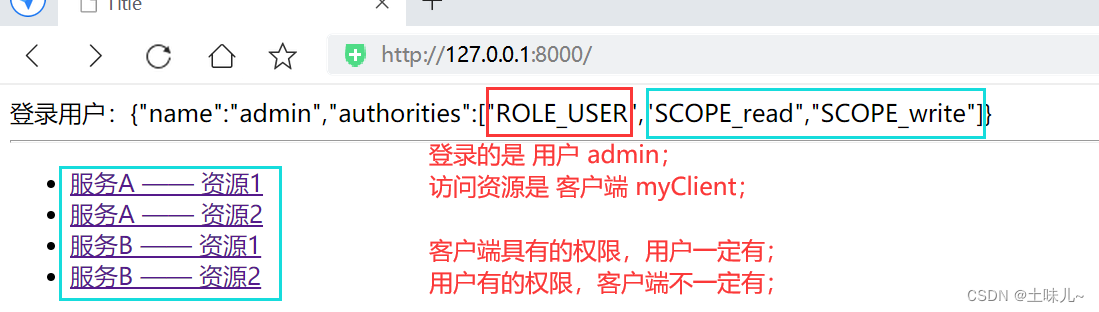
当前客户端所拥有的权限范围:
admin用户通过当前客户端进入后,只能在
read或write范围内访问;所以可以看出,只能访问res1,不能访问res2,因为没有write1或all权限。write 和 write1是不同的。SCOPE、ROLE、AUTH 简单区别:
整个项目(包括多个微服务模块)相当于一座大楼,每一楼层相当于一个微服务模块,每一个微服务模块内有多个资源。用户进去大楼后,只可以访问特定的楼层(这就是范围SCOPE),到达楼层后,根据身份(ROLE),查看对应的权限(AUTH),再访问对应的资源。
资源可以与SCOPE、ROLE、AUTH 绑定。如:
- 绑定SCOPE:只要进入到楼层,就可以访问
- 绑定ROLE:先进入到楼层,再根据身份ROLE去访问。只要这个ROLE能进入到楼层就可以。
- 绑定AUTH:先进入到楼层,不看身份,只看有没有与资源匹配的权限
三种绑定情况,对权限的要求粒度越来越细。

5.7.2、直接访问
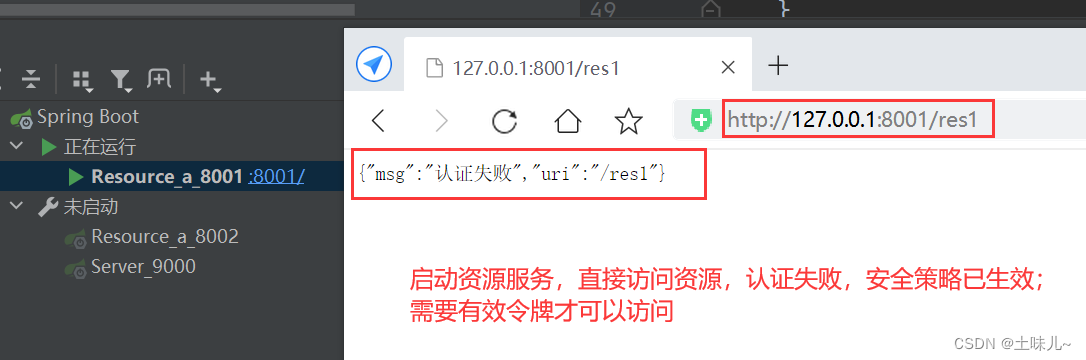
5.7.3、postman申请令牌
启动授权服务,申请授权码、令牌


5.7.4、携带令牌访问资源1

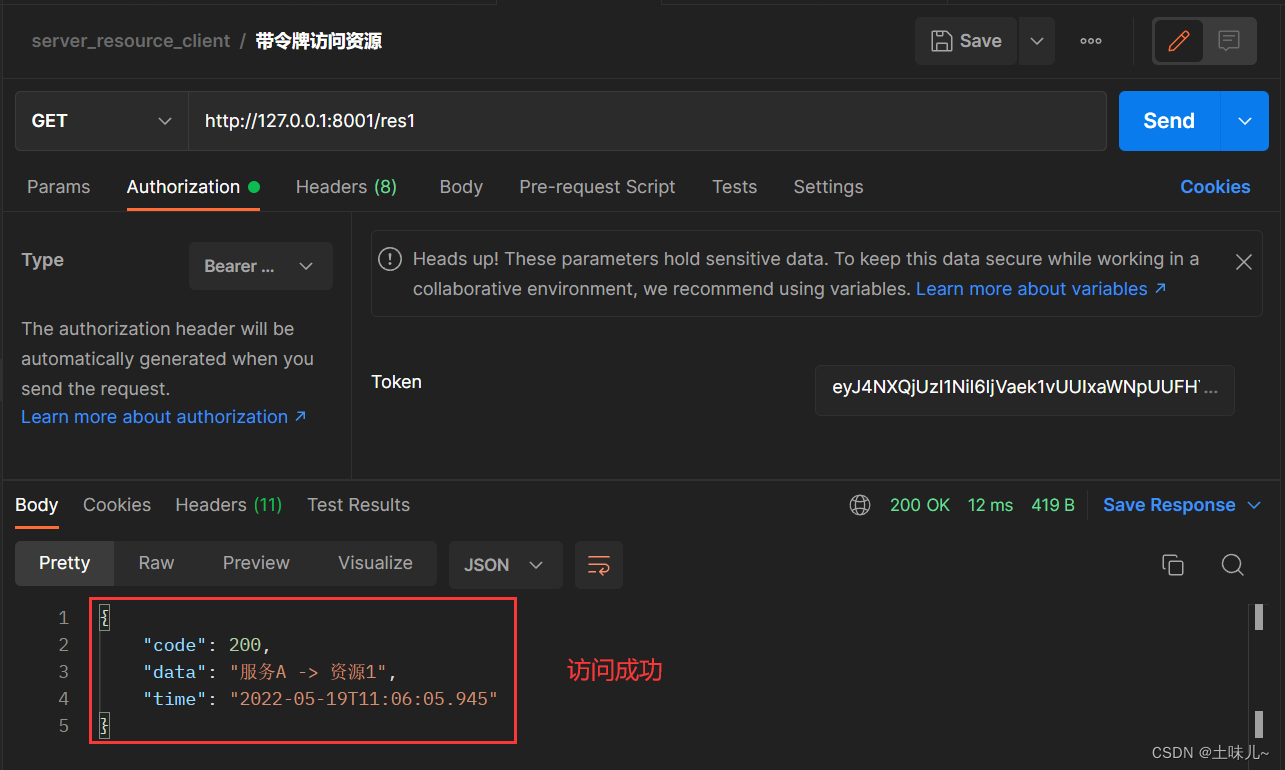
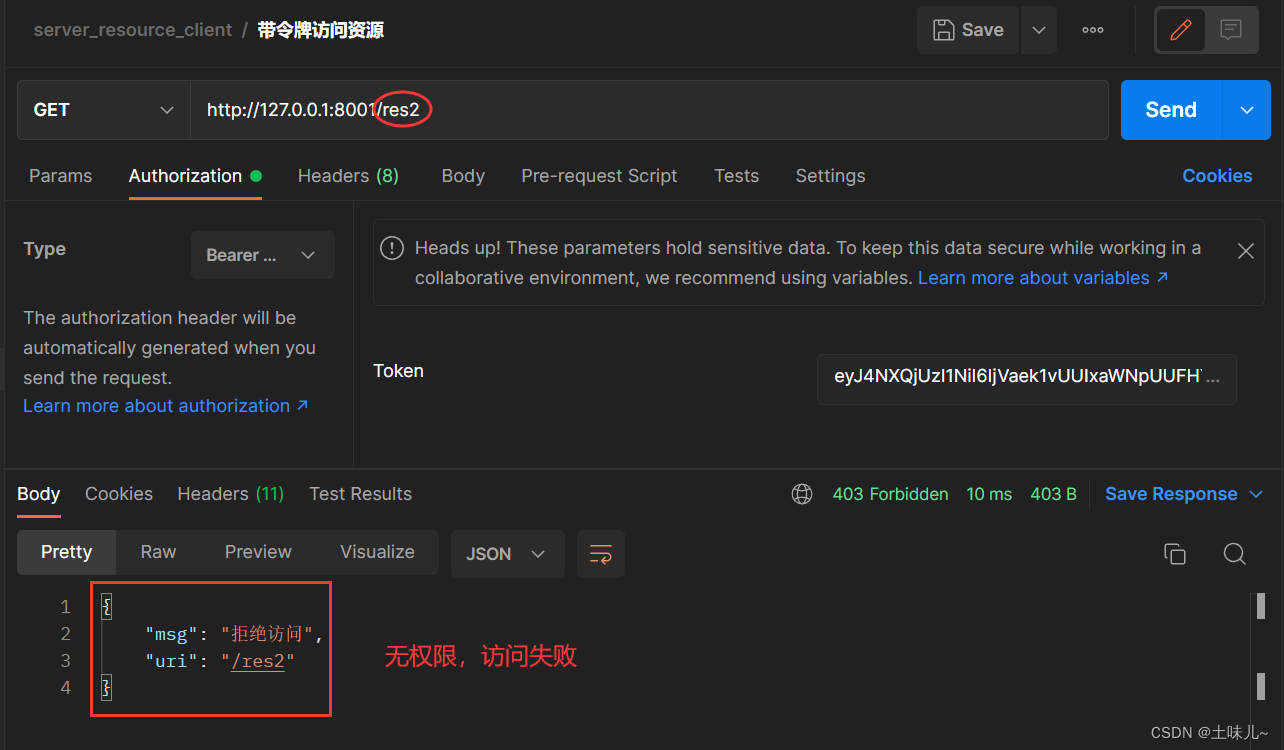
5.7.5、携带令牌访问资源2
因为res2要求有 write1 或 all,当前用户没有这个权限,所以拒绝访问。
5.7.6、资源服务器自行鉴权

5.8、疑惑解析
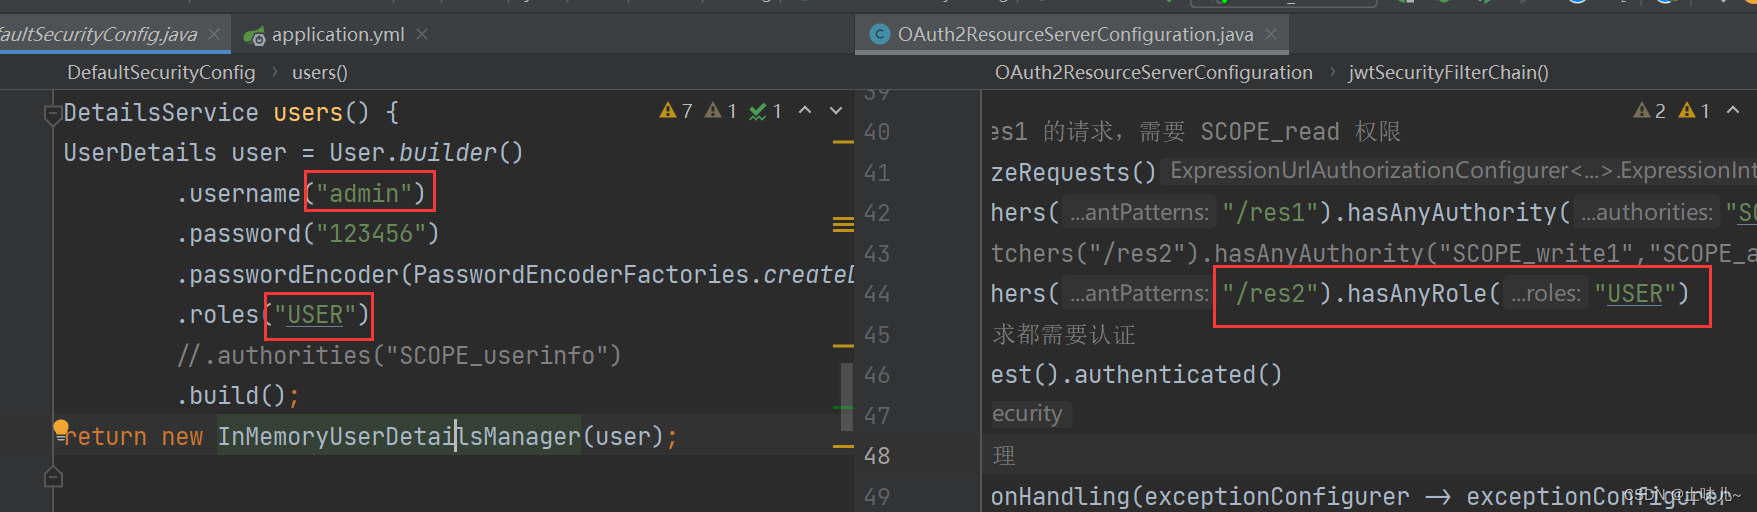
admin用户的身份Role为USER,如果把res2的访问权限修改为:hasAnyRole("USER"),即允许身份为USER的用户访问,那么是否可以成功访问 res2?
重启测试:

分析原因:

访问的请求主体不同
当前测试的访问主体是客户端my_client,它在注册时只有read、write权限范围,用户admin只会在这两个范围内给my_client授权,不会也不能把自已的身份USER赋于my_client,所以my_client是不具有USER身份的,也就不能访问res2。
换言之,如果是admin用户本人来访问,它具有USER身份,当然就可以访问了。但资源服务器不提供登录认证的功能,所以用户本人无法直接访问。
在资源中指定ROLE,是针对当前访问主体的身份,不是资源拥有者的身份。
6、搭建客户端
6.1、pom.xml
<?xml version="1.0" encoding="UTF-8"?><project xmlns="http://maven.apache.org/POM/4.0.0"
         xmlns:xsi="http://www.w3.org/2001/XMLSchema-instance"
         xsi:schemaLocation="http://maven.apache.org/POM/4.0.0 http://maven.apache.org/xsd/maven-4.0.0.xsd">
    <parent>
        <artifactId>oauth2-server-resource-client</artifactId>
        <groupId>com.tuwer</groupId>
        <version>1.0-SNAPSHOT</version>
    </parent>
    <modelVersion>4.0.0</modelVersion>

    <artifactId>oauth2-client-8000</artifactId>

    <properties>
        <maven.compiler.source>8</maven.compiler.source>
        <maven.compiler.target>8</maven.compiler.target>
    </properties>
    <dependencies>
        <dependency>
            <groupId>org.springframework.boot</groupId>
            <artifactId>spring-boot-starter-thymeleaf</artifactId>
        </dependency>
        <dependency>
            <groupId>org.springframework.boot</groupId>
            <artifactId>spring-boot-starter-oauth2-client</artifactId>
        </dependency>
        <dependency>
            <groupId>org.springframework.boot</groupId>
            <artifactId>spring-boot-starter-web</artifactId>
        </dependency>
        <dependency>
                <groupId>com.alibaba.fastjson2</groupId>
                <artifactId>fastjson2</artifactId>
            </dependency>
        <dependency>
        <dependency>
            <groupId>org.projectlombok</groupId>
            <artifactId>lombok</artifactId>
        </dependency>
        <dependency>
            <groupId>commons-lang</groupId>
            <artifactId>commons-lang</artifactId>
        </dependency>
    </dependencies></project>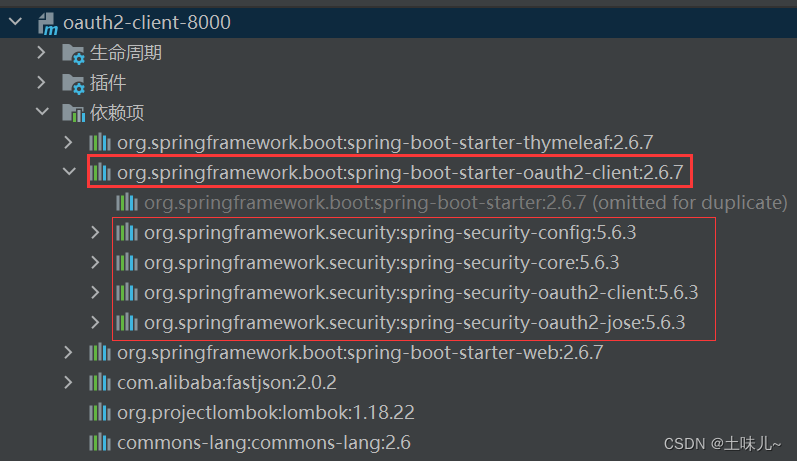
6.2、application.yml
server:
  port: 8000spring:
  application:
    # 应用名称
    name: oauth2-client-8000
  security:
    oauth2:
      client:
        registration:
          # 客户端:与注册时保持一致
          myClient:
            client-id: my_client            client-secret: 123456
            #client-name: my_client_name
            scope: read,write            authorization-grant-type: authorization_code            provider: myOauth2            redirect-uri: '{baseUrl}/{action}/oauth2/code/{registrationId}'
            # 认证方法
            client-authentication-method: client_secret_basic        provider:
          # 服务提供地址
          myOauth2:
            #issuer-uri: http://os.com:9000
            # issuer-uri 可以简化下面的配置
            # 请求授权码地址
            authorization-uri: http://os.com:9000/oauth2/authorize            # 请求令牌地址
            token-uri: http://os.com:9000/oauth2/token            # 用户资源地址
            user-info-uri: http://os.com:9000/oauth2/user            # 用户资源返回中的一个属性名
            user-name-attribute: name            user-info-authentication-method: GET
6.3、启动类
@SpringBootApplicationpublic class Client_8000 {
    public static void main(String[] args) {
        SpringApplication.run(Client_8000.class, args);
    }}
6.4、首页index.html
使用thymeleaf模版;放在 resources 下的 templates 中
<!DOCTYPE html><html lang="en" xmlns:th="http://www.thymeleaf.org"><head>
    <meta charset="UTF-8">
    <title>Title</title></head><body>登录用户:<span th:text="${user}"></span><hr/><ul>
    <li><a href="./server/a/res1">服务A —— 资源1</a></li>
    <li><a href="./server/a/res2">服务A —— 资源2</a></li>
    <li><a href="./server/b/res1">服务B —— 资源1</a></li>
    <li><a href="./server/b/res2">服务B —— 资源2</a></li></ul></body></html>
6.5、安全配置类
package com.tuwer.config;import org.springframework.boot.web.client.RestTemplateBuilder;import org.springframework.context.annotation.Bean;import org.springframework.context.annotation.Configuration;import org.springframework.security.config.Customizer;import org.springframework.security.config.annotation.web.builders.HttpSecurity;import org.springframework.security.web.SecurityFilterChain;import org.springframework.web.client.RestTemplate;/**
 * @author 土味儿
 * Date 2022/5/13
 * @version 1.0
 */@Configuration(proxyBeanMethods = false)public class SecurityConfiguration {
    /***
     * 安全配置
     * @param http http
     * @return SecurityFilterChain
     * @throws Exception exception
     */
    @Bean
    SecurityFilterChain oauth2SecurityFilterChain(HttpSecurity http) throws Exception {
        http.authorizeRequests(requests ->
                // 任何请求都需要认证
                requests.anyRequest().authenticated()
            )
                // oauth2三方登录
                .oauth2Login(Customizer.withDefaults())
                .oauth2Client()
            .and()
                .logout();
        return http.build();
    }

    @Bean
    public RestTemplate oauth2ClientRestTemplate(RestTemplateBuilder restTemplateBuilder) {
        return restTemplateBuilder.build();
    }}
6.6、Controller
6.6.1、IndexController.java
package com.tuwer.controller;import com.alibaba.fastjson2.JSON;import org.springframework.beans.factory.annotation.Autowired;import org.springframework.security.core.Authentication;import org.springframework.security.core.GrantedAuthority;import org.springframework.security.core.context.SecurityContextHolder;import org.springframework.security.oauth2.client.OAuth2AuthorizedClient;import org.springframework.security.oauth2.client.annotation.RegisteredOAuth2AuthorizedClient;import org.springframework.stereotype.Controller;import org.springframework.ui.Model;import org.springframework.web.bind.annotation.GetMapping;import org.springframework.web.client.RestTemplate;import javax.servlet.http.HttpServletRequest;import javax.servlet.http.HttpServletResponse;import java.io.IOException;import java.util.*;/**
 * @author 土味儿
 * Date 2022/5/16
 * @version 1.0
 */@Controllerpublic class IndexController {
    @Autowired
    RestTemplate restTemplate;

    @GetMapping("/")
    public String index(Model model) {
        // 从安全上下文中获取登录信息,返回给model
        Map<String, Object> map = new HashMap<>(2);
        Authentication auth = SecurityContextHolder.getContext().getAuthentication();
        map.put("name", auth.getName());
        Collection<? extends GrantedAuthority> authorities = auth.getAuthorities();
        Iterator<? extends GrantedAuthority> iterator = authorities.stream().iterator();
        ArrayList<Object> authList = new ArrayList<>();
        while (iterator.hasNext()) {
            authList.add(iterator.next().getAuthority());
        }

        map.put("authorities", authList);
        model.addAttribute("user", JSON.toJSONString(map));
        return "index";
    }}
6.6.2、ResourceController
package com.tuwer.controller;import lombok.extern.slf4j.Slf4j;import org.springframework.beans.factory.annotation.Autowired;import org.springframework.http.HttpEntity;import org.springframework.http.HttpHeaders;import org.springframework.http.HttpMethod;import org.springframework.http.ResponseEntity;import org.springframework.security.oauth2.client.OAuth2AuthorizedClient;import org.springframework.security.oauth2.client.annotation.RegisteredOAuth2AuthorizedClient;import org.springframework.web.bind.annotation.GetMapping;import org.springframework.web.bind.annotation.RestController;import org.springframework.web.client.RestClientException;import org.springframework.web.client.RestTemplate;/**
 * @author 土味儿
 * Date 2022/5/15
 * @version 1.0
 */@Slf4j@RestControllerpublic class ResourceController {
    @Autowired
    RestTemplate restTemplate;

    @GetMapping("/server/a/res1")
    public String getServerARes1(@RegisteredOAuth2AuthorizedClient
                                         OAuth2AuthorizedClient oAuth2AuthorizedClient) {
        return getServer("http://127.0.0.1:8001/res1", oAuth2AuthorizedClient);
    }

    @GetMapping("/server/a/res2")
    public String getServerARes2(@RegisteredOAuth2AuthorizedClient
                                         OAuth2AuthorizedClient oAuth2AuthorizedClient) {
        return getServer("http://127.0.0.1:8001/res2", oAuth2AuthorizedClient);
    }

    @GetMapping("/server/b/res1")
    public String getServerBRes1(@RegisteredOAuth2AuthorizedClient
                                         OAuth2AuthorizedClient oAuth2AuthorizedClient) {
        return getServer("http://127.0.0.1:8002/res1", oAuth2AuthorizedClient);
    }

    @GetMapping("/server/b/res2")
    public String getServerBRes2(@RegisteredOAuth2AuthorizedClient
                                         OAuth2AuthorizedClient oAuth2AuthorizedClient) {
        return getServer("http://127.0.0.1:8002/res2", oAuth2AuthorizedClient);
    }

    /**
     * 绑定token,请求微服务
     *
     * @param url
     * @param oAuth2AuthorizedClient
     * @return
     */
    private String getServer(String url, OAuth2AuthorizedClient oAuth2AuthorizedClient) {
        // 获取 token
        String tokenValue = oAuth2AuthorizedClient.getAccessToken().getTokenValue();

        // 请求头
        HttpHeaders headers = new HttpHeaders();
        headers.add("Authorization", "Bearer " + tokenValue);
        // 请求体
        HttpEntity<Object> httpEntity = new HttpEntity<>(headers);
        // 发起请求
        ResponseEntity<String> responseEntity;
        try {
            responseEntity = restTemplate.exchange(url, HttpMethod.GET, httpEntity, String.class);
        } catch (RestClientException e) {
            // e.getMessage() 信息格式:
            // 403 : "{"msg":"拒绝访问","uri":"/res2"}"
            // 解析,取出消息体 {"msg":"拒绝访问","uri":"/res2"}
            String str = e.getMessage();
            // 取两个括号中间的部分(包含两个括号)
            return str.substring(str.indexOf("{"), str.indexOf("}") + 1);
        }
        // 返回
        return responseEntity.getBody();
    }}
6.7、测试
- 启动服务
- 资源访问
6.8、注销策略
用户登录后,会在认证服务器和客户端都保存session信息。要注销时,需要把两个地方的都清除,包括安全上下文,仅清除客户端或认证服务器是不彻底的。
security的退出操作是 /logout ,可以清除相关的登录信息。
- 客户端首页添加
退出按钮;先调用/logout测试
<a href="./logout">退出</a>
点击退出后,出现确认退出页面,确认后进入三方登录列表页,再点击 myClient 登录后,直接自动登录了。这个过程没有出现登录/授权页面。这样的退出是不彻底的,仅仅是客户端的退出。实际的需求应该是再次登录时,需要用户参与(登录/授权)。
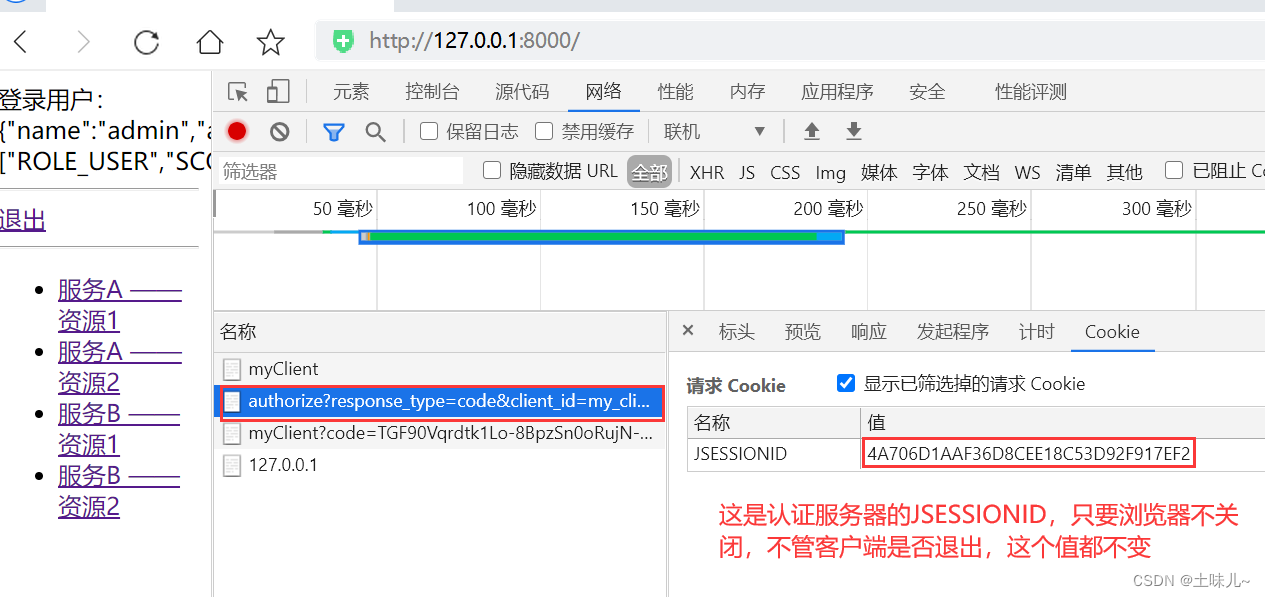
原因分析:这里的退出,仅仅清除了客户端的登录信息。在认证服务器中,用户还是登录状态。浏览器不关闭时,客户端与认证服务器间的JSESSIONID是不变的。
用不变的JSESSIONID,向认证服务器发起请求,认证服务器中用户是登录状态,保存有与JSESSIONID对应的信息,这时会直接返回用户请求的信息,当然就不会再登录/授权了。
解决思路:一次退出操作,同时清除客户端和认证服务器的登录信息

实现步骤:
1、客户端添加自定义退出接口 /out
    @GetMapping("/out")
    public void logout(HttpServletRequest request,
                       HttpServletResponse response) {

        // ========== 清理客户端 ===========
        // 清理客户端session
        request.getSession().invalidate();
        // 清理客户端安全上下文
        SecurityContextHolder.clearContext();

        // ========== 清理认证中心 ===========
        // 跳转至认证中心退出页面
        try {
            response.sendRedirect("http://os.com:9000/logout");
        } catch (IOException e) {
            e.printStackTrace();
        }
    }
2、修改客户端退出链接
<a href="./out">退出</a>3、认证服务器中配置 退出成功后跳转页面 logoutSuccessUsl()
// 在安全策略类、授权策略类中都添加上// 退出成功后跳转至客户端logoutSuccessUrl("http://127.0.0.1:8000")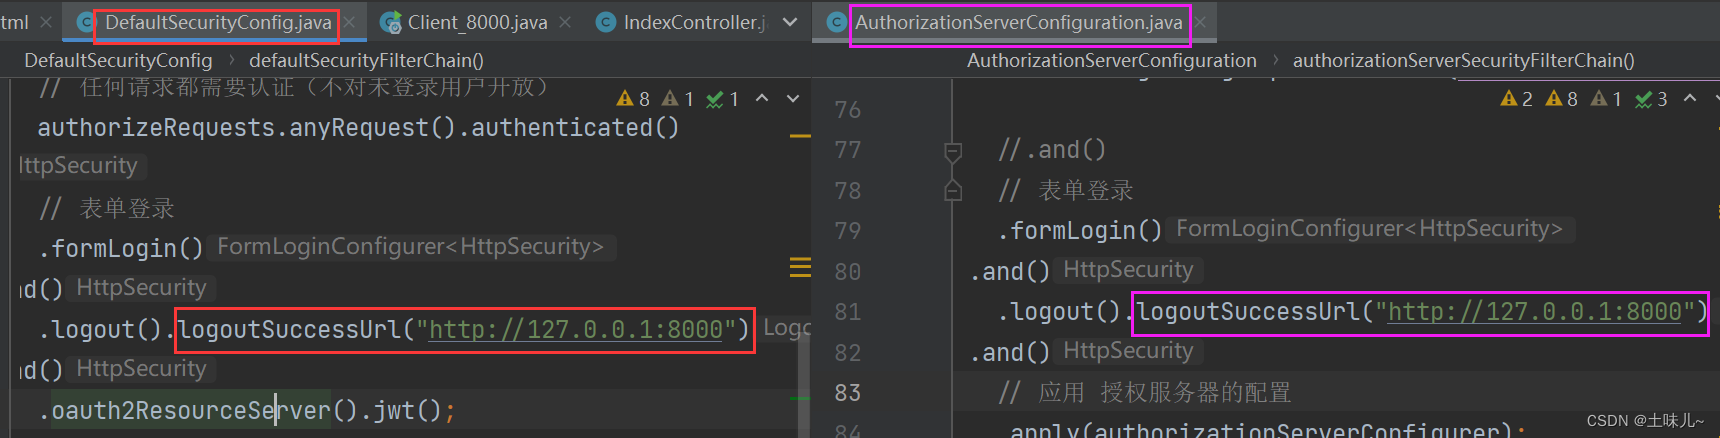
演示:

至此,本项目完结。
接下来,准备在此基础上,实现资源服务间相互调用…
| 阿里云国内75折 回扣 微信号:monov8 |
| 阿里云国际,腾讯云国际,低至75折。AWS 93折 免费开户实名账号 代冲值 优惠多多 微信号:monov8 飞机:@monov6 |