

Docker容器数据卷与数据卷容器
| 阿里云国内75折 回扣 微信号:monov8 |
| 阿里云国际,腾讯云国际,低至75折。AWS 93折 免费开户实名账号 代冲值 优惠多多 微信号:monov8 飞机:@monov6 |
文章目录
什么是容器数据卷
Docker理念回顾
将应用和运行的环境打包形成容器运行运行可以伴随着容器但是我们对于数据的要求是希望能够
持久化的
就好比你安装一个MySQL结果你把容器删了就相当于删库跑路了这TM也太扯了吧
所以我们希望容器之间有可能可以共享数据Docker容器产生的数据如果不通过docker commit 生成
新的镜像使得数据作为镜像的一部分保存下来那么当容器删除后数据自然也就没有了这样是行
不通的
为了能保存数据在Docker中我们就可以使用卷让数据挂载到我们本地这样数据就不会因为容器删除
而丢失了
Docekr作用
卷就是目录或者文件存在一个或者多个容器中由docker挂载到容器但不属于联合文件系统因此
能够绕过 Union File System 提供一些用于持续存储或共享数据的特性
卷的设计目的就是数据的持久化完全独立于容器的生存周期因此Docker不会在容器删除时删除其挂
载的数据卷。
Docker特点
- 数据卷可在容器之间共享或重用数据
- 卷中的更改可以直接生效
- 数据卷中的更改不会包含在镜像的更新中
- 数据卷的生命周期一直持续到没有容器使用它为止
总结一句话 就是容器的持久化以及容器间的继承和数据共享
使用数据卷
容器中直接使用命令来添加
# 命令
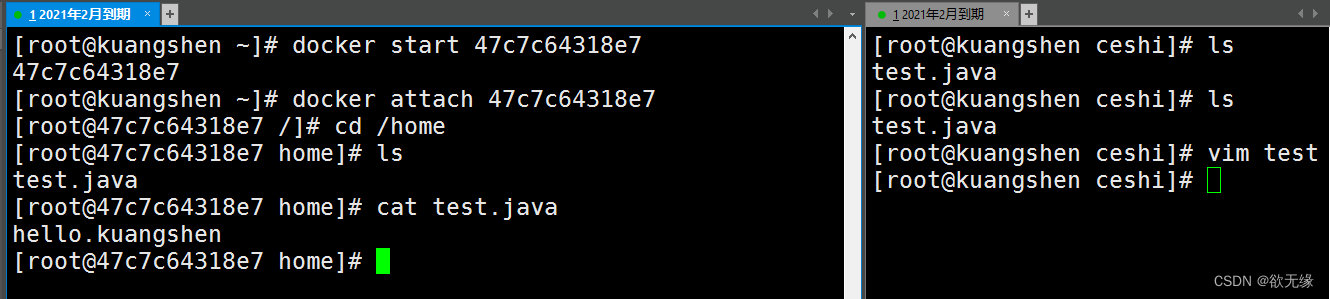
docker run -it -v 宿主机绝对路径目录:容器内目录 镜像名
# 测试
docker run -it -v /home/ceshi:/home centos /bin/bash
查看数据卷是否挂载成功 docker inspect 容器id

测试容器和宿主机之间数据共享可以发现在容器中创建的会在宿主机中看到

测试容器停止退出后主机修改数据是否会同步
- 停止容器
- 在宿主机上修改文件增加些内容
- 启动刚才停止的容器
- 然后查看对应的文件发现数据依旧同步ok
使用 docker 安装 mysql
思考mysql 数据持久化的问题
搜索镜像
docker search mysql
NAME               DESCRIPTION               STARS
mysql               MySQL is a widely used, open-source   relation…  9488
拉取镜像
docker pull mysql:5.7
5.7: Pulling from library/mysql
54fec2fa59d0: Already exists
bcc6c6145912: Pull complete
951c3d959c9d: Pull complete
05de4d0e206e: Pull complete
319f0394ef42: Pull complete
d9185034607b: Pull complete
013a9c64dadc: Pull complete
e745b3361626: Pull complete
03145d87b451: Pull complete
3991a6b182ee: Pull complete
62335de06f7d: Pull complete
Digest:
sha256:e821ca8cc7a44d354486f30c6a193ec6b70a4eed8c8362aeede4e9b8d74b8ebb
Status: Downloaded newer image for mysql:5.7
docker.io/library/mysql:5.7
启动容器
docker run -d -p 3310:3306 -v/home/mysql/conf:/etc/mysql/conf.d -v /home/mysql/data:/var/lib/mysql -e
MYSQL_ROOT_PASSWORD=123456 --name mysql01 mysql:5.7
使用本地的sqlyog连接测试一下 3310
查看本地的 /home/mysql 目录
 pwd
/home/mysql/data
 ls
.. ... . test  # 可以看到我们刚刚建立的mysql数据库在本地存储着
删除mysql容器
 docker rm -f mysql01
# ls
.. ... . test    # 可以看到我们刚刚建立的mysql数据库在本地存储着
删除容器然后发现远程连接失败
通过Docker File 来添加了解
DockerFile 是用来构建Docker镜像的构建文件是由一些列命令和参数构成的脚本。
我们在这里先体验下后面我们会详细讲解 DockerFile
我们在宿主机 /home 目录下新建一个 docker-test-volume文件夹
mkdir docker-test-volume
在编写DockerFile文件中使用 VOLUME 指令来给镜像添加一个或多个数据卷
VOLUME["/dataVolumeContainer1","/dataVolumeContainer2","/dataVolumeContainer3"]
出于可移植和分享的考虑我们之前使用的 -v 主机目录:容器目录 这种方式不能够直接在DockerFile中实现。
由于宿主机目录是依赖于特定宿主机的并不能够保证在所有宿主机上都存在这样的特定目录
编写DockerFile文件
vim dockerfile1
FROM centos
VOLUME ["/dataVolumeContainer1","/dataVolumeContainer2"]
CMD echo "-------end------"
CMD /bin/bash
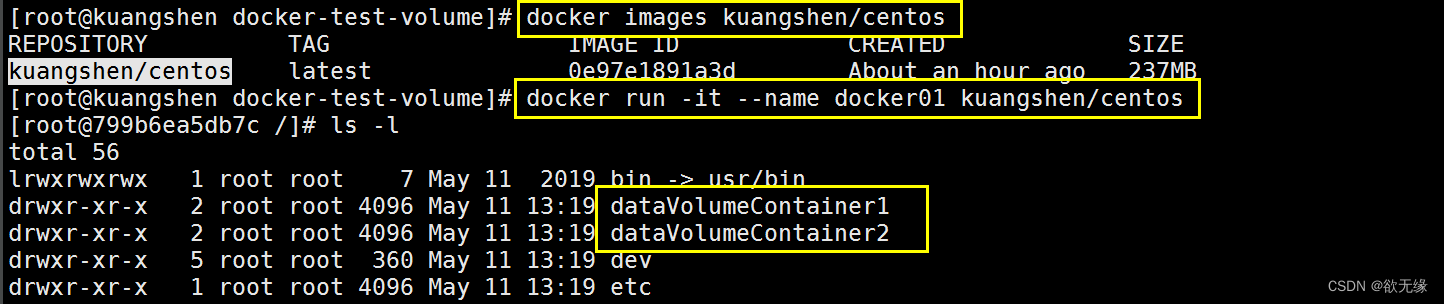
build后生成镜像获得一个新镜像 kuangshen/centos注意最后有个.
docker build -f /home/docker-test-volume/dockerfile1 -t kuangshen/centos .

启动容器
docker run -it 0e97e1891a3d /bin/bash
在容器内执行 ls -l
[root@f5824970eefc /] ls -l
total 56
lrwxrwxrwx  1 root root   7 May 11  2019 bin -> usr/bin
drwxr-xr-x  2 root root 4096 May 11 11:55 dataVolumeContainer1  # 数据卷目录
drwxr-xr-x  2 root root 4096 May 11 11:55 dataVolumeContainer2  # 数据卷目录
drwxr-xr-x  5 root root  360 May 11 11:55 dev
drwxr-xr-x  1 root root 4096 May 11 11:55 etc
drwxr-xr-x  2 root root 4096 May 11  2019 home
问题:通过上述步骤容器内的卷目录地址就已经知道了但是对应的主机目录地址在哪里呢
我们在数据卷中新建一个文件
[root@f5824970eefc dataVolumeContainer1] pwd
/dataVolumeContainer1
[root@f5824970eefc dataVolumeContainer1] touch container.txt
[root@f5824970eefc dataVolumeContainer1] ls -l
total 0
-rw-r--r-- 1 root root 0 May 11 11:58 container.txt
查看下这个容器的信息
docker inspect 0e97e1891a3d
查看输出的Volumes 发现看不到
"Volumes": {
  "/dataVolumeContainer1": {},
  "/dataVolumeContainer2": {}
},
其实这个卷在主机对应的默认位置

注意如果访问出现了 cannot open directory: Permission denied
解决办法在挂载目录后多加一个 --privileged=true参数即可
匿名和具名挂载
匿名挂载
docker run -d -P --name nginx01 -v /etc/nginx nginx # -v 容器内路径
匿名挂载的缺点就是不好维护通常使用命令 docker volume维护
docker volume ls
具名挂载
docker run -d -P --name nginx02 -v nginxconfig:/etc/nginx nginx #-v 卷名:/容器内路径
查看挂载的路径
docker volume inspect nginxconfig
[
 {
    "CreatedAt": "2020-05-13T17:23:00+08:00",
    "Driver": "local",
    "Labels": null,
    "Mountpoint": "/var/lib/docker/volumes/nginxconfig/_data",
    "Name": "nginxconfig",
    "Options": null,
    "Scope": "local"
 }
]
怎么判断挂载的是卷名而不是本机目录名不是/开始就是卷名是/开始就是目录名
指定容器对我们挂载出来的内容的读写权限
# ro: readonly
# rw: readwrite
docker run -d -P --name nginx02 -v nginxconfig:/etc/nginx:ro nginx
docker run -d -P --name nginx02 -v nginxconfig:/etc/nginx:rw nginx
数据卷容器
命名的容器挂载数据卷其他容器通过挂载这个父容器实现数据共享挂载数据卷的容器称之为
数据卷容器。
我们使用上一步的镜像kuangshen/centos 为模板运行容器 docker01docker02docker03他
们都会具有容器卷
"/dataVolumeContainer1"
"/dataVolumeContainer2"
我们来测试下容器间传递共享
先启动一个父容器docker01然后在dataVolumeContainer2新增文件

退出不停止ctrl+P+Q
创建docker02让它继承docker01 --volumes-from
docker run -it --name docker02 --volumes-from docker01 kuangshen/centos
查看有哪些文件
cd /dataVolumeContainer2
ls
docker01.txt
我们创建 docker02.txt
touch docker02.txt
ls
docker01.txt docker02.txt
创建docker03 让它继承docker01 --volumes-from
docker run -it --name docker03 --volumes-from docker01 kuangshen/centos
查看有哪些文件
cd /dataVolumeContainer2
ls
docker01.txt docker02.txt
我们创建 docker03.txt
touch docker03.txt
ls
docker01.txt docker02.txt docker03.txt
回到docker01发现可以看到 02 和 03 添加的共享文件
docker attach docker01
 ls -l
total 0
-rw-r--r-- 1 root root 0 May 11 13:20 docker01.txt
-rw-r--r-- 1 root root 0 May 11 13:22 docker02.txt
-rw-r--r-- 1 root root 0 May 11 13:24 docker03.txt
删除docker01docker02 修改后docker03还能不能访问
docker rm -f docker01
docker01
docker attach docker02
ls -l
total 0
-rw-r--r-- 1 root root 0 May 11 13:20 docker01.txt
-rw-r--r-- 1 root root 0 May 11 13:22 docker02.txt
-rw-r--r-- 1 root root 0 May 11 13:24 docker03.txt
 touch docker02-update.txt
 ls -a
. .. docker01.txt docker02.txt docker02-update.txt docker03.txt
 docker attach docker03
 ls -l
total 0
-rw-r--r-- 1 root root 0 May 11 13:20 docker01.txt
-rw-r--r-- 1 root root 0 May 11 13:22 docker02.txt
-rw-r--r-- 1 root root 0 May 11 13:29 docker02-update.txt
-rw-r--r-- 1 root root 0 May 11 13:24 docker03.txtl+P+Q 退出容器
删除docker02 docker03还能不能访问
docker ps
CONTAINER ID    IMAGE
95164598b306    kuangshen/centos
ea4c82779077    kuangshen/centos
docker rm -f docker02
docker02
docker attach docker03
ls -l
total 0
-rw-r--r-- 1 root root 0 May 11 13:20 docker01.txt
-rw-r--r-- 1 root root 0 May 11 13:22 docker02.txt
-rw-r--r-- 1 root root 0 May 11 13:29 docker02-update.txt
-rw-r--r-- 1 root root 0 May 11 13:24 docker03.txt
touch docker03-update.txt
新建docker04继承docker03然后再删除docker03看下是否可以访问

cd dataVolumeContainer2
 ls -l
total 0
-rw-r--r-- 1 root root 0 May 11 13:20 docker01.txt
-rw-r--r-- 1 root root 0 May 11 13:22 docker02.txt
-rw-r--r-- 1 root root 0 May 11 13:29 docker02-update.txt
-rw-r--r-- 1 root root 0 May 11 13:32 docker03-update.txt
-rw-r--r-- 1 root root 0 May 11 13:24 docker03.txt
# 查看当前运行的容器
 docker ps
CONTAINER ID    IMAGE           NAMES
2119f4f23a92    kuangshen/centos     docker04
95164598b306    kuangshen/centos     docker03
# 继续删除docker03
docker rm -f docker03
docker03
docker attach docker04
ls -l
total 0
-rw-r--r-- 1 root root 0 May 11 13:20 docker01.txt
-rw-r--r-- 1 root root 0 May 11 13:22 docker02.txt
-rw-r--r-- 1 root root 0 May 11 13:29 docker02-update.txt
-rw-r--r-- 1 root root 0 May 11 13:32 docker03-update.txt
-rw-r--r-- 1 root root 0 May 11 13:24 docker03.txt
得出结论
容器之间配置信息的传递数据卷的生命周期一直持续到没有容器使用它为止。
存储在本机的文件则会一直保留