

Android开发----实现登录注册页面(创建本地数据库,对注册的账户密码进行存储)
| 阿里云国内75折 回扣 微信号:monov8 |
| 阿里云国际,腾讯云国际,低至75折。AWS 93折 免费开户实名账号 代冲值 优惠多多 微信号:monov8 飞机:@monov6 |
实现登录注册页面创建本地数据库对注册的账户密码进行存储
写在前面
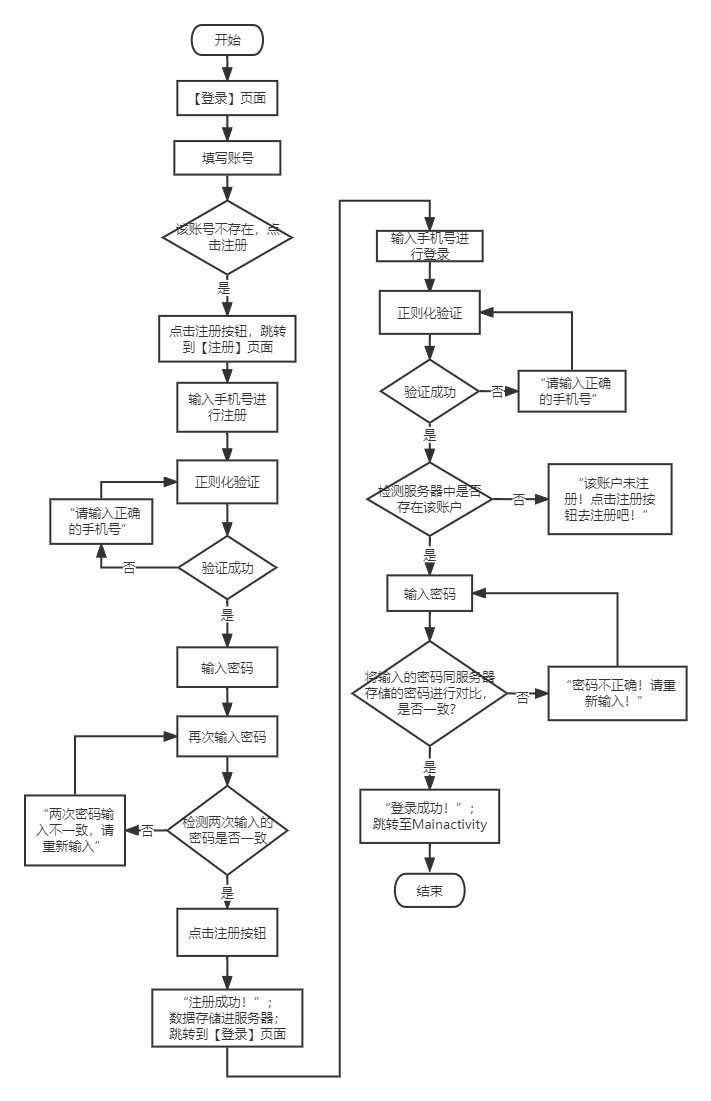
本文实现了登录注册页面的开发创建了本地数据库存储注册的账户密码。注册账户为手机号对账户为手机号进行了正则化验证。登录成功跳转至主页面。
目录
20221028-实现登录注册功能
登录注册的业务流程图
页面展示
源码如下
首先说一下项目部署是在原有项目新建两个activity项目右键–new–activity–empty activityLoginActivity登录页面布局文件.xml文件和登录.java文件和RegisterActivity注册页面布局文件.XML和注册.java文件两个活动并新建DBOpenHelper.javamain文件夹右键–new–.java类这个类是封装数据库的类。
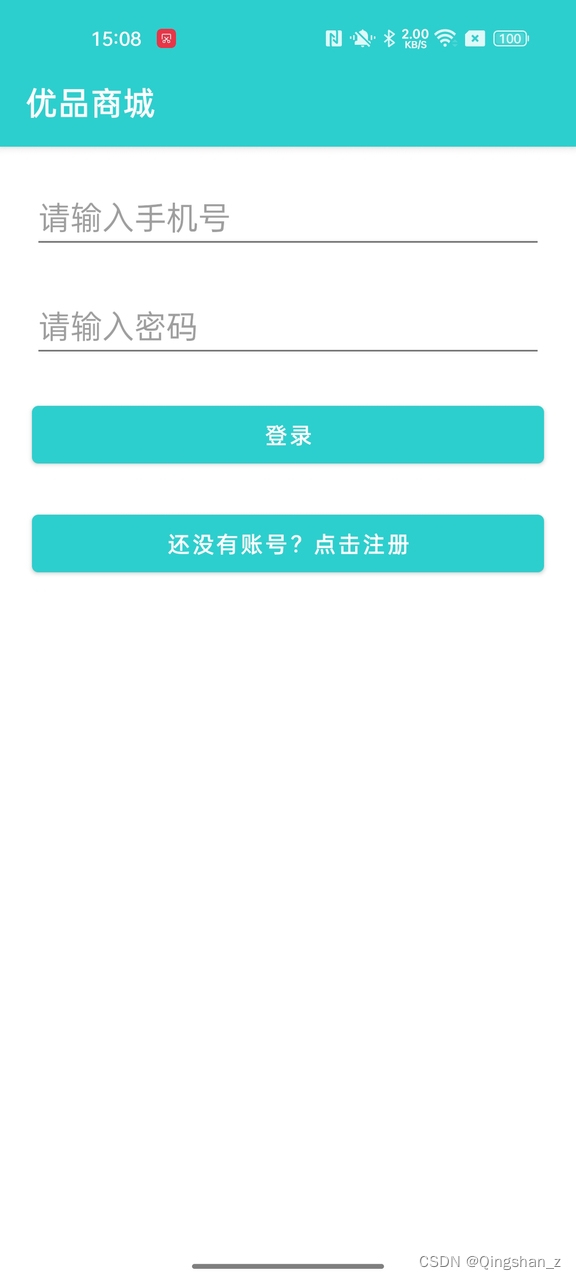
1.登录页面部署activity_login.xml
<?xml version="1.0" encoding="utf-8"?>
<LinearLayout xmlns:android="http://schemas.android.com/apk/res/android"
    xmlns:app="http://schemas.android.com/apk/res-auto"
    xmlns:tools="http://schemas.android.com/tools"
    android:orientation="vertical"
    android:layout_width="match_parent"
    android:layout_height="match_parent"
    tools:context=".LoginActivity">

<!--    不能输入多行要做数字判断-->
    <EditText
        android:id="@+id/et_username"
        android:layout_width="match_parent"
        android:layout_height="wrap_content"
        android:hint="请输入手机号"
        android:layout_marginLeft="20dp"
        android:layout_marginRight="20dp"
        android:layout_marginTop="20dp"
        android:gravity="center_vertical"
        android:textSize="20sp"/>
<!--密码也要判断-->
    <EditText
        android:id="@+id/et_password"
        android:layout_width="match_parent"
        android:layout_height="wrap_content"
        android:hint="请输入密码"
        android:layout_marginLeft="20dp"
        android:layout_marginRight="20dp"
        android:layout_marginTop="20dp"
        android:textSize="20sp"
        />
<!--    跳转到mainactivity-->
    <Button
        android:id="@+id/btn_login"
        android:layout_width="match_parent"
        android:layout_height="wrap_content"
        android:text="登录"
        android:layout_marginLeft="20dp"
        android:layout_marginRight="20dp"
        android:layout_marginTop="20dp"
        />
    <Button
        android:id="@+id/btn_register1"
        android:layout_width="match_parent"
        android:layout_height="wrap_content"
        android:text="还没有账号点击注册"
        android:layout_marginLeft="20dp"
        android:layout_marginRight="20dp"
        android:layout_marginTop="20dp"
        />
<!--    测试框 显示数据库存储的内容-->
<!-- 登录页面的最下面设置了个通过输入的用户名调用数据库结果的测试的listview栏-->
    <ListView
        android:id="@+id/test_text"
        android:layout_width="match_parent"
        android:layout_height="wrap_content"
    />
</LinearLayout>
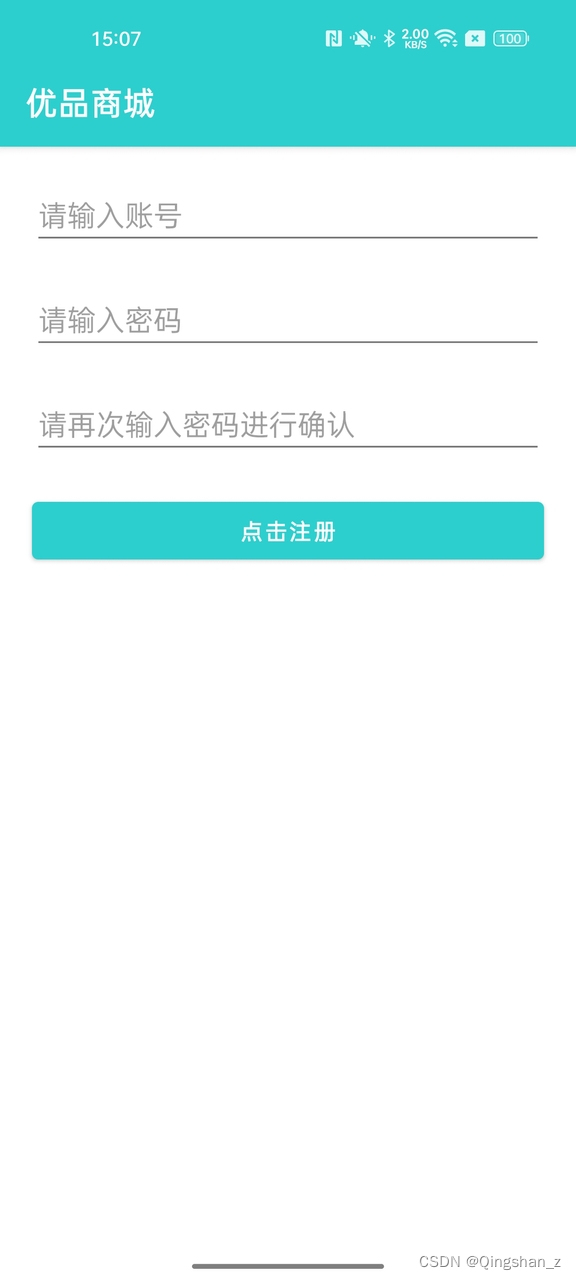
2.注册页面部署activity_register.xml
<?xml version="1.0" encoding="utf-8"?>
<LinearLayout xmlns:android="http://schemas.android.com/apk/res/android"
    xmlns:app="http://schemas.android.com/apk/res-auto"
    xmlns:tools="http://schemas.android.com/tools"
    android:layout_width="match_parent"
    android:layout_height="match_parent"
    android:orientation="vertical"
    tools:context=".RegisterActivity">
    <EditText
        android:id="@+id/et_register_username"
        android:layout_width="match_parent"
        android:layout_height="wrap_content"
        android:hint="请输入账号"
        android:layout_marginLeft="20dp"
        android:layout_marginRight="20dp"
        android:layout_marginTop="20dp"/>
    <EditText
        android:id="@+id/et_register_password"
        android:layout_width="match_parent"
        android:layout_height="wrap_content"
        android:hint="请输入密码"
        android:layout_marginLeft="20dp"
        android:layout_marginRight="20dp"
        android:layout_marginTop="20dp"/>
    <EditText
        android:id="@+id/et_again_password"
        android:layout_width="match_parent"
        android:layout_height="wrap_content"
        android:hint="请再次输入密码进行确认"
        android:layout_marginLeft="20dp"
        android:layout_marginRight="20dp"
        android:layout_marginTop="20dp"/>
    <Button
        android:id="@+id/btn_register"
        android:layout_width="match_parent"
        android:layout_height="wrap_content"
        android:text="点击注册"
        android:layout_marginLeft="20dp"
        android:layout_marginRight="20dp"
        android:layout_marginTop="20dp"
        />
</LinearLayout>
3.新建数据库java文件DBOpenHelper.java
新建数据库用来存储注册的用户名和密码
package com.domain.mainView;

import android.content.Context;
import android.database.sqlite.SQLiteDatabase;
import android.database.sqlite.SQLiteOpenHelper;

public class DBOpenHelper extends SQLiteOpenHelper {

    //定义创建用户数据表的SQL语句  主键user数据库表 username和password字段
    final String CREATE_USER_SQL=
            "create table user(_id integer primary " + "key autoincrement , username, password)";
    public DBOpenHelper(Context context, String name, SQLiteDatabase.CursorFactory factory, int version){
        super(context,name,null,version);
    }
    @Override
    //数据库第一次创建时被调用
    public void onCreate(SQLiteDatabase db){
        //创建用户列表 execSQL执行修改数据库内容的SQL语句
        db.execSQL(CREATE_USER_SQL);
    }

    @Override
    //版本号发生改变时使用
    public void onUpgrade(SQLiteDatabase db, int oldVersion, int newVersion) {
        //提示版本更新
        System.out.println("---版本更新----"+oldVersion+"--->"+newVersion);
    }
}
4.注册页面RegisterActivity.java
package com.domain.mainView;

import androidx.appcompat.app.AppCompatActivity;
import android.content.ContentValues;
import android.database.sqlite.SQLiteDatabase;
import android.os.Bundle;
import android.text.TextUtils;
import android.view.View;
import android.widget.Button;
import android.widget.EditText;
import android.widget.Toast;
import java.util.regex.Matcher;
import java.util.regex.Pattern;

public class RegisterActivity extends AppCompatActivity {
    public static final int RESULT_CODE_REGISTER=0;
    private Button btn_register;
    private EditText et_register_username,et_register_password,et_again_password;
    /*数据库成员变量*/
    private DBOpenHelper dbOpenHelper;

    String et_name;
    String et_password;
    @Override
    protected void onCreate(Bundle savedInstanceState) {
        super.onCreate(savedInstanceState);
        setContentView(R.layout.activity_register);
        //注册按钮
        btn_register=(Button) findViewById(R.id.btn_register);
        //用户名编辑框
        et_register_username= findViewById(R.id.et_register_username);
        //密码编辑框
        et_register_password=findViewById(R.id.et_register_password);
        //再次输入密码编辑框
        et_again_password=findViewById(R.id.et_again_password);

        /*实例化数据库变量dbOpenHelper*/
        dbOpenHelper=new DBOpenHelper(RegisterActivity.this,"user.db",null,1);

        btn_register.setOnClickListener(new View.OnClickListener() {
            @Override
            public void onClick(View view) {
            //获取三个编辑框的内容
                String et_name=et_register_username.getText().toString();
                String et_password=et_register_password.getText().toString();
                String et_confirm=et_again_password.getText().toString();

                //判断异常情况弹窗
                //编辑框为空
                if(TextUtils.isEmpty(et_name)){
                    Toast.makeText(RegisterActivity.this,"用户名不能为空",Toast.LENGTH_SHORT).show();
                    //对用户名进行手机号正则化验证调用下面写的idTelPhoneNumber方法
                }else if(!isTelPhoneNumber(et_name)){
                    Toast.makeText(RegisterActivity.this,"请输入正确的手机号码",Toast.LENGTH_SHORT).show();
                } else if(TextUtils.isEmpty(et_password)){
                    Toast.makeText(RegisterActivity.this,"密码不能为空",Toast.LENGTH_SHORT).show();
                    //两次密码框内容不一致
                }else if(!TextUtils.equals(et_password,et_confirm)){
                    Toast.makeText(RegisterActivity.this,"密码不一致",Toast.LENGTH_SHORT).show();
                } else{
                //存储注册的用户名和密码 把账号密码存储进数据库
                    insertData(dbOpenHelper.getReadableDatabase(),et_name,et_password);
                    Toast.makeText(RegisterActivity.this,"注册成功",Toast.LENGTH_SHORT).show();
                }
                //关闭注册页面 跳转到登录页面
                RegisterActivity.this.finish();
            }
        });
    }
    /*正则化验证手机号码方法*/
    public static boolean isTelPhoneNumber(String mobile) {
        if (mobile != null && mobile.length() == 11) {
            Pattern pattern = Pattern.compile("^1[3|4|5|6|7|8|9][0-9]\\d{8}$");
            Matcher matcher = pattern.matcher(mobile);
            return matcher.matches();
        }else{
            return false;
        }
    }
    //创建数据库的insert方法 插入数据方法
    private void insertData(SQLiteDatabase readableDatabase, String username1, String password1){
        ContentValues values=new ContentValues();
        values.put("username",username1);
        values.put("password",password1);
        readableDatabase.insert("user",null,values);
    }
    //重写onDestroy()方法
    @Override
    protected void onDestroy() {
        super.onDestroy();
        if (dbOpenHelper != null) {
            dbOpenHelper.close();
        }
    }
}
5.登录页面LoginActivity.java
package com.domain.mainView;

import androidx.appcompat.app.AppCompatActivity;
import android.content.Intent;
import android.database.Cursor;
import android.os.Bundle;
import android.util.Log;
import android.view.View;
import android.widget.Button;
import android.widget.EditText;
import android.widget.ListView;
import android.widget.SimpleAdapter;
import android.widget.Toast;
import java.util.ArrayList;
import java.util.HashMap;
import java.util.Map;
import java.util.regex.Matcher;
import java.util.regex.Pattern;

public class LoginActivity extends AppCompatActivity {

    //定义登录Button 编辑框
    private Button btn_login;
    private EditText et_password,et_userName;
    /*定义数据库所需成员变量 */
    private DBOpenHelper dbOpenHelper;
    //数据库里存储的password
    String dbpassword;

    @Override
    protected void onCreate(Bundle savedInstanceState) {
        super.onCreate(savedInstanceState);
        setContentView(R.layout.activity_login);
        ListView test_text=(ListView)findViewById(R.id.test_text);
        //初始化
        initView();
        //注册完之后更新

        /*定义数据库对象 */
        dbOpenHelper=new DBOpenHelper(LoginActivity.this,"user.db",null,1);

        /*点击跳转至注册页面 【还没有账号点击注册】按钮*/
        Button btn_register1=(Button)findViewById(R.id.btn_register1);
        btn_register1.setOnClickListener(new View.OnClickListener() {
            @Override
            public void onClick(View view) {
                //点击按钮跳转到注册页面
                Intent intent = new Intent(getApplicationContext(), RegisterActivity.class);
                //注册返回代码为0时跳转
                startActivity(intent);
            }
        });

        //登录按钮单击事件
        btn_login=(Button)findViewById(R.id.btn_login);
        btn_login.setOnClickListener(new View.OnClickListener() {
            @Override
            public void onClick(View view) {
                //获取输入的密码框内容
                String etpassword=et_password.getText().toString();
                /*获取数据库里的数据*/
                //登录按钮获取要查询的账号
                String key=et_userName.getText().toString();
                Cursor cursor=dbOpenHelper.getReadableDatabase().query("user",null,"username = ?",new String[]{key},null,null,null);
                //创建ArrayList对象用于保存用户数据结果
                ArrayList<Map<String,String>> resultList =new ArrayList<Map<String,String>>();//不用测试的话直接遍历取值getstring2就行创建数组可以省去。
                while(cursor.moveToNext()){
                    //将结果集中的数据存入HashMap
                    Map<String,String> map=new HashMap<>();
                    //取出查询结果第二列和第三列的值
                    //用户名
                    map.put("username",cursor.getString(1));
                    //密码
                    map.put("password",cursor.getString(2));
                    resultList.add(map);

                    //获取数据库中符合用户名的对应的密码
                    dbpassword=map.get("password");
                }
                //正则化判断输入的账号是否符合手机号格式
                if(!isTelPhoneNumber(key)){
                    Toast.makeText(LoginActivity.this,"请输入正确的手机号",Toast.LENGTH_SHORT).show();
                }else if (resultList == null || resultList.size() == 0) { //如果数据库中没有查询的用户数据
                    //显示提示信息没有相关记录
                    Toast.makeText(LoginActivity.this,
                            "该用户名未注册请先注册", Toast.LENGTH_LONG).show();
                } else {
                /*R.layout.userdata_main、R.id.result_name, R.id.result_grade
                这里的是我登录页面里面有个测试框用来显示数据库中符合输入的用户名的结果的
                等会写在下面把 只有一个userdata_main.xml */
                    SimpleAdapter simpleAdapter= new SimpleAdapter(LoginActivity.this, resultList,
                            R.layout.userdata_main, new String[]{"username", "password"}, new int[]{R.id.result_name, R.id.result_grade});
                    //将适配器和测试的listview关联我这里的listview叫test_text
                    test_text.setAdapter(simpleAdapter);

                    //查到了用户 对比输入的密码与数据库的密码是否一致 如果相等跳转到主页面去
                    if(etpassword.equals(dbpassword)){
                        Toast.makeText(LoginActivity.this,"登陆成功",Toast.LENGTH_SHORT).show();
                        //跳转到Mainactivity
                        Intent intent=new Intent(LoginActivity.this,MainActivity.class);
                        startActivity(intent);
                        //关闭登录页面
                        LoginActivity.this.finish();
                    }else{
                        Toast.makeText(LoginActivity.this,"密码错误",Toast.LENGTH_SHORT).show();
                    }
                };
            }
        });
    }
    /*正则化验证手机号码*/
    public static boolean isTelPhoneNumber(String mobile) {
        if (mobile != null && mobile.length() == 11) {
            Pattern pattern = Pattern.compile("^1[3|4|5|6|7|8|9][0-9]\\d{8}$");
            Matcher matcher = pattern.matcher(mobile);
            return matcher.matches();
        }else{
            return false;
        }
    }
    //定义初始化
    private void initView(){
        btn_login=findViewById(R.id.btn_login);
        et_userName=findViewById(R.id.et_username);
        et_password=findViewById(R.id.et_password);
    }

//    //重写onDestroy()方法
    @Override
    protected void onDestroy() {
        super.onDestroy();
        if (dbOpenHelper != null) {
            dbOpenHelper.close();
        }
    }
}
6.这里是我登录页面上最下面有个测试窗口布局调用的这个XML
这个窗口是用来显示输入框输入的用户名与之匹配的数据库的结果的userdata_main.XML(res文件夹–右键–new–layoutxml)
<?xml version="1.0" encoding="utf-8"?>
<LinearLayout xmlns:android="http://schemas.android.com/apk/res/android"
    android:layout_width="match_parent"
    android:layout_height="match_parent"
    android:orientation="vertical">
    <TextView
        android:layout_width="match_parent"
        android:layout_height="wrap_content"
        android:id="@+id/result_name"/>
    <TextView
        android:layout_width="match_parent"
        android:layout_height="wrap_content"
        android:id="@+id/result_grade"/>
    <TextView
        android:id="@+id/textView1"
        android:layout_width="match_parent"
        android:layout_height="wrap_content"
        />
    <TextView
        android:id="@+id/textView2"
        android:layout_width="match_parent"
        android:layout_height="wrap_content"
        />
</LinearLayout>
tips要设置下点进APP就是Login登录页面哦在AndroidManifest.XML里面
 <activity
            android:name=".LoginActivity"
            android:exported="true">
            <intent-filter>
                <action android:name="android.intent.action.MAIN" />
                <category android:name="android.intent.category.LAUNCHER" />
            </intent-filter>
            />
/*注意这里同时要把mainactivity的exported属性改为false 并删除<intent-filter>属性*/
		   <activity
		    android:name=".MainActivity"
            android:exported="false"/>
登录注册的所有内容都在这里啦码字不易来过的点个赞吧
还有还有Android新手一枚实现的功能比较简单也有很多问题还没考虑到
有什么意见欢迎多多指教有什么问题也欢迎留在评论区沟通交流哦
下一篇点击查看商城主页面底部导航栏的创建使用Bottom Navigation Activity+Fragment+ViewPager实现底部导航栏
相关文章
Android开发----实现应用启动页
Android开发----ViewPager实现广告轮播图
Android商城开发----点击左侧分类实现右侧更新为对应的商品列表
RecyclerView设置点击选中更改背景颜色 这里是更改选中效果
Android商城开发----点击加入购物车购物车商品的增删减