

SpringBoot第三讲
| 阿里云国内75折 回扣 微信号:monov8 |
| 阿里云国际,腾讯云国际,低至75折。AWS 93折 免费开户实名账号 代冲值 优惠多多 微信号:monov8 飞机:@monov6 |
三、SpringBoot+MybatisPlus+Vue增删改查
3.1 查询
后台查询代码
@RestController
@RequestMapping("/t-user")
public class TUserController {
@Resource
private ITUserService itUserService;
/**
* 查询所有的数据
*/
@GetMapping
public Result getAll(){
return new Result(itUserService.list());
}
}运行项目后可以先在浏览器访问路径看看是否正确
前端查询代码
<template>
<div>
<!-- 表格数据 -->
<el-table :data="tableData" style="width: 100%" :row-class-name="tableRowClassName">
<!-- 表格中的prop属性要和数据库的列名保持一致 -->
<el-table-column prop="id" label="编号">
</el-table-column>
<el-table-column prop="username" label="姓名">
</el-table-column>
<el-table-column prop="sex" label="性别">
</el-table-column>
<el-table-column prop="birthday" label="生日">
</el-table-column>
<el-table-column prop="status" label="状态">
<template slot-scope="scope">
<el-switch
disabled
v-model="scope.row.status"
active-color="#13ce66"
inactive-color="#ff4949"
:active-value="1"
:inactive-value="2">
</el-switch>
<!--
disabled 禁用开关
v-model="scope.row.status" 绑定模板当前行的status值
active-color="#13ce66" 未禁用颜色
inactive-color="#ff4949" 禁用颜色
:active-value="1" 未禁用值
:inactive-value="2"> 禁用值
-->
</template>
</el-table-column>
<el-table-column label="操作">
<template slot-scope="scope">
<el-button type="primary" icon="el-icon-edit" circle></el-button>
<el-button type="danger" icon="el-icon-delete" circle></el-button>
</template>
</el-table-column>
</el-table>
</div>
</template>
<style>
.el-table .warning-row {
/* 表格的提示背景色 */
background: oldlace;
}
.el-table .success-row {
/* 表格的提示背景色 */
background: #f0f9eb;
}
</style>
<script>
import qs from "qs"
export default {
methods: {
initTable() { //查询函数
// 发出axios请求向后台请求数据
this.$axios.get("t-user").then(r => {
//将请求来的数据赋值给表格数据
this.tableData = r.data.t;
})
},
tableRowClassName({
row,
rowIndex
}) {
if (rowIndex%4 === 0) { //行数对4取余为0时提示的颜色
return 'warning-row';
} else if (rowIndex%4 === 2) {//行数对4取余为2时提示的颜色
return 'success-row';
}
return '';
}
},
data() {
return {
// 表格数据定义的变量
tableData: [],
}
},
created() { //初始化钩子函数
// 调用查询函数
this.initTable()
}
}
</script>
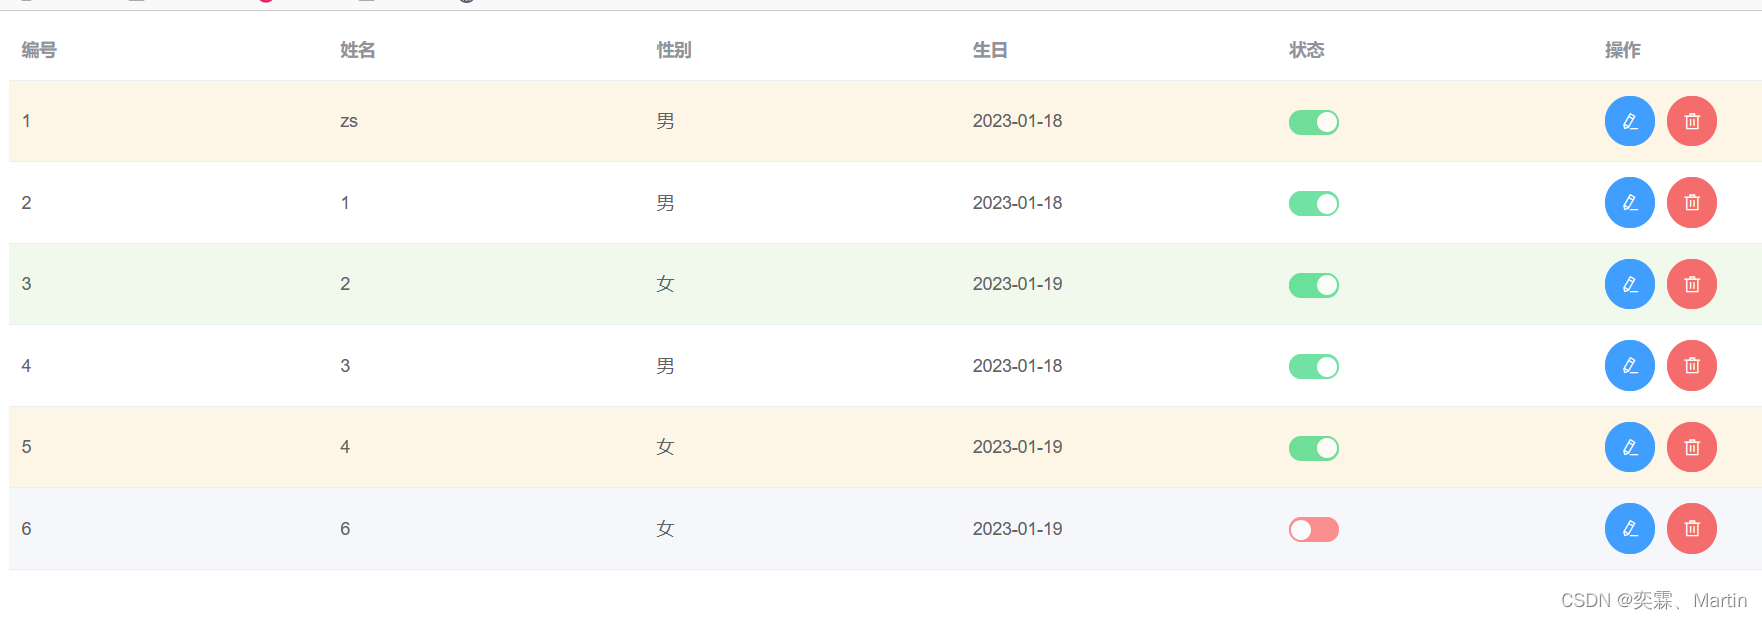
简单查询效果
查询时如果时间格式为datatime查询出来的时间有年月日时分秒并且会多出一个T但在前段进行显示时不需要显示那个T所以需要进行替换
替换代码如下

// 循环替换时间字符串中的 T 字符
                    for (let i = 0; i < r.data.t.records.length; i++) {
                        r.data.t.records[i].recordtime = r.data.t.records[i].recordtime.replace(/T/g, ' ')
                            .replace(/.[\d]{3}Z/, ' ')
                    }
3.2 删除
前端代码
1、在表格中定义删除按钮
<el-table-column label="操作">
                <template slot-scope="scope">
                    <!-- 修改的按钮 -->
                    <el-button type="primary" icon="el-icon-edit" circle></el-button>
                    <!-- 删除的按钮  定义函数时把当前行的数据传递过去-->
                    <el-button type="danger" icon="el-icon-delete" circle @click="delUser(scope.row)"></el-button>
                </template>
            </el-table-column>
2、定义并编写函数
delUser(row){
                // row代表的是当前行的数据
                //根据id删除数据
                let id = row.id
                // 两种传递格式都可以
                this.$axios.delete(`t-user/${id}`).then(r=>{
                // this.$axios.delete(`t-user/`+id).then(r=>{
                    if(r.data.code=200){
                        console.log("操作成功")
                        //删除成功后刷新表格
                        this.initTable();
                    }
                })
            }
后端代码
    /**
     * 根据id 对用户进行删除
     * rest风格的编写方式  路由/参数
     * 这里的参数可以随便命名如果方法中的形参和此处参数命名不同
     * 则需要在注解@Pathvariable中进行注明对应的哪一个参数
     */
    @DeleteMapping("{id}")
    public Result delUser(@PathVariable Integer id){
        //        这里根据id进行删除时是对应实体类中的@TableId属性进行删除如果对应的实体类中没有对应的属性删除将不会成功
        return new Result(itUserService.removeById(id));
    }
简单的删除就可以了
但是没有删除确认提醒显然不够人性化万一是误删呢
添加删除确认提醒
            delUser(row) {
                // row代表的是当前行的数据
                //根据id删除数据
                let id = row.id
                this.$confirm('此操作将永久删除该文件, 是否继续?', '提示', {
                    confirmButtonText: '确定',
                    cancelButtonText: '取消',
                    type: 'warning'
                }).then(() => { //确认按钮触发的事件
                    // 两种传递格式都可以
                    this.$axios.delete(`t-user/${id}`).then(r => {
                        // this.$axios.delete(`t-user/`+id).then(r=>{
                        if (r.data.code = 200) {
                            this.$message({
                                showClose: true,
                                type: 'success',
                                message: '删除成功!'
                            });
                            //删除成功后刷新表格
                            this.initTable();
                        }
                    })
                }).catch(() => { //取消按钮触发的事件
                    this.$message({
                        showClose: true,//可关闭消息提示框
                        type: 'info',
                        message: '已取消删除'
                    });
                });
            }
上面的删除是真删除也有一种删除是一种逻辑删除
逻辑删除配置
#MybatisPlus逻辑删除
# 1 1代表逻辑删除之前的值
mybatis-plus.global-config.db-config.logic-not-delete-value=1
# 2 2代表逻辑删除之后的值
mybatis-plus.global-config.db-config.logic-delete-value=2
实体类中添加@TableLogic注解
    /**
     * 状态
     * @TableLogic:逻辑删除注解
     */
    @TableLogic
    private Integer status;
其他地方和删除一样只不过逻辑删除是将status值修改为逻辑删除之后的值查询时会自动添加status=1的条件所以是逻辑删除
3.3 添加
前端代码
1、定义添加按钮和添加事件
<el-button type="primary" plain @click="addUser" style="float: right;">添加</el-button>2、定义添加按钮的弹出层
<!-- 添加或修改对话框 -->
        <el-dialog title="提示" :visible.sync="dialogVisible" width="30%" :before-close="handleClose">
            <span>
                <!-- 添加/修改表单 -->
                <el-form ref="form" :model="form" label-width="80px">
                    <el-form-item label="名字">
                        <el-input v-model="form.username"></el-input>
                    </el-form-item>
                    <el-form-item label="性别" prop="sex" :label-width="formLabelWidth">
                        <el-select v-model="form.sex" placeholder="请选择..." style="width: 100%;">
                            <el-option v-for="item in sexoptions" :key="item.value" :label="item.label"
                                :value="item.value">
                            </el-option>
                        </el-select>
                    </el-form-item>
                    <el-form-item label="生日">
                        <el-col :span="11">
                            <!-- format:代表着前端显示时间的格式   value-format代表的是前端向后台传递数据的格式 -->
                            <el-date-picker type="date" value-format="yyyy-MM-dd" placeholder="选择日期"
                                v-model="form.birthday" style="width: 100%;">
                            </el-date-picker>
                        </el-col>
                    </el-form-item>
                    <el-form-item label="状态">
                        <el-switch v-model="form.status" active-color="#13ce66" inactive-color="#ff4949"
                            :active-value="1" :inactive-value="2" disabled>
                        </el-switch>
                    </el-form-item>
                    <el-form-item>
                        <el-button type="primary" @click="onSubmit">确定</el-button>
                        <!-- 点击取消按钮关闭对话框 -->
                        <el-button @click="dialogVisible=false">取消</el-button>
                    </el-form-item>
                </el-form>
            </span>
        </el-dialog>
3、弹出层使用到的变量
// 对话框的控制值
                dialogVisible: false,
                //表格通用长度
                formLabelWidth: '80px',
                //添加或修改表单对应的变量
                form: {},
                /* 选择框中的性别 */
                sexoptions: [{
                    value: '男',
                    label: '男'
                }, {
                    value: '女',
                    label: '女'
                }],
4、编写按钮触发的addUser函数
addUser() { //添加按钮触发事件
//打开对话框
this.dialogVisible = true;
//添加时初始状态的值设置为启用
this.form = {
status: 1
}
},5、对话框关闭函数
handleClose(done) { //修改或添加对话框关闭按钮触发事件
                this.$confirm('确认关闭')
                    .then(_ => {
                        done();
                    })
                    .catch(_ => {});
            },
6、编写表单提交事件
onSubmit() { //添加/修改表单确定按钮触发的事件
                // 添加的时候把form里面的内容传到后台即可
                this.$axios.post("t-user",qs.stringify(this.form)).then(r=>{
                    if(r.data.t==true){
                        this.$message({
                            showClose: true,
                            type: 'success',
                            message: '操作成功!'
                        });
                        // 关闭弹出对话框
                        this.dialogVisible = false;
                        // 将表单内容清空
                        this.form = {};
                        //刷新表格数据
                        this.initTable();
                    }else{
                        this.$message({
                            showClose: true,
                            type: 'warning',
                            message: '操作失败!'
                        });
                    }
                })
            },
后端代码
实体类
    /**
     * 用户生日
     * @DateTimeFormat接收前台格式的注解要和前端的时间格式保持一致
     */
    @DateTimeFormat(pattern = "yyyy-MM-dd")
    private LocalDate birthday;
controller层
    /**
     * 添加/修改用户信息
     * 因为前端的key值都是和实体类的列名一致所以这里用实体类接收即可
     */
    @PostMapping
    public Result addOrUpd(TUser tUser){
        return new Result(itUserService.saveOrUpdate(tUser));
    }
3.4 修改
修改和添加功能类似
1、定义修改按钮和修改事件
<el-table-column label="操作">
                <template slot-scope="scope">
                    <!-- 修改的按钮 -->
                    <el-button type="primary" icon="el-icon-edit" circle @click="updUser(scope.row)"></el-button>
                    <!-- 删除的按钮  定义函数时把当前行的数据传递过去-->
                    <el-button type="danger" icon="el-icon-delete" circle @click="delUser(scope.row)"></el-button>
                </template>
            </el-table-column>
2、编写修改按钮触发函数
updUser(row) {
                //打开对话框
                this.dialogVisible = true;
                //将当前这一行的数据赋值给表单
                //this.form = row  浅拷贝的形式不行
                //采取深克隆的形式    JSON.stringify(row):转化为json字符串
                // JSON.parse():把JSON字符串转化为JSON对象
                this.form = JSON.parse(JSON.stringify(row));
            }
表单提交和后端函数和添加使用的都是同一份所以不需要再编写别的东西
3.5 分页
1、添加分页组件
        <!-- 分页组件 -->
        <el-pagination
              @size-change="handleSizeChange"
              @current-change="handleCurrentChange"
              :current-page="page.current"
              :page-sizes="[2, 4, 6, 8]"
              :page-size="page.size"
              layout="total, sizes, prev, pager, next, jumper"
              :total="page.total">
        </el-pagination>
2、定义函数及变量
handleSizeChange(val) { //分页组件 每页条数改变触发函数
                console.log(`每页 ${val} 条`);
            },
            handleCurrentChange(val) { //分页组件 当前页改变触发函数
                console.log(`当前页: ${val}`);
            }

#变量
page: {
                    current: 1,
                    size: 2,
                    total: 20
                }
3、编写分页函数
分页用的函数也是查询的函数initTable()
只需要把信息传到后台即可
initTable() { //查询函数
                // 发出axios请求向后台请求数据
                // 参数传递为this.page
                this.$axios.get("t-user",{params:this.page}).then(r => {
                    //将请求来的数据赋值给表格数据
                    this.tableData = r.data.t;
                })
            },
4、分页插件
    /**
     * 新的分页插件,一缓和二缓遵循mybatis的规则,需要设置 MybatisConfiguration#useDeprecatedExecutor = false 避免缓存出现问题(该属性会在旧插件移除后一同移除)
     */
    @Bean
    public MybatisPlusInterceptor mybatisPlusInterceptor() {
        MybatisPlusInterceptor interceptor = new MybatisPlusInterceptor();
        interceptor.addInnerInterceptor(new PaginationInnerInterceptor(DbType.MYSQL));
        return interceptor;
    }
    @Bean
    public ConfigurationCustomizer configurationCustomizer() {
        return configuration -> configuration.setUseDeprecatedExecutor(false);
    }
5、后台接收并调用参数
    /**
     * 查询所有的数据
     * 并进行分页
     */
    @GetMapping
    public Result getAll(Page page){
        //这里参数取名为page
        Page page1 = itUserService.page(page);
        return new Result(page1);
    }
6、分页数据查询结果格式
{
  code:状态码
  msg:信息
  t:{
    records:[{}],
    size:
    current:
  }
}
7、修改前台数据
tableData里面的数据对应的我我们传递过去的对象t里面的属性records
所以需要更改数据
initTable() { //查询函数
                // 发出axios请求向后台请求数据
                // 参数传递为this.page
                this.$axios.get("t-user",{params:this.page}).then(r => {
                    //将请求来的数据赋值给表格数据这里数据在records中
                    this.tableData = r.data.t.records;
                    // 查询数据的总条数赋值给total
                    this.page.total = r.data.t.total;
                })
            },
8、编写当前页和每页条数触发函数
handleSizeChange(val) { //分页组件 每页条数改变触发函数
                console.log(`每页 ${val} 条`);
                // 将当前每页条数赋值给size
                this.page.size = val;
                // 重新调用查询函数
                this.initTable();
            },
            handleCurrentChange(val) { //分页组件 当前页改变触发函数
                console.log(`当前页: ${val}`);
                this.page.current=val;
                this.initTable();
            }
3.6 模糊查询
1、搜索框和搜索按钮以及重置按钮
<!-- 模糊查询 -->
        <el-input v-model="searchform.username" placeholder="请输入用户名"
            style="width:130px;margin-right: 5px;margin-bottom: 5px; float: left;">
        </el-input>
        <el-button icon="el-icon-delete" circle @click="resetSearchForm()"
            style="wmargin-right: 5px;margin-bottom: 5px; float: left;"></el-button>
        <el-button icon="el-icon-search" circle @click="queryData()"
            style="margin-right: 5px;margin-bottom: 5px; float: left;"></el-button>
2、定义变量修改函数
//模糊查询对象
                searchform: {}
函数
queryData() { //模糊查询按钮触发事件
                this.page.current = 1;
                this.initTable();
            },
            resetSearchForm() { //模糊查询重置按钮触发事件
                console.log("diaoyong")
                // 清空模糊查询条件
                this.searchform = {};
                this.initTable();
            }
后台代码
    /**
     * 查询所有的数据
     * 并进行分页
     * 模糊查询
     */
    @GetMapping
    public Result getAll(Page page,TUser tUser){
        QueryWrapper queryWrapper = new QueryWrapper();
        if (StringUtils.isNotBlank(tUser.getUsername())){
            queryWrapper.like("username",tUser.getUsername());
        }
        //这里参数取名为page
        Page page1 = itUserService.page(page,queryWrapper);
        return new Result(page1);
    }