手写RPC框架08-自定义SpringBoot-Starter
| 阿里云国内75折 回扣 微信号:monov8 |
| 阿里云国际,腾讯云国际,低至75折。AWS 93折 免费开户实名账号 代冲值 优惠多多 微信号:monov8 飞机:@monov6 |
系列文章
- 注册中心模块实现
- 路由模块实现
- 序列化模块实现
- 过滤器模块实现
- 自定义SPI机制增加框架的扩展性的设计与实现
- 基于线程和队列提升框架并发处理能力
- 框架容错性相关设计
- 通过SpringBoot-Starter接入SpringBoot
为什么要接入Spring/SpringBoot
目前Spring和SpringBoot在Java领域应该是主流的开发框架了国内的小伙伴应该是无人不用唯一的差异点可能就是有的人还没有使用过SpringBoot但Spring肯定是事实标准了。
Spring/SpringBoot有啥优点呢简单来说是它帮我们减少了很多不必要的工作比如第三方中间件的集成、框架的集成它都有一套自己的封装因此目前主流的框架或者中间件都会去适配Spring/SpringBoot一方面为了自己框架的推广另一方面也是为了使用Spring/SpringBoot的特性让框架的使用更加简单便捷。
那是怎么让框架的使用更加简单便捷的呢首先我们就要先了解我们框架目前使用的困难点可以看到我们发起一次调用都要写这么复杂的代码。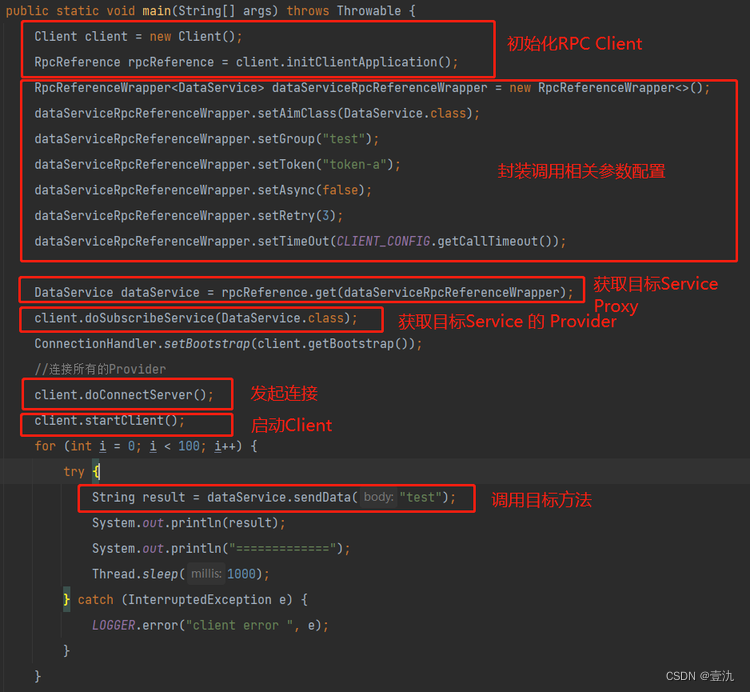
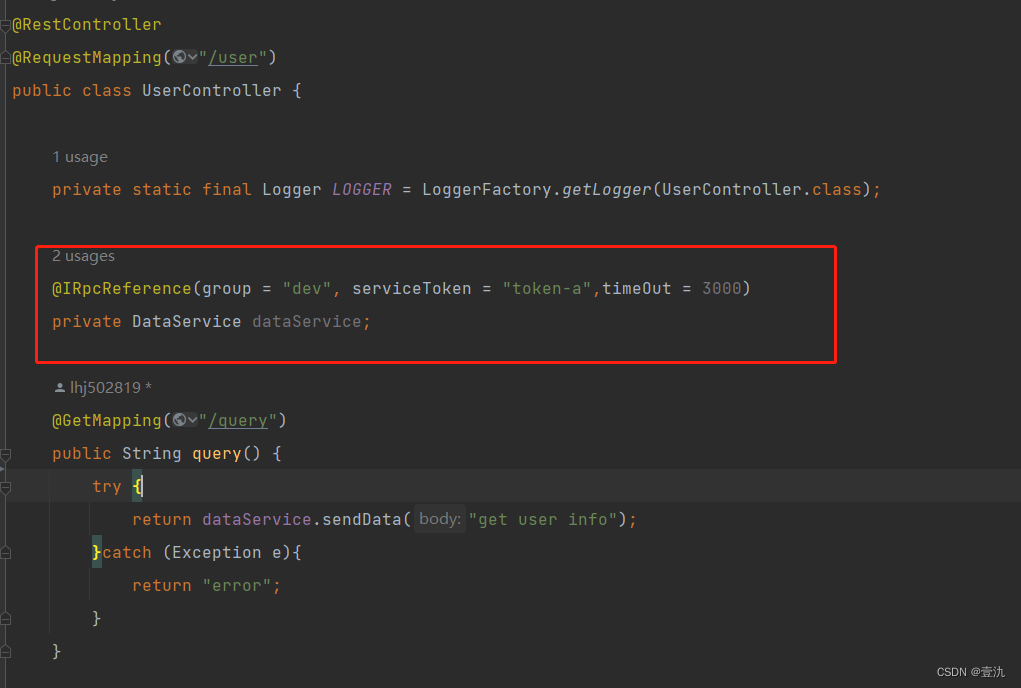
那通过集成Spring/SpringBoot能达到什么效果呢我们先看下接入后的使用流程如下图对你没有看错就是这么简单相信使用过Dubbo的朋友一定很熟悉就是借鉴的Dubbo~

接下来让我们一起看看怎么操作吧

自定义Spingboot starter
这里我们就不去实现对Spring的集成了直接上高阶的因为Spring的比较麻烦哈哈目前主流的应该也是Springboot了。
如何自定义Springboot starter
我们需要在META-INF中创建自动装配配置文件spring.factories文件内容如下
org.springframework.boot.autoconfigure.EnableAutoConfiguration=\
cn.onenine.irpc.framework.springboot.starter.config.IRpcServerAutoConfiguration,\
cn.onenine.irpc.framework.springboot.starter.config.IRpcClientAutoConfiguration
EnableAutoConfiguration为SpringBoot的注解见名知意就是开启自动配置的意思其=号后边的就是我们需要装配的类通过这样的方式我们将starter项目编译打包之后推送到maven仓库他人在便可以通过引用我们的starter maven坐标来集成RPC框架具体的使用方式会在后边进行演示。

Client端自动装配/配置实现
自定义Reference注解
为了我们能一眼就认出哪些属性需要我们进行动态代理比如DataService dataService因此我们需要设计一个注解来标识并且我们还可以把该Service的调用相关参数通过注解进行配置这样我们在自动装配的时候直接读取注解的元信息再去执行相关的封装操作岂不美哉。

@Target(ElementType.FIELD)
@Retention(RetentionPolicy.RUNTIME)
@Documented
public @interface IRpcReference {

    String url() default "";

    String group() default "";

    String serviceToken() default "";

    int timeOut() default 3000;

    int retry() default 1;

    boolean async() default false;
}
可以看到和这里的属性是一一对应的。

自动装配逻辑
接下来该咋办呢我们都知道在使用Spring的时候都需要去定义Controller/Service/DAO在里边去注入我们需要的其他Bean并且我们的Controller/Service/DAO也会作为一个Bean被Spring容器管理起来那我们就需要想办法在Bean创建完之后获取到有标记IRpcReference注解属性的Bean再执行后续的生成代理对象获取Provider和建立连接的逻辑。
在Spring中为我们提供了一些列的扩展点其中有一个接口BeanPostProcessor该接口提供了两个方法如下
public interface BeanPostProcessor {
    //Bean实例化之前执行
    @Nullable
    default Object postProcessBeforeInitialization(Object bean, String beanName) throws BeansException {
        return bean;
    }
    //Bean实例化之后执行
    @Nullable
    default Object postProcessAfterInitialization(Object bean, String beanName) throws BeansException {
        return bean;
    }
}
那这里很明显我们就要去实现postProcessAfterInitialization去完成我们的相关逻辑以下是代码实现比较简单就不过多解释了

public class IRpcClientAutoConfiguration implements BeanPostProcessor, ApplicationListener<ApplicationReadyEvent>, ApplicationContextAware {

    private static final Logger LOGGER = LoggerFactory.getLogger(IRpcClientAutoConfiguration.class);

    private Client client;

    private RpcReference rpcReference;

    /**
     * 是否需要启动NettyClient
     */
    private boolean hasInitClientApplication;

    public Object postProcessAfterInitialization(Object bean, String beanName) throws BeansException {
        Field[] fields = bean.getClass().getDeclaredFields();
        for (Field field : fields) {
            try {
                //设置私有变量可访问
                field.setAccessible(true);
                IRpcReference rpcReferenceAnnotation = field.getAnnotation(IRpcReference.class);
                if (rpcReferenceAnnotation == null) {
                    continue;
                }
                if (!hasInitClientApplication){
                    try {
                        client = new Client();
                        rpcReference = client.initClientApplication();
                    } catch (Exception e) {
                        LOGGER.error("init and start netty client error" , e);
                        throw new RuntimeException(e);
                    }
                }
                hasInitClientApplication = true;
                RpcReferenceWrapper rpcReferenceWrapper = new RpcReferenceWrapper();
                rpcReferenceWrapper.setAimClass(field.getType());
                rpcReferenceWrapper.setGroup(rpcReferenceAnnotation.group());
                rpcReferenceWrapper.setTimeOut(rpcReferenceAnnotation.timeOut());
                rpcReferenceWrapper.setToken(rpcReferenceAnnotation.serviceToken());
                rpcReferenceWrapper.setUrl(rpcReferenceAnnotation.url());
                rpcReferenceWrapper.setRetry(rpcReferenceAnnotation.retry());
                rpcReferenceWrapper.setAsync(rpcReferenceAnnotation.async());
                field.set(bean,rpcReference.get(rpcReferenceWrapper));
                //订阅服务提前获取到所有的service Provider
                client.doSubscribeService(field.getType());
            } catch (Throwable e) {
                throw new RuntimeException("[IRpcClientAutoConfiguration#postProcessAfterInitialization] init rpcReference error", e);
            }
        }
        return bean;
    }

    public void onApplicationEvent(ApplicationReadyEvent event) {
       if (hasInitClientApplication){
           ConnectionHandler.setBootstrap(client.getBootstrap());
           client.doConnectServer();
           client.startClient();
       }
    }

    public void setApplicationContext(ApplicationContext applicationContext) throws BeansException {
        System.out.println(applicationContext);
    }
}
Server端自动装配/配置实现
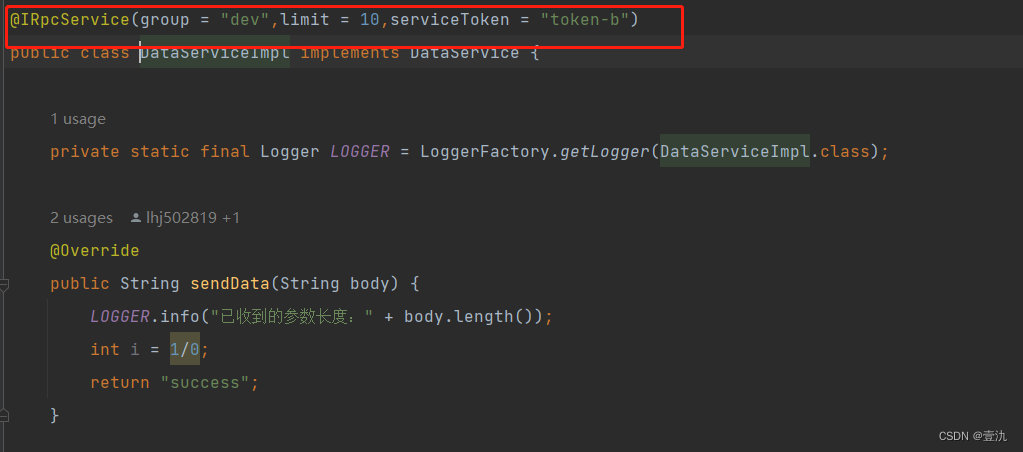
自定义IRpcService注解
Client端我们整了个注解来解决自动装配需要远程调用的属性字段那Server端需要做啥呢首先我们需要考虑的是Server端其实就是将我们的Service注册到注册中心创建Socket等待连接接入和处理IO请求对于Socket我们使用Netty框架来完成NIO的操作而唯一需要简化的便是如何简单的将需要暴露注册的Service更加简单的注册到注册中心其实最简单的方式还是通过注解去标识在自动装配逻辑中去获取到标记了这些注解的Class自动执行后续的注册逻辑。

自定义注解如下
@Target(ElementType.TYPE)
@Retention(RetentionPolicy.RUNTIME)
@Documented
@Component
public @interface IRpcService {

    int limit() default 0;

    String group() default "";

    String serviceToken() default "";

}
其实和我们的直接使用API还是一一对应的
自动装配逻辑
自动装配这里的逻辑还是比较简单我们也就不过多解释了上代码
public class IRpcServerAutoConfiguration implements InitializingBean, ApplicationContextAware {

    private static final Logger LOGGER = LoggerFactory.getLogger(IRpcServerAutoConfiguration.class);

    private ApplicationContext applicationContext;

    public void afterPropertiesSet() throws Exception {
        Server server = null;
        Map<String, Object> beansWithAnnotation = applicationContext.getBeansWithAnnotation(IRpcService.class);
        if (beansWithAnnotation.isEmpty()) {
            //没有带暴露的服务
            return;
        }

        printBanner();
        long start = System.currentTimeMillis();
        server = new Server();
        server.initServerConfig();
        for (String beanName : beansWithAnnotation.keySet()) {
            Object beanObject = beansWithAnnotation.get(beanName);
            IRpcService iRpcService = beanObject.getClass().getAnnotation(IRpcService.class);
            ServiceWrapper serviceWrapper = new ServiceWrapper(beanObject, iRpcService.group());
            serviceWrapper.setLimit(iRpcService.limit());
            serviceWrapper.setServiceToken(iRpcService.serviceToken());
            server.exportService(serviceWrapper);
            LOGGER.info("service {} export success!", beanName);
        }
        long end = System.currentTimeMillis();
        ApplicationShutdownHook.registryShutdownHook();
        server.startApplication();
        LOGGER.info("{} start success in {} times", server.getConfig(), end - start);
    }

    private void printBanner() {
        System.out.println();
        System.out.println("==============================================");
        System.out.println("|||---------- IRpc Starting Now! ----------|||");
        System.out.println("==============================================");
        System.out.println("源代码地址: https://github.com/lhj502819/IRpc");
        System.out.println("version: 1.9.0");
        System.out.println();
    }

    public void setApplicationContext(ApplicationContext applicationContext) throws BeansException {
        this.applicationContext = applicationContext;
    }
}
待优化项
目前我们只是对Client和Server的目标Service和待暴露Service进行了自动装配而却少了对相关的配置与SpringBoot集成本打算去集成一下试试鉴于时间的原因一直没做大家可以参照比较流行的框架如SpringCloudGateway去仿照着实现下但我们自动装配的方式可能就需要调整下感兴趣的可以去研究研究但是目前的实现方式不影响大家理解

接入一个SpringBoot项目
首先需要引入相关的Maven依赖irpc-starter和springboot-web为主其他的大家看项目需要。
<dependency>
    <groupId>cn.onenine</groupId>
    <artifactId>irpc-framework-spring-start</artifactId>
    <version>1.0-SNAPSHOT</version>
</dependency>
<dependency>
    <groupId>org.springframework.boot</groupId>
    <artifactId>spring-boot-starter-web</artifactId>
    <version>2.7.0</version>
</dependency>
其次我们在配置完相关Client/Server的配置后就可以直接使用了。
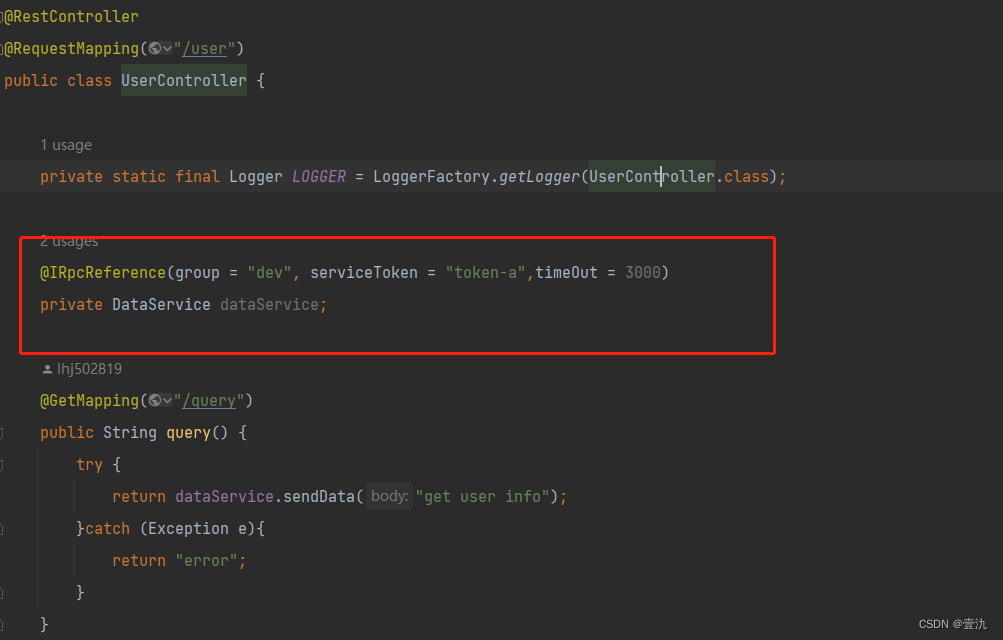
Client
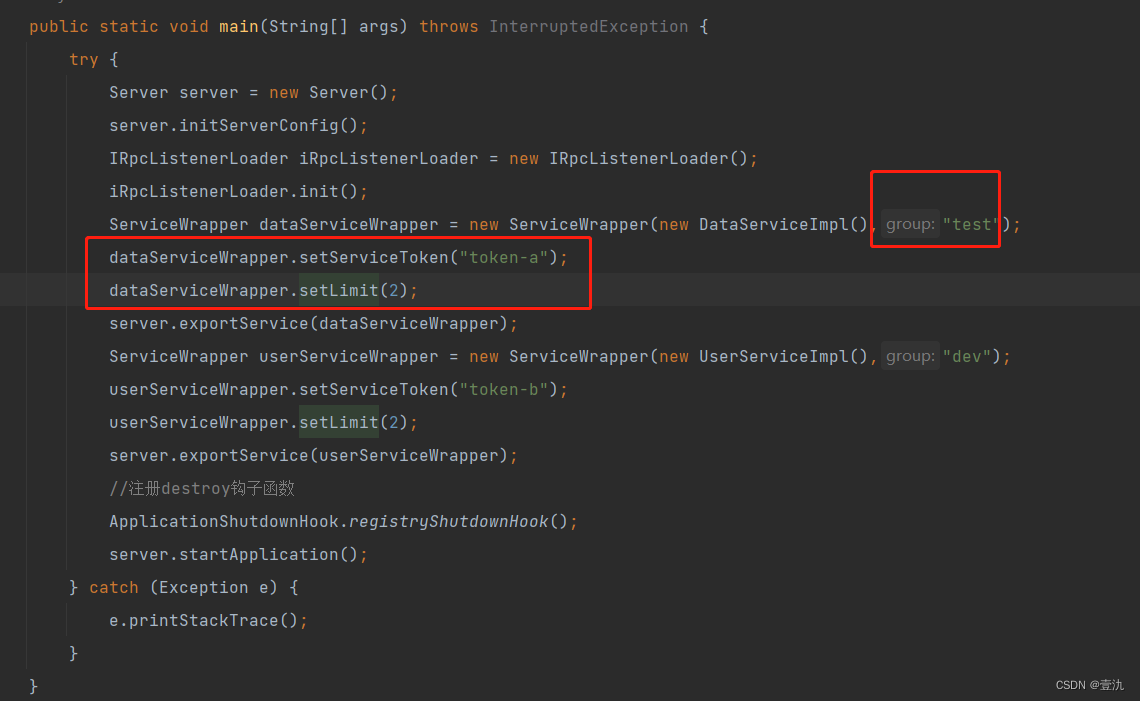
Server
是不是很简单就是这么简单大家自行去看源码即可~
总结
本次我们主要通过自定义的Springboot-starter来完成了我们RPC框架对Springboot的集成方便了框架的接入和使用成本大家还有什么需要直接在基础上扩展即可新年即将来临别的也不祝福了就祝大家身体健康吧目前虽然很难让我们一起前行共渡难关