

Softmax Loss、AAM-Softmax(ArcFace)、Sub-center ArcFace的PyTorch实现与代码解读
| 阿里云国内75折 回扣 微信号:monov8 |
| 阿里云国际,腾讯云国际,低至75折。AWS 93折 免费开户实名账号 代冲值 优惠多多 微信号:monov8 飞机:@monov6 |
概述
- 说话人识别中的损失函数分为基于多类别分类的损失函数和端到端的损失函数(也叫基于度量学习的损失函数关于这些损失函数的理论部分可参考说话人识别中的损失函数
- 本文主要关注这些损失函数的实现此外文章说话人识别中的损失函数中没有详细介绍基于多类别分类的损失函数因此本文会顺便补足这一点
- 本文持续更新
Softmax Loss
- 先看Softmax Loss完整的叫法是Cross-entropy Loss with Softmax主要由三部分组成
-
Fully Connected将当前样本的嵌入码(embedding变换成长度为类别数的向量(通常称为Logit公式如下
y = W x + b y=Wx+b y=Wx+b
其中- x是特征向量长度为 e m b e d - d i m embed\text{-}dim embed-dim
- W是权重矩阵维度为 [ n - c l a s s e s , e m b e d - d i m ] [n\text{-}classes,embed\text{-}dim] [n-classes,embed-dim] n - c l a s s e s n\text{-}classes n-classes为类别数
- b是偏置向量长度为 n - c l a s s e s n\text{-}classes n-classes
- Logit中的每一个值对应W的每一行与x逐项相乘再相加然后与b中的对应项再相加
-
Softmax将Logit变换成多类别概率分布Probability不改变向量长度公式如下(取 N = n - c l a s s e s − 1 N=n\text{-}classes-1 N=n-classes−1
y i = e x i ∑ i = 0 N e x i y_i=\frac{e^{x_i}}{\sum_{i=0}^{N}e^{x_i}} yi=∑i=0Nexiexi
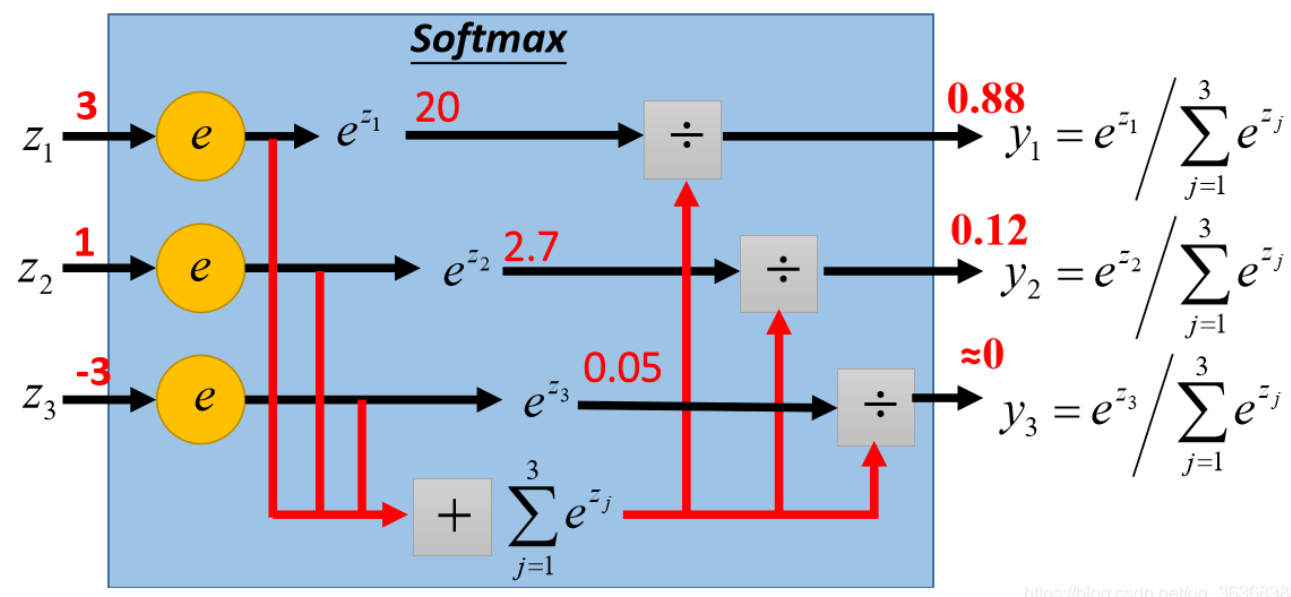
- 本质上是max函数的软化版本将不可导的max函数变得可导
- 因此需要像max函数那样具有最大值主导的特点上图中
s o f t m a x ( [ 3 , 1 , − 3 ] ) = [ 0.88 , 0.12 , 0 ] softmax([3,1,-3])=[0.88,0.12,0] softmax([3,1,−3])=[0.88,0.12,0] - 又因为输出是多类别概率分布因此Probability的每一项相加等于1
∑ i = 0 N y i = 1 \sum_{i=0}^{N}y_i=1 i=0∑Nyi=1 - 但是当Logit的值都比较小时比如
[
0
,
1
]
[0,1]
[0,1]最大值主导的效果不明显
s o f t m a x ( [ 0.1 , 0.3 , 0.5 , 0.7 , 0.9 ] ) = [ 0.1289 , 0.1574 , 0.1922 , 0.2348 , 0.2868 ] softmax([0.1,0.3,0.5,0.7,0.9])=[0.1289, 0.1574, 0.1922, 0.2348, 0.2868] softmax([0.1,0.3,0.5,0.7,0.9])=[0.1289,0.1574,0.1922,0.2348,0.2868]
-
Cross-entropy(交叉熵将Ground Truth(基本事实的One-hot Vector(记为 P P P与Probability(记为 Q Q Q计算相似度输出是标量。交叉熵的值越小Probability与One-hot Vector越相似公式如下
L C E ( P , Q ) = − ∑ i = 0 N p i log ( q i ) L_{CE}(P,Q)=-\sum_{i=0}^{N} p_i \log(q_i) LCE(P,Q)=−i=0∑Npilog(qi)- One-hot Vector的长度与Probability一致即等于类别数 N N N形式为 [ 0 , 0 , . . . , 1 , . . . , 0 ] [0,0,...,1,...,0] [0,0,...,1,...,0]即GT是哪个类哪个类对应的下标就为1
- 设One-hot Vector值为1的下标为
j
j
j上式可简化为
L S o f t m a x ( P , Q ) = − log ( q j ) = − log ( e x j ∑ i = 0 N e x i ) L_{Softmax}(P,Q)=-\log(q_j)=-\log(\frac{e^{x_j}}{\sum_{i=0}^{N}e^{x_i}}) LSoftmax(P,Q)=−log(qj)=−log(∑i=0Nexiexj)
-
- 在上述的过程中如果用tensor.scatter_来实现One-hot Vector是比较难懂的完整PyTorch代码如下
import torch import torch.nn.functional as F import torch.nn as nn embed_dim = 5 num_class = 10 device = torch.device("cuda" if torch.cuda.is_available() else "cpu") x = torch.tensor([0.1, 0.3, 0.5, 0.7, 0.9]) x.unsqueeze_(0) # 模拟batch-size就地在dim = 0插入维度此时x的维度为[1,5] x = x.expand(2, embed_dim) # 直接堆叠x使batch-size = 2此时x的维度为[2,5] x = x.float().to(device) # label是长度为batch-size的向量每个值是GT的下标维度为[2] label = torch.tensor([0, 5]) label = label.long().to(device) weight = nn.Parameter(torch.FloatTensor(num_class, embed_dim)).to(device) nn.init.xavier_uniform_(weight) # 初始化权重矩阵 logit = F.linear(x, weight) # 取消偏置向量 probability = F.softmax(logit, dim=1) # 维度为[2,10] # one_hot的数据类型与设备要和x相同维度和Probability相同[2,10] one_hot = x.new_zeros(probability.size()) # 根据label就地得到one_hot步骤如下 # scatter_函数Tensor.scatter_(dim, index, src, reduce=None) # 先把label的维度变为[2,1]然后根据label的dim = 1(参数中的src)上的值 # 作为one_hot的dim = 1(参数中的dim)上的下标并将下标对应的值设置为1 # 由于label的dim = 1上的值只有一个所以是One-hot如果label维度为[2,2]则为Two-hot # 如果label维度为[2,k]则为K-hot one_hot.scatter_(1, label.view(-1, 1).long(), 1) # 等价于 # one_hot = F.one_hot(label, num_class).float().to(device) # 但是F.one_hot只能构造One-hotTensor.scatter_可以构造K-hot # 对batch中每个样本计算loss并求均值 loss = 0 for P, Q in zip(one_hot, probability): loss += torch.log((P * Q).sum()) loss /= -one_hot.size()[0] # 等价于 # loss = F.cross_entropy(logit, label) - 上述PyTorch代码要看懂是之后魔改Softmax Loss的基础
AAM-Softmax(ArcFace
-
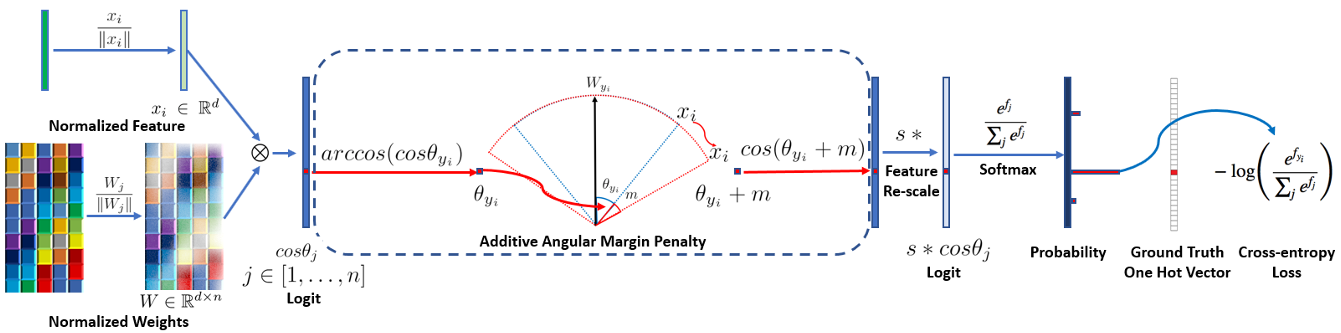
AAM-Softmax(Additive Angular Margin Loss也叫ArcFace出自人脸识别是说话人识别挑战VoxSRC近年冠军方案的基础损失函数是基于Softmax Loss进行改进而来的。步骤如下
-
取消偏置向量根据上文Logit中的每一个值对应W的每一行 w i w_i wi与x逐项相乘再相加即 y i = w i x y_i=w_ix yi=wix
-
把 w i w_i wi和 x x x都单位化
w i ′ = w i ∣ ∣ w i ∣ ∣ , x ′ = x ∣ ∣ x ∣ ∣ w'_i=\frac{w_i}{||w_i||},x'=\frac{x}{||x||} wi′=∣∣wi∣∣wi,x′=∣∣x∣∣x -
计算Logit此时Logit中的每一个值如下即 w i w_i wi和 x x x的夹角的余弦值记为 θ i \theta_i θi
y i = w i ′ x ′ = w i ∣ ∣ w i ∣ ∣ x ∣ ∣ x ∣ ∣ = cos < w i , x > = cos θ i y_i=w'_ix'=\frac{w_i}{||w_i||}\frac{x}{||x||}=\cos<w_i,x>=\cos\theta_i yi=wi′x′=∣∣wi∣∣wi∣∣x∣∣x=cos<wi,x>=cosθi -
权重矩阵W的每一行本质上是神经网络学习到的每个说话人的中心向量(中心点关于说话人的中心点可参考说话人识别中的损失函数中的端到端损失函数。端到端的损失函数直接利用每个batch中属于不同说话人的样本计算对应说话人的中心点;而基于多类别分类的损失函数则是通过学习得到每个说话人的中心点
-
因此将 w i w_i wi和 x x x单位化后再计算Softmax Loss可以视作是对当前样本嵌入码与每一个说话人中心点计算余弦相似度向量对余弦相似度向量进行Softmax Loss优化。根据上文当Logit的值都比较小时比如 [ 0 , 1 ] [0,1] [0,1]Softmax最大值主导的效果不明显所以单位化后计算的Logit需要进行伸缩(Scale即 y i = s ∗ y i = s cos θ i y_i=s*y_i=s\cos\theta_i yi=s∗yi=scosθi。此时再计算Softmax Loss如下
L = − log ( e s cos θ j ∑ i = 0 N e s cos θ i ) L=-\log(\frac{e^{s\cos\theta_j}}{\sum_{i=0}^{N}e^{s\cos\theta_i}}) L=−log(∑i=0Nescosθiescosθj) -
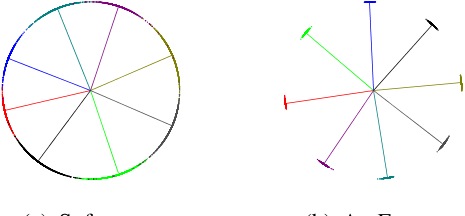
用此时的Softmax Loss训练2维嵌入码然后取8个类对这8个类的大量样本计算嵌入码绘制到图上如下面左图所示。发现这8个类类间是可分的但是类内却没有聚合我们希望这8个类能够像下面右图那样不仅类间可分而且类内聚合
-
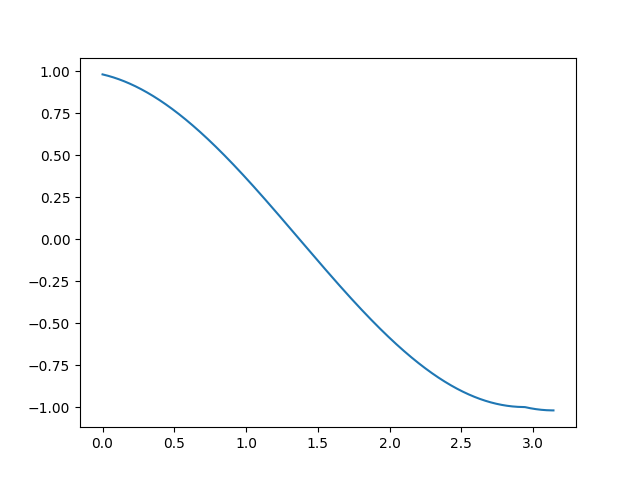
首先要明确两个向量的夹角范围为 [ 0 , π ] [0,\pi] [0,π]夹角余弦值范围为 [ − 1 , 1 ] [-1,1] [−1,1]并且单调递减如下图所示

-
训练时对嵌入码和GT说话人中心点的夹角施加额外的惩罚惩罚后该夹角变大从而余弦值变小神经网络需要将余弦值重新变大才能使该嵌入码正确分类。测试时用嵌入码与不同的嵌入码直接计算相似度此时没有惩罚从而实现类间可分和类内聚合
-
AAM-Softmax中直接将GT夹角加上一个值 m m m(通常称为margin从而Logit中GT对应的值变为 y j = s cos ( θ j + m ) y_j=s\cos(\theta_j+m) yj=scos(θj+m)Logit中其他的值不变仍为 s cos θ i s\cos\theta_i scosθi。此时再计算Softmax Loss如下
L = − log ( e s cos ( θ j + m ) e s cos ( θ j + m ) + ∑ i = 0 , i ≠ j N e s cos θ i ) L=-\log(\frac{e^{s\cos(\theta_j+m)}}{e^{s\cos(\theta_j+m)}+\sum_{i=0,i\ne j}^{N}e^{s\cos\theta_i}}) L=−log(escos(θj+m)+∑i=0,i=jNescosθiescos(θj+m))
-
-
在上述的过程中施加额外的惩罚这一步有不同的情况需要讨论先看forward函数
def forward(self, input, label): # input即上述的xlabel与上述要求一致 # 计算cos(theta)F.normalize默认对dim = 1施加l2-norm cosine = F.linear(F.normalize(input), F.normalize(self.weight)) # 计算sin(theta) sine = torch.sqrt(1.0 - torch.pow(cosine, 2)) # cos(theta-m) = cos(theta)cos(m) - sin(theta)sin(m) phi = cosine * self.cos_m - sine * self.sin_m # easy_margin表示只将cos(theta) > 0的余弦值惩罚为cos(theta-m) # cos(theta) <= 0的余弦值仍为cos(theta) # 惩罚后的余弦值范围为[-1, cos(m)] if self.easy_margin: phi = torch.where(cosine > 0, phi, cosine) # 否则对全区间施加惩罚但不都是惩罚为cos(theta-m) # 取th = -cos(m) # 将cos(theta) > th的余弦值惩罚为cos(theta-m) # 将cos(theta) <= th的余弦值惩罚为cos(theta) + cos(m) - 1 # 惩罚后的余弦值范围为[cos(m) - 2, cos(m)] else: ######## # 主流代码会将cos(theta) <= th的余弦值 # 惩罚为m*sin(m)难以理解在此不采用 # phi = torch.where(cosine > self.th, phi, cosine - self.mm) phi = torch.where(cosine > self.th, phi, cosine - self.mmm) ######## # 构造One-hot Vector one_hot = input.new_zeros(cosine.size()) one_hot.scatter_(1, label.view(-1, 1).long(), 1) # 只有GT对应的余弦值被惩罚其他余弦值仍为cos(theta) output = (one_hot * phi) + ((1.0 - one_hot) * cosine) # 伸缩 output *= self.scale # 返回的是logit return output -
如果采用easy-margin会导致GT余弦值较大的不连续
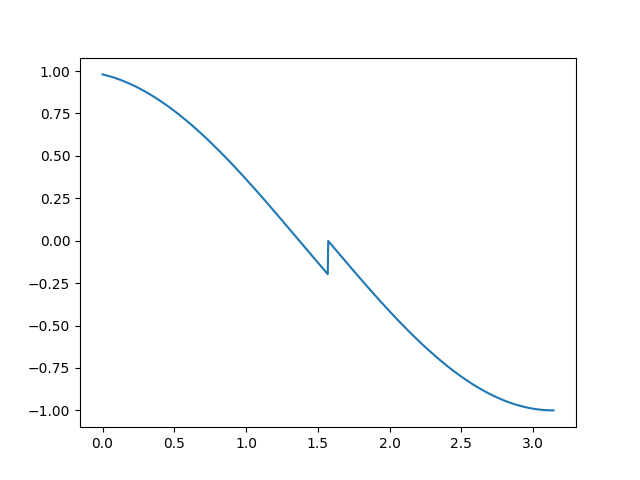
-
不采用easy-marginGT余弦值能变得连续
-
最后是AAM-Softmax的完整PyTorch代码
class ArcMarginProduct(nn.Module):
    r"""Implement of large margin arc distance: :
        Args:
            in_features: size of each input sample
            out_features: size of each output sample
            scale: norm of input feature
            margin: margin
            cos(theta + margin)
        """

    def __init__(self,
                 in_features,
                 out_features,
                 scale=32.0,
                 margin=0.2,
                 easy_margin=False):
        super(ArcMarginProduct, self).__init__()
        self.in_features = in_features
        self.out_features = out_features
        self.scale = scale
        self.margin = margin
        self.weight = nn.Parameter(torch.FloatTensor(out_features,
                                                     in_features))
        nn.init.xavier_uniform_(self.weight)

        self.easy_margin = easy_margin
        self.cos_m = math.cos(margin)
        self.sin_m = math.sin(margin)
        self.th = math.cos(math.pi - margin)
        self.mm = math.sin(math.pi - margin) * margin
        self.mmm = 1.0 + math.cos(
            math.pi - margin)  # this can make the output more continuous
        ########
        self.m = self.margin
        ########

	# update函数可用于margin调度类似学习率调度只不过margin是越调度越大
    def update(self, margin=0.2):
        self.margin = margin
        self.cos_m = math.cos(margin)
        self.sin_m = math.sin(margin)
        self.th = math.cos(math.pi - margin)
        self.mm = math.sin(math.pi - margin) * margin
        self.m = self.margin
        self.mmm = 1.0 + math.cos(math.pi - margin)
        # self.weight = self.weight
        # self.scale = self.scale

    def forward(self, input, label):
        cosine = F.linear(F.normalize(input), F.normalize(self.weight))
        sine = torch.sqrt(1.0 - torch.pow(cosine, 2))
        phi = cosine * self.cos_m - sine * self.sin_m
        if self.easy_margin:
            phi = torch.where(cosine > 0, phi, cosine)
        else:
            ########
            # phi = torch.where(cosine > self.th, phi, cosine - self.mm)
            phi = torch.where(cosine > self.th, phi, cosine - self.mmm)
            ########

        one_hot = input.new_zeros(cosine.size())
        one_hot.scatter_(1, label.view(-1, 1).long(), 1)
        output = (one_hot * phi) + ((1.0 - one_hot) * cosine)
        output *= self.scale

        return output

    def extra_repr(self):
        return '''in_features={}, out_features={}, scale={},
                  margin={}, easy_margin={}'''.format(self.in_features,
                                                      self.out_features,
                                                      self.scale, self.margin,
                                                      self.easy_margin)
Sub-center ArcFace
- 数据集常常带有噪声越是大的数据集噪声越是多常见的噪声有离群点(Outlier噪声和标签翻转(Label-flip噪声关于数据噪声可参考说话人识别的数据需求中“数据的正确性”这一节
- 大数据集的噪声清除是非常困难且昂贵的神经网络需要能够在带有噪声(CASIA Face中噪声约有9.3%-13.0%的数据集中甚至是强噪声(MS1MV0中噪声约有47.1%-54.4%的数据集中进行训练
- Sub-center ArcFace就是用于在带有噪声的大规模数据集训练中要求类内聚合和类间可分(即严格性Strictness同时不被数据集中的噪声过度影响(即鲁棒性Robustness的损失函数步骤如下
-
根据上文权重矩阵W的每一行本质上是神经网络学习到的每个说话人的中心点但是在带有噪声的数据集中 这个学习到的中心点可能不是非常准确
-
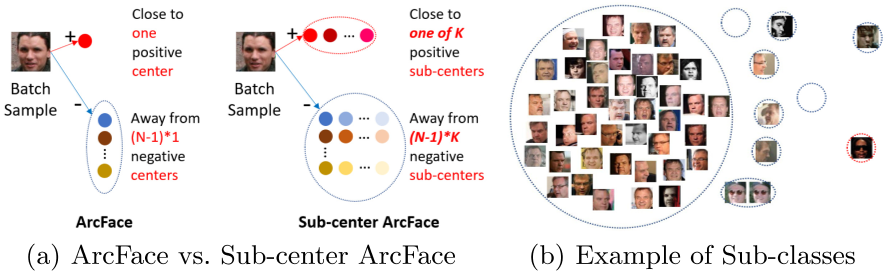
可以让神经网络学习每个说话人的 K K K个中心点其中一个是正常样本(Easy clean的中心点称为主导中心点(Dominant Sub-center其余是噪声(Hard or Noise样本的中心点称为非主导中心点(Non-dominant Sub-center。如下图(b)所示取 K = 10 K=10 K=10则一共有10个圆圈最大圆圈为主导中心点其余圆圈为非主导中心点
-
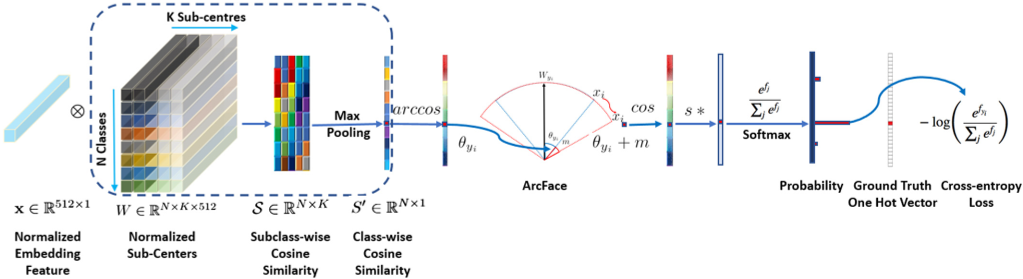
由此W的维度从 [ n - c l a s s e s , e m b e d - d i m ] [n\text{-}classes,embed\text{-}dim] [n-classes,embed-dim]变成了 [ n - c l a s s e s , e m b e d - d i m , K ] [n\text{-}classes,embed\text{-}dim,K] [n-classes,embed-dim,K]将嵌入码和W的每个中心点计算余弦相似度会得到维度为 [ n - c l a s s e s , K ] [n\text{-}classes,K] [n-classes,K]的相似度矩阵
-
对相似度矩阵的每一行进行池化会得到长为 n - c l a s s e s n\text{-}classes n-classes的向量可以作为Logit后续的步骤与ArcFace一致。Sub-center ArcFace的额外处理集中在下图的蓝色虚线内
-
上述对相似度矩阵的池化操作就是平衡损失函数的Strictness和Robustness的关键。我们知道ArcFace是对Logit中嵌入码和GT中心点的夹角加上margin再取cos得到GT相似度最后对Logit计算Softmax Loss
-
因此要分析margin与池化的协同作用需要先把相似度矩阵映射成夹角矩阵再作分析如下图所示
-
其中
- min ( i n t e r ) \min(inter) min(inter)表示对当前非GT的 ( N − 1 ) ∗ K (N-1)*K (N−1)∗K个夹角进行最小值池化
- max ( i n t e r ) \max(inter) max(inter)表示对当前非GT的 ( N − 1 ) ∗ K (N-1)*K (N−1)∗K个夹角进行最大值池化
- min ( i n t r a ) \min(intra) min(intra)表示对当前GT的 K K K个夹角进行最小值池化
- max ( i n t r a ) \max(intra) max(intra)表示对当前GT的 K K K个夹角进行最大值池化
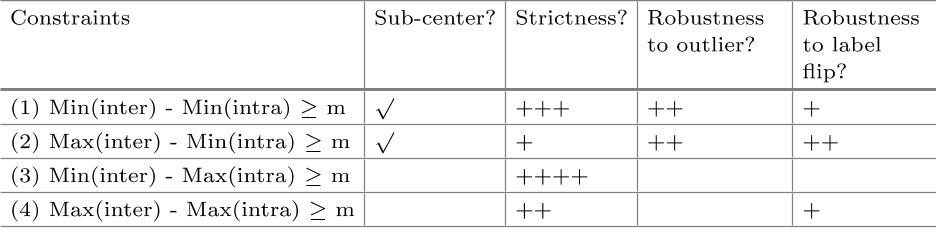
- (1) 表示取嵌入码与距离最近的GT夹角加上margin再取cos得到GT相似度;取嵌入码与距离最近的非GT夹角再取cos得到非GT相似度。此时对类内聚合的Strictness降低从而对离群点噪声的Robustness提高;对类间可分的Strictness提高从而对标签翻转噪声的Robustness一般
- (2) 表示取嵌入码与距离最近的GT夹角加上margin再取cos得到GT相似度;取嵌入码与距离最远的非GT夹角再取cos得到非GT相似度。此时对类内聚合的Strictness降低从而对离群点噪声的Robustness提高;对类间可分的Strictness降低从而对标签翻转噪声的Robustness提高。但此时训练无法收敛因为监督信息不够强梯度方向不明确
- (3) 表示取嵌入码与距离最远的GT夹角加上margin再取cos得到GT相似度;取嵌入码与距离最近的非GT夹角再取cos得到非GT相似度。此时对类内聚合的Strictness提高从而无法学习出多个Sub-center导致对噪声Robustness弱;对类间可分的Strictness提高。此时效果类似原始ArcFace
- (4) 表示取嵌入码与距离最远的GT夹角加上margin再取cos得到GT相似度;取嵌入码与距离最远的非GT夹角再取cos得到非GT相似度。此时对类内聚合的Strictness提高从而无法学习出多个Sub-center导致对噪声Robustness弱;对类间可分的Strictness降低
-
综上(1) 是较优的做法但是较大的 K K K(如 K = 10 K=10 K=10会破坏类内聚合因为正常样本中许多困难样本被用于学习非主导中心点因此常取 K = 3 K=3 K=3。为增强类内聚合还可以在神经网络判别能力较强时去除非主导中心点只保留主导中心点即 K = 1 K=1 K=1同时去除与GT主导中心点夹角小于75度的样本(这些样本可视为噪声再用剩下的样本进行训练
-
- 如何检验Sub-center ArcFace的效果呢?我们希望的效果是简单和困难样本越靠近主导中心点越好噪声样本越靠近非主导中心点越好。因此要检验Sub-center ArcFace的效果可以先用强噪声的大规模数据集训练Sub-center ArcFace之后统计训练集中更靠近主导中心点与更靠近非主导中心点的样本最后检查这些样本中哪些是正常样本哪些是噪声样本。如下图所示

- 从上图中可见相比ArcFace(图cSub-center ArcFace靠近主导中心点(图a的噪声样本从38%降低到12%不过也有4%左右的正常样本更靠近非主导中心点(图b
- 绝大多数的靠近主导中心点的噪声样本夹角都大于75度这也是上述Sub-center ArcFace最后一个步骤中的增强类内聚合按照75度来去除噪声样本的依据。采用增强类内聚合方法后效果如图(d)所示
- 有了ArcFace的基础Sub-center ArcFace的PyTorch实现就比较好理解了下面是完整代码
class ArcMarginProduct_subcenter(nn.Module):
    r"""Implement of large margin arc distance with subcenter:
        Reference:
            Sub-center ArcFace: Boosting Face Recognition by
            Large-Scale Noisy Web Faces.
            https://ibug.doc.ic.ac.uk/media/uploads/documents/eccv_1445.pdf
        Args:
            in_features: size of each input sample
            out_features: size of each output sample
            scale: norm of input feature
            margin: margin
            cos(theta + margin)
            K: number of sub-centers
        """

    def __init__(self,
                 in_features,
                 out_features,
                 scale=32.0,
                 margin=0.2,
                 easy_margin=False,
                 K=3):
        super(ArcMarginProduct_subcenter, self).__init__()
        self.in_features = in_features
        self.out_features = out_features
        self.scale = scale
        self.margin = margin

        # subcenter
        self.K = K

        # initial classifier
        self.weight = nn.Parameter(
            torch.FloatTensor(self.K * out_features, in_features))
        nn.init.xavier_uniform_(self.weight)

        self.easy_margin = easy_margin
        self.cos_m = math.cos(margin)
        self.sin_m = math.sin(margin)
        self.th = math.cos(math.pi - margin)
        self.mm = math.sin(math.pi - margin) * margin
        self.mmm = 1.0 + math.cos(
            math.pi - margin)  # this can make the output more continuous
        ########
        self.m = self.margin
        ########

    def update(self, margin=0.2):
        self.margin = margin
        self.cos_m = math.cos(margin)
        self.sin_m = math.sin(margin)
        self.th = math.cos(math.pi - margin)
        self.mm = math.sin(math.pi - margin) * margin
        self.m = self.margin
        self.mmm = 1.0 + math.cos(math.pi - margin)

    def forward(self, input, label):
    	# 对cos(theta)的额外处理是与ArcFace的唯一区别
        cosine = F.linear(F.normalize(input),
                          F.normalize(self.weight))  # (batch, out_dim * k)
        cosine = torch.reshape(
            cosine, (-1, self.out_features, self.K))  # (batch, out_dim, k)
        # 取max是因为cos(theta)是相似度与theta刚好成反比
        # 如果现在处理的是theta则应取min然后取cos
        cosine, _ = torch.max(cosine, 2)  # (batch, out_dim)

        sine = torch.sqrt(1.0 - torch.pow(cosine, 2))
        phi = cosine * self.cos_m - sine * self.sin_m

        if self.easy_margin:
            phi = torch.where(cosine > 0, phi, cosine)
        else:
            ########
            # phi = torch.where(cosine > self.th, phi, cosine - self.mm)
            phi = torch.where(cosine > self.th, phi, cosine - self.mmm)
            ########

        one_hot = input.new_zeros(cosine.size())
        one_hot.scatter_(1, label.view(-1, 1).long(), 1)

        output = (one_hot * phi) + ((1.0 - one_hot) * cosine)
        output *= self.scale

        return output

	def extra_repr(self):
		return 'in_features={}, out_features={}, scale={}, margin={}, ' \
		       'easy_margin={}, K={}'.format(
		          self.in_features, self.out_features, self.scale, self.margin,
		          self.easy_margin, self.K)