

《Spring in action 4》(五)SpringMVC起步
| 阿里云国内75折 回扣 微信号:monov8 |
| 阿里云国际,腾讯云国际,低至75折。AWS 93折 免费开户实名账号 代冲值 优惠多多 微信号:monov8 飞机:@monov6 |
SpringMVC起步
文章目录
- SpringMVC起步
- 介绍
- 跟踪SpringMVC流程
- web.xml版本的Web项目
- 1. 项目结构
- 2. Pom 文件
- 3. 生成web.xml
- 4. 配置Spring和SpringMVC
- 5. 编写逻辑代码
- 6. 测试和结果
- 无配置文件的Web项目
- 1. 替代web.xml的InitWeb
- 2. POM
- 3. RootConfig
- 4. ServletConfig
- 5. 编写逻辑代码
- 6. 测试和结果
- 接受请求参数的输入
- 1. 查询参数
- 2. 通过路径参数
- 3. 处理表单
- 4. 参数校验
- 4.1 参数检验注解
- 5. 本地中的POM 文件
- 最后
介绍
SpringMVC基于模型-视图-通知器(Model-View-Controller,MVC)模式实现的,它能够帮助我们构建像Spring框架那样灵活和松耦合的Web应用程序。
跟踪SpringMVC流程
图示:
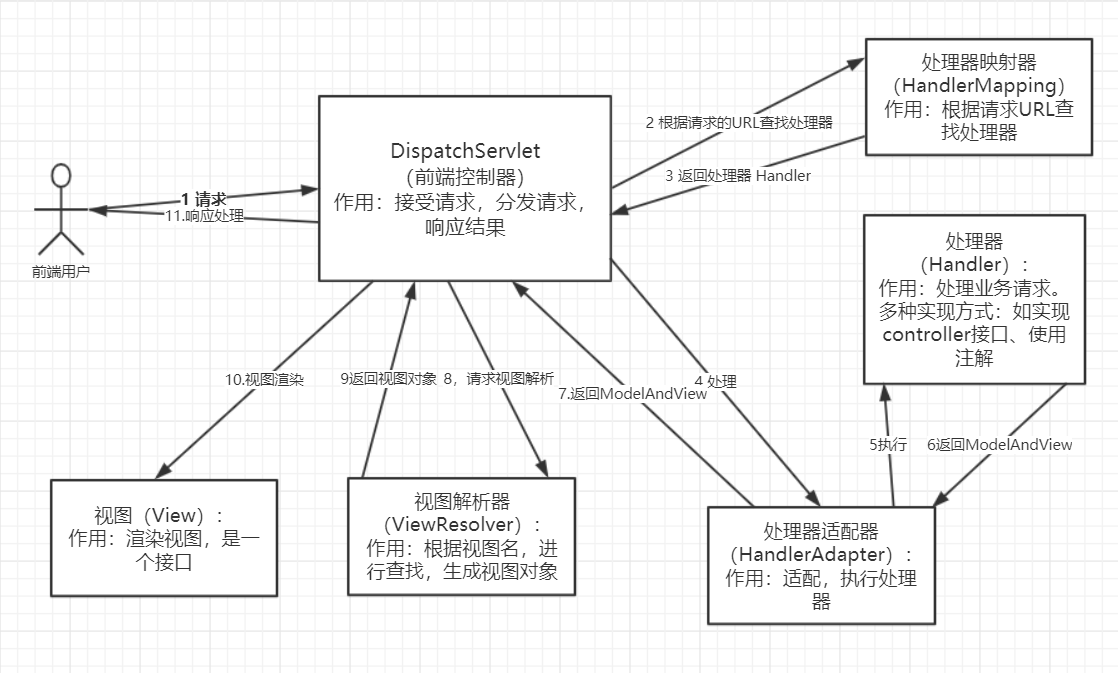
步骤说明:
- 用户发送请求到前端控制器(DispatchServlet),该控制器会过滤出哪些请求可以访问servlet、哪些不能访问。就是URL-Pattern的作用,并且会加载SpringMVC.xml配置文件。
- 前端控制器会找到处理器映射器(HandlerMapping),通过HandlerMapping完成URL到Controller映射的组件,简单来说,就是将在SpringMVC.xml中配置的或者注解的URL与对应的处理类找到并进行存储,用
Map<URL,handler>这样的方式来存储。 - HandlerMapping有了映射关系,并且找到了URL对应的处理器,HandlerMapping就会将其处理器(Handler)返回,在放回前,会加上很多拦截器。
- DispatchServlet拿到Handler之后,找到HandlerAdapter(处理器适配器),通过它来访问处理器,并执行处理器。
- 执行处理器。
- 处理器会返回一个ModelAndView对象到HandlerAdapter。
- 通过HandlerAdapter将ModelAndView对象返回到前端控制器DispatchServlet。
- 前端控制器请求视图解析器(ViewResolver)去进行视图解析,根据逻辑视图名解析成真真的视图(JSP),其实就是将ModelAndView对象中存放视图的名称进行查找,找到对应的页面形成视图对象。
- 返回视图对象到前端控制器。
- 视图渲染,就是将ModelAndView对象中的数据放到Request域中,用来让页面加载数据的。
- 通过第8步,通过名称找到了对应的页面,通过第10步,request域中有了所需要的数据,那么就可以进行视图渲染了。最后将其返回即可。
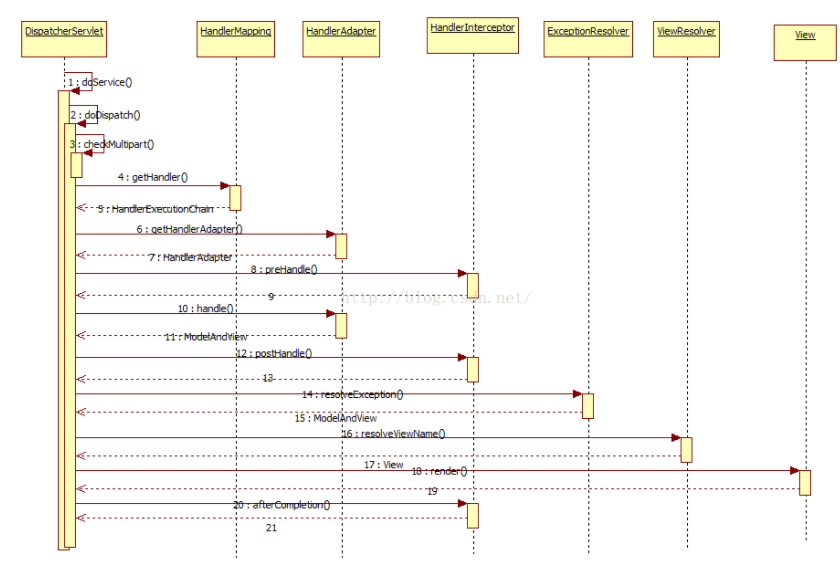
这里再附上网上的一张详细的图:
web.xml版本的Web项目
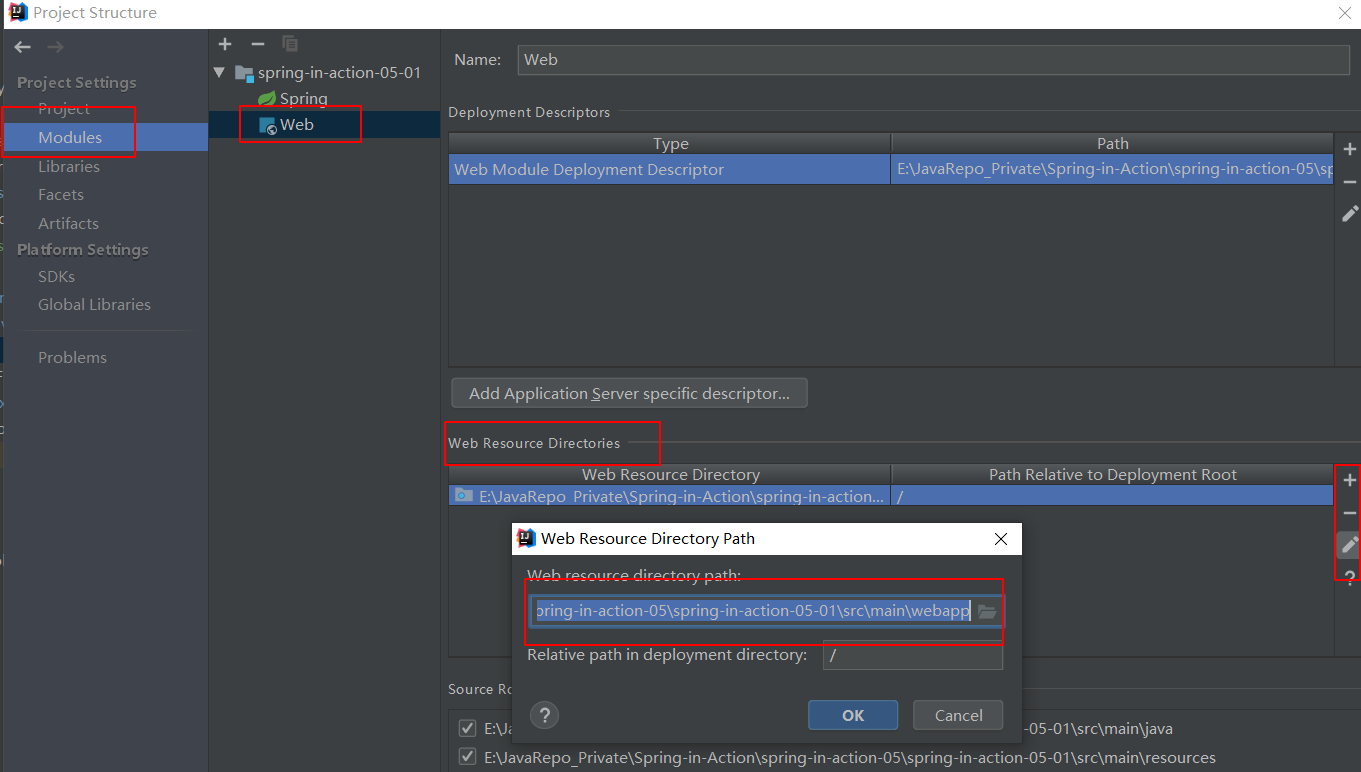
1. 项目结构
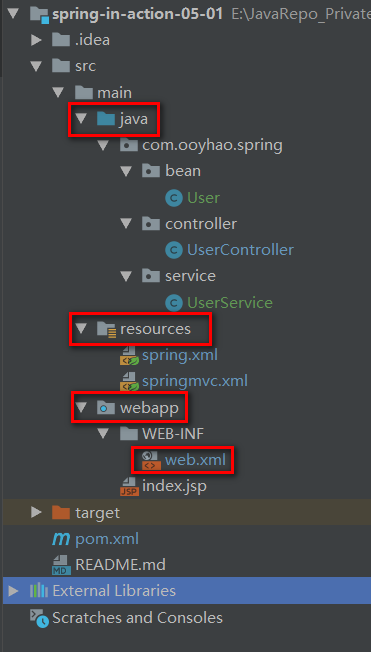
说明:蓝色的Java文件夹,标注为 sources,标有条形圆筒的resources文件夹标注为Resources。
- java文件夹用来存放java源码。
- resources文件夹用来存放资源文件:如spring配置文件,mapper文件。
- webapp目录则用来存放web相关的资源。
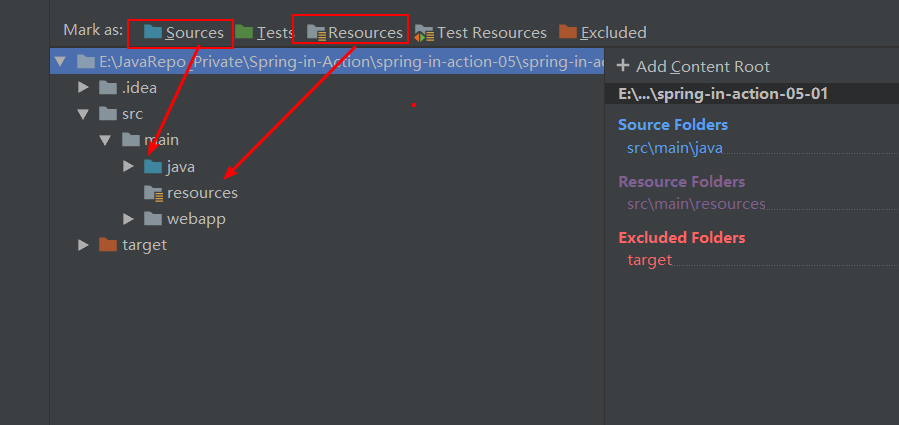
File–>Project Structure
2. Pom 文件
<?xml version="1.0" encoding="UTF-8"?>

<project xmlns="http://maven.apache.org/POM/4.0.0" xmlns:xsi="http://www.w3.org/2001/XMLSchema-instance"
         xsi:schemaLocation="http://maven.apache.org/POM/4.0.0 http://maven.apache.org/xsd/maven-4.0.0.xsd">
    <modelVersion>4.0.0</modelVersion>

    <groupId>com.ooyhao.spring</groupId>
    <artifactId>spring-in-action-05-01</artifactId>
    <version>1.0-SNAPSHOT</version>
    <packaging>war</packaging>

    <name>spring-in-action-05-01 Maven Webapp</name>
    <url>http://www.example.com</url>

    <properties>
        <project.build.sourceEncoding>UTF-8</project.build.sourceEncoding>
        <maven.compiler.source>1.7</maven.compiler.source>
        <maven.compiler.target>1.7</maven.compiler.target>
    </properties>

    <dependencies>
        <dependency>
            <groupId>org.springframework</groupId>
            <artifactId>spring-webmvc</artifactId>
            <version>5.1.9.RELEASE</version>
        </dependency>

        <dependency>
            <groupId>org.springframework</groupId>
            <artifactId>spring-web</artifactId>
            <version>5.1.9.RELEASE</version>
        </dependency>

        <dependency>
            <groupId>org.springframework</groupId>
            <artifactId>spring-aop</artifactId>
            <version>5.1.9.RELEASE</version>
        </dependency>

        <dependency>
            <groupId>org.springframework</groupId>
            <artifactId>spring-aspects</artifactId>
            <version>4.3.15.RELEASE</version>
        </dependency>

        <dependency>
            <groupId>org.springframework</groupId>
            <artifactId>spring-context-support</artifactId>
            <version>5.1.8.RELEASE</version>
        </dependency>

        <dependency>
            <groupId>org.springframework</groupId>
            <artifactId>spring-context</artifactId>
            <version>5.1.9.RELEASE</version>
        </dependency>
        <dependency>
            <groupId>junit</groupId>
            <artifactId>junit</artifactId>
            <version>4.11</version>
            <scope>test</scope>
        </dependency>

        <!-- json 解析,不配置转化器和引入依赖,返回List则会抛出异常-->
        <dependency>
            <groupId>com.fasterxml.jackson.core</groupId>
            <artifactId>jackson-databind</artifactId>
            <version>2.9.5</version>
        </dependency>
        <dependency>
            <groupId>com.fasterxml.jackson.core</groupId>
            <artifactId>jackson-annotations</artifactId>
            <version>2.9.5</version>
        </dependency>


    </dependencies>

</project>
3. 生成web.xml
项目结构搭建好之后,需要生成web.xml文件并配置。
web.xml文件:
<!DOCTYPE web-app PUBLIC
        "-//Sun Microsystems, Inc.//DTD Web Application 2.3//EN"
        "http://java.sun.com/dtd/web-app_2_3.dtd" >
<web-app>
    <display-name>Archetype Created Web Application</display-name>

    <!--配置applicationContext配置文件-->
    <context-param>
        <param-name>contextConfigLocation</param-name>
        <param-value>classpath:spring.xml</param-value>
    </context-param>


    <!--配置编码过滤器-->
    <filter>
        <filter-name>encodingFilter</filter-name>
        <filter-class>
          org.springframework.web.filter.CharacterEncodingFilter
        </filter-class>
        <init-param>
            <param-name>encoding</param-name>
            <param-value>utf-8</param-value>
        </init-param>
        <init-param>
            <param-name>forceEncoding</param-name>
            <param-value>true</param-value>
        </init-param>
    </filter>
    <filter-mapping>
        <filter-name>encodingFilter</filter-name>
        <url-pattern>/*</url-pattern>
    </filter-mapping>

    <!--配置Spring上下文加载器的监听器-->
    <!--默认加载classpath:下面的applicationContext.xml文件。需要自定义可以配置
        <context-param></context-param> 进行配合使用
    -->
    <listener>
        <listener-class>
          org.springframework.web.context.ContextLoaderListener
         </listener-class>
    </listener>

    <!--配置前端控制器-->
    <servlet>
        <servlet-name>dispatcherServlet</servlet-name>
        <servlet-class>
          org.springframework.web.servlet.DispatcherServlet
        </servlet-class>
        <init-param>
            <param-name>contextConfigLocation</param-name>
            <param-value>classpath:springmvc.xml</param-value>
        </init-param>
        <load-on-startup>1</load-on-startup>
    </servlet>
    <servlet-mapping>
        <servlet-name>dispatcherServlet</servlet-name>
        <url-pattern>/</url-pattern>
    </servlet-mapping>
</web-app>
4. 配置Spring和SpringMVC
springmvc.xml配置文件:
<?xml version="1.0" encoding="UTF-8"?>
<beans xmlns="http://www.springframework.org/schema/beans"
       xmlns:xsi="http://www.w3.org/2001/XMLSchema-instance"
       xmlns:context="http://www.springframework.org/schema/context"
       xmlns:mvc="http://www.springframework.org/schema/mvc"
       xsi:schemaLocation="http://www.springframework.org/schema/beans
       http://www.springframework.org/schema/beans/spring-beans.xsd
        http://www.springframework.org/schema/context
        http://www.springframework.org/schema/context/spring-context.xsd
        http://www.springframework.org/schema/mvc
        http://www.springframework.org/schema/mvc/spring-mvc.xsd
">

    <context:component-scan base-package="com.ooyhao.spring.**.controller"/>


    <!--注解驱动,配置controller返回的转换器-->
    <mvc:annotation-driven>
        <mvc:message-converters>
            <bean class="org.springframework.http.converter.StringHttpMessageConverter"/>
            <bean class="org.springframework.http.converter.json.MappingJackson2HttpMessageConverter"/>
        </mvc:message-converters>
    </mvc:annotation-driven>

    <!--解决@ResponseBody返回中文乱码情况-->
    <bean class="org.springframework.web.servlet.mvc.method.annotation.RequestMappingHandlerAdapter" >
        <property name="messageConverters">
            <list>
                <bean class="org.springframework.http.converter.StringHttpMessageConverter">
                    <property name="supportedMediaTypes">
                        <list>
                            <value>text/plain;charset=utf-8</value>
                            <value>text/html;charset=UTF-8</value>
                        </list>
                    </property>
                </bean>
            </list>
        </property>
    </bean>
    <!--静态页面,如html,css,js,images可以访问-->
    <mvc:default-servlet-handler/>

    <bean    class="org.springframework.web.servlet.view.InternalResourceViewResolver">
        <property name="viewClass"
                  value="org.springframework.web.servlet.view.JstlView"/>
        <property name="prefix" value="/WEB-INF/jsp"/>
        <property name="suffix" value=".jsp"/>
    </bean>
</beans>
spring.xml配置文件
<?xml version="1.0" encoding="UTF-8"?>
<beans xmlns="http://www.springframework.org/schema/beans"
       xmlns:xsi="http://www.w3.org/2001/XMLSchema-instance"
       xmlns:context="http://www.springframework.org/schema/context"
       xsi:schemaLocation="http://www.springframework.org/schema/beans
       http://www.springframework.org/schema/beans/spring-beans.xsd
       http://www.springframework.org/schema/context
       http://www.springframework.org/schema/context/spring-context.xsd
">
    <!--组件扫描-->
    <context:component-scan base-package="com.ooyhao.spring">
        <context:exclude-filter type="annotation" expression="org.springframework.stereotype.Controller"/>
    </context:component-scan>
</beans>
5. 编写逻辑代码
User类:
public class User implements Serializable {
    private String username;
    private Integer age;
    private String sex;
    //noArgsConstructor
    //allArgsConstructor
    //getter and setter
    //toString
}
UserService类:
@Service
public class UserService {
    public List<User> findAllUsers(){
        List<User> users = new ArrayList<>();
        users.add(new User("林黛玉",18,"女"));
        users.add(new User("贾宝玉",20,"男"));
        return users;
    }
}
UserController类:
@Controller
public class UserController {
    @Autowired
    private UserService userService;
    @RequestMapping("/hello")
    @ResponseBody
    public List<User> hello(){
        return userService.findAllUsers();
    }
}
6. 测试和结果
启动程序,并测试 localhost:8080/SpringDemo/getAllUsers

无配置文件的Web项目
如果使用过SpringBoot的都知道,SpringBoot可以做到零配置,即没有xml文件,这是因为Spring3.2之后,引入了WebApplicationInitializer。我们可以看一下这个类的源码中:
容在下,拿着这一级英语水平去翻译。
/**
Interface to be implemented in Servlet 3.0+ environments in order to configure the {@link ServletContext} programmatically  as opposed to (or possibly in conjunction with) the traditional {@code web.xml}-based approach.
译:
 在servlet3.0版本以上,通过实现接口以编程的方式进行配置ServletContext,这与传统的web.xml的形式近乎相反(不用web.xml文件,同样可以创建一个web应用)

Implementations of this SPI will be detected automatically by {@link
SpringServletContainerInitializer}, which itself is bootstrapped automatically by any Servlet 3.0 container.
译:
 实现了这个SPI,将会被SpringServletContainerInitializer自动识别,并自动启动。

See {@linkplain SpringServletContainerInitializer its
Javadoc} for details on this bootstrapping mechanism.
译:
 可以通过查看SpringServletContainerInitializer文档去了解自启动机制的详情。

<h2>Example</h2>
译:示例
 <h3>The traditional, XML-based approach</h3>
 译:传统基于Xml的方式
Most Spring users building a web application will need to register Spring's {@code DispatcherServlet}. For reference, in WEB-INF/web.xml, this would typically be done as,follows:
 译:大部分Spring用户在构建一个web应用程序都需要去注册一个Spring的前端控制器(DispatchServlet),而其典型的就是在WEB-INF下的web.xml文件中注册。如下:

--->源码不是这样的,源码的尖括号使用了转义字符
 * <servlet>
 *   <servlet-name>dispatcher</servlet-name>
 *   <servlet-class>
 *     org.springframework.web.servlet.DispatcherServlet
 *   </servlet-class>
 *   <init-param>
 *     <param-name>contextConfigLocation</param-name>
 *     <param-value>/WEB-INF/spring/dispatcher-config.xml</param-value>
 *   </init-param>
 *   <load-on-startup>1</load-on-startup>
 * </servlet>
 *
 * <servlet-mapping>
 *   <servlet-name>dispatcher</servlet-name>
 *   <url-pattern>/</url-pattern>
 * </servlet-mapping>

以上配置就是使用传统的xml配置文件的方式,向servlet容器中注册一个DispatchServlet。

The code-based approach with {@code WebApplicationInitializer}
 * Here is the equivalent {@code DispatcherServlet} registration logic,
 * {@code WebApplicationInitializer}-style:
 译:
  通过使用WebApplicationInitializer的基于代码的方式,其与xml是一个相同的注册逻辑。WebApplicationInitializer代码方式:

 * public class MyWebAppInitializer implements WebApplicationInitializer {
 *    @Override
 *    public void onStartup(ServletContext container) {
 *      XmlWebApplicationContext appContext = new XmlWebApplicationContext();
 *      appContext.setConfigLocation("/WEB-INF/spring/dispatcher-config.xml");
 *
 *      ServletRegistration.Dynamic dispatcher =
 *        container.addServlet("dispatcher", new
            DispatcherServlet(appContext));
 *      dispatcher.setLoadOnStartup(1);
 *      dispatcher.addMapping("/");
 *    }
 * }
 *
 * As an alternative to the above, you can also extend from {@link
org.springframework.web.servlet.support.AbstractDispatcherServletInitializer}.

译:你也可以通过集成自AbstractDispatcherServletInitializer来实现,以上二者任选其一


 * As you can see, thanks to Servlet 3.0's new {@link ServletContext#addServlet} method we're actually registering an instance of the {@code DispatcherServlet}, and this means that the {@code DispatcherServlet} can now be treated like any other object receiving constructor injection of its application context in this case.

译:如你所见,正是由于servlet3.0 的新方法(ServletContext#addServlet)出现,我们可以通过它注册一个DispatchServlet的实例了。这也意味着DispatchServlet可以像其他对象那
样,通过构造注入的方式接受一个Application Context

This style is both simpler and more concise. There is no concern for dealing with init-params, etc, just normal JavaBean-style properties and constructor arguments. You are free to create and work with your Spring application contexts as necessary before injecting them into the {@code DispatcherServlet}.

译:这种方式既简单又简洁。我们不需要如何去处理初始化参数,等,仅仅需要处理像普通JavaBean那样的属性和构造方法参数。在你必须将他们注入到DispatchServlet中之前,你可以很自由的构建和处理你的spring应用程序。

 Most major Spring Web components have been updated to support this style of registration.  You'll find that {@code DispatcherServlet}, {@code FrameworkServlet},{@code ContextLoaderListener} and {@code DelegatingFilterProxy} all now support constructor arguments. Even if a component (e.g. non-Spring, other third party) has not been specifically updated for use within {@code WebApplicationInitializers}, they still
 may be used in any case. The Servlet 3.0 {@code ServletContext} API allows for setting init-params, context-params, etc programmatically.

 译:大部分Spring web 组件都进行了更新,以至于能够支持这个注册方式,你可以发现像 DispatcherServlet、FrameworkServlet、ContextLoaderListener和DelegatingFilterProxy ,现在全部都支持构造参数注入。甚至是一些非spring,其他第三方组织的组件在WebApplicationInitializers中使用的没有支持的也会更新,以至于一直可以使用。Servlet3.0 API 也可以通过编程的方式 去设置 初始化参数、容器参数等


A 100% code-based approach to configuration In the example above,
{@code WEB-INF/web.xml} was successfully replaced with code in
 * the form of a {@code WebApplicationInitializer}, but the actual
 * {@code dispatcher-config.xml} Spring configuration remained XML-based.
 * {@code WebApplicationInitializer} is a perfect fit for use with Spring's code-based
 * {@code @Configuration} classes.
  See @{@link org.springframework.context.annotation.Configuration Configuration} Javadoc for complete details, but the following example demonstrates refactoring to use Spring's {@link org.springframework.web.context.support.AnnotationConfigWebApplicationContext AnnotationConfigWebApplicationContext} in lieu of {@code XmlWebApplicationContext}, and user-defined {@code @Configuration} classes {@code AppConfig} and {@code DispatcherConfig} instead of Spring XML files.

 译 :上面是一个完全由代码的配置方式的案例,web.xml文件已经被一个WebApplicationInitializer 成功取代。当然,实际上 Spring的配置任然保持着基于xml方式,WebApplicationInitializer 是一个更加适合 Spring代码的 配置类。可以查看Configuration的文档,了解完整的详情。但是下面这个例子是使用Spring的 AnnotationConfigWebApplicationContext 来代替XmlWebApplicationContext进行重构的。并且用户通过@Configuration,AppConfig,DispatcherConfig来代替xml配置文件。


 This example also goes a bit beyond those above to demonstrate typical configuration of the 'root' application context and registration of the {@code ContextLoaderListener}:
译:这个例子比上面的例子更进一步,使用root application context 来重构的典型配置,并且注册ContextLoaderListener

 * public class MyWebAppInitializer implements WebApplicationInitializer {
 *    @Override
 *    public void onStartup(ServletContext container) {
 *      // Create the 'root' Spring application context
    创建root Spring的应用上下文
 *      AnnotationConfigWebApplicationContext rootContext =
 *        new AnnotationConfigWebApplicationContext();
 *      rootContext.register(AppConfig.class);

 *      // Manage the lifecycle of the root application context
    管理root 应用上下文的生命周期
 *      container.addListener(new ContextLoaderListener(rootContext));

 *      // Create the dispatcher servlet's Spring application context
    // 创建了Servlet的前端控制器的Spring应用上下文
 *      AnnotationConfigWebApplicationContext dispatcherContext =
 *        new AnnotationConfigWebApplicationContext();
 *      dispatcherContext.register(DispatcherConfig.class);

 *      // Register and map the dispatcher servlet
    //注册并且映射前端控制器
 *      ServletRegistration.Dynamic dispatcher =
 *        container.addServlet("dispatcher", new
          DispatcherServlet(dispatcherContext));
 *      dispatcher.setLoadOnStartup(1);
 *      dispatcher.addMapping("/");
 *    }
 * }


 *
 * As an alternative to the above, you can also extend from {@link
 org.springframework.web.servlet.support.AbstractAnnotationConfigDispatcherServletInitializer}.
 你也可以通过集成自AbstractAnnotationConfigDispatcherServletInitializer,以上二者任选其一。

Remember that {@code WebApplicationInitializer} implementations are
  detected automatically -- so you are free to package them within your application as you see fit.

记住,WebApplicationInitializer 的实现类 都是自动识别的。所以,你可以自由的将他们打包到你认为合适的应用程序中。


Ordering {@code WebApplicationInitializer} execution
 {@code WebApplicationInitializer} implementations may optionally be annotated at the
 * class level with Spring's @{@link org.springframework.core.annotation.Order Order}
 * annotation or may implement Spring's {@link org.springframework.core.Ordered Ordered}
 * interface. If so, the initializers will be ordered prior to invocation. This provides
 * a mechanism for users to ensure the order in which servlet container initialization
 * occurs. Use of this feature is expected to be rare, as typical applications will likely
 * centralize all container initialization within a single {@code WebApplicationInitializer}.

Caveats :说明、警告

web.xml versioning
web.xml版本

{@code WEB-INF/web.xml} and {@code WebApplicationInitializer} use are not mutually exclusive; for example, web.xml can register one servlet, and a {@code WebApplicationInitializer} can register another. An initializer can even modify registrations performed in {@code web.xml} through methods such as {@link ServletContext#getServletRegistration(String)}.

译:web.xml与WebApplicationInitializer不会相互排斥,例如,web.xml可注册一个Servlet,而WebApplicationInitializer可以注册另一个,后者甚至可以修改在xml中注册的。


However, if {@code WEB-INF/web.xml} is present in the application, its {@code version} attribute must be set to "3.0" or greater, otherwise {@code ServletContainerInitializer} bootstrapping will be ignored by the servlet container

译:然而,如果web.xml存在于应用中,那么它的版本必须在3.0或以上,否则ServletContainerInitializer 自己化启动将会被Servlet容器忽略。


 * <h3>Mapping to '/' under Tomcat</h3>、
 在tomcat下映射/
 * <p>Apache Tomcat maps its internal {@code DefaultServlet} to "/", and on Tomcat versions
<= 7.0.14, this servlet mapping cannot be overridden programmatically
 7.0.15 fixes this issue. Overriding the "/" servlet mapping has also been tested successfully under GlassFish 3.1
译:在tomcat7.0.14及以下,tomcat使用其自身的DefaultServlet去映射/,这个Servlet映射将不能被编程方式重写在7.0.15版本。在GlassFish 3.1下, 成功测试出可以重写/这个Servlet映射器。
 */

public interface WebApplicationInitializer {

  /**
   * Configure the given {@link ServletContext} with any servlets, filters, listeners context-params and attributes necessary for initializing this web application.
   为你这个web容器配置任何必要的 filter,listener,servlet,及其参数和属性

   See examples {@linkplain WebApplicationInitializer above}.
   * @param servletContext the {@code ServletContext} to initialize
   * @throws ServletException if any call against the given {@code ServletContext}
   * throws a {@code ServletException}
   */
  void onStartup(ServletContext servletContext) throws ServletException;

}
当你耐心的看完源码和翻译,你大概就知道SpringBoot为何可以做到不用web.xml文件就可以搭建一个web项目。这是使用了WebApplicationInitializer。
其实当我们好好学习Spring,会发现曾经SpringBoot那些神秘面纱,慢慢被揭开了。这也是我学了SpringBoot基础之后,又回头学习Spring的原因。
废话不多说了,开始搭建我们无配置文件的wen项目。
1. 替代web.xml的InitWeb
web.xml这里使用InitWeb.java代替,这里使用的是AbstractAnnotationConfigDispatcherServletInitializer,WebApplicationInitializer的子类,代码如下:
public class InitWeb extends AbstractAnnotationConfigDispatcherServletInitializer {


    @Override
    protected Class<?>[] getRootConfigClasses() {
        //配置rootConfig,即原来的applicationContext.xml
        return new Class[]{RootConfig.class};
    }

    @Override
    protected Class<?>[] getServletConfigClasses() {
        //配置ServletConfig,即原来的springmvc.xml
        return new Class[]{ServletConfig.class};
    }

    @Override
    protected String[] getServletMappings() {
        //配置servlet映射,即之前在web.xml中DispatchServlet中配置的。
        return new String[]{"/"};
    }
}
2. POM
<?xml version="1.0" encoding="UTF-8"?>

<project xmlns="http://maven.apache.org/POM/4.0.0" xmlns:xsi="http://www.w3.org/2001/XMLSchema-instance"
  xsi:schemaLocation="http://maven.apache.org/POM/4.0.0 http://maven.apache.org/xsd/maven-4.0.0.xsd">
  <modelVersion>4.0.0</modelVersion>

  <groupId>com.ooyhao.spring</groupId>
  <artifactId>spring-in-action-05-02</artifactId>
  <version>1.0-SNAPSHOT</version>
  <packaging>war</packaging>

  <name>spring-in-action-05-02 Maven Webapp</name>
  <url>http://www.example.com</url>

  <properties>
    <project.build.sourceEncoding>UTF-8</project.build.sourceEncoding>
    <maven.compiler.source>1.7</maven.compiler.source>
    <maven.compiler.target>1.7</maven.compiler.target>
  </properties>

  <dependencies>
    <dependency>
      <groupId>junit</groupId>
      <artifactId>junit</artifactId>
      <version>4.11</version>
      <scope>test</scope>
    </dependency>

    <dependency>
      <groupId>com.fasterxml.jackson.core</groupId>
      <artifactId>jackson-databind</artifactId>
      <version>2.9.5</version>
    </dependency>
    <dependency>
      <groupId>com.fasterxml.jackson.core</groupId>
      <artifactId>jackson-annotations</artifactId>
      <version>2.9.5</version>
    </dependency>

    <dependency>
      <groupId>javax.servlet</groupId>
      <artifactId>javax.servlet-api</artifactId>
      <version>4.0.1</version>
      <scope>provided</scope>
    </dependency>

    <dependency>
      <groupId>org.springframework</groupId>
      <artifactId>spring-webmvc</artifactId>
      <version>5.1.9.RELEASE</version>
    </dependency>

  </dependencies>

</project>
3. RootConfig
/*相当于spring.xml*/
@ComponentScan(basePackages = "com.ooyhao.spring", useDefaultFilters = true,excludeFilters = {
        @ComponentScan.Filter(type = FilterType.ANNOTATION,classes = EnableWebMvc.class)
})
public class RootConfig {
扫描基础包,使用默认的过滤器。即全部都扫描。排除标有Controller注解的。
4. ServletConfig
/*相当于springmvc.xml*/
@Configuration
@EnableWebMvc
@ComponentScan(basePackages = "com.ooyhao.spring.**.controller")
public class ServletConfig implements WebMvcConfigurer {


    /*配置JSP视图解析器*/
    @Bean
    public ViewResolver viewResolver(){
        InternalResourceViewResolver resolver =
                new InternalResourceViewResolver();
        resolver.setPrefix("/WEB-INF/views/");
        resolver.setSuffix(".jsp");
        resolver.setExposeContextBeansAsAttributes(true);
        return resolver;
    }

    /*配置静态资源的处理*/
    @Override
    public void configureDefaultServletHandling(DefaultServletHandlerConfigurer configurer) {
        configurer.enable();
    }
}
可以看出,SpringMvc的配置文件,比前面的spring配置文件多了很多内容。扫描所有的Controller,配置视图解析器,配置静态资源处理。开启webmvc(@EnableWebMvc)
@EnableWebMvc 相当于之前在springmvc.xml文件中配置的<mvc:annotation-driven>
5. 编写逻辑代码
Article:
public class Article implements Serializable {


    private Integer id;
    private String title;
    private String content;
    private String author;

    public Article() {}

    public Article(Integer id, String title, String content,
                   String author) {
        this.id = id;
        this.title = title;
        this.content = content;
        this.author = author;
    }

    public Integer getId() {
        return id;
    }

    public void setId(Integer id) {
        this.id = id;
    }

    public String getTitle() {
        return title;
    }

    public void setTitle(String title) {
        this.title = title;
    }

    public String getContent() {
        return content;
    }

    public void setContent(String content) {
        this.content = content;
    }

    public String getAuthor() {
        return author;
    }

    public void setAuthor(String author) {
        this.author = author;
    }

    @Override
    public String toString() {
        return "Article{" +
                "id=" + id +
                ", title='" + title + '\'' +
                ", content='" + content + '\'' +
                ", author='" + author + '\'' +
                '}';
    }
}
ArticleService:
@Service
public class ArticleService {

    private static List<Article> articles = new ArrayList<>();

    static {
        Article article1 = new Article(1,"红楼梦","红楼梦","曹雪芹");
        Article article2 = new Article(2,"三国演义","三国演义","罗贯中");
        Article article3 = new Article(3,"水浒传","水浒传","施耐庵");
        Article article4 = new Article(4,"西游记","西游记","吴承恩");
        articles.add(article1);
        articles.add(article2);
        articles.add(article3);
        articles.add(article4);
    }

    public List<Article> findAllArticle(){
        return articles;
    }
}
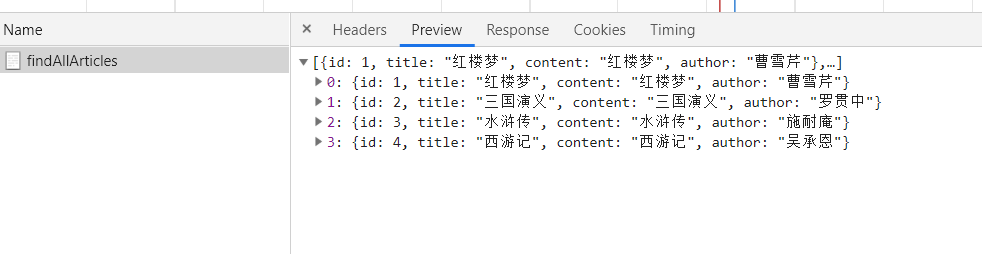
ArticleController:
@Controller
public class ArticleController {
    @Autowired
    private ArticleService articleService;

    @RequestMapping("/findAllArticles")
    @ResponseBody
    public List<Article> findAllArticles(){
        List<Article> articles = articleService.findAllArticle();
        return articles;
    }
}
6. 测试和结果
接受请求参数的输入
SpringMVC允许以多种方式将客户端中的数据传送到控制器的处理器方法中,包括:
- 查询参数(Query Parameter)
- 表单参数(Form Patameter)
- 路径参数(Path Variable)
将上述示例进行了一定的修改,配合页面进行展示:
1. 查询参数
查询参数,我们以分页来做示例:
ArticleService:
@Service
public class ArticleService {
    private static Map<Integer,Article> articles = new HashMap<>();

    static {
        Article article1 = new Article(1,"红楼梦","林黛玉、贾宝玉","曹雪芹");
        Article article2 = new Article(2,"三国演义","诸葛亮、刘备","罗贯中");
        Article article3 = new Article(3,"水浒传","鲁智深、武松","施耐庵");
        Article article4 = new Article(4,"西游记","孙悟空、猪八戒","吴承恩");
        articles.put(1,article1);
        articles.put(2,article2);
        articles.put(3,article3);
        articles.put(4,article4);
    }

    public List<Article> findAllArticle(){
        return new ArrayList<>(articles.values());
    }

    public Article findArticleById(Integer id) {
        return articles.get(id);
    }

    public List<Article> findArticleByPage(Integer page, Integer size){
        int firstIndex = (page-1) * size;
        int lastIndex = page * size;
        return new ArrayList<>
          (articles.values()).subList(firstIndex,lastIndex);
    }

}
ArticleController:
@Controller
public class ArticleController {

    @Autowired
    private ArticleService articleService;

    @GetMapping("/article")
    public String article(Model model,
           @RequestParam(value = "page",defaultValue = "1") Integer page,
           @RequestParam(value = "size",defaultValue = "2") Integer size){
        List<Article> articles = articleService.findArticleByPage(page,
                                                                  size);
        model.addAttribute("articles",articles);
        return "articleList";
    }
}
articleList.jsp
<%@ taglib prefix="c" uri="http://java.sun.com/jsp/jstl/core" %>
<%--
  Created by IntelliJ IDEA.
  User: ouYang
  Date: 2019/9/1
  Time: 11:13
  To change this template use File | Settings | File Templates.
--%>
<%@ page contentType="text/html;charset=UTF-8" language="java" %>
<html>
<head>
    <title>Title</title>
</head>
<body>

    <%--文章信息--%>
    <h1>文章列表</h1>

    <c:forEach items="${articles}" var="article">
        <ul>
            <li>ID:<c:out value="${article.id}"/></li>
            <li>标题:<c:out value="${article.title}"/></li>
            <li>内容:<c:out value="${article.content}"/></li>
            <li>作者:<c:out value="${article.author}"/></li>
        </ul>
    </c:forEach>
</body>
</html>
测试及结果:
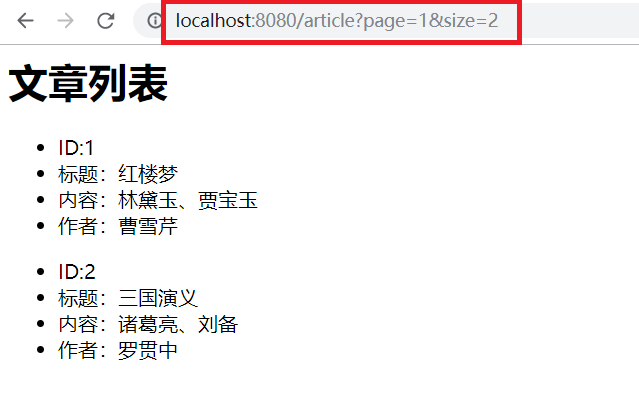
说明:
请求参数会拼接在请求路径后面使用?隔开,参数和值之间使用=连接。多个参数之间使用&进行拼接。Controller可以通过@RequestParam注解接收,可以设置默认值,当然,也可以省略@RequestParam注解。
2. 通过路径参数
ArticleController:
/*将参数写到路径上*/
@GetMapping("/article/{id}")
public String article(Model model,@PathVariable("id") Integer id){
  Article article = articleService.findArticleById(id);
  List<Article> articles = new ArrayList<>();
  articles.add(article);
  model.addAttribute("articles",articles);
  return "articleList";
}
测试及结果:
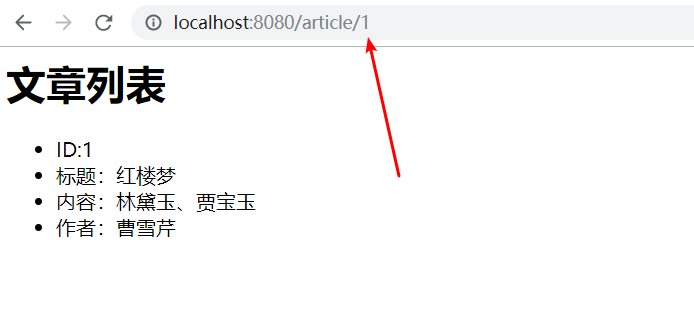
说明:
可以看出,路径参数与请求参数是不一样的,路径参数是请求地址中的一部分,在Controller中通过@PathVariable注解来注释接受。/article/{id} 在路径上使用{}来标注参数的位置。
3. 处理表单
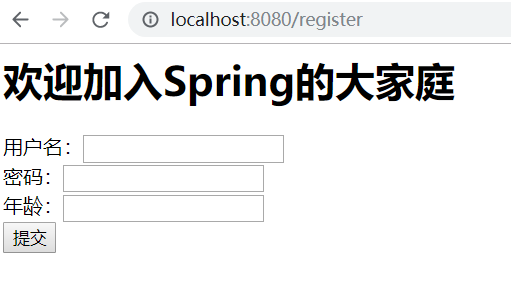
处理表单参数,首先我们需要一个表单,这里以注册为例:
register jsp文件:
<%@ taglib prefix="c" uri="http://java.sun.com/jsp/jstl/core" %>
<%--
  Created by IntelliJ IDEA.
  User: ouYang
  Date: 2019/9/1
  Time: 10:29
  To change this template use File | Settings | File Templates.
--%>
<%@ page contentType="text/html;charset=UTF-8" language="java" %>
<html>
<head>
    <title>Blog</title>
</head>
<body>

    <h1>欢迎加入Spring的大家庭</h1>
    <form method="post" >
        用户名:<input name="username" type="text" ><br>
        密码:<input name="password" type="password" ><br>
        年龄:<input name="age" type="number" ><br>
        <input type="submit" value="提交"><br>
    </form>
</body>
</html>
一个普通的表单,使用post请求提交,当我们没有指定action属性的时候,点击提交之后,会使用原地址,即请求表单页面的地址,通过post请求提交,本例中是/register. 表单包括 用户名,密码和年龄三个属性。后台进行相应的Bean接受(User)
User:
public class User implements Serializable {
    private String username;
    private String password;
    private Integer age;
    //all/noArgConstructor, getter and setter, toString
}
UserService:
@Service
public class UserService {
    private static List<User> users = new ArrayList<>();
    public void saveUser(User user){
        users.add(user);
    }
}
IndexController:
@Controller
public class IndexController {

    @Autowired
    private UserService userService;

    @GetMapping("/")
    public String home(){
        return "home";
    }

    @GetMapping("/register")
    public String toRegister(){
        return "register";
    }

    /*处理表单数据,并验证*/
    @PostMapping("/register")
    public String register(User user){
        userService.saveUser(user);
        return "redirect:/registerSuccess";
    }

    @GetMapping("/registerSuccess")
    public String registerSuccess(){
        return "registerSuccess";
    }

    @GetMapping("/registerFail")
    public String registerFail(){
        return "registerFail";
    }
}
通过上面代码可以看出,通过get请求类型,请求路径为/register,通过返回逻辑视图名,DispatchServlet将逻辑视图名去查找视图,并渲染返回,就可以进入注册表单页面。显而易见,前端提交的参数会自动填写到User对象中,这就是SpringMVC的强大之处,可以将数据自动与实体进行映射。

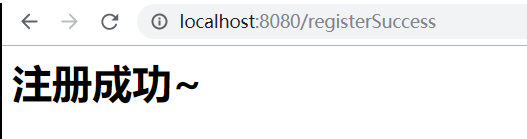
注册成功之后就会跳到注册成功的页面:
<%@ taglib prefix="c" uri="http://java.sun.com/jsp/jstl/core" %>
<%@ page contentType="text/html;charset=UTF-8" language="java" %>
<html>
<head>
    <title>Blog</title>
</head>
<body>
    <h1>注册成功~</h1>
</body>
</html>
如下:
但是此时我们可以尝试,在页面不填写任何数据,同样是可以提交成功的,这明显不符合我们的业务要求。所以这里需要进行参数校验。
4. 参数校验
首先,我们需要导入一个Jar包
<!-- https://mvnrepository.com/artifact/org.hibernate.validator/hibernate-validator -->
<dependency>
  <groupId>org.hibernate.validator</groupId>
  <artifactId>hibernate-validator</artifactId>
  <version>6.1.0.Alpha3</version>
</dependency>
其次我们需要修改我们的实体类
public class User implements Serializable {
    @NotNull
    @Size(min = 4,max = 20)
    private String username;

    @NotNull
    @Size(min = 6,max = 32)
    private String password;

    @NotNull
    @Min(1)
    @Max(150)
    private Integer age;

    //all/noArgConstructor, getter and setter, toString
}
并且需要在Controller的方式接受参数的地方加上@Valid注解,如下:
/*处理表单数据,并验证*/
@PostMapping("/register")
public String register(@Valid User user, Errors errors){
  if (errors.hasErrors()){
    return "redirect:/registerFail";
  }
  userService.saveUser(user);
  return "redirect:/registerSuccess";
}
可以看出这里有个Errors参数,这个参数必须紧跟在@Valid注解之后,并且可以通过它判断参数填写是否正确。因为即使加了@Valid,也无法阻止方法的执行,所以需要手动判断处理。
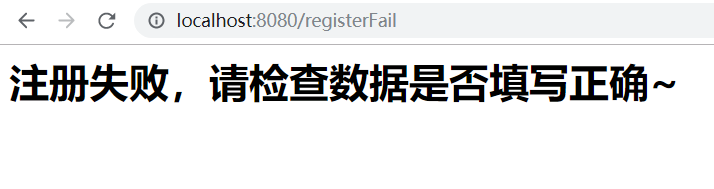
我们增加一个注册失败的提示页面。
registerFail:
<%@ taglib prefix="c" uri="http://www.springframework.org/tags" %>
<%@ page contentType="text/html;charset=UTF-8" language="java" %>
<html>
<head>
    <title>Blog</title>
</head>
<body>
    <h1>注册失败,请检查数据是否填写正确~</h1>
</body>
</html>
如未按要求填写数据就提交:
4.1 参数检验注解
注解 | 描述 |
@AssertFalse | 所注解的元素必须是Boolean类型,并且值为false |
@AssertTrue | 所注解的元素必须是Boolean类型,并且值为true |
@DecimalMax | 所注解的元素必须是数字,并且它的值要小于或等于给定的BigDecimalString的值 |
@DecimalMin | 所注解的元素必须是数字,并且它的值要大于或等于给定的BigDecimalString的值 |
@Digists | 所注解的元素必须是数字,并且它的值必须有指定的位数 |
@Future | 所注解的元素的值必须是一个将来的日期 |
@Max | 所注解的元素必须是数字,并且它的值要小于或等于给定的值 |
@Min | 所注解的元素必须是数字,并且它的值要大于或等于给定的值 |
@NotNull | 所注解元素的值必须不能为null |
@Null | 所注解元素的值必须为null |
@Past | 所注解的元素的值必须是一个已过去的日期 |
@Pattern | 所注解的元素的值必须匹配给定的正则表达式 |
@Size | 所注解的元素的值必须是String,集合或数组,并且它的长度要符合给定的范围 |
5. 本地中的POM 文件
<?xml version="1.0" encoding="UTF-8"?>

<project xmlns="http://maven.apache.org/POM/4.0.0" xmlns:xsi="http://www.w3.org/2001/XMLSchema-instance"
  xsi:schemaLocation="http://maven.apache.org/POM/4.0.0 http://maven.apache.org/xsd/maven-4.0.0.xsd">
  <modelVersion>4.0.0</modelVersion>

  <groupId>com.ooyhao.spring</groupId>
  <artifactId>spring-in-action-05-02</artifactId>
  <version>1.0-SNAPSHOT</version>
  <packaging>war</packaging>

  <name>spring-in-action-05-02 Maven Webapp</name>
  <url>http://www.example.com</url>

  <properties>
    <project.build.sourceEncoding>UTF-8</project.build.sourceEncoding>
    <maven.compiler.source>1.7</maven.compiler.source>
    <maven.compiler.target>1.7</maven.compiler.target>
  </properties>

  <dependencies>
    <dependency>
      <groupId>junit</groupId>
      <artifactId>junit</artifactId>
      <version>4.11</version>
      <scope>test</scope>
    </dependency>

    <!-- @ResponseBody自动转JSON -->
    <dependency>
      <groupId>com.fasterxml.jackson.core</groupId>
      <artifactId>jackson-databind</artifactId>
      <version>2.9.5</version>
    </dependency>
    <dependency>
      <groupId>com.fasterxml.jackson.core</groupId>
      <artifactId>jackson-annotations</artifactId>
      <version>2.9.5</version>
    </dependency>


    <!-- servlet参数 -->
    <dependency>
      <groupId>javax.servlet</groupId>
      <artifactId>javax.servlet-api</artifactId>
      <version>4.0.1</version>
      <scope>provided</scope>
    </dependency>

    <dependency>
      <groupId>org.springframework</groupId>
      <artifactId>spring-webmvc</artifactId>
      <version>5.1.9.RELEASE</version>
    </dependency>


<!-- 参数校验 -->
    <dependency>
      <groupId>org.hibernate.validator</groupId>
      <artifactId>hibernate-validator</artifactId>
      <version>6.1.0.Alpha3</version>
    </dependency>

<!--jsp中使用jstl标签-->
    <dependency>
      <groupId>jstl</groupId>
      <artifactId>jstl</artifactId>
      <version>1.2</version>
    </dependency>
  </dependencies>

  <build>
    <finalName>spring-in-action-05-02</finalName>
    <pluginManagement>
      <plugins>
        <plugin>
          <artifactId>maven-clean-plugin</artifactId>
          <version>3.1.0</version>
        </plugin>
        <plugin>
          <artifactId>maven-resources-plugin</artifactId>
          <version>3.0.2</version>
        </plugin>
        <plugin>
          <artifactId>maven-compiler-plugin</artifactId>
          <version>3.8.0</version>
        </plugin>
        <plugin>
          <artifactId>maven-surefire-plugin</artifactId>
          <version>2.22.1</version>
        </plugin>
        <plugin>
          <artifactId>maven-war-plugin</artifactId>
          <version>3.2.2</version>
        </plugin>
        <plugin>
          <artifactId>maven-install-plugin</artifactId>
          <version>2.5.2</version>
        </plugin>
        <plugin>
          <artifactId>maven-deploy-plugin</artifactId>
          <version>2.8.2</version>
        </plugin>
      </plugins>
    </pluginManagement>
  </build>
</project>
总结:
这一节主要是将web.xml构建web项目和WebApplicationInitializer构建项目对比,手动搭建一个无xml文件的web项目。同时也揭开了SpringBoot无配置文件启动的神秘面纱。并且连接了三种参数输入的方式。
案例地址:
https://gitee.com/ooyhao/JavaRepo_Public/tree/master/Spring-in-Action/spring-in-action-05
最后
如果觉得不错的话,那就关注一下小编哦!一起交流,一起学习

| 阿里云国内75折 回扣 微信号:monov8 |
| 阿里云国际,腾讯云国际,低至75折。AWS 93折 免费开户实名账号 代冲值 优惠多多 微信号:monov8 飞机:@monov6 |