

CSS(八):定位属性
| 阿里云国内75折 回扣 微信号:monov8 |
| 阿里云国际,腾讯云国际,低至75折。AWS 93折 免费开户实名账号 代冲值 优惠多多 微信号:monov8 飞机:@monov6 |
一、position属性
1、relative(相对定位)
- 相对它原来的位置,通过指定偏移,到达新的位置。
- 扔在标准流中,它对父级盒子和相邻的盒子都没有任何影响。
看下面的例子:
<!DOCTYPE html>

<html lang="en">

<head>

    <meta charset="UTF-8">

    <meta name="viewport" content="width=device-width, initial-scale=1.0">

    <meta http-equiv="X-UA-Compatible" content="ie=edge">

    <title>相对定位</title>

    <style type="text/css">

      .box1,.box2,.box3{

         width: 100px;

         height: 100px;

      }

      .box1{

        background-color: red;

      }

      .box2{

        background-color:blue;

      }

      .box3{

        background-color: yellow;

      }

    </style>

</head>

<body>

    <div class="box"></div>

    <div class="box1"></div>

    <div class="box2"></div>

    <div class="box3"></div>

</body>

</html>
效果:

然后分别给第一个和第二个盒子添加定位:
<!DOCTYPE html>

<html lang="en">

<head>

    <meta charset="UTF-8">

    <meta name="viewport" content="width=device-width, initial-scale=1.0">

    <meta http-equiv="X-UA-Compatible" content="ie=edge">

    <title>相对定位</title>

    <style type="text/css">

      .box1,.box2,.box3{

         width: 100px;

         height: 100px;

      }

      .box1{

        background-color: red;

        position: relative;

        left: 100px;

      }

      .box2{

        background-color:blue;

        position: relative;

        left: 100px;

        top: 50px;

      }

      .box3{

        background-color: yellow;

      }

    </style>

</head>

<body>

    <div class="box"></div>

    <div class="box1"></div>

    <div class="box2"></div>

    <div class="box3"></div>

</body>

</html>
效果:
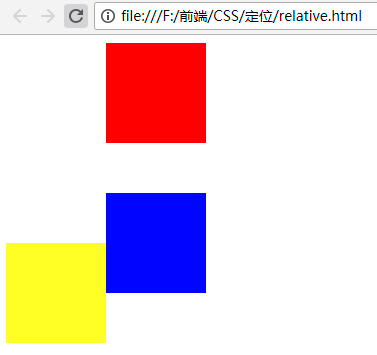
观察上面的截图会发现:第一个和第二个盒子分别相对于原来的位置进行了偏移,但是对父级盒子和相邻的盒子都没有影响。
2、absolute(绝对定位)
- 相对已设定非static定位属性的父元素计算偏移量,脱离文档流。
看下面的例子:
<!DOCTYPE html>

<html lang="en">

<head>

    <meta charset="UTF-8">

    <meta name="viewport" content="width=device-width, initial-scale=1.0">

    <meta http-equiv="X-UA-Compatible" content="ie=edge">

    <title>绝对定位</title>

    <style type="text/css">

      .box1,.box2,.box3{

         width: 100px;

         height: 100px;

      }

      .box1{

        background-color: red;

        position: relative;

        left: 100px;

      }

      .box2{

        background-color:blue;

        position: absolute;

        left: 100px;

        top: 50px;

      }

      .box3{

        background-color: yellow;

        width: 120px;

      }

    </style>

</head>

<body>

    <div class="box"></div>

    <div class="box1"></div>

    <div class="box2"></div>

    <div class="box3"></div>

</body>

</html>
效果:

观察上面的截图可以发现:absolute定位是脱离文档流的,是相对于父元素进行偏移。
3、fixed(相对浏览器固定定位,IE6不支持)
看下面的例子:
<!DOCTYPE html>

<html lang="en">

<head>

    <meta charset="UTF-8">

    <meta name="viewport" content="width=device-width, initial-scale=1.0">

    <meta http-equiv="X-UA-Compatible" content="ie=edge">

    <title>fixed</title>

    <style type="text/css">

      .box1,.box2,.box3{

         width: 100px;

         height: 100px;

      }

      .box1{

        background-color: red;

        position: relative;

        left: 100px;

      }

      .box2{

        background-color:blue;

        position: absolute;

        left: 100px;

        top: 50px;

      }

      .box3{

        background-color: yellow;

        width: 120px;

        position: fixed;

        left: 100px;

        top: 200px;

      }

    </style>

</head>

<body>

    <div class="box"></div>

    <div class="box1"></div>

    <div class="box2"></div>

    <div class="box3"></div>

    <br /><br /><br /><br /><br /><br /><br /><br /><br /><br /><br /><br /><br /><br /><br />

    <br /><br /><br /><br /><br /><br /><br /><br /><br /><br /><br /><br /><br />

    <br /><br /><br /><br /><br /><br /><br /><br /><br /><br /><br /><br /><br />

    <br /><br /><br /><br /><br /><br /><br />

</body>

</html>
效果:

上下移动滚动条的时候你会发现,第三个盒子的位置不会随着滚动条的滚动而上下移动,相对于浏览器是固定的。
4、static(默认)
- 偏移量设置
- X轴(left、right属性)与Y轴(top、bottom属性)
- 可取值:像素或百分比。
5、定位图解

6、Z-Index
Z-Index用来设置定位盒子的层级
- 数字越大层级越高,越在上层。
例如:Z-Index:2;
注意:
- 数字之后没有单位。
- 数字可以设置为负值。
看下面的例子:
<!DOCTYPE html>

<html lang="en">

<head>

    <meta charset="UTF-8">

    <meta name="viewport" content="width=device-width, initial-scale=1.0">

    <meta http-equiv="X-UA-Compatible" content="ie=edge">

    <title>绝对定位</title>

    <style type="text/css">

      .box1,.box2,.box3{

         width: 100px;

         height: 100px;

      }

      .box1{

        background-color: red;

        position: relative;

        left: 100px;

      }

      .box2{

        background-color:blue;

        position: absolute;

        left: 100px;

        top: 50px;

      }

      .box3{

        background-color: yellow;

        width: 120px;

      }

    </style>

</head>

<body>

    <div class="box"></div>

    <div class="box1"></div>

    <div class="box2"></div>

    <div class="box3"></div>

</body>

</html>
效果:

现在给box1添加层级:
<!DOCTYPE html>

<html lang="en">

<head>

    <meta charset="UTF-8">

    <meta name="viewport" content="width=device-width, initial-scale=1.0">

    <meta http-equiv="X-UA-Compatible" content="ie=edge">

    <title>绝对定位</title>

    <style type="text/css">

      .box1,.box2,.box3{

         width: 100px;

         height: 100px;

      }

      .box1{

        background-color: red;

        position: relative;

        left: 100px;

        z-index: 1;

      }

      .box2{

        background-color:blue;

        position: absolute;

        left: 100px;

        top: 50px;

      }

      .box3{

        background-color: yellow;

        width: 120px;

      }

    </style>

</head>

<body>

    <div class="box"></div>

    <div class="box1"></div>

    <div class="box2"></div>

    <div class="box3"></div>

</body>

</html>
效果:

这时box1就会在box2上面。
也可以给box2添加层级:
<!DOCTYPE html>

<html lang="en">

<head>

    <meta charset="UTF-8">

    <meta name="viewport" content="width=device-width, initial-scale=1.0">

    <meta http-equiv="X-UA-Compatible" content="ie=edge">

    <title>绝对定位</title>

    <style type="text/css">

      .box1,.box2,.box3{

         width: 100px;

         height: 100px;

      }

      .box1{

        background-color: red;

        position: relative;

        left: 100px;

        /* z-index: 1; 添加层级 */

      }

      .box2{

        background-color:blue;

        position: absolute;

        left: 100px;

        top: 50px;

        z-index: -2;/*添加负数的层级*/

      }

      .box3{

        background-color: yellow;

        width: 120px;

      }

    </style>

</head>

<body>

    <div class="box"></div>

    <div class="box1"></div>

    <div class="box2"></div>

    <div class="box3"></div>

</body>

</html>
效果:

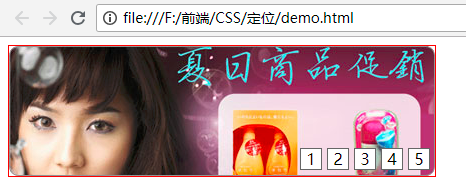
实例:
实现网页横幅的效果:
<!DOCTYPE html>

<html lang="en">

<head>

    <meta charset="UTF-8">

    <meta name="viewport" content="width=device-width, initial-scale=1.0">

    <meta http-equiv="X-UA-Compatible" content="ie=edge">

    <title>定位基本应用</title>

    <style type="text/css">

      #adverImg{

          width: 426px;

          height: 130px;/*和图片的宽度和高度一致*/

          position: relative;/*父元素添加相对定位*/

          border: 1px solid red;

      }

      #number{

          position: absolute;

          right: 5px;

          bottom: -10px;

      }

      /*li标签设置样式,使用后代选择器*/

      #number li{

          list-style: none;/*设置li标签样式:不显示前面的圆点*/

          float: left; /*设置浮动:使li标签在一行显示*/

          width: 20px;

          height: 20px;

          border: 1px solid #666666;/*设置边框*/

          margin-left: 5px;/*设置向左的外边距,使每个li标签之间有空格*/

          text-align: center;/*设置文字水平方向居中*/

          line-height: 20px;/*设置文字垂直方向居中*/

          /* color: white; */

          cursor: pointer;/*设置鼠标移动到li标签时显示小手的形状*/

          background-color: white;

      }

    </style>

</head>

<body>

    <div id="adverImg">

        <img src="data:images/adver-01.jpg" alt="商品促销" />

        <ul id="number">

            <li>1</li>

            <li>2</li>

            <li>3</li>

            <li>4</li>

            <li>5</li>

        </ul>

    </div>

</body>

</html>
效果:
| 阿里云国内75折 回扣 微信号:monov8 |
| 阿里云国际,腾讯云国际,低至75折。AWS 93折 免费开户实名账号 代冲值 优惠多多 微信号:monov8 飞机:@monov6 |