

Mybatis (七) Mybatis整合Spring
| 阿里云国内75折 回扣 微信号:monov8 |
| 阿里云国际,腾讯云国际,低至75折。AWS 93折 免费开户实名账号 代冲值 优惠多多 微信号:monov8 飞机:@monov6 |
Mybatis整合Spring操作DB
☞ 博客导航,带你有序的阅读和学习!
文章目录
- Mybatis整合Spring操作DB
- 项目结构图
- 项目的POM依赖
- Mybatis的全局配置
- properties文件
- RoleMapper 文件
- RoleMapper XML
- RoleService
- 单元测试类
- 最后
这一节我们主要看一下如何使用Spring整合Mybatis操作,同时也是基于操作方面的,对于其Spring如何操作Mybatis的,还需要后续的学习。虽然之前的Spring in action 4 中涉及到了SSM整合,但是在学习mybatis之后,再次整合Spring加Mybatis,会体会到不一样的感觉。
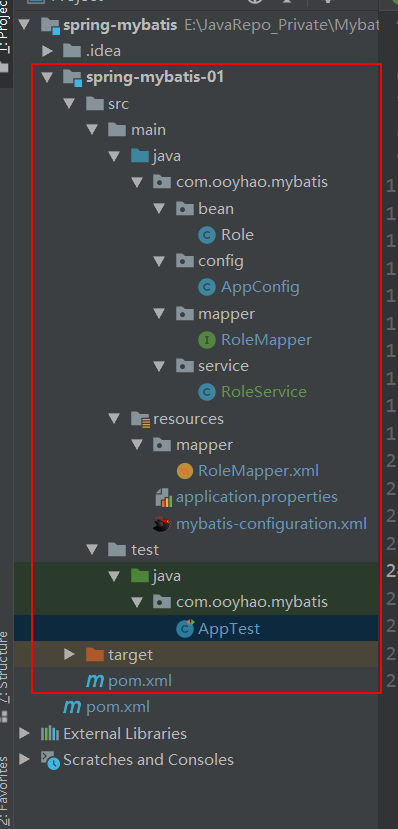
项目结构图
项目的POM依赖
<?xml version="1.0" encoding="UTF-8"?>
<project xmlns="http://maven.apache.org/POM/4.0.0" xmlns:xsi="http://www.w3.org/2001/XMLSchema-instance"
         xsi:schemaLocation="http://maven.apache.org/POM/4.0.0 http://maven.apache.org/xsd/maven-4.0.0.xsd">
    <parent>
        <artifactId>spring-mybatis</artifactId>
        <groupId>com.ooyhao.mybatis</groupId>
        <version>1.0-SNAPSHOT</version>
    </parent>
    <modelVersion>4.0.0</modelVersion>

    <artifactId>spring-mybatis-01</artifactId>

    <name>spring-mybatis-01</name>
    <url>http://www.example.com</url>

    <properties>
        <project.build.sourceEncoding>UTF-8</project.build.sourceEncoding>
        <maven.compiler.source>1.7</maven.compiler.source>
        <maven.compiler.target>1.7</maven.compiler.target>
    </properties>

    <dependencies>

        <dependency>
            <groupId>junit</groupId>
            <artifactId>junit</artifactId>
            <version>4.12</version>
        </dependency>

        <dependency>
            <groupId>org.springframework</groupId>
            <artifactId>spring-context</artifactId>
            <version>5.1.9.RELEASE</version>
        </dependency>

        <dependency>
            <groupId>org.springframework</groupId>
            <artifactId>spring-context-support</artifactId>
            <version>5.1.8.RELEASE</version>
        </dependency>

        <!--mybatis依赖包-->
        <dependency>
            <groupId>org.mybatis</groupId>
            <artifactId>mybatis</artifactId>
            <version>3.4.6</version>
        </dependency>

        <!--mybatis整合spring-->
        <dependency>
            <groupId>org.mybatis</groupId>
            <artifactId>mybatis-spring</artifactId>
            <version>1.3.2</version>
        </dependency>

        <!--mysql驱动-->
        <dependency>
            <groupId>mysql</groupId>
            <artifactId>mysql-connector-java</artifactId>
            <version>5.1.47</version>
        </dependency>

        <dependency>
            <groupId>com.alibaba</groupId>
            <artifactId>druid</artifactId>
            <version>1.1.9</version>
        </dependency>

        <dependency>
            <groupId>org.springframework</groupId>
            <artifactId>spring-jdbc</artifactId>
            <version>5.1.6.RELEASE</version>
        </dependency>

        <dependency>
            <groupId>org.springframework</groupId>
            <artifactId>spring-aop</artifactId>
            <version>5.1.9.RELEASE</version>
        </dependency>

        <dependency>
            <groupId>org.springframework</groupId>
            <artifactId>spring-aspects</artifactId>
            <version>5.1.6.RELEASE</version>
        </dependency>

        <!--日志-->
        <dependency>
            <groupId>org.slf4j</groupId>
            <artifactId>slf4j-api</artifactId>
            <version>1.8.0-beta0</version>
        </dependency>

        <dependency>
            <groupId>org.slf4j</groupId>
            <artifactId>slf4j-simple</artifactId>
            <version>1.8.0-beta0</version>
        </dependency>

        <!--lombok-->
        <dependency>
            <groupId>org.projectlombok</groupId>
            <artifactId>lombok</artifactId>
            <version>1.18.8</version>
        </dependency>

        <!--jackson-->
        <dependency>
            <groupId>com.fasterxml.jackson.core</groupId>
            <artifactId>jackson-databind</artifactId>
            <version>2.10.0.pr3</version>
        </dependency>

        <dependency>
            <groupId>com.fasterxml.jackson.core</groupId>
            <artifactId>jackson-core</artifactId>
            <version>2.10.0.pr3</version>
        </dependency>

        <dependency>
            <groupId>com.fasterxml.jackson.core</groupId>
            <artifactId>jackson-annotations</artifactId>
            <version>2.10.0.pr3</version>
        </dependency>

        <dependency>
            <groupId>org.springframework</groupId>
            <artifactId>spring-tx</artifactId>
            <version>5.1.8.RELEASE</version>
        </dependency>
    </dependencies>

</project>
POM依赖也需要注意,所以我把完整的POM依赖贴出来,有的时候项目没问题,可能就是依赖搞错了导致项目运行不了、
Mybatis的全局配置
<?xml version="1.0" encoding="UTF-8" ?>
<!DOCTYPE configuration
        PUBLIC "-//mybatis.org//DTD Config 3.0//EN"
        "http://mybatis.org/dtd/mybatis-3-config.dtd">
<configuration>

    <!--属性配置文件-->
    <!--<properties resource="application.properties"/>-->

    <!--设置-->
    <settings>
        <!--<setting name="cacheEnabled" value="true"/>-->
        <setting name="mapUnderscoreToCamelCase" value="true"/>
        <!--<setting name="logImpl" value="STDOUT_LOGGING"/>-->
    </settings>

    <!--别名-->
    <!--<typeAliases>
        <package name="com.ooyhao.mybatis.bean"/>
    </typeAliases>-->

    <!--Spring中配置-->
    <!--<environments default="dev">
        <environment id="dev">
            <transactionManager type="JDBC"></transactionManager>
            <dataSource type="POOLED">
                <property name="driver" value="${jdbc.driver}"/>
                <property name="url" value="${jdbc.url}"/>
                <property name="username" value="${jdbc.username}"/>
                <property name="password" value="${jdbc.password}"/>
            </dataSource>
        </environment>
    </environments>-->


    <!--Mapper xml文件-->
    <!--<mappers>
        <mapper resource="mapper/RoleMapper.xml"/>
    </mappers>-->

</configuration>
可以看出,这里只是配置了一下开启驼峰命名,因为这一项在配置类中配置无效(测试结果),所以在配置文件中保留了这一项,其他的均可以通过配置类来配置。
properties文件
# 配合数据源
jdbc.driver= com.mysql.jdbc.Driver
jdbc.url = jdbc:mysql://120.79.167.xx:3306/mybatis?useUnicode=true&characterEncoding=UTF-8&allowMultiQueries=true&autoReconnect=true&useSSL=false
jdbc.username = root
jdbc.password = root


#配置Mybatis参数
mybatis.configuration = mybatis-configuration.xml
mybatis.mapperLocations = mapper/*.xml
mybatis.typeAliasesPackage = com.ooyhao.mybatis.bean
Spring配置类
package com.ooyhao.mybatis.config;

import com.alibaba.druid.pool.DruidDataSource;
import org.apache.ibatis.logging.stdout.StdOutImpl;
import org.mybatis.spring.SqlSessionFactoryBean;
import org.mybatis.spring.annotation.MapperScan;
import org.springframework.beans.factory.annotation.Value;
import org.springframework.context.annotation.Bean;
import org.springframework.context.annotation.ComponentScan;
import org.springframework.context.annotation.Configuration;
import org.springframework.context.annotation.PropertySource;
import org.springframework.core.io.ClassPathResource;
import org.springframework.core.io.Resource;
import org.springframework.core.io.support.PathMatchingResourcePatternResolver;
import org.springframework.jdbc.datasource.DataSourceTransactionManager;
import org.springframework.transaction.annotation.EnableTransactionManagement;

import javax.sql.DataSource;

/**
 * 描述:
 * 类【AppConfig】
 *
 * @author ouYangHao
 * @create 2019-09-20 16:58
 */
@Configuration //标注为一个配置类
@PropertySource(value = "classpath:application.properties") //加载属性文件
@ComponentScan(basePackages = "com.ooyhao.mybatis")  //组件扫描
@MapperScan(basePackages = {"com.ooyhao.mybatis.mapper"})  //mapper文件的扫描
@EnableTransactionManagement //开启事务管理
public class AppConfig {

    @Value("${jdbc.url}")
    private String url;

    @Value("${jdbc.driver}")
    private String driverClassName;

    @Value("${jdbc.username}")
    private String username;

    @Value("${jdbc.password}")
    private String password;

    @Value("${mybatis.configuration}")
    private String mybatisConfiguration;

    @Value("${mybatis.mapperLocations}")
    private String mybatisMapperLocations;

    @Value("${mybatis.typeAliasesPackage}")
    private String mybatisTypeAliasesPackage;

    /*配置数据源*/
    @Bean
    public DataSource dataSource(){
        DruidDataSource druidDataSource = new DruidDataSource();
        druidDataSource.setUrl(url);
        druidDataSource.setDriverClassName(driverClassName);
        druidDataSource.setUsername(username);
        druidDataSource.setPassword(password);
        return druidDataSource;
    }

    /*Mybatis的全局配置*/
    @Bean
    public SqlSessionFactoryBean sqlSessionFactoryBean(DataSource dataSource)
                                                        throws Exception {
        SqlSessionFactoryBean sqlSessionFactoryBean = new SqlSessionFactoryBean();
        /*配置Mybatis的全局配置文件*/
        ClassPathResource resource = new ClassPathResource(mybatisConfiguration);
        sqlSessionFactoryBean.setConfigLocation(resource);

        /*配置Mapper.xml文件的路径*/
        PathMatchingResourcePatternResolver resolver
                                = new PathMatchingResourcePatternResolver();
        Resource[] resources = resolver.getResources(mybatisMapperLocations);
        sqlSessionFactoryBean.setMapperLocations(resources);
        /*配置别名包*/
        sqlSessionFactoryBean.setTypeAliasesPackage(mybatisTypeAliasesPackage);
        /*设置数据源,位置有要求,需要在下面几项之前*/
        sqlSessionFactoryBean.setDataSource(dataSource);
        /*配置驼峰命名*/
        sqlSessionFactoryBean.getObject().getConfiguration()
                                        .setMapUnderscoreToCamelCase(true);
        /*配置日志类*/
        sqlSessionFactoryBean.getObject().getConfiguration()
                                        .setLogImpl(StdOutImpl.class);
        /*设置开启缓存*/
        sqlSessionFactoryBean.getObject().getConfiguration().setCacheEnabled(true);
        return sqlSessionFactoryBean;
    }

    /*配置数据源事务管理器,需要将数据源注入*/
    @Bean
    public DataSourceTransactionManager transactionManager(DataSource dataSource){
        DataSourceTransactionManager transactionManager =
                new DataSourceTransactionManager();
        transactionManager.setDataSource(dataSource);
        return transactionManager;
    }
}
提示:配置说明如注释;
RoleMapper 文件
public interface RoleMapper {
    Role findById(Integer id);
    void deleteById(Integer id);
}
RoleMapper XML
<?xml version="1.0" encoding="UTF-8" ?>
<!DOCTYPE mapper PUBLIC "-//mybatis.org//DTD Mapper 3.0//EN" "http://mybatis.org/dtd/mybatis-3-mapper.dtd" >
<mapper namespace="com.ooyhao.mybatis.mapper.RoleMapper">

    <!--开启二级缓存-->
    <!--开启本mapper的namespace下的二级缓存-->
    <cache eviction="FIFO"
           flushInterval="60000"
           readOnly="true"
           size="512" />

    <resultMap id="base_map" type="role">
        <id column="id" jdbcType="INTEGER" property="id" />
        <result column="role_name" jdbcType="VARCHAR" property="roleName"/>
        <result column="description" jdbcType="VARCHAR" property="description"/>
        <result column="status" jdbcType="INTEGER" property="status"/>
        <result column="create_time" jdbcType="TIMESTAMP" property="createTime"/>
        <result column="create_user" jdbcType="VARCHAR" property="createUser"/>
        <result column="modify_time" jdbcType="TIMESTAMP" property="modifyTime"/>
        <result column="modify_user" jdbcType="VARCHAR" property="modifyUser"/>
    </resultMap>


    <!--可以通过设置useCache来规定这个sql是否开启缓存,ture是开启,false是关闭-->
    <select id="findById" resultMap="base_map" useCache="true" >
        select * from tb_role where id = #{id}
    </select>

    <delete id="deleteById">
        delete from tb_role where id = #{id}
    </delete>

</mapper>
RoleService
@Service
public class RoleService {

    @Autowired
    private RoleMapper roleMapper;

//    @Transactional
    public Role findById(Integer id){
        roleMapper.findById(id);
        return roleMapper.findById(id);
    }

    @Transactional
    public void deleteById(Integer id){
        roleMapper.deleteById(id);
        int i = 1/0;
    }

}
单元测试类
public class AppTest {

    AnnotationConfigApplicationContext context = null;

    @Before
    public void init(){
        context = new AnnotationConfigApplicationContext(AppConfig.class);
    }

    @Test
    public void testFindById() {
        AnnotationConfigApplicationContext context = new
                AnnotationConfigApplicationContext(AppConfig.class);
        RoleService bean = context.getBean(RoleService.class);
        Role role = bean.findById(1);
        System.out.println(role);
    }

    @Test
    public void testDeleteById(){
        RoleService service = context.getBean(RoleService.class);
        service.deleteById(7);
    }
}
这里顺便测试一下Mapper的一级缓存和二级缓存:
当我们在查询Service上不使用事务注解的时候:
测试结果如下:
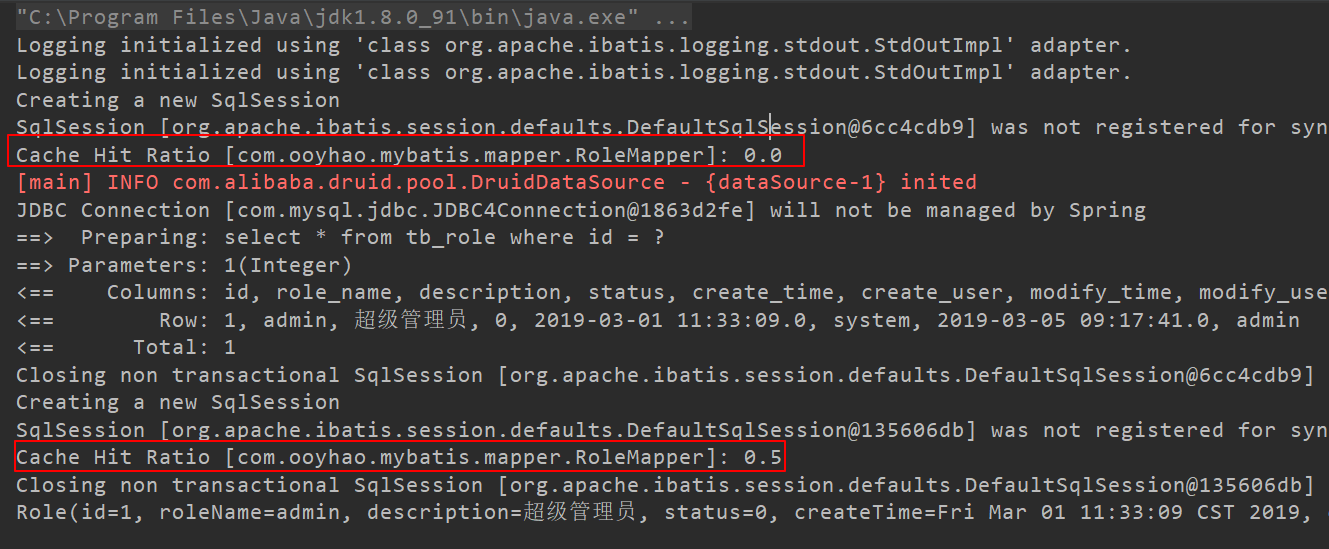
可以看出,这种情况下我们走的是二级缓存,即,在此情况下,一级缓存是没有生效的。
当我们在查询Service上加上事务时:
测试结果如下:
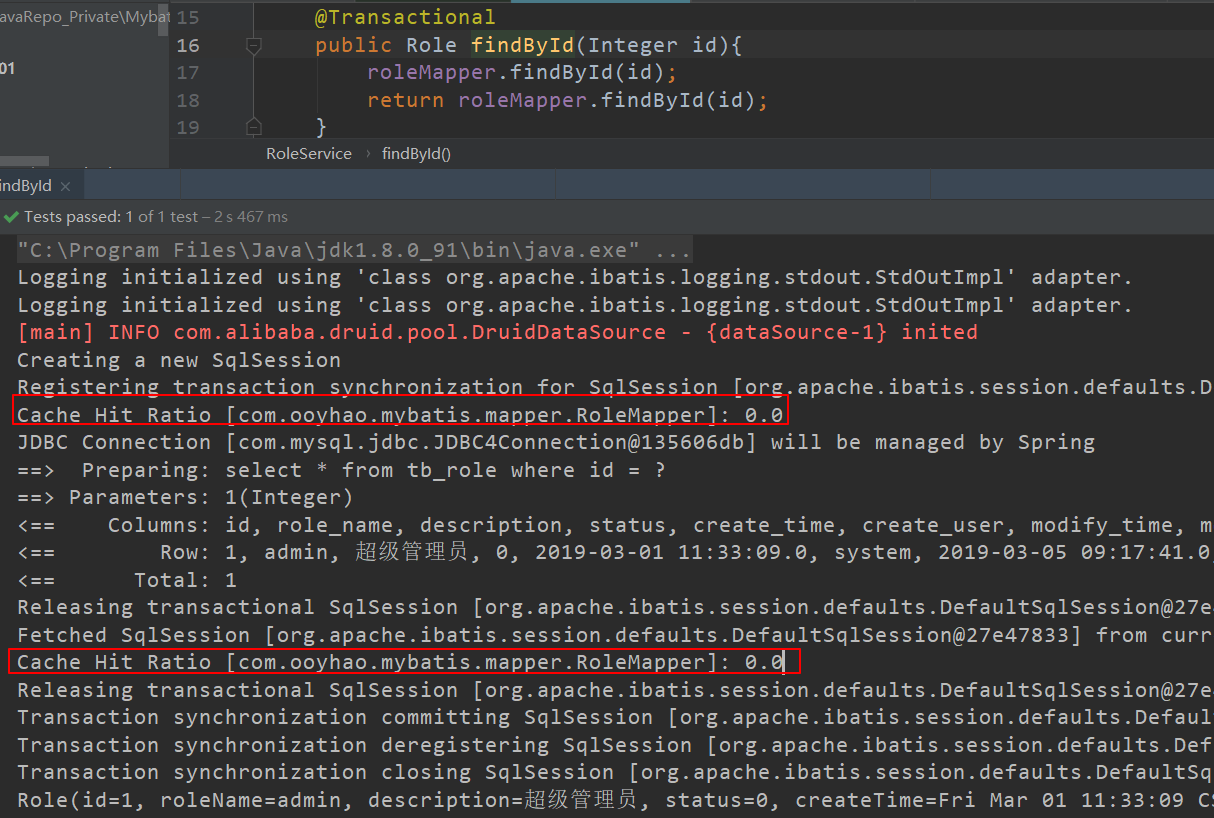
可以看出此时走的是一级缓存,因为二级缓存的击中率都是0,但是查询了两次,只发送一次SQL,所以此时可以看出是查询的一级缓存。
总结:
至此,Spring的基础和Mybatis的基础就完整的过了一遍了,将Mybatis的各种基础用法,动态SQL,结果映射都使用了一遍,同时前面的Spring中也将Spring的基础再次熟悉了一遍,比如自动装配,AOP,同时知道了如何不使用Web.xml和其他配置文件的情况下,搭建起一个web项目。
源码地址:
https://gitee.com/ooyhao/JavaRepo_Public/tree/master/Mybatis
最后
如果觉得不错的话,那就关注一下小编哦!一起交流,一起学习

| 阿里云国内75折 回扣 微信号:monov8 |
| 阿里云国际,腾讯云国际,低至75折。AWS 93折 免费开户实名账号 代冲值 优惠多多 微信号:monov8 飞机:@monov6 |