

AWS实战:ECS Fargate部署nodejs docker image
| 阿里云国内75折 回扣 微信号:monov8 |
| 阿里云国际,腾讯云国际,低至75折。AWS 93折 免费开户实名账号 代冲值 优惠多多 微信号:monov8 飞机:@monov6 |
项目地址
https://github.com/JessicaWin/aws-fargate-example
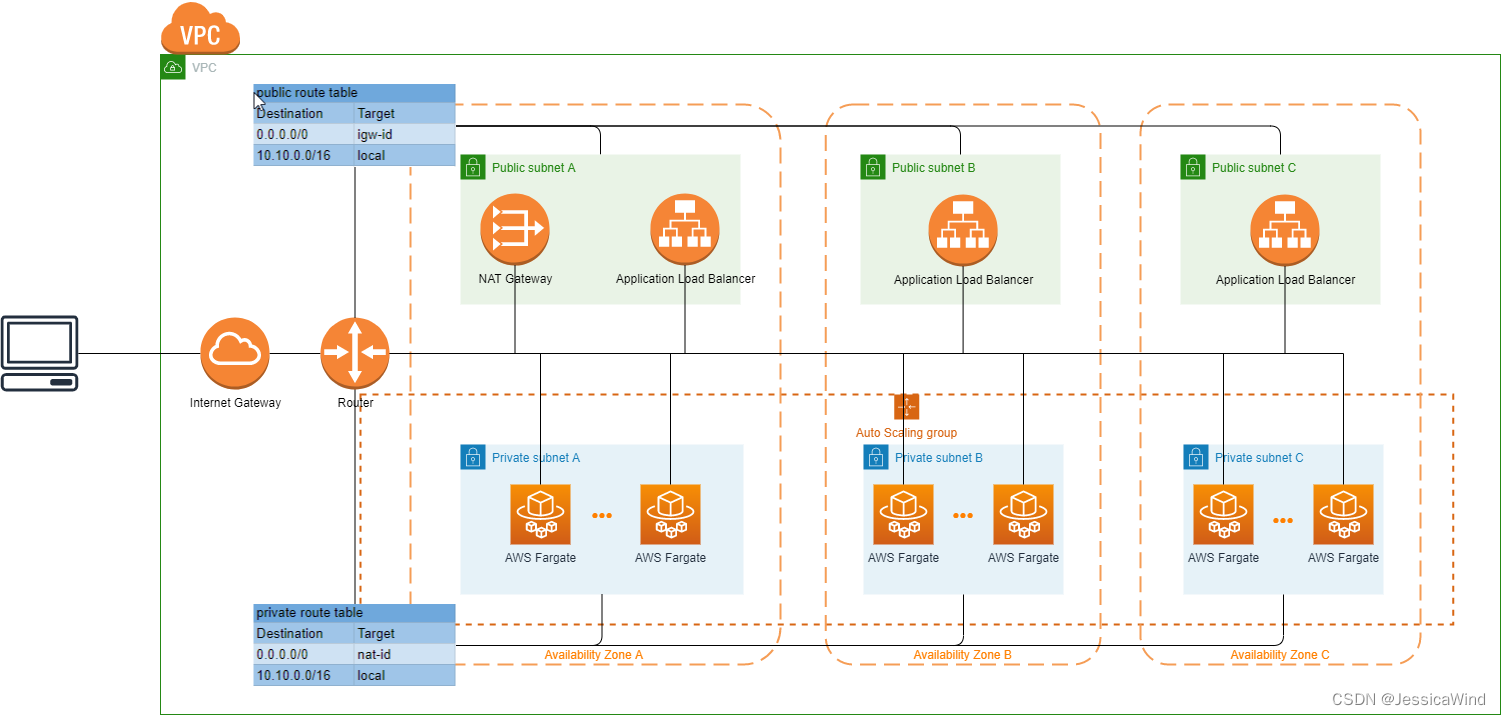
项目架构图
1.构建nodejs项目
$ sudo npm i -g @nestjs/cli
$ nest new aws-fargate-example
$ cd aws-fargate-example
$ npm install
$ npm run start项目启动成功后浏览器输入http://localhost:3000/可以看到Hello World!
2.构建docker image并启动
创建Dockerfile
#use alpine version to decrease docker image size, https://hub.docker.com/_/node?tab=description&page=1&ordering=last_updated
FROM node:18-alpine3.14 As development

WORKDIR /app

COPY package*.json ./

RUN npm install

#copies files from a local source location to a destination in the Docker container
COPY . .

RUN npm run build

CMD ["npm", "run", "start"]

# Multi Staging Build
FROM node:18-alpine3.14 As production

ARG NODE_ENV=production
ENV NODE_ENV=${NODE_ENV}

WORKDIR /app

COPY package*.json ./

# Create node_modules that is necessary only for production
RUN npm install production

#copies files from a local source location to a destination in the Docker container
COPY . .

# Copy dist generated in development stage
COPY --from=development /app/dist ./dist

EXPOSE 3000

CMD ["npm", "run", "start:prod"]
指令含义
FROM指定 基础镜像因此一个Dockerfile中FROM是必备的指令并且必须是第一条指令WORKDIR制定后续RUN,CMD,ENTRYPOINT,COPY和ADD指令的工作目录COPY将从构建上下文目录中<源路径>的文件/目录复制到新的一层的镜像内的<目标路径>位置。RUN执行命令行命令CMD容器启动命令ARG构建参数- ENV设置环境变量
EXPOSE声明容器运行时提供服务的端口这只是一个声明在容器运行时并不会因为这个声明应用就会开启这个端口的服务
构建和启动docker
$ docker build -t aws-fargate-example:latest --target=development ./
$ docker run -it -d -p 3001:3000 aws-fargate-example:latestdocker启动成功后浏览器输入http://localhost:3001/可以看到Hello World!
3.使用docker compose管理容器
Compose 是用于定义和运行多容器 Docker 应用程序的工具。通过 Compose可以使用 YML 文件来配置应用程序需要的所有服务。然后使用一个命令就可以从 YML 文件配置中创建并启动所有服务。
Compose 使用的三个步骤
-
使用 Dockerfile 定义应用程序的环境。
-
使用 docker-compose.yml 定义构成应用程序的服务这样它们可以在隔离环境中一起运行。
-
最后执行 docker-compose up 命令来启动并运行整个应用程序。
# set based on docker version, refer to https://docs.docker.com/compose/compose-file/compose-file-v3/
version: '3.6'

services:
    dev:
        container_name: aws-fargate-example-dev
        image: aws-fargate-example-dev:${IMAGE_TAG:-latest}
        build:
            context: .
            target: development
            dockerfile: ./Dockerfile
        command: npm run start
        ports:
            - 3000:3000
        networks:
            - aws-fargate-example-network
        restart: unless-stopped
    prod:
        container_name: aws-fargate-example-prod
        image: aws-fargate-example-prod:${IMAGE_TAG:-latest}
        build:
            context: .
            target: production
            dockerfile: ./Dockerfile
        command: npm run start:prod
        ports:
            - 3000:3000
        networks:
            - aws-fargate-example-network
        restart: unless-stopped

networks:
    aws-fargate-example-network:
构建和启动docker
# use ocker-compose to build image for all services/stages
$ docker-compose build
# use ocker-compose to start specific service
$ docker-compose up dev
$ docker-compose up prod
4.部署deploy bucket
在部署ecr之前我们首先部署一个bucket用作以后各个aws资源的deploy bucket
deploy bucket cloudformation template
AWSTemplateFormatVersion: '2010-09-09'
Description: Cloudformation template for creating deployment related S3 buckets
Parameters:
  Stage:
    Type: String
    Default: develop
    Description: the stage of the environment like develop, production

Resources:
  DeploymentBucket:
    Type: AWS::S3::Bucket
    Properties:
      BucketName: !Sub com.jessica.${Stage}-deploy-bucket
      CorsConfiguration:
        CorsRules:
          - AllowedHeaders: ['*']
            AllowedMethods: [GET, PUT, HEAD, POST, DELETE]
            AllowedOrigins: ['*']
Outputs:
  DeploymentBucket:
    Value: !Ref DeploymentBucket
    Export:
      Name: !Sub ${Stage}-deploy-bucket
deploy bucket 部署脚本
#!/bin/bash
echo "Deploying deploy bucket ..."
DELETE=$1

STAGE_LIST=( develop production )

for i in "${STAGE_LIST[@]}"
do
	STAGE=$i
	REGION="ap-northeast-1"
	if [ "$STAGE" = "develop" ];then
		REGION="ap-southeast-1"
	fi
	echo "Deploying deploy-bucket.yml to $STAGE in $REGION ..."
	if [ "$DELETE" = "remove" ];then
		aws cloudformation delete-stack --stack-name $STAGE-deploy-bucket
	else
		stackOutput=`aws cloudformation create-stack --stack-name $STAGE-deploy-bucket --template-body file://./deploy-bucket.yml --parameters ParameterKey=Stage,ParameterValue=$STAGE --region $REGION 2>&1`
        if [[ "$stackOutput" =~ "AlreadyExistsException" ]]; then
			noUpdate=`aws cloudformation update-stack --stack-name $STAGE-deploy-bucket --template-body file://./deploy-bucket.yml --parameters ParameterKey=Stage,ParameterValue=$STAGE --region $REGION 2>&1`
			if [[ "$noUpdate" =~ "No updates are to be performed" ]]; then
				echo "No updates are to be performed"
			else
				echo $noUpdate
			fi
		else
			echo $stackOutput
		fi
	fi
done
5.部署ECR repository
部署ecr repository用来存储docker image
ecr cloudformation template
service: aws-fargate-example-ecr

provider:
  name: aws
  region: ${opt:region, 'ap-southeast-1'}
  stage: ${opt:stage, 'develop'}
  stackName: ${self:provider.stage}-${self:service}
  deploymentBucket:
    name: com.jessica.${self:provider.stage}-deploy-bucket
    serverSideEncryption: AES256
resources:
  Resources:
    NestjsstarterEcr:
      Type: AWS::ECR::Repository
      Properties:
        RepositoryName: aws-fargate-example
        RepositoryPolicyText:
          Version: '2012-10-17'
          Statement:
            - Effect: Allow
              Principal:
                AWS:
                  - !Sub arn:aws:iam::${AWS::AccountId}:root
              Action:
                - 'ecr:ListImages'
                - 'ecr:BatchGetImage'
                - 'ecr:GetDownloadUrlForLayer'
                - 'ecr:PutImage'
ecr部署命令
# deploy to develop stage
$ sls deploy --stage develop --region ap-southeast-1

# deploy to production stage
$ sls deploy --stage production --region ap-norheast-1
6.部署IAM Role
部署ECS Fargate Service至少需要两个role
- Task RoleECS task执行时使用的role需要的权限根据task
- ExecutionRoleECS service启动task使用的role需要的权限
此外因为本项目中的fargate service用到了auto scale所以额外需要一个auto scale role
service: aws-fargate-example-iam

provider:
  name: aws
  region: ${opt:region, 'ap-southeast-1'}
  stage: ${opt:stage, 'develop'}
  stackName: ${self:provider.stage}-${self:service}
  deploymentBucket:
    name: name: com.jessica.${self:provider.stage}-deploy-bucket
    serverSideEncryption: AES256
resources:
  Resources:
    ECSPolicy:
      Type: AWS::IAM::ManagedPolicy
      Properties:
        ManagedPolicyName: !Sub '${self:provider.stage}_ECSPolicy'
        PolicyDocument:
          Version: '2012-10-17'
          Statement:
            - Action:
                - ecr:BatchGetImage
                - ecr:BatchCheckLayerAvailability
                - ecr:CompleteLayerUpload
                - ecr:GetDownloadUrlForLayer
                - ecr:InitiateLayerUpload
                - ecr:PutImage
                - ecr:UploadLayerPart
                - ecr:GetAuthorizationToken
              Resource:
                - '*'
              Effect: Allow
            - Action:
                - ecs:*
                - elasticloadbalancing:DescribeTargetGroups
                - elasticloadbalancing:DescribeListeners
                - elasticloadbalancing:ModifyListener
                - elasticloadbalancing:DescribeRules
                - elasticloadbalancing:ModifyRule
                - lambda:InvokeFunction
                - cloudwatch:DescribeAlarms
                - sns:Publish
                - s3:GetObject
                - s3:GetObjectVersion
              Resource:
                - '*'
              Effect: Allow
            - Action:
                - iam:PassRole
              Resource:
                - !Sub 'arn:aws:iam::*:role/${self:provider.stage}_ECSTaskRole'
              Effect: Allow

    ECSTaskPolicy:
      Type: AWS::IAM::ManagedPolicy
      Properties:
        ManagedPolicyName: !Sub '${self:provider.stage}_ECSTaskPolicy'
        PolicyDocument:
          Version: '2012-10-17'
          Statement:
            - Action:
                - kinesis:*
              Resource:
                - '*'
              Effect: Allow

    ECSTaskRole:
      Type: AWS::IAM::Role
      Properties:
        RoleName: !Sub '${self:provider.stage}_ECSTaskRole'
        AssumeRolePolicyDocument:
          Statement:
            - Effect: Allow
              Action: sts:AssumeRole
              Principal:
                Service:
                  - ecs-tasks.amazonaws.com
        ManagedPolicyArns:
          - !Ref ECSTaskPolicy
          - !Ref ECSPolicy

    ECSExecuteRole:
      Type: AWS::IAM::Role
      Properties:
        RoleName: !Sub '${self:provider.stage}_ECSExecuteRole'
        AssumeRolePolicyDocument:
          Version: '2012-10-17'
          Statement:
            - Effect: Allow
              Principal:
                Service: ecs-tasks.amazonaws.com
              Action: 'sts:AssumeRole'
        ManagedPolicyArns:
          - 'arn:aws:iam::aws:policy/service-role/AmazonECSTaskExecutionRolePolicy'

    ECSAutoScalingRole:
      Type: AWS::IAM::Role
      Properties:
        RoleName: !Sub '${self:provider.stage}_ECSAutoScalingRole'
        AssumeRolePolicyDocument:
          Statement:
            - Effect: Allow
              Principal:
                Service: ecs-tasks.amazonaws.com
              Action: 'sts:AssumeRole'
        ManagedPolicyArns:
          - 'arn:aws:iam::aws:policy/service-role/AmazonEC2ContainerServiceAutoscaleRole'
  Outputs:
    ECSExecuteRole:
      Value: !GetAtt ECSExecuteRole.Arn
      Export:
        Name: ${self:provider.stage}-ECSExecuteRole
    ECSTaskRole:
      Value: !GetAtt ECSTaskRole.Arn
      Export:
        Name: ${self:provider.stage}-ECSTaskRole
    ECSAutoScalingRole:
      Value: !GetAtt ECSAutoScalingRole.Arn
      Export:
        Name: ${self:provider.stage}-ECSAutoScalingRole
iam部署命令
# deploy to develop stage
$ sls deploy --stage develop --region ap-southeast-1

# deploy to production stage
$ sls deploy --stage production --region ap-norheast-1
7.部署VPC
本项目中fargate task的NetworkMode使用awsvpc因此我们需要先部署一个vpcvpc中包含的资源如下
- 三个public subnet
- 三个private subnet
- 一个Internet gateway
- 一个EIP
- 一个Nat gateway
- 一个public security group
- 一个private security group
- 一个public network access control list
- 一个private network access control list
- 一个public route table
- 一个private route table
vpc cloudformation template
service: aws-fargate-example-vpc

custom:
  classB: ${opt:classB, '10'}

provider:
  name: aws
  region: ${opt:region, 'ap-southeast-1'}
  stage: ${opt:stage, 'develop'}
  stackName: ${self:provider.stage}-${self:service}
  deploymentBucket:
    name: com.jessica.${self:provider.stage}-deploy-bucket
    serverSideEncryption: AES256

resources:
  Resources:
    VPC:
      Type: 'AWS::EC2::VPC'
      Properties:
        CidrBlock: !Sub '10.${self:custom.classB}.0.0/16'
        EnableDnsSupport: true
        EnableDnsHostnames: true
        InstanceTenancy: default
        Tags:
          - Key: Name
            Value: !Sub 'VPC_${self:custom.classB}'
    # Internet Gateway
    InternetGateway:
      Type: 'AWS::EC2::InternetGateway'
      Properties:
        Tags:
          - Key: Name
            Value: !Sub 'VPC_${self:custom.classB}_InternetGateway'
    VPCGatewayAttachment:
      Type: 'AWS::EC2::VPCGatewayAttachment'
      Properties:
        VpcId: !Ref VPC
        InternetGatewayId: !Ref InternetGateway

    # public security group
    PublicSecurityGroup:
      Type: AWS::EC2::SecurityGroup
      Properties:
        GroupDescription: Allow http to client host
        VpcId: !Ref VPC
        SecurityGroupIngress:
          - IpProtocol: tcp
            FromPort: 80
            ToPort: 80
            CidrIp: 0.0.0.0/0
          - IpProtocol: tcp
            FromPort: 443
            ToPort: 443
            CidrIp: 0.0.0.0/0
          - IpProtocol: tcp
            FromPort: 3000
            ToPort: 3000
            CidrIp: 0.0.0.0/0
        Tags:
          - Key: Name
            Value: !Sub 'VPC_${self:custom.classB}_PublicSecurityGroup'
    # private security group
    PrivateSecurityGroup:
      Type: AWS::EC2::SecurityGroup
      Properties:
        GroupDescription: Allow access frm public securty group
        VpcId: !Ref VPC
        SecurityGroupIngress:
          - IpProtocol: tcp
            FromPort: 3000
            ToPort: 3000
            SourceSecurityGroupId: !Ref PublicSecurityGroup
        Tags:
          - Key: Name
            Value: !Sub 'VPC_${self:custom.classB}_PrivateSecurityGroup'
    # public route table
    RouteTablePublic:
      Type: 'AWS::EC2::RouteTable'
      Properties:
        VpcId: !Ref VPC
        Tags:
          - Key: Name
            Value: !Sub 'VPC_${self:custom.classB}_RouteTablePublic'
    RouteTablePublicInternetRoute:
      Type: 'AWS::EC2::Route'
      DependsOn: VPCGatewayAttachment
      Properties:
        RouteTableId: !Ref RouteTablePublic
        DestinationCidrBlock: '0.0.0.0/0'
        GatewayId: !Ref InternetGateway

    # public subnet
    SubnetAPublic:
      Type: 'AWS::EC2::Subnet'
      Properties:
        AvailabilityZone: !Select [0, !GetAZs '']
        CidrBlock: !Sub '10.${self:custom.classB}.0.0/20'
        MapPublicIpOnLaunch: true
        VpcId: !Ref VPC
        Tags:
          - Key: Name
            Value: !Sub 'VPC_${self:custom.classB}_SubnetAPublic'
    RouteTableAssociationAPublic:
      Type: 'AWS::EC2::SubnetRouteTableAssociation'
      Properties:
        SubnetId: !Ref SubnetAPublic
        RouteTableId: !Ref RouteTablePublic

    SubnetBPublic:
      Type: 'AWS::EC2::Subnet'
      Properties:
        AvailabilityZone: !Select [1, !GetAZs '']
        CidrBlock: !Sub '10.${self:custom.classB}.32.0/20'
        MapPublicIpOnLaunch: true
        VpcId: !Ref VPC
        Tags:
          - Key: Name
            Value: !Sub 'VPC_${self:custom.classB}_SubnetBPublic'
    RouteTableAssociationBPublic:
      Type: 'AWS::EC2::SubnetRouteTableAssociation'
      Properties:
        SubnetId: !Ref SubnetBPublic
        RouteTableId: !Ref RouteTablePublic

    SubnetCPublic:
      Type: 'AWS::EC2::Subnet'
      Properties:
        AvailabilityZone: !Select [2, !GetAZs '']
        CidrBlock: !Sub '10.${self:custom.classB}.64.0/20'
        MapPublicIpOnLaunch: true
        VpcId: !Ref VPC
        Tags:
          - Key: Name
            Value: !Sub 'VPC_${self:custom.classB}_SubnetCPublic'
    RouteTableAssociationCPublic:
      Type: 'AWS::EC2::SubnetRouteTableAssociation'
      Properties:
        SubnetId: !Ref SubnetCPublic
        RouteTableId: !Ref RouteTablePublic

    # nat gateway
    EIP:
      Type: 'AWS::EC2::EIP'
      Properties:
        Domain: vpc
    NatGateway:
      Type: 'AWS::EC2::NatGateway'
      Properties:
        AllocationId: !GetAtt 'EIP.AllocationId'
        SubnetId: !Ref SubnetAPublic

    # private route table
    RouteTablePrivate:
      Type: 'AWS::EC2::RouteTable'
      Properties:
        VpcId: !Ref VPC
        Tags:
          - Key: Name
            Value: !Sub 'VPC_${self:custom.classB}_RouteTablePrivate'
    RouteTablePrivateRoute:
      Type: 'AWS::EC2::Route'
      Properties:
        RouteTableId: !Ref RouteTablePrivate
        DestinationCidrBlock: '0.0.0.0/0'
        NatGatewayId: !Ref NatGateway

    # private subnet
    SubnetAPrivate:
      Type: 'AWS::EC2::Subnet'
      Properties:
        AvailabilityZone: !Select [0, !GetAZs '']
        CidrBlock: !Sub '10.${self:custom.classB}.16.0/20'
        VpcId: !Ref VPC
        Tags:
          - Key: Name
            Value: !Sub 'VPC_${self:custom.classB}_SubnetAPrivate'
    RouteTableAssociationAPrivate:
      Type: 'AWS::EC2::SubnetRouteTableAssociation'
      Properties:
        SubnetId: !Ref SubnetAPrivate
        RouteTableId: !Ref RouteTablePrivate

    SubnetBPrivate:
      Type: 'AWS::EC2::Subnet'
      Properties:
        AvailabilityZone: !Select [1, !GetAZs '']
        CidrBlock: !Sub '10.${self:custom.classB}.48.0/20'
        VpcId: !Ref VPC
        Tags:
          - Key: Name
            Value: !Sub 'VPC_${self:custom.classB}_SubnetBPrivate'
    RouteTableAssociationBPrivate:
      Type: 'AWS::EC2::SubnetRouteTableAssociation'
      Properties:
        SubnetId: !Ref SubnetBPrivate
        RouteTableId: !Ref RouteTablePrivate

    SubnetCPrivate:
      Type: 'AWS::EC2::Subnet'
      Properties:
        AvailabilityZone: !Select [2, !GetAZs '']
        CidrBlock: !Sub '10.${self:custom.classB}.80.0/20'
        VpcId: !Ref VPC
        Tags:
          - Key: Name
            Value: !Sub 'VPC_${self:custom.classB}_SubnetCPrivate'
    RouteTableAssociationCPrivate:
      Type: 'AWS::EC2::SubnetRouteTableAssociation'
      Properties:
        SubnetId: !Ref SubnetCPrivate
        RouteTableId: !Ref RouteTablePrivate

    # public subnet network access control list
    NetworkAclPublic:
      Type: 'AWS::EC2::NetworkAcl'
      Properties:
        VpcId: !Ref VPC
        Tags:
          - Key: Name
            Value: !Sub 'VPC_${self:custom.classB}_NetworkAclPublic'
    NetworkAclEntryInPublicAllowAll:
      Type: 'AWS::EC2::NetworkAclEntry'
      Properties:
        NetworkAclId: !Ref NetworkAclPublic
        RuleNumber: 99
        Protocol: -1
        RuleAction: allow
        Egress: false
        CidrBlock: '0.0.0.0/0'
    NetworkAclEntryOutPublicAllowAll:
      Type: 'AWS::EC2::NetworkAclEntry'
      Properties:
        NetworkAclId: !Ref NetworkAclPublic
        RuleNumber: 99
        Protocol: -1
        RuleAction: allow
        Egress: true
        CidrBlock: '0.0.0.0/0'
    SubnetNetworkAclAssociationAPublic:
      Type: 'AWS::EC2::SubnetNetworkAclAssociation'
      Properties:
        SubnetId: !Ref SubnetAPublic
        NetworkAclId: !Ref NetworkAclPublic
    SubnetNetworkAclAssociationBPublic:
      Type: 'AWS::EC2::SubnetNetworkAclAssociation'
      Properties:
        SubnetId: !Ref SubnetBPublic
        NetworkAclId: !Ref NetworkAclPublic
    SubnetNetworkAclAssociationCPublic:
      Type: 'AWS::EC2::SubnetNetworkAclAssociation'
      Properties:
        SubnetId: !Ref SubnetCPublic
        NetworkAclId: !Ref NetworkAclPublic

    # private subnet network access control list
    NetworkAclPrivate:
      Type: 'AWS::EC2::NetworkAcl'
      Properties:
        VpcId: !Ref VPC
        Tags:
          - Key: Name
            Value: !Sub 'VPC_${self:custom.classB}_NetworkAclPrivate'
    NetworkAclEntryInPrivateAllowVPC:
      Type: 'AWS::EC2::NetworkAclEntry'
      Properties:
        NetworkAclId: !Ref NetworkAclPrivate
        RuleNumber: 99
        Protocol: -1
        RuleAction: allow
        Egress: false
        CidrBlock: '0.0.0.0/0'
    NetworkAclEntryOutPrivateAllowAll:
      Type: 'AWS::EC2::NetworkAclEntry'
      Properties:
        NetworkAclId: !Ref NetworkAclPrivate
        RuleNumber: 99
        Protocol: -1
        RuleAction: allow
        Egress: true
        CidrBlock: '0.0.0.0/0'
    SubnetNetworkAclAssociationBPrivate:
      Type: 'AWS::EC2::SubnetNetworkAclAssociation'
      Properties:
        SubnetId: !Ref SubnetBPrivate
        NetworkAclId: !Ref NetworkAclPrivate
    SubnetNetworkAclAssociationAPrivate:
      Type: 'AWS::EC2::SubnetNetworkAclAssociation'
      Properties:
        SubnetId: !Ref SubnetAPrivate
        NetworkAclId: !Ref NetworkAclPrivate
    SubnetNetworkAclAssociationCPrivate:
      Type: 'AWS::EC2::SubnetNetworkAclAssociation'
      Properties:
        SubnetId: !Ref SubnetCPrivate
        NetworkAclId: !Ref NetworkAclPrivate

  Outputs:
    VPC:
      Description: 'VPC.'
      Value: !Ref VPC
      Export:
        Name: !Sub '${self:provider.stackName}'
    SubnetsPublic:
      Description: 'Subnets public.'
      Value:
        !Join [
          ',',
          [!Ref SubnetAPublic, !Ref SubnetBPublic, !Ref SubnetCPublic],
        ]
      Export:
        Name: !Sub '${self:provider.stackName}-PublicSubnets'
    SubnetsPrivate:
      Description: 'Subnets private.'
      Value:
        !Join [
          ',',
          [!Ref SubnetAPrivate, !Ref SubnetBPrivate, !Ref SubnetCPrivate],
        ]
      Export:
        Name: !Sub '${self:provider.stackName}-PrivateSubnets'
    DefaultSecurityGroup:
      Description: 'VPC Default Security Group'
      Value: !GetAtt VPC.DefaultSecurityGroup
      Export:
        Name: !Sub '${self:provider.stackName}-DefaultSecurityGroup'
    PublicSecurityGroup:
      Description: 'The id of the PublicSecurityGroup'
      Value: !Ref PublicSecurityGroup
      Export:
        Name: !Sub '${self:provider.stackName}-PublicSecurityGroup'
    PrivateSecurityGroup:
      Description: 'The id of the PrivateSecurityGroup'
      Value: !Ref PrivateSecurityGroup
      Export:
        Name: !Sub '${self:provider.stackName}-PrivateSecurityGroup'
vpc部署命令
# deploy to develop stage
$ sls deploy --stage develop --region ap-southeast-1

# deploy to production stage
$ sls deploy --stage production --region ap-norheast-1
8.项目添加health check代码
本项目中会使用application load balancer对服务进行负载均衡需要一个path来进行服务健康检测。
health.controller.ts
import { Controller, Get, HttpCode } from '@nestjs/common';
import {
  DiskHealthIndicator,
  HealthCheck,
  HealthCheckService,
  HttpHealthIndicator,
  MemoryHealthIndicator,
} from '@nestjs/terminus';

@Controller('health')
export class HealthController {
  constructor(
    private health: HealthCheckService,
    private http: HttpHealthIndicator,
    private memory: MemoryHealthIndicator,
    private disk: DiskHealthIndicator,
  ) {}

  @Get('success')
  @HttpCode(200)
  @HealthCheck()
  ping() {
    return 'ok!';
  }

  @Get('error')
  @HttpCode(500)
  @HealthCheck()
  pingError() {
    return 'error';
  }

  @Get('check')
  @HealthCheck()
  checkHttp() {
    return this.health.check([
      async () =>
        this.http.pingCheck('sample', 'http://localhost:3000/health/success'),
      async () => this.memory.checkHeap('memory_heap', 500 * 1024 * 1024),
      async () => this.memory.checkRSS('memory_rss', 3000 * 1024 * 1024),
      async () =>
        this.disk.checkStorage('storage', { thresholdPercent: 0.9, path: '/' }),
    ]);
  }
}
9.构建并上传docker image到ECR
# replace ${AWS_AccountId} with your own aws accountId
# Retrieve an authentication token and authenticate your Docker client to your registry.
$ aws ecr get-login-password --region ap-southeast-1 | docker login --username AWS --password-stdin ${AWS_AccountId}.dkr.ecr.ap-southeast-1.amazonaws.com

# Build your Docker image using the following command. For information on building a Docker file from scratch see the instructions here . You can skip this step if your image is already built:
$ docker-compose build dev

#After the build completes, tag your image so you can push the image to this repository:
$ docker tag aws-fargate-example:latest ${AWS_AccountId}.dkr.ecr.ap-southeast-1.amazonaws.com/aws-fargate-example:latest

#Run the following command to push this image to your newly created AWS repository:
$ docker push ${AWS_AccountId}.dkr.ecr.ap-southeast-1.amazonaws.com/aws-fargate-example:latest
10.部署ECS Fargate Service
本项目中ECS Fargate Service包含的资源如下
- Application Load Balancer
- Target Group
- Http Listerner
- Load Balance
- Auto Scaling
- Scaling Target
- Scaling Policy
- ECS Cluster
- ECS Service
- ECS Task Definition
- ECS Task Log Group
ecs cloudformation template
service: aws-fargate-example-ecs

provider:
  name: aws
  region: ${opt:region, 'ap-southeast-1'}
  stage: ${opt:stage, 'develop'}
  stackName: ${self:provider.stage}-${self:service}
  deploymentBucket:
    name: com.jessica.${self:provider.stage}-deploy-bucket
    serverSideEncryption: AES256
resources:
  Parameters:
    ServiceName:
      Type: String
      Default: aws-fargate-example
    ContainerPort:
      Type: Number
      Default: 3000
    LoadBalancerPort:
      Type: Number
      Default: 80
    HealthCheckPath:
      Type: String
      Default: /health/check
    # for autoscaling
    MinCapacity:
      Type: Number
      Default: 3
    # for autoscaling
    MaxCapacity:
      Type: Number
      Default: 6
    DesiredCount:
      Type: Number
      Default: 3
    # target CPU utilization (%)
    AutoScalingTargetValue:
      Type: Number
      Default: 50
    VPCName:
      Type: String
      Default: aws-fargate-example-vpc

  Resources:
    LogGroup:
      Type: AWS::Logs::LogGroup
      Properties:
        LogGroupName: !Join ['', [/ecs/, !Ref ServiceName, task]]
    NestjsFargateCluster:
      Type: 'AWS::ECS::Cluster'
      Properties:
        ClusterName: !Join ['-', [!Ref ServiceName, cluster]]
        CapacityProviders:
          - FARGATE
          - FARGATE_SPOT
        DefaultCapacityProviderStrategy:
          - CapacityProvider: FARGATE
            Weight: 1
          - CapacityProvider: FARGATE_SPOT
            Weight: 1
        Configuration:
          ExecuteCommandConfiguration:
            Logging: DEFAULT
        ClusterSettings:
          - Name: containerInsights
            Value: enabled
    NestjsFargateTaskDefinition:
      Type: AWS::ECS::TaskDefinition
      # Makes sure the log group is created before it is used.
      DependsOn: LogGroup
      Properties:
        # Name of the task definition. Subsequent versions of the task definition are grouped together under this name.
        Family: !Join ['-', [!Ref ServiceName, task-definition]]
        # awsvpc is required for Fargate
        NetworkMode: awsvpc
        RequiresCompatibilities:
          - FARGATE
        Cpu: 256
        # Between 8GB and 30GB in 1GB increments - Available cpu values: 4096 (4 vCPU)
        Memory: 512
        # A role needed by ECS.
        # "The ARN of the task execution role that containers in this task can assume. All containers in this task are granted the permissions that are specified in this role."
        # "There is an optional task execution IAM role that you can specify with Fargate to allow your Fargate tasks to make API calls to Amazon ECR."
        ExecutionRoleArn:
          Fn::ImportValue: ${self:provider.stage}-ECSExecuteRole
        # "The Amazon Resource Name (ARN) of an AWS Identity and Access Management (IAM) role that grants containers in the task permission to call AWS APIs on your behalf."
        TaskRoleArn:
          Fn::ImportValue: ${self:provider.stage}-ECSTaskRole
        ContainerDefinitions:
          - Name: !Ref ServiceName
            Image: !Sub ${AWS::AccountId}.dkr.ecr.${self:provider.region}.amazonaws.com/aws-fargate-example:latest
            PortMappings:
              - ContainerPort: !Ref ContainerPort
            # Send logs to CloudWatch Logs
            LogConfiguration:
              LogDriver: awslogs
              Options:
                awslogs-region: ${self:provider.region}
                awslogs-group: !Ref LogGroup
                awslogs-stream-prefix: ecs
    NestjsFargateService:
      Type: AWS::ECS::Service
      DependsOn:
        - ListenerHTTP
      Properties:
        ServiceName: !Ref ServiceName
        Cluster: !Ref NestjsFargateCluster
        TaskDefinition: !Ref NestjsFargateTaskDefinition
        DeploymentConfiguration:
          MinimumHealthyPercent: 100
          MaximumPercent: 200
        DesiredCount: !Ref DesiredCount
        # This may need to be adjusted if the container takes a while to start up
        HealthCheckGracePeriodSeconds: 30
        LaunchType: FARGATE
        NetworkConfiguration:
          AwsvpcConfiguration:
            # change to DISABLED if you're using private subnets that have access to a NAT gateway
            AssignPublicIp: DISABLED
            Subnets:
              Fn::Split:
                - ','
                - Fn::ImportValue: !Sub ${self:provider.stage}-${VPCName}-PrivateSubnets
            SecurityGroups:
              - Fn::ImportValue: !Sub ${self:provider.stage}-${VPCName}-PrivateSecurityGroup
        LoadBalancers:
          - ContainerName: !Ref ServiceName
            ContainerPort: !Ref ContainerPort
            TargetGroupArn: !Ref TargetGroup
    TargetGroup:
      Type: AWS::ElasticLoadBalancingV2::TargetGroup
      Properties:
        HealthCheckIntervalSeconds: 10
        # will look for a 200 status code by default unless specified otherwise
        HealthCheckPath: !Ref HealthCheckPath
        HealthCheckTimeoutSeconds: 5
        UnhealthyThresholdCount: 2
        HealthyThresholdCount: 2
        Name: !Join ['-', [!Ref ServiceName, target-group]]
        Port: !Ref ContainerPort
        Protocol: HTTP
        TargetGroupAttributes:
          - Key: deregistration_delay.timeout_seconds
            Value: 60 # default is 300
        TargetType: ip
        VpcId:
          Fn::ImportValue: !Sub ${self:provider.stage}-${VPCName}
    ListenerHTTP:
      Type: AWS::ElasticLoadBalancingV2::Listener
      Properties:
        DefaultActions:
          - TargetGroupArn: !Ref TargetGroup
            Type: forward
        LoadBalancerArn: !Ref LoadBalancer
        Port: !Ref LoadBalancerPort
        Protocol: HTTP
        # Certificates:
        #   - CertificateArn: !Ref Certificate
    LoadBalancer:
      Type: AWS::ElasticLoadBalancingV2::LoadBalancer
      Properties:
        LoadBalancerAttributes:
          # this is the default, but is specified here in case it needs to be changed
          - Key: idle_timeout.timeout_seconds
            Value: 60
        Name: !Join ['-', [!Ref ServiceName, balancer]]
        # "internal" is also an option
        Scheme: internet-facing
        SecurityGroups:
          - Fn::ImportValue: !Sub ${self:provider.stage}-${VPCName}-PublicSecurityGroup
        Subnets:
          Fn::Split:
            - ','
            - Fn::ImportValue: !Sub ${self:provider.stage}-${VPCName}-PublicSubnets

    NestjsFargateAutoScalingTarget:
      Type: AWS::ApplicationAutoScaling::ScalableTarget
      Properties:
        MinCapacity: !Ref MinCapacity
        MaxCapacity: !Ref MaxCapacity
        ResourceId:
          !Join [
            '/',
            [
              service,
              !Ref NestjsFargateCluster,
              !GetAtt NestjsFargateService.Name,
            ],
          ]
        ScalableDimension: ecs:service:DesiredCount
        ServiceNamespace: ecs
        # "The Amazon Resource Name (ARN) of an AWS Identity and Access Management (IAM) role that allows Application Auto Scaling to modify your scalable target."
        RoleARN:
          Fn::ImportValue: ${self:provider.stage}-ECSAutoScalingRole
    NestjsFargateAutoScalingPolicy:
      Type: AWS::ApplicationAutoScaling::ScalingPolicy
      Properties:
        PolicyName: ${self:provider.stage}-NestjsFargateAutoScalingPolicy
        PolicyType: TargetTrackingScaling
        ScalingTargetId: !Ref NestjsFargateAutoScalingTarget
        TargetTrackingScalingPolicyConfiguration:
          PredefinedMetricSpecification:
            PredefinedMetricType: ECSServiceAverageCPUUtilization
          ScaleInCooldown: 10
          ScaleOutCooldown: 10
          # Keep things at or lower than 50% CPU utilization, for example
          TargetValue: !Ref AutoScalingTargetValue
部署命令
# deploy to develop stage
$ sls deploy --stage develop --region ap-southeast-1

# deploy to production stage
$ sls deploy --stage production --region ap-norheast-1
11.配置github OpenID Connect (OIDC) identity providers
service: aws-fargate-example-github-iam

provider:
  name: aws
  region: ${opt:region, 'ap-southeast-1'}
  stage: ${opt:stage, 'develop'}
  stackName: ${self:service}
  deploymentBucket:
    name: com.jessica.${self:provider.stage}-deploy-bucket
    serverSideEncryption: AES256
resources:
  Resources:
    GithubECSPolicy:
      Type: AWS::IAM::ManagedPolicy
      Properties:
        ManagedPolicyName: GithubECSPolicy
        PolicyDocument:
          Version: '2012-10-17'
          Statement:
            - Action:
                - ecr:BatchGetImage
                - ecr:BatchCheckLayerAvailability
                - ecr:CompleteLayerUpload
                - ecr:GetDownloadUrlForLayer
                - ecr:InitiateLayerUpload
                - ecr:PutImage
                - ecr:UploadLayerPart
                - ecr:GetAuthorizationToken
              Resource:
                - '*'
              Effect: Allow
            - Action:
                - ecs:*
                - elasticloadbalancing:DescribeTargetGroups
                - elasticloadbalancing:DescribeListeners
                - elasticloadbalancing:ModifyListener
                - elasticloadbalancing:DescribeRules
                - elasticloadbalancing:ModifyRule
                - lambda:InvokeFunction
                - cloudwatch:DescribeAlarms
                - sns:Publish
                - s3:GetObject
                - s3:GetObjectVersion
              Resource:
                - '*'
              Effect: Allow
            - Action:
                - iam:PassRole
              Resource:
                - !Sub 'arn:aws:iam::${AWS::AccountId}:role/develop_ECSTaskRole'
                - !Sub 'arn:aws:iam::${AWS::AccountId}:role/production_ECSTaskRole'
              Effect: Allow
    GitHubRole:
      Type: AWS::IAM::Role
      Properties:
        RoleName: GitHubRole
        AssumeRolePolicyDocument:
          Statement:
            - Effect: Allow
              Action: sts:AssumeRoleWithWebIdentity
              Principal:
                Federated:
                  - !Ref GithubOidc
              Condition:
                StringLike:
                  token.actions.githubusercontent.com:sub: repo:JessicaWin/aws-fargate-example:*
        ManagedPolicyArns:
          - !Ref GithubECSPolicy
    GithubOidc:
      Type: AWS::IAM::OIDCProvider
      Properties:
        Url: https://token.actions.githubusercontent.com
        ClientIdList:
          - sts.amazonaws.com
        ThumbprintList:
          - 6938fd4d98bab03faadb97b34396831e3780aea1

  Outputs:
    GitHubRole:
      Value: !GetAtt GitHubRole.Arn
      Export:
        Name: GitHubRole
部署命令
# deploy to develop stage
$ sls deploy --stage develop --region ap-southeast-1

# deploy to production stage
$ sls deploy --stage production --region ap-norheast-1
12.配置GitHub repository secrets
打开自己项目的setting页面左边栏选择Secrets->Actions,打开页面后点击右上角的New repository secret 按钮然后添加Secrets。
本项目中用到了三个Secrets需要添加以下三个Secrets
- AWS_FEDARATED_ROLEarn:aws:iam::${AWS_AccountId}:role/GitHubRole
- DEVELOP_ECS_TASK_ROLE: arn:aws:iam::${AWS_AccountId}:role/develop_ECSTaskRole
- PRODUCTION_ECS_TASK_ROLE: arn:aws:iam::${AWS_AccountId}:role/production_ECSTaskRole
13.使用GitHub workflow实现CI/CD
代码检测
一般代码检测包括formate和执行测试用例检测时机为提交pull request
pre-merge.yml
name: Pre Merge Formate Check

on:
  # Triggers the workflow on pull request events but only for the master branch
  pull_request:
    branches: [develop, master]

  # Allows you to run this workflow manually from the Actions tab
  workflow_dispatch:

jobs:
  # This workflow contains a single job called "build"
  build:
    # The type of runner that the job will run on
    runs-on: ubuntu-20.04
    strategy:
      matrix:
        node-version: [14.x]

    # Steps represent a sequence of tasks that will be executed as part of the job
    steps:
      # Checks-out your repository under $GITHUB_WORKSPACE, so your job can access it
      - name: Checkout repository
        uses: actions/checkout@v2
        with:
          fetch-depth: 0

      - name: Use Node.js ${{ matrix.node-version }}
        uses: actions/setup-node@v2
        with:
          node-version: ${{ matrix.node-version }}

      - name: Install
        run: npm ci

      - name: Format code
        run: npm run format

      - name: Check diff exists
        run: |
          git add -N .
          git diff
          line=`git diff | wc -l`
          if [ $line -gt 0 ]; then
            echo "■■■■■ You need to format before commit ■■■■"
            git diff
            exit -1
          fi
      - name: Lint code
        run: npm run lint

      - name: Run tests
        run: npm run test
Develop环境自动部署ECS Fargate Task Definition
develop环境实现代码merge时进行自动部署。部署流程如下
- checkout 当前分支
- 使用${{ secrets.DEVELOP_ECS_TASK_ROLE }} 替换aws-resources/ecs/aws-fargate-example-task-def.json中的executionRoleArnValue
- 生成aws credentials
- 登录ecr
- 生成版本号
- 使用生成的版本号给项目打tag
- 构建docker image并上传到ecr
- 替换task definition中的image为ecr中image的路径
- 更新task definition并部署
aws-fargate-example-task-def.json
{
    "family": "aws-fargate-example-task-definition",
    "executionRoleArn": "executionRoleArnValue",
    "networkMode": "awsvpc",
    "requiresCompatibilities": [ "FARGATE" ],
    "cpu": "256",
    "memory": "512",
    "containerDefinitions": [
      {
        "name": "aws-fargate-example",
        "image": "TO_BE_REPLACED",
        "essential": true,
        "portMappings": [
          {
            "hostPort": 3000,
            "protocol": "tcp",
            "containerPort": 3000
          }
        ]
      }
    ]
  }
develop-release-and-deploy.yml
name: Develop Release & Deploy

on:
  push:
    branches: [master]

permissions:
  id-token: write
  contents: write

jobs:
  # For Staging. Build this project into docker image and push it in ECR.
  build-release-deploy:
    runs-on: ubuntu-20.04
    timeout-minutes: 300

    steps:
      - name: Checkout repository
        uses: actions/checkout@v2

      - name: Replace executionRoleArn in task definition
        env:
          TASK_ROLE: ${{ secrets.DEVELOP_ECS_TASK_ROLE }}
        run: |
          sed -i "s@executionRoleArnValue@$TASK_ROLE@g" aws-resources/ecs/aws-fargate-example-task-def.json

      - name: Configure AWS Credentials
        uses: aws-actions/configure-aws-credentials@v1
        with:
          aws-region: ap-southeast-1
          role-to-assume: ${{ secrets.AWS_FEDARATED_ROLE }}
          role-session-name: aws-fargate-example

      - name: Login to Amazon ECR
        id: login-ecr
        uses: aws-actions/amazon-ecr-login@v1

      - name: Generate version
        id: generate-version
        run: |
          VERSION=`date "+%Y%m%d%H%M%S"`
          echo "::set-output name=version::$VERSION"

      - name: Build, tag, and push image to Amazon ECR
        id: build-image
        env:
          ECR_REGISTRY: ${{ steps.login-ecr.outputs.registry }}
          ECR_REPOSITORY: aws-fargate-example
          IMAGE_TAG: ${{ steps.generate-version.outputs.version }}
        run: |
          git tag $IMAGE_TAG
          git push origin $IMAGE_TAG
          docker-compose build dev
          docker tag aws-fargate-example-dev:$IMAGE_TAG $ECR_REGISTRY/$ECR_REPOSITORY:$IMAGE_TAG
          docker push $ECR_REGISTRY/$ECR_REPOSITORY:$IMAGE_TAG
          echo "::set-output name=image::$ECR_REGISTRY/$ECR_REPOSITORY:$IMAGE_TAG"

      - name: logout from Amazon ECR
        if: always()
        run: docker logout $ECR_REGISTRY

      # Insert Image URI in Task Definition file
      - name: render new task definition
        id: render-container
        uses: aws-actions/amazon-ecs-render-task-definition@v1
        with:
          task-definition: aws-resources/ecs/aws-fargate-example-task-def.json
          container-name: aws-fargate-example
          image: ${{ steps.build-image.outputs.image }}

      # Update ECS task version and Deploy
      - name: Deploy task definition to Amazon ECS
        uses: aws-actions/amazon-ecs-deploy-task-definition@v1
        with:
          task-definition: ${{ steps.render-container.outputs.task-definition }}
          service: aws-fargate-example
          cluster: aws-fargate-example-cluster
Production环境release时部署ECS Fargate Task Definition
production环境的部署以release作为触发条件可以用develop部署过程中生成的tag进行release也可以自己重新打tag进行release。
production-release-and-deploy.yml
name: Production Release & Deploy

on:
  release:
    types: [released]

permissions:
  id-token: write
  contents: read

jobs:
  # For Staging. Build this project into docker image and push it in ECR.
  build-release-deploy:
    runs-on: ubuntu-20.04
    timeout-minutes: 300

    steps:
      - name: Checkout repository
        uses: actions/checkout@v2

      - name: Replace executionRoleArn in task definition
        env:
          TASK_ROLE: ${{ secrets.PRODUCTION_ECS_TASK_ROLE }}
        run: |
          sed -i "s@executionRoleArnValue@$TASK_ROLE@g" aws-resources/ecs/aws-fargate-example-task-def.json

      - name: Configure AWS Credentials
        uses: aws-actions/configure-aws-credentials@v1
        with:
          aws-region: ap-northeast-1
          role-to-assume: ${{ secrets.AWS_FEDARATED_ROLE }}
          role-session-name: aws-fargate-example

      - name: Login to Amazon ECR
        id: login-ecr
        uses: aws-actions/amazon-ecr-login@v1

      - name: Build, tag, and push image to Amazon ECR
        id: build-image
        env:
          ECR_REGISTRY: ${{ steps.login-ecr.outputs.registry }}
          ECR_REPOSITORY: aws-fargate-example
        run: |
          IMAGE_TAG=$(echo ${{ github.ref }} | sed -e "s#refs/tags/##g")
          export IMAGE_TAG=$IMAGE_TAG
          docker-compose build prod
          docker tag aws-fargate-example-prod:$IMAGE_TAG $ECR_REGISTRY/$ECR_REPOSITORY:$IMAGE_TAG
          docker push $ECR_REGISTRY/$ECR_REPOSITORY:$IMAGE_TAG
          echo "::set-output name=image::$ECR_REGISTRY/$ECR_REPOSITORY:$IMAGE_TAG"

      - name: logout from Amazon ECR
        if: always()
        run: docker logout $ECR_REGISTRY

      # Insert Image URI in Task Definition file
      - name: render new task definition
        id: render-container
        uses: aws-actions/amazon-ecs-render-task-definition@v1
        with:
          task-definition: aws-resources/ecs/aws-fargate-example-task-def.json
          container-name: aws-fargate-example
          image: ${{ steps.build-image.outputs.image }}

      # Update ECS task version and Deploy
      - name: Deploy task definition to Amazon ECS
        uses: aws-actions/amazon-ecs-deploy-task-definition@v1
        with:
          task-definition: ${{ steps.render-container.outputs.task-definition }}
          service: aws-fargate-example
          cluster: aws-fargate-example-cluster
项目地址
https://github.com/JessicaWin/aws-fargate-example
参考
Webhook events and payloads - GitHub Docs
https://github.blog/changelog/2021-04-20-github-actions-control-permissions-for-github_token/