

RHCE第五章 NFS服务器
| 阿里云国内75折 回扣 微信号:monov8 |
| 阿里云国际,腾讯云国际,低至75折。AWS 93折 免费开户实名账号 代冲值 优惠多多 微信号:monov8 飞机:@monov6 |
文章目录
第五章 NFS服务器
1.1 NFS服务器简介
NFSNetwork File System网络文件系统是FreeBSD支持的文件系统中的一种它允许网络中的计算机不同的计算机、不同的操作系统之间通过TCP/IP网络共享资源主要在unix系列操作系统上使用。在NFS的应用中本地NFS的客户端应用可以透明地读写位于远端NFS服务器上的文件就像访问本地文件一样。
NFS服务器可以让PC将网络中的NFS服务器共享的目录挂载到本地端的文件系统中而在本地端的系统中看来那个远程主机的目录就好像是自己的一个磁盘分区一样。
由于NFS支持的功能比较多而不同的功能都会使用不同的程序来启动每启动一个功能就会启用一些端口来传输数据因此NFS的功能所对应的端口并不固定而是随机取用一些未被使用的小于1024的端口用于传输。但如此一来就会产生客户端连接服务器的问题因为客户端需要知道服务器端的相关端口才能够连接。
此时就需要RPCRemote Procedure Call远程过程调用的服务。由于当服务器在启动NFS时会随机选取数个端口号并主动向RPC注册所以RPC知道每个NFS功能所对应的端口号RPC将端口号通知给客户端让客户端可以连接到正确的端口上去。RPC采用固定端口号port 111来监听客户端的需求并向客户端响应正确的端口号。
注在启动NFS之前要先启动RPC否则NFS会无法向RPC注册。另外RPC若重新启动原来注册的数据会消失不见因此RPC重启后它管理的所有服务都需要重新启动以重新向RPC注册。
1.2 NFS的使用
RPC主程序rpcbind
NFS主程序nfs-utils
[root@localhost ~]# yum install rpcbind

[root@localhost ~]# yum install nfs-utils
/etc/exports:主配置文件文件不一定存在
/usr/sbin/exportfs :维护NFS共享资源的命令可以使用该命令重新共享/etc/exports更新的目录资源、将NFS server共享的目录卸载或重新共享等
/var/lib/nfs/*tab:
在NFS服务器中日志文件都放置到/var/lib/nfs目录中在该目录下有两个比较重要的日志文件一个是etab主要记录了NFS所共享出来的目录的完整权限设置值另一个是xtab记录了曾经链接到此NFS服务器的相关客户端数据。
/usr/sbin/showmount: 该命令主要用在client端。这个命令可以查看NFS共享出来的目录资源
/etc/exports:配置文件的语法与参数

主机名的设置方式
可以使用完整的IP或者是网络号例如172.24.8.128或172.24.8.0/24或者172.24.8.128/255.255.255.0
可以使用主机名但是主机名必须要在/etc/hosts内或者可以使用DNS域名解析解析出对应的IP地址。可以用“*”代表所有主机。
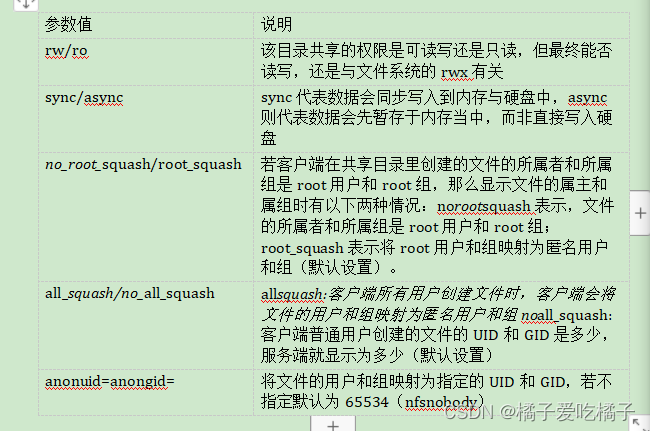
权限需要写在括号内且括号是紧接着主机名的。权限相关参数可以写多个多个参数之间用逗号隔开具体相关参数说明如下
1.3 客户端使用autofs自动挂载
在一般NFS文件系统的使用过程中如果客户端要使用服务端所提供的文件系统可以在/etc/rc.d/rc.local中设置开机时自动挂载/etc/rc.d/rc.local文件中写入的命令在每次启动系统用户登录之前都会执行一次;也可以在登录系统后手动利用mount来挂载。
由于网络的问题NFS服务器与客户端的连接不会一直存在当我们挂载了NFS服务器之后任何一方脱机都可能造成另外一方等待超时。为了解决这样的问题就出现了下面的想法
1、当客户端在有使用NFS文件系统的需求时才让系统自动挂载。
2、当NFS文件系统使用完毕后让NFS自动卸载。
于是就产生了autofs这个服务。
autofs这个服务是在客户端的上面它会持续的检测某个指定的目录并预先设置当使用到该目录的某个子目录时将会取得来自服务器端的NFS文件系统资源并进行自动挂载的操作。
NFS服务端172.24.8.128
#关闭防火墙和selinux
[root@localhost ~]# yum install rpcbind
[root@localhost ~]# yum install nfs-utils
[root@localhost ~]# vim /etc/exports
/data  *(ro)
[root@localhost ~]# mkdir /data
[root@localhost data]# echo this is test > /data/file
[root@localhost ~]# systemctl status rpcbind
[root@localhost ~]# systemctl restart rpcbind
[root@localhost ~]# systemctl restart nfs
客户端
[root@client ~]# yum install autofs -y
1、在主配置文件里面指定被检测的特定目录为/nfs该目录不需要事先存在因为autofs会主动建立该目录对应的数据文件是/etc/auto.nfs该文件名可自定义
[root@localhost ~]# vim /etc/auto.master
/nfs   /etc/auto.nfs
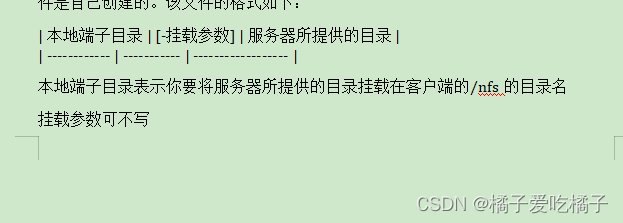
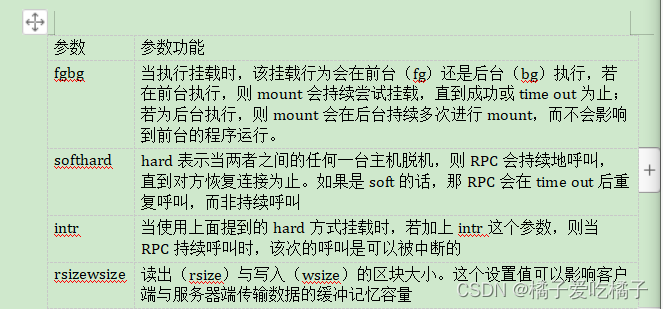
2、建立数据对应文件内/etc/auto.nfs的挂载信息与服务器对应的资源该文件是自己创建的。该文件的格式如下
[root@localhost ~]# vim /etc/auto.nfs
guazai  172.24.8.128:/data
[root@localhost ~]# systemctl restart autofs
[root@localhost ~]# mount | grep /nfs
/etc/auto.nfs on /nfs type autofs (rw,relatime,fd=12,pgrp=4598,timeout=300,minproto=5,maxproto=5,indirect)
3、触发自动挂载
[root@localhost ~]# cd /nfs/guazai/  #这个目录名即本地端子目录

172.24.8.128:/data on /nfs/guazai type nfs4 (rw,relatime,vers=4.0,rsize=262144,wsize=262144,namlen=255,hard,proto=tcp,port=0,timeo=600,retrans=2,sec=sys,clientaddr=172.24.8.129,local_lock=none,addr=172.24.8.128)
1.4 实验
服务端172.24.8.128
[root@localhost ~]# vim /etc/exports
/data   *(ro)
[root@localhost ~]# mkdir /data
[root@localhost ~]# systemctl status rpcbind
[root@localhost ~]# systemctl restart rpcbind
[root@localhost ~]# systemctl restart nfs
[root@localhost ~]# showmount -e 172.24.8.128
Export list for 172.24.8.128:
/data *
[root@localhost ~]# systemctl stop firewalld
客户端172.24.8.129
[root@localhost ~]# showmount -e 172.24.8.128
Export list for 172.24.8.128:
/data *
[root@localhost ~]# mount 172.24.8.128:/data /mnt
服务端
[root@localhost data]# echo this is ceshi > /data/ceshi
客户端
[root@localhost mnt]# ll /mnt
total 4
-rw-r--r--. 1 root root 14 Mar 28  2019 ceshi
[root@localhost mnt]# rm -f ceshi
rm: cannot remove ‘ceshi’: Read-only file system
注意在客户端如果要删除ceshi文件需要在服务端的主配置文件更改为 data *(rw)
服务端
[root@localhost data]# vim /etc/exports
/data   *(rw)
[root@localhost data]# exportfs -r
exportfs的选项
-a : 全部挂载或卸载/etc/exports中的内容
-r : 重新读取/etc/exports中的信息并同步更新/etc/exports,/var/lib/nfs/xtab
-u : 卸载单一目录和-a一起使用为卸载所有/etc/exports文件中的目录
-v : 在export的时候将详细的信息输出到屏幕上
客户端
[root@localhost mnt]# rm -f ceshi
rm: cannot remove ‘ceshi’: Permission denied

服务端
[root@localhost data]# chmod o+w /data/
[root@localhost data]# ll -d /data/
drwxr-xrwx. 2 root root 18 3月  28 15:05 /data/

客户端
[root@localhost mnt]# rm -f ceshi
[root@localhost mnt]# ll
total 0
[root@localhost mnt]# echo this is client ceshi > client
[root@localhost mnt]# ll /mnt
total 4
-rw-r--r--. 1 nfsnobody nfsnobody 21 Mar 28  2019 client
[redhat@localhost mnt]$ touch /mnt/red
[redhat@localhost mnt]$ ll /mnt
total 4
-rw-r--r--. 1 nfsnobody nfsnobody 21 Mar 28  2019 client
-rw-rw-r--. 1 redhat    redhat     0 Mar 28  2019 red
1.5 练习实践
架设一台NFS服务器并按照以下要求配置
1、开放/nfs/shared目录供所有用户查询资料
2、开放/nfs/upload目录该目录为172.24.8.0/24网段的主机的数据上传目录并将所有该网段主机上传文件的所属者和所属组映射为nfs-upload,其UID和GID为2001
3、将/home/tom该目录为uid=1111gid=1111的tom用户的家目录目录仅共享给172.24.8.129这台主机上的jerry用户jerry对该目录具有访问、新建和删除文件的权限。