

Java高手速成 | Spring、JPA与Hibernate的整合
阿里云国际版折扣https://www.yundadi.com |
| 阿里云国际,腾讯云国际,低至75折。AWS 93折 免费开户实名账号 代冲值 优惠多多 微信号:monov8 飞机:@monov6 |

01、设置Spring的配置文件
在Spring的配置文件applicationContext.xml中配置C3P0数据源、EntityManagerFactory和JpaTransactionManager等Bean组件。以下是applicationContext.xml文件的源程序。
/* applicationContext.xml */
<?xml version="1.0" encoding="UTF-8"?>
<beans xmlns=…>

  <!-- 配置属性文件的文件路径 -->
  <context:property-placeholder
       location="classpath:jdbc.properties"/>

  <!-- 配置C3P0数据库连接池 -->
  <bean id="dataSource"
     class="com.mchange.v2.c3p0.ComboPooledDataSource">
    <property name="jdbcUrl" value="${jdbc.url}"/>
    <property name="driverClass" value="${jdbc.driver.class}"/>
    <property name="user" value="${jdbc.username}"/>
    <property name="password" value="${jdbc.password}"/>
  </bean>

  <!-- Spring 整合 JPA配置 EntityManagerFactory-->
  <bean id="entityManagerFactory"
      class="org.springframework.orm.jpa
             .LocalContainerEntityManagerFactoryBean">
     <property name="dataSource" ref="dataSource"/>

     <property name="jpaVendorAdapter">
        <bean class="org.springframework.orm.jpa.vendor
            .HibernateJpaVendorAdapter">

          <!-- Hibernate 相关的属性 -->
          <!-- 配置数据库类型 -->
         <property name="database" value="MYSQL"/>
         <!-- 显示执行的 SQL -->
         <property name="showSql" value="true"/>
      </bean>
    </property>

    <!-- 配置Spring所扫描的实体类所在的包 -->
    <property name="packagesToScan">
      <list>
        <value>mypack</value>
      </list>
    </property>
  </bean>

  <!-- 配置事务管理器 -->
  <bean id="transactionManager"
    class="org.springframework.orm.jpa.JpaTransactionManager">
    <property name="entityManagerFactory"
                      ref="entityManagerFactory"/>
   </bean>

   <bean id="CustomerService"  class="mypack.CustomerServiceImpl" />
   <bean id="CustomerDao"  class="mypack.CustomerDaoImpl" />

    <!-- 配置开启由注解驱动的事务处理 -->
    <tx:annotation-driven transaction-manager="transactionManager"/>

     <!-- 配置Spring需要扫描的包
         Spring会扫描这些包以及子包中类的Spring注解 -->
     <context:component-scan base-package="mypack"/>
</beans>
applicationContext.xml配置文件的<context:property-placeholder>元素设定属性文件为classpath根路径下的jdbc.properties文件。C3P0数据源会从该属性文件获取连接数据库的信息。以下是jdbc.properties文件的源代码。
/* jdbc.properties */
jdbc.username=root
jdbc.password=1234
jdbc.driver.class=com.mysql.jdbc.Driver
jdbc.url=jdbc:mysql://localhost:3306/sampledb?useSSL=false
Spring的applicationContext.xml配置文件在配置EntityManagerFactory Bean组件时指定使用HibernateJpaVendorAdapter适配器该适配器能够把Hibernate集成到Spring中。<property name="packagesToScan">属性指定实体类所在的包Spring会扫描这些包中实体类中的对象-关系映射注解。
applicationContext.xml配置文件的<tx:annotation-driven>元素表明在程序中可以通过@Transactional注解来为委托Spring为一个方法声明事务边界。
02、编写范例的Java类
本范例运用了Spring框架把业务逻辑层又细分为业务逻辑服务层、数据访问层和模型层。
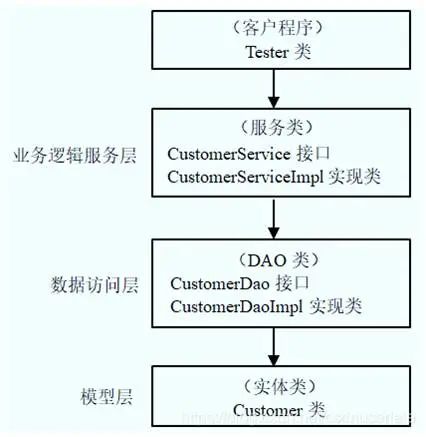
在上图中模型层包含了表示业务数据的实体类数据访问层负责访问数据库业务逻辑服务层负责处理各种业务逻辑并且通过数据访问层提供的方法来完成对数据库的各种操作。CustomerDaoImpl类、CustomerServiceImpl类和Tester类都会用到Spring API中的类或者注解。其余的类和接口则不依赖Spring API。
1●编写Customer实体类
Customer类是普通的实体类它不依赖Sping API但是会通过JPA API和Hibernate API中的注解来设置对象-关系映射。以下是Customer类的源代码。
/* Customer.java */
@Entity
@Table(name="CUSTOMERS")
public class Customer implements java.io.Serializable {
  @Id
  @GeneratedValue(generator="increment")
  @GenericGenerator(name="increment", strategy = "increment")
  @Column(name="ID")
  private Long id;

  @Column(name="NAME")
  private String name;

  @Column(name="AGE")
  private int age;

  //此处省略Customer类的构造方法、set方法和get方法
  …
}
2●编写CustomerDao数据访问接口和类
CustomerDao为DAOData Access Object数据访问对象接口提供了与Customer对象有关的访问数据库的各种方法。以下是CustomerDao接口的源代码。
/* CustomerDao.java */
public interface CustomerDao {
  public void insertCustomer(Customer customer);
  public void updateCustomer(Customer customer);
  public void deleteCustomer(Customer customer);
  public Customer findCustomerById(Long customerId);
  public List<Customer>findCustomerByName(String name);
}
CustomerDaoImpl类实现了CustomerDao接口通过Spring API和JPA API来访问数据库。以下是CustomerDaoImpl类的源代码。
/* CustomerDaoImpl.java */
package mypack;
import org.springframework.stereotype.Repository;
import javax.persistence.EntityManager;
import javax.persistence.PersistenceContext;
import java.util.List;

@Repository("CustomerDao")
public class CustomerDaoImpl implements CustomerDao {

    @PersistenceContext(name="entityManagerFactory")
    private EntityManager entityManager;

    public void insertCustomer(Customer customer) {
        entityManager.persist(customer);
    }

    public void updateCustomer(Customer customer) {
        entityManager.merge(customer);
    }

    public void deleteCustomer(Customer customer) {
        Customer c = findCustomerById(customer.getId());
        entityManager.remove(c);
    }

    public Customer findCustomerById(Long customerId) {
        return entityManager.find(Customer.class, customerId);
    }

    public List<Customer> findCustomerByName(String name) {
        return entityManager
                .createQuery("from Customer c where c.name = :name",
                                 Customer.class)
                .setParameter("name", name)
                .getResultList();
    }
}
在CustomerDaoImpl类中使用了以下来自Spring API的两个注解。
1 @Repository注解表明CustomerDaoImpl是DAO类在Spring的applicationContext.xml文件中通过<bean>元素配置了这个Bean组件Spring会负责创建该Bean组件并管理它的生命周期如
<bean id="CustomerDao" class="mypack.CustomerDaoImpl" />2@PersistenceContext注解表明CustomerDaoImpl类的entityManager属性由Spring来提供Spring会负责创建并管理EntityManager对象的生命周期。Spring会根据@PersistenceContext(name="entityManagerFactory")注解中设置的EntityManagerFactory对象来创建EntityManager对象而EntityManagerFactory对象作为Bean组件在applicationContext.xml文件中也通过<bean>元素做了配置EntityManagerFactory对象的生命周期也由Spring来管理。
从CustomerDaoImpl类的源代码可以看出这个类无须管理EntityManagerFactory和EntityManager对象的生命周期只需用Spring API的@Repository和@PersistenceContext注解来标识Spring 就会自动管理这两个对象的生命周期。
在applicationContext.xml配置文件中 <context:component-scan>元素指定Spring所扫描的包Spring会扫描指定的包以及子包中的所有类中的Spring注解提供和注解对应的功能。
3●编写CustomerService业务逻辑服务接口和类
CustomerService接口作为业务逻辑服务接口会包含一些处理业务逻辑的操作。本范例做了简化CustomerService接口负责保存、更新、删除和检索Customer对象以下是它的源代码。
/* CustomerService.java */
public interface CustomerService {
  public void insertCustomer(Customer customer);
  public void updateCustomer(Customer customer);
  public Customer findCustomerById(Long customerId);
  public void deleteCustomer(Customer customer);
  public List<Customer> findCustomerByName(String name);
}
CustomerServiceImpl类实现了CustomerService接口通过CustomerDao组件来访问数据库以下是它的源代码。
/* CustomerServiceImpl.java */
package mypack;
import org.springframework.beans.factory.annotation.Autowired;
import org.springframework.stereotype.Service;
import org.springframework.transaction.annotation.Transactional;
import java.util.List;

@Service("CustomerService")
public class CustomerServiceImpl implements CustomerService{
  @Autowired
  private CustomerDao customerDao;

  @Transactional
  public void insertCustomer(Customer customer){
    customerDao.insertCustomer(customer);
  }

  @Transactional
  public void updateCustomer(Customer customer){
    customerDao.updateCustomer(customer);
  }

  @Transactional
  public Customer findCustomerById(Long customerId){
    return customerDao.findCustomerById(customerId);
  }

  @Transactional
  public void deleteCustomer(Customer customer){
    customerDao.deleteCustomer(customer);
  }

  @Transactional
  public List<Customer> findCustomerByName(String name){
    return customerDao.findCustomerByName(name);
  }
}
在CustomerServiceImpl类中使用了以下来自Spring API的三个注解。
1@Service注解表明CustomerServiceImpl类是服务类。在Spring的applicationContext.xml文件中通过<bean>元素配置了这个Bean组件Spring会负责创建该Bean组件并管理它的生命周期如
<bean id="CustomerService" class="mypack.CustomerServiceImpl" />2@Autowired注解表明customerDao属性由Spring来提供。
3@Transactional注解表明被注解的方法是事务型的方法。Spring将该方法中的所有操作加入到事务中。
从CustomerServiceImpl类的源代码可以看出CustomerServiceImpl类虽然依赖CustomerDao组件但是无须创建和管理它的生命周期而且CustomerServiceImpl类也无须显式声明事务边界。这些都由Spring代劳了。
4●编写测试类Tester
Tester类是测试程序它会初始化Spring框架并访问CustomerService组件以下是它的源代码。
/* Tester.java */
package mypack;
import org.springframework.beans.factory.annotation.Autowired;
import org.springframework.test.context.ContextConfiguration;
import org.springframework.context.ApplicationContext;
import org.springframework.context.support
                      .ClassPathXmlApplicationContext;
import java.util.List;

public class Tester{
  private ApplicationContext ctx = null;
  private CustomerService customerService = null;

  public Tester(){
    ctx = new ClassPathXmlApplicationContext("applicationContext.xml");
    customerService = ctx.getBean(CustomerService.class);
  }

  public void test(){
     Customer customer=new Customer("Tom",25);
     customerService.insertCustomer(customer);
     customer.setAge(36);
     customerService.updateCustomer(customer);

     Customer c=customerService.findCustomerById(customer.getId());
     System.out.println(c.getName()+": "+c.getAge()+"岁");

     List<Customer> customers=
               customerService.findCustomerByName(c.getName());
     for(Customer cc:customers)
         System.out.println(cc.getName()+": "+cc.getAge()+"岁");

     customerService.deleteCustomer(customer);
  }

  public static void main(String args[]) throws Exception {
    new Tester().test();
  }
}
在Tester类的构造方法中首先根据applicationContext.xml配置文件的内容来初始化Spring框架并且创建了一个ClassPathXmlApplicationContext对象再调用这个对象的getBean(CustomerService.class)方法就能获得CustomerService组件。