

nodejs框架koa,egg以及es6一起学
| 阿里云国内75折 回扣 微信号:monov8 |
| 阿里云国际,腾讯云国际,低至75折。AWS 93折 免费开户实名账号 代冲值 优惠多多 微信号:monov8 飞机:@monov6 |
文章目录
前言
大家知道eggjs框架是基于Koa开发的。关于koa有一张经典的洋葱图
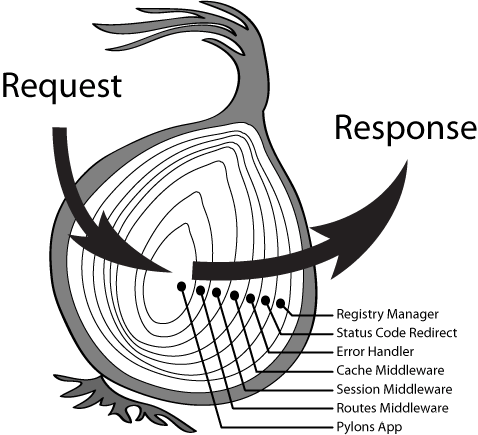
这张图比较形象地展示了koa对于request和response的处理。每一层都留下扩展点整个框架比较有弹性方便其它框架来进一步丰富它。比koa传统一点的express框架是用比较典型的web框架思路req和res来做参数调用中间件的而koa的不同就是使用了ctx。做为koa的中间件来处理ctx的就是Generator函数。简单解释下当一个request过来的时候会依次经过各个中间件进行处理而处理过程中肯定是需要跳转的所以跳转需要一个信号或者标识这个信号就是yield next当到某个中间件后该中间件处理完不执行yield next的时候然后就会反向执行前面那些中间件剩下的逻辑。就像洋葱图里所有层是被切片的有点像AOP。举个官方的例子
var koa = require('koa');
var app = koa();

// response-time
app.use(function *(next){
  var start = new Date;
  yield next;
  var ms = new Date - start;
  this.set('X-Response-Time', ms + 'ms');
});

// logger
app.use(function *(next){
  var start = new Date;
  yield next;
  var ms = new Date - start;
  console.log('%s %s - %s', this.method, this.url, ms);
});

// response
app.use(function *(){
  this.body = 'Hello World';
});

app.listen(3000);
其中我们可以把response-timeloggerresponse分别作为三个层。不错这很洋葱。
问题
那么问题来了如果多层执行顺序要怎么控制呢稍微改一下输出比较方便看结果代码如下
var koa = require('koa');
var app = koa();

app.use(function* function1(next) {
    console.log('function1 -> before next');
    yield next;
    console.log('function1 -> after next');
});

app.use(function* function2(next) {
    console.log('function2 -> before next');
    yield next;
    console.log('function2 -> after next');
});

app.use(function* function3(next) {
    console.log('function3 -> before next');
    this.body = 'hello world';
    console.log('function3 -> after next');
});

app.listen(3000);
关于这个执行顺序画个图比较容易看明白
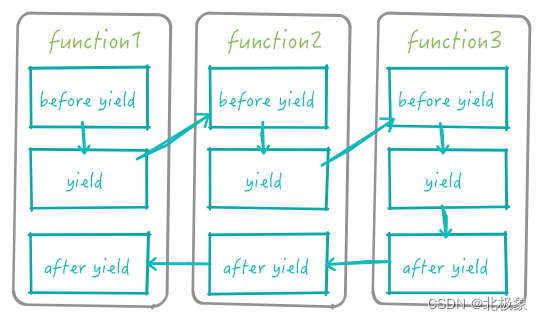
so 执行结果是这样的
function1 -> before next
function2 -> before next
function3 -> before next
function3 -> after next
function2 -> after next
function1 -> after next
并不是想象中串行执行function123的。
关于ES6-Generator
其实这里讲述的顺序有点乱因为上面算是结果导致结果的过程是因为我最早光去看代码是不知道function后面的那个星号是什么意思的去查了才开始了解Generator于是才有了上面的执行顺序的探索。其实星号和yield可以理解成Generator的特征。看《ECMAScript 6 入门》里Generator这一章就足够详细了里面有一句话大概是讲Generator函数可以理解成一个状态机它封装了多个内部状态。执行Generator函数时会返回一个遍历器对象可以依次遍历Generator函数内部的每一个状态。回到刚才的栗子作为状态机Generator对象一定会维护一个状态属性就是GeneratorStatus。回到刚才的栗子GeneratorStatus的值从suspended变为closed后就不会再改变了。也就是说Generator对象在一个环境中只能执行一遍上面的Generator的执行就有点类似于function1(function2(function3({})))
理解了这些基本上就可以获得了对koa最肤浅的理解。
egg中的处理
再说egg我理解其实egg是框架的框架它最大的价值是给开发者定义了规范做了MVC做的事情。正好这周我也听了不四大神的分享。他说egg更像java的spring框架。
回到需求本身举个栗子做需求的过程中遇到了一个上传的filestream问题。简单来讲上传文件实际上拿到的是一个fs的read流。如果是文本其实很好办node也像java一样有类似readline的方法能解决。但是我要解决的是一个多sheet的excel文件。第一反应就是去npm找合适的第三方包来解决。把流行的几个包试了一下基本都是要读取路径的没有直接可以对流处理的。其中最强大的xlsx可以处理流但是直接用是不行的。首先它读的一定是个正常的文件流上传来的read流并不支持。又尝试了各种其他方案一一否决了之后决定先把流生成临时文件代码如下
function read(rs) {
  return new Promise((resolve, reject) => {
    rs.on('data', (chunk) => {
      fs.writeFileSync(filePath, chunk, 'binary');
    }).on('end', () => {
      resolve();
    }).on('error', (err) => {
      reject(err);
    });
  });
}
Promise
Promise解决的是异步编程的问题理念上他像一个容器里面保存着某个异步操作的结果。从语法上来看它是一个对象构造函数包括resolve和rejected。
我理解他也是维护状态来实现回调的包括三种状态的变化pending处理中resolved处理成功reject处理失败。resolve是将Promise对象的状态从从Pending变为Resolved在异步操作成功时调用并将异步操作的结果作为参数传递出去。同理reject将Promise对象的状态从从Pending变为Rejected在异步操作失败时调用并将异步操作报出的错误作为参数传递出去。Promise实例生成以后可以用then方法分别指定Resolved状态和Reject状态的回调函数。更深入可以看http://liubin.org/promises-book/ 很详细很强大。
node的fs
用法上API基本足矣但是要理解的是写文件其实是有一个pipe概念在里面的。就好比两个桶read流是一个桶source用一根管子pipe往另一个桶target也就是要生成的文件里倒水data。用pipe运输data是需要过程的这个过程就用到了Promise的状态来看是不是写完了。于是就有了上面的代码。
xlsx–解析Excel文件
有了真实存在的文件而不是一个read流就解决一切了么当初天真的LZ也是这么一位的然而真相使用xlsx是只转workbook对象的部分是可以的主要是下面这一部分。
function parse_xlscfb(cfb, options) {
if(!options) options = {};
fix_read_opts(options);
reset_cp();
var CompObj, Summary, Workbook;
if(cfb.find) {
    CompObj = cfb.find('!CompObj');
    Summary = cfb.find('!SummaryInformation');
    Workbook = cfb.find('/Workbook');
} else {
    prep_blob(cfb, 0);
    Workbook = {content: cfb};
}

if(!Workbook) Workbook = cfb.find('/Book');
var CompObjP, SummaryP, WorkbookP;

if(CompObj) CompObjP = parse_compobj(CompObj);
if(options.bookProps && !options.bookSheets) WorkbookP = {};
else {
    if(Workbook) WorkbookP = parse_workbook(Workbook.content, options, !!Workbook.find);
    else throw new Error("Cannot find Workbook stream");
}
但是从workbook读取sheet页的对象的时候就抛异常了把workbook对象打出来看了一下再对比下解析的源码大概是因为sheet页的类似于head的一个东西一般是[‘!range’]但是我手里的文件是[‘!ref’]不知道是不是因为背景中叙述的文件来源是xmind导出来的树所导致的。那其实现在是要兼容[‘!ref’]。
Worksheet Object
在xlsx的wiki里看到关于worksheet对象的解释如下
Each key that does not start with ! maps to a cell (using A-1 notation)
worksheet[address] returns the cell object for the specified address.
Special worksheet keys (accessible as worksheet[key], each starting with !):
ws['!ref']: A-1 based range representing the worksheet range. Functions that work with sheets should use this parameter to determine the range. Cells that are assigned outside of the range are not processed. In particular, when writing a worksheet by hand, be sure to update the range. For a longer discussion, see http://git.io/KIaNKQFunctions that handle worksheets should test for the presence of !ref field. If the !ref is omitted or is not a valid range, functions are free to treat the sheet as empty or attempt to guess the range. The standard utilities that ship with this library treat sheets as empty (for example, the CSV output is an empty string).
When reading a worksheet with the sheetRows property set, the ref parameter will use the restricted range. The original range is set at ws['!fullref']

ws['!cols']: array of column properties objects. Column widths are actually stored in files in a normalized manner, measured in terms of the “Maximum Digit Width” (the largest width of the rendered digits 0-9, in pixels). When parsed, the column objects store the pixel width in the wpx field, character width in the wch field, and the maximum digit width in the MDW field.
ws['!merges']: array of range objects corresponding to the merged cells in the worksheet. Plaintext utilities are unaware of merge cells. CSV export will write all cells in the merge range if they exist, so be sure that only the first cell (upper-left) in the range is set.
其实我自己也懒得看英文上面这段大概就是解释了一下ref和cols两种情况取sheet页里cell范围的相关事宜具体在查+试并结合xlsx的规范发现应该是这样把sheet页的cell对象读出来作为一个二维数组返回的
function _decode_range(range) {
  let o = {s: {c: 0, r: 0}, e: {c: 0, r: 0}};
  let idx, i = 0, cc = 0;
  let len = range.length;
  for (idx = 0; i < len; ++i) {
    if ((cc = range.charCodeAt(i) - 64) < 1 || cc > 26) break;
    idx = 26 * idx + cc;
  }
  o.s.c = --idx;

  for (idx = 0; i < len; ++i) {
    if ((cc = range.charCodeAt(i) - 48) < 0 || cc > 9) break;
    idx = 10 * idx + cc;
  }
  o.s.r = --idx;

  if (i === len || range.charCodeAt(++i) === 58) {
    o.e.c = o.s.c;
    o.e.r = o.s.r;
    return o;
  }

  for (idx = 0; i !== len; ++i) {
    if ((cc = range.charCodeAt(i) - 64) < 1 || cc > 26) break;
    idx = 26 * idx + cc;
  }
  o.e.c = --idx;

  for (idx = 0; i !== len; ++i) {
    if ((cc = range.charCodeAt(i) - 48) < 0 || cc > 9) break;
    idx = 10 * idx + cc;
  }
  o.e.r = --idx;
  return o;
}
至此我拿到了上传的Excel文件的每个sheet页的每个cell值。后面要做的就是一些业务逻辑处理了就不粘代码了。整体来看上传大概就是做了下面这几件事生成临时文件->读取文件->解析数据->得到数据后删除临时文件->对数据进行业务逻辑处理->返回处理后的结果
exports.upload = function*() {
  const rs = yield this.getFileStream();
  let ret = [];
  try {
    yield read(rs).then(function () {
      return _parse_xlsx(filePath);
    }, function (error) {
      return error;
    }).then(function () {
      _clean(filePath);
      ret = _build(data);
    });
    this.body = {
      data: ret,
    };
  } catch (e) {
    this.logger.error(`upload(${data})`, e);
    toResponse(this, Result.error(ResultCode.FILE_NOT_SUPPORT, e.message));
  }
};
参考文档
- koa的API文档
- koa官方中文文档
- egg官方API
- 阮一峰的ES6入门