

【vue2】vuex基础与五大配置项
| 阿里云国内75折 回扣 微信号:monov8 |
| 阿里云国际,腾讯云国际,低至75折。AWS 93折 免费开户实名账号 代冲值 优惠多多 微信号:monov8 飞机:@monov6 |

🥳博 主初映CY的前说(前端领域)
🌞个人信条想要变成得到中间还有做到
🤘本文核心vuex基础认识、state、getters、mutations actions、modules使用
目录(文末原素材)
一、vuex介绍
1.vuex概念引入
当我们修改其中一个头像的时候我们怎么同步到多个组件当中呢

这个是平级的非父子关系我们应该怎么传递值进去呢用vuex来对非父子关系传值
2.为什么要有vuex
- vuex的作用是解决多组件状态共享的问题在大型的项目中组件通讯会变得很混乱使用vuex可以统一管理组件之间的通讯
- vuex是响应式布局 只要vuex中的数据变化对应的组件会自动更新(类似于vue数据驱动)
3.Vuex使用场景
不是所有的场景都适用于vuex只有在必要的时候才使用vuex,如果不必要尽量别用
2.适合使用vuex场景
- 这个数据需要在很多个地方要写如果采用组件传值方式写起来很麻烦而且多个地方都要写
- 例如用户信息姓名头像可能会在很多个地方使用个人页面评论页面等
3.不适合使用vuex场景
- 这个数据
不需要多个地方使用,如果某个数据仅仅只是在两个组件之间通讯,优先使用props或$emit
4.vuex特点
- 所有组件数据共享
- 响应式 一旦vuex数据修改所有使用的地方都会自动更新
二、五大核心配置项
1.state
①原生写法
1.概念
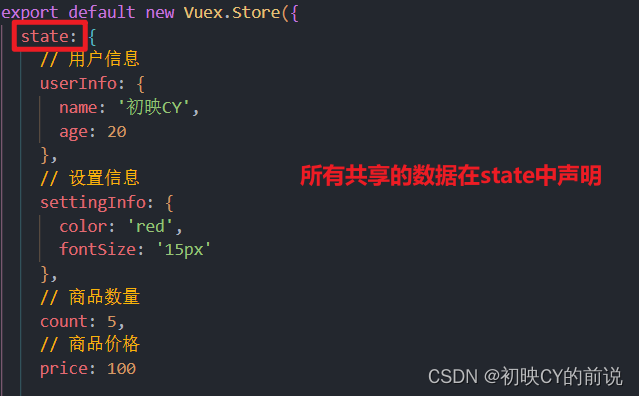
state提供vuex唯一的公共数据源所有共享的数据都要统一放到store中的State中存储。
2.声明语法
state:{
//在此处写共享属性即可
}
3.使用语法
$store.state.属性名
举个例子
1.声明
2.使用

可以看出我们的存放在state中的数据被我们成功的获取到啦
②state辅助函数mapSaatate
1.概念
将vuex中的数据映射到组件的计算属性中简化书写操作(写在computed中)
2.使用方法
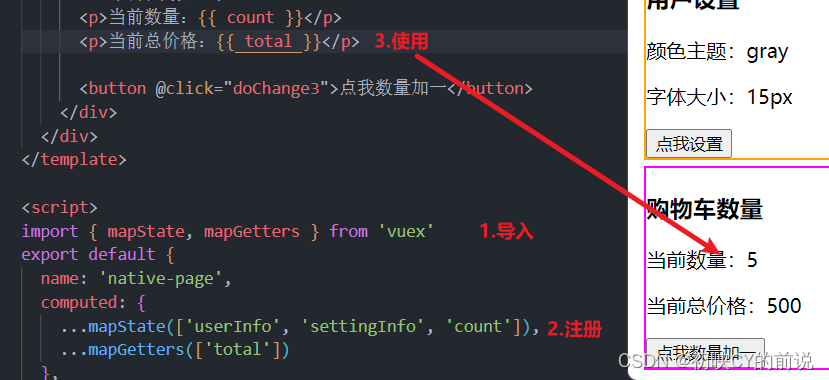
1.导入import { mapState } from 'vuex'
2. ...mapState([‘state中属性名’])
3.举个例子

2.getters
①原生写法
1.概念
state的计算属性
2.声明语法
 getters: {
    计算属性名(state) {
      return 要返回的值
    }
  }
3.使用语法
$store.getters.getter名
举个例子
1.声明

2.使用

可以看出我们的存放在getters中的数据被我们成功的获取到了注意步骤是getters下
②getters辅助函数mapGetters
1.概念
同上是简化我们的写法(写在computed中)
2.使用方法
1.导入import { mapGetters } from 'vuex'
2. ...mapGetters([‘getters中计算属性’])
3.举个例子
3.mutations
①原生写法
1.概念
state数据的修改只能通过mutations并且mutations必须是同步的。Mutations是同步更新state数据的唯一方式
2.声明语法
  mutations{
  	mutation名(state , 载荷 ) {
  },
每一项都是一个函数可以声明两个形参
第一个参数是必须的表示当前的state。
第二个参数是可选的表示载荷是可选的。在使用时要传入的数据
专业术语载荷表示额外的参数
3.使用语法
this.$store.commit('mutation名', 载荷 )
4.举个例子
1.声明

2.使用
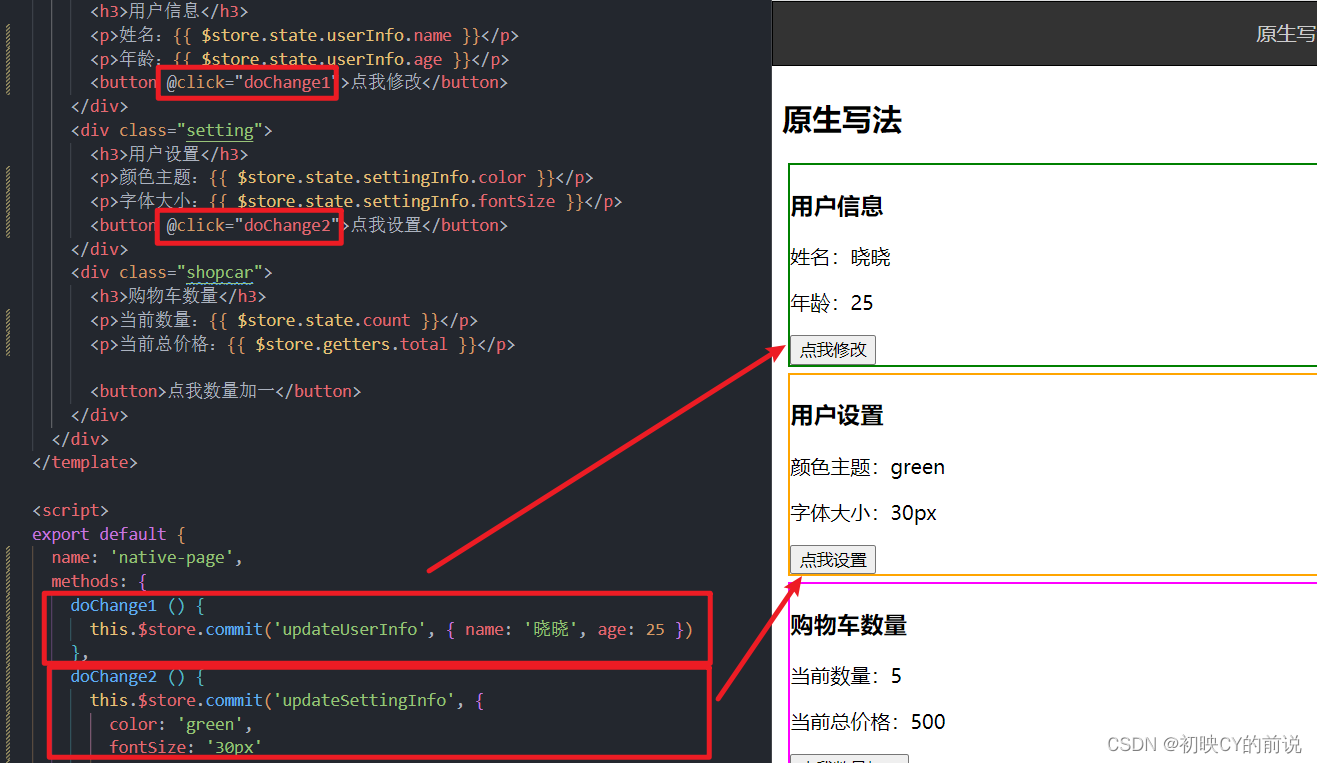
当我们点击按钮的时候我们荷载payload中的数据传到了mutation中随后完成我们的值传递将我们原始的数据改变。
②mutations辅助函数mapMutations
1.概念
简化书写操作成方法形式(写在methods中)
2.使用方法
1.导入import { mapMutations } from 'vuex'
2. ...mapMutations([‘mutations名’])
3.举个例子

4.actions
1.概念
actions: 异步更新我们的数据例如你的数据来源于ajax

2.声明语法
这个地方的载荷一般为ajax接口需要的参数如果没有就不用传
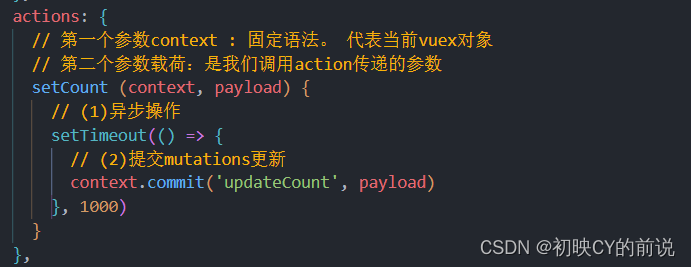
 actions: {
    // context对象会自动传入它与store实例具有相同的方法和属性
    action的名字: function(context, 载荷) {
      // 1. 异步操作获取数据
      // 2. commit调用mutation来修改数据
      // context.commit('mutation名', 载荷)
    }
  }
每一项都是一个函数可以声明两个形参
第一个参数是必须的表示当前的state。
第二个参数是可选的表示载荷是可选的。在使用时要传入的数据
专业术语载荷表示额外的参数
3.使用语法
this.$store.dispath ( 'actions的名字'参数
4.举个例子
4.1.声明
4.2.使用

②actions辅助函数mapActions
1.概念
简化书写操作成方法形式(写在methods中)
2.使用方法
1.导入import { mapActions } from 'vuex'
2. ...mapmapActions([‘action名’])
3.举个例子

vuex工作流程
我们先触发了Actions中的异步操作当异步结果出来之后如果没有异步操作则直接执行后面的操作我们触发commit调用mutations去修改我们的state,最后因为我们是具有响应式的特点因此我们的数据被修改成功。
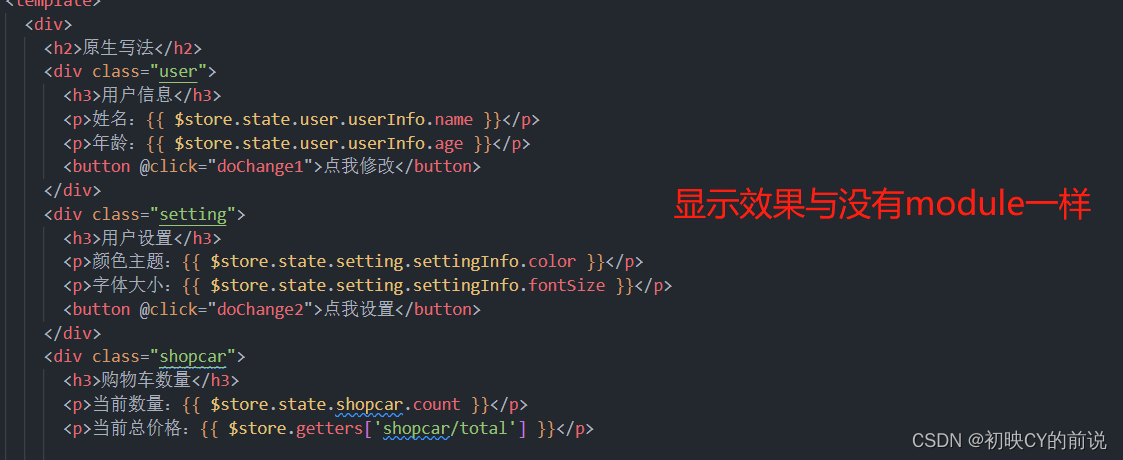
5.modules
①原生写法
1.概念
模块化处理vuex数据将我们每个模块的vuex数据分开处理
2.声明语法
//在我们的store/index.js中书写
 modules: {
  	模块名1 {
    	// namespaced为true则在使用mutations时就必须要加上模块名
      	namespaced: true,
3.使用语法
//state
全局的: $store.state.数据项名
模块的: $store.state.模块名.数据项名
//getters
全局的 $store.getters.getter名
模块的 $store.getters['模块名/getters名']
//mutations
全局的: $store.commit('mutations名',载荷)
模块的: $store.commit('模块名/mutations名',载荷)
//actions
全局的: $store.dispatch('actions名',载荷)
模块的: $store.dispatch('模块名/actions名',载荷)
4.举个例子
4.1声明
我们先封装模块

在index.js中导入

4.2使用
注意模块化语法一定一定需要开启命名空间namespaced:true
②modules封装写法

注意点我们分了模块我们的数据要单独的导入进来喔
【vuex辅助函数源素材】
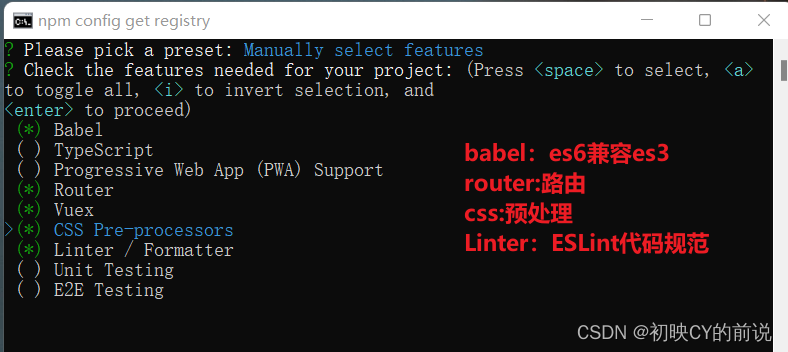
1.先搭建我们的脚手架务必勾选上以下选项
2.引入我们的组件
App.vue
<template>
  <div>
    <!-- 顶部导航栏 -->
    <div class="footer_wrap">
      <!-- 路由导航 -->
      <!-- <router-link to="/native">原生写法</router-link> -->
      <router-link to="/facilitate">辅助函数写法</router-link>
    </div>
    <!-- 下面内容 -->
    <div class="top">
      <!-- 路由出口 -->
      <router-view></router-view>
    </div>
  </div>
</template>

<script>
export default {
  name: 'facilitate-page',

  methods: {}
}
</script>

<style scoped>
body,
html {
  margin: 0;
  padding: 0;
}
.footer_wrap {
  position: fixed;
  left: 0;
  top: 0;
  display: flex;
  width: 100%;
  text-align: center;
  background-color: #333;
  color: #ccc;
}
.footer_wrap a,
span {
  cursor: pointer;
  flex: 1;
  text-decoration: none;
  padding: 15px 0;
  line-height: 20px;
  background-color: #333;
  color: #ccc;
  border: 1px solid black;
}
.footer_wrap a:hover,
span:hover {
  background-color: #555;
}

.top {
  padding-top: 50px;
}

.footer_wrap .router-link-active {
  background-color: #000;
}
</style>
Facilitate.vueViews/ Facilitate.vue
<template>
  <div>
    <h2>辅助函数写法</h2>
    <div class="user">
      <h3>用户信息</h3>
      <p>姓名{{ userInfo.name }}</p>
      <p>年龄{{ userInfo.age }}</p>
      <button @click="doChange1">点我修改</button>
    </div>
    <div class="setting">
      <h3>用户设置</h3>
      <p>颜色主题{{ settingInfo.color }}</p>
      <p>字体大小{{ settingInfo.fontSize }}</p>
      <button @click="doChange2">点我设置</button>
    </div>
    <div class="shopcar">
      <h3>购物车数量</h3>
      <p>当前数量{{ count }}</p>
      <p>当前总价格{{ total }}</p>

      <button @click="doChange3">点我数量加一</button>
    </div>
  </div>
</template>

<script>
// 导入辅助函数
import { mapState, mapGetters, mapMutations, mapActions } from 'vuex'

export default {
  name: 'facilitate-page',
  computed: {
    ...mapState('user', ['userInfo']),
    ...mapState('setting', ['settingInfo']),
    ...mapState('shopcar', ['count']),
    ...mapGetters('shopcar', ['total'])
  },
  methods: {
    ...mapMutations('user', ['updateUserInfo']),
    ...mapMutations('setting', ['updateSettingInfo']),
    ...mapActions('shopcar', ['setCount']),
    // 1.点击修改信息
    doChange1 () {
      // 提交mutations
      this.updateUserInfo({
        name: '结束啦',
        age: 666
      })
    },
    // 2.点击修改设置
    doChange2 () {
      // 提交mutations
      this.updateSettingInfo({ color: 'green', fontSize: '20px' })
    },
    // 3.点击购买按钮
    doChange3 () {
      // 提交actions
      this.setCount(this.count + 1)
    }
  }
}
</script>

<style scoped>
.user {
  border: 2px solid green;
  margin: 5px;
}

.setting {
  border: 2px solid orange;
  margin: 5px;
}

.shopcar {
  border: 2px solid magenta;
  margin: 5px;
}
</style>
3.引入路由
index.js (router/index.js)
import Vue from 'vue'
import VueRouter from 'vue-router'

// 1.导入组件
// import native from '@/views/Native.vue'
import facilitate from '@/views/Facilitate.vue'

Vue.use(VueRouter)

// 2.路由规则
const routes = [
  // { path: '/', redirect: '/Native' },
  // { path: '/native', component: native },
  { path: '/facilitate', component: facilitate }
]

const router = new VueRouter({
  routes
})

export default router
愿这一份资料能帮帮助到你如果可以请关注博主呦