

yolov5 模型输出的格式解析
| 阿里云国内75折 回扣 微信号:monov8 |
| 阿里云国际,腾讯云国际,低至75折。AWS 93折 免费开户实名账号 代冲值 优惠多多 微信号:monov8 飞机:@monov6 |
工作需要 又需要对yolov5 输出的模型进行转onnx 再用c++进行后续处理。
两个问题。
- yolov5 的模型输出的是个啥啊
- 转成onnx后输出的和yolov5输出的处理是否一样呢
关于第一个问题yolov5 的模型输出的是个啥啊
以前只知道抄代码就行 也不知道里面干了啥 输出的后处理也都是由现成的代码来实现。 我也懒得考虑内部的原理 反正代码正常跑。系统正常运行就可以。
但是今天不行啦 得自己解析输出。 被逼无奈之下 只能仔细研究下yolov5的模型和其内部的神经网络结构。关于神经网络的结构 主要是在文件 models\yolov5s.yaml 中定义的。具体的我在下面的文件中注释写进去了。
# YOLOv5 🚀 by Ultralytics, GPL-3.0 license

# Parameters
nc: 80  # number of classes
depth_multiple: 0.33  # model depth multiple
width_multiple: 0.50  # layer channel multiple
anchors:
  - [10,13, 16,30, 33,23]  # P3/8
  - [30,61, 62,45, 59,119]  # P4/16
  - [116,90, 156,198, 373,326]  # P5/32

# YOLOv5 v6.0 backbone
backbone:
  # [from, number, module, args]
  # 关键是这个说明 这里得分成4个看分别是
  # [from 数据从哪里来, number 有几个这样的层, module 层的名称, args参数]
  [[-1, 1, Conv, [64, 6, 2, 2]],  # 0-P1/2
   [-1, 1, Conv, [128, 3, 2]],  # 1-P2/4
   #下面这个配置的意思是数据从-1层上一层来创建3层类名叫C3的层 参数是128
   [-1, 3, C3, [128]],
   #下面这个配置的意思是数据从-1层上一层来创建1层类名叫Conv的层 参数是256, 3, 2
   [-1, 1, Conv, [256, 3, 2]],  # 3-P3/8
   [-1, 6, C3, [256]],
   [-1, 1, Conv, [512, 3, 2]],  # 5-P4/16
   [-1, 9, C3, [512]],
   [-1, 1, Conv, [1024, 3, 2]],  # 7-P5/32
   [-1, 3, C3, [1024]],
   [-1, 1, SPPF, [1024, 5]],  # 9
  ]

# YOLOv5 v6.0 head
head:
  [[-1, 1, Conv, [512, 1, 1]],
   [-1, 1, nn.Upsample, [None, 2, 'nearest']],
   [[-1, 6], 1, Concat, [1]],  # cat backbone P4
   [-1, 3, C3, [512, False]],  # 13

   [-1, 1, Conv, [256, 1, 1]],
   [-1, 1, nn.Upsample, [None, 2, 'nearest']],
   [[-1, 4], 1, Concat, [1]],  # cat backbone P3
   [-1, 3, C3, [256, False]],  # 17 (P3/8-small)

   [-1, 1, Conv, [256, 3, 2]],
   [[-1, 14], 1, Concat, [1]],  # cat head P4
   [-1, 3, C3, [512, False]],  # 20 (P4/16-medium)

   [-1, 1, Conv, [512, 3, 2]],
   [[-1, 10], 1, Concat, [1]],  # cat head P5
   [-1, 3, C3, [1024, False]],  # 23 (P5/32-large)

   [[17, 20, 23], 1, Detect, [nc, anchors]],  # Detect(P3, P4, P5)
  ]
这个配置文件的解析是在models\yolo.py 文件中 由 parse_model() 方法执行解析的。
下面贴一下这个函数的代码如果没兴趣可以不看
从代码中可以看的出来配置文件中的最后一列 arg参数 并不是跟代码中class的参数一一对应的。
例如Conv参数在代码中需要好多个参数 而配置文件中只配置了3个。我非常反感这种配置来配置去搞脑子的写法 因为非常的不方便代码理解 不如直接在代码中硬编码, 最好的代码是一看就懂。
def parse_model(d, ch):  # model_dict, input_channels(3)
    # Parse a YOLOv5 model.yaml dictionary
    LOGGER.info(f"\n{'':>3}{'from':>18}{'n':>3}{'params':>10}  {'module':<40}{'arguments':<30}")
    anchors, nc, gd, gw, act = d['anchors'], d['nc'], d['depth_multiple'], d['width_multiple'], d.get('activation')
    if act:
        Conv.default_act = eval(act)  # redefine default activation, i.e. Conv.default_act = nn.SiLU()
        LOGGER.info(f"{colorstr('activation:')} {act}")  # print
    na = (len(anchors[0]) // 2) if isinstance(anchors, list) else anchors  # number of anchors
    no = na * (nc + 5)  # number of outputs = anchors * (classes + 5)

    layers, save, c2 = [], [], ch[-1]  # layers, savelist, ch out
    for i, (f, n, m, args) in enumerate(d['backbone'] + d['head']):  # from, number, module, args
        m = eval(m) if isinstance(m, str) else m  # eval strings
        for j, a in enumerate(args):
            with contextlib.suppress(NameError):
                args[j] = eval(a) if isinstance(a, str) else a  # eval strings

        n = n_ = max(round(n * gd), 1) if n > 1 else n  # depth gain
        if m in {
                Conv, GhostConv, Bottleneck, GhostBottleneck, SPP, SPPF, DWConv, MixConv2d, Focus, CrossConv,
                BottleneckCSP, C3, C3TR, C3SPP, C3Ghost, nn.ConvTranspose2d, DWConvTranspose2d, C3x}:
            c1, c2 = ch[f], args[0]
            if c2 != no:  # if not output
                c2 = make_divisible(c2 * gw, 8)

            args = [c1, c2, *args[1:]]
            if m in {BottleneckCSP, C3, C3TR, C3Ghost, C3x}:
                args.insert(2, n)  # number of repeats
                n = 1
        elif m is nn.BatchNorm2d:
            args = [ch[f]]
        elif m is Concat:
            c2 = sum(ch[x] for x in f)
        # TODO: channel, gw, gd
        elif m in {Detect, Segment}:
            args.append([ch[x] for x in f])
            if isinstance(args[1], int):  # number of anchors
                args[1] = [list(range(args[1] * 2))] * len(f)
            if m is Segment:
                args[3] = make_divisible(args[3] * gw, 8)
        elif m is Contract:
            c2 = ch[f] * args[0] ** 2
        elif m is Expand:
            c2 = ch[f] // args[0] ** 2
        else:
            c2 = ch[f]

        print("模型结构" + str(m) + str(args)+"\r\n")

        m_ = nn.Sequential(*(m(*args) for _ in range(n))) if n > 1 else m(*args)  # module
        t = str(m)[8:-2].replace('__main__.', '')  # module type
        np = sum(x.numel() for x in m_.parameters())  # number params
        m_.i, m_.f, m_.type, m_.np = i, f, t, np  # attach index, 'from' index, type, number params
        LOGGER.info(f'{i:>3}{str(f):>18}{n_:>3}{np:10.0f}  {t:<40}{str(args):<30}')  # print
        save.extend(x % i for x in ([f] if isinstance(f, int) else f) if x != -1)  # append to savelist
        layers.append(m_)
        if i == 0:
            ch = []
        ch.append(c2)
    return nn.Sequential(*layers), sorted(save)
好了回归正题 根据yolov5s.yaml配置文件来看 模型的最后一层是Detect层
只要看懂了Detect的代码既能理解yolov5到底输出了啥。
为方波快速理解我下面把Detect层的 class 源代码贴出来。
源代码在models\yolo.py 文件中 38 行
class Detect(nn.Module):
    # YOLOv5 Detect head for detection models
    stride = None  # strides computed during build
    dynamic = False  # force grid reconstruction
    export = False  # export mode

    def __init__(self, nc=80, anchors=(), ch=(), inplace=True):  # detection layer
        super().__init__()
        self.nc = nc  # number of classes
        self.no = nc + 5  # number of outputs per anchor
        self.nl = len(anchors)  # number of detection layers
        self.na = len(anchors[0]) // 2  # number of anchors
        self.grid = [torch.empty(0) for _ in range(self.nl)]  # init grid
        self.anchor_grid = [torch.empty(0) for _ in range(self.nl)]  # init anchor grid
        self.register_buffer('anchors', torch.tensor(anchors).float().view(self.nl, -1, 2))  # shape(nl,na,2)
        self.m = nn.ModuleList(nn.Conv2d(x, self.no * self.na, 1) for x in ch)  # output conv
        self.inplace = inplace  # use inplace ops (e.g. slice assignment)

    def forward(self, x):
        z = []  # inference output
        for i in range(self.nl):
            x[i] = self.m[i](x[i])  # conv
            bs, _, ny, nx = x[i].shape  # x(bs,255,20,20) to x(bs,3,20,20,85)
            x[i] = x[i].view(bs, self.na, self.no, ny, nx).permute(0, 1, 3, 4, 2).contiguous()

            if not self.training:  # inference
                if self.dynamic or self.grid[i].shape[2:4] != x[i].shape[2:4]:
                    self.grid[i], self.anchor_grid[i] = self._make_grid(nx, ny, i)

                if isinstance(self, Segment):  # (boxes + masks)
                    xy, wh, conf, mask = x[i].split((2, 2, self.nc + 1, self.no - self.nc - 5), 4)
                    xy = (xy.sigmoid() * 2 + self.grid[i]) * self.stride[i]  # xy
                    wh = (wh.sigmoid() * 2) ** 2 * self.anchor_grid[i]  # wh
                    y = torch.cat((xy, wh, conf.sigmoid(), mask), 4)
                else:  # Detect (boxes only)
                    xy, wh, conf = x[i].sigmoid().split((2, 2, self.nc + 1), 4)
                    xy = (xy * 2 + self.grid[i]) * self.stride[i]  # xy
                    wh = (wh * 2) ** 2 * self.anchor_grid[i]  # wh
                    # xy 是中心点
                    # wh 是宽高
                    # conf 是confidence 即可信度
                    y = torch.cat((xy, wh, conf), 4)
                z.append(y.view(bs, self.na * nx * ny, self.no))

        return x if self.training else (torch.cat(z, 1),) if self.export else (torch.cat(z, 1), x)

    def _make_grid(self, nx=20, ny=20, i=0, torch_1_10=check_version(torch.__version__, '1.10.0')):
        d = self.anchors[i].device
        t = self.anchors[i].dtype
        shape = 1, self.na, ny, nx, 2  # grid shape
        y, x = torch.arange(ny, device=d, dtype=t), torch.arange(nx, device=d, dtype=t)
        yv, xv = torch.meshgrid(y, x, indexing='ij') if torch_1_10 else torch.meshgrid(y, x)  # torch>=0.7 compatibility
        grid = torch.stack((xv, yv), 2).expand(shape) - 0.5  # add grid offset, i.e. y = 2.0 * x - 0.5
        anchor_grid = (self.anchors[i] * self.stride[i]).view((1, self.na, 1, 1, 2)).expand(shape)
        return grid, anchor_grid
从代码
# xy 是中心点
# wh 是宽高
# conf 是confidence 即可信度
y = torch.cat((xy, wh, conf), 4)
中可以看的出 这里是输出的主要数据的格式 分别是3个参数 xy 中心点, wh 宽高,conf 可信度
经过调试发现数据的格式如下。
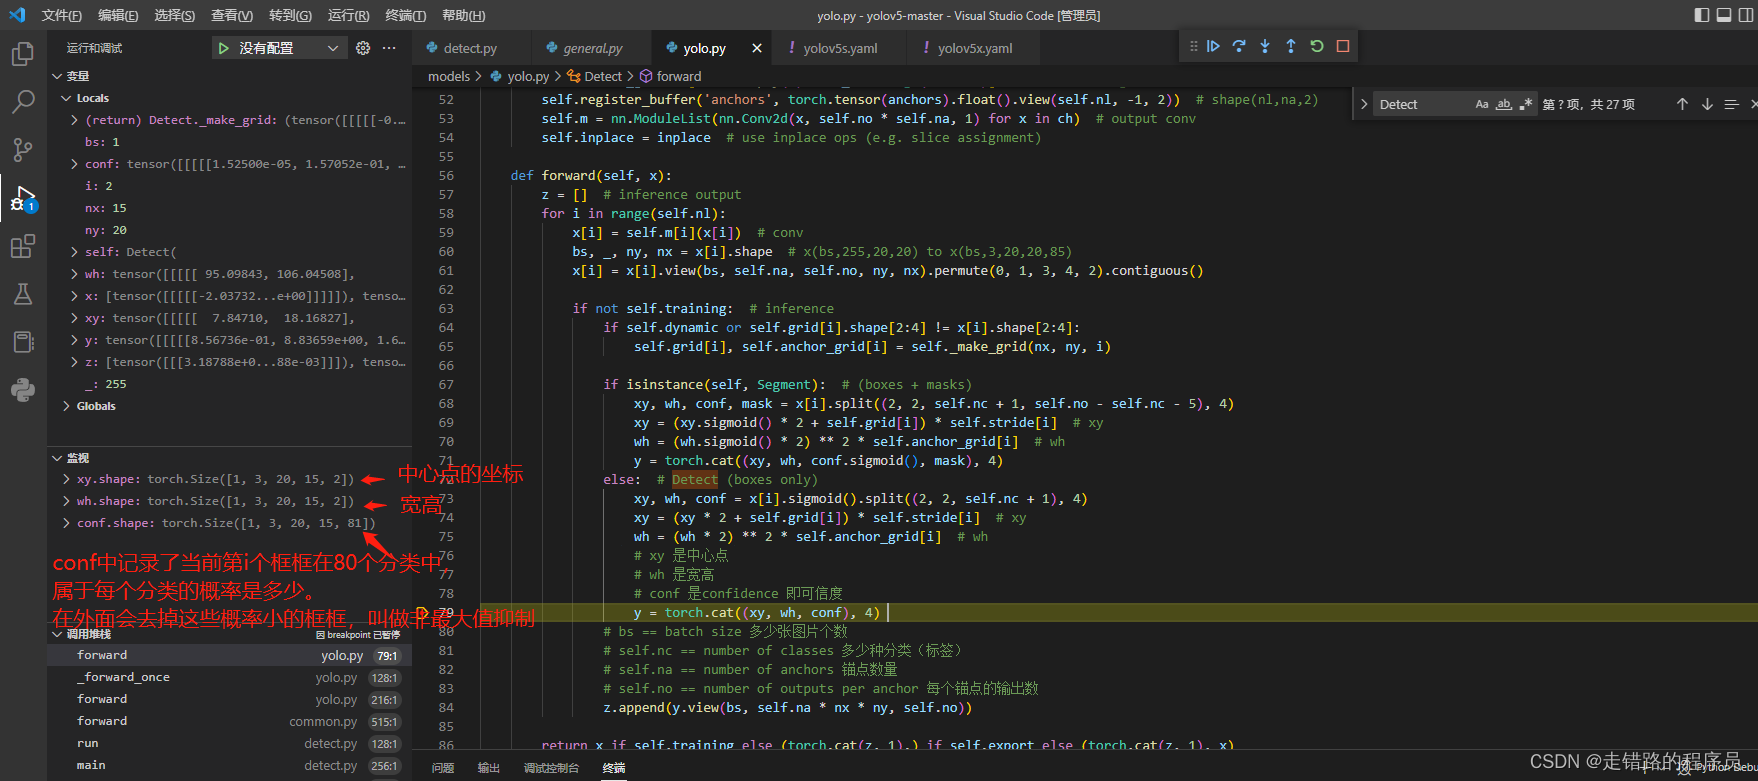
关键要看shape的最后一位在这一步的时候不是最终输出的格式这里只是把它们合并起来了。后面还有个y.view进行了重新改变维度 让这个组合的矩阵变的更加的直观 改变维度后 它的shape变成了

实际内部存储仍然是
	 [
		xy1,wh1,conf1,
		xy2,wh2,conf2,
		xy3,wh3,conf3,
		....
	]
这里再补充一下实际内部格式是
	 [
		x1,y1,w1,h1,conf1,
		x2,y2,w2,h2,conf2,
		x3,y3,w3,h3,conf3,
		....
	]
5位数代表一个识别的框框box。
这里的xy,wh的单位不是像素哦 是归一化后的数值 需要按比例转换成像素值。 然后画到图片上就行了
xy的坐标是框框中心点的坐标而不是左上角的坐标哦。
知道了存储的数据格式后续的处理实际上就很简单了。
分别是去掉可信度比较低的框框 叫做非极值抑制也就是这个函数non_max_suppression(). 有的叫 nms
然后就是把可信度比较高的框框画到图片上。剩下的应该都能看的懂。