4.1 为什么收集Nginx日志
我们需要获取用户的信息,比如:来源的IP是哪个地域,网站的PV、UV、状态码、访问时间等等;所以需要收集 Nginx 日志;
4.2 Nginx日志收集架构图
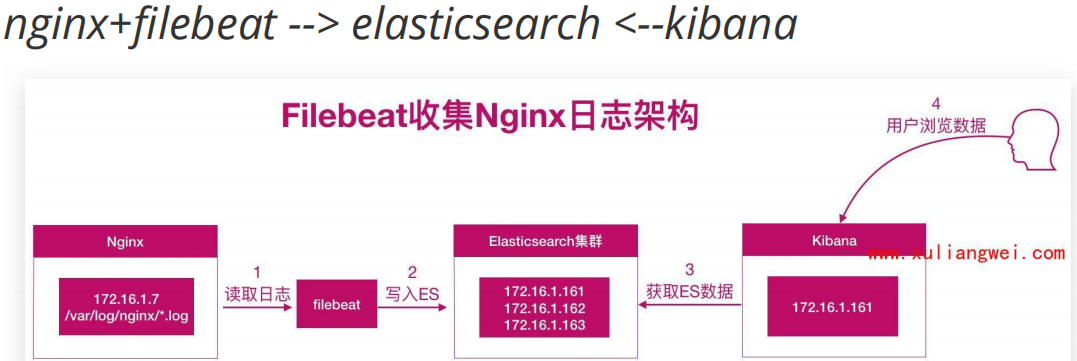
4.3 Nginx日志收集实践
4.3.1 安装Nginx
yum install nginx -y

cat /etc/nginx/conf.d/elk.conf
server {
	listen 5555;
	server_name elk.bertwu.net;
	location / {
		root /code;
		index index.html;
		}
}

systemctl start nginx
4.3.2 配置filebeat
配置Filebeat,收集本机Nginx日志

cat filebeat.yml
filebeat.inputs:
- type: log
  enabled: true
  paths: /var/log/nginx/access.log

output.elasticsearch:
  hosts: ["172.16.1.161:9200","172.16.1.162:9200","172.16.1.163:9200"]
  index: "nginx-access-%{[agent.version]}-%{+yyyy.MM.dd}" #自定义索引名称

setup.ilm.enabled: false
setup.template.name: "nginx"       #定义模板名称
setup.template.pattern: "nginx-*"  #定义模板的匹配索引名称

systemctl restart filebeat
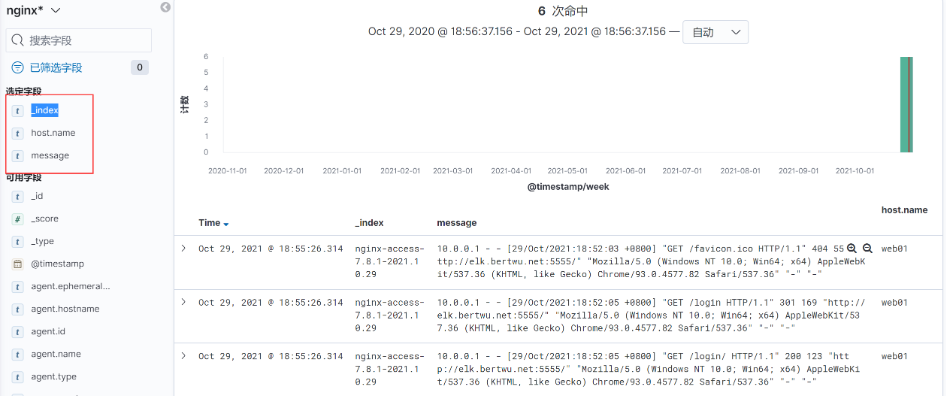
4.3.3 kibana展示
4.4 Nginx Json日志收集实践
4.4.1 收集问题
我们实现了 Nginx 日志的收集,但是所有的数据都在 message 字段中,无法满足分析的需求,比如:
   需要统计状态码的情况;
   统计所有请求总产生的流量大小;
   统计来源使用的客户端;等等
这些是没有办法实现的
4.4.2 解决方案
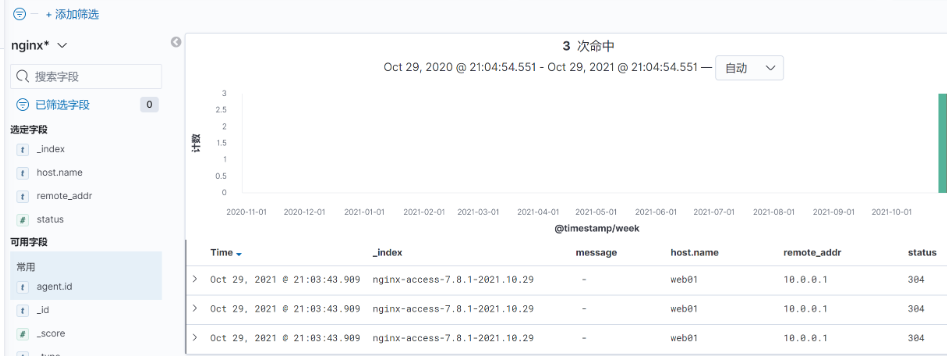
需要将日志中的每一个选项都拆分出来,拆分成 key-value 的形式,那么就需要借助 json 的格式。
4.4.3 配置Json
1.重置nginx日主格式为json格式
log_format json '{ "time_local": "$time_local",'
                        '"remote_addr": "$remote_addr",'
                        '"referer": "$http_referer",'
                        '"request": "$request",'
                        '"status": $status,'
                        '"bytes": $body_bytes_sent,'
                        '"test_agent": "$http_user_agent",'
                        '"x_forwarded": "$http_x_forwarded_for",'
                        '"up_addr": "$upstream_addr",'
                        '"up_host": "$upstream_http_host",'
                        '"upstream_time": "$upstream_response_time",'
                        '"request_time": "$request_time"'
                        '}';

2.重新配置nginx.conf
cat /etc/nginx/conf.d/elk.conf
server {
	listen 5555;
	server_name elk.bertwu.net;
	access_log  /var/log/nginx/access.log  json; # 定义日志格式为json
	location / {
		root /code;
		index index.html;
		}
}

3.重新配置filebeat文件
[root@web01 filebeat]# cat filebeat.yml
filebeat.inputs:
- type: log
  enabled: true
  paths: /var/log/nginx/access.log
  json.keys_under_root: true  # Flase会将json解析的格式存储至messages,改为true则不存储至
  json.overwrite_keys: true  #覆盖默认message字段,使用自定义json格式的key
output.elasticsearch:
  hosts: ["172.16.1.161:9200","172.16.1.162:9200","172.16.1.163:9200"]
  index: "nginx-access-%{[agent.version]}-%{+yyyy.MM.dd}" #自定义索引名称
setup.ilm.enabled: false
setup.template.name: "nginx"       #定义模板名称
setup.template.pattern: "nginx-*"  #定义模板的匹配索引名称

4.重启filebeat、Nginx,然后清空日志,在重新产生json格式的日志
systemctl restart nginx
systemctl restart filebeat
> /var/log/nginx/access.log
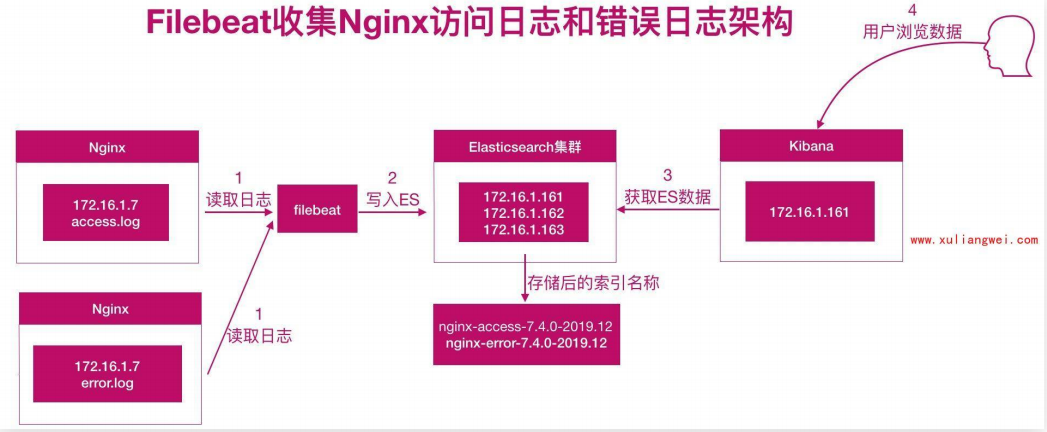
4.5 Nginx多个日志收集实践
nginx 存在访问日志和错误日志,那么如何使用filebeat 同时收集 nginx 的访问日志、错误日志;
我们希望的状态如下:
nginx访问日志 --存储–> nginx-access-xxx 索引
nginx错误日志 --存储–> nginx-error-xxx 索引
1.配置 filebeat 收集多个日志,需要通过 tags 标签进行区分;
cat filebeat.yml
filebeat.inputs:
- type: log
enabled: true
paths: /var/log/nginx/access.log
json.keys_under_root: true
json.overwrite_keys: true
tags: ["access"]
- type: log
enabled: true
paths: /var/log/nginx/error.log
tags: ["error"]
output.elasticsearch:
hosts: ["172.16.1.161:9200","172.16.1.162:9200","172.16.1.163:9200"]
indices:
- index: "nginx-access-%{[agent.version]}-%{+yyyy.MM.dd}" #自定义索引名称
when.contains:
tags: "access"
- index: "nginx-error-%{[agent.version]}-%{+yyyy.MM.dd}"
when.contains:
tags: "error"
setup.ilm.enabled: false #索引生命周期ilm功能默认开启,开启情况下索引名称只能为filebeat-*
setup.template.name: "nginx" #定义模板名称
setup.template.pattern: "nginx-*" #定义模板的匹配索引名称
2.重启filebeat
systemctl restart filebeat
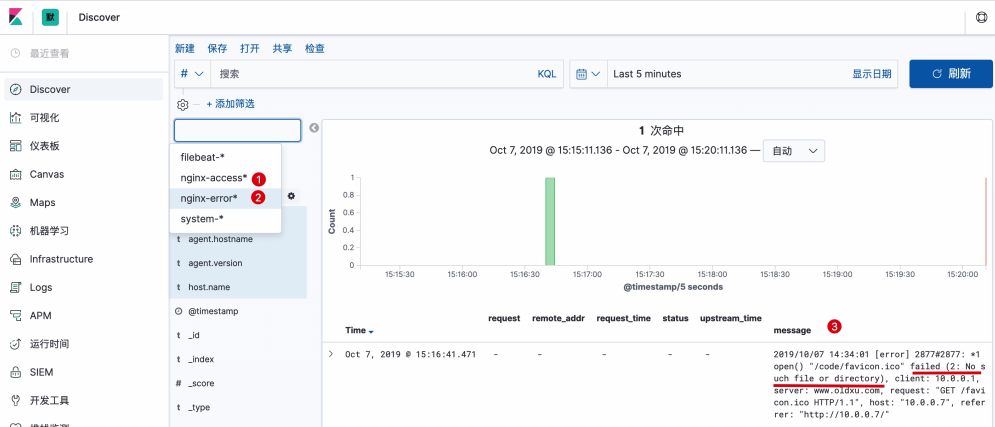
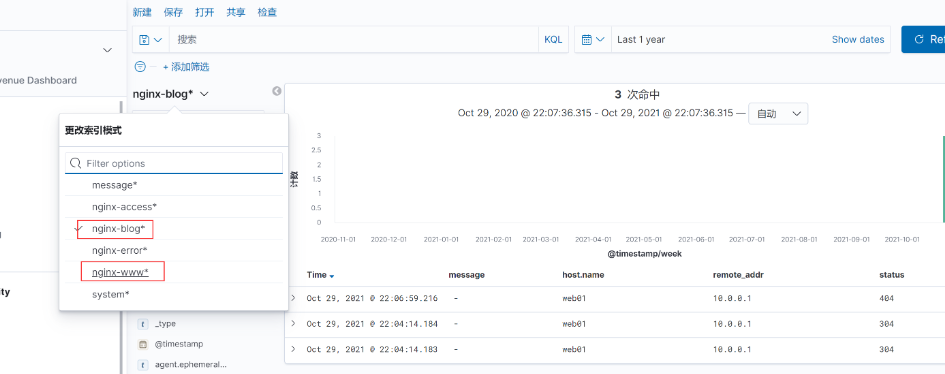
3.使用kibana添加nginx错误日志索引,然后展示数据
4.6 Nginx多虚拟主机收集实践
Nginx 如果有多个站点;filebeat 该如何收集多个域名的访问日志

1.配置nginx多站点
[root@web01 ~]# cat /etc/nginx/conf.d/elk.conf
server {
	listen 5555;
	server_name elk.qingchen.net;
	access_log  /var/log/nginx/access.log  json;
	location / {
		root /code;
		index index.html;
		}
}
server {
  listen 5555;
  server_name blog.qingchen.net;
  access_log  /var/log/nginx/blog.log  json;
  location / {
    root /code;
    index index.html;
    }
}
server {
  listen 5555;
  server_name www.qingchen.net;
  access_log  /var/log/nginx/www.log  json;
  location / {
    root /code;
    index index.html;
    }
}

2.配置filebeat
cat filebeat.yml
filebeat.inputs:
- type: log
  enabled: true
  paths: /var/log/nginx/access.log
  json.keys_under_root: true
  json.overwrite_keys: true
  tags: ["access"]

- type: log
  enabled: true
  paths: /var/log/nginx/error.log
  tags: ["error"]

- type: log
  enabled: true
  paths: /var/log/nginx/www.log
  json.keys_under_root: true
  json.overwrite_keys: true
  tags: ["nginx-www"]

- type: log
  enabled: true
  paths: /var/log/nginx/blog.log
  json.keys_under_root: true
  json.overwrite_keys: true
  tags: ["nginx-blog"]
output.elasticsearch:
  hosts: ["172.16.1.161:9200","172.16.1.162:9200","172.16.1.163:9200"]
  indices:
    - index: "nginx-access-%{[agent.version]}-%{+yyyy.MM.dd}" #自定义索引名称
      when.contains:
        tags: "access"
    - index: "nginx-error-%{[agent.version]}-%{+yyyy.MM.dd}"
      when.contains:
        tags: "error"
    - index: "nginx-www-%{[agent.version]}-%{+yyyy.MM.dd}"
      when.contains:
        tags: "nginx-www"
    - index: "nginx-blog-%{[agent.version]}-%{+yyyy.MM.dd}"
      when.contains:
        tags: "nginx-blog"
setup.ilm.enabled: false
setup.template.name: "nginx"       #定义模板名称
setup.template.pattern: "nginx-*"  #定义模板的匹配索引名称
| 阿里云国内75折 回扣 微信号:monov8 |
| 阿里云国际,腾讯云国际,低至75折。AWS 93折 免费开户实名账号 代冲值 优惠多多 微信号:monov8 飞机:@monov6 |

