Linux基本功系列之chown命令实战
| 阿里云国内75折 回扣 微信号:monov8 |
| 阿里云国际,腾讯云国际,低至75折。AWS 93折 免费开户实名账号 代冲值 优惠多多 微信号:monov8 飞机:@monov6 |

文章目录
一. 前言🚀🚀🚀
想要学好Linux命令是基本功企业中常用的命令大约200多个不管是写shell脚本还是管理操作系统最常用的命令必须要牢牢掌握像我们以前学乘法口诀一样烂熟于心唯有如此才能打牢基础。
💓 知识最重要的是记忆
💓 入门须知 想要人生从容必须全力以赴努力才是你最终的入场券🚀🚀🚀
💕 最后 努力成长自己愿我们都能在看不到的地方闪闪发光 一起加油进步🍺🍺🍺
二. chown命令介绍
Linux/Unix 属于多用户多任务操作系统所有的文件皆有拥有者。
使用chown 命令可以将指定的文件的拥有着改为指定的用户和组。
chown命令来自于英文词组”Change owner“的缩写其功能是用于改变文件或目录的用户和用户组信息。
管理员可以改变一切文件的所属信息而普通用户只能改变自己文件的所属信息
三. 语法格式及常用选项
使用–help来参看具体的参数和格式
[root@mufenggrow ~]# chown --help
用法chown [选项]... [所有者][:[组]] 文件...
 或chown [选项]... --reference=参考文件 文件...
Change the owner and/or group of each FILE to OWNER and/or GROUP.
With --reference, change the owner and group of each FILE to those of RFILE.

  -c, --changes          like verbose but report only when a change is made
  -f, --silent, --quiet  suppress most error messages
  -v, --verbose          output a diagnostic for every file processed
      --dereference      affect the referent of each symbolic link (this is
                         the default), rather than the symbolic link itself
  -h, --no-dereference   affect symbolic links instead of any referenced file
                         (useful only on systems that can change the
                         ownership of a symlink)
      --from=当前所有者:当前所属组
                         	只当每个文件的所有者和组符合选项所指定时才更改所
				有者和组。其中一个可以省略这时已省略的属性就不
				需要符合原有的属性。
      --no-preserve-root  do not treat '/' specially (the default)
      --preserve-root    fail to operate recursively on '/'
      --reference=RFILE  use RFILE's owner and group rather than
                         specifying OWNER:GROUP values
  -R, --recursive        operate on files and directories recursively

The following options modify how a hierarchy is traversed when the -R
option is also specified.  If more than one is specified, only the final
one takes effect.

  -H                     if a command line argument is a symbolic link
                         to a directory, traverse it
  -L                     traverse every symbolic link to a directory
                         encountered
  -P                     do not traverse any symbolic links (default)

      --help		显示此帮助信息并退出
      --version		显示版本信息并退出

Owner is unchanged if missing.  Group is unchanged if missing, but changed
to login group if implied by a ':' following a symbolic OWNER.
OWNER and GROUP may be numeric as well as symbolic.

示例
  chown root /u		将 /u 的属主更改为"root"。
  chown root:staff /u	和上面类似但同时也将其属组更改为"staff"。
  chown -hR root /u	将 /u 及其子目录下所有文件的属主更改为"root"。
从上面的代码实例中可以看到常用的几个参数如下
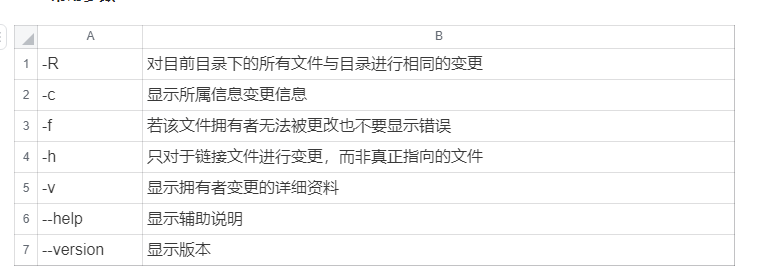
其中最常用的是 -R参数对目录及目录下所有文件进行变更。
四. 参考案例
3.1 改变指定文件的属组和属主
创建一个文件a.txt同时把属组和属主改为 lp用户
[root@mufenggrow ~]# mkdir test
[root@mufenggrow ~]# cd test
[root@mufenggrow test]# touch a.txt
[root@mufenggrow test]# ll a.txt
-rw-r--r--. 1 root root 0 1月  22 14:33 a.txt
[root@mufenggrow test]# chown lp:lp a.txt
[root@mufenggrow test]# ll a.txt
-rw-r--r--. 1 lp lp 0 1月  22 14:33 a.txt
使用ll查看发现a.txt的所有者和所有组变成了lp
3.2 改变指定文件的所属主与所属组并显示过程
-c 参数 like verbose but report only when a change is made
在更改时显示详细的报告
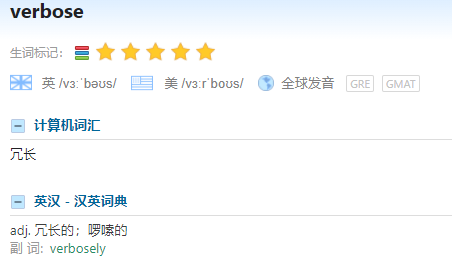
set verbos 设置打印信息
[root@mufenggrow test]# chown -c root:root a.txt
changed ownership of "a.txt" from lp:lp to root:root
[root@mufenggrow test]# ll a.txt
-rw-r--r--. 1 root root 0 1月  22 14:33 a.txt
[root@mufenggrow test]#
这里的 ownership 指的是所有权
3.3 改变指定目录及其内所有子文件的所属主与所属组
当一个目录中有多个文件的时候我们想要改变文件及文件内部的所有文件的权限就会用到 -R参数。
如下 我们先创建一个目录在目录里创建几个文件然后对目录修改属组和属主并加上-R参数。
[root@mufenggrow test]# mkdir a
[root@mufenggrow test]# cd a
[root@mufenggrow a]# touch {1..5}.txt
[root@mufenggrow a]# ll
总用量 0
-rw-r--r--. 1 root root 0 1月  22 14:40 1.txt
-rw-r--r--. 1 root root 0 1月  22 14:40 2.txt
-rw-r--r--. 1 root root 0 1月  22 14:40 3.txt
-rw-r--r--. 1 root root 0 1月  22 14:40 4.txt
-rw-r--r--. 1 root root 0 1月  22 14:40 5.txt
[root@mufenggrow a]# cd ..
[root@mufenggrow test]# chown -R lp:lp a
[root@mufenggrow test]# cd a
[root@mufenggrow a]# ll
总用量 0
-rw-r--r--. 1 lp lp 0 1月  22 14:40 1.txt
-rw-r--r--. 1 lp lp 0 1月  22 14:40 2.txt
-rw-r--r--. 1 lp lp 0 1月  22 14:40 3.txt
-rw-r--r--. 1 lp lp 0 1月  22 14:40 4.txt
-rw-r--r--. 1 lp lp 0 1月  22 14:40 5.txt
可以看到测试结果与我们预想的一样。
3.4 只修改文件所属组为mufeng组
我们已经知道想要修改属组和属主可以使用 lp:lp的形式
如果只想修改属组怎么办呢
这时候会用到用户名的方式 比如本题中我们只设置沐风组就可以用:mufeng
以下是测试
[root@mufenggrow a]# ls
1.txt  2.txt  3.txt  4.txt  5.txt
[root@mufenggrow a]# groupadd mufeng
[root@mufenggrow a]# chown :mufeng 1.txt
[root@mufenggrow a]# ll 1.txt
-rw-r--r--. 1 lp mufeng 0 1月  22 14:40 1.txt
[root@mufenggrow a]#
除了:mufeng这种用法外我们也可以使用. 的形式来修改属组。
[root@mufenggrow a]# ll 2.txt
-rw-r--r--. 1 lp lp 0 1月  22 14:40 2.txt
[root@mufenggrow a]# chown .mufeng 2.txt
[root@mufenggrow a]# ll 2.txt
-rw-r--r--. 1 lp mufeng 0 1月  22 14:40 2.txt
[root@mufenggrow a]#
3.5 只修改属主
只修改属主可以直接写属主的名字比如
我们给3.txt的属主改为 mufeng但不改变属组
[root@mufenggrow a]# useradd mufeng -g mufeng

[root@mufenggrow a]# ll 3.txt
-rw-r--r--. 1 lp lp 0 1月  22 14:40 3.txt
[root@mufenggrow a]# chown mufeng 3.txt
[root@mufenggrow a]# ll 3.txt
-rw-r--r--. 1 mufeng lp 0 1月  22 14:40 3.txt
[root@mufenggrow a]#
这里需要注意因为我们一开始先创建的mufeng组当你创建mufeng用户的时候需要用-g参数指定数组否则会报错。
五. 总结
以上就是关于chown命令的详细使用需要多多练习。
💕💕💕 好啦这就是今天要分享给大家的全部内容了我们下期再见✨ ✨ ✨
🍻🍻🍻如果你喜欢的话就不要吝惜你的一键三连了~