

微信小程序自定义tabbar栏【中间突出样式】
| 阿里云国内75折 回扣 微信号:monov8 |
| 阿里云国际,腾讯云国际,低至75折。AWS 93折 免费开户实名账号 代冲值 优惠多多 微信号:monov8 飞机:@monov6 |
文章目录
前言
昨天主管突然给我说微信小程序默认的
tabBar不美观让我改成中间突出的那种样式。纵然我心里面有千般不情愿但还是接下了这个任务。查了一下文档 自定义 tabBar 发现有这个方法有思路了就赶紧搞起来以下是我的开发经验分享。
一、自定义tabbar栏 配置
- 在 app.json 文件中的 tabBar 中指定 custom 字段为 true意思是允许使用自定义 tabBar
- 在 app.json 中全局开启使用组件或者在所有涉及的 tab 页 json 中申明usingComponents 项
- 在 app.json 中添加作为 tabBar 栏的页面
示例代码
  "tabBar": {
    "custom": true,
    "color": "#afafaf",
    "selectedColor": "#0099f6",
    "backgroundColor": "#F7F8F8",
    "list": [
      {
        "pagePath": "pages/index/index",
        "text": "首页"
      },
      {
        "pagePath": "pages/goodIndexCopy/goodIndexCopy",
        "text": "易购商城"
      },
      {
        "pagePath": "pages/release/release",
        "text": "发布"
      },
      {
        "pagePath": "pages/nearby/nearby",
        "text": "本地"
      },

      {
        "pagePath": "pages/mine/mine",
        "text": "我的"
      }
    ]
  },
  "usingComponents": {},
pagePath 是自己添加的页面text 是tabBar上展示的文字。
二、添加自定义tabbar栏组件
在根目录下创建 custom-tab-bar 文件夹并在该文件夹下新建 Component或者新建 Page但是这种创建方式需要自己改动一些代码在这里我们选用新建 Component 的方式。
添加组件代码
1、完善 wxml 文件代码tabBar 栏需要展示的页面是一个固定的数组可以使用 wx:for 循环展示在这里用到 selected 这个字段这个字段的作用是帮助展示 tabBar 选中和未选中的样式。
<!--custom-tab-bar/index.wxml-->
<view class="tab-bar">
  <view wx:for="{{list}}" wx:key="index" class="tab-bar-item {{item.bulge?'bulge':''}}" data-path="{{item.pagePath}}" data-index="{{index}}" bindtap="switchTab">
    <view  wx:if="item.bulge" class="tab-bar-bulge"></view>
    <image class="image" src="{{selected == index ? item.selectedIconPath : item.iconPath}}"></image>
    <!-- <view  wx:if="{{item.text}}" style="color: {{selected === index ? selectedColor : color}}" class="tab-bar-view">{{item.text}}</view> -->
    <view  class="tab-bar-view" style="color: {{selected === index ? selectedColor : color}}">{{item.text}}</view>
  </view>
</view>
2、完善 js 文件代码list 数组就是在 tabBar 栏展示的页面信息switchTab 方法作用可以出看来是负责跳转页面。其它的字段相信各位都知道这里就不再描述。
  /**
   * 组件的初始数据
   */
  data: {
    selected: 0,
    color: "#afafaf",
    selectedColor: "#0099f6",
    backgroundColor: "#F7F8F8",
    list: [
      {
        pagePath: "/pages/index/index",
        iconPath: "/images/icon/wtc/icon_zhuye2.png",
        selectedIconPath: "/images/icon/wtc/icon_zhuye2_d.png",
        text: "首页",
      },
      {
        pagePath: "/pages/goodIndexCopy/goodIndexCopy",
        iconPath: "/images/icon/wtc/icon_pintuan2.png",
        selectedIconPath: "/images/icon/wtc/icon_pintuan2_d.png",
        text: "易购商城"
      },
      {
        pagePath: "/pages/release/release",
        bulge:true,
        iconPath: "/images/add.png",
        selectedIconPath: "/images/add-active.png",
        text: "发布"
      },
      {
        pagePath: "/pages/nearby/nearby",
        iconPath: "/images/icon/wtc/icon_pintuan3.png",
        selectedIconPath: "/images/icon/wtc/icon_pintuan3_d.png",
        text: "本地",
      },
      {
        pagePath: "/pages/mine/mine",
        iconPath: "/images/icon/wtc/icon_wode3.png",
        selectedIconPath: "/images/icon/wtc/icon_wode3_d.png",
        text: "我的"
      },
    ]
  },
    /**
   * 组件的方法列表
   */
  methods: {
    switchTab(e) {
      // console.log(e);
      const data = e.currentTarget.dataset;
      const url = data.path;
      wx.switchTab({url})
    }
  }
3、完善 wxss 文件代码。
.tab-bar {
  position: fixed;
  bottom: 0;
  left: 0;
  right: 0;
  height: 50px;
  background: #FFF;
  display: flex;
  line-height: 1.2;
  padding-bottom: env(safe-area-inset-bottom);
  border-top: 1px solid #e6e6e6;
}

.tab-bar-item {
  flex: 1;
  text-align: center;
  display: flex;
  justify-content: center;
  align-items: center;
  flex-direction: column;
}

.tab-bar-item .image {
  width: 26px;
  height: 26px;
}
.bulge {
  background-color: #FFF;
}
.bulge .tab-bar-bulge{
  position: absolute;
  z-index: -1;
  width: 64px;
  height: 64px;
  top: -24px;
  border-radius: 50%;
  border-top: 1px solid #e6e6e6;
  background-color: #FFF;
}
.bulge .image{
  position: absolute;
  width: 50px;
  height: 50px;
  top: -20px;
}
.bulge .tab-bar-view{
  position: relative;
  bottom: -16px;
  margin-top: 4px;
}

.tab-bar-item .tab-bar-view {
  font-size: 12px;
  margin-top: 4px;
}
创建全局字段
做完以上工作之后我们可以就可以看一下效果了是不是就以为这样就可以了呢但是事与愿违会发现这里存在 bug在我们点击 tabBar 栏进行跳转的时候会发现页面跳转过去了但是对应页面的 tabBar 没有改变颜色。为了解决这个 bug需要添加全局字段。在 app.js 文件中创建该字段。
  globalData: {
    selected: 0
  },
在组件中保存重要字段
全局字段创建完成之后我们需要在组件 js 文件中使用该字段在 ready 函数中保存这个字段在点击 tabBar 栏时把相应的index 赋值给这个全局字段。
// 引入全局函数
const app = getApp()
Component({
  /**
   * 组件的初始数据
   */
  data: {
    selected: 0,
    color: "#afafaf",
    selectedColor: "#0099f6",
    backgroundColor: "#F7F8F8",
    list: [
      {
        pagePath: "/pages/index/index",
        iconPath: "/images/icon/wtc/icon_zhuye2.png",
        selectedIconPath: "/images/icon/wtc/icon_zhuye2_d.png",
        text: "首页",
      },
      {
        pagePath: "/pages/goodIndexCopy/goodIndexCopy",
        iconPath: "/images/icon/wtc/icon_pintuan2.png",
        selectedIconPath: "/images/icon/wtc/icon_pintuan2_d.png",
        text: "易购商城"
      },
      {
        pagePath: "/pages/release/release",
        bulge:true,
        iconPath: "/images/add.png",
        selectedIconPath: "/images/add-active.png",
        text: "发布"
      },
      {
        pagePath: "/pages/nearby/nearby",
        iconPath: "/images/icon/wtc/icon_pintuan3.png",
        selectedIconPath: "/images/icon/wtc/icon_pintuan3_d.png",
        text: "本地",
      },
      {
        pagePath: "/pages/mine/mine",
        iconPath: "/images/icon/wtc/icon_wode3.png",
        selectedIconPath: "/images/icon/wtc/icon_wode3_d.png",
        text: "我的"
      },
    ]
  },
  ready: function() {
    this.setData({
      selected: app.globalData.selected
    })
  },
  /**
   * 组件的方法列表
   */
  methods: {
    switchTab(e) {
      // console.log(e);
      const data = e.currentTarget.dataset;
      const url = data.path;
      app.globalData.selected = data.index;
      wx.switchTab({url})
    }
  }
})
添加完成后可以测试一下效果发现刚才的 bug 已经解决。perfect
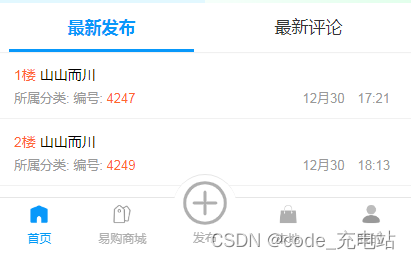
三、效果展示
总结
经过了不断探索终于完成了这个功能事后想了一下还是自己的本事不到家以后还是需要不断提升自己的能力 ~ ~ ~