

以太坊2.0客户端Prysm搭建并运行节点记录
| 阿里云国内75折 回扣 微信号:monov8 |
| 阿里云国际,腾讯云国际,低至75折。AWS 93折 免费开户实名账号 代冲值 优惠多多 微信号:monov8 飞机:@monov6 |
前言
主要的参考文档Prysm官方文档
系统情况Ubuntu 18.04 并已更换为阿里源
配置要求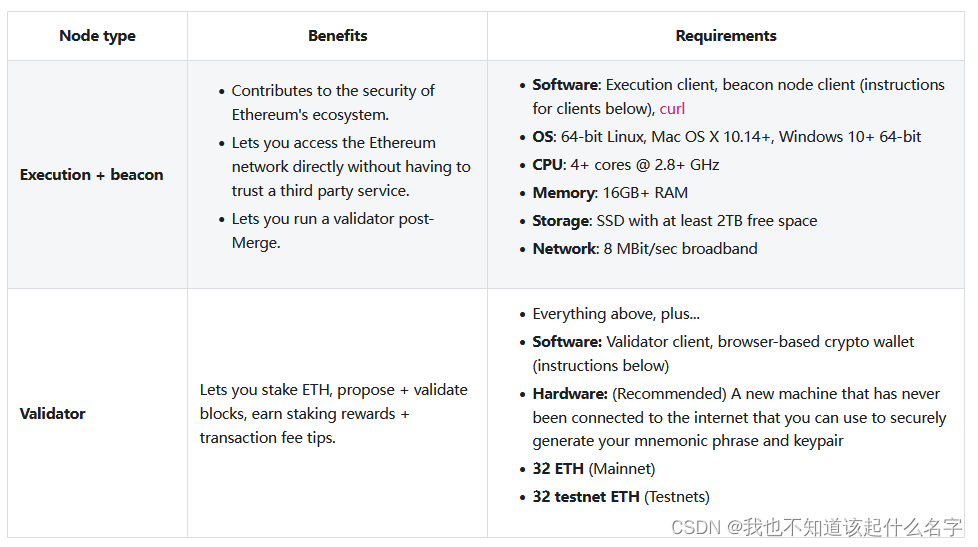
一、Prysm是什么
Prysm is an implementation of the Ethereum proof-of-stake consensus specification.
使用Prysm运行节点和stake ETH可分为以下三个步骤
- 使用执行层客户端配置execution node。
- 使用共识层客户端Prysm配置beacon node。
- 使用Prysm(可选)配置a validator和 stake ETH。
二、安装及运行步骤
1.prysm安装
安装Prysm的方法主要有三种
可能是网络问题多次尝试该方法均连接失败。现把拉取及启动代码附上
①使用docker拉取prysm镜像
docker pull gcr.io/prysmaticlabs/prysm/beacon-chain:v3.1.1
②prysm容器启动
新建prysm目录
mkdir prysm && cd prysm
prysm容器启动前提要已经生成jwt.hex文件该文件的生成方式可参见下文
docker run -itd --restart=unless-stopped  \
   -v /etc/localtime:/etc/localtime \
   -v /etc/timezone:/etc/timezone \
   --name beacon-node \
   -v $(pwd)/data:/data -v $(pwd)/data/jwt.hex:/opt/jwt.hex \
  --network=host \
   gcr.io/prysmaticlabs/prysm/beacon-chain:v3.1.1 \
  --datadir=/data \
  --jwt-secret=/opt/jwt.hex \
  --rpc-host=0.0.0.0 \
  --grpc-gateway-host=0.0.0.0 \
  --monitoring-host=0.0.0.0 \
  --execution-endpoint=http://127.0.0.1:8551 \
  --accept-terms-of-use=true
跟踪beacon-node日志输出
docker logs -f beacon-node
本步骤是官网上推荐也是我成功安装的方式
①创建文件夹
sudo mkdir ethereum
cd ethereum
sudo mkdir consensus
cd .. #返回上一级目录
sudo mkdir execution
即为这样的目录结构

②切换到consensus目录下
cd ethereum/consensus
③新建prysm数据文件夹
sudo mkdir prysm && cd prysm
④拉取脚本并修改文件权限
curl https://raw.githubusercontent.com/prysmaticlabs/prysm/master/prysm.sh --output prysm.sh && chmod +x prysm.sh
⑤生成JWT Secret
beacon node和execution node之间的HTTP连接需要使用JWT令牌进行身份验证。有几种方法可以生成这个JWT令牌:
- 使用在线生成网站将其复制并拷贝到新建的jwt.hex文件夹中。
- 通过OpenSSL命令生成
openssl rand -hex 32 | tr -d "\n" > "jwt.hex"- 使用geth客户端生成
- 使用prysm生成这里是使用了这种方式
切换到prysm目录下执行
./prysm.sh beacon-chain generate-auth-secret #这种方式生成的jwt.hex文件路径在consensus目录下
注可以把jwt.hex文件放置在任何位置只要将后续命令中的jwt.hex文件路径写成实际存储路径即可。
这里使用的是第四种方法其绝对路径为 :/opt/ethereum/consensus/jwt.hex
2.运行geth客户端
①保证系统已安装go(1.18+)和c compiler,安装geth的教程可参考
官网对geth客户端的版本要求为1.10.22+
②启动geth客户端在以太坊的执行层中运行一个执行节点
geth --http --http.api eth,net,engine,admin --authrpc.jwtsecret /opt/ethereum/consensus/jwt.hex
参数定义可参见网站介绍
同步可能需要很长时间——从几个小时到几天。您可以在执行节点同步的同时进行下一步。
可另打开终端通过以下命令检查geth执行节点情况
curl -H "Content-Type: application/json" -X POST --data '{"jsonrpc":"2.0","method":"eth_syncing","params":[],"id":1}' http://localhost:8545
若出现以下响应则证明节点已完成同步

3.使用prysm运行beacon node
在prysm文件夹下执行
./prysm.sh beacon-chain --execution-endpoint=http://localhost:8551 --jwt-secret=/opt/ethereum/consensus/jwt.hex --suggested-fee-recipient=0x01234567722E6b0000012BFEBf6177F1D2e9758D9
Your beacon node will now begin syncing. This usually takes a couple days, but it can take longer depending on your network and hardware specs.
Congratulations - you’re now running a full, Merge-ready Ethereum node. To check the status of your node, visit Check node and validator status.
可以使用以下命令查询节点同步情况
curl http://localhost:3500/eth/v1alpha1/node/syncing
根据教程如果同步完成则返回{"syncing":false}
但是跑了一下午后查询的状态是
