

【c语言】数据结构-带头双向循环链表
| 阿里云国内75折 回扣 微信号:monov8 |
| 阿里云国际,腾讯云国际,低至75折。AWS 93折 免费开户实名账号 代冲值 优惠多多 微信号:monov8 飞机:@monov6 |
qq:2188956112欢迎小伙伴呀hi✿(。◕ᴗ◕。)✿
目录
共八种链表

前言
经过上文的学习我们了解了单链表的构造同时实现了部分的算法操作
我们可以从中体会到单链表增查删改的复杂与麻烦正因如此单链表在项目中才很少被独立使用
更多的是作为其他数据结构的一部分出现
而本文将将介绍一种结构单链表复杂的链表————带头双向循环链表取自c++的STL库
一、结构简图与分析
结构简图

单链表时我们使用了一个指针“phead”指向存储数据的首节点的地址而带头双向循环链表
则直接存储数据的首节点处增加了一个与节点结构相同但不存储数据的头结点“head”
也被称为哨兵位
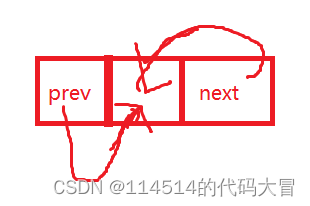
该链表最明显的一个特征就是 单个节点均存储两个指针,分别指向前一个节点与后一个节点
而且此结构下的链表尾节点指向头结点头结点也会有一个指针指向尾如此则实现
双向 循环
二、链表操作详解附代码实现
1. 准备工作
首先依旧按照标准工程的标准建立三个文件如下图所示
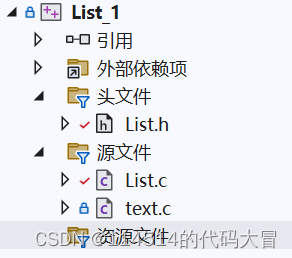
“List.h”存放函数声明与头文件
“List.c”进行各种接口的实现
“test.c”进行接口功能的检测
2. 链表节点代码结构
typedef int LTDateType;

typedef struct ListNode
{
	LTDateType data;
	struct ListNode* next;
	struct ListNode* prev;
}ListNode;
“data”存储数据
“next”指向下一节点
“prev”指向上一节点
3.尾插在链表末端添加数据
思路
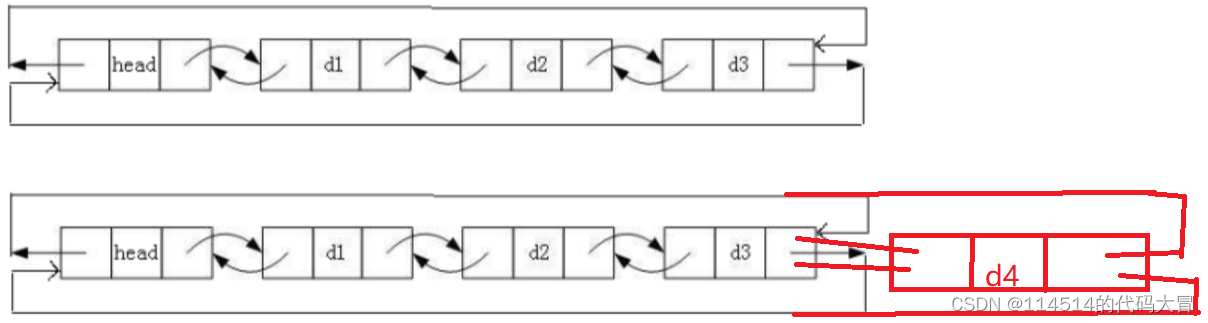
尾节点的next指向新节点
新节点的prev指向尾节点
新节点的next指向head
head的prev指向新节点
void ListPushBack(ListNode* phead, LTDateType x)
{
	assert(phead);

	ListNode* tail = phead->prev;
	ListNode* newnode = BuyListNode(x);


	tail->next = newnode;
	newnode->prev = tail;

	newnode->next = phead;
	phead->prev = newnode;
}
4.链表的打印与初始化
初始化
ListNode* ListInit()
{
	ListNode* phead = (ListNode*)malloc(sizeof(ListNode));
	phead->next = phead;
	phead->prev = phead;

	return phead;
}
打印
void ListPrint(ListNode* phead)
{
	assert(phead);
	ListNode* cur = phead->next;
	while (cur != phead)
	{
		printf("%d ", cur->data);
		cur = cur->next;
	}

	printf("\n");

}
5.头插在链表首端添加数据
思路

head的next指向newnode
newnode的prev指向head
nenode的next指向d1
d1的prev指向newnode
代码
void ListPushFront(ListNode* phead, LTDateType x)
{
	assert(phead);
	ListNode* newnode = BuyListNode(x);

	ListNode* next = phead->next;

	phead->next = newnode;
	newnode->prev = phead;

	newnode->next = next;
	next->prev = newnode;
}
6.产生新节点
鉴于所以插入数据的操作都需要进行新节点的生成
于是我们将新节点单独封装
代码
ListNode* BuyListNode(LTDateType x)
{
	ListNode* newnode = (ListNode*)malloc(sizeof(ListNode));
	newnode->data = x;
	newnode->next = NULL;
	newnode->prev = NULL;
	return newnode;

}
在这个函数基础上
我们可以选择对头插尾插进行改进
void ListPushBack(ListNode* phead, LTDateType x)
{
	assert(phead);

	ListInsert(phead, x);
}
void ListPopBack(ListNode* phead)
{
assert(phead);
assert(phead->next != phead);
}7.尾删在链表末端删除数据
思路

这里的大致思路可以参照上文进行模仿不是很难的操作
但是这里要强调的是链表为空的情况
next与prev均指向头结点自身
这个时候我们就不允许进行删除操作了所以要对这种情况进行相应的处理
与单链表时一致我们可以选择使用assert进行经过也可以是if语句限制删除操作
下图代码使用的是前者
代码
void ListPopBack(ListNode* phead)
{
assert(phead);
assert(phead->next != phead);
ListNode* tail = phead->prev;
ListNode* tailPrev = tail->prev;
free(tail);
tailPrev->next = phead;
phead->prev = tailPrev;
}8.头删在链表首部删除数据

依然这里还是要考虑链表为空的情况与尾删同理
下图为变量表示的

这里要注意的是next不要过早释放内存
以防非法访问一定要确保已经不需要next提供相关指针信息后再释放next
另外指针置为NULL在这里是没有意义的不需要进行此类操作
代码
void ListPopFront(ListNode* phead, LTDateType x)
{
assert(phead);
assert(phead->next != phead);
ListNode* next = phead->next;
ListNode* nextNext = next->next;
phead->next = nextNext;
nextNext->prev = phead;
free(next);
}9.寻找指定节点
代码
ListNode* ListFind(ListNode* phead, LTDateType x)
{
assert(phead);
ListNode* cur = phead->next;
while (cur != phead)
{
if (cur != phead)
{
return cur;
}
cur = cur->next;
}
return NULL;
}这里强调一下
cur = cur->next进行推进然后直到cur == phead头节点时
代表着链表的最后一个节点也已经被访问
于是停止循环
10.在指定位置前插入
思路
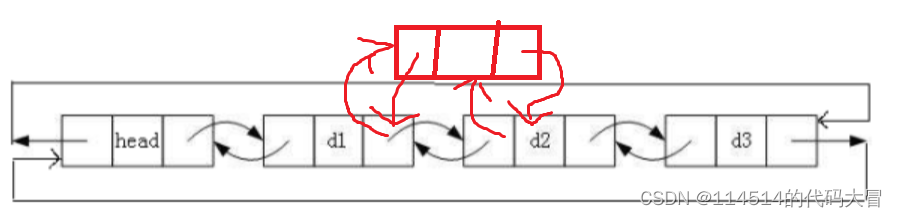
代码
void ListInsert(ListNode* pos, LTDateType x)
{
assert(pos);
ListNode* posPrev = pos->prev;
ListNode* newnode = BuyListNode(x);
posPrev->next = newnode;
newnode->prev = posPrev;
newnode->next = pos;
pos->prev = newnode;
}于是利用这个函数可以对头插尾插再次改造
相关改造我会放在文末的总代码区朋友们可以先自行思考
11.删除指定位置的数据
代码
void ListErase(ListNode* pos)
{
aasert(pos);
ListNode* prev = pos->prev;
ListNode* next = pos->next;
prev->next = next;
next->prev = prev;
free(pos);
}12.删除整个链表释放动态内存
思路
先利用头结点对整个链表的内容注意释放释放节点时记得要保留下一节点的位置
然后删除释放头结点
代码
void ListDestory(ListNode* phead)
{
assert(phead);
ListNode* cur = phead->next;
while (cur != phead)
{
ListNode* next = cur->next;
free(cur);
cur = next;
}
free(phead);
}头结点指针的置空需要使用者自行操作
三.总代码
List.h:
#pragma once
#include <stdio.h>
#include <stdlib.h>
#include <assert.h>
typedef int LTDateType;
typedef struct ListNode
{
LTDateType data;
struct ListNode* next;
struct ListNode* prev;
}ListNode;
ListNode* ListInit();
void ListPrint(ListNode* phead);
void ListPushBack(ListNode* phead, LTDateType x);
ListNode* BuyListNode(LTDateType x);
void ListPopFront(ListNode* phead, LTDateType x);
void ListPopBack(ListNode* phead);
void ListPushFront(ListNode* phead, LTDateType x);
ListNode* ListFind(ListNode* phead, LTDateType x);
void ListInsert(ListNode* pos, LTDateType x);
void ListErase(ListNode* pos);
void ListDestory(ListNode* phead);List.c:
#include "List.h"
ListNode* ListInit()
{
ListNode* phead = (ListNode*)malloc(sizeof(ListNode));
phead->next = phead;
phead->prev = phead;
return phead;
}
//void ListPushBack(ListNode* phead, LTDateType x)
//{
// assert(phead);
//
// ListNode* tail = phead->prev;
// ListNode* newnode = BuyListNode(x);
//
//
// tail->next = newnode;
// newnode->prev = tail;
//
// newnode->next = phead;
// phead->prev = newnode;
//}
void ListPushBack(ListNode* phead, LTDateType x)
{
assert(phead);
ListInsert(phead, x);
}
ListNode* BuyListNode(LTDateType x)
{
ListNode* newnode = (ListNode*)malloc(sizeof(ListNode));
newnode->data = x;
newnode->next = NULL;
newnode->prev = NULL;
return newnode;
}
void ListPrint(ListNode* phead)
{
assert(phead);
ListNode* cur = phead->next;
while (cur != phead)
{
printf("%d ", cur->data);
cur = cur->next;
}
printf("\n");
}
//void ListPopBack(ListNode* phead)
//{
// assert(phead);
//
// assert(phead->next != phead);
//
// ListNode* tail = phead->prev;
// ListNode* tailPrev = tail->prev;
// free(tail);
//
// tailPrev->next = phead;
// phead->prev = tailPrev;
//}
void ListPopBack(ListNode* phead)
{
	assert(phead);

	assert(phead->next != phead);

}
//void ListPopFront(ListNode* phead, LTDateType x)
//{
// assert(phead);
//
// assert(phead->next != phead);
//
// ListNode* next = phead->next;
// ListNode* nextNext = next->next;
//
// phead->next = nextNext;
// nextNext->prev = phead;
// free(phead);
//
//}
void ListPopFront(ListNode* phead, LTDateType x)
{
assert(phead);
assert(phead->next != phead);
ListErase(phead->next);
}
//void ListPushFront(ListNode* phead, LTDateType x)
//{
// assert(phead);
// ListNode* newnode = BuyListNode(x);
//
// ListNode* next = phead->next;
//
// phead->next = newnode;
// newnode->prev = phead;
//
// newnode->next = next;
// next->prev = newnode;
//}
void ListPushFront(ListNode* phead, LTDateType x)
{
assert(phead);
ListInsert(phead->next, x);
}
ListNode* ListFind(ListNode* phead, LTDateType x)
{
	assert(phead);

	ListNode* cur = phead->next;

	while (cur != phead)
	{
		if (cur != phead)
		{
			return cur;
		}

		cur = cur->next;
	}

	return NULL;
}
void ListInsert(ListNode* pos, LTDateType x)
{
	assert(pos);
	ListNode* posPrev = pos->prev;
	ListNode* newnode = BuyListNode(x);

	posPrev->next = newnode;
	newnode->prev = posPrev;
	newnode->next = pos;
	pos->prev = newnode;


}
void ListErase(ListNode* pos)
{
	aasert(pos);

	ListNode* prev = pos->prev;
	ListNode* next = pos->next;

	prev->next = next;
	next->prev = prev;

	free(pos);

}
void ListDestory(ListNode* phead)
{
	assert(phead);
	ListNode* cur = phead->next;
	while (cur != phead)
	{
		ListNode* next = cur->next;
		free(cur);
		cur = next;

	}

	free(phead);
}
//使用完要进行置空test.c:
读者可自行进行函数调用与修改
总结
以上就是今天的全部内容了双向带头循环结构是链表中最复杂的同时也是最容易操作的
正因如此也是最实用的链表结构
这就是数据结构的第一步之后我们将进行的是;
栈和队列的学习
我们下期再见